

Hawking HWREN1 Rev 1 Quick Installation Manual
QUICK INSTALLATION GUIDE
Part No. HWREN1 Rev 1 Hi-GainTM Wireless-300N Range Extender
© 2010 Hawking Technologies, Inc. All rights reserved.
www.hawkingtech.com Technical Support: 1.888.202.3344
•1x Setup CD-ROM
•1x QIG (Quick Install Guide)
•2x Dipole Antennas
Start Here
1 Check Package Contents & Requirements
Package Contents
•1x Wireless-300N Range Extender
•1x Power Adapter
•1x Ethernet Cable
Requirements
•Internet Access with a Wireless AP or Router
•PC Computer (for configuration only)
•Power Outlet
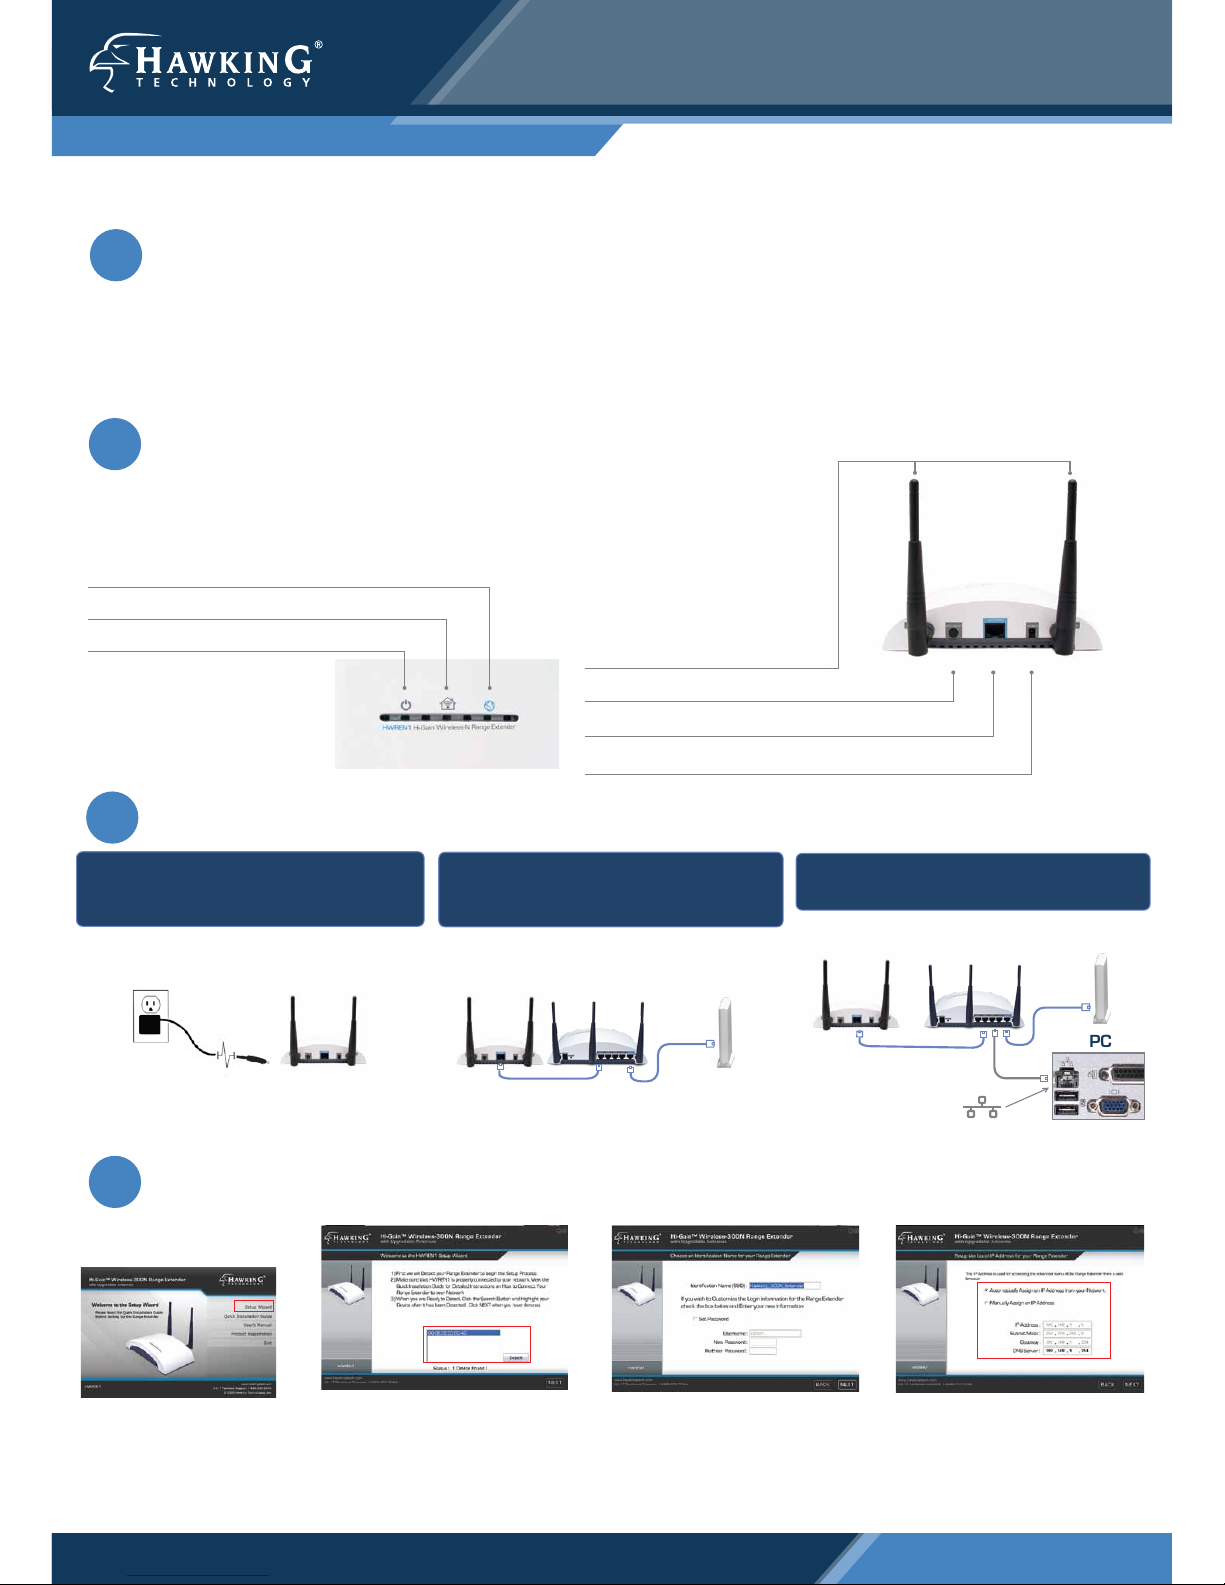
2 Overview
3 Connecting the Range Extender
4 Configuring the Range Extender
1.) Connect the A/C power adapter to an
electrical source, and then connect it to the
‘Power’ socket of the Range Extender.
3.) Connect your PC to any of the LAN ports
located on the back of your router/AP.
Example
PC Rear Ports
Router/AP
“SOURCE”
PC Symbol for Ethernet Port
HWREN1 Range Extender
HWREN1
Range Extender
“REPEATER”
1.) Insert the Setup CD into the
CD-ROM drive of your computer.
2.) When the auto-load page
appears, click the Setup Wizard
option on the right and follow the
Setup directions.
3.) Scan for your Range Extender by
clicking the ‘Search’ button. Once
found, click the device to highlight it
and click ‘Next”.
4.) Choose a name for your Range
Extender. You will use this name to
identify and connect to your extended
network. Optionally, you may change
your login username and password.
Click ‘Next’.
5.) Here, the Setup Wizard will automatically obtain a new IP address for
your Range Extender from the Router.
Please wait for this IP to generate into
the IP address field. Note the new IP
address and click ‘Next’ to continue.
PC
2.) Connect your Range Extender to a LAN
port on the Router or AP that you would
like to extend (repeat) the range on.
Router/AP
“SOURCE”
HWREN1
Range Extender
“REPEATER”
Broadband Modem
Broadband Modem
LED Description
LAN Connection - LED is on, when there is a wired connection to your computer or network
Wireless LAN - LED is on, (blinking) when wireless data activity is detected.
Power/WPS - LED is on when power is plugged in. In WPS mode, it will flash.
Removable Antennas - Removable Omni-Directional Antennas
Power - Power Adapter Plug
Network Port - For connecting directly to your computer or network ethernet port
WPS/Reset Switch - WPS Mode/Reset Button
Back Panel Description

© 2010 Hawking Technologies, Inc. All rights reserved. All trademarks herein are the property of
their respective owners. Apple and Mac are registered trademarks of Apple Computer, Inc. No
affiliation implied or expressed.
Technical Support: 1.888.202.3344 or techsupport@hawkingtech.com www.hawkingtech.com
Home Router or AP
Home Router or AP
Home Router or AP
Place the HWREN1 within the range of your wireless source.
Hi-Gain™ Wireless-300N Range Extender
HWREN1
Router / HotSpot
(wireless source)
Wireless Device
(laptop)
Home Router or AP
Hi-Gain™ Wireless-300N Range Extender
HWREN1
Wireless Device
(laptop)
DO NOT place the HWREN1 outside the range of your wireless source.
Router / HotSpot
(wireless source)
Cont’d
6 Connecting to your New Wireless Network (with a PC or Mac)
6.) In the Search box, find the Wireless Network
that you would like to extend. This Range
Extender works best with other Wireless-N
networks, but also supports Wireless-B and G
networks as well. Select your preferred network
and then click ‘Next’.
7.) For Security Settings, you must make sure
that the Range Extender’s security settings are
identical to that of the Router/AP that is having
the signal extended. If you do not know these
settings please contact your network administrator.
4
8.) The Setup Summary displays all configured
settings of the Range Extender. If the information displayed corresponds with your desired
networks settings, click ‘Set’ to apply the
settings. The HWREN1 will automatically
reboot. Please be patient.
Connecting with PC Connecting with Mac
1.) Click the wireless network
icon in the upper right hand
corner of the Finder.
2.)From the drop-down menu
select your wireless network
(default ID: Hawking_300N).
You can now enjoy your new
wireless network!
NOTE: If you have Security enabled you will be prompted to
enter your password.
5 Placing your Range Extender in an Optimal Location
2.) If prompted, enter your security key that you
set up in Step 5a-2. You should now be
connected.
1.) To connect your computer to the HWREN1,
please use your wireless utility. On Windows, it
is an icon typically located in your lower right
hand corner of your desktop. In our example,
we are using Windows 7. Click on the icon and
it should show you available networks. Select
your network and click connect.
 Loading...