

Page 1
Hawking_HWABN25
Quick Installation Guide
HWABN25 Hi-Gain™ Wireless-300N Multi-Function Extender Pro
Requirements
• Wired or Wireless Internet Connection
• A Wired or Wireless Network Device (Tablet,
Smartphone, Mac or Windows Computer
• Power Outlet
• Ethernet cable
(optional, dependent on mode)
Start Here
1 Hardware Setup
Package Contents
• 1x Wireless-300N Multi-Function
Extender Pro
• 1x Power Adapter 5V/2A
• 1x Ceiling/Wall Mounting Bracket
• 1x Pack of Mounting Screws
• 1x Setup CD-ROM
• 1x Quick Installation Guide (QIG)
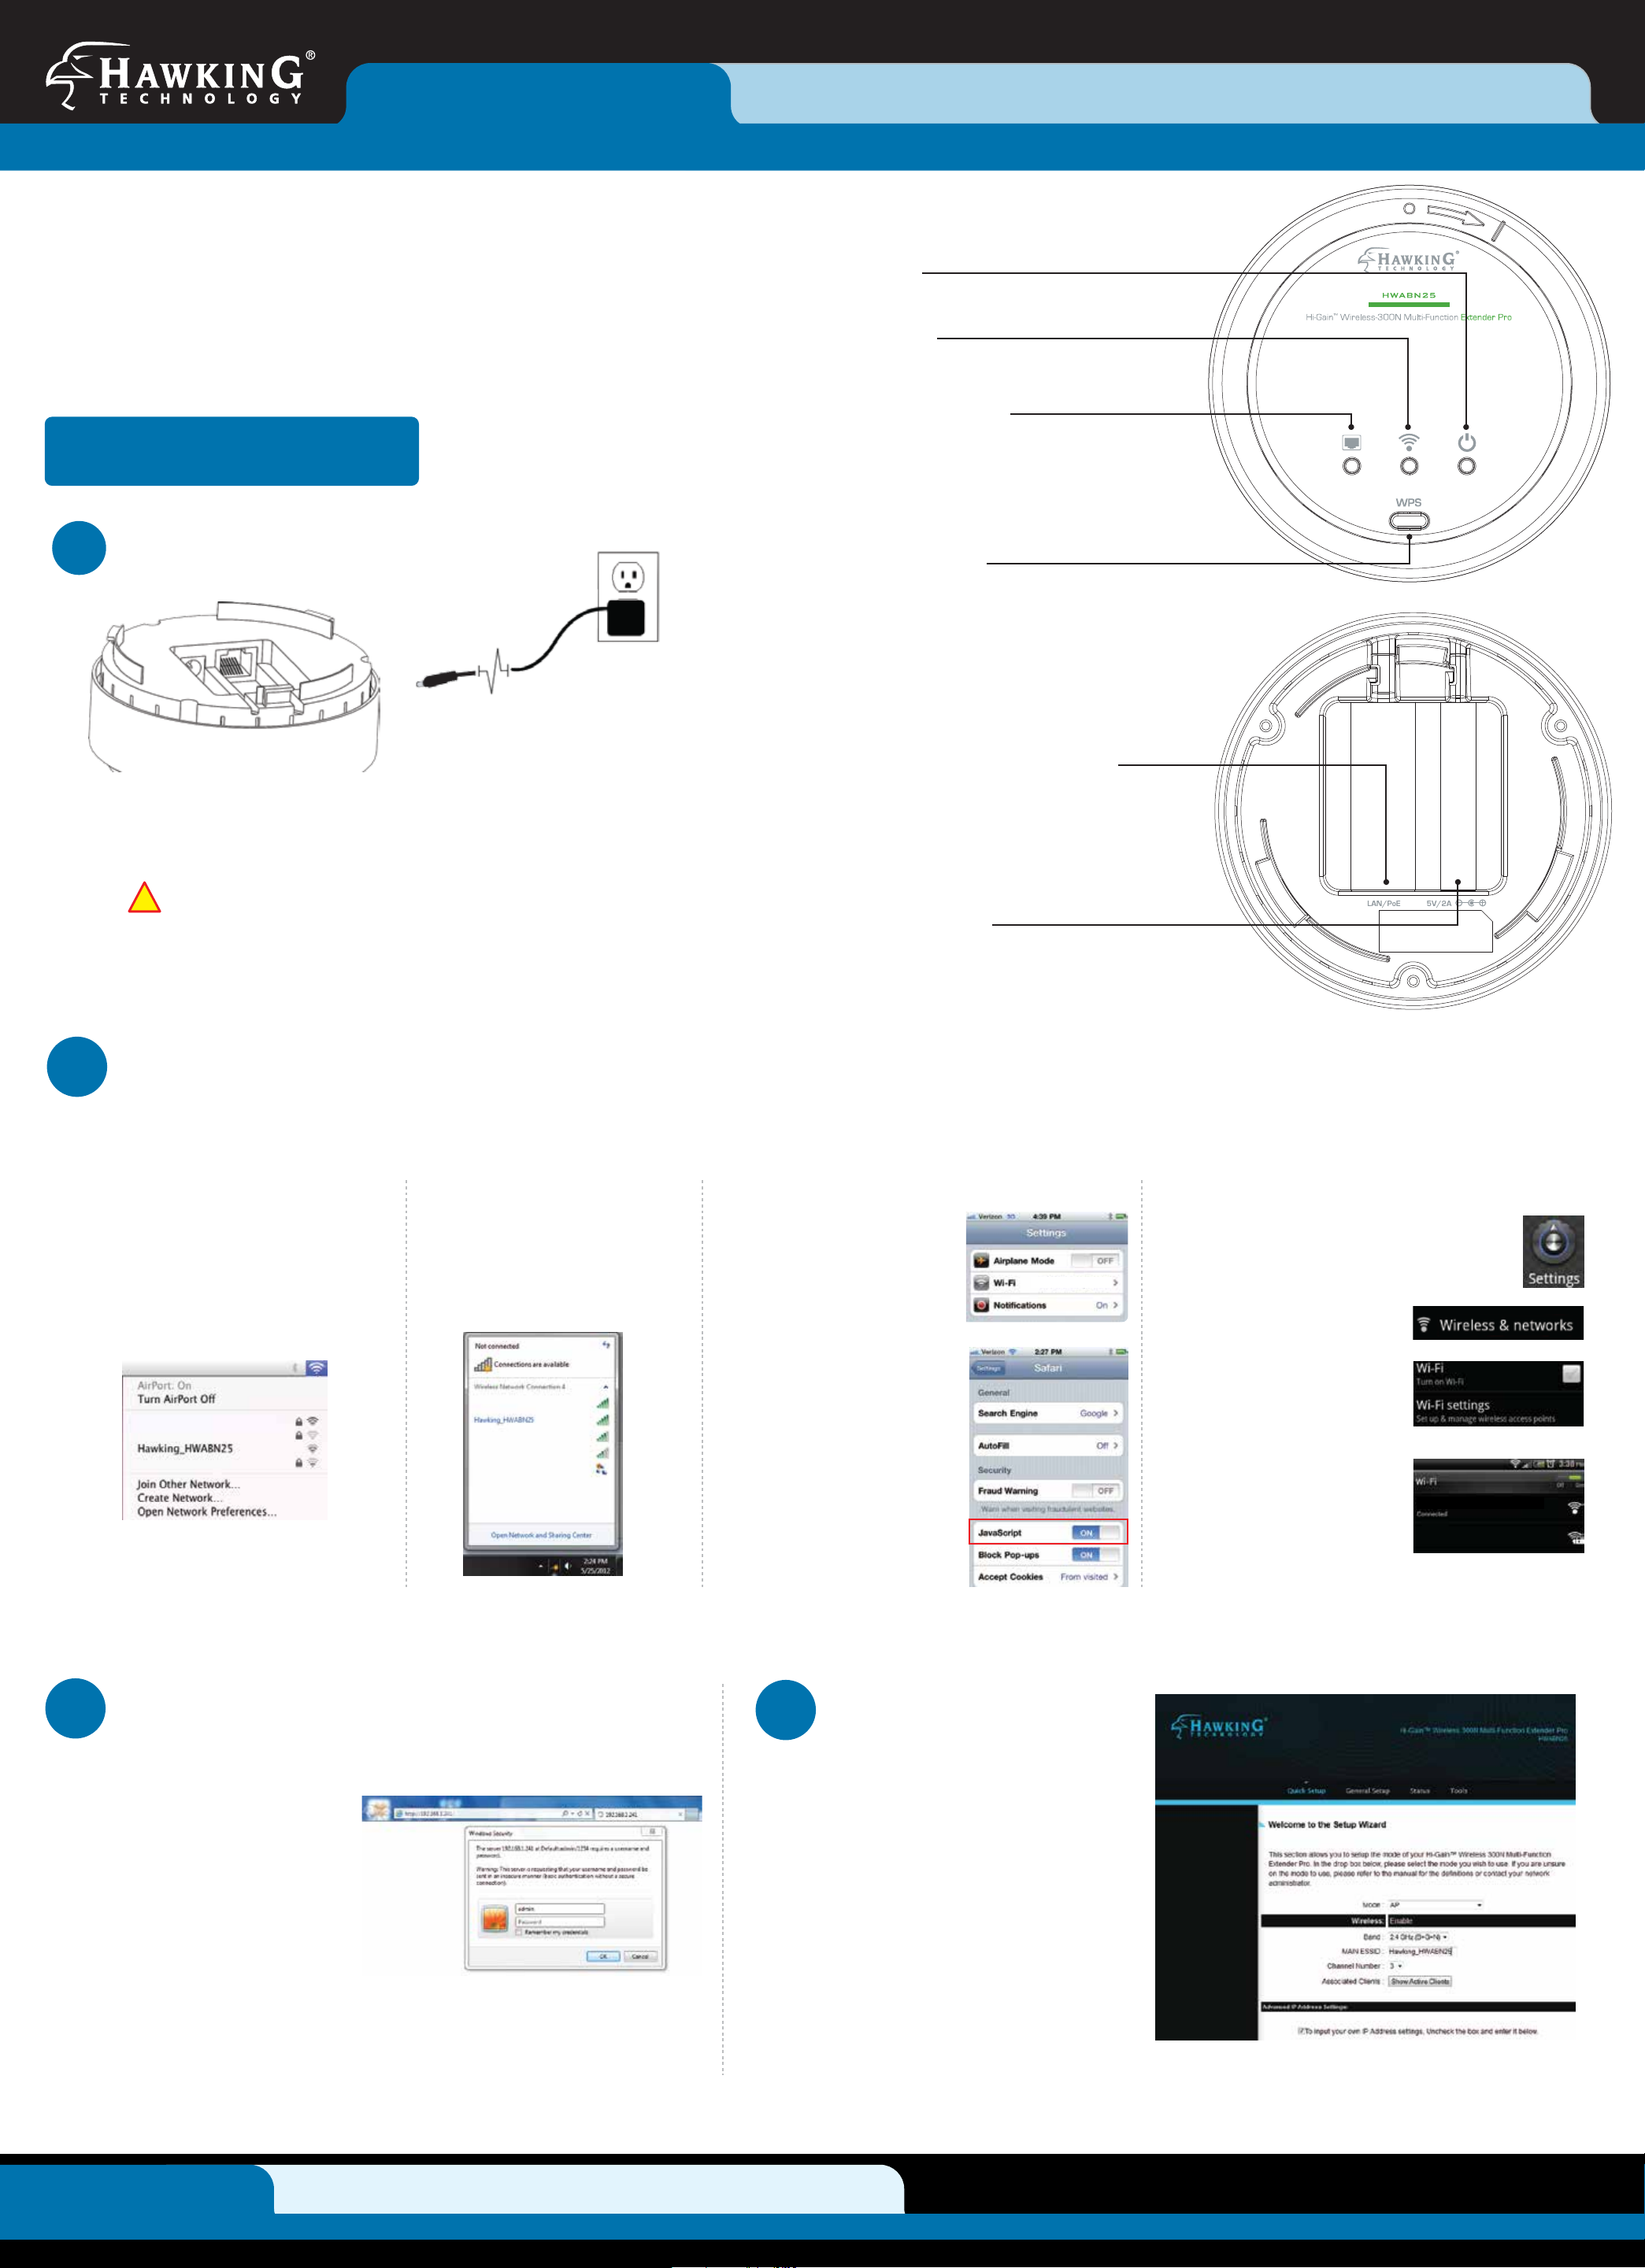
Top Panel Description
Power LED
Indicator that the power is switched on and correctly
powered.
Wireless LED
LED is on when Wireless is activated. Blinking when
wireless data is transmitting/receiving.
Wired Connection LED
LED is on when connected (When a ethernet cable is plugged
into the ethernet port). Blinking when wired data is
transmitting/receiving.
WPS/Reset Button
-WPS: Press and release to initiate WPS
-Reset to manufacturer settings: Press and hold down button
for 15 seconds. Unplug the power for a few seconds then
plug it back in for factory reset
Twist base to remove the mounting bracket. Plug either the included
A/C Adapter into the port labeled 5V/2A or, if using PoE, plug a ethernet
cable into the LAN/PoE port if you have a PoE power source.
i
This Quick Installation Guide provides a quick and easy way to
set up the HWABN25 in Universal Repeater or Access Point Modes.
If you need to use the other modes, please refer to the manual
located on the CD.
2 Conguring the HWABN25
Using WiFi enabled device, access the HWABN25 setup page by searching for the Hawking_HWABN25.
(If you are planning to configure the HWABN25 using a wired connection, please plug your computer into the port labeled “LAN”, then go straight to Step 3.)
Bottom Panel Description
Ethernet/Power over Ethernet (PoE)*
Local Area Network (LAN) port. Can also function as a
PoE port if you have a PoE power supply. (*sold
separately)
Power Plug (5V/2A)
Plug the provided A/C adapter to power on the device.
(Not used if using PoE.)
For Mac Users
Click on the Wi-Fi icon in the
“Apple” toolbar. Click on the
“Hawking_HWABN25” network
from the drop-down menu.
Then Continue to Step 3.
For Windows Users
On the lower right corner, go to
your wireless network select.
Click on
“Hawking_HWABN25”. Then
Continue on to Step 3.
Using an iPad®
or an iPhone®
Go to your wireless setting,
select
“Hawking_HWABN25”
Network. Then, go to Step
3.
Make sure JavaScript is ON.
To check your settings, go to
Settings > Select Safari >
then scroll down to view
Javascript.
Using an Android device
On your mobile device, locate the
“settings” menu.
Select “Wireless & Networks”.
Click “Turn on Wi-Fi” and
then click on the “Wi-Fi
Settings” option.
Look for
“Hawking_HWABN25”.
Select it to connect.
Then Continue to Step 3.
Hawking_HWABN25
3 Login into the HWABN25
Using the same device, open a web browser and type in the following web address in the web address bar:
Once the page loads, enter
the following login information:
Login: admin
Password: 1234
Click Login to continue
If the page doesn’t load, please check if JavaScript is enabled. Generally, this
should be enabled by default. However, if it’s not, please go into your Browser
Settings and enable JavaScript.
4 Choosing your Mode
http://192.168.1.241
In the drop down box, please
select your mode of operation
for the HWABN25. This quick
installation guide will only
outline the Universal Repeater
and Access Point modes.
For other modes and features,
please refer to the manual on
your CD.
Technical Support
HWABN25- QIG 2012.08.29
Tel: 1.888.202.3344
E-mail: techsupport@hawkingtech.com
© 2012 Hawking Tech nologies, Inc. A ll rights reser ved. All tradem arks herin are the p roperty of the ir respective ow ners. Apple, Mac , iPad, and iPhone ar e registered trad emarks of Apple C omputer, Inc. No Aff iliation impl ied or expressed.
www.hawkingtech.com
Page 2
5 Conguring the Universal Repeater (Range Extender) Mode or Access Point Mode
(For other modes, please refer to the User’s Manual on the CD).
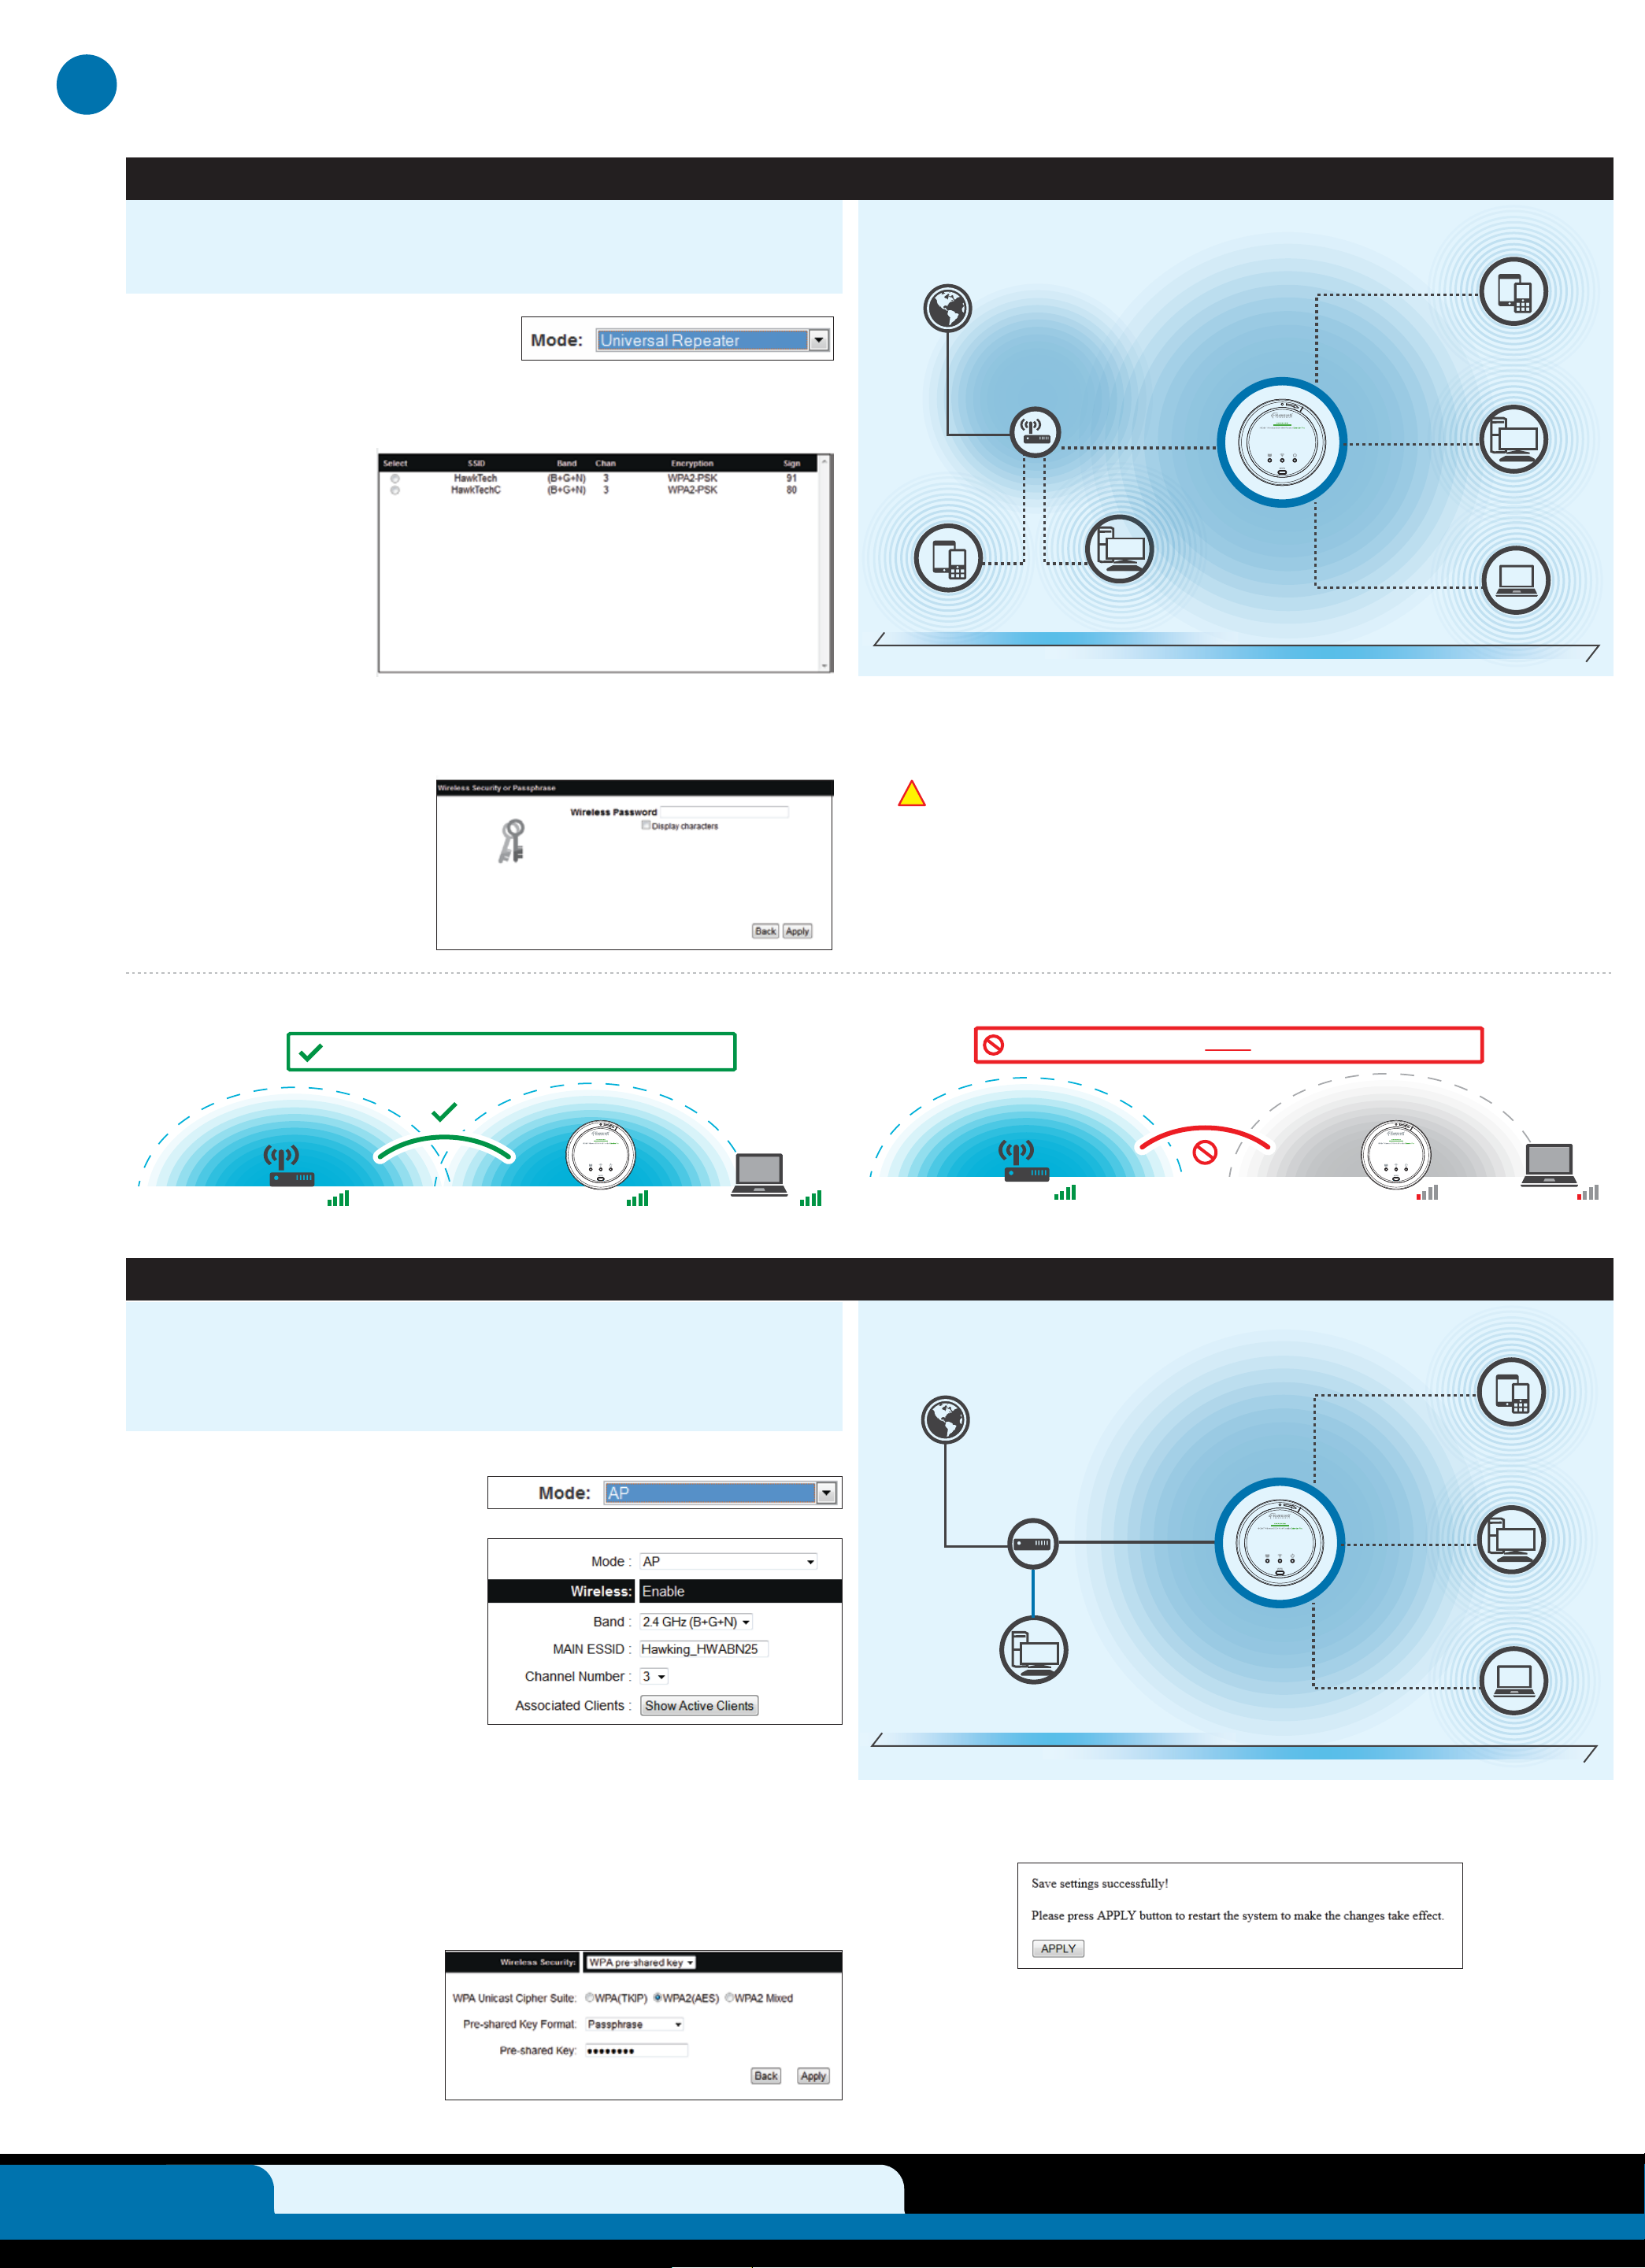
UNIVERSAL REPEATER MODE (also known as Range Extender Mode)
In this mode, the HWABN25 will repeat the wireless signal of an existing
wireless router/access point. It will act as a wireless relay and create a larger
seamless wireless network for your devices to connect to.
A. In the drop down menu, choose
“Universal Repeater”
Click ‘Scan’ to find your wireless Internet connection. Select a network you would
B.
like to extend and click ‘Connect’.
If the signal strength is
low or your network
does not appear, you
may need to adjust the
location of your
HWABN25. Click
‘Scan’ to try again.
original wireless network
extended wireless network
C. If the network you are connecting to is encrypted, the Quick Setup will prompt
you to enter a security key. Enter the key and click ‘Continue’.
If there is no security on the original network, this step will automatically be
skipped.
If you do not know the security
key of the network you are
connecting to, please consult
your network administrator.
Make sure the HWABN25 is placed in a location where it can receive a strong signal from your desired wireless Internet connection. The Reapter Mode will not work without a signal it can repeat.
Place the HWABN25 within the range of your wireless source.
D. The setup of your HWABN25 is now complete. Click ‘Apply’ to complete your
setup. The HWABN25 will automatically reboot and start repeating and extending your wireless network.
i
After the reboot, the HWABN25 will join the original network. It will automatically be
renamed to your original wireless network, unless otherwise specified during the set up
process. If you wish to modify this name, please refer to the user’s manual.
DO NOT place the HWABN25 outside the range of your wireless source.
ACCESS POINT MODE
In the Access Point Mode, the HWABN25 broadcasts Wi-Fi Signal from a wired
Network (e.g. a wired router) and allows your Wi-Fi enabled devices to connect
wirelessly to your Network. Note: The HWABN25 must be plugged into the
router or network after setup.
A. In the drop down menu, choose “AP”
(Access Point).
The Main ESSID will be the
wireless name of your network:
Default: Hawking_HWABN25
Click “Next”.
If you wish to modify this name,
please refer to the user’s manual.
wired network
wireless network
B. Hawking recommends you choose a security setting to protect your network from
unauthorized users.
In the drop down box, please
select “WPA (pre-shared
key)”. In the pre-shared key
field, please create a
password, at least 8
characters. If you wish to not
use security or use a different
type of security you can
choose your selection from
the drop down menu. Then,
click “Apply”.
Technical Support
HWABN25- QIG 2012.08.29
Tel: 1.888.202.3344
C. The HWABN25 will ask you if you wish to apply these settings. Click “Apply” .
E-mail: techsupport@hawkingtech.com
© 2012 Hawking Tech nologies, Inc. A ll rights reser ved. All tradem arks herin are the p roperty of the ir respective ow ners. Apple, Mac , iPad, and iPhone ar e registered trad emarks of Apple C omputer, Inc. No Aff iliation impl ied or expressed.
Congratulations! You have set up the HWABN25 as an Access Point.
Please connect the HWABN25 into your network with an Ethernet cable in
order for the HWABN25 to function properly in Access Point Mode.
www.hawkingtech.com
 Loading...