

Hawking HWABN25 User Manual
Hi-Gain™ Wireless-300N Multi-Function Extender Pro HWABN25
website www.hawkingtech.com
e-mail techsupport@hawkingtech.com
© COPYRIGHT 2012 HAWKING TECHNOLOGIES,INC. ALL RIGHTS RESERVED.
USER’S MANUAL

COPYRIGHT
Copyright ©2012 by Hawking Technologies, Inc. All rights reserved. No part of this
publication may be reproduced, transmitted, transcribed, stored in a retrieval system, or
translated into any language or computer language, in any form or by any means,
electronic, mechanical, magnetic, optical, chemical, manual or otherwise, without the
prior written permission of this company
LIMITED WARRANTY
Hawking Technology guarantees that every HWABN25 Hi-Gain™ Wireless-300N
Multi-Function Extender Pro is free from physical defects in material and workmanship
under normal use for one (1) year from the date of purchase. If the product proves
defective during this one-year warranty period, call Hawking Customer Service in order
to obtain a Return Authorization number. Warranty is for repair or replacement only.
Hawking Technology does not issue any refunds. BE SURE TO HAVE YOUR PROOF
OF PURCHASE. RETURN REQUESTS CAN NOT BE PROCESSED WITHOUT
PROOF OF PURCHASE. When returning a product, mark the Return Authorization
number clearly on the outside of the package and include your original proof of purchase.
IN NO EVENT SHALL HAWKING TECHNOLOGY’S LIABILTY EXCEED THE
PRICE PAID FOR THE PRODUCT FROM DIRECT, INDIRECT, SPECIAL,
INCIDENTAL OR CONSEQUENTIAL DAMAGES RESULTING FROM THE USE OF
THE PRODUCT, ITS ACCOMPANYING SOFTWARE OR ITS DOCUMENTATION.
Hawking Technology makes no warranty or representation, expressed, implied or
statutory, with respect to its products or the contents or use of this documentation and all
accompanying software, and specifically disclaims its quality, performance,
merchantability, or fitness for any particular purpose. Hawking Technology reserves the
right to revise or updates its products, software, or documentation without obligation to
notify any individual or entity. Please direct all inquiries to:
techsupport@hawkingtech.com
1

Federal Communication Commission
Interference Statement
FCC Part 15
This equipment has been tested and found to comply with the limits for a Class B digital
device, pursuant to Part 15 of FCC Rules. These limits are designed to provide reasonable
protection against harmful interference in a residential installation. This equipment
generates, uses, and can radiate radio frequency energy and, if not installed and used in
accordance with the instructions, may cause harmful interference to radio
communications. However, there is no guarantee that interference will not occur in a
particular installation. If this equipment does cause harmful interference to radio or
television reception, which can be determined by turning the equipment off and on, the
user is encouraged to try to correct the interference by one or more of the following
measures:
1. Reorient or relocate the receiving antenna.
2. Increase the separation between the equipment and receiver.
3. Connect the equipment into an outlet on a circuit different from that to which
the receiver is connected.
4. Consult the dealer or an experienced radio technician for help.
FCC Caution
This equipment must be installed and operated in accordance with provided instructions
and a minimum 20 cm spacing must be provided between computer mounted antenna and
person’s body (excluding extremities of hands, wrist and feet) during wireless modes of
operation.
This device complies with Part 15 of the FCC Rules. Operation is subject to the following
two conditions: (1) this device may not cause harmful interference, and (2) this device
must accept any interference received, including interference that may cause undesired
operation.
2

Any changes or modifications not expressly approved by the party responsible for
compliance could void the authority to operate equipment.
Federal Communication Commission (FCC) Radiation Exposure Statement
This equipment complies with FCC radiation exposure set forth for an uncontrolled
environment. In order to avoid the possibility of exceeding the FCC radio frequency
exposure limits, human proximity to the antenna shall not be less than 20cm (8 inches)
during normal operation.
The antenna(s) used for this transmitter must not be co-located or operating in
conjunction with any other antenna or transmitter.
R&TTE Compliance Statement
This equipment complies with all the requirements of DIRECTIVE 1999/5/EC OF THE
EUROPEAN PARLIAMENT AND THE COUNCIL of March 9, 1999 on radio
equipment and telecommunication terminal Equipment and the mutual recognition of
their conformity (R&TTE).
The R&TTE Directive repeals and replaces in the directive 98/13/EEC
(Telecommunications Terminal Equipment and Satellite Earth Station Equipment) As of
April 8, 2000.
Safety
This equipment is designed with the utmost care for the safety of those who install and
use it. However, special attention must be paid to the dangers of electric shock and static
electricity when working with electrical equipment. All guidelines of this and of the
computer manufacture must therefore be allowed at all times to ensure the safe use of the
equipment.
3

EU Countries Intended for Use
The ETSI version of this device is intended for home and office use in Austria, Belgium,
Denmark, Finland, France, Germany, Greece, Ireland, Italy, Luxembourg, the
Netherlands, Portugal, Spain, Sweden, and the United Kingdom.
The ETSI version of this device is also authorized for use in EFTA member states:
Iceland, Liechtenstein, Norway, and Switzerland.
EU Countries NOT intended for use
None.
4

Table of Contents
Chapter I: Product Information ........................................................................................... 7
1-1 Introduction and Safety Information ........................................................................ 7
1-2 Safety Information .................................................................................................... 8
1-3 System Requirements ............................................................................................... 9
1-4 Package Contents .................................................................................................... 10
1-5 Product Overview ....................................................................................................11
Chapter II: System and Network Setup ............................................................................ 14
2-1 Build Network Connection ..................................................................................... 14
2-2 Definitions of the HWABN25 Supported Modes ................................................... 15
2-3 Connecting to the HWABN25 via Web Browser ................................................... 19
2-3-1 Windows 95/98/Me IP address setup .............................................................. 20
2-3-2 Windows 2000 IP address setup ...................................................................... 21
2-3-3 Windows XP IP address setup ......................................................................... 23
2-3-4 Windows Vista/7 IP address setup ................................................................... 25
2-3-5 Mac OS X IP Address Setup ........................................................................... 27
2-3-6 Tablet/Smartphone Setup ................................................................................ 28
2-3-7 Accessing the Web Page User Interface .......................................................... 31
2-4 ‘Quick Setup’ .......................................................................................................... 33
2-4-1 Setup Procedure for ‘Access Point’ ................................................................ 35
2-4-2 Setup Procedure ‘Station-Infrastructure’ (Wireless Bridge) ........................... 38
2-4-3 Setup procedure for ‘AP Bridge-Point to Point’: ............................................ 40
2-4-4 Setup procedure for ‘AP Bridge-Point to Multi-Point’ ................................... 42
2-4-5 Setup Procedure for ‘AP-Bridge WDS’ .......................................................... 44
2-4-6 Setup Procedure for ‘Universal Repeater’ ...................................................... 46
Chapter III General Setu p ................................................................................................. 49
3-1 Change Management password .............................................................................. 50
3-2 Wired LAN Configuration ...................................................................................... 53
3-2-1 Local Network ................................................................................................. 54
3-2-2 DHCP Server: .................................................................................................. 55
3-3 Wireless Network ................................................................................................... 57
3-3-1 Basic Wireless Settings ................................................................................... 57
3-3-2 Advanced Wireless Settings ............................................................................ 68
3-3-3 Security Settings .............................................................................................. 71
5

3-3-4 Wireless Access Control .................................................................................. 77
3-3-5 Wi-Fi Protected Setup (WPS) ......................................................................... 80
3-3-6 Security Tips for Wireless Network ................................................................ 83
Chapter IV Status and Tools ............................................................................................. 84
4-1 System Status .......................................................................................................... 84
4-1-1 System information and firmware version ...................................................... 84
4-1-2 Local Network ................................................................................................. 86
4-1-3 Statistics .......................................................................................................... 88
4-2 Configuration Tools ................................................................................................ 89
4-3 Firmware Upgrade .................................................................................................. 90
4-4 System Reset........................................................................................................... 92
Chapter V: Appendix ......................................................................................................... 93
5-1 Hardware Specification .......................................................................................... 93
5-2 Troubleshooting ...................................................................................................... 94
5-3 Glossary .................................................................................................................. 96
6

Chapter I: Product Information
1-1 Introduction and Safety Information
Thank you for purchasing the HWABN25 Hi-Gain™ Wireless-300N Multi-Function
Extender Pro. This highly efficient access point is the best choice for Small office /
Home office users. It allows computers and network devices to gain wireless access in
several modes throughout their network. Easy install procedures allow any computer user
to setup a network environment in a very short time.
All computers and wireless-enabled network devices (including PDA, cellular phone,
game console, etc.) can connect to this Hi-Gain™ Wireless-300N Multi-Function
Extender Pro without additional cabling. 802.11N wireless capability also gives you the
highest wireless speeds.
Other features of the HWABN25 include:
• Provides IEEE 802.11b/g/Draft-N wireless LAN capabil i t y
• 6 different Wireless Modes: Access Point, Bridge Client, Bridge Point to Point,
Bridge Point to Multi-Point, AP Bridge WDS modes, Universal Repeater
• Supports 64/128-bit WEP, WPA, and WPA2 wireless data encryption.
• Supports MAC address filtering (Only allow specific wireless device of your
choice to connect to this access point).
• One wired LAN port (10/100M)
• Auto MDI / MDI-X function for all wired Ethernet ports.
• Provides IEEE 802.11a/b/g/n wireless LAN capability.
• Support DHCP (Server/Client) for easy IP-address setup.
• Easy to use Web-based GUI for network configuration and management purposes.
7

1-2 Safety Information
In order to keep the safety of users and property, please follow these safety instructions:
1. This access point is designed for indoor use only; DO NOT place this Extender
outdoors.
2. DO NOT put this Extender at or near hot or humid places, like kitchens or bathrooms.
Also, do not leave this access point in the car in summer.
3. DO NOT pull any connected cable with force; disconnect them from the access point
first.
4. If you want to place this Extender in a high place or hang on the wall, please make sure
the Extender is firmly secured. Falling can damage the Extender and its accessories and
the warranty will be void.
5. Accessories of this Extender, such as the power supply, are a danger to small children
under 3 years old. KEEP THIS EXTENDER OUT OF THE REACH OF CHILDREN!
6. The Extender will become warm when used for a long period of time (This is normal
and is not a malfunction). DO NOT put this access point on paper, cloth, or other
flammable materials.
7. There are no user-serviceable parts inside the Extender. If you have found that the
Extender is not working properly, please contact technical support or your place of
purchase and ask for help. DO NOT disassemble the Extender, or warranty will be void.
8. If the Extender falls into water when it’s powered on, DO NOT use your hands to pick
it up. Switch the electrical power off before you do anything, or contact an experienced
technician for help.
9. If you smell something strange, or see smoke coming out from the Extender or power
supply, remove the power supply or switch the electrical power off immediately, and call
techsupport or your place of purchase for help.
8

1-3 System Requirements
• One computer (Mac or PC).
• Internet Web Browser (Internet Explorer, Safari, etc.)
• A Wired or Wireless network adapter (e.g. Airport card, built-in Ethernet adapter,
etc.)
9

1-4 Package Contents
Before you start to use this Extender, please check if there’s anything missing in the
package, and contact your place of purchase or contact Hawking Technologies.
• 1x HWABN25 Hi-Gain™ Wireless-300N Multi-Function Extender Pro
• 1x AC Power Adapter (5V/2A)
• 1x Setup CD-ROM
• 1x Quick Installation Guide (QIG)
10
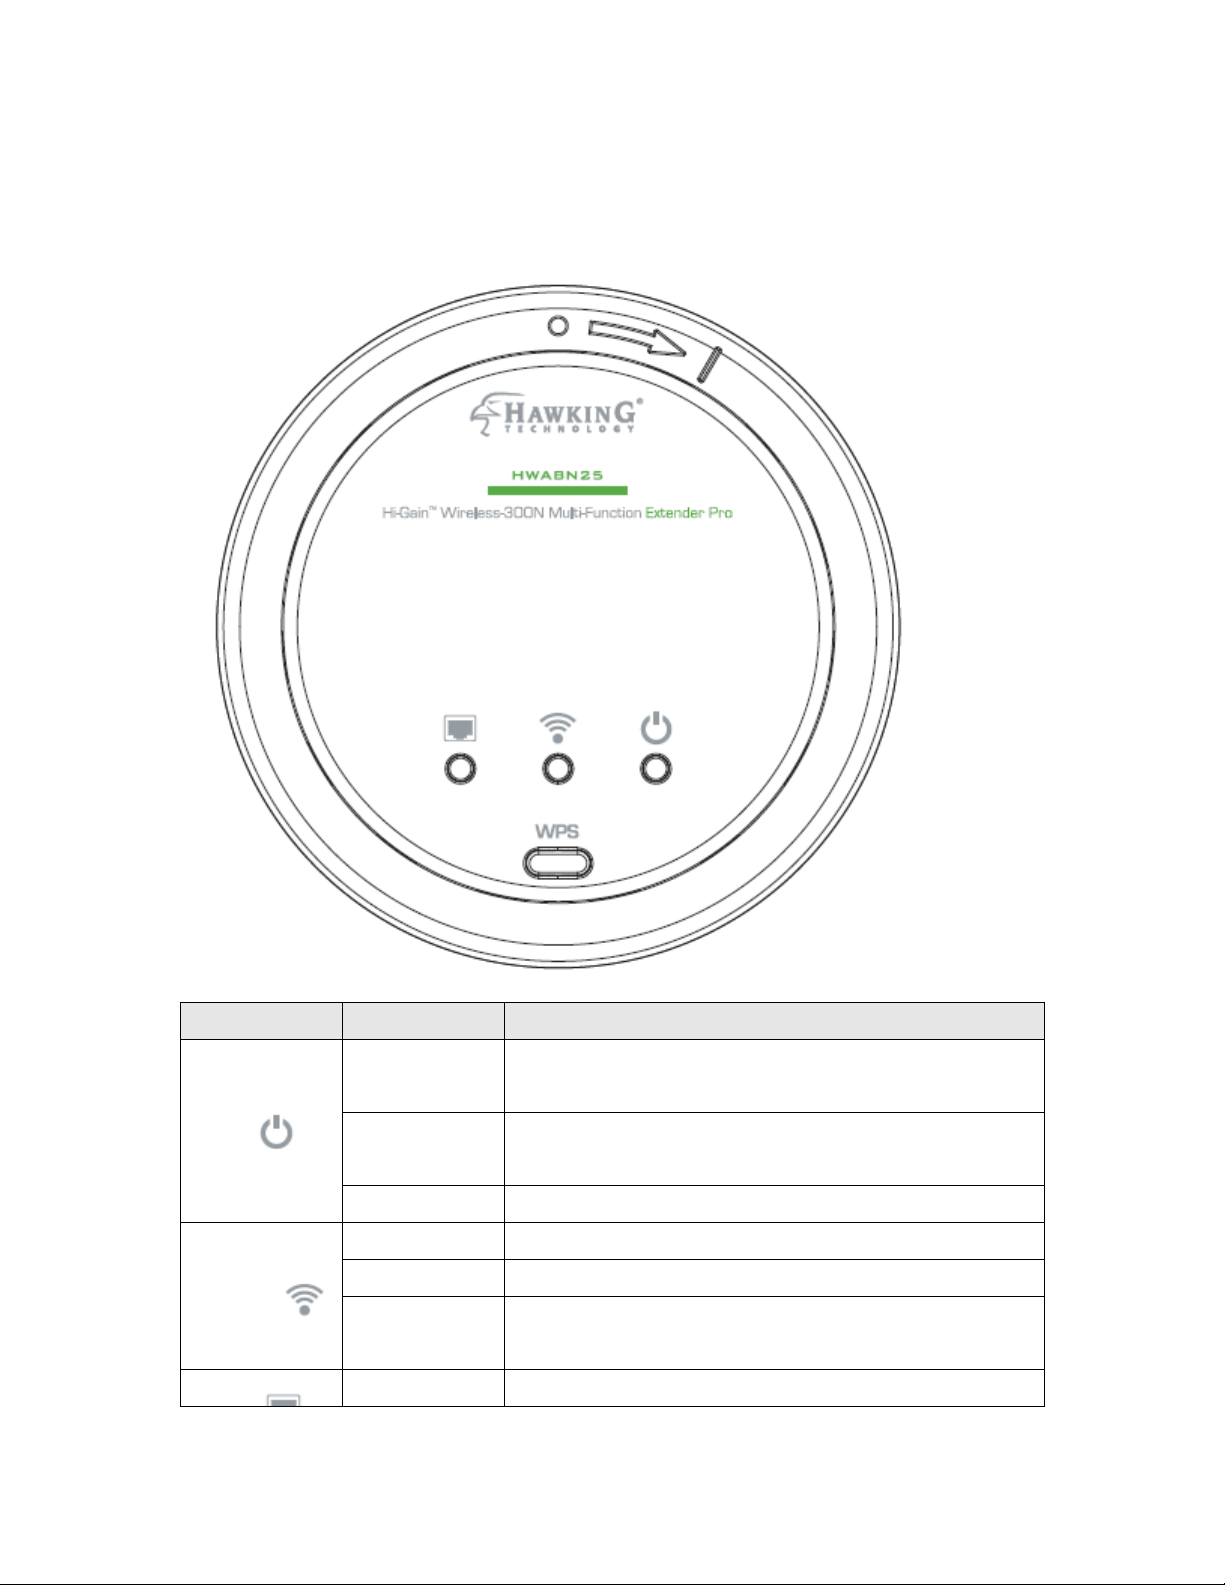
1-5 Product Overview
LED Name
Light Status
Description
Off
The access point is switched off.
Off
Wireless network is switched off.
Top
PWR
WLAN
On The access point is switched on and correctly
powered.
Slow Blinking System is reset to factory default, at the same time
WLAN LED is on.
On Wireless WPS mode is enabled.
Flashing Wireless LAN activity (transferring or receiving
data).
On LAN port is connected
11
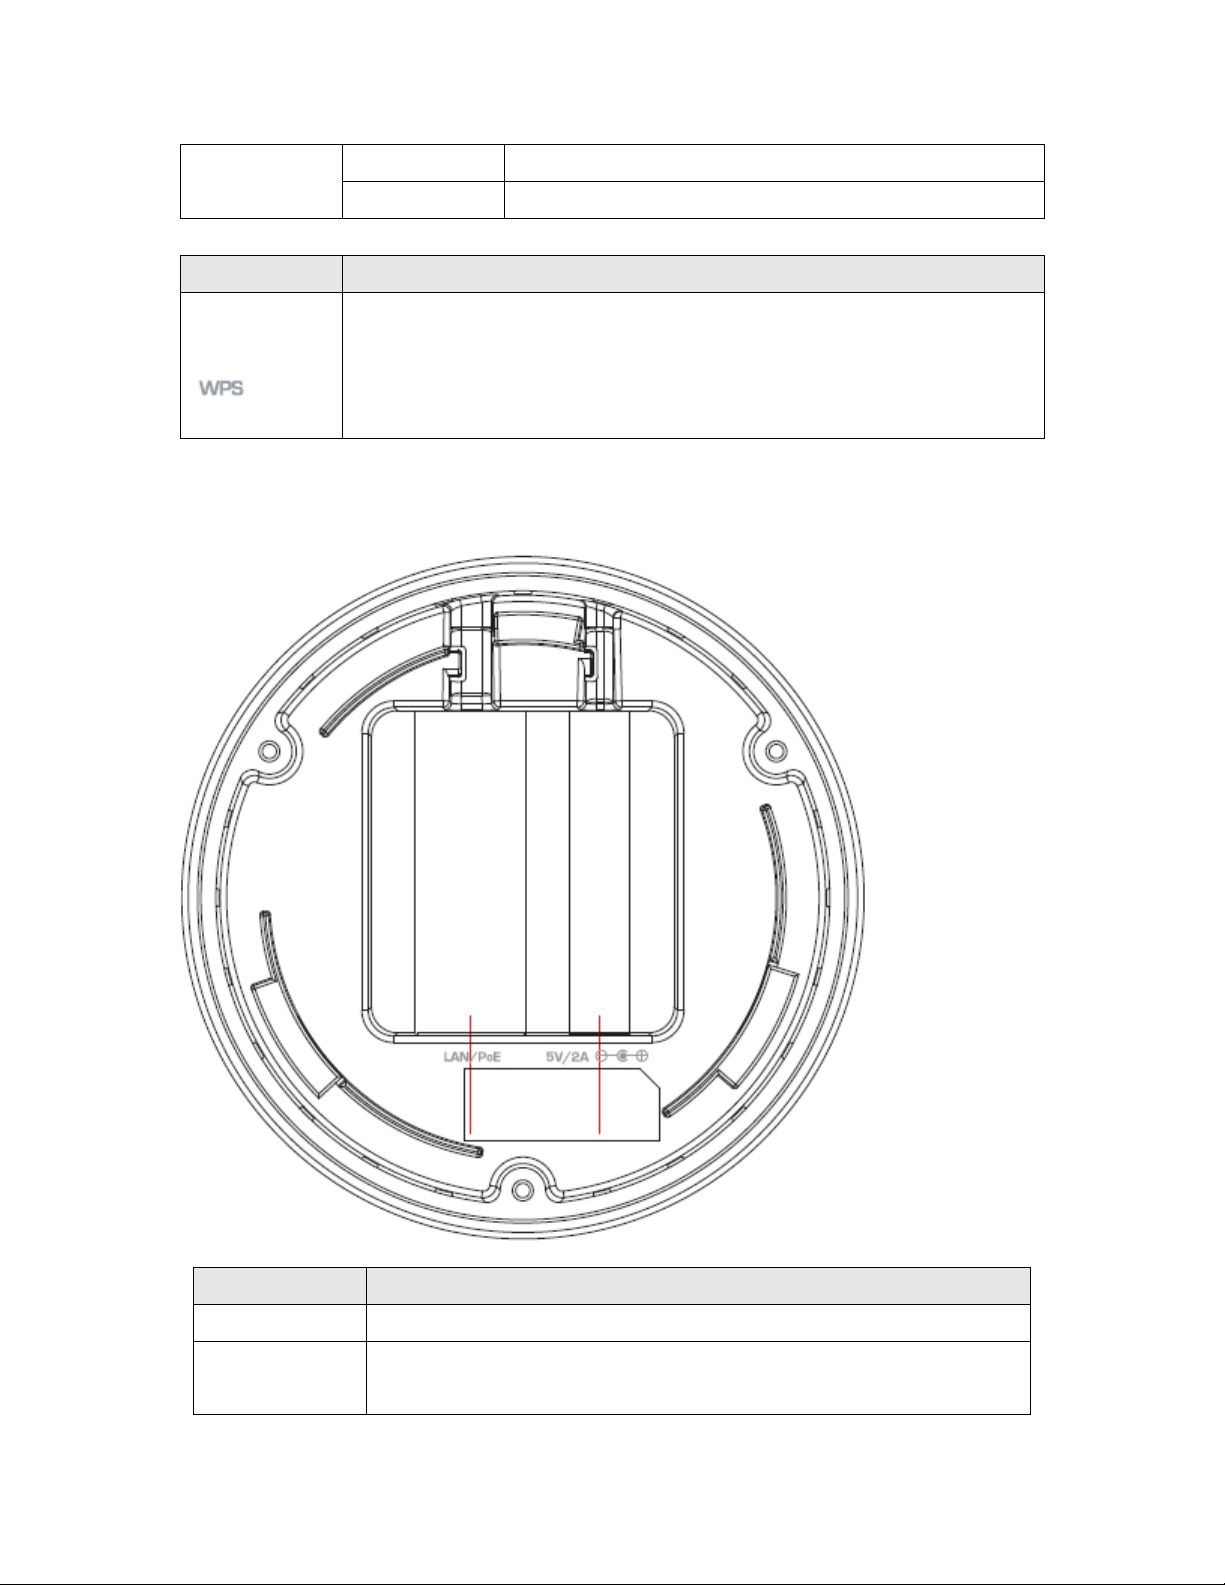
Off LAN port is not connected
Item Name
Description
Item Name
Description
Ethernet/PoE
Local Area Network (LAN) port. Can also function as a Power
Flashing LAN activity (transferring or receiving data)
Reset the router to factory default settings (clear all settings) or start
Reset / WPS
Bottom
WPS function. Press this button and hold for 10 seconds to restore all
settings to factory defaults, and press this button for less than 5
seconds to start WPS function.
Power 5V/2A Power connector, connects to A/C power adapter.
Over Ethernet port if you have a PoE power supply. (sold
12

separately)
13
Chapter II: System and Network Setup
2-1 Build Network Connection
Please follow the following instructions to build the network connection between your
new HWABN25 Hi-Gain™ Wireless-300N Multi-Function Extender Pro and your
computers and other network devices:
1. Connect the A/C power adapter to the wall socket, and then connect it to the ‘Power’
socket of HWABN25 located on the bottom of the unit. You may need to remove
the back panel on the HWABN25 to get to this power socket.
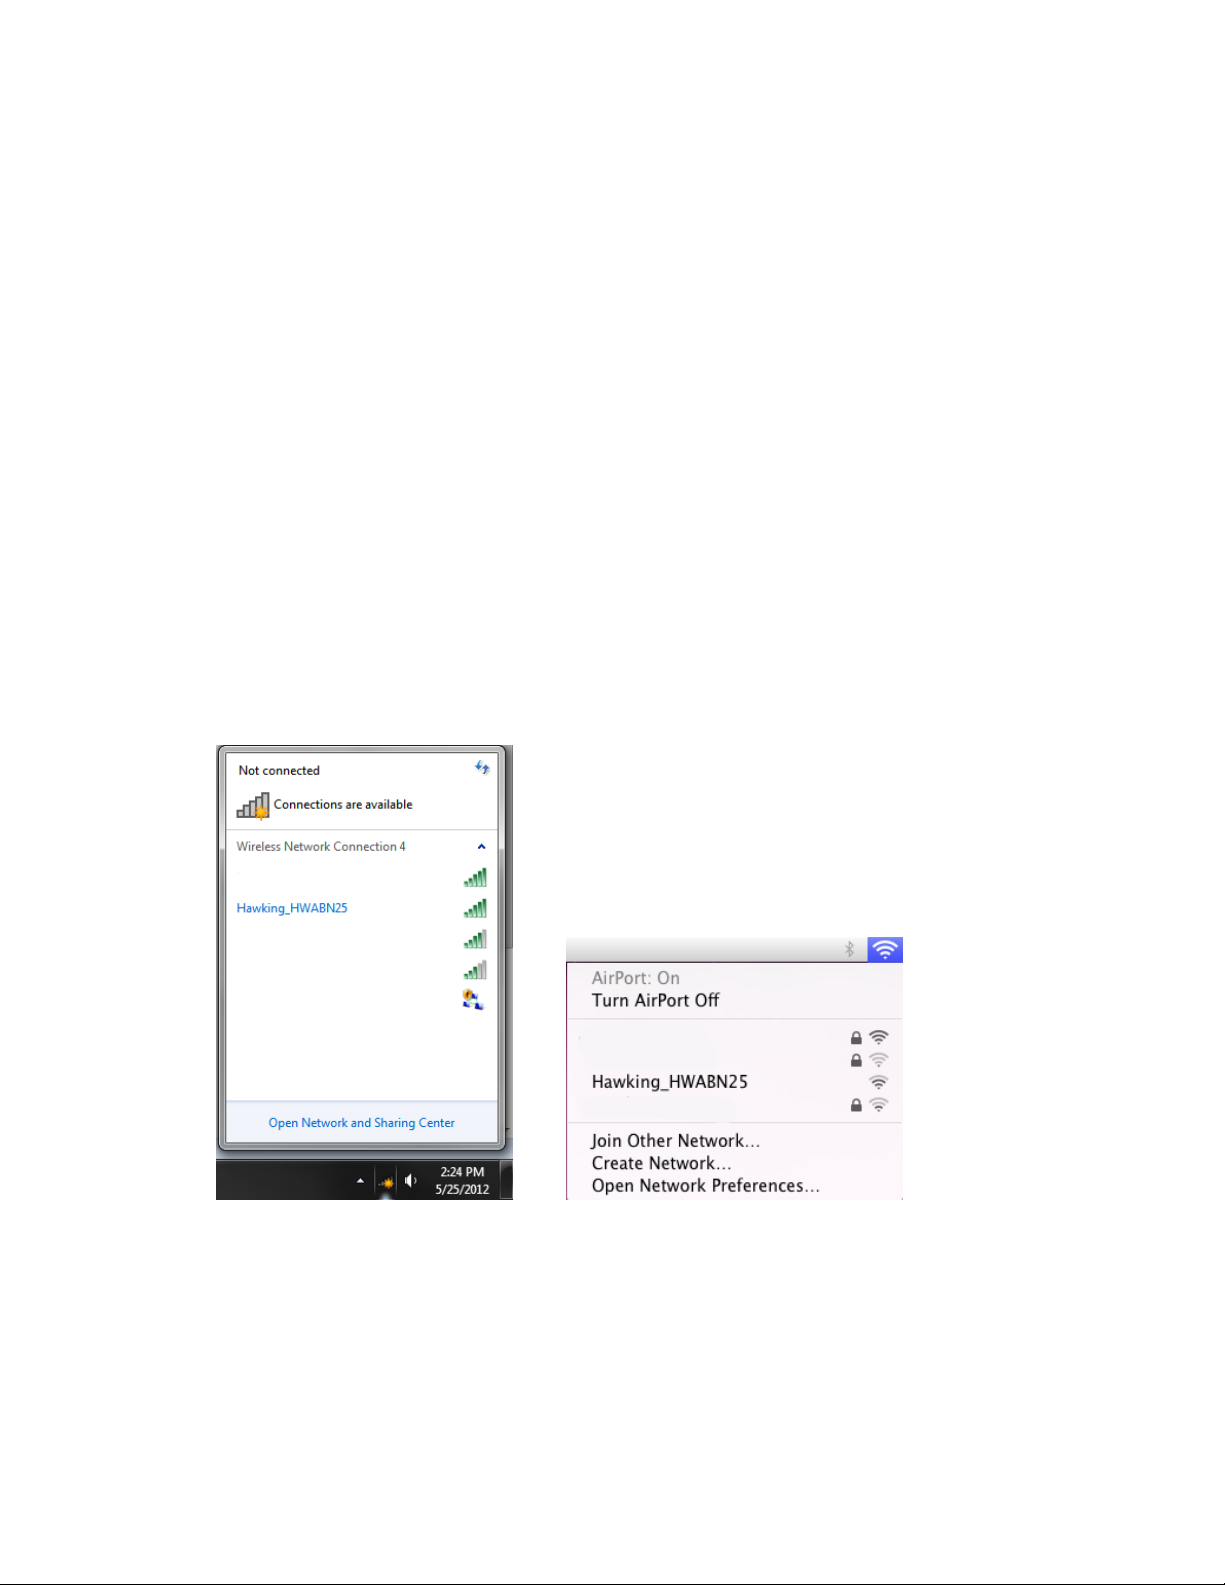
2. Connect your HWABN25’s LAN port to an Ethernet cable. You can plug the other
end into your computer. If you have a wireless device, you can also connect to the
wireless network “Hawking_HWABN25”.
.
3. Log into the setup page to configure the HWABN25. See section 2.3
14
2-2 Definiti ons of the HWABN25 Supported Modes
Modes
The HWABN25 supports 6 different modes.
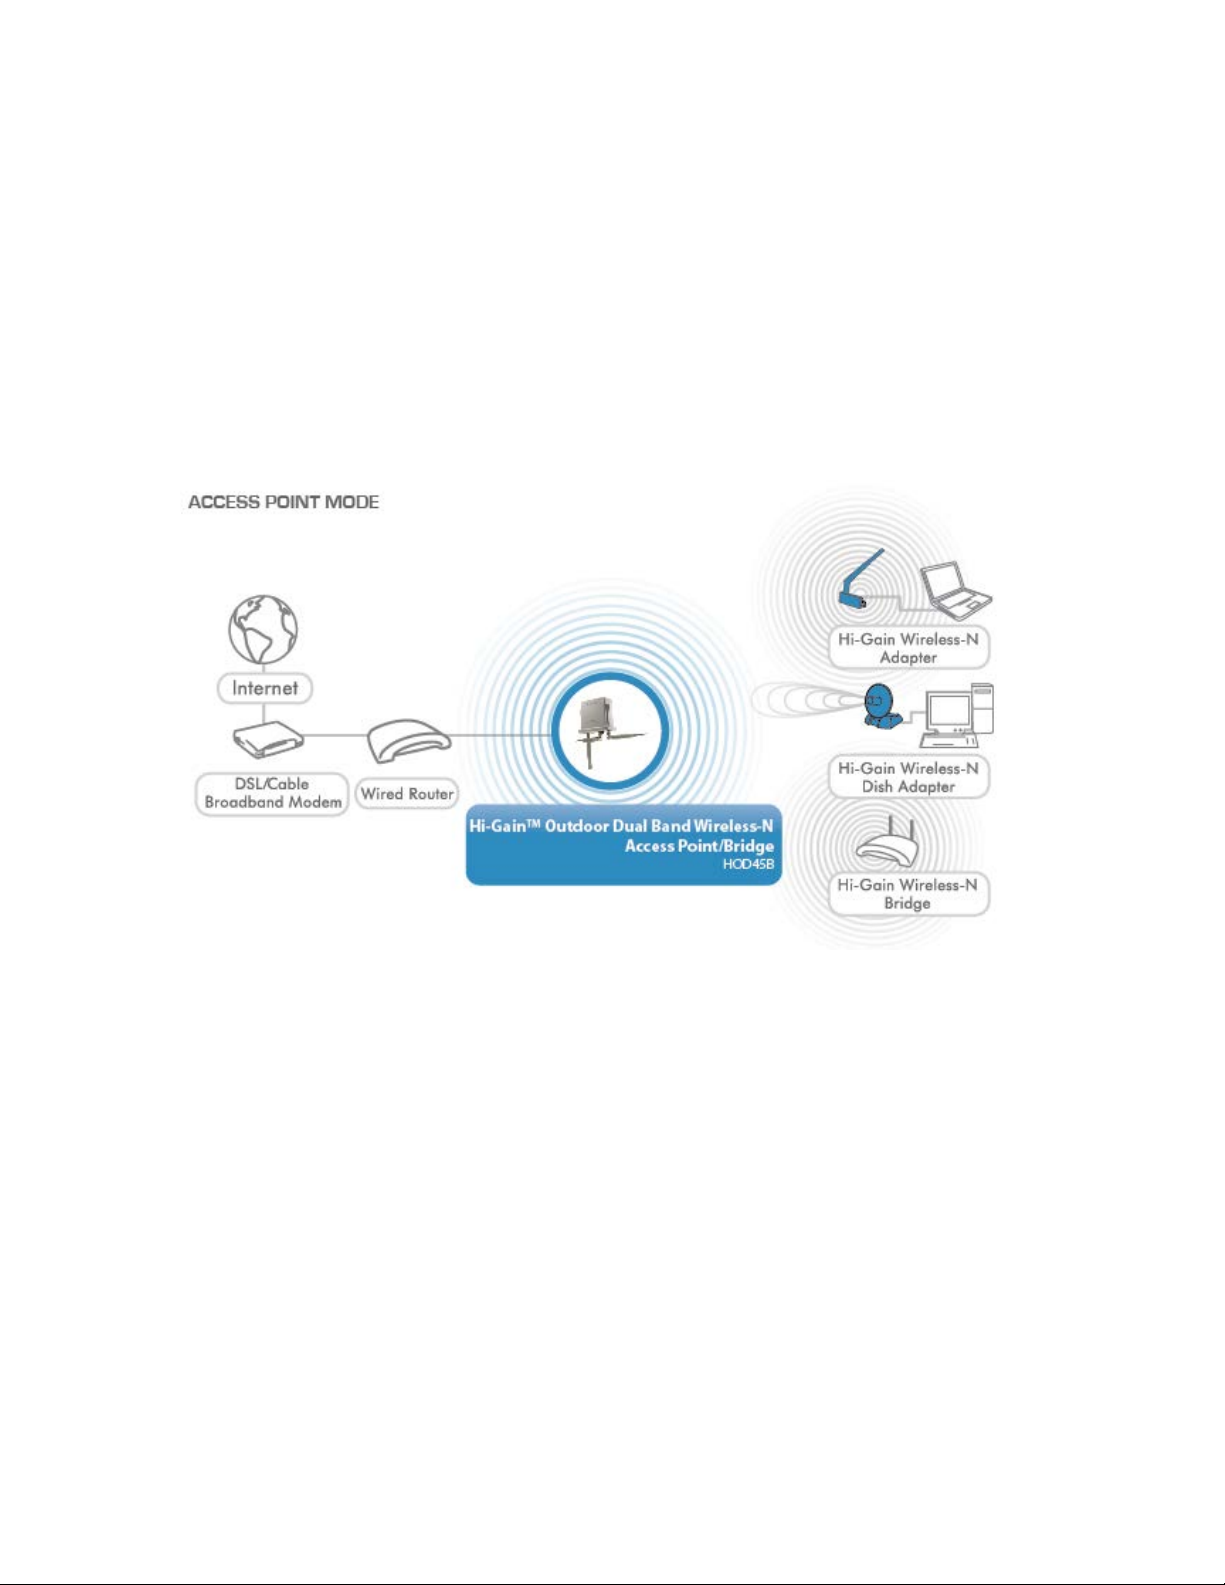
Access Point: The HWABN25 will broadcast a WiFi signal for other computers and
devices to connect to. Must be plugged into the router or network after setup.
Station – Infrastructure (Bridge): The HWABN25 will allow you connect wired
devices wirelessly to an existing wireless router or access point. It will “bridge” these
devices wirelessly with your network. It will not broadcast any WiFi signal. It will
only make a wireless connection between your wireless signal and the HWABN25.
15

AP Bridge – Point to Point: Similar to station-infrastructure, this requires two
HWABN25’s on each end. This will create a wireless bridge between these two points.
No WiFi signal will be broadcast and it will only make a wireless connection between
those two points.
AP Bridge – Point to Multi-Point: Similar to AP Bridge – Point to Point, this allows
you to connect several HWABN25’s to one point. No WiFi signal will be broadcast and
it will only make a wireless connection between the HWABN25s.
16
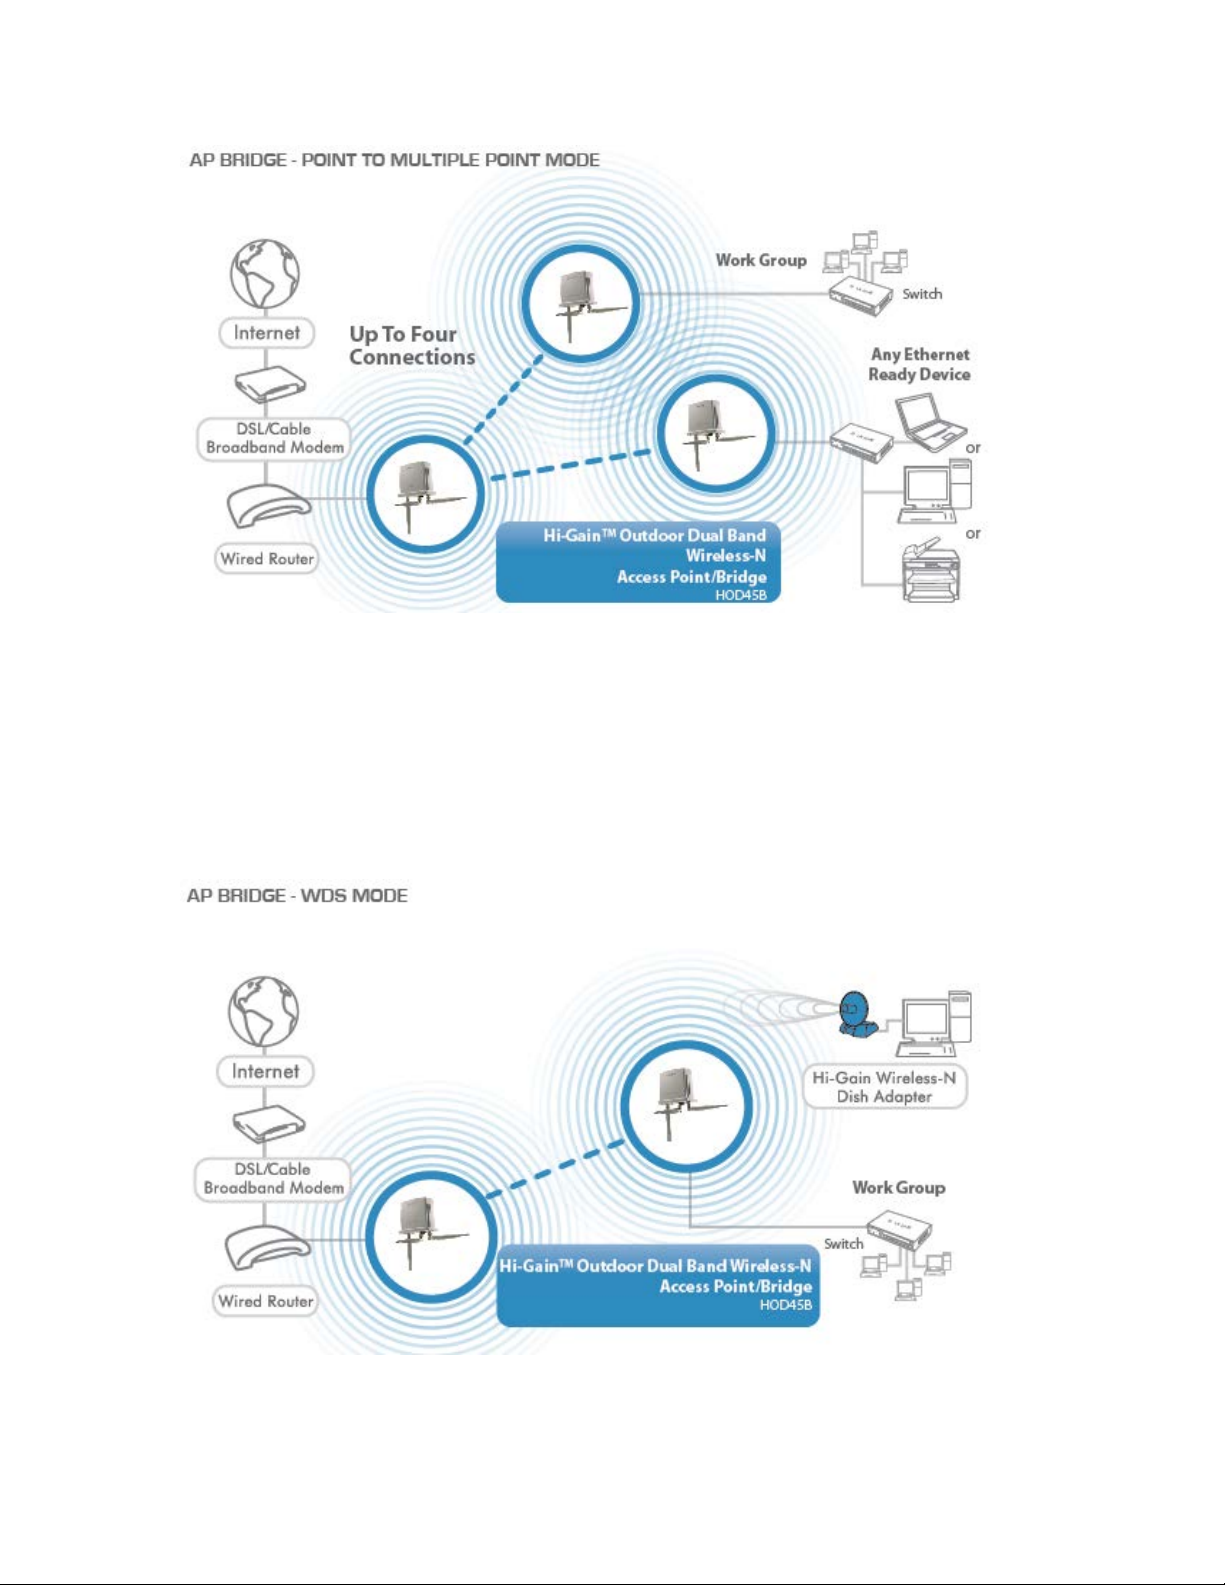
AP Bridge WDS: Wireless Distributing System. This allows you to create a wireless
network using up to four HWABN25’s using the same SSID (wireless name). It will
broadcast a WiFI signal.
Universal Repeater: In this mode, the HWABN25 will repeat the wireless signal of any
existing wireless router/access point. It will act as a wireless relay and create a larger
17
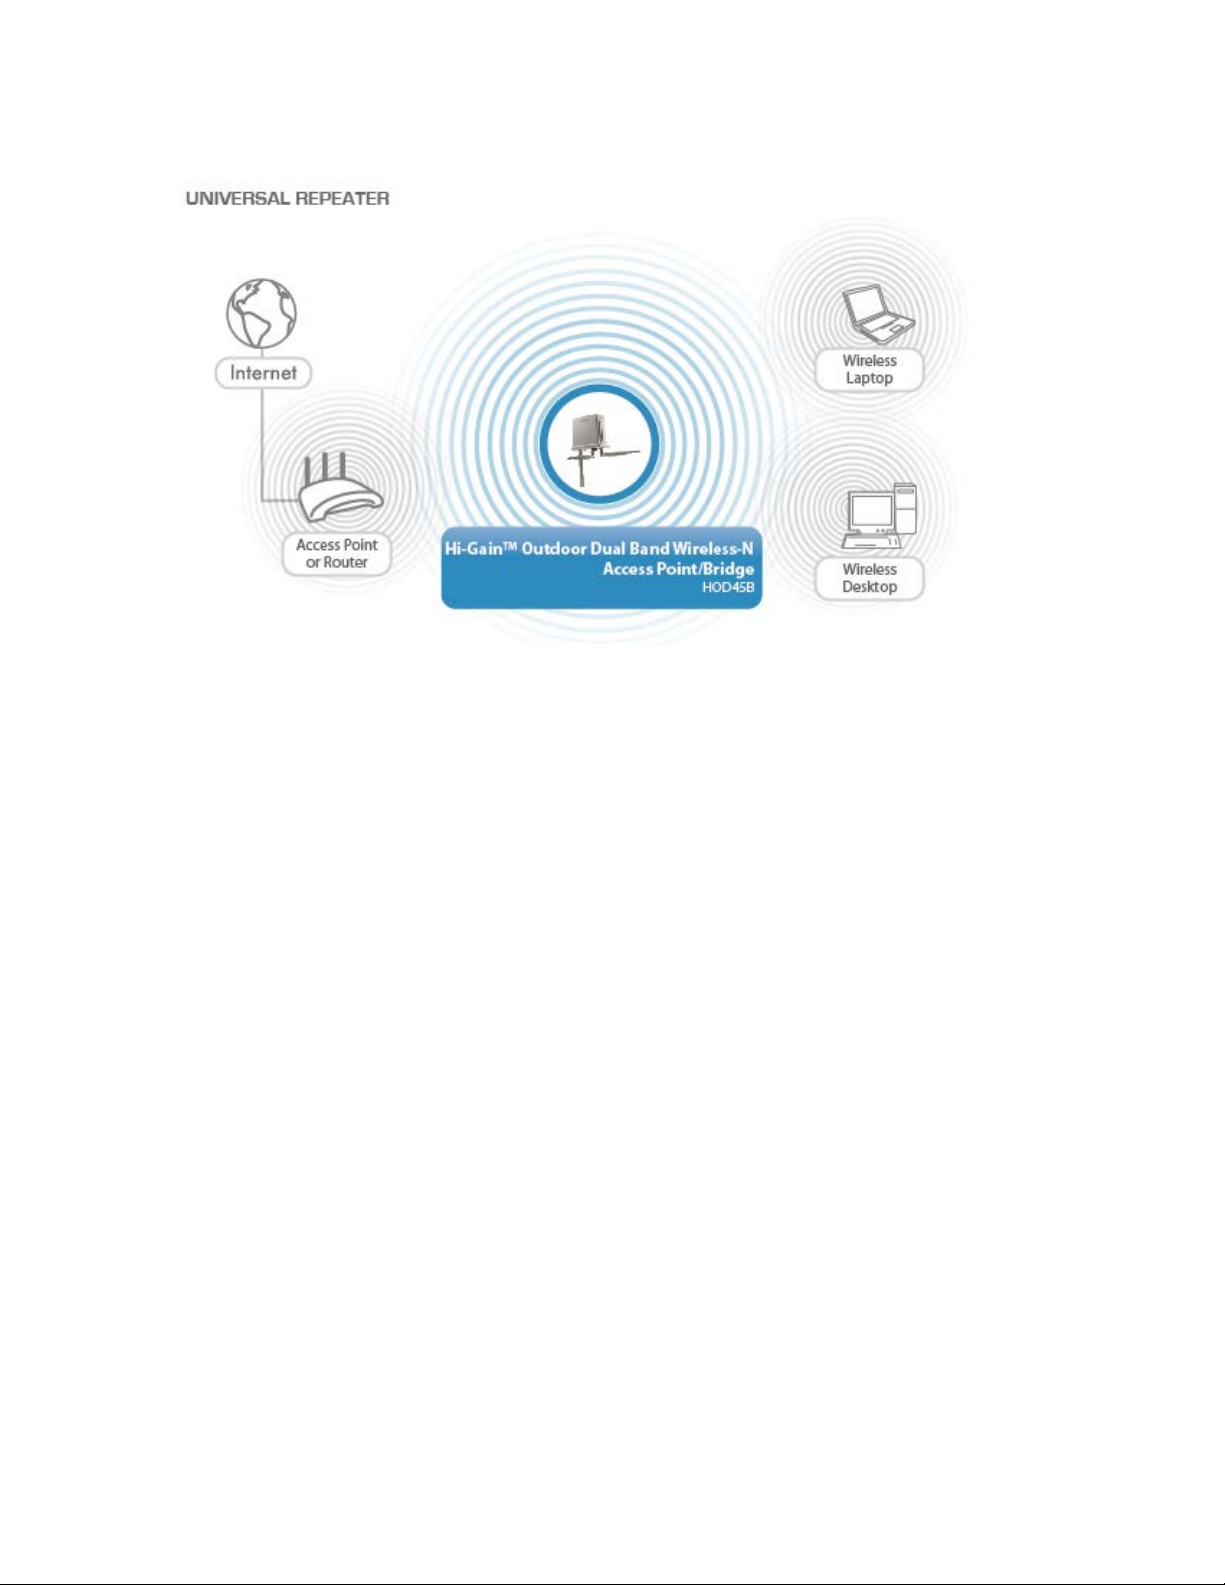
and seamless network for your wireless devices to connect to.
18

2-3 Connecting to the HWABN25 via W e b Brow se r
After the network connection is built, the next step you should do is setup the Extender
with proper network parameters, so it can work properly in your network environment.
Before you can connect to the Extender and start configuration procedures, your
computer must be set to obtain an IP automatically. Please follow the following
instructions to configure your computer to use a static IP address:
If the operating system of your computer is….
Windows 95/98/Me - please go to section 2-3-1
Windows 2000 - please go to section 2-3-2
Windows XP - please go to section 2-3-3
Windows Vista/7 - please go to section 2-3-4
Mac OS - please go to section 2-3-5
Tablet/Smartphone - please go to section 2-3-6
19
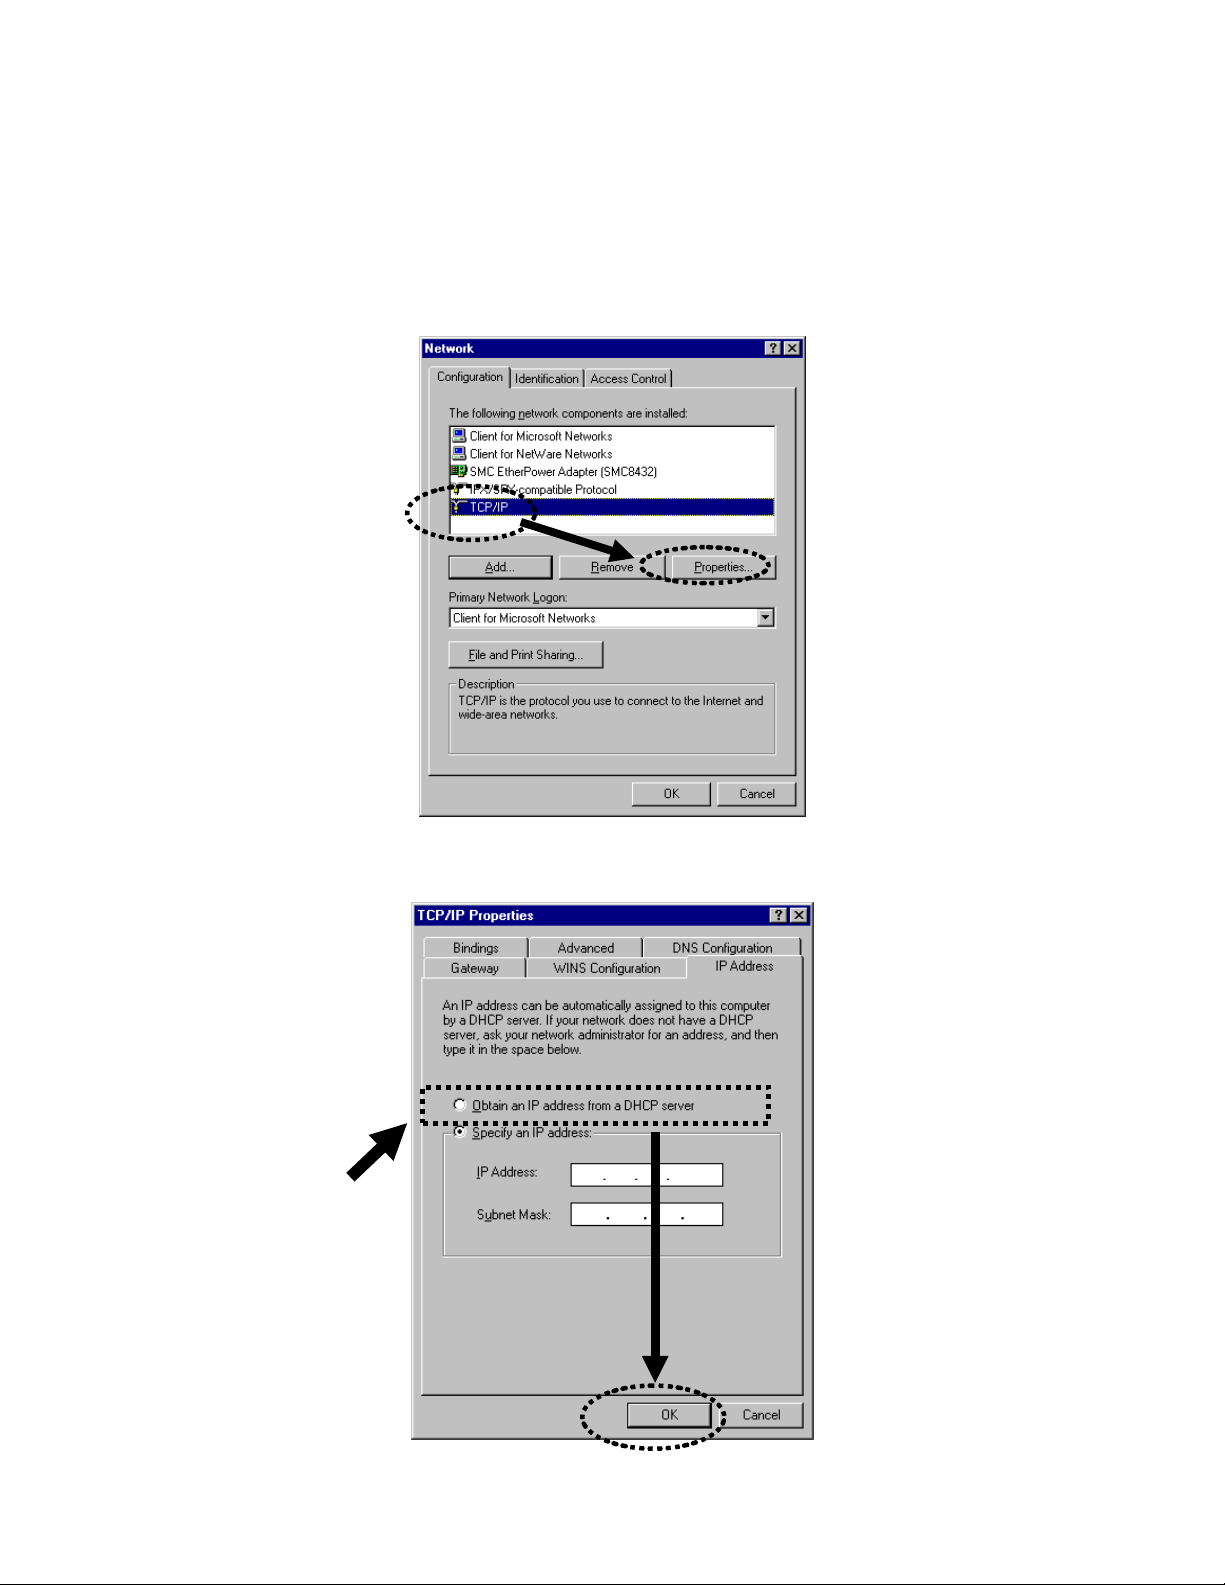
2-3-1 Windows 95/98 /Me IP address setup
1. Click ‘Start’ button (it shou ld be located at lower-left c orner of your
computer), then click control panel. Double-click Network icon, and
Network window will appear. Select ‘TCP /IP’, then clic k ‘Properties’.
2. Select ‘Obtain an IP address from a DHCP server’ and then click ‘OK’.
20
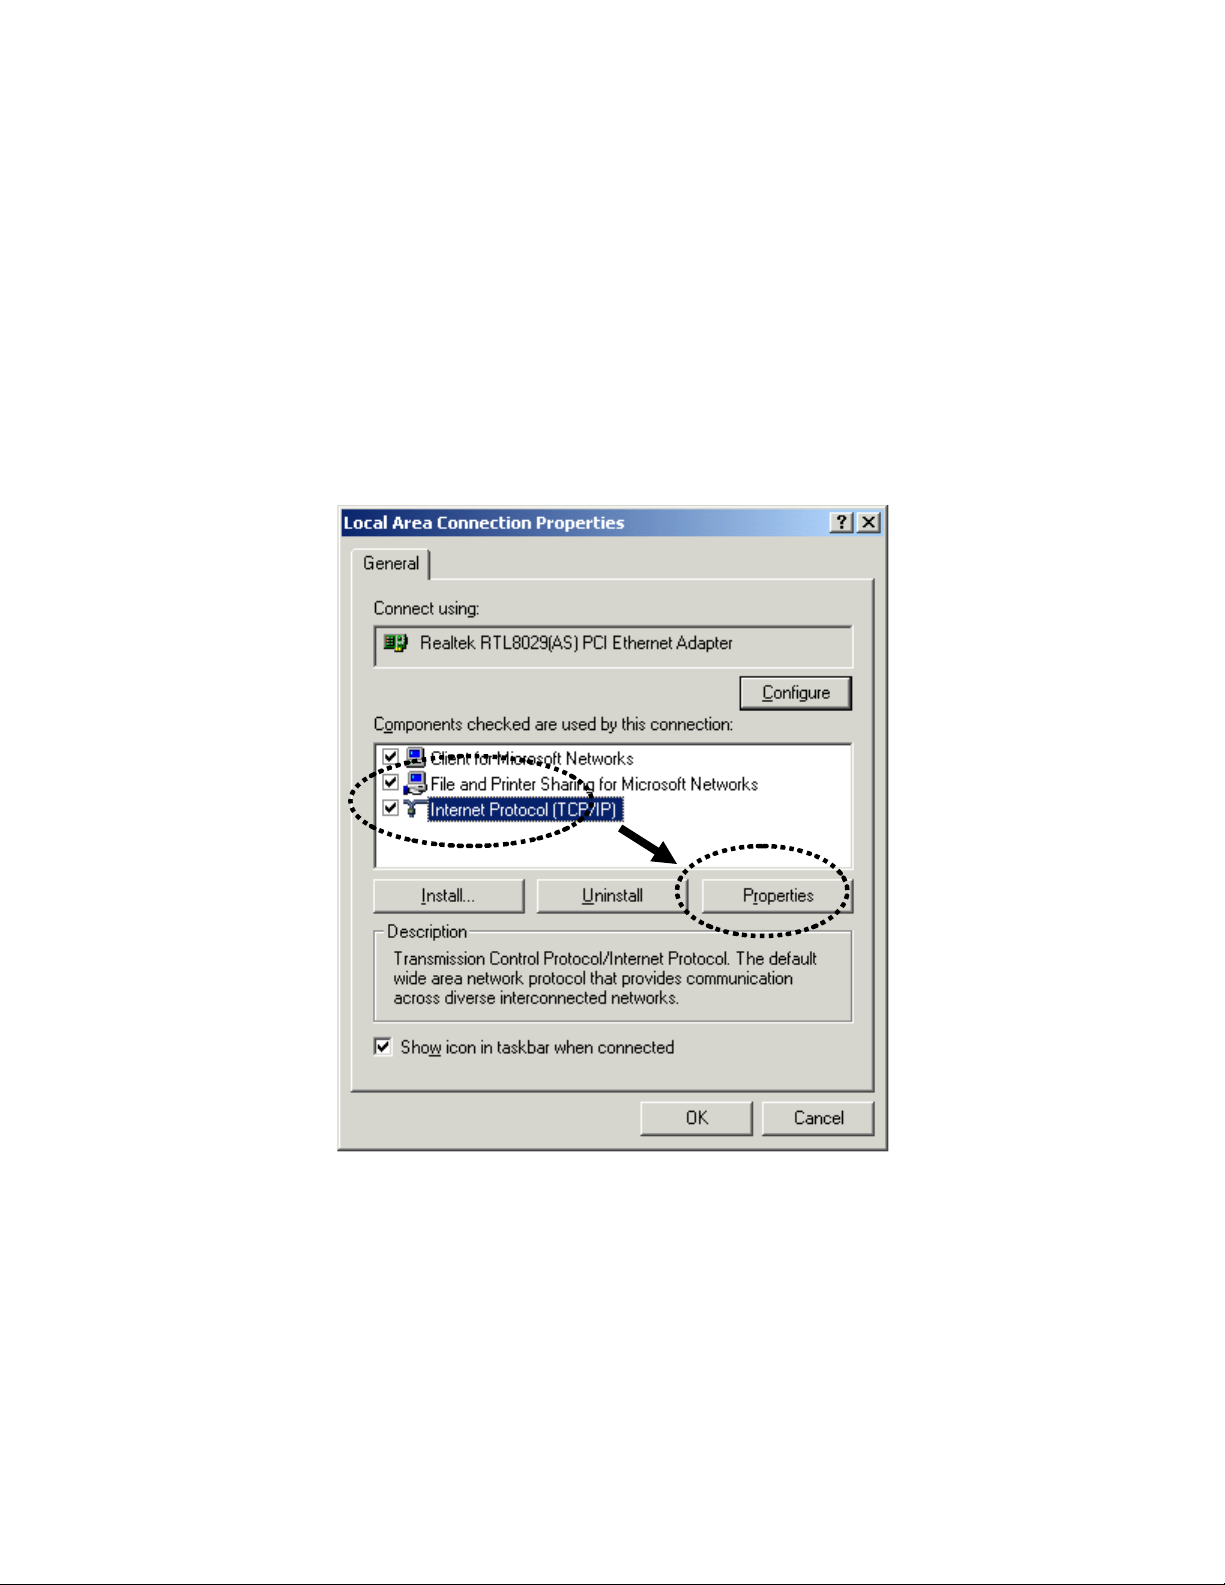
2-3-2 Windows 2000 IP address setup
1. Click ‘Start’ button (it should be located at lower-left corner of your
computer), then click control panel. Double-click Networ k and D ia l-up
Connections icon; click Local Area Connection , and Local Ar ea
Connection Properties window will appear. Select ‘Internet Protocol
(TCP/IP)’ and then click ‘Proper ties’
21
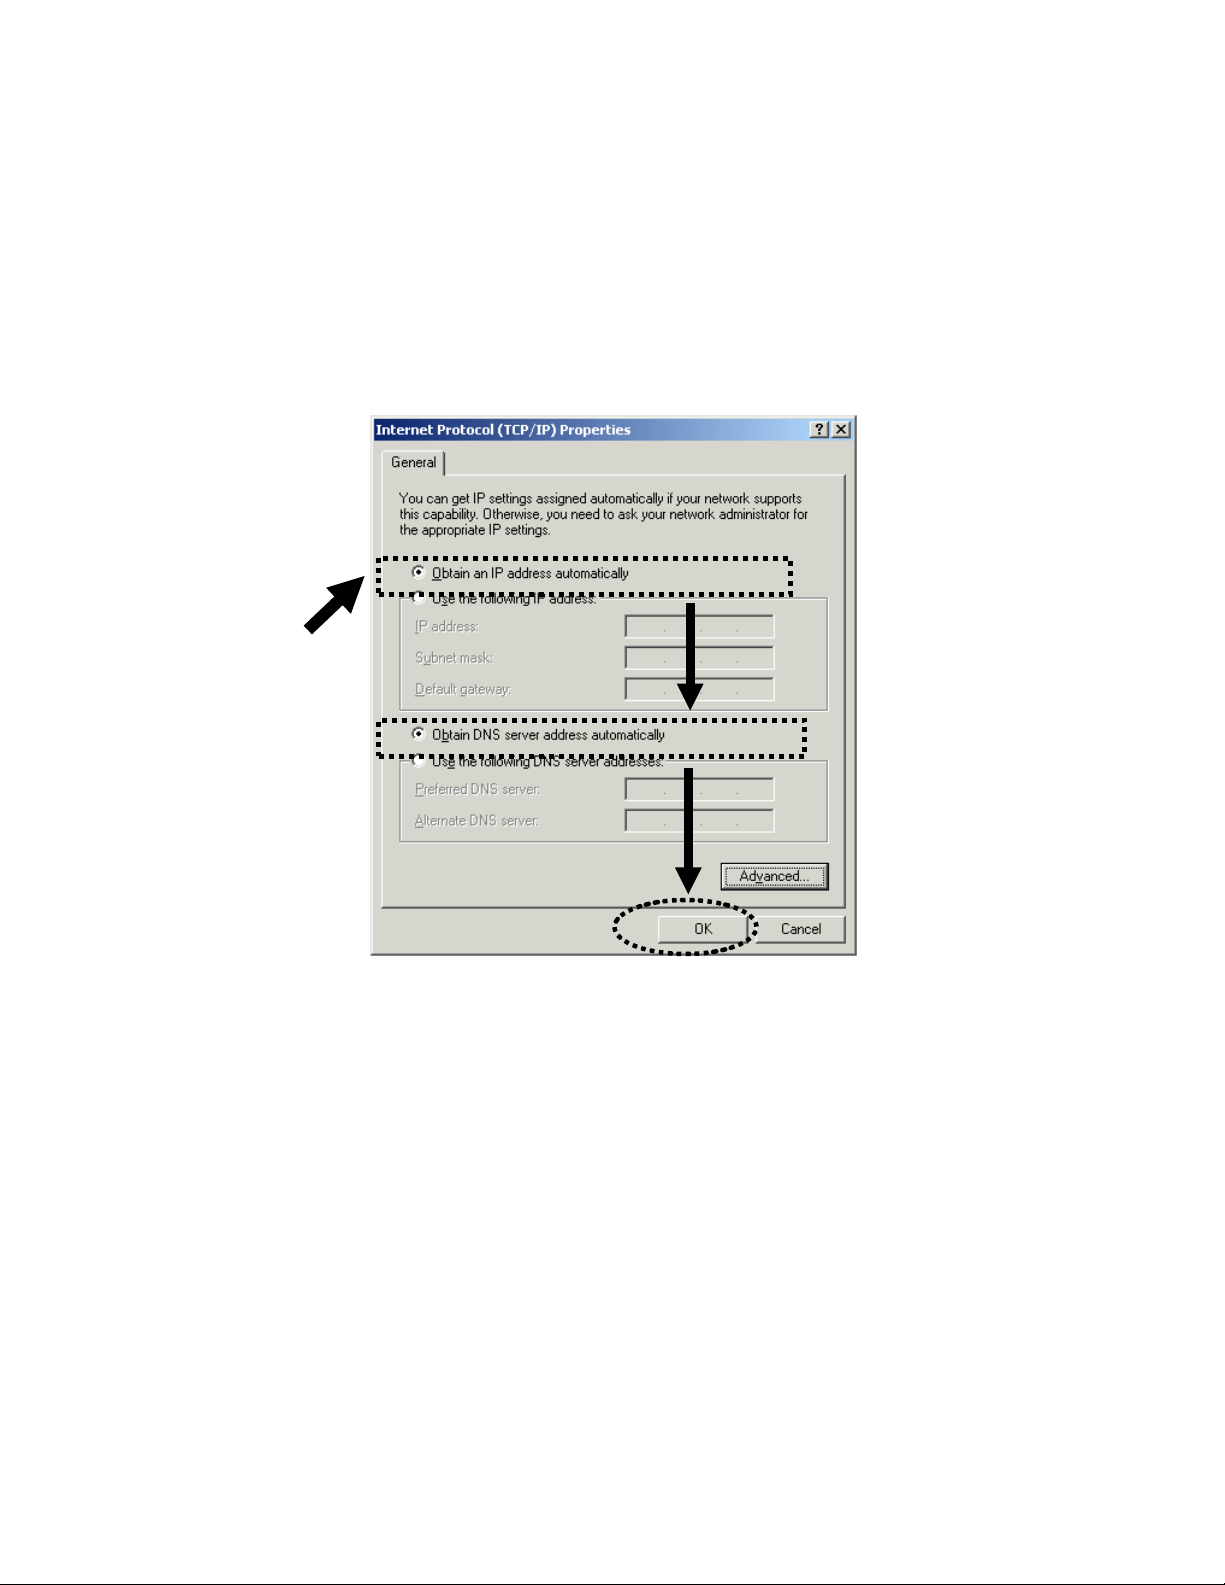
2. Select ‘Obtain an IP address automatically’ and ‘Obtain DNS server
address aut omatically’, then click ‘OK’.
22
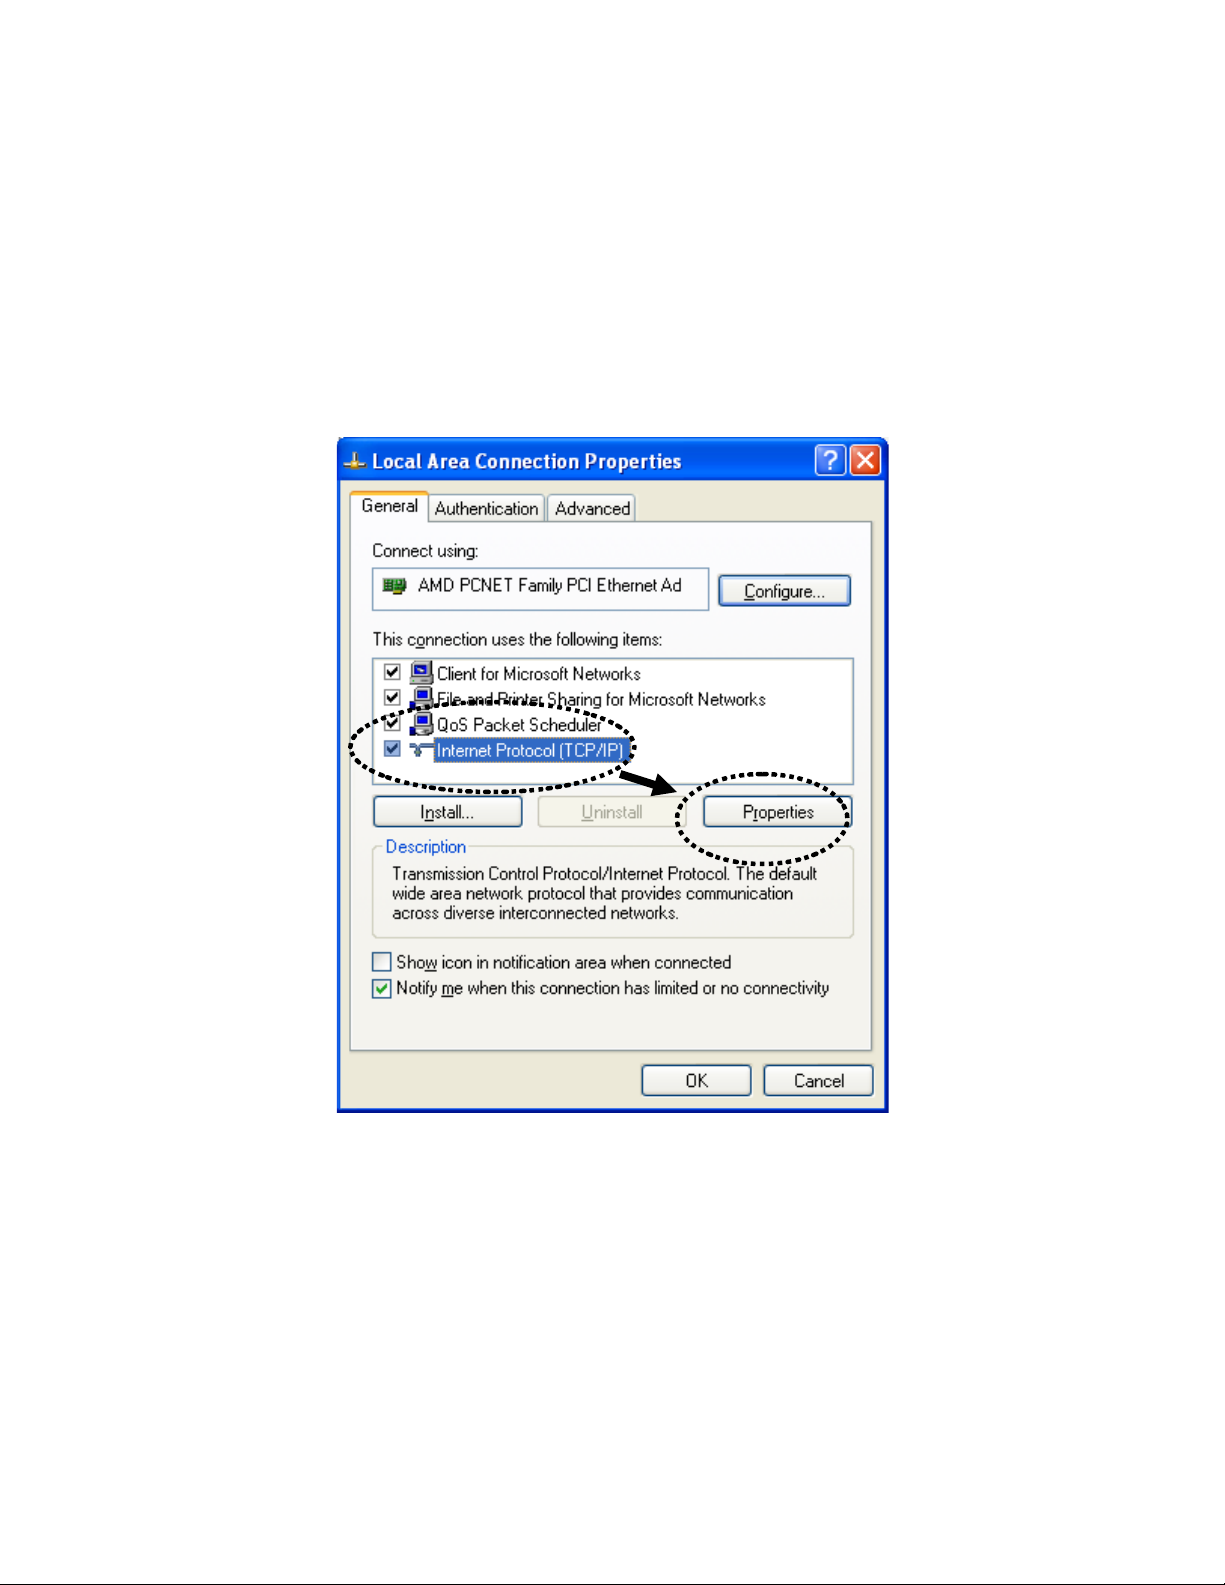
2-3-3 W in dows XP IP address setup
1. Click ‘Start’ button (it should be located at lower-left corner of your
computer), then click control panel. Double-click Networ k and In te rne t
Connections icon, click Network Connecti ons, and then double-click Local
Area Connection, Local Area Connection Status window will appear, and
then click ‘ Properties’
23
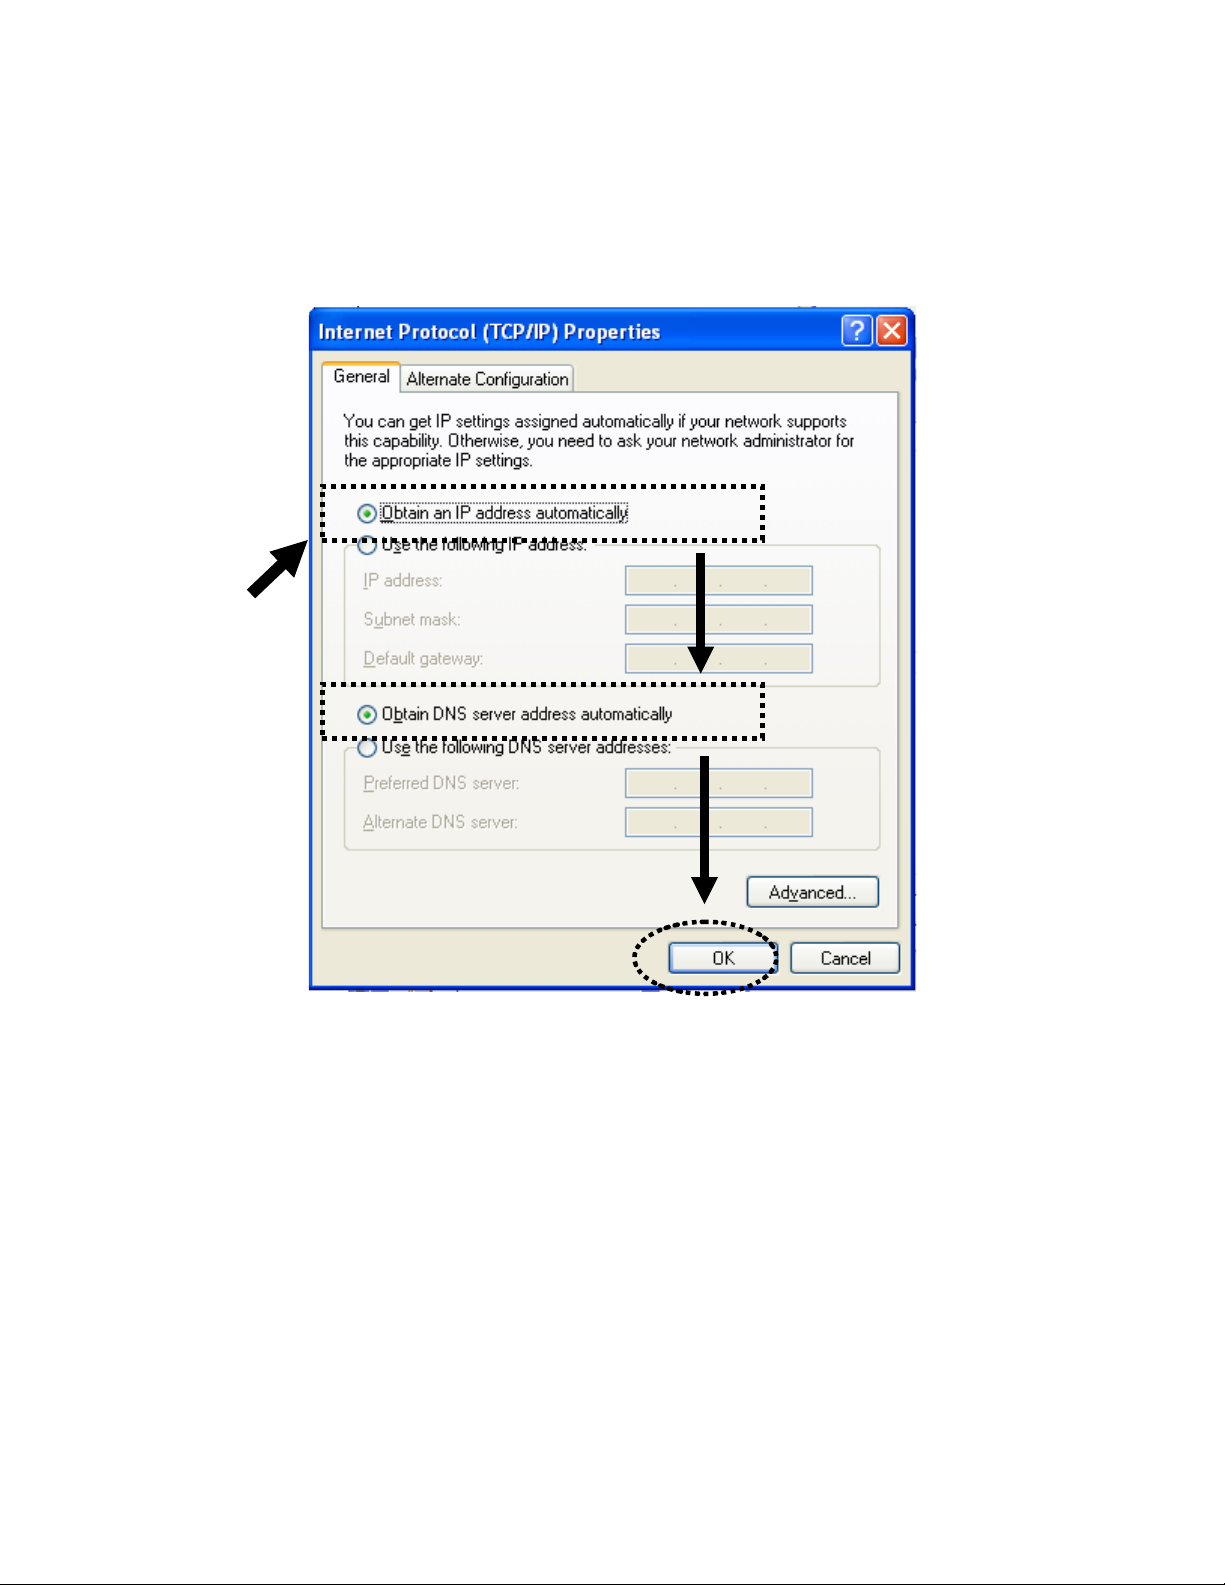
2. Select ‘Obtain an IP address automatically’ and ‘Obtain DNS server
address aut omatically’, then click ‘OK’.
24
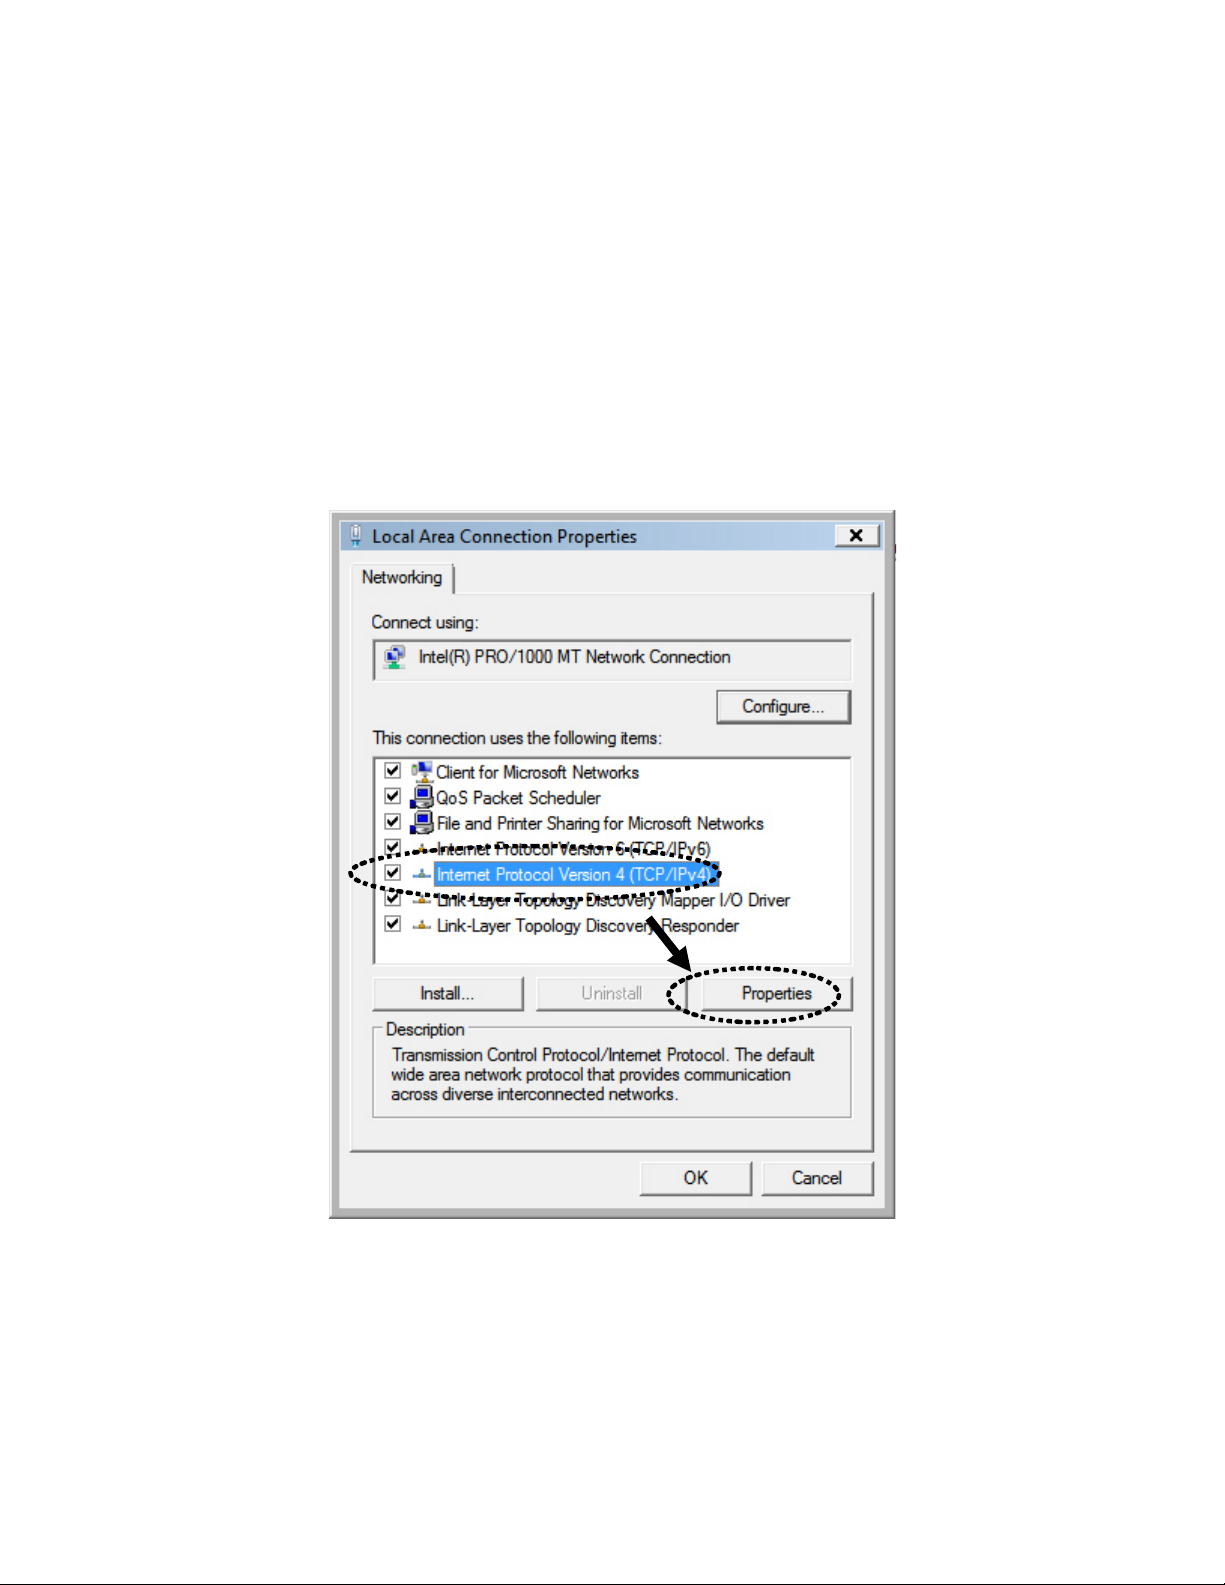
2-3-4 Windows Vista/7 IP address setup
1. Click ‘Start’ button (it should be located at lower-left corner of your
computer), then click control panel. Clic k View Network Status and Tasks,
and then click Manage Network Conn ections. Right-click Local Area
Network, then select ‘Properties’. Local Area Connection Properties
window will appear, select ‘Internet Protocol Version 4 (TCP / IPv4), and
then click ‘ Properties’
25
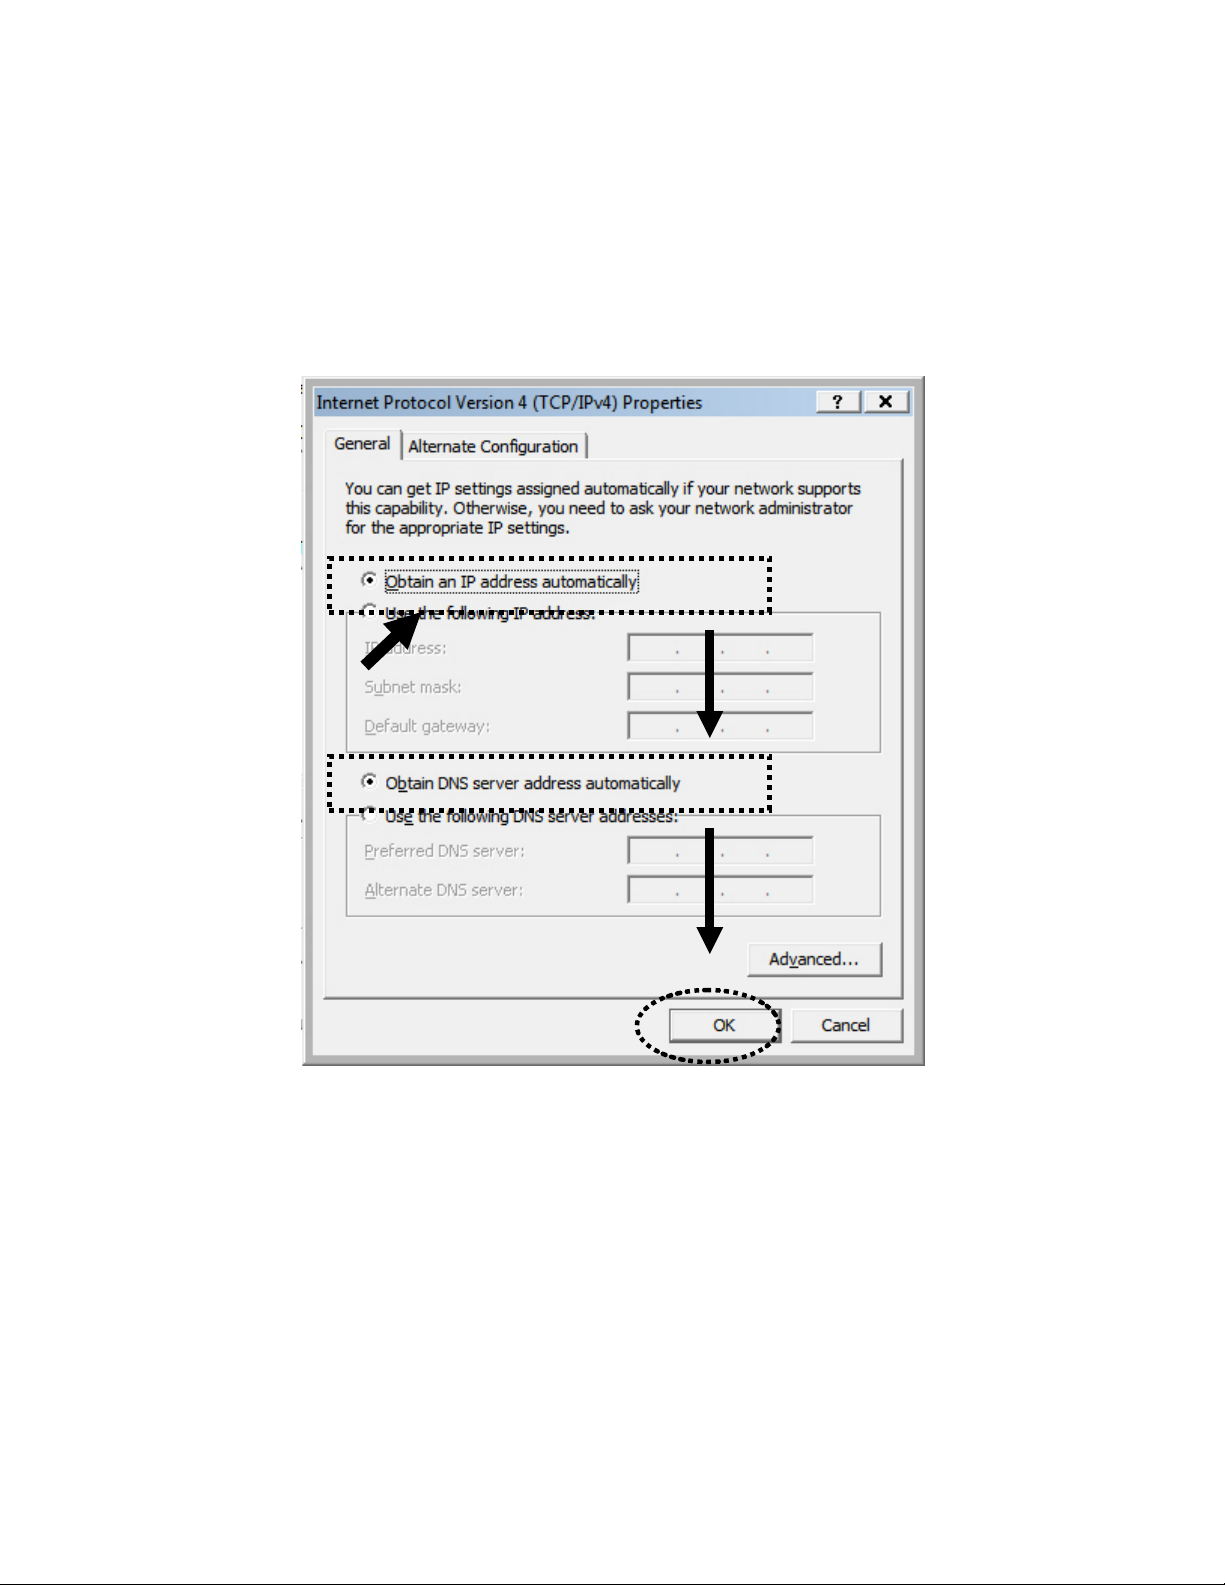
2. Select ‘Obtain an IP address automatically’ and ‘Obtain DNS server
address aut omatically’, then click ‘OK’.
26
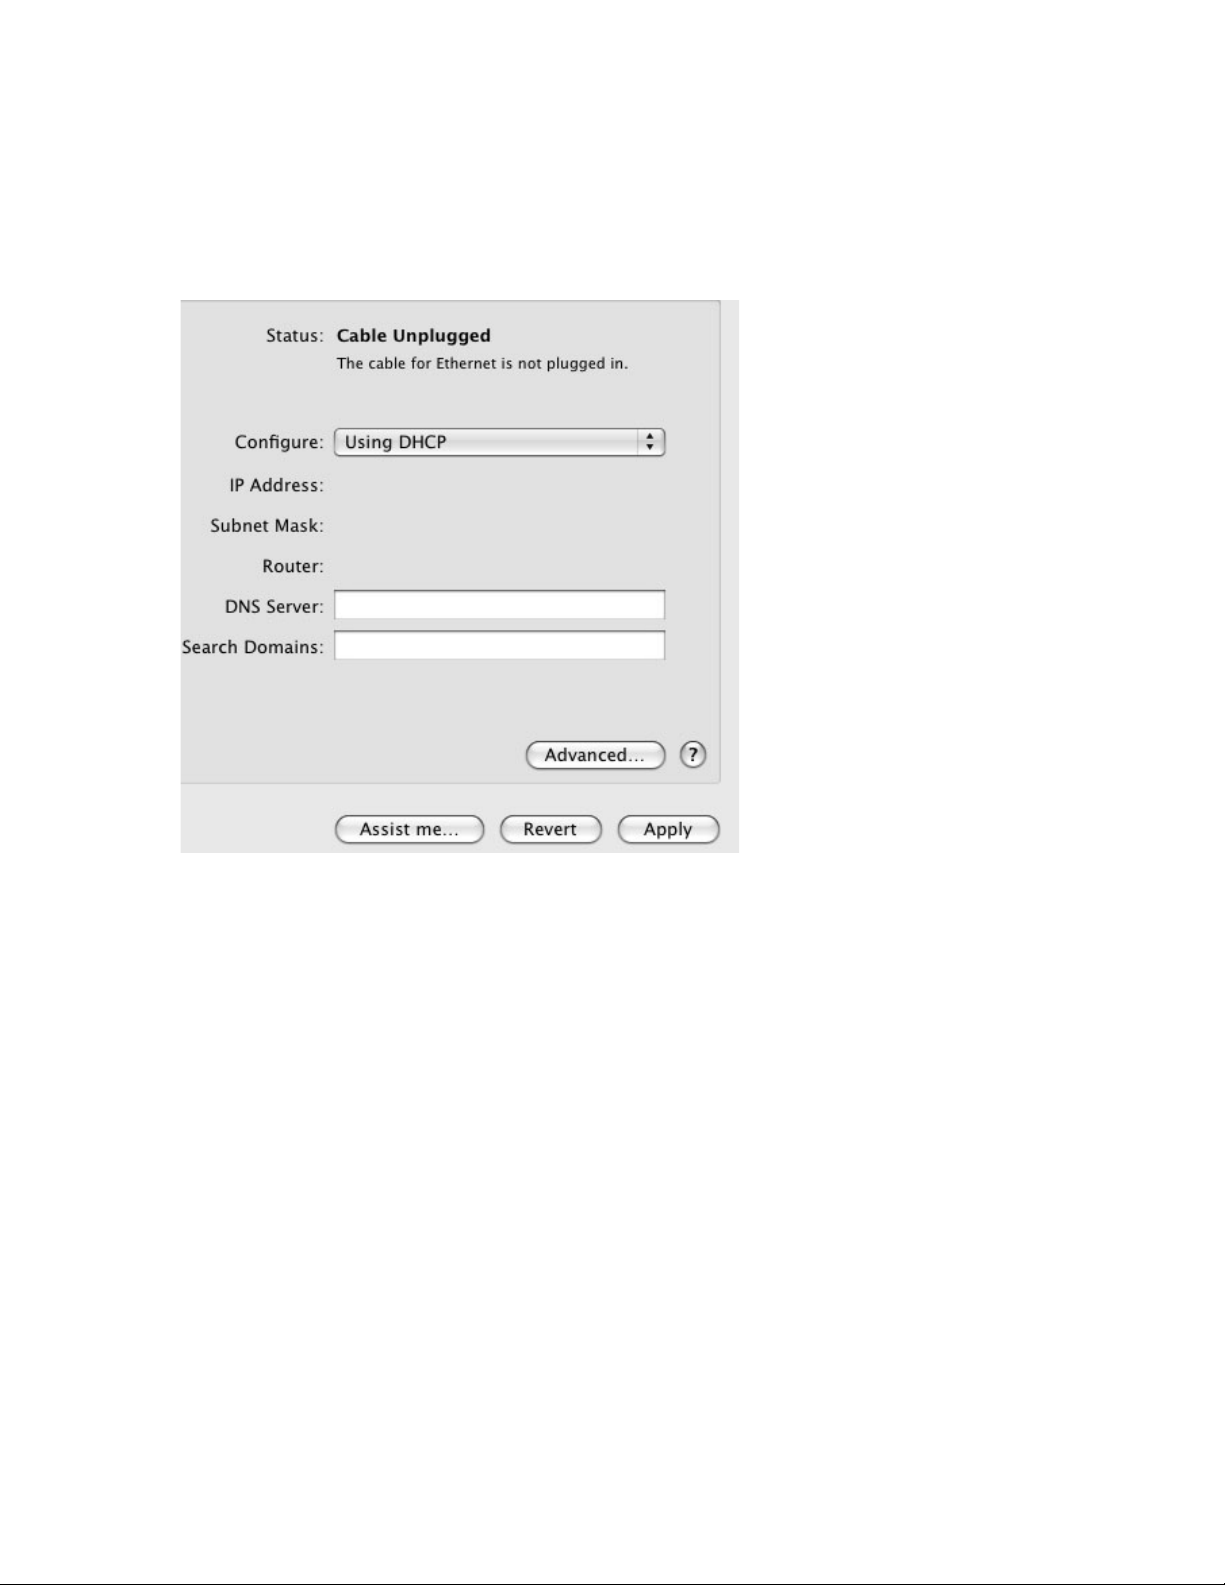
2-3-5 Mac OS X IP Address Setup
1)
Go to your system preferences, go to network. Make sure next to “Configure”, you
have it set under “Using DHCP”
27

2-3-6 Tablet/Smartphone Setup
iOS (iPhone or iPad)
Go to your settings on your tablet or smart phone
First, make sure JavaScript is On: Go to Settings icon Select Safari > make sure
JavaScript is ON.
Go back to Home Screen > Select Settings > In Wi-Fi Networks, select
“Hawking_HWABN25”
28
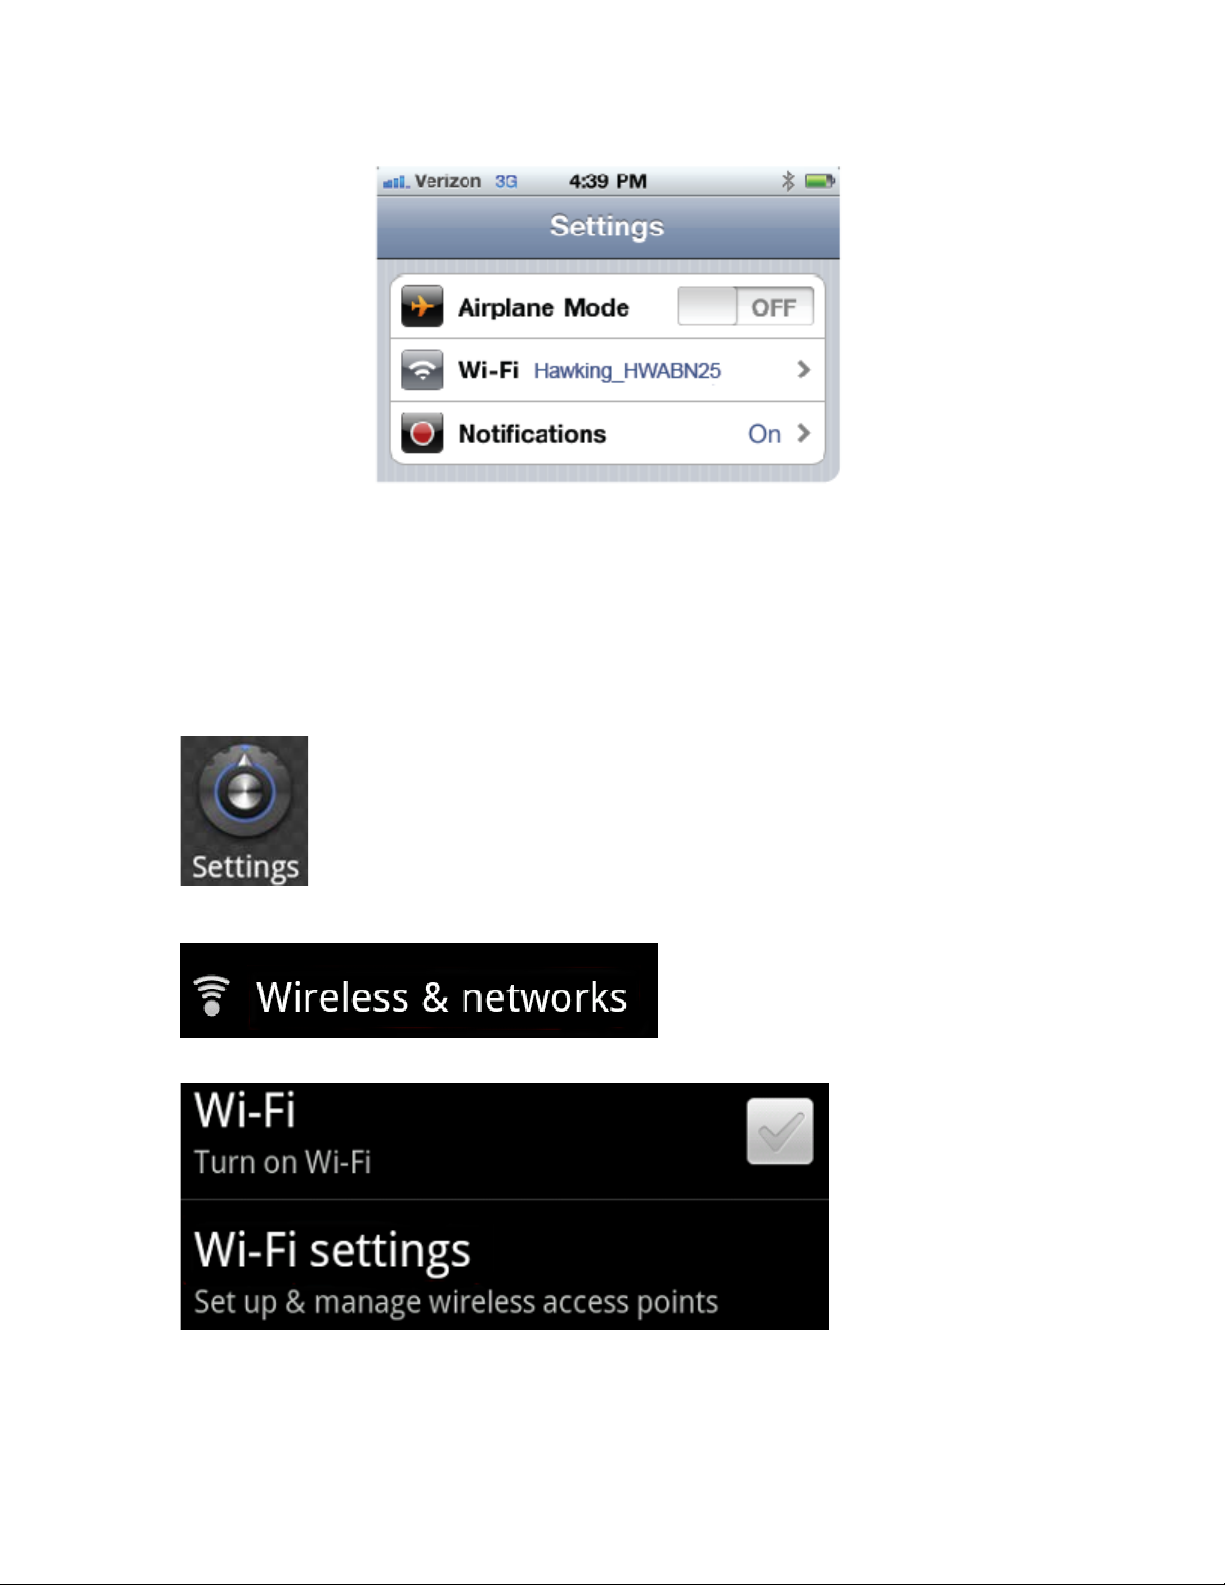
Android (Android 2.1 +)
Go to Settings
Go to Wireless & Networks
Check “Turn on Wi-Fi” and then click on Wi-Fi settings
Look for Hawking_HWABN25, then select to connect
29
 Loading...