


QUICK INSTALLATION GUIDE
k
)
p
Part No. HW2R1
Part No. HWABN2 Hi-Gain™ Wireless 300N Access Point/Bridge Pro
Power
LED is on, when the power adapter is connected
and plugged into an outlet
Start Here T V
Wireless Connection
LED is on when Wireless Connection is activated. Blinking
IMPORTANT! This Quick Installation Guide provides the quick and easy
way to set up the HWABN2 in Access Point or Bridge modes. If you need
to use the other modes, please refer to the manual located on the CD.
Package Contents
• 1x HWABN2 Access Point/Bridge Pro
• 1x 12V/1A Power Adapter
• 1x Ethernet Cable
• 1x Setup CD-ROM
• 2x 3dBi Omni-Directional Antennas
when transmitting/receiving wireless data
Wired Connection
LED is on, when an ethernet cable is plugged into the ethernet port
Antennas
Two RP-SMA Connectors + Two 3dBi OmniDirectional Antennas (Upgradable)
Front / LED Description
Back Panel Description
n
Setup the Device
A. Attach the Antennas
Locate the 2 antennas from your
packaging and attach them to the
Hi-Gain Wireless 300N Access
Point/Bridge Pro.
Requirements
• Wired or Wireless Internet Connection
• A Network Enabled Device (Computer,
Smart Phone, or Tablet)
• Power Outlet
Wireless Radio On/Off Switch
Turns off the wireless functions
Reset Switch / WPS (WiFi Protected Setup)
Resets your router to its default settings / initiates WPS Setup
Wired (5 LAN Ports)
LAN port connects your wired network devices and computers to your network
Power
12V1A Power Adapter Plug
C. Access the HWABN2
You must access the HWABN2 to run the initial configuration.
up
es WPS Setu
d computers to your networ
Wireless: If you have a wireless enabled device,
please proceed to Step 2
B. Plug in the Power Adapter
When you have completed the
antenna setup, plug in the included
power adapter into the nearest power
outlet.
o
connect to t he HWABN2 by sear c hing for the wir eles s network nam ed: Hawking_HWABN2_AP_Pro.
Configuring your Access Point/Bridge Pro using a Wireless Connection
Using a com puter or a wireles s dev ic e with wireless acc es s ,
For Mac Users
Click on the Wi-Fi icon
in the “apple” toolbar.
Click on the
“Hawking_HWABN2
_AP_Pro
from the drop-down
menu. Then Continue
to Step 3.
” network
For Windows Users
When the “Wireless Network” Icon pops up on the
lower right of the Windows
taskbar, Click on the Icon
and choose the
Hawking_HWABN2_
“
AP_Pro
Continue on to Step 3.
” Network. Then
Wired: If you don’t have a wireless enabled
device, use an ethernet cable and connect your
laptop or through one of the five LAN ports
located on the back, Then, proceed to Step 3.
For Tablet or
Smartphone Users
Hawking_HWABN2_AP_Pro
Go to your wireless
setting, select the
Hawking_HWABN2
“
_AP_Pro
Then, go to Step 3.
” Network.
p
Login into the the HWABN2
Using the same computer/device, open a web browser and type in the following
web address in the web address bar: http://192.168.1.241
Once the page loads, enter the following login information:
Login: admin
Password: 1234
Click Login to continue.
If the page doesn’t load, please check if
yourJavaScript is enabled. Generally,
this should be enabled by default.
However, if it’s not, please go to your
your Browser Settings and enable
JavaScript.
www.hawkingtech.com
q
Choosing your Mode
In the drop down box, please
select your mode of operation
for the HWABN2. This quick
installation guide will outline
the basic Access Point and
Station Infrastructure (Bridge)
modes.
For other modes and features
please refer to the manual on
your CD.
HWABN2- QIG 12202011
Technical Support: 1.888.202.3344
Technical Support | Toll free US & Canada: 1.888.202.3344 | Email: techsupport@hawkingtech.com
HW2R1 rev 1 I QIG v.20101118
© 2011 Hawking Technologies, Inc. All rights reserved.
www.hawkingtech.com
\
0:3
2
M
Configuring Access Point mode or Station-Infrastructure (Bridge) mode
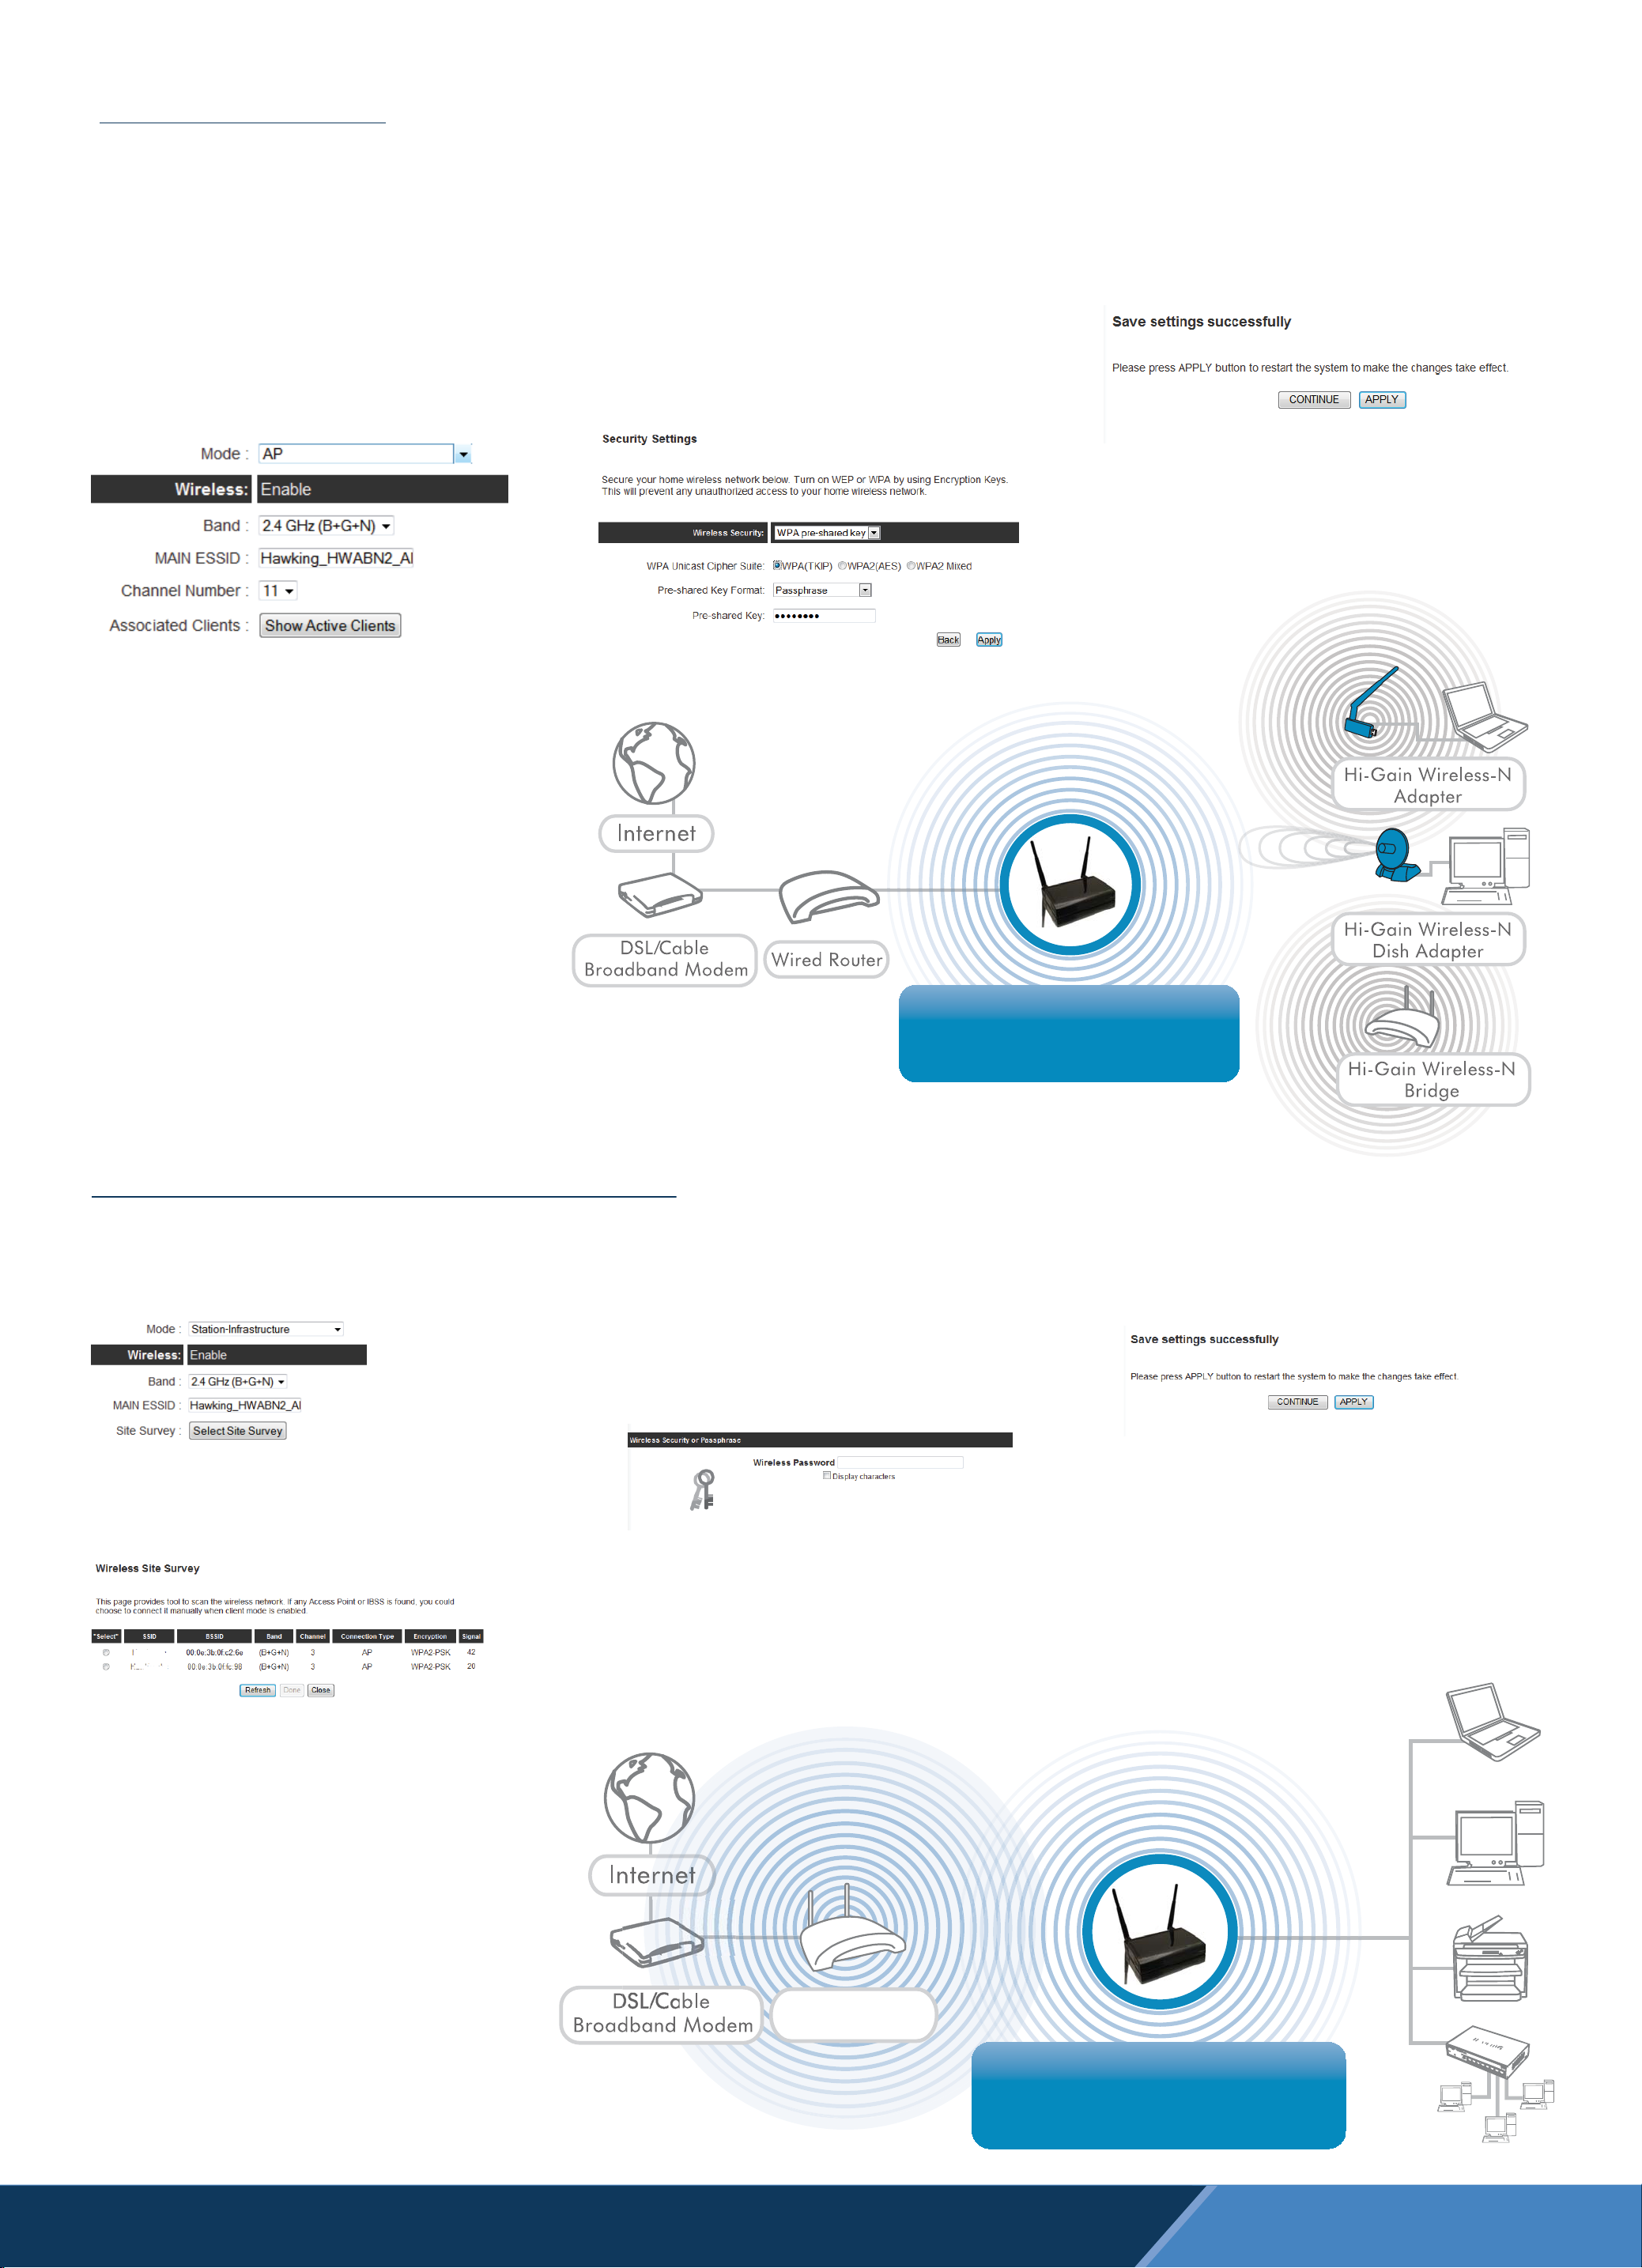
ACCESS POINT MODE
In the Access Point Mode, the HWABN2 broadcasts WiFi Signal from a wired Network (i.e. a wired Router) and allows your WiFi enabled devices to connect wirelessly to
your Network. Note: The HWABN2 must be plugged into the router or network after setup.
A. In the drop down menu, choose “AP” (Access Point).
The Main ESSID will be the wireless name of your
network. Default: Hawking_HWABN2_AP_Pro
Please change the name if you wish to use something
unique. Click “Next” on the bottom of the page.
B. Security Settings
Hawking Recommends you choose a security
setting to secure your network from unauthorized users.
In the drop down box, please select “WPA (pre-shared key)”.
In the pre-shared key field, please type in a password of at
least 8 characters of your choice. If you wish to not use
security or use a different type of security you can choose
your selection from the drop down menu. Click “Apply”.
C. The HWABN2 will ask you if you wish to apply
these settings. Click “Apply”.
Congratulations! You have set up the HWABN2 as an
Access Point.
Please plug the HWABN2 into your network via ethernet cable for the device to function properly.
Overview
Access Point Mode
Hi-Gain™ Wireless 300N
Access Point-Bridge Pro
HWABN2
STATION - INFRASTRUCTURE (BRIDGE MODE)
In this mode, the HWABN2 Bridge allows you to connect wired devices to an existing wireless router or access point. Note: Using this mode, the HWABN2 Bridge does not
broadcast any WiFi signal. It can only link directly to the wireless source (see the overview diagram below).
A. In the drop down menu, choose “Station-Infrastructure”
Click on “Select Site Survey” A new window will pop up.
Select your network, click “Done”. The site survey window
will close and you will be returned to the first page.
Choose “Next”
B. If the network you are selecting has security, it will
prompt you to put in a wireless security key.
Be sure to type in the correct key! If you are unsure
what your key is, please contact your network
administrator or router manufacturer.
C. The HWABN2 will ask you if you wish to apply these
settings. Click “Apply”.
Congratulations! You have set up the HWABN2 as a
Bridge.
Please plug the HWABN2 into the device you wish to
bridge via ethernet cable.
Wired Network Devices
or
Overview
Station Infrastructure (Bridge) Mode
or
Wireless
Router
Hi-Gain™ Wireless 300N
Access Point/Bridge Pro
HWABN2
© 2012 Hawking Technologies, Inc. All rights reserved. All trademarks herein are the property of
Technical Support | Toll free US & Canada: 1.888.202.3344 | Email: techsupport@hawkingtech.com
their respective owners. Apple, Mac, iPod, and iPad are registered trademarks of Apple Computer,
Inc. No affiliation implied or expressed.
or
 Loading...