

Page 1
Page 2

FCC Warning
This equipment has been tested and found to comply with the limits for a Class B digital device,
pursuant to subpart J of Part 15 of the FCC Rules. These limits are designed to provide
reasonable protection against harmful interference when the equipment is operated in a
commercial environment. This equipment generates, uses, and can radiate radio frequency
energy and, if not installed and used in accordance with the instruction manual, may cause
harmful interference to radio communications. Operation of this equipment in a residential
area is likely to cause harmful interference in which the user will be required to correct the
interference at their own expense.
CE Mark Warning
This is a Class B product. In a domestic environment, this product may cause radio interference, in
which case the user may be required to take adequate measures.
VCCI Mark Warning
LIMITED WARRANTY
Hawking Technology guarantees that every HPS3P 3 Parallel Port 10/100M Print Server is free from
physical defects in material and workmanship under normal use for two (2) years from the date of
purchase. If the product proves defective during this two-year warranty period, call Hawking
Customer Service in order to obtain a Return Authorization number. Warranty is for repair or
replacement only. Hawking Technology does not issue any refunds. BE SURE TO HAVE YOUR
PROOF OF PURCHASE. RETURN REQUESTS CAN NOT BE PROCESSED WITHOUT PROOF
OF PURCHASE. When returning a product, mark the Return Authorization number clearly on the
outside of the package and include your original proof of purchase.
IN NO EVEN SHALL HAWKING TECHNOLOGY’S LIABILTY EXCEED THE PRICE PAID
FOR THE PRODUCT FROM DIRECT, INDIRECT, SPECIAL, INCIDENTAL OR
CONSEQUENTIAL DAMAGES RESULTING FROM THE USE OF THE PRODUCT, ITS
ACCOMPANYING SOFTWARE OR ITS DOCUMENTATION. Hawking Technology makes no
warranty or representation, expressed, implied or statutory, with respect to its products or the
contents or use of this documentation and all accompanying software, and specifically disclaims its
quality, performance, merchantability, or fitness for any particular purpose. Hawking Technology
reserves the right to revise or updates its products, software, or documentation without obligation to
notify any individual or entity. Please direct all inquiries to:techsupport@hawkingtech.com
Trademarks
NetWare is a registered trademark of Novell Inc. and Windows 95/98/Me and Windows NT/2000/XP are
registered trademarks of Microsoft Corp. All other brands and product names are trademarks of their
respective companies.
Copyright
No part of this publication may be reproduced in any form or by any means or used to make any derivative
(such as translation, transformation or adaptation) without the express written consent of the manufacturer
as stipulated by the United States Copyright Act of 1976.
Page 3

Table of Contents
1.1 Product Introduction..................................................... 6
1.2 Product Features ........................................................... 7
1.3 Product Package ........................................................... 8
1.4.1 Print Server Network Functions................................................... 10
1.4.3 Network Printing Functions for a Network Server...................... 14
1.5 Network Printing Environment .................................. 15
1.6 Contents of the User’s Manual................................... 18
1.7 Firmware & Printing Function ................................... 20
2. HARDWARE INSTALLATION .........................................22
3. WINDOWS PEER-TO-PEER NETWORK ........................23
3.1 System Architecture ................................................... 24
3.2 Administrator Installation and Setup.......................... 26
3.3 Administrator Utilities................................................ 35
3.4 Client Installation and Setup ...................................... 36
3.5 Client Utilities ............................................................ 40
3.5.1 Network Ports Quick Setup ......................................................... 40
3.5.2 Remote Ports (Utility).................................................................. 42
4. WINDOWS NT/2000 NETWORK...................................... 45
4.1 System Architecture ................................................... 46
4.2 Windows NT/2000 Server Installation and Setup...... 47
4.3 User Installation and Setup ........................................ 49
5. NETWARE NETWORK ....................................................50
5.1 System Architecture ................................................... 51
5.2 NetWare 3.x Installation & Setup .............................. 54
5.2.1 Quick Installation Using the “Install” program ........................... 54
5.2.2 Installation Using PSETUP.......................................................... 57
5.3 NetWare 4.x/5.x Installation & Setup ........................ 67
5.3.1 Quick Installation Using “Install” program ................................. 68
Page 4

5.3.2 NetWare 4.x/5.x Installation Using PSETUP .............................. 71
6. UNIX SYSTEM NETWORK ..............................................78
6.1 Introduction ................................................................ 79
6.2 Enable Print Server’s TCP/IP Support ....................... 80
6.3 Setup the HPS3P’s IP Address................................... 81
6.3.1 ARP & Ping Assignment ............................................................. 81
6.3.2 DHCP........................................................................................... 82
6.3.3 BOOTP ........................................................................................ 82
6.3.4 RARP ........................................................................................... 84
6.4 Verify the HPS3P’s IP Address.................................. 86
6.5 Configure Remote lpd Printing on the Host............... 87
6.6 Print a Test Page......................................................... 89
7. CONFIGURATION UTILITY .............................................90
7.1 Introduction ................................................................ 91
7.2 General - General Information for the HPS1U........... 93
7.4 Printer Status - Attached Printer Status...................... 95
7.5 IP Cfg - IP Address Configuration ............................. 96
7.6 NW PS Cfg - NetWare Print Server Configuration.... 97
7.7 NW RP Cfg - NetWare Remote Printer Configuration
.............................................................................................. 99
7.8 NW Information - NetWare Printing Summary ....... 100
7.9 Print Server Cfg – Print Server Network Ability Setting
............................................................................................ 101
7.10 Restore Default - Restore to Default ........................ 102
7.11 Upgrade - Firmware Upgrade / Update.................... 103
7.12 DHCP Cfg - DHCP Server Configure...................... 104
7.13 DHCP Information - DHCP Information ................. 106
7.14 Mail Print Configuration - Email Printing Setting ... 107
7.15 SMB Cfg – SMB Printing Setting............................ 109
Page 5

7.16 SNMP Cfg - SNMP Parameter Setting .................... 110
7.17 AppleTalk Cfg – AppleTalk Configuration ............ 111
8. WEB MANAGEMENT..................................................... 112
8.1 Introduction .............................................................. 113
8.2 Web Manager Utility................................................ 114
8.2.1 Installation and Execution.......................................................... 114
8.2.2 Starting The Web Manager Utility ............................................ 114
8.3 Web Management of the HPS3P Print Server.......... 117
8.3.1 Using Your Browser .................................................................. 117
8.3.2 Obtaining Print Server Information ........................................... 119
8.3.3 Obtaining Printer Status............................................................. 119
8.3.4 Obtaining NetWare Information................................................ 120
8.3.5 Obtaining DHCP Status ............................................................. 120
8.3.6 Changing the Device Configuration .......................................... 121
8.3.7 Setting IP Address ..................................................................... 123
8.3.8 Configuring DHCP Parameters.................................................. 123
8.3.9 Configuring E-Mail Printing...................................................... 125
8.3.10 Configuring SNMP Parameters ................................................. 126
8.3.11 System Utilities.......................................................................... 127
9. EMAIL PRINTING........................................................... 129
9.1 Introduction .............................................................. 130
9.2 System Requirements............................................... 131
9.2.1 Print Server Side ........................................................................ 131
9.2.2 Client Side.................................................................................. 131
9.3 System Setup............................................................ 132
9.3.1 Print Server Side ........................................................................ 132
9.3.2 Client User Side ......................................................................... 132
10. IPP PRINTING ...............................................................133
10.1 Introduction .............................................................. 134
10.2.1 Print Server Side ....................................................................... 134
10.2.2 Client Side.................................................................................. 135
Page 6

1.1 Product Introduction
Congratulations on purchasing Hawking’s HPS3P 3
Parallel Port 10/100M Internet Print Server. The Hawking
HPS3P is a powerful and convenient network printing
solution that will connect your parallel printer(s) to a
network. The HPS3P has a 10/100Mbps auto-sensing port,
allowing you to attach it to a 10Base-T or 100Base-TX
network without the need for a dedicated PC print server.
The HPS3P also supports multiple servers and multiple
protocols, providing you with the capability to print from
anywhere, from any computer and from any application.
The HPS3P print server supports IPX, TCP/IP, AppleTalk,
and NetBEUI protocols. It also supports the most common
network operating systems and protocols including
Windows 95/98/Me, Peer-to-Peer Printing, Windows
NT/2000/XP, NetWare, Unix/Linux, MAC OS, etc.
With the HPS3P Installation Wizard for Windows,
you can easily and instantly adjust the HPS3P’s settings
for your printing environment, and start enjoying the
fantastic features provided by this print server.
In the following chapters, we will introduce in
detail the printing features, installation methods, and
system configuration for different network environments.
If you would like to set up and install print server
quickly, please refer to the Quick Installation Guide that
comes along with this print server.
Page 7

1.2 Product Features
• Provides one 10/100Mbps auto-sensing port that complies with
IEEE 802. and 802.3u standards
• Provides three printer ports that can attach directly to a printer's
parallel port
• Supports TCP/IP, IPX/SPX, NetBEUI network protocols
• Supports LPR, Email Printing, Raw Printing, Unix Logical Printer
• Supports Peer-to-Peer Printing (TCP/IP/IPX/NetBEUI)
• Supports Server-based printing (Novell NetWare and Windows)
• Compatible with all major operating systems (Windows
95/98/Me/NT/2000/XP, NetWare (3.x above) and Unix/Linux)
• Supports DHCP (both client and server) protocol
• Efficient print job transfer using DMA (Direct Memory Access)
• Supports bi-directional capability; able to get information from
printers
• Supports Web-based management, Windows Configuration Utility,
SNMP Protocol
• Provides easy-to-use installation, setup and diagnostic programs
• Provides flash memory for convenient software upgrades
• Supports a Fault-Tolerant Upgrade capability
Page 8

1.3 Product Package
Package Contents
The following items are packaged with your HPS3P 3 Parallel Port 10/100M Internet
print server:
HPS3P Print Server One CD-ROM Quick Installation Guide One power adapter
Page 9
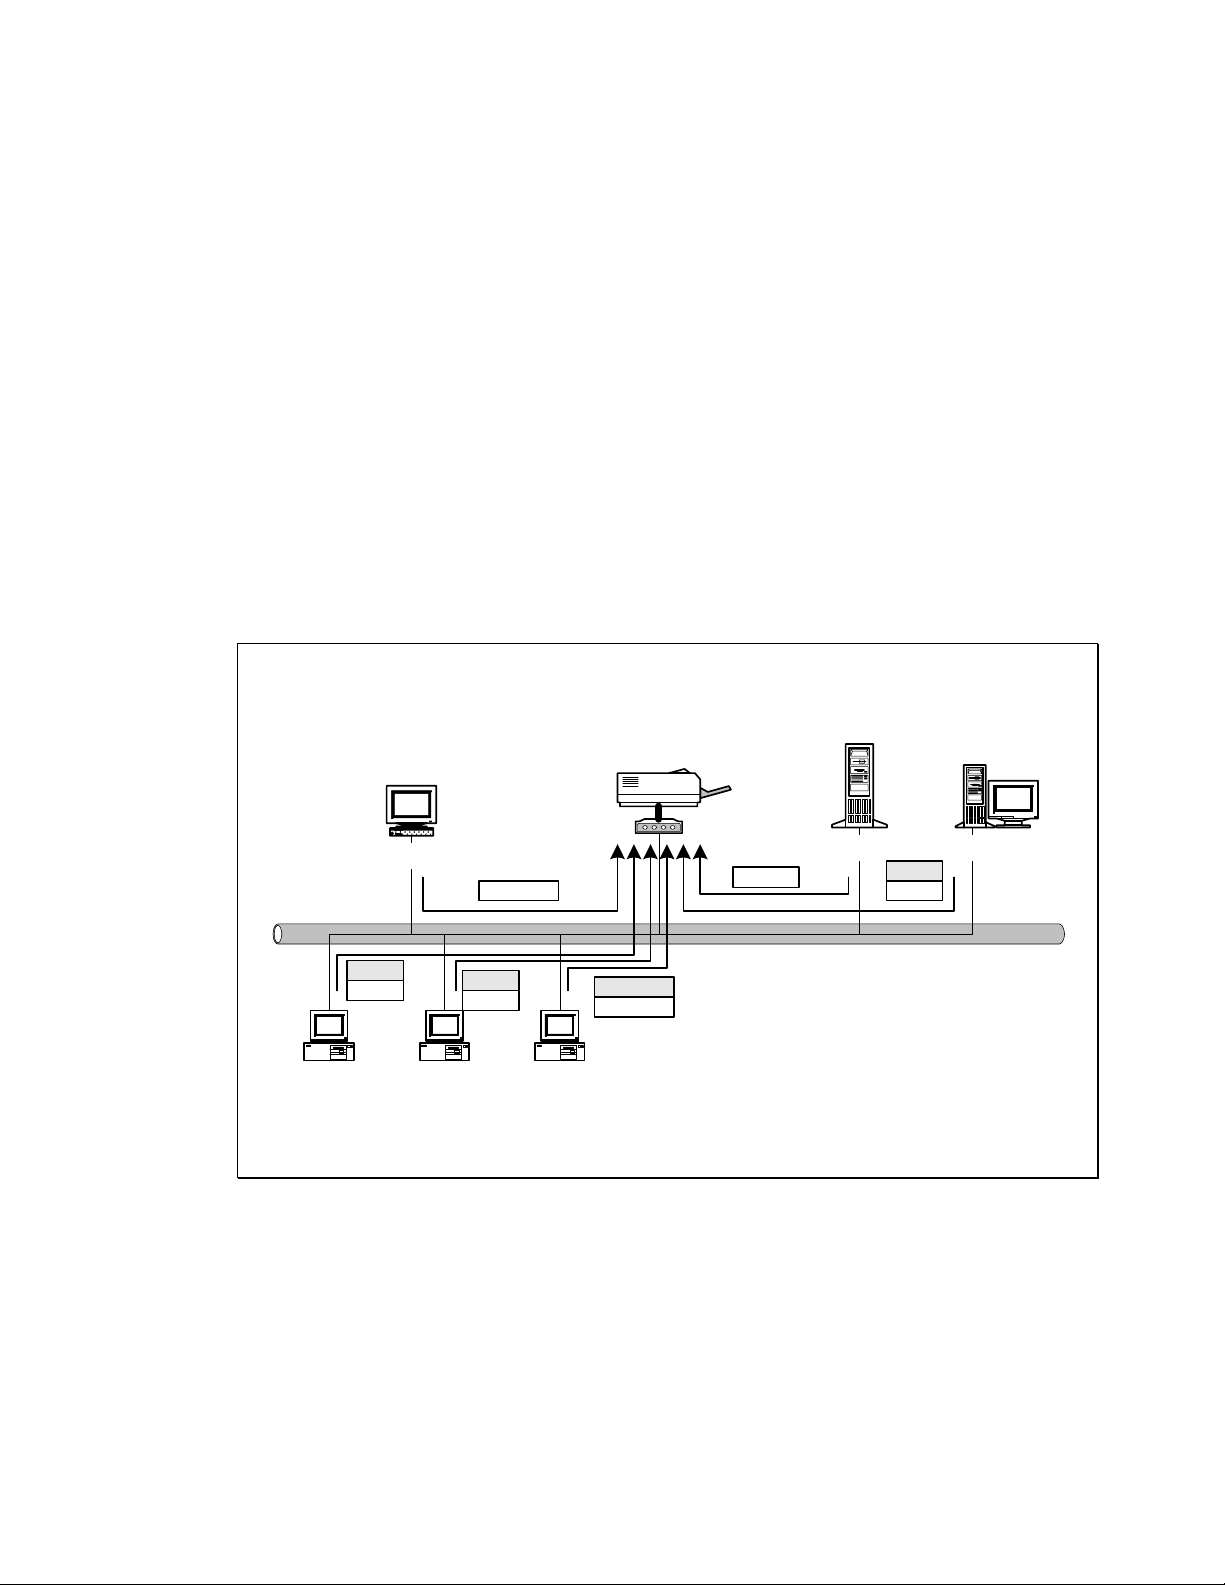
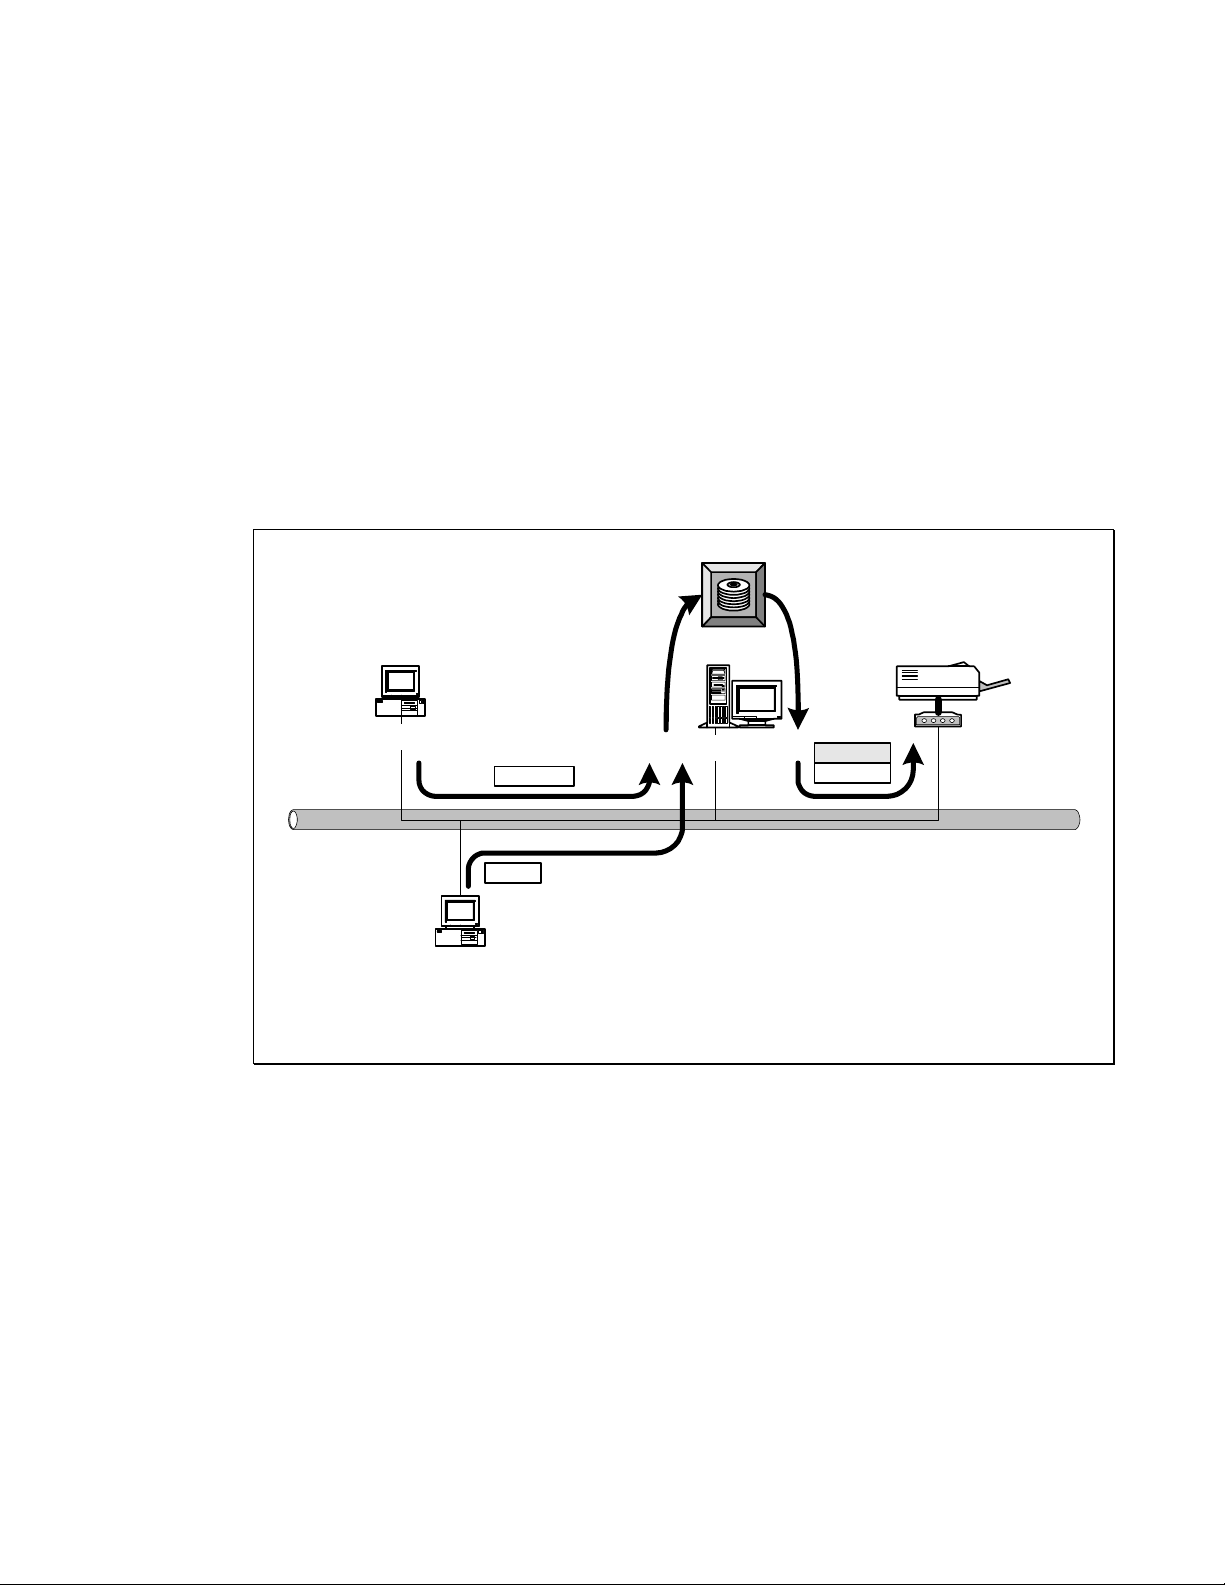
1.4 Network Printing Architecture
This section illustrates how a print server functions over
a network environment. Before you install and use the
HPS3P print server, it is strongly suggested that you read
this section completely and select only the chapters that
pertain to your specific operating system.
Below is a diagram of a typical network with a print
server installed. There is a main server, several client
computers, print server, along with an optional network
server.
Print Server
Client User
Network Server (optional)
Network Printing Environment
Network Server
NetWare Server
Windows NT Server
Workstation
Client User
Unix Print Server
Windows 2000
Windows 98Windows NT
Print Server
Page 10

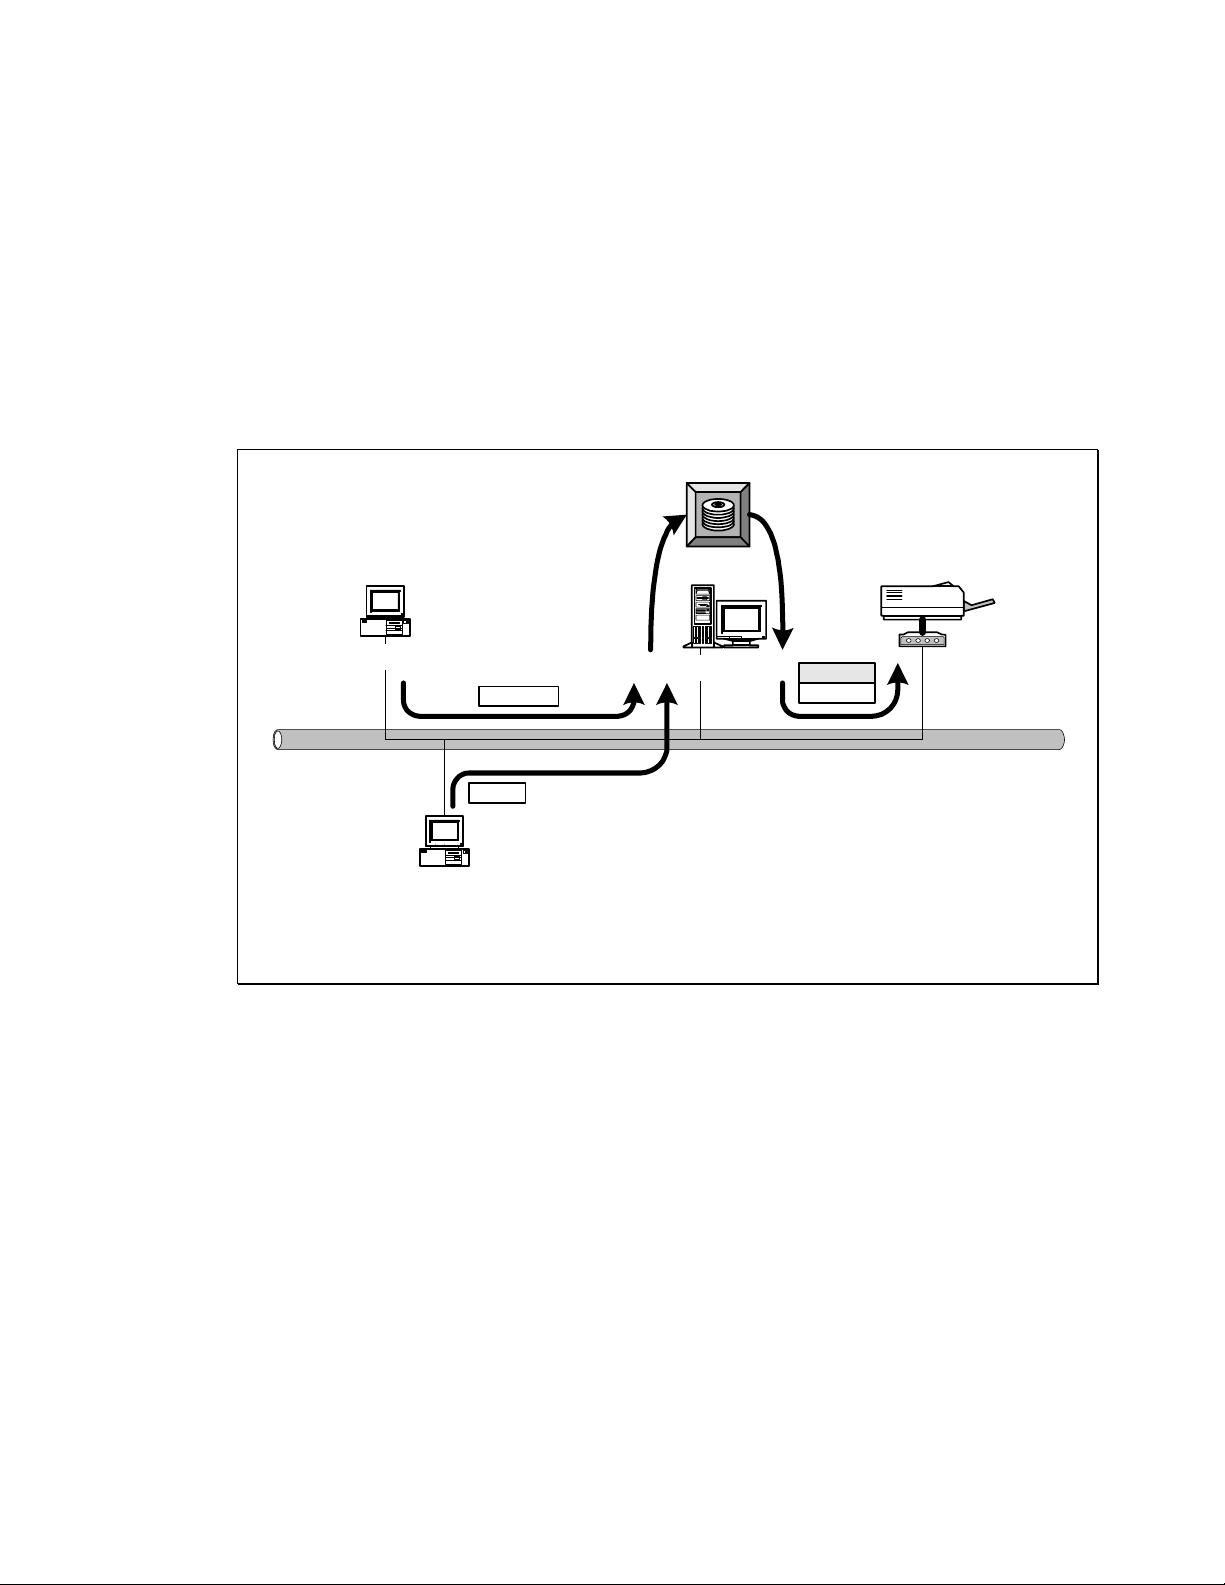
1.4.1 Print Server Network Functions
Print Server
Unix Print Server
Windows 2000
Workstation
Windows 98Windows NT
NetWare Server
Windows NT Server
Because the HPS3P print server supports IPX, TCP/IP,
AppleTalk and NetBEUI network protocols, any
networked computer can print directly through the print
server from any of the installed protocols.
* TCP/IP
* IPX
* NetBEUI
Unix
TCP/IP
NetWare Server
IPX
Windows NT Server
TCP/IP
Workstation
Windows 2000
TCP/IP
IPX
NetBEUI
Windows 98Windows NT
Page 11

1.4.2 Network Printing Functions for Clients
Client User
Unix Print Server
Windows 98Windows NT
Windows 2000
Workstation
NetWare Server
Windows NT Server
Windows 95/98/Me/NT/2000/XP
The HPS3P provides a PTPP (Peer-to-Peer Printing)
driver and utilities for Windows 95/98/NT/2000/XP users.
PTPP (Peer-to-Peer Printing) supports IPX, TCP/IP, and
NetBEUI protocols. While printing after installation,
PTPP will automatically select the proper transport
protocol to connect to the print server depending on the
protocols installed in each computer (the client computer
may only have IPX or TCP/IP installed).
Page 12
Application
PTPP
IPX TCP/IP NetBEUI
* TCP/IP
* IPX
* NetBEUI
Windows 98
Application
PTPP
PTPP
NetBEUI
PTPP
TCP/IP
Windows 2000
IPX TCP/IP NetBEUI
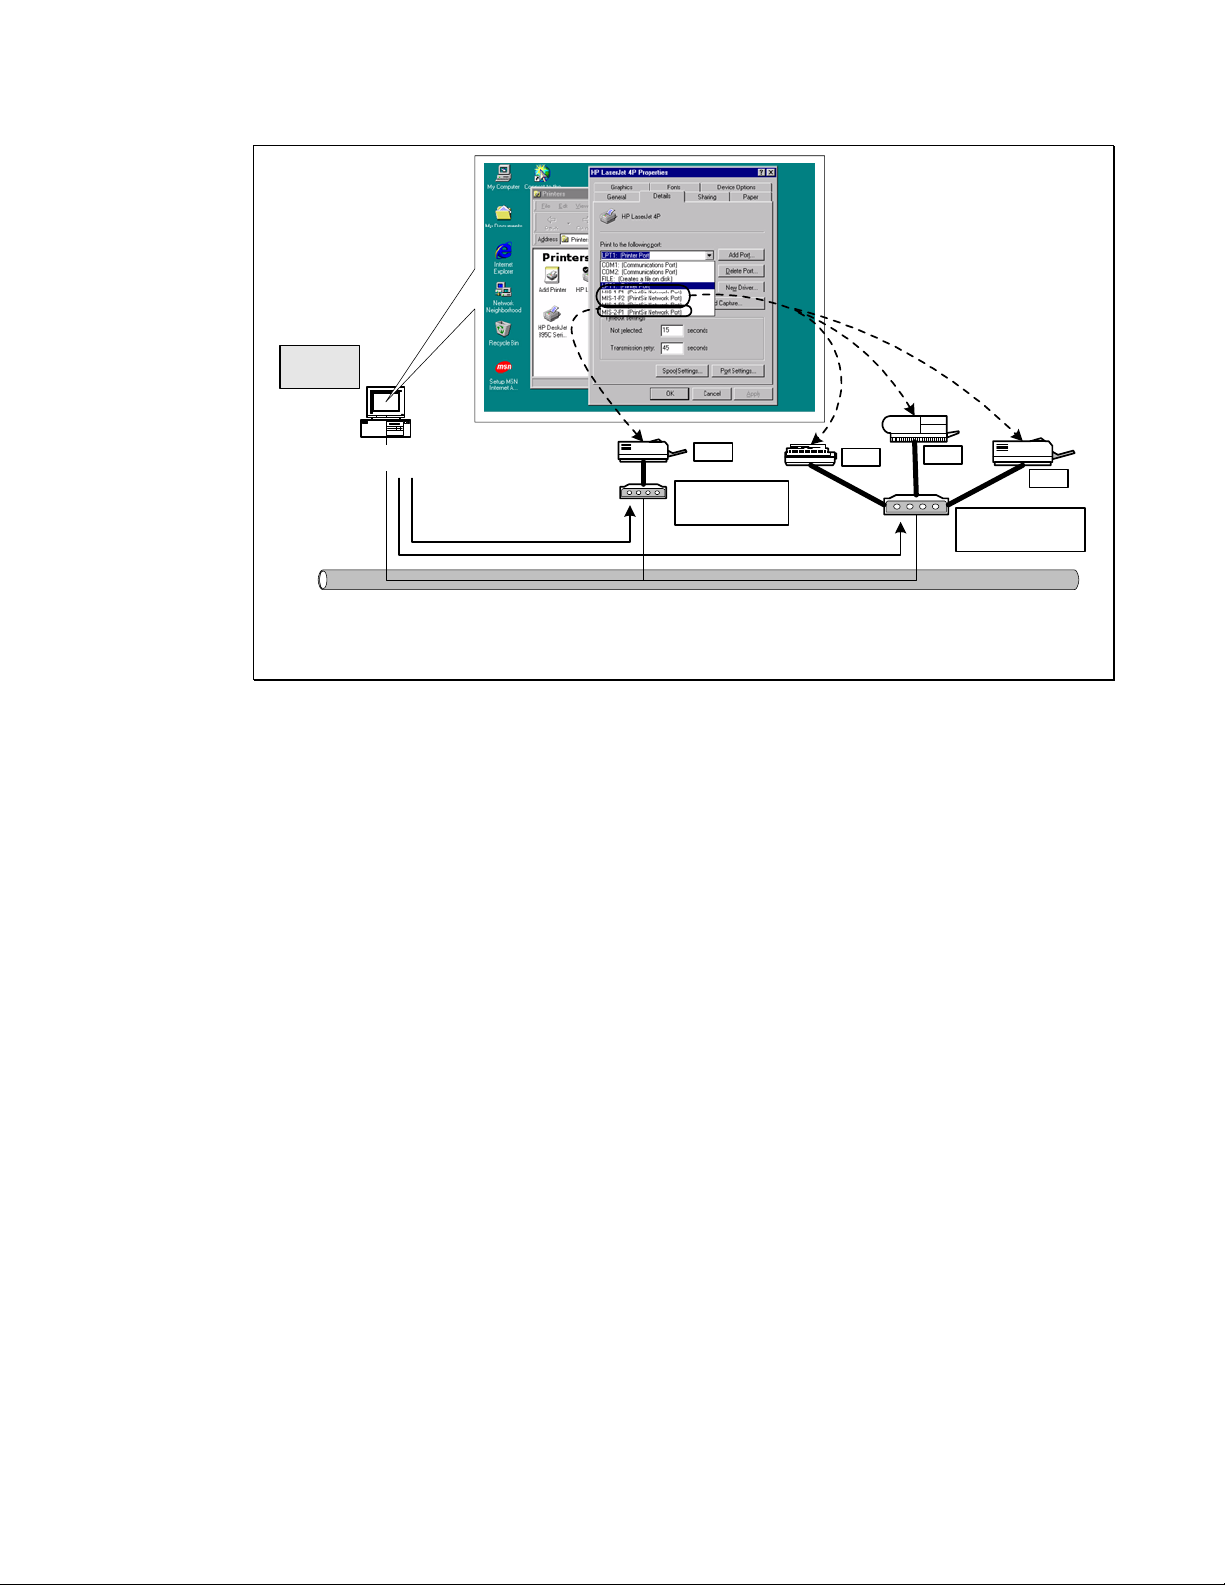
In the client installation procedure, after the PTPP (Peerto-Peer Printing Driver) is installed into Windows, the
client or administrator system will automatically (manual
configuration is also allowed) search for an available
print port through Windows. (see diagram below)
Page 13
PTPP
Windows 98
P1
Print Server
MIS-2
P1
P2
Print Server
MIS-1
UNIX / Linux
UNIX (includes HP/UX, SCO Unix, SunOS, Solaris,
Unixware DECUnix, IBM AIX and others) and Linux use
the system-standard LPR to print to your HPS3P.
MAC OS
P3
The MAC OS can use the system-standard AppleTalk
network to print through your HPS3P.
Page 14

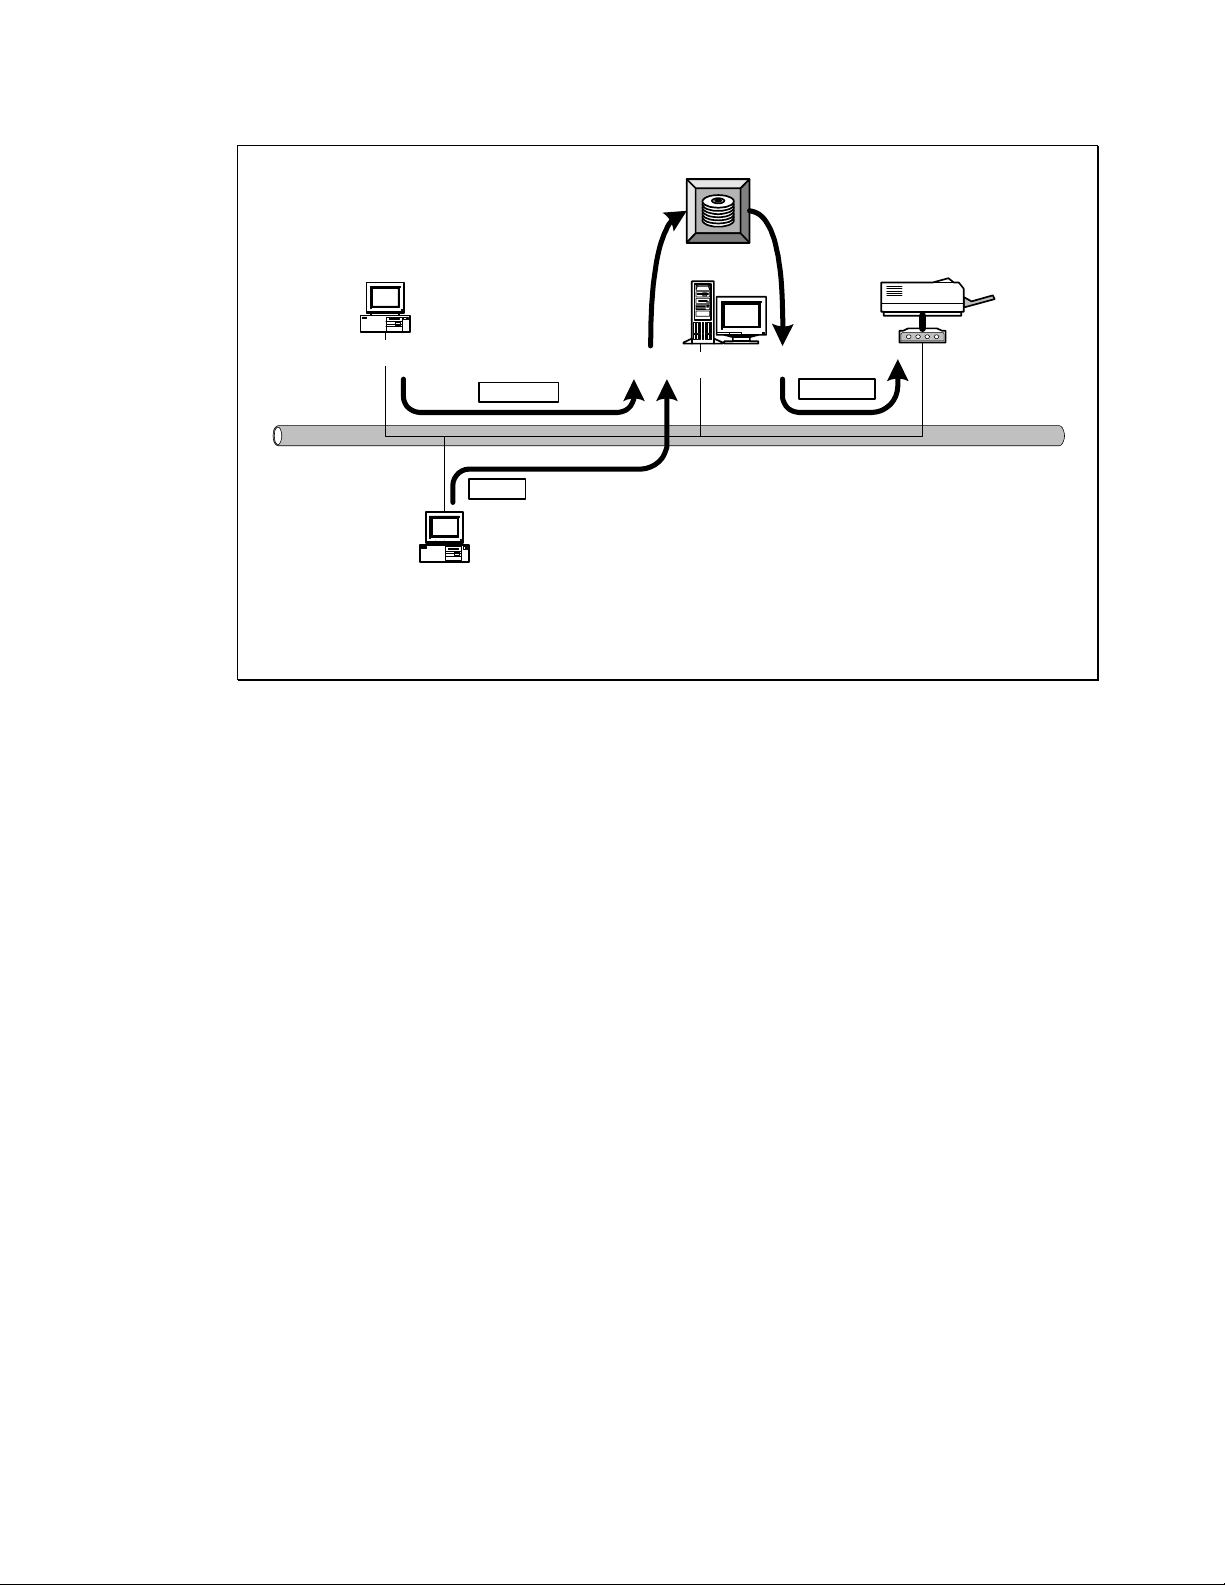
1.4.3 Network Printing Functions for a Network Server
Network Server
Unix Print Server
Windows 2000
Workstation
Windows 98Windows NT
NetWare Server
Windows NT Server
Common network servers use the following operating
systems:
Windows NT/2000
The HPS3P provides a PTPP (Peer-to-Peer Printing)
driver with utilities for Windows NT and Windows 2000.
After PTPP is installed, the server can directly print to
the HPS3P print server. Adding this printing function into
Windows NT/2000 Server allows for print queuing, user
authority management, and many other advanced features.
NetWare 3.x/4.x/5.x
In a NetWare environment, the HPS3P offers various
printing modes including print queue, remote printer, etc.
Page 15
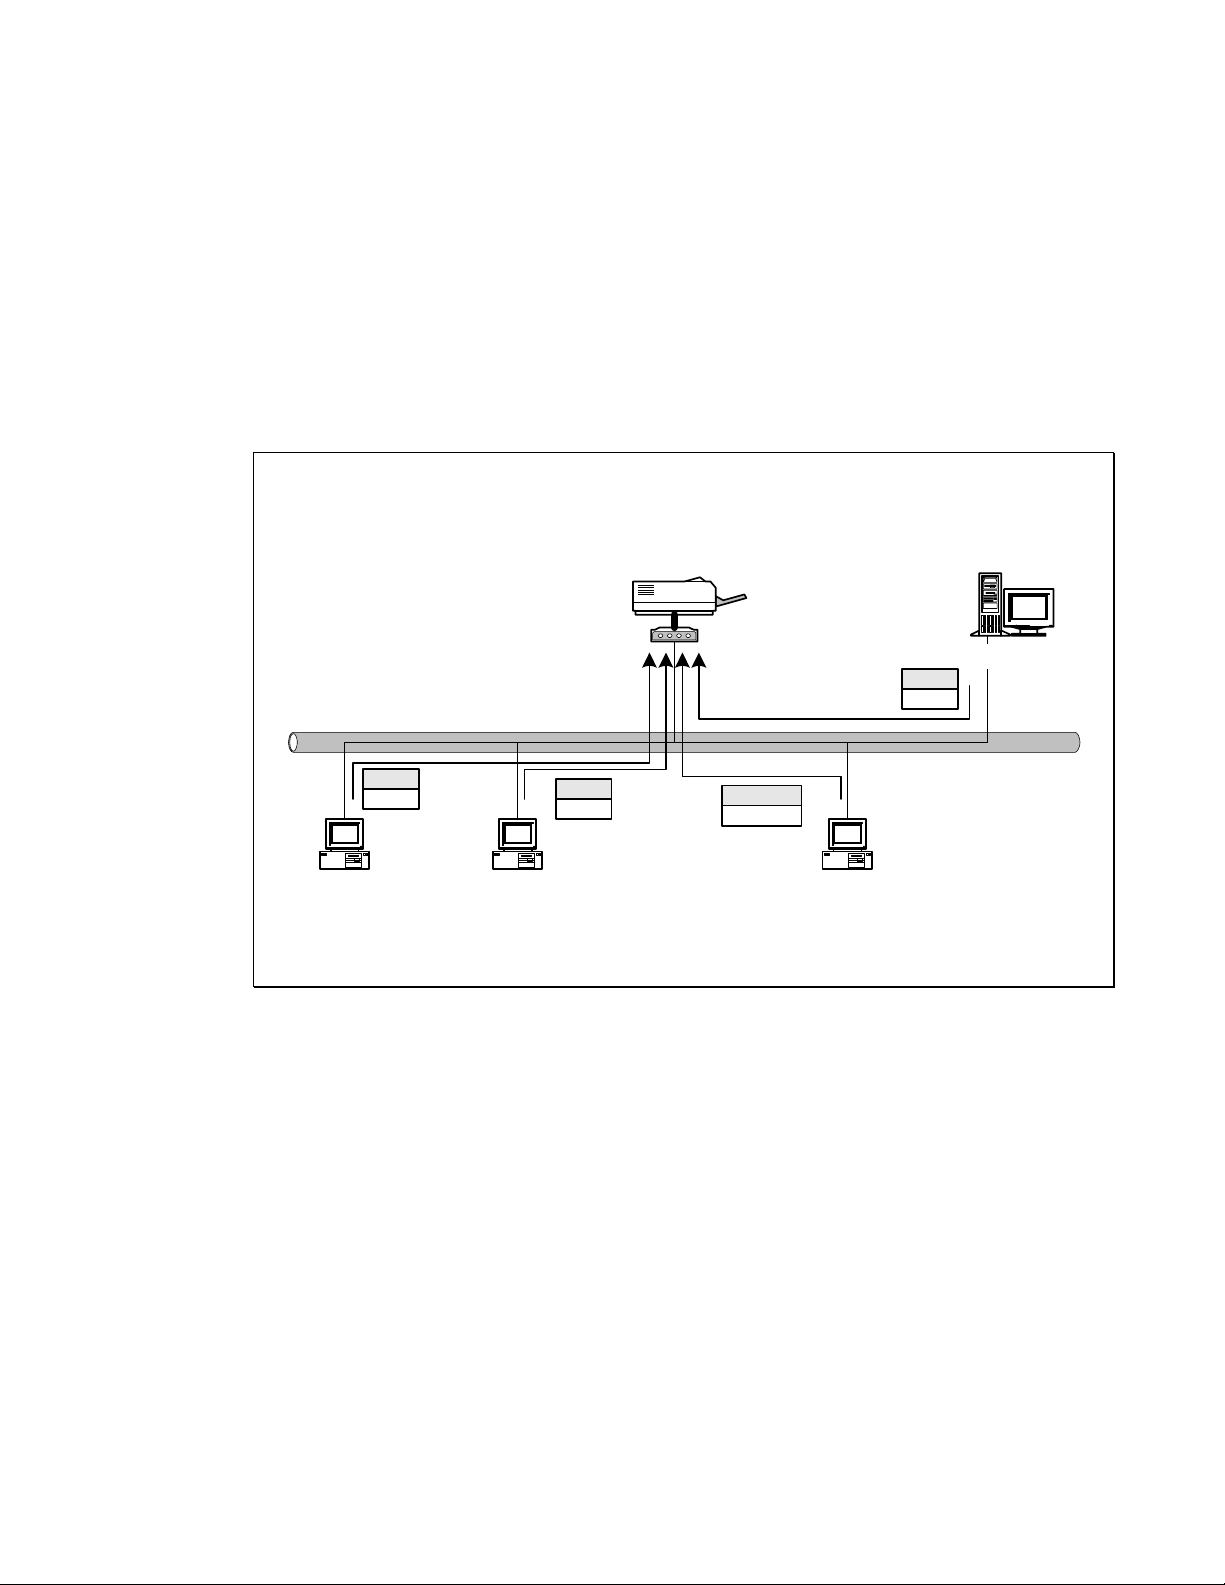
1.5 Network Printing Environment
Common network printing environments use the following:
Windows Peer-to-Peer Network
Since both the HPS3P and client’s PTPP drivers fully
support IPX, TCP/IP, and NetBEUI protocols, the PTPP
driver will automatically search and match up the proper
printing protocol for both client and print server when a
print request is issued.
* TCP/IP
* IPX
Unix
PTPP
NetBEUI
Windows 2000
PTPP
IPX
TCP/IP
Windows 98Windows NT
* NetBEUI
IPX
PTPP
TCP/IP
Windows NT ServerNetWare Server
PTPP
TCP/IP
Workstation
Page 16
Windows NT/2000 Network
The network printing function will become available after
the PTPP driver is installed into Windows NT/2000.
Adding this printing function for your Windows NT/2000
Server enable print queuing, user authority management,
and many other advanced features.
Print
Queue
* TCP/IP
Windows 98
TCP/IP
Windows NT Server
PTPP
TCP/IP
* IPX
* NetBEUI
IPX
Windows 2000
NetWare Network (see below)
Page 17
Print
Queue
* TCP/IP
Windows 98
IPX / IP
IPX
NetWare 3.x/4.x/5.x
IPX
* IPX
* NetBEUI
Windows 2000
Page 18

1.6 Contents of the User’s Manual
Chapter 2 explains print server’s hardware installation
and configuration.
The following chapters 3, 4, 5, and 6 introduce
configuration features for each of the following operating
system networks:
Chapter 3. Windows Peer-to-Peer Network
Chapter 4. Windows NT/2000 Server-Based Network
Chapter 5. NetWare Network
Chapter 6. UNIX System Network
You may select the appropriate chapters and sections to
read depending on your networks printing requirements.
Chapter 7 and chapter 8 introduce the HPS3P’s
management and configuration utilities for Windows and
your Web Browser’s environment. You may select the
appropriate management utility according to your
computer’s platform.
Chapter 9 introduces the HPS3P’s Print Server Email
Printing function and setup procedure. Email Printing
provides a new way to print documents across the Internet
by through the use of an IP accessible email account.
Chapter 10 introduces the HPS3P’s IPP Printing functions
and setup procedure. IPP Printing provides a convenient
Page 19

way to print documents across the Internet through the
use of Windows NT/2000/and XP native IPP protocol.
Page 20

1.7 Firmware & Printing Function
In order to provide a complete network printing solution,
this HPS3P’s supports Multiple Feature Function Sets for
users to select the appropriate Printing Feature Set to use
depending on individual’s printing requirement. Currently,
the system provides two Feature Sets for users to choose
from:
Standard Feature Set
PTPP (Peer-to-Peer-Printing)
TCP/IP (LPR)
NetBEUI
IPX
Email Printing
IPP Printing (Only some models, see 1.2)
NetWare Bindery Printing
NetWare Enhancement Feature Set
TCP/IP Printing (LPR)
NetWare Bindery Printing
NetWare NDS Printing (Only some models, see 1.2)
NetWare Remote Printer (Only some models, see 1.2)
Page 21

All feature sets are included on the HPS3P’s CD-ROM.
<CD Driver>\FLASHROM\<Model
Name>\PSxxROM.BIN
Please refer to section 7.11 for instructions on how to
select and setup the Feature Set.
If you need to use NetWare NDS Printing, then you must
change the system’s default Standard Feature Set to the
NetWare Enhancement Feature Set. In the meantime, the
print server will support NetWare NDS / Remote Printer
and other printing functions, however, it will not support
NetBEUI, Email Printing and the other Standard Feature
Set’s special functions.
Page 22

2. Hardware Installation
1. Unpack the HPS3P’s packaging and check all the
items listed in section 1.3.
2. Connect the print server to the printer you want to
share on your network
For direct attach models, plug the print server directly to
the printer’s DB-25 (parallel) port.
For palmtop/desktop models, connect the printer to print
server through the standard printer cable.
3. Connect the power adapter to the print server.
4. The print server will perform the Power-On-Self-Test
(POST) after it is powered on. The Status LED will flash
for up to one minute to indicate that the print server is
ready.
NOTE1 : You MUST use the power adapter shipped with the print server,
do NOT use any other power adapter from any other sources.
NOTE2: To prevent any compatibility problems between the HPS3P and
other printers, it is recommend that you power on the print server
before the printer.
Page 23

3. Windows Peer-to-Peer Network
Page 24
3.1 System Architecture
The HPS3P supports Windows Peer-to-Peer network
printing mode, which is suitable for most medium and
small network environments. Through the quick and
simple installation procedure, users can immediately
enjoy the convenience of network printing.
* TCP/IP
* IPX
* NetBEUI
Windows NT Server
PTPP
TCP/IP
PTPP
NetBEUI
Windows 2000
Workstation
PTPP
IPX
PTPP
TCP/IP
Windows 98Windows NT
The installation procedure is separated into the following
two parts:
1. Administrator Installation and Setup (refer to section
2 for more detailed information).
System administrators must :
Install the administrator’s utilities into his/her computer.
Page 25

Configure the print server from the administrator’s
configuration utility.
2. Client Installation and Configuration (refer to section
3 for more detailed information).
Client users must install the Windows PTPP driver (Peerto-Peer Printing) for network printing.
In addition, after PTPP is installed, the system will
automatically search for all print servers on the network,
and add all printing ports (P1/P2/P3) of the print server
into Windows’ printing port (refer to Network Printing
Architecture in section 1.4 for more detailed information).
Page 26
3.2 Administrator Installation and Setup
WINDOWS 95/98/Me/NT/2000/XP
1) POWER ON: After you have correctly connected your print server to
your PC and router, please power on all units.
2) Before the installation, please verify that your network protocols are
installed on your PC (TCP/IP, IPX and/or NetBEUI). If they are not
installed, please consult your operating systems manual for
instructions on how to do so.
3) INSTALL the Administrator Installation Program: To install your
Print Server administration software, please follow the directions
listed below.
1. Insert the Windows 95/98/Me/NT/2000/XP Setup CD into your CD-
ROM.
(Windows should execute the Autorun.exe program automatically. If
not, run Autorun.exe manually from your CD-ROM drive’s root
directory).
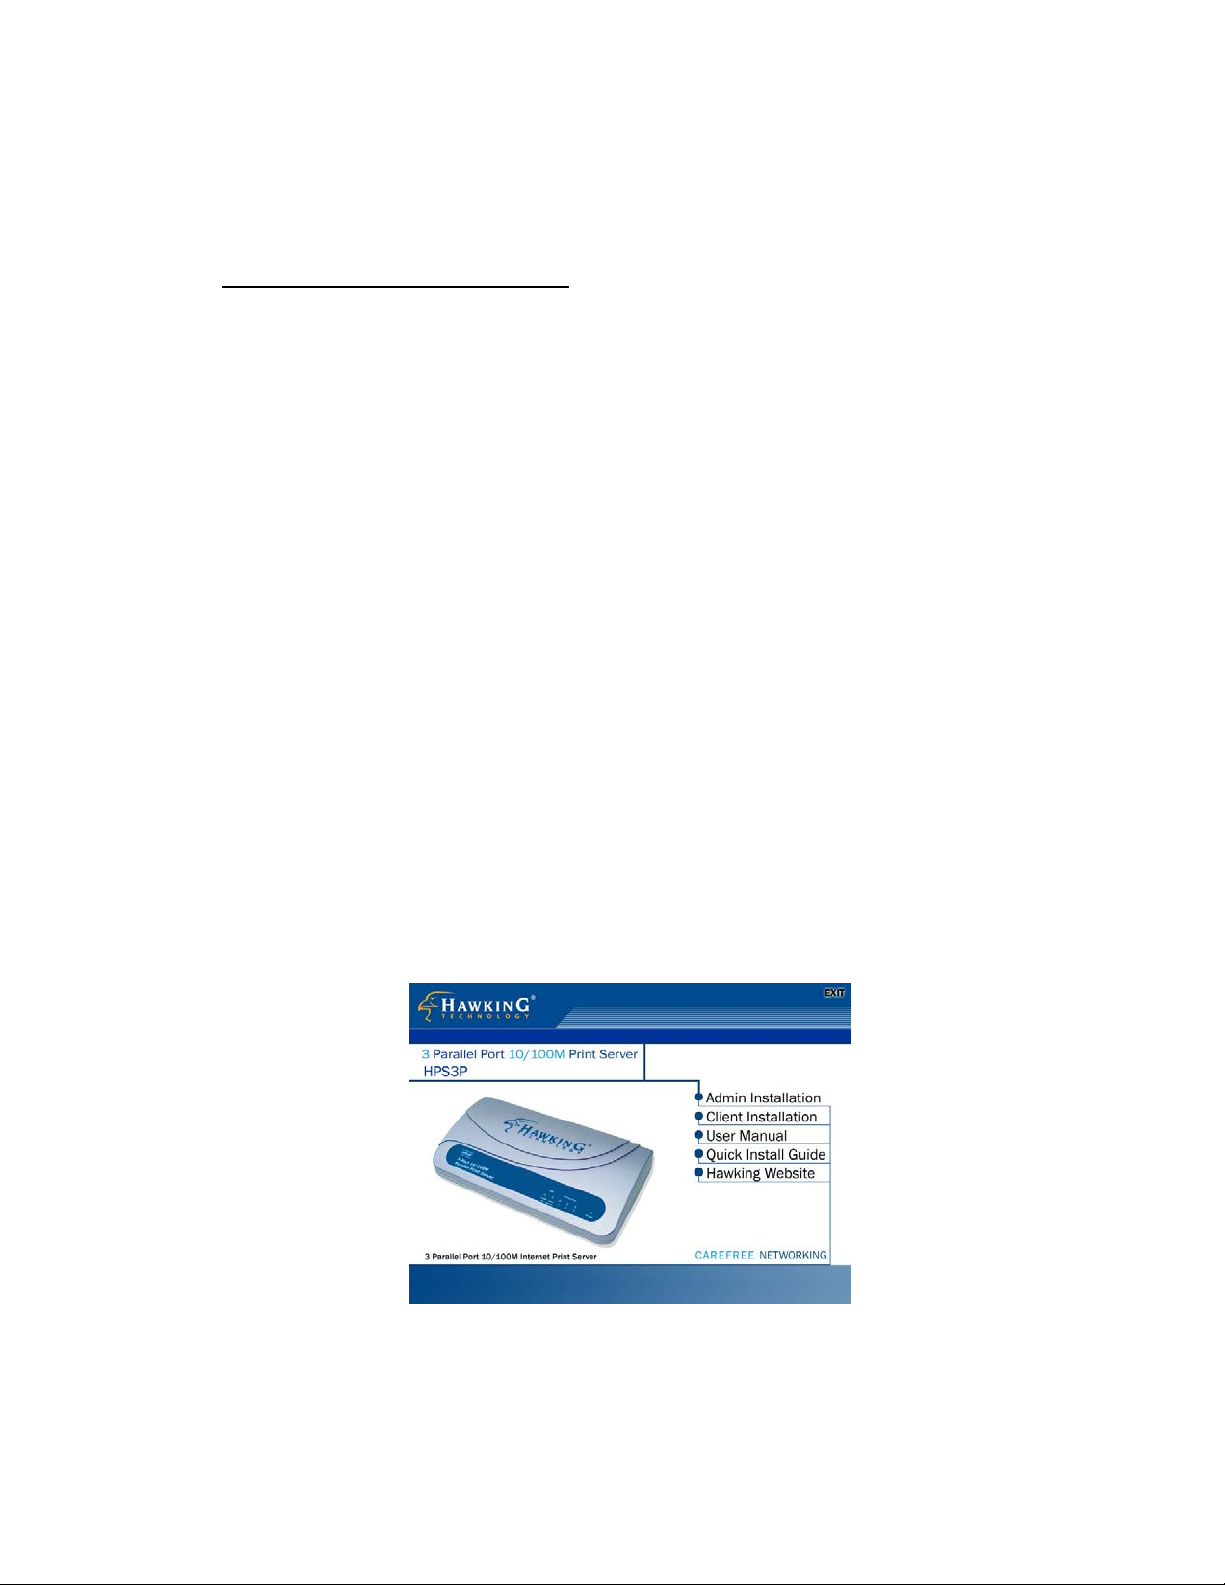
2. The Hawking Installation windows manager will pop up on your
screen as follows:
3. Click on “Admin Installation” and the “Utilities Setup” window will
be displayed.
Page 27
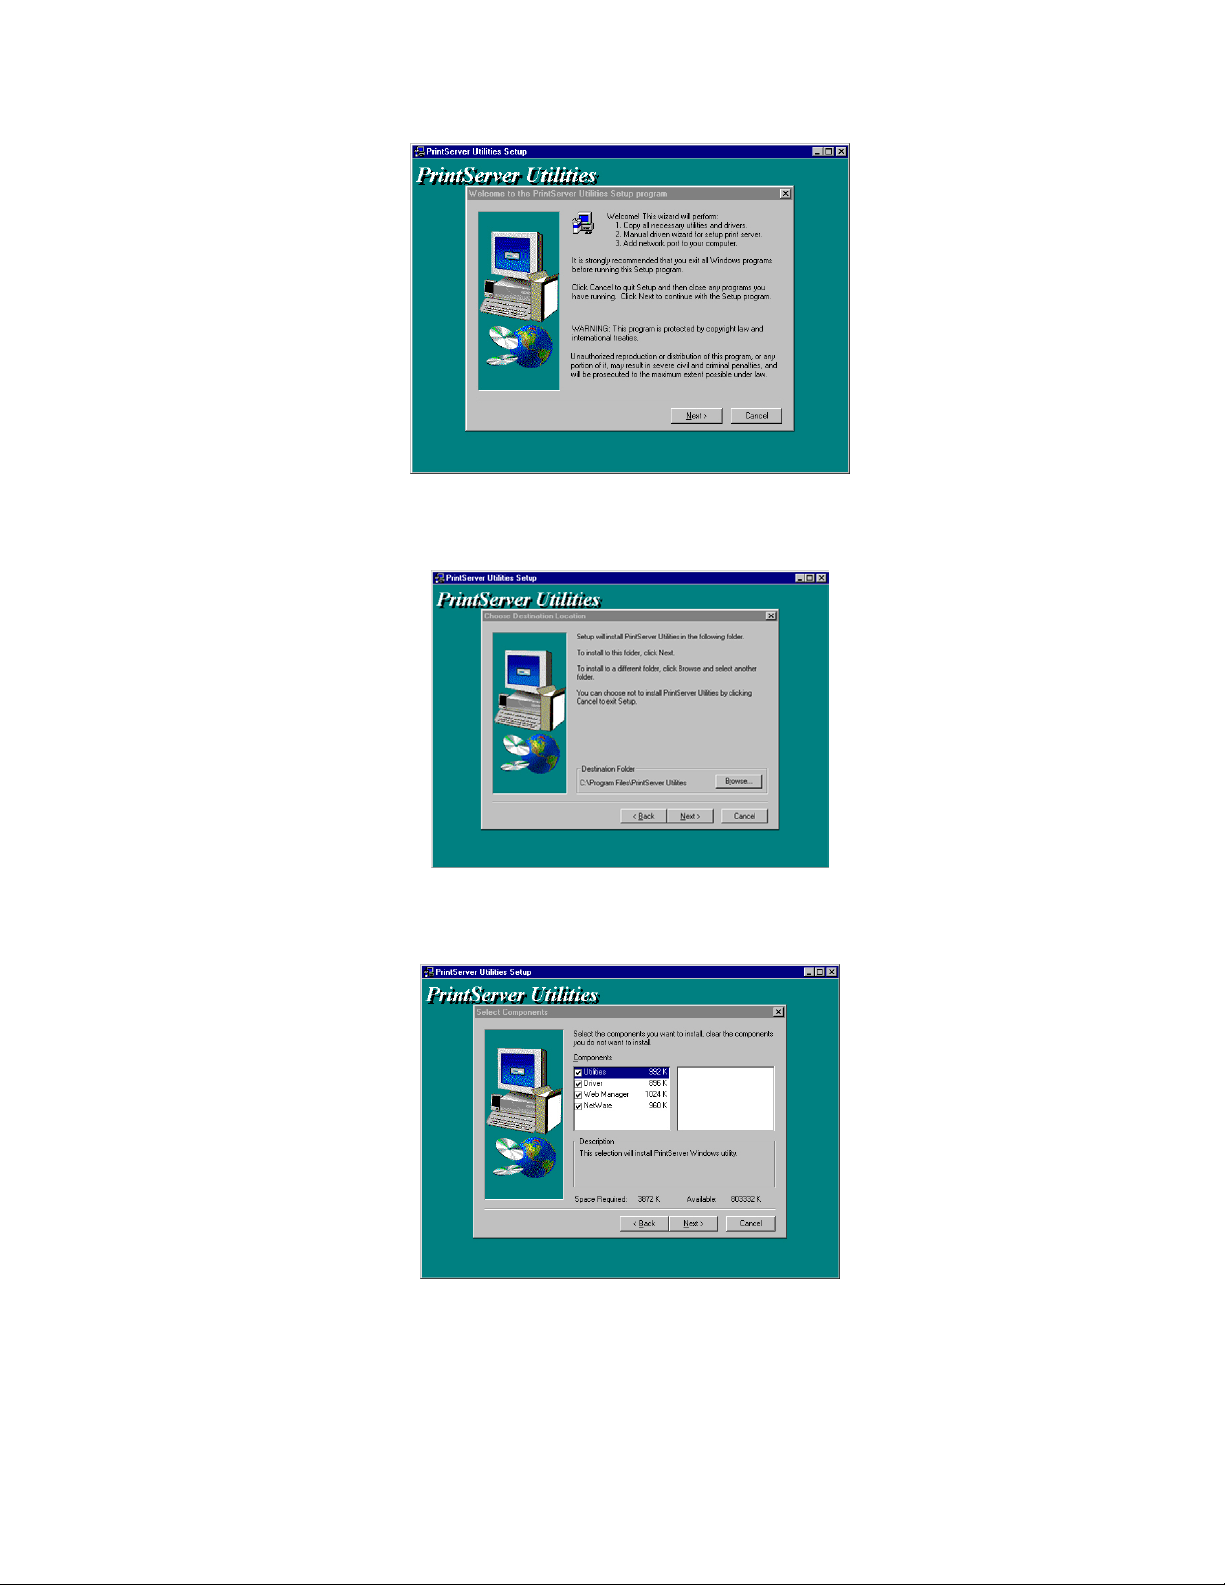
1. Click “Next,” and specify the destination folder where the HPS3P utility
files will be installed.
2. Click “Next,” and select the components you want to install. It is highly
recommended to install all provided components.
3. Click “Next,” and specify the program folder where the program icons
will be added.
Page 28
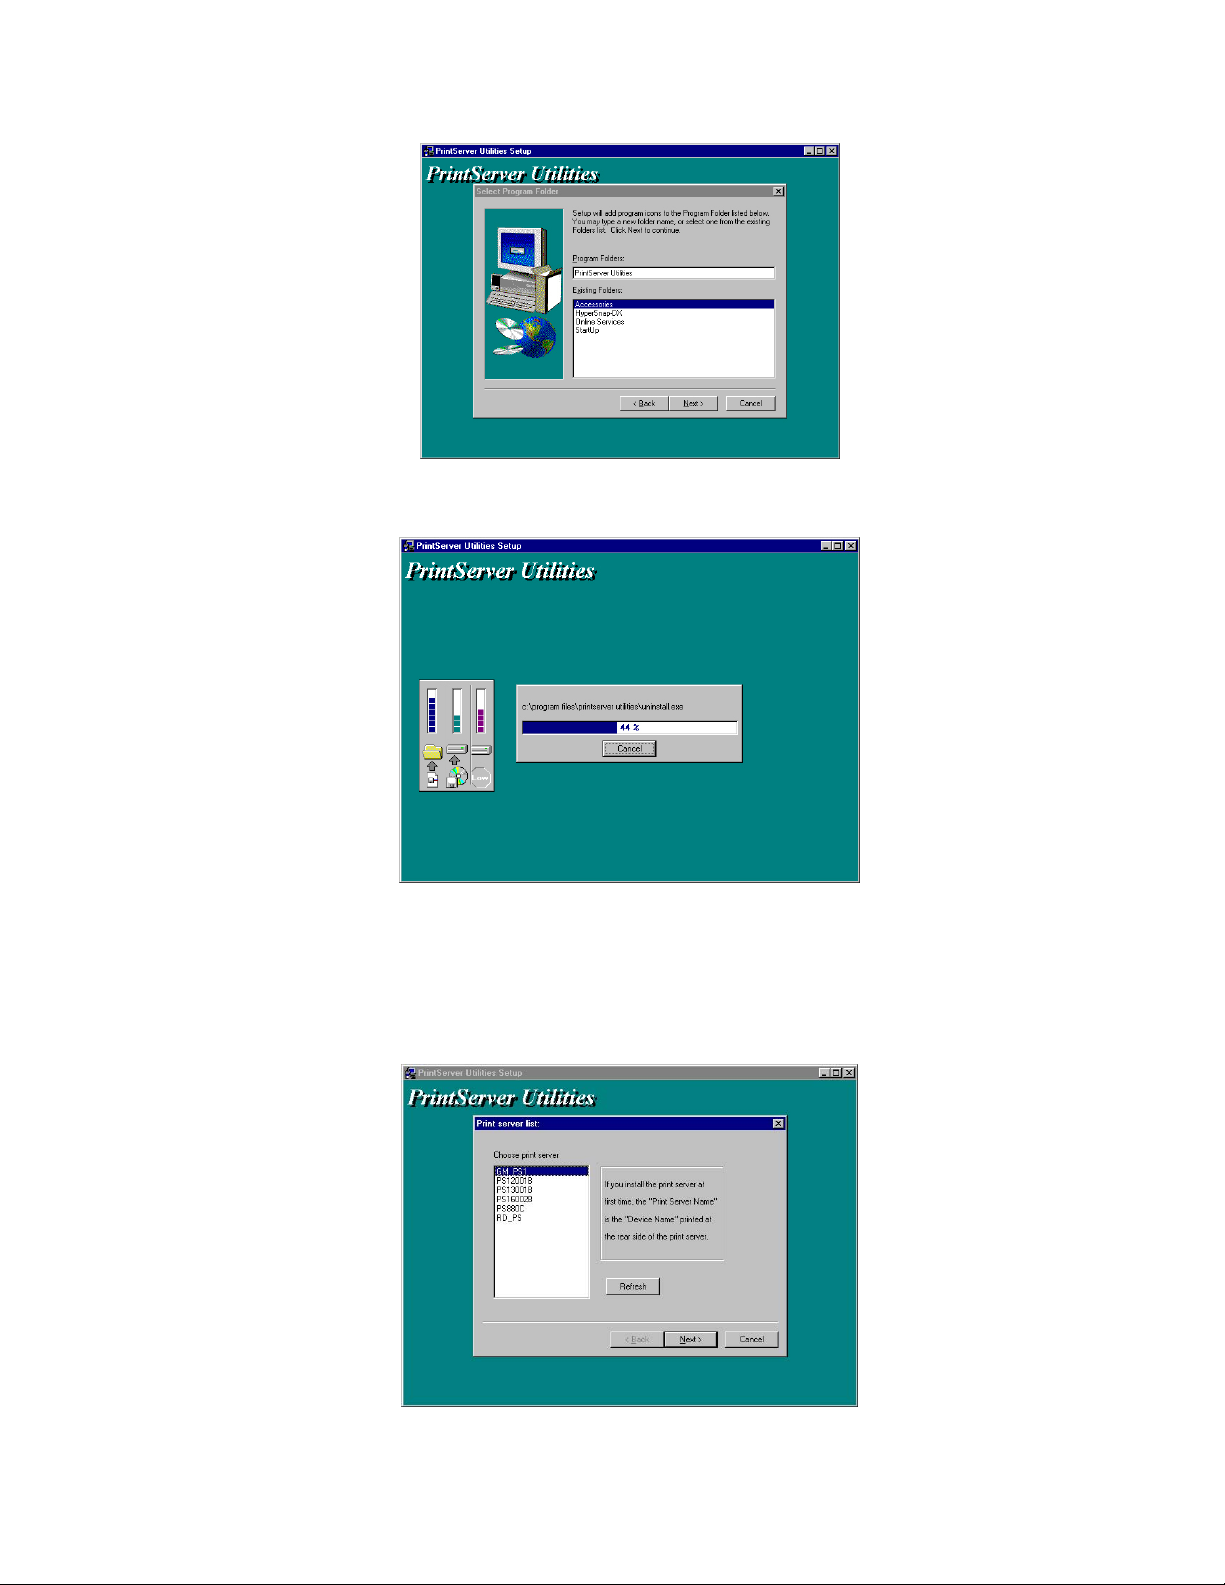
4. Click “Next” to start the utility file installation.
5. The “Print Server Utilities” program will finish installing. After this
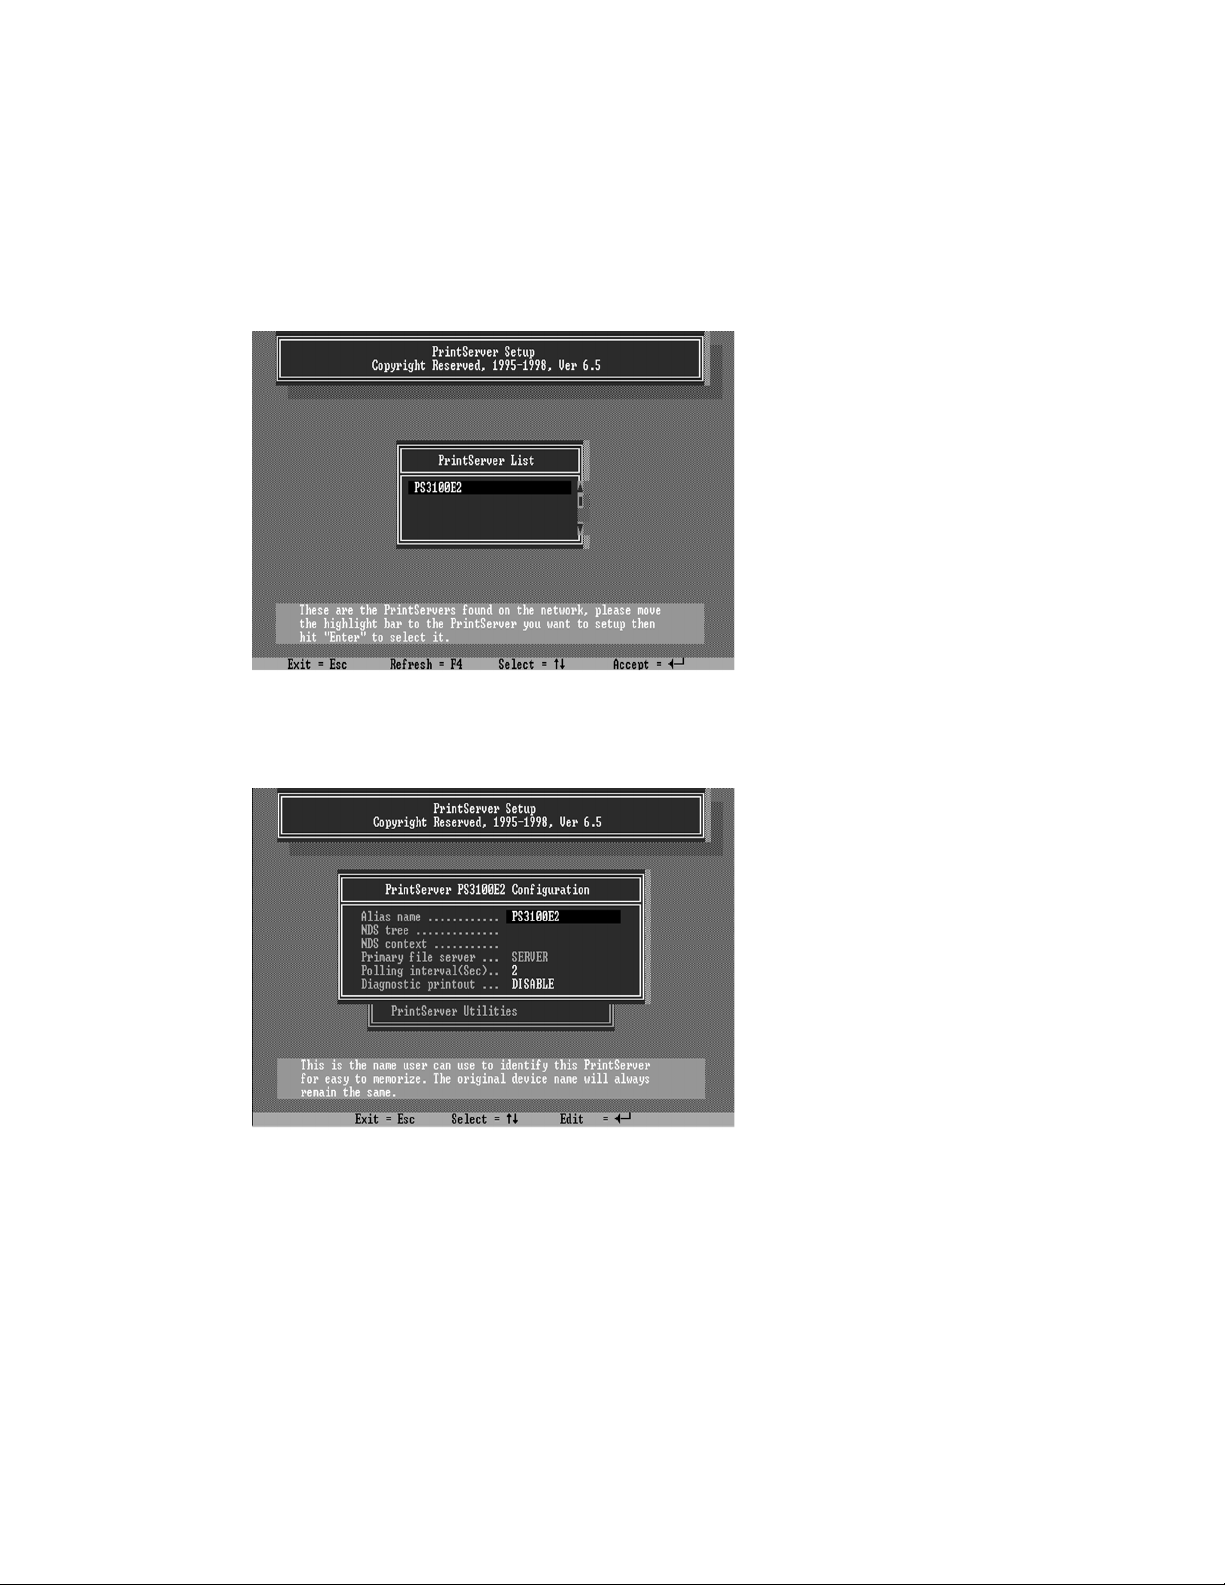
installation is complete, the next step will involve configuring your
HPS3P. Click “Next,” and the “Choose Print Server” dialog box will be
displayed as follows.
Page 29
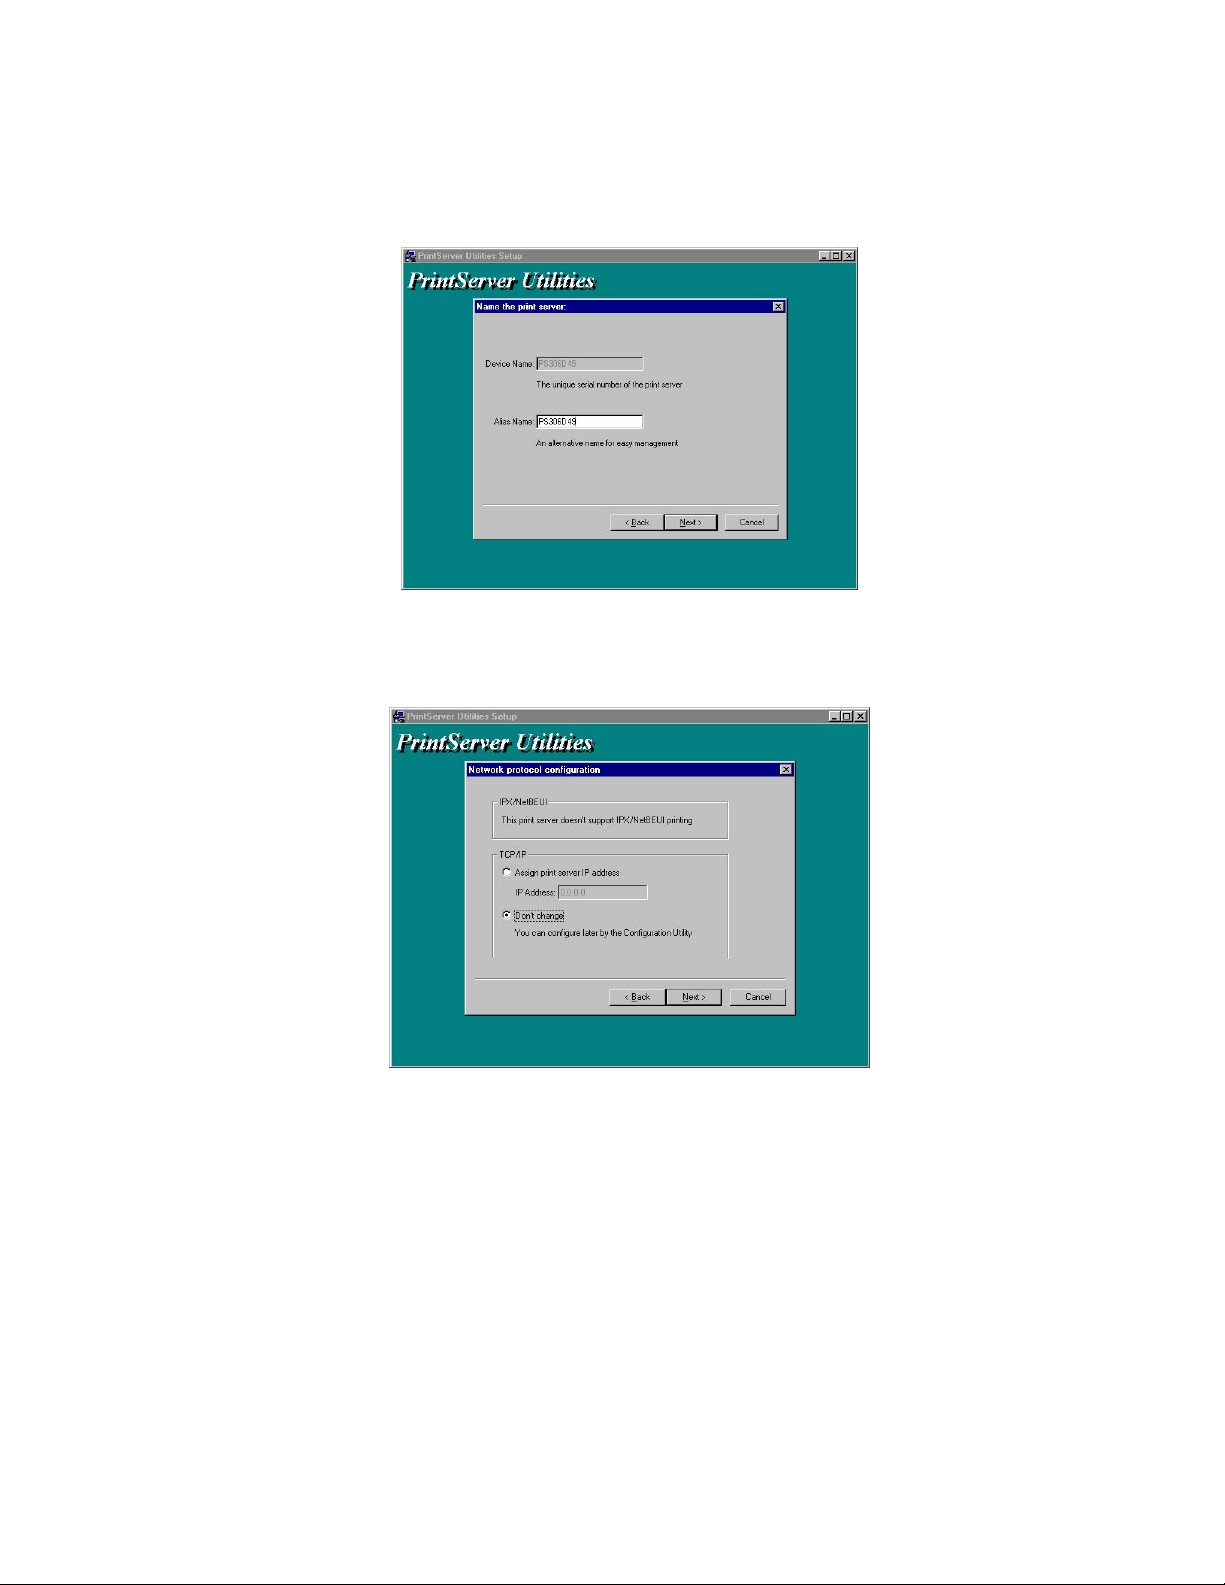
6. Click “Next” and a dialog box will prompt you to name your print server.
(Please make sure to write down the name you assign to your print server
for future use).
7. Click “Next” to configure your print server’s network communication
protocol.
As a system default setting, IPX and NetBEUI protocols are enabled and
do not need to be configured.
With the TCP/IP protocol, you can either (1) assign a dedicated IP
address for your print server or (2) configure it later through the
configuration utility software. (If you choose “Do not change IP –
configure later,” there is no effect on your network settings. It is
suitable for both Non-IP and IP-enabled networks).
8. Click “Next” and the configuration summary will be displayed in the
setup window. You have completed the “Print Server Setup” process and
are ready to setup your print server to work with your printer. Please
Page 30
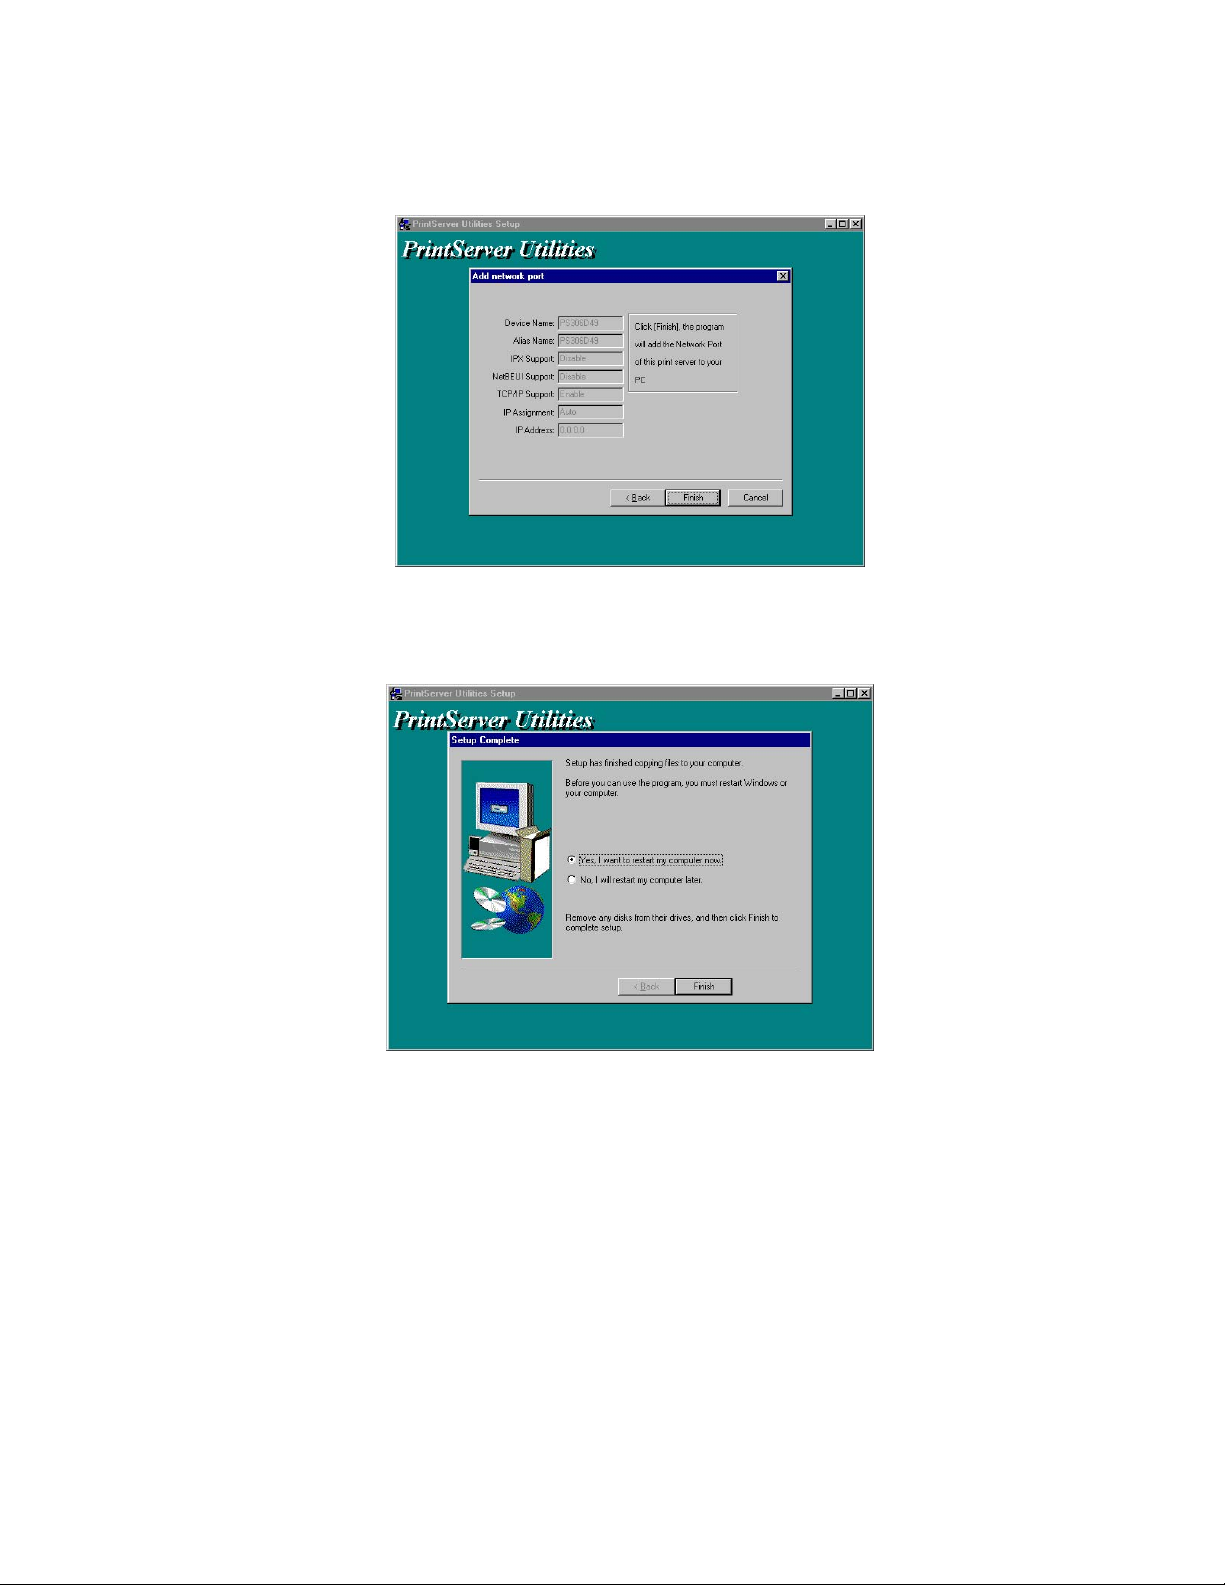
click “Next” and your system will add the HPS3P’s network port to your
PC.
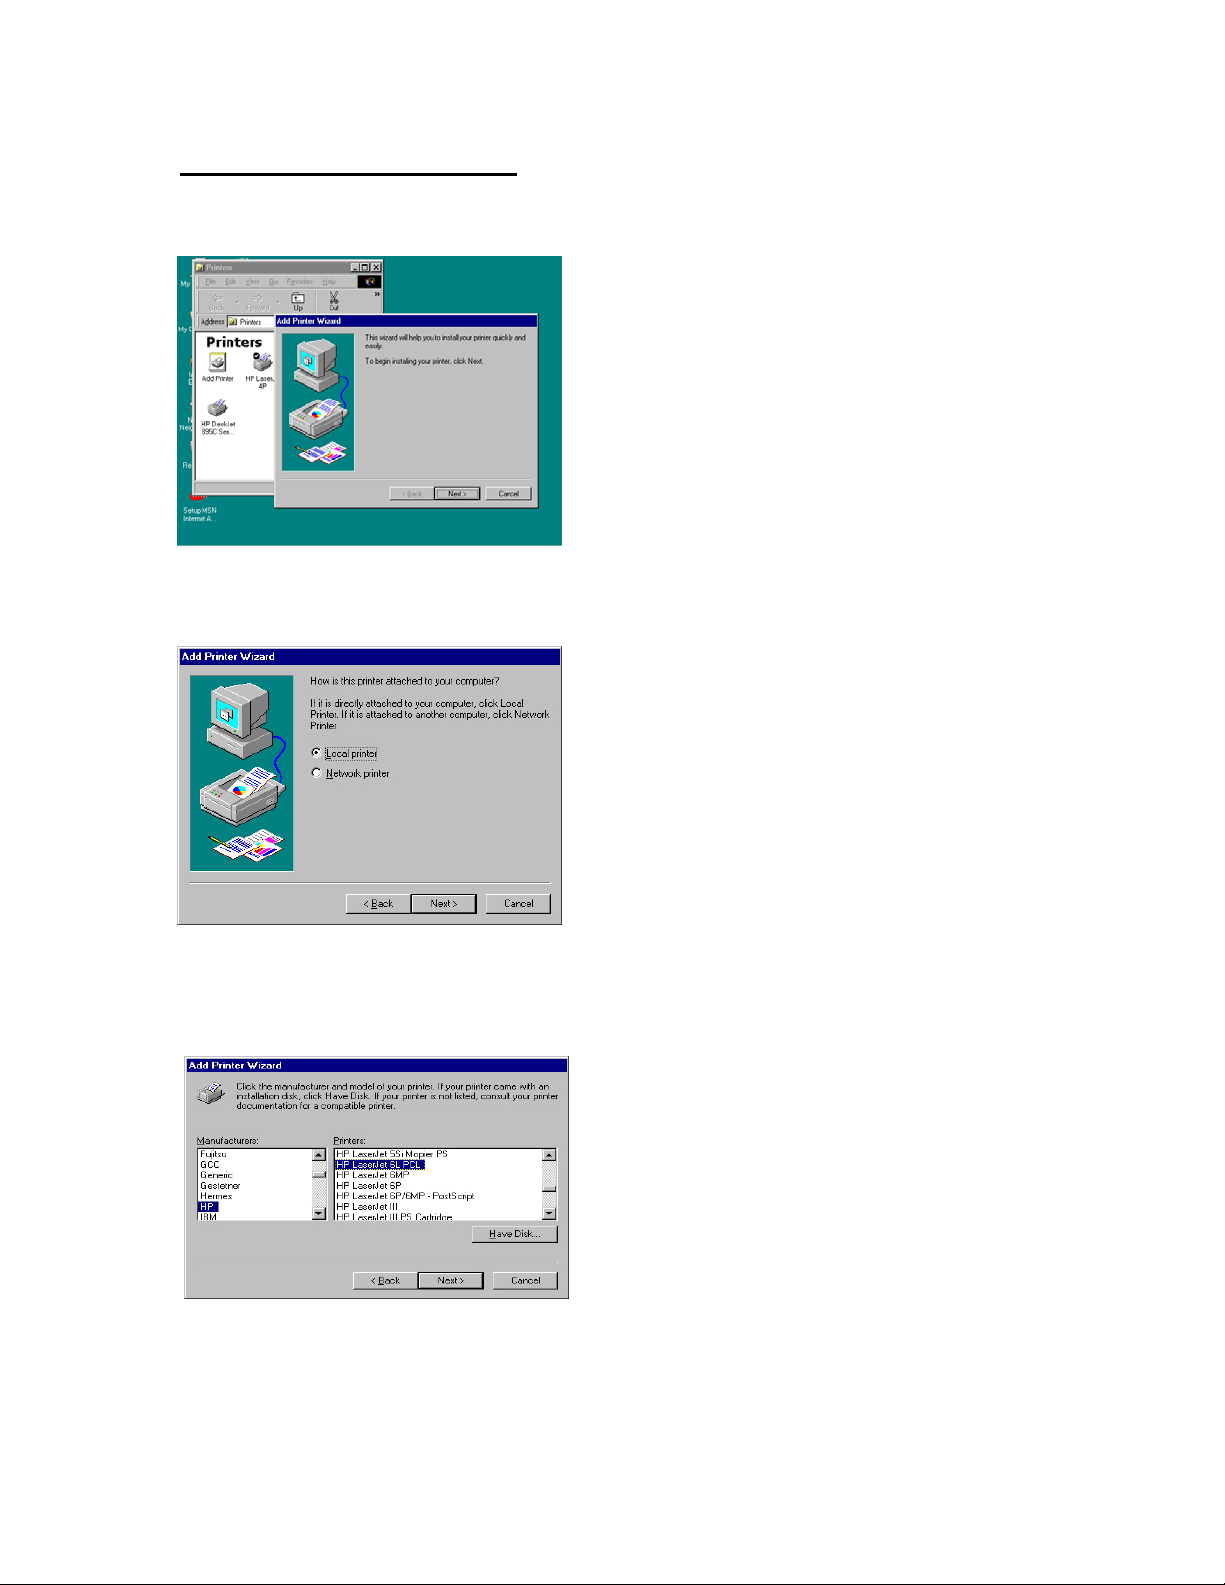
9. The “Installation complete” window will be displayed to indicate that the
Administrator Installation procedure is finished.
(Please restart your computer for your setup to complete its
installation)
Now that you have completed the administrator’s setup, you can perform the
“Client Installation” procedure on all client computers in your network.
To set up printing from this administrator’s PC to the print server, please
follow the standard “Add Printer” procedure as described in the steps below.
Please choose your appropriate operating system and follow the directions to
add your printer through your OS.
Page 31
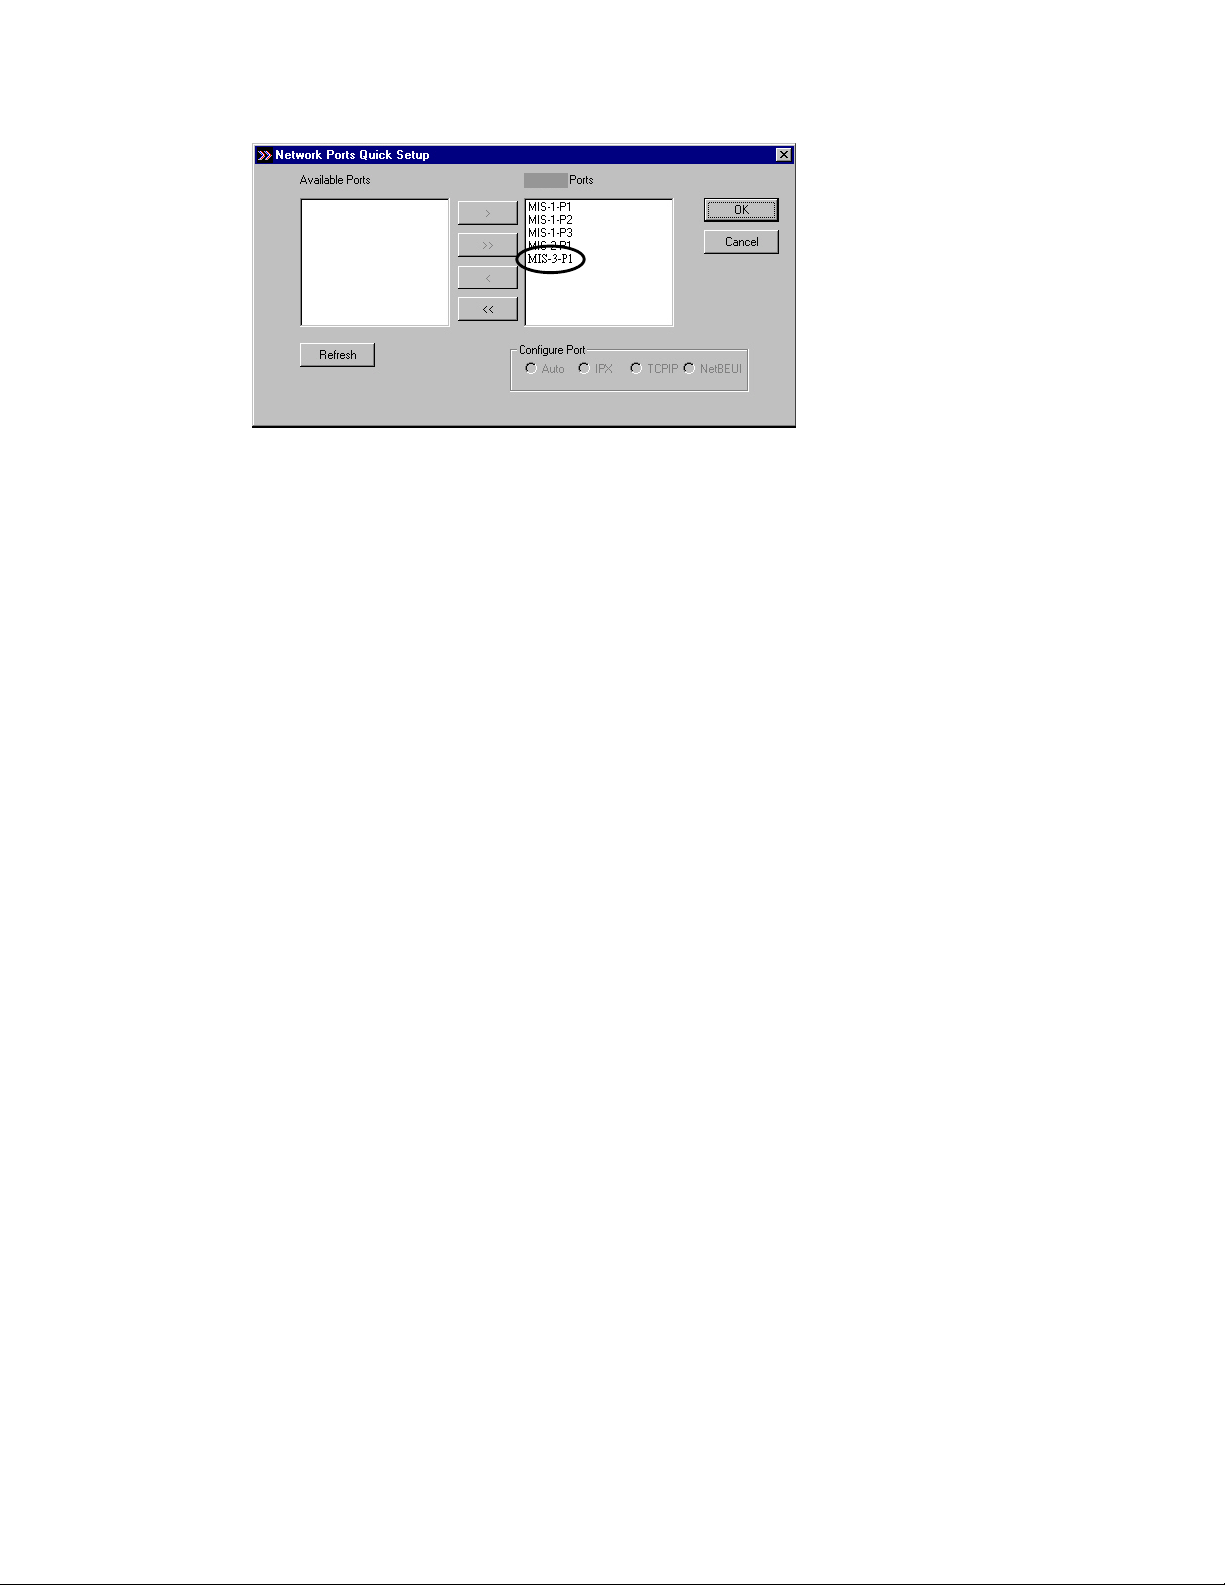
WINDOWS 98/NT/Me/2000
Step1. Click the Start button, choose Setting Î Printers
Step2. Double click on Add Printer
Step3. Select Local printer Î click Next.
Step4. Select your printer manufacturer and model, and then click
Next.
Page 32

Step5. Choose the Print Server’s Network Port, which was created by
the administrator or client installation process, and click Next.
Step6. Complete the rest of the questions to finish the network
printer setup.
Page 33

WINDOWS XP Setup
Step1. Click the Start button; choose Control Panel Î Printers and Faxes
Step2. Click on Add a Printer
Step3. The Add Printer Wizard will appear Î Press Next.
Step4. Select “Local printer attached to this computer” Î Press Next.
Page 34

Step5. In the “Select a Printer Port ” window select “Use the following
port” and drag the selection bar down to your newly created print server
entry Î Press Next.
Step6. Select a suitable printer manufacturer and model, and then click
Next.
Step7. Please continue through the next couple of installation steps by
pressing Next until your new printer is added to your computer. Press the
finish button to finalize your configuration.
Please repeat “add Printer” steps for every printer attached to the HPS3P.
Page 35

3.3 Administrator Utilities
After the Administrator Installation is completed, there
will be six utilities in print server’s Program folder.
Network Ports Quick Setup
Local printer port management tool (see section 3.5).
Remote Ports
Remote printer port management tool (see section 3.5).
NetWare Quick Setup
NetWare quick installation software (see chapter 5).
Print Server Configuration
HPS3P management tool (see chapter 7 –Print Server
Configuration).
Uninstall
Web Manager Administrator
Web based management tool (see chapter 8 – Web
Manager Configuration).
Page 36

3.4 Client Installation and Setup
1. Insert the CD shipped along with the HPS3P into your CD-ROM drive.
The Autorun.exe program will execute automatically. If it does not start
automatically, run Autorun.exe manually from your CD-ROM drive’s root
directory.
2. The "Installation Manager" will be displayed on the screen as follows.
3. Click “Client Installation” and the “Utilities Setup” window will be
displayed.
4. Click “Next” and specify the destination folder where the utilities will be
installed.
Page 37

5. Click “Next” and specify the program folder where the program icons
will be added.
6. Click “Next” to start the installation.
Page 38

7. You have completed the software installation process. Click “Continue”
and the HPS3P’s network port will be detected on the network and will be
added to your PC.
8. The “Installation complete” window will be displayed to indicate that the
Client Installation procedure is finished.
You must then perform the Windows standard “Add Printer” procedure, as
described below, to add a network printer to your PC.
Step1. Click the Start button, choose Setting Î Printers
Step2. Double click the Add New Printer Î select Local printer Î
click Next.
Page 39

Step3. Select a suitable printer manufacturer and model, and then click
Next.
Step4. Choose the HPS3P’s Network Port that was created in the
client installation process and click Next.
Step5. Complete the rest of the questions by hitting Next to finish the
network printer setup.
Please make sure to repeat the “add Printer” steps for every printer attached
to the HPS3P.
Page 40

3.5 Client Utilities
After Client Installation is completed, there will be three
tools located in the print server’s Program folder.
1) Network Ports Quick Setup
2) Remote Ports
3) Uninstall Network Driver
The Uninstall Network Driver tool will assist you in
removing all installed client software. The other two tools
are described as follows:
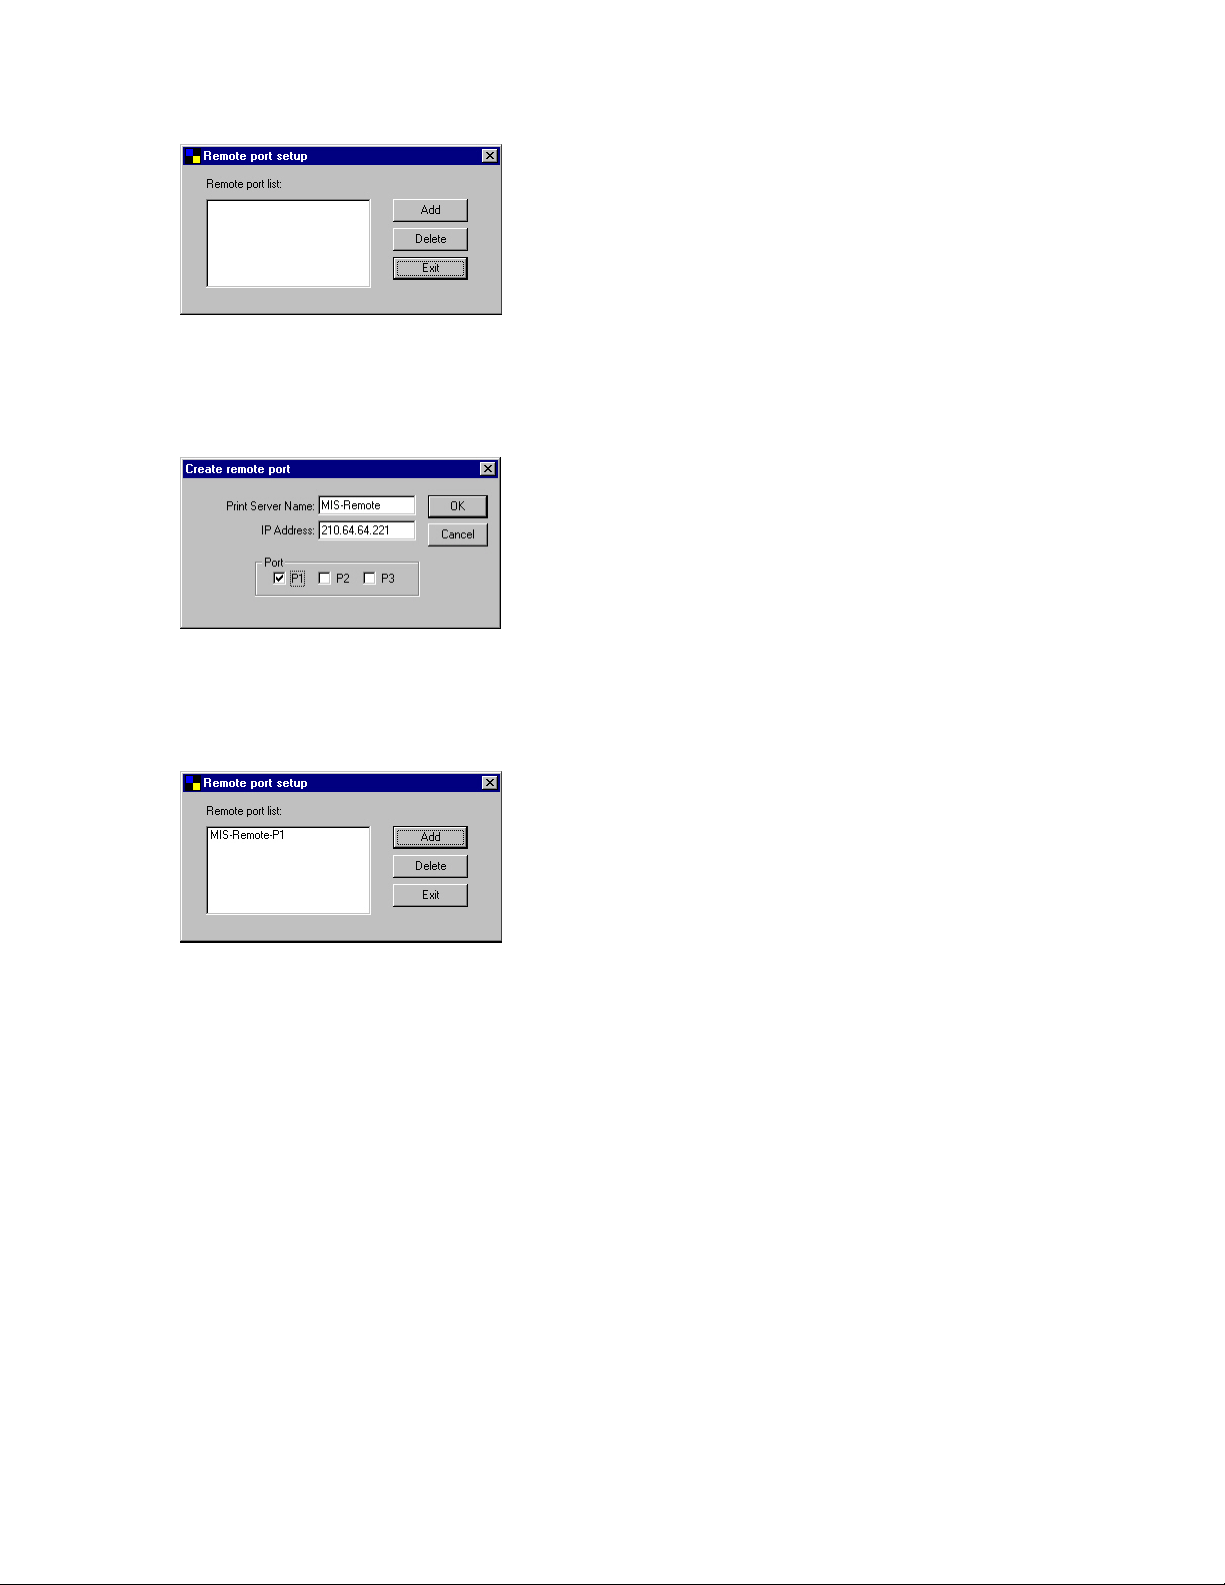
3.5.1 Network Ports Quick Setup
The Network Ports Quick Setup Utility offers a very
simple method to add or remove your print server’s
printer port from the client’s computer.
During the client’s installation procedure, the system will
automatically search for all print servers on the network
and add them into the printer ports of the client’s
computer. (see below)
Page 41

If you have just installed another new print server on
your network, you must run this program first. This
program will search for new print servers and allow you
to add the new network printer port into the client’s
computer. Perform the standard Add Printer procedure,
and you will be able to print directly to the printer
through the newly installed print server port.
Chosen
Page 42
Chosen
Please be aware that Network Ports Quick Setup Utility
can only detect and configure all print servers on the
same network; it cannot search and configure print
servers on other subnets across network segments. You
must use the Remote Ports Utility described in the next
section to manage remote (across network segments) print
servers.
3.5.2 Remote Ports (Utility)
The Remote Ports Utility is a convenient tool for you to
manage and add printer ports of a remote print server.
From the utility assistant panel, you can print to other
print servers outside of your subnet and across your
network segments. Please note that this function only
supports the TCP/IP network protocol.
Please follow the procedures described below:
Step1. Run the Remote Ports Utility
Page 43
Step2. Press Add, then enter the HPS3P’s name,
IP address, and port number.
Step3. Press OK to add the remote printer port
into your computer’s printer ports.
In order to use the remote printing function, you will
have to proceed with the normal Add Printer procedure
and select your printer port as the newly added remote
printer port.
Page 44

Page 45

4. Windows NT/2000 Network
Page 46
4.1 System Architecture
Peer-to-Peer network printing and Server-Based Printing
is available for machines using the Windows NT/2000
server. Only one Windows NT/2000 is required to have
the Windows PTPP (Peer-to-Peer Printing) driver
installed to share the printing service on the network.
Other network users can simply connect to the server and
access the shared printer. (See below).
Windows 98
TCP/IP
Print
Queue
Windows NT Server
PTPP
TCP/IP
* TCP/IP
* IPX
* NetBEUI
IPX
Windows 2000
Page 47
4.2 Windows NT/2000 Server Installation and
Setup
Please follow the procedures described below for
installation of a peer-to-peer connection (PTPP) between
a Windows NT/2000 Server and the HPS3P.
Print
Queue
* TCP/IP
Windows 98
Windows 2000
IPX
TCP/IP
Windows NT Server
PTPP
TCP/IP
* IPX
* NetBEUI
Step1.
If this is your first time installing the print server, please
install the administrator software on your Windows
NT/2000 server first. Refer to section 3.2 for installation
instructions.
If your network has already an installed working print
server and your Windows NT/2000 server has not yet
installed the PTPP driver, please install the client
software. Refer to section 3.4 and 3.5 for installation
instructions.
Step2.
Please add/configure Peer-to-Peer Printing on your
Windows NT/2000 network printer and verify that you
Page 48

can print from Windows NT/2000 to the print server
through the installed PTPP driver.
Step3.
Share the above server’s printer to the network by
performing the standard Windows printer sharing process.
Page 49

4.3 User Installation and Setup
Print Queue
* TCP/IP
Windows 98
TCP/IP
IPX
Windows 2000
Windows NT Server
PTPP
NetBEUI
After the server side installation is completed, the client
side will be able to find the server’s shared printer in
your Network Neighborhood. You will then need to
* IPX
* NetBEUI
perform Window’s standard Add New Printer procedure.
Select “Network Printer” as shown in the screen below,
and complete the configurations to access the shared
printer.
Page 50

5. NetWare Network
Page 51

5.1 System Architecture
We implemented the NetWare printer sharing
functionality into the HPS3P, to allow one or more
printers attached to the print server to be connected to
your network. The HPS3P can support both the NetWare
print server and remote printer functions:
The embedded print server, which emulates the “queue
management functionality” of the NetWare print server, is
the PSERVER program running on the NetWare server. A
user first prints a job at a workstation, the job is routed to
a NetWare server. The NetWare server then stores the
job in a print queue and the print server gets the print job
from the queue to the printer on your network.
Print Queue
Windows 98
Windows 2000
Netware Server
Print Server
The embedded remote printer allows a printer to function
identically to a DOS workstation running
NPRINTER.EXE program without the DOS workstation.
A user first prints a job at a workstation; the job is routed
to a NetWare server; then the NetWare server stores the
job in a print queue and the print server moves the print
Page 52

job from the queue to the remote printer and then to the
printer.
Print Server Function
Print Queue
Windows 98
Windows 2000
Netware Server
Remote Printer
The advantages of embedding the NetWare network
printing functionality in the print server include:
Quick and easy installation.
Easy network management.
Enhanced printing performance.
Relief of NetWare’s file server burden.
The HPS3P can operate either in print server mode or in a
remote printer mode. Each print server should log into a
NetWare server before servicing the print jobs. Each print
server will occupy a user account with which it can log
into the NetWare server. A remote printer will not log
into a NetWare server; it will connect to a NetWare print
server and get the print jobs from the print server. A
remote printer does not occupy any user account. A
NetWare print server can control many remote printers;
thus a print server account can be shared to many remote
Page 53

printers. The printing performance of a remote printer
will be slower than a print server‘s performance, because
a remote printer does not get a print job directly from the
print queue. The remote printer gets its print job from
the print server.
The Advantages of a Print Server
- Easy configuration.
- Better printing performance.
The Advantage of a Remote Printer
- Save user licenses.
Page 54

5.2 NetWare 3.x Installation & Setup
Once your print server is connected to your Ethernet
network, you can set it up for use with your networking
software. There are two methods you can use to do this
easily:
Please note that, you need install the IPX protocol before
continuing to install the print server.
1. In a DOS environment or DOS Windows, use the
“INSTALL” quick-installation program found on the
<CD-ROM Drive>\DOSUTIL of CD-ROM included with
the print server.
2. In a DOS environment or DOS Windows box, use the
“PSETUP” configuration program found on the included
<CD-ROM Drive>\DOSUTIL; configure the print server
to use a particular file server. Then, use NetWare’s
PCONSOLE program to create a NetWare print server and
print queue with the appropriate names.
5.2.1 Quick Installation Using the “Install” program
The INSTALL program included on the CD-ROM can be
used to quickly set up the HPS3P for use with the
NetWare environment. It can only be used to set up the
print server in Printer Server mode; it cannot be used to
configure the print server in Remote Printer mode. The
HPS3P handles changing the print server’s internal
settings, the creation of the NetWare print server and
print queue objects on the file server as well as the
assignment of the print server to the queue. Unless you
need to configure the NetWare settings to conform to
Page 55

special requirements for your network, you can use the
quick installation method.
To use this method,
1. Log into your NetWare server as SUPERVISOR.
2. Insert the CD-ROM included with the print server, and
change to the appropriate drive and directory. Ex.
e:\dosutil\
3. Run the INSTALL program.
4. Select your new print server from the displayed list
and press Enter. The name listed will be the same as the
Device Name printed on the back label of your print
server.
5. A list of defaults will be displayed. If you need to
change any of these items, use the arrow keys to choose
the item you need to change, then press Enter to display a
list of choices. When all of the values are correct, select
the Continue Installation item and press Enter.
Page 56

6. The quick installation program will not only set up the
print server, but also create and setup all required objects
on the file server. When setup is complete, it will display
an execution command that you can run after logging into
the file server to redirect print commands to the new print
server.
capture /S=III /Q=PRINTSERVER_Q1 /nt /nff /nb /l=1
/ti=10
This command redirects the LPT1 port (/l=1) to the print
queue PRINTSERVER_Q1 on the file server named III.
No banner page will be printed (/nb); no form feed will
be added to the end of the job (/nff); and tabs will not be
expanded into spaces (/nt). If the program does not
explicitly signal end-of-job, the capture facility will wait
10 seconds (/ti=10) before assuming that the print job is
complete.
7. Reset the print server to have the changes take effect.
Before printing, you may want to verify that the setup
was complete. Using the Print Server Status option of
the PSETUP command (as described in the following
Page 57

section), you can verify that the print server is connected
to the right file server and is using the correct network
frame type.
You may also want to use the NetWare PCONSOLE
program to verify that:
A NetWare print server and one, two, or three print
queue(s) have been created on the file server. The number
of print queues created is equal to the number of printer
ports on your print server.
Printer 0 (or Printer 1, Printer 2) on the print server is
serving the new print queue(s).
The print queue(s) and print server have the right
permissions and notification settings.
For more detailed information, consult your NetWare
manual.
5.2.2 Installation Using PSETUP
5.2.2.1 Configuring in Print Server Mode
For more complex setup needs, you can use the PSETUP
program in conjunction with the NetWare PCONSOLE
program.
The installation procedure is as follows:
1. From a workstation, log in to your NetWare server as
SUPERVISOR.
Page 58
2. Run the PSETUP program included on the CD-ROM.
( Ex. e:\dosutil\psetup.exe )
3. Select your new print server from the list provided.
4. Choose NetWare Configuration from the menu.
5. Select the Print server in the Printing mode field.
6. Change the Alias of the print server if you wish.
7. Set the Primary File Server to be the file server where
the print server’s queue will be located.
Page 59

8. Press Escape to exit the Print Server Configuration
screen, confirm that the changes should be saved, and exit
PSETUP.
At this point the print server setup is complete. You can
now begin setting up the NetWare print server and print
queue objects:
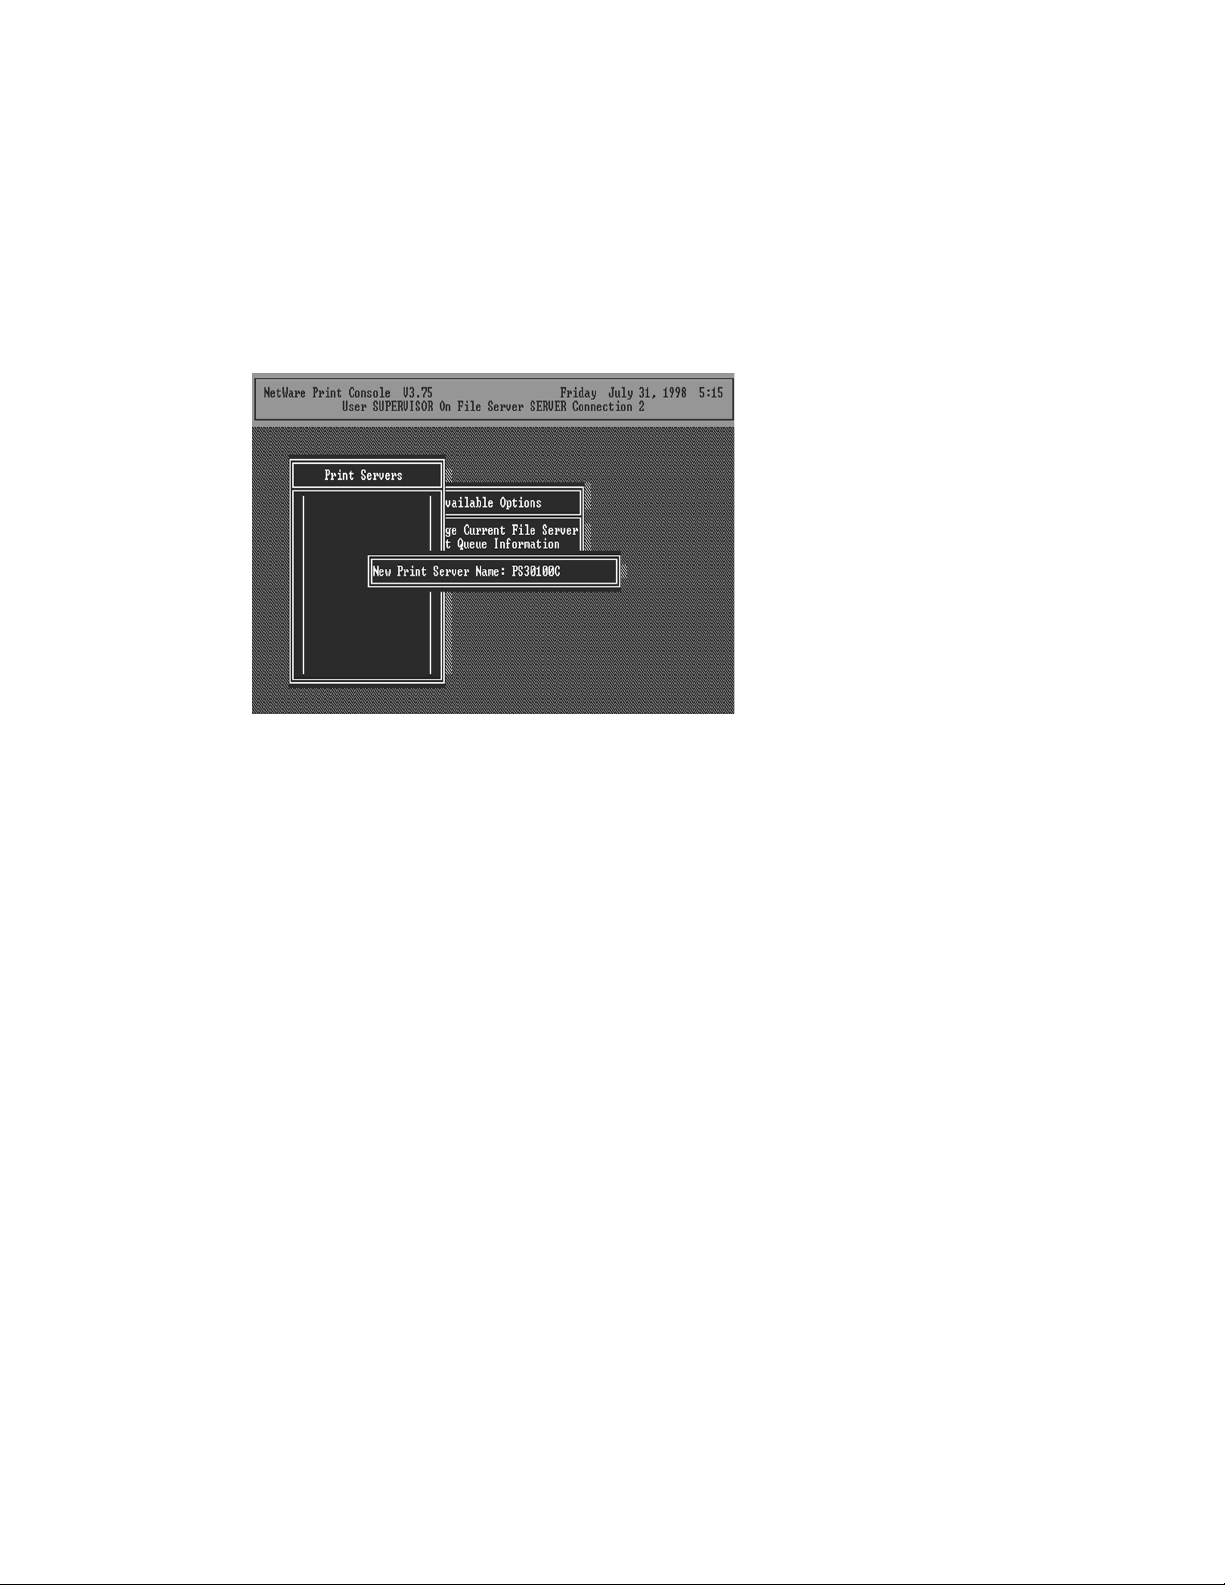
9. Run the NetWare PCONSOLE program.
10. Change the current file server, if necessary, using
the Change Current File Server menu selection.
11. Choose the Print Queue Information menu selection.
12. Press the Insert key to add a new print queue.
13. Type in a print queue name, such as “PQ” or “Q1”.
14. You have now successfully created the print queue
that your print server will serve. Press the Escape key
until the Available Options main menu is displayed.
15. Select “Print Server Information.”
Page 60
16. Press the Insert key to add a new NetWare print
server object. The print server name can be identical to
the PSxxxxxx name printed on the label of the print
server, or you can use an alias name you have assigned
using PSETUP.
17. Press Enter to select the newly created print server.
18. Select “Print Server Configuration.”
19. Select “Printer Configuration.”
20. Select Printer 0 (or Printer 1, Printer 2), and press
Enter, then select Parallel LPT1 (or LPT2, LPT3) in the
Type field. If your print server has only one port, you do
not need to configure this Type field.
Page 61
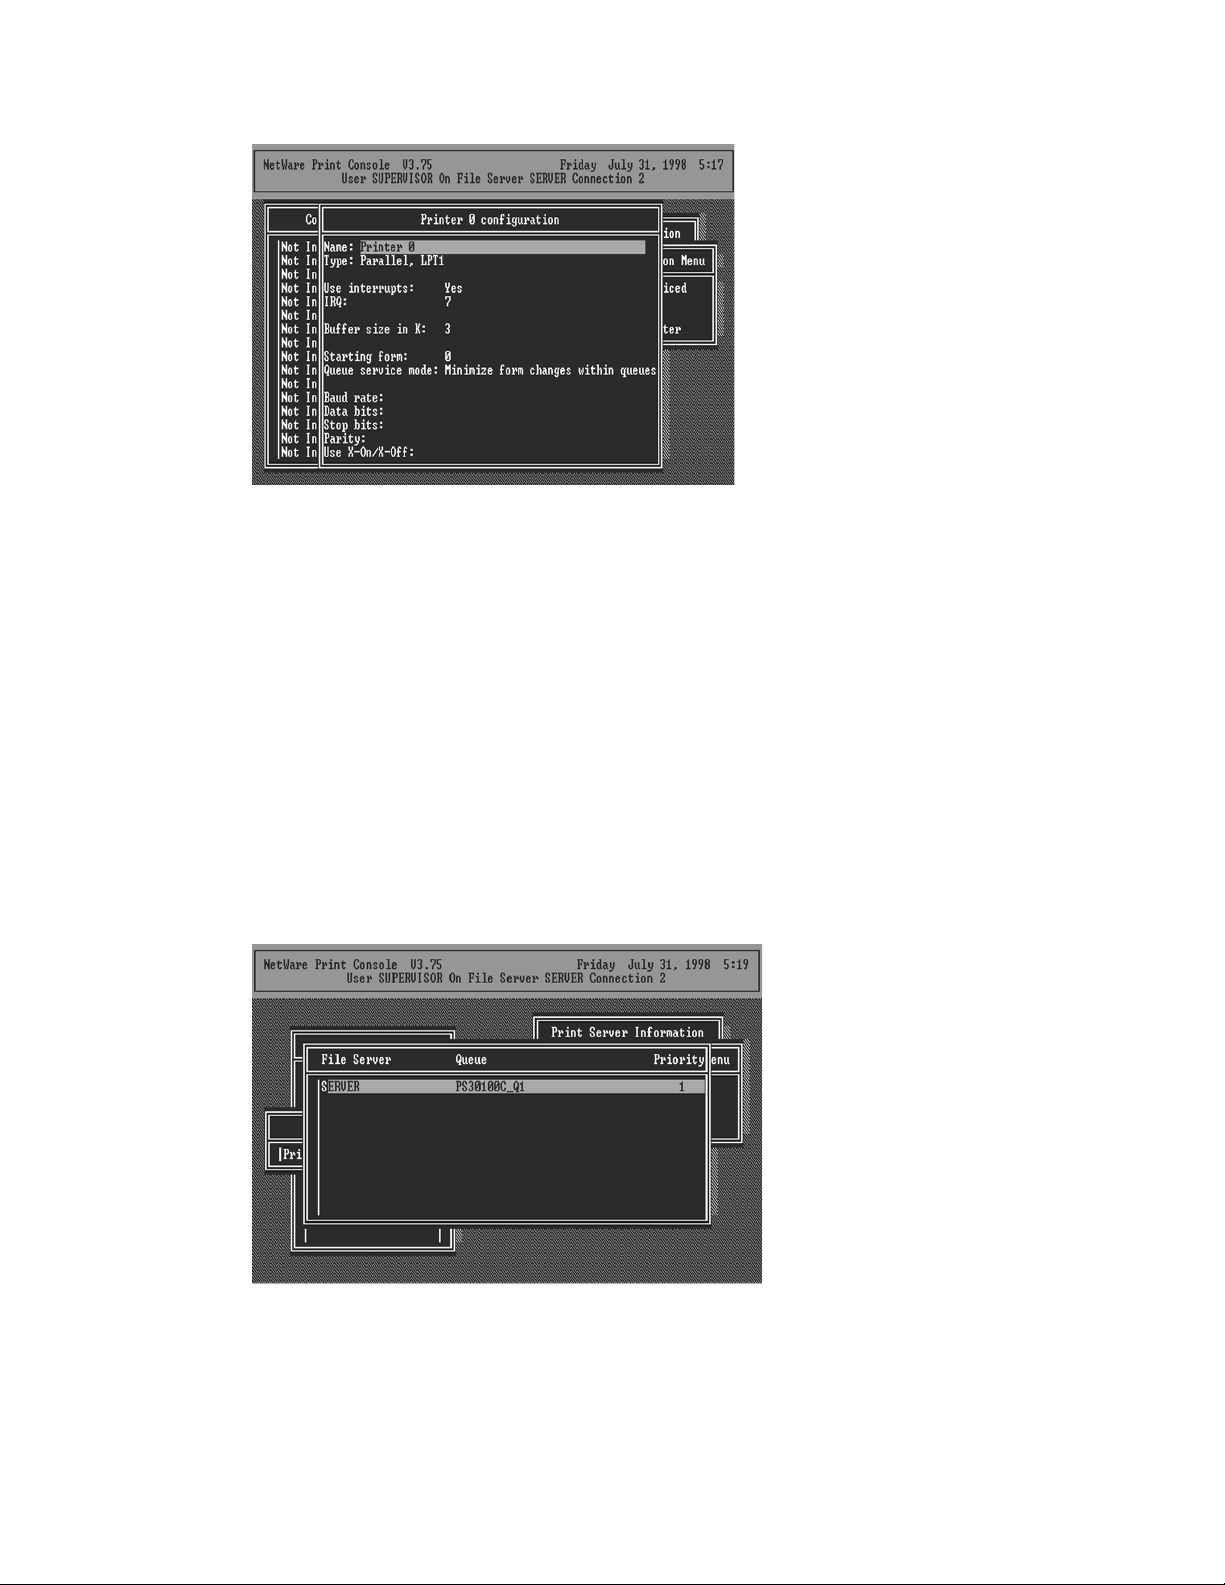
21. Press Escape, and answer Yes to the Save Changes
question.
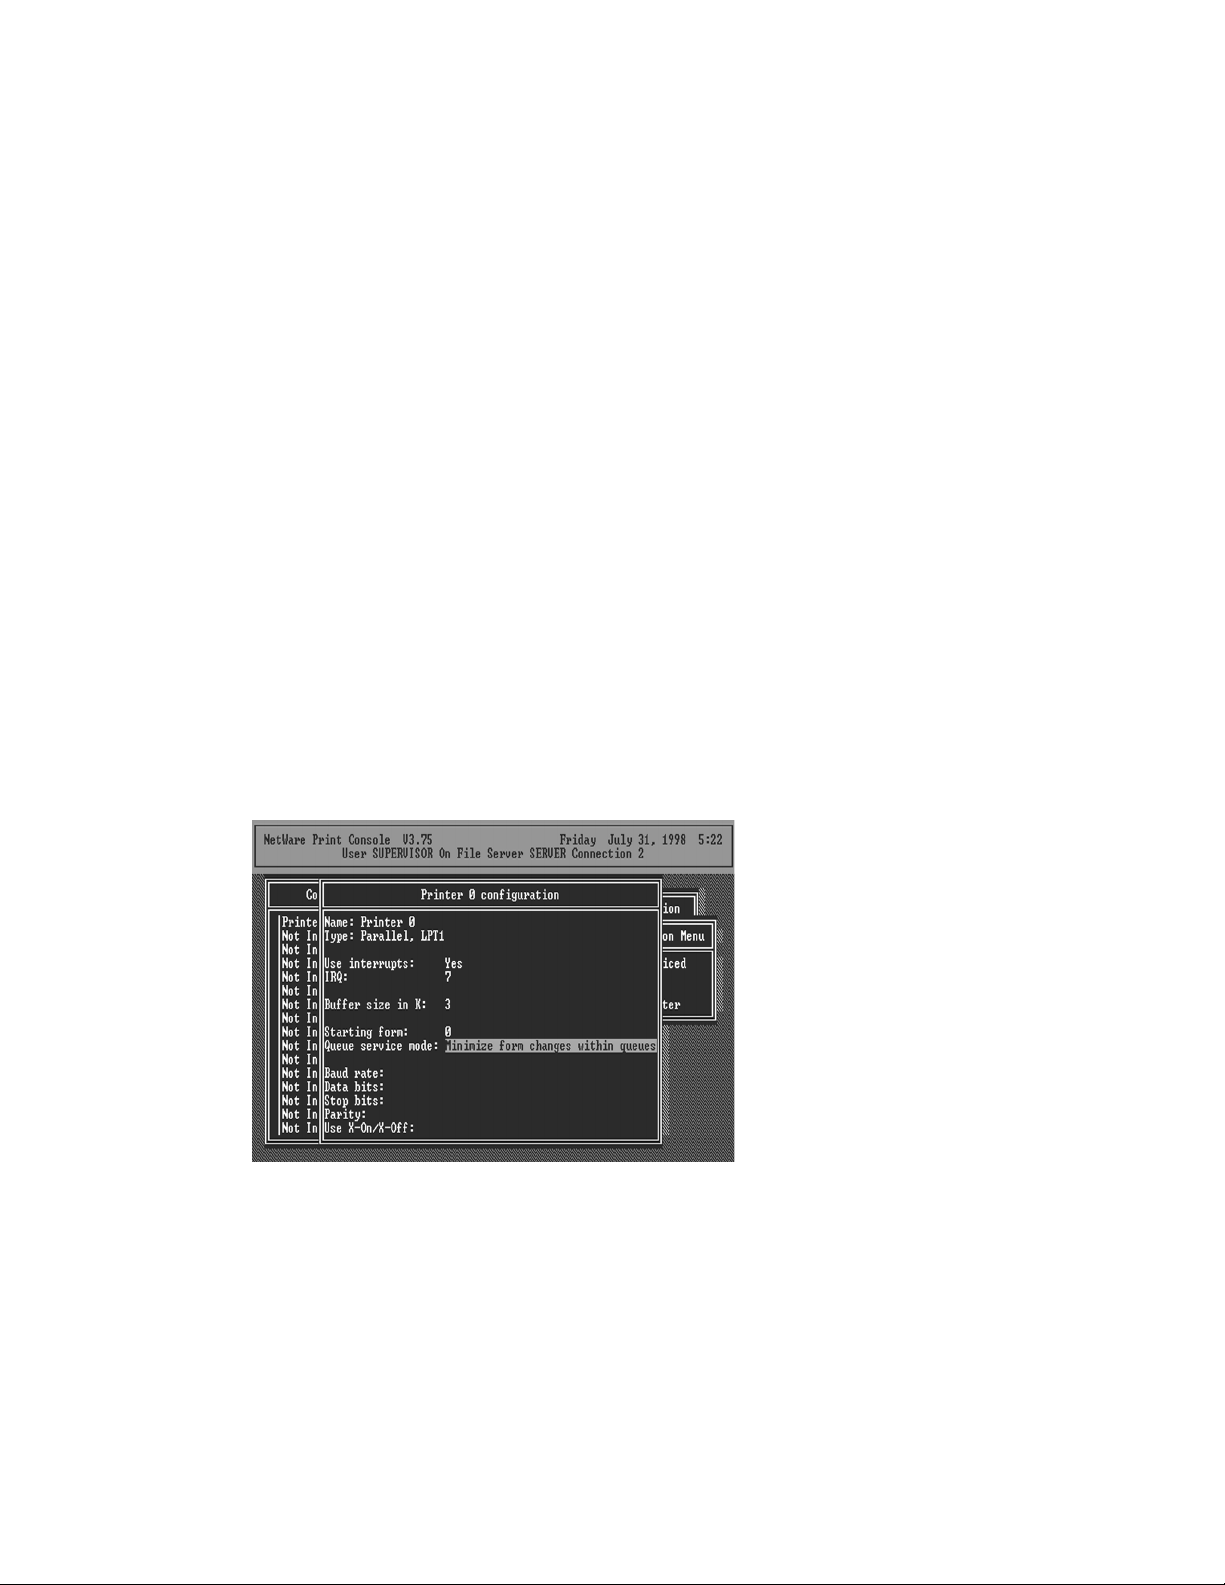
22. Select Queues Serviced by Printer, then select
Printer 0 (or Printer 1, Printer 2) and press Enter.
23. Press Insert and add your newly created print queue
to the list of queues serviced by the printer. Enter a
priority number for the queue service, or press Enter to
accept the default.
24. Repeatedly press Escape to exit the PCONSOLE
program.
Page 62

25. Reset the print server to have the changes take effect.
NOTE: If the print server you have is with multiple
printer connectors, you may create multiple print queues
and printer objects.
Your print server should now be ready to use. You
should be able to redirect printing to your print server
using a CAPTURE command like the one shown in the
previous section.
5.2.2.2 Configuring as a Remote Printer Mode
The remote printer feature is not available for some print
server models. Make sure that you have created the
NetWare print server with Type Remote using
PCONSOLE utility before you configure the print server.
For more detailed information about PCONSOLE, please
refer to NetWare’s manual. You can set up the NetWare
print server and print queue objects by following the
steps below:
1. Run the NetWare PCONSOLE program.
2. Change the current file server, if necessary, using the
Change Current File Server menu selection.
3. Choose the “Print Queue” Information menu selection.
4. Press the Insert key to add a new print queue.
5. Type in a print queue name, like “PQ” or “Q1”.
Page 63
6. You have now successfully created the print queue
that your NetWare print server will serve. Press the
Escape key until the Available Options main menu is
displayed.
7. Select “Print Server Information.”
8. Press the Insert key to add a new NetWare print server.
9. Press Enter to select the newly created print server.
10. Select “Print Server Configuration.”
11. Select “Printer Configuration.”
12. Select Printer 0 (or Printer 1, Printer 2), press Enter,
and then select Remote Parallel in the Type field.
13. Press Escape, and answer Yes to the Save Changes
question.
14. Select Queues Serviced by Printer, then select
Printer 0 and press Enter.
Page 64

15. Press Insert and add your newly created print queue
to the list of queues serviced by the printer. Enter a
priority number for the queue service, or press Enter to
accept the default.
16. Repeatedly press Escape to exit the PCONSOLE
program.
17. You must now load the NetWare print server on the
NetWare file server so that the print server configured as
a remote printer can connect to that print server and
service the print jobs. To load the NetWare print server,
type “LOAD PSERVER.NLM PrintServer” at the system
console of the NetWare file server where the PrintServer
is the print server name newly created by the PCONSOLE
program.
To configure the print server as a NetWare remote printer,
perform the following steps:
1. From a workstation, log in to your NetWare server as
SUPERVISOR.
Page 65

2. Run the PSETUP program included on the CD-ROM.
(ex. e:\dosutil\psetup.exe)
3. Select your new print server from the list provided.
4. Choose NetWare Configuration from the menu.
5. Select “Remote Printer” in the Printing mode field.
6. Type the print server’s name in the Print server field.
The print server that is being configured as a remote
printer now will service the print server.
Page 66

7. Type the printer number assigned in PCONSOLE in
the Printer Number field.
8. Press Escape to exit the NetWare Configuration screen,
confirm that the changes should be saved, and exit
PSETUP.
9. At this point the print server setup is complete.
10. Reset the print server to let the changes take effect.
Page 67

5.3 NetWare 4.x/5.x Installation & Setup
This chapter explains how to configure your print server
for operation with NetWare 4.x/5.x file servers and
clients using NDS (NetWare Directory Services). If you
need to install NetWare 4.x/5.x bindery mode network
printing, please refer to the previous chapter. The
installation procedure is the same as NetWare 3.x.
How NetWare 4.x/5.x is Different
Novell NetWare version 3.x uses a database called
bindery for storing information such as user and group
information, server configuration, and information about
network services. Each NetWare 3.x file server has its
own bindery, which is administrated separately from
other file servers using commands such as SYSCON,
PCONSOLE, and so on.
NetWare version 4.x/5.x improved on the bindery concept
by introducing NDS, NetWare Directory Services. NDS is
a tree-structured directory that is shared by a group of
file servers on a network, allowing centralized
administration and easy coordination of users,
permissions, and resources between servers.
To make it possible for NetWare 4.x/5.x servers to
coexist with NetWare 3.x servers, NetWare 4.x/5.x
supports bindery emulation, which makes parts of the
NDS directory visible to NetWare 3.x clients, just as if
the information were stored in a NetWare 3.x bindery.
This allows clients to access NetWare 4.x/5.x servers
Page 68

without being upgraded to the NetWare 4.x/5.x software,
and for 3.x and 4.x/5.x servers to be mixed on a network.
Your print server can operate either in bindery mode or
NDS mode. Bindery mode works with NetWare 3.x
servers and with NetWare 4.x/5.x servers using bindery
emulation. NDS mode works with NetWare 4.x/5.x
servers.
NOTE: Though the print server supports both bindery
mode and NDS mode, it cannot support both modes at the
same time. If you are using both NetWare 3.x and 4.x/5.x
servers, you need to set up the print server to use bindery
mode. If you need to install NetWare 4.x/5.x bindery
mode network printing, please refer to the previous
chapter. The installation procedure is the same as
NetWare 3.x.
5.3.1 Quick Installation Using “Install” program
The INSTALL program included on the CD-ROM can be
used to quickly set up the print server for use. It can only
be used to set up the print server in Server mode; it
cannot be used to configure the print server in Remote
Printer mode. To use this method,
1. Log in to your NetWare server as ADMIN.
2. Insert the CD-ROM and change to the appropriate
drive and directory. Ex. e:\dosutil\
3. Run the INSTALL program with the “NDS” option.
E :\dosutil\install /NDS
Page 69

4. Choose your new print server from the displayed list
and press Enter. The name listed will be the same as the
Device Name printed on a label of your print server.
5. A list of defaults will be displayed. If you need to
change any of these items, use the arrow keys to choose
the item you need to change, then press Enter to display a
list of choices. When all of the values are correct, select
the Continue Installation item and press Enter.
The Current Tree and Current Context settings cannot be
changed within the INSTALL program. If you need to
change the tree or context where the print server will be
Page 70

installed, use the CX command to change them before
starting the INSTALL program.
6. The quick installation program will not only set up the
print server but also create and setup all required objects
on the network. When the setup is complete, it will also
display an execution command that you can run after
logging in to the file server to redirect print commands to
the new print server.
7. Reset the print server to have the changes take effect.
NOTE: The print server may require up to a minute
after power-up to log into a NetWare Directory Services
context because of the large number of the calculations
NDS security requires.
Page 71

5.3.2 NetWare 4.x/5.x Installation Using PSETUP
5.3.2.1 Configuring in Print Server Mode
For more complex setup requirements, you can use the
PSETUP program in conjunction with the NetWare
PCONSOLE program.
To install the print server using NetWare Directory
Services (NDS) mode:
1. Log into your NetWare server as ADMIN.
2. Run the PSETUP program included on the print server
CD-ROM. (ex. e:\dosutil\psetup.exe)
3. Select your new print server from the list provided.
4. Choose NetWare Configuration from the menu.
5. Select Print server in the Printing mode field.
6. Change Alias name if you want.
7. Set the NDS tree and NDS context where the print
server will be located. Do NOT set a Primary file server,
as that would force the use of bindery mode.
8. Press Escape to exit the Print Server Configuration
screen, confirm that the changes should be saved, and exit
PSETUP.
9. Run the NetWare PCONSOLE program.
Page 72

10. Change the current context, if necessary, using the
Change Context menu selection.
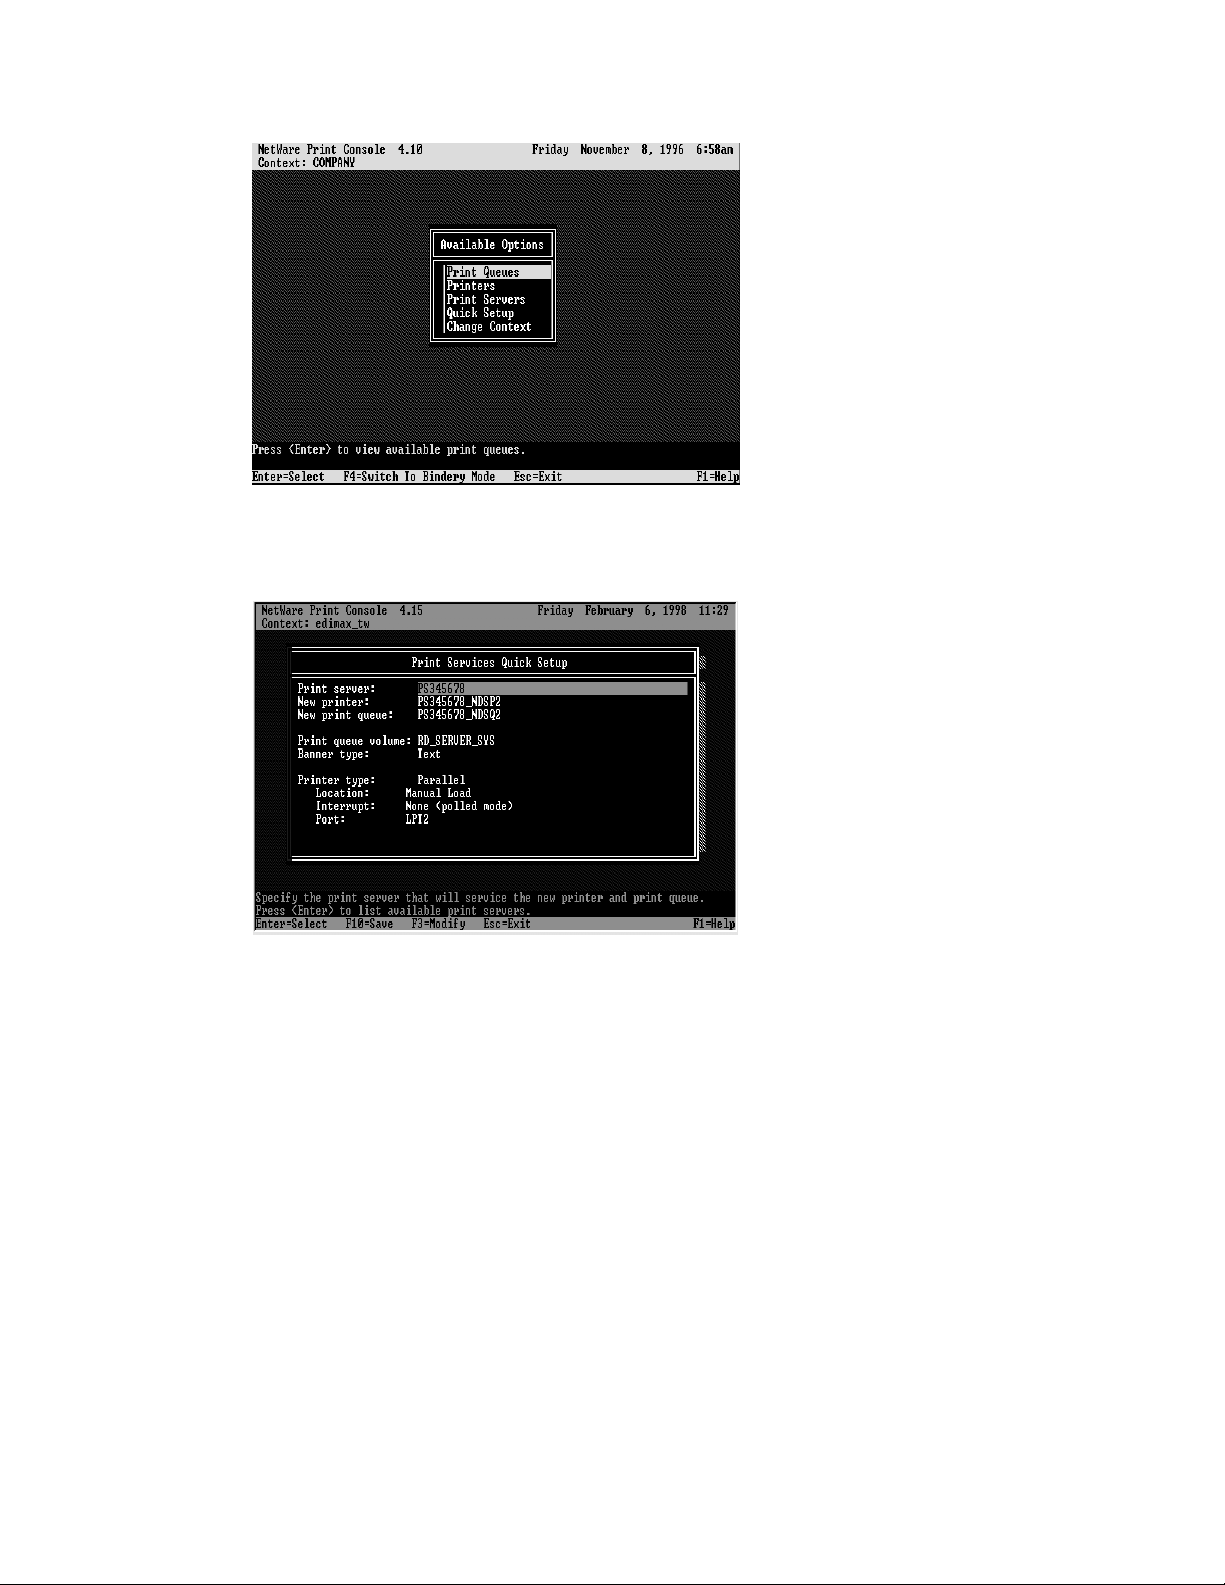
11. Choose Quick Setup from the menu.
12. Enter the print server name (either the PSxxxxxx
name or an alias name you have assigned) in the Print
server field.
13. Assign printer and print queue names.
14. Set the Banner type to PostScript if you are using a
PostScript printer, and to Text otherwise.
Page 73

15. Press F10 to save the new configuration.
16. Reset the print server to have the changes take effect.
NOTE: The print server may require up to a minute
after power-up to log into a NetWare Directory Services
context because of the large number of calculations NDS
security requires.
Your print server should now be ready for use by
workstation users. You should be able to redirect printing
to your print server using a CAPTURE command.
5.3.2.2 Configuring in Remote Printer Mode
This remote printer feature is not available for our
10/100Mbps 3-port models. Make sure that you have
created the NetWare print server with Type Remote using
the PCONSOLE utility before you configure the print
server. For more detailed information about PCONSOLE,
please refer to NetWare‘s manual. You can set up the
NetWare print server, print queue and printer objects by
following the steps below:
1. Run the NetWare PCONSOLE program.
2. Change the current context, if necessary, using the
Change Context menu selection.
Page 74
3. Choose Quick Setup from the menu.
4. Enter the print server name in the Print server field.
5. Assign printer and print queue names.
6. Set the Banner type to PostScript if you are using a
PostScript printer, and to Text otherwise.
7. Set the Location to Manual Load.
8. Press F10 to save the new configuration and return to
the main menu.
Page 75

9. Choose the Printers menu.
10. Select your newly created Printer from the Printers
list.
11. You can view or edit the Printer number from 0 to
255.
12. Save the new configuration and exit PCONSOLE.
Page 76

You must load the NetWare print server on the NetWare
file server so that the print server configured as a remote
printer can connect to the print server and service the
print jobs. To load the NetWare print server, type “LOAD
PSERVER.NLM PrintServer” in the system console of the
NetWare file server; PrintServer is the print server name
newly created by the PCONSOLE program.
To configure the print server as a NetWare remote printer,
perform the following steps:
1. Log in to your NetWare server as ADMIN.
2. Run the PSETUP program included on the CD-ROM.
ex: e:\dosutil\psetup.exe
3. Select your new print server from the list provided.
4. Choose NetWare Configuration from the menu.
5. Select Remote Printer in the Printing mode field.
Page 77

6. Type the print server’s name in the Print server field.
The print server that is being configured as a remote
printer now will service the printer.
7. Type the printer number assigned in PCONSOLE in
the Printer Number field.
8. Press Escape to exit the NetWare Configuration screen,
confirm that the changes should be saved, and exit
PSETUP.
9. Reset the HPS3P to have the changes take effect.
Page 78

6. UNIX System Network
Page 79

6.1 Introduction
The print server is available for TCP/IP printing through
the Unix lpd (Line Printer Daemon) protocol. The lpd
protocol originated with Unix release is based on the BSD
version of Unix and supported under most versions of
Unix.
This chapter explains how to configure the print server
for TCP/IP operation, and how to modify configuration
files on your Unix system to allow printing to the print
server. The configuration examples in this manual follow
the syntax for BSD based Unix systems. Please refer to
the related system documentation for the correct syntax of
your systems.
To configure the print server for lpd printing, perform the
following procedures below:
1. Enable the HPS3P’s TCP/IP Support.
2. Set the HPS3P’s IP address.
3. Verify the HPS3P’s IP Address.
4. Configure remote lpd printing on the host.
5. Print a test page.
In the next section, we will describe these five procedures
in depth.
Page 80

6.2 Enable Print Server’s TCP/IP Support
The default configuration of the HPS3P has TCP/IP
support enabled. You can configure the HPS3P to enable
TCP/IP support using the configuration program or
PSETUP program on the CD-ROM included with the
HPS3P.
Page 81

6.3 Setup the HPS3P’s IP Address
The print server must have a unique IP address in order to
be recognized by the network.
You can set up the IP address on various Unix systems
using any one of the following methods:
1. ARP & Ping Assignment (Recommand for Unix)
2. DHCP (Dynamic Host Configuration Protocol)
3. BOOTP (Bootstrap Protocol)
4. RARP (Reverse Address Resolution Protocol)
The print server will use the last three methods to obtain
its IP address automatically if its IP address is configured
as Auto (0.0.0.0).
6.3.1 ARP & Ping Assignment
You can use ARP and Ping commands with a web
browser to complete print server’s IP address setting.
Parameters for the commands are as follows:
arp –s <IP Address> <Ethernet ID>
ping <IP Address>
For example, a print server with the following
configuration:
Page 82

Node ID: 0000B4010101
(the Node ID is printed on the rear side of the print
server)
Assign IP address: 203.66.191.12
arp –s 203.66.191.12 00-00-B4-01-01-01
ping 203.66.191.12
In the meantime, your HPS3P IP will “temporarily”
be set to 203.66.191.12 (will restore after reboot).
Therefore, you need to run your web browser to set a
permanent IP address (refer to section 8.3.7 for
detailed IP configuration).
6.3.2 DHCP
There are many Unix systems that support the DHCP
protocol nd the procedures to configure the DHCP
server database are different. This manual does not
describe the DHCP server configuration on Unix
systems. It is highly recommended that the DHCP
server should be located on the same network as the
HPS3P.
6.3.3 BOOTP
If you have the BOOTP daemon, bootpd, running on
your UNIX system which is accessible to the print
server, you can use the BOOTP protocol to set up the
Page 83

IP address of the print server. We recommend that
the BOOTP server should be located on the same
subnet as the print server. If you use Network
Information Services (NIS) in your system, you may
need to rebuild the NIS map with the BOOTP
services before doing the following BOOTP
configuration. To rebuild the NIS map, please refer
to your system documentation.
To configure the IP address data for the BOOTP
server, you will need to log in as the host of the
BOOTP server with superuser (root) admin rights.
Perform the following steps to add address entries:
1. Optionally, assign a name corresponding to the print
server’s IP address. You can add this address to the
/etc/hosts file, by adding the following line:
203.66.191.12 pserver
2. Add an entry to the host’s /etc/bootptab file, similar to
the following:
hostname:\
:ht=1:\
:ha=print_server_ethernet_address:\
:ip=print_server_ip_address:
Lines should be indented with tabs.
Page 84

Where hostname is the device name of the HPS3P;
the ht=1 tag specifies that the hardware type is
Ethernet. The ha= tag specifies that the Ethernet
address of the HPS3P is the Node ID located on the
print server. The ha tag must be preceded by the ht
tag. The ip= tag should correspond to the IP address
you want to assign to the print server.
For example, below is an example of a print server
with the following configuration:
Node ID: 0000B4010101 (this implies Ethernet
address is 0000B4010101),
IP address: 203.66.191.12
The entry for this print server in the /etc/bootptab
file should be:
PS010101:\
:ht=1:\
:ha=0000B4010101:\
:ip=203.66.191.12:
6.3.4 RARP
The procedure below enables the RARP daemon
running on your system to respond to a RARP
request from the print server and assign an IP
address to the print server.
Page 85

1. Log in the host of RARP server as the superuser (root).
2. Assign a name corresponding to the print server ’s IP
address. You can add this address to the /etc/hosts file,
by adding a line such as:
203.66.191.12 pserver
3. Add the Ethernet address and the host name for the
print server to the /etc/ethers file, by adding a line like:
00:00:B4:01:01:01 pserver
The Ethernet address of the print server is the Node
ID located on the print server.
4. If your system uses Network Information Services
(NIS), you will need to make changes to the NIS host and
its databases.
5. Check if the RARP daemon is running using the ps and
grep commands. If the RARP daemon is not running on
your host, type “rarpd -a” to run the RARP server.
Page 86

6.4 Verify the HPS3P’s IP Address
To verify that your print server is responding to the
newly assigned IP address, use a PING command to
check the HPS3P’s response:
ping ip-address
Page 87

6.5 Configure Remote lpd Printing on the Host
You can use this procedure to configure your Unix host(s)
to allow printing to your network. The procedure below
can be used for Unix variants that are related to BSD
Unix, like SunOS or Linux. For other versions of Unix,
consult your system documentation, keeping in mind that:
1. The print server should be treated as a BSD networked
print server host.
2. The host name should be the name (or IP address) that
you have assigned to the print server.
3. The printer name (or queue name) on the remote host
should be lpt1, lpt2 or lpt3, the name of the parallel port
on the print server.
You will need to perform the tasks below, logged in as
the superuser (root). To configure your Unix host for
printing,
1. Optionally, assign a name corresponding to the print
server’s IP address. You can add this address to the
/etc/hosts file, by adding the following line:
203.66.191.186 pserver
2. Create a spool directory for the printer in the same
directory where spool directories are normally kept on the
machine, such as /var/spool or /var/spool/lpd:
mkdir /var/spool/lpd/pserverd
chown daemon /var/spool/lpd/pserverd
Page 88

chgrp daemon /var/spool/lpd/pserverd
chmod 775 /var/spool/lpd/pserverd
3. Add an entry to the host’s /etc/printcap file, similar to
the following:
printer-name:\
:lp=:\
:rm=203.66.191.186:\
:rp=lpt1:\
:lf=/var/spool/lpd/pserverd.log:\
:sd=/var/spool/lpd/pserverd:\
:mx#0:
Lines should be indented with tabs. More than one printer
name can be used, with variants separated by vertical bars
(name1|name2).
The rm= entry should correspond to the IP address you
have assigned to the print server. You can also use a host
name if you have one assigned in the /etc/hosts file.
The sd= entry should correspond to the spool directory
you created in the previous step.
The rp= entry should correspond to the port name of the
remote printer. The values should be one of lpt1, lpt2 or
lpt3 depending on the which printer port your printer is
attached to (for multiple port print servers).
The print server should now be available for printing
from your Unix host.
Page 89

6.6 Print a Test Page
To print to the print server, you can use the lpr command:
lpr -Pprinter-name file ...
or, you can use the lp command on SCO Open Server:
lp –d printer-name file ...
Where printer-name is one of the names for the printer in
the /etc/printcap file, which you created in the previous
step.
Consult your system documentation for more information
about printer configuration and administration and about
lpr and other printing commands.m
Page 90

7. Configuration Utility
Page 91

7.1 Introduction
This chapter introduces the HPS3P’s system configuration
utility in a Windows environment. This utility is
automatically installed during the Windows Administrator
Utility installation procedure - refer to section 3.2 and
3.3.
This utility provides complete management and
configuration functions for the print server. This utility
only provides configuration functions for the HPS3P
itself; it does not include configuration functions for
client side or other file server or NetWare server in the
network environment.
The Configuration Utility provides the following
configuration and management functions:
General: General Information of print server
PrintServer Status: PrintServer Network Status
Printer Status: Attached Printer Status
IP Cfg: IP Address Configuration
NW PS Cfg: NetWare Print Server Configuration
NW RP Cfg: NetWare Remote Printer Configuration
NW Information: NetWare Printing Summary
Print Server Cfg: Print Server Network Ability Setting
Page 92

Restore Default: Restore to the Default Value
Upgrade: Firmware Upgrade / Update
DHCP Cfg: DHCP Server Configuration
DHCP Information: DHCP Information
Mail Print Cfg: Email Printing Setting
SMB Cfg: SMB Printing Setting
SNMP Cfg: SNMP Parameter Setting
AppleTalk Cfg: AppleTalk Protocol Setting
The following section will explain in detail each specific
function.
Page 93

7.2 General - General Information for the
HPS1U
Each time you run the HPS1U’s configuration utility, the
system will initially delay for several seconds because the
utility is using system’s available network protocols to
search for all print servers on the network. Therefore, you
must first select the print server you would like to
configure from the Print Server Name’s field under the
General tag. The system will, at the same time, display
the selected print server’s model number and firmware
version.
You may select any available printer port in the Printer
Port’s field at the bottom of that page, and then press the
“TestPrint” button to test print.
By pressing the “Refresh” button, you may manually
search again for print servers on the network.
Page 94
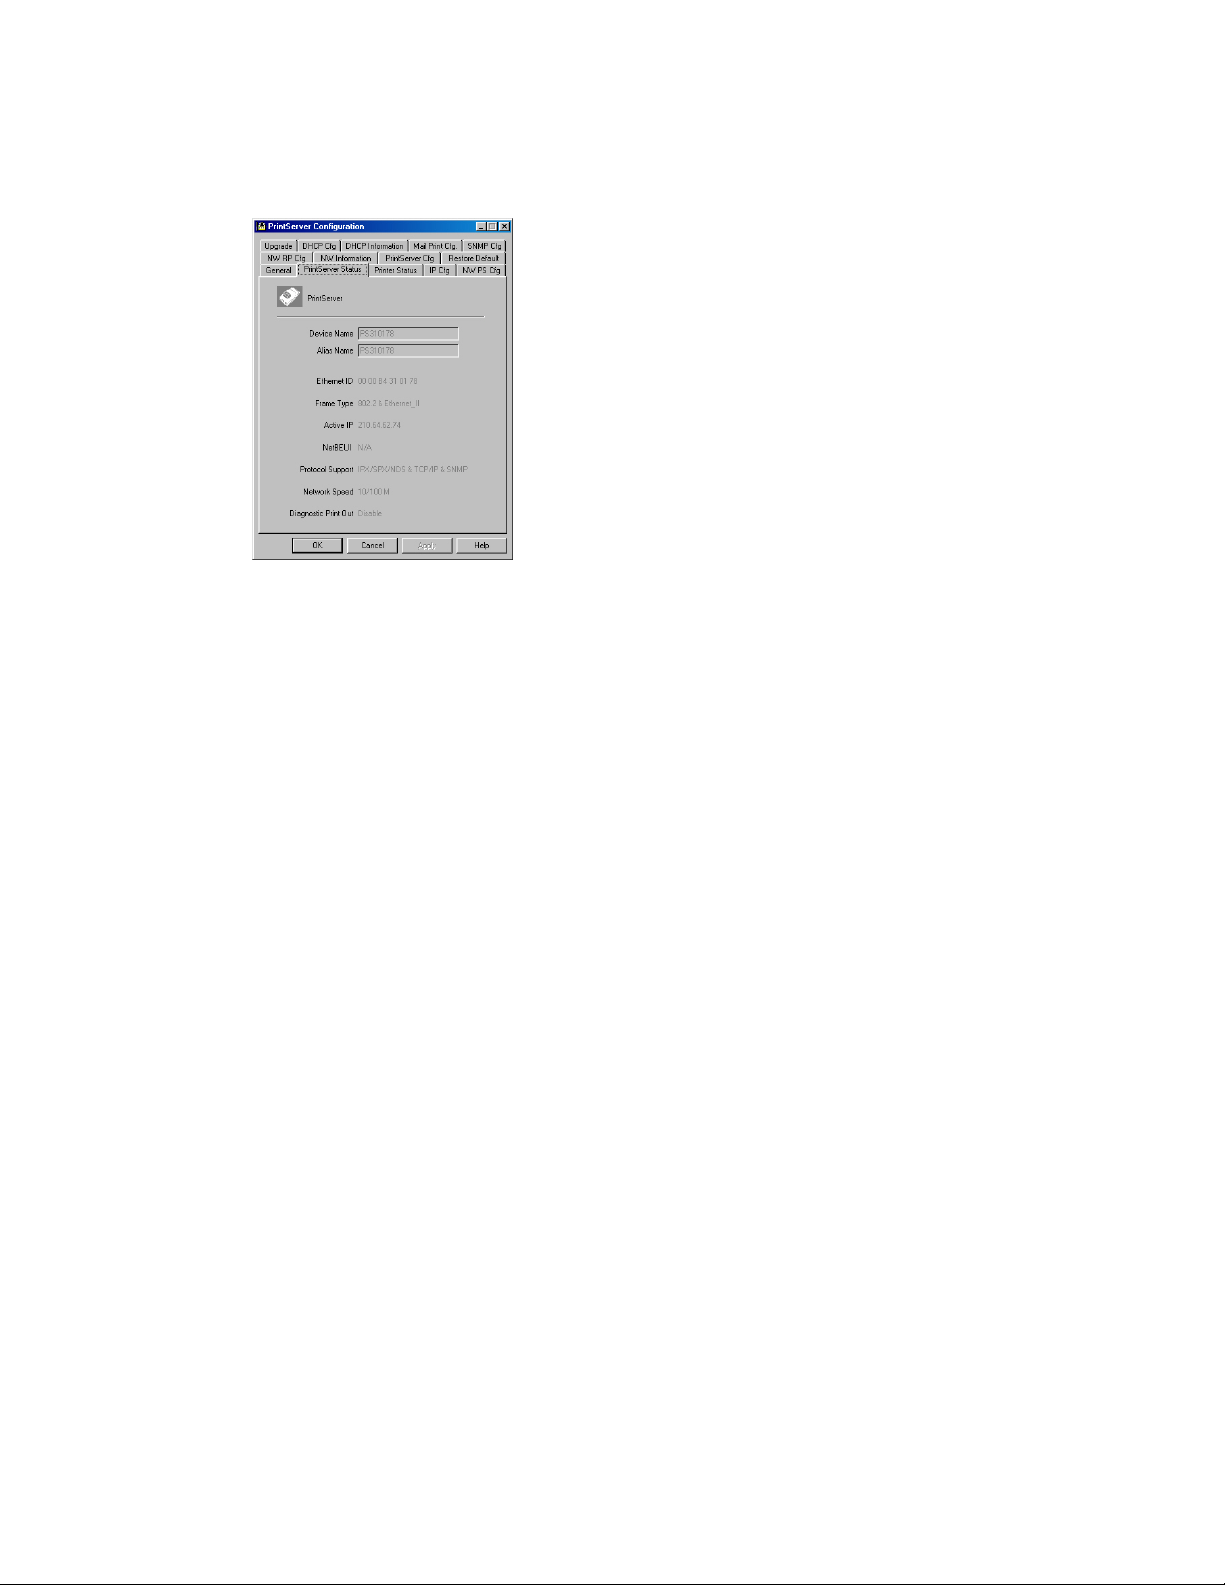
7.3 Print Server Status
The Print Server Status page displays the network ability
and status of the HPS3P in detail.
Page 95
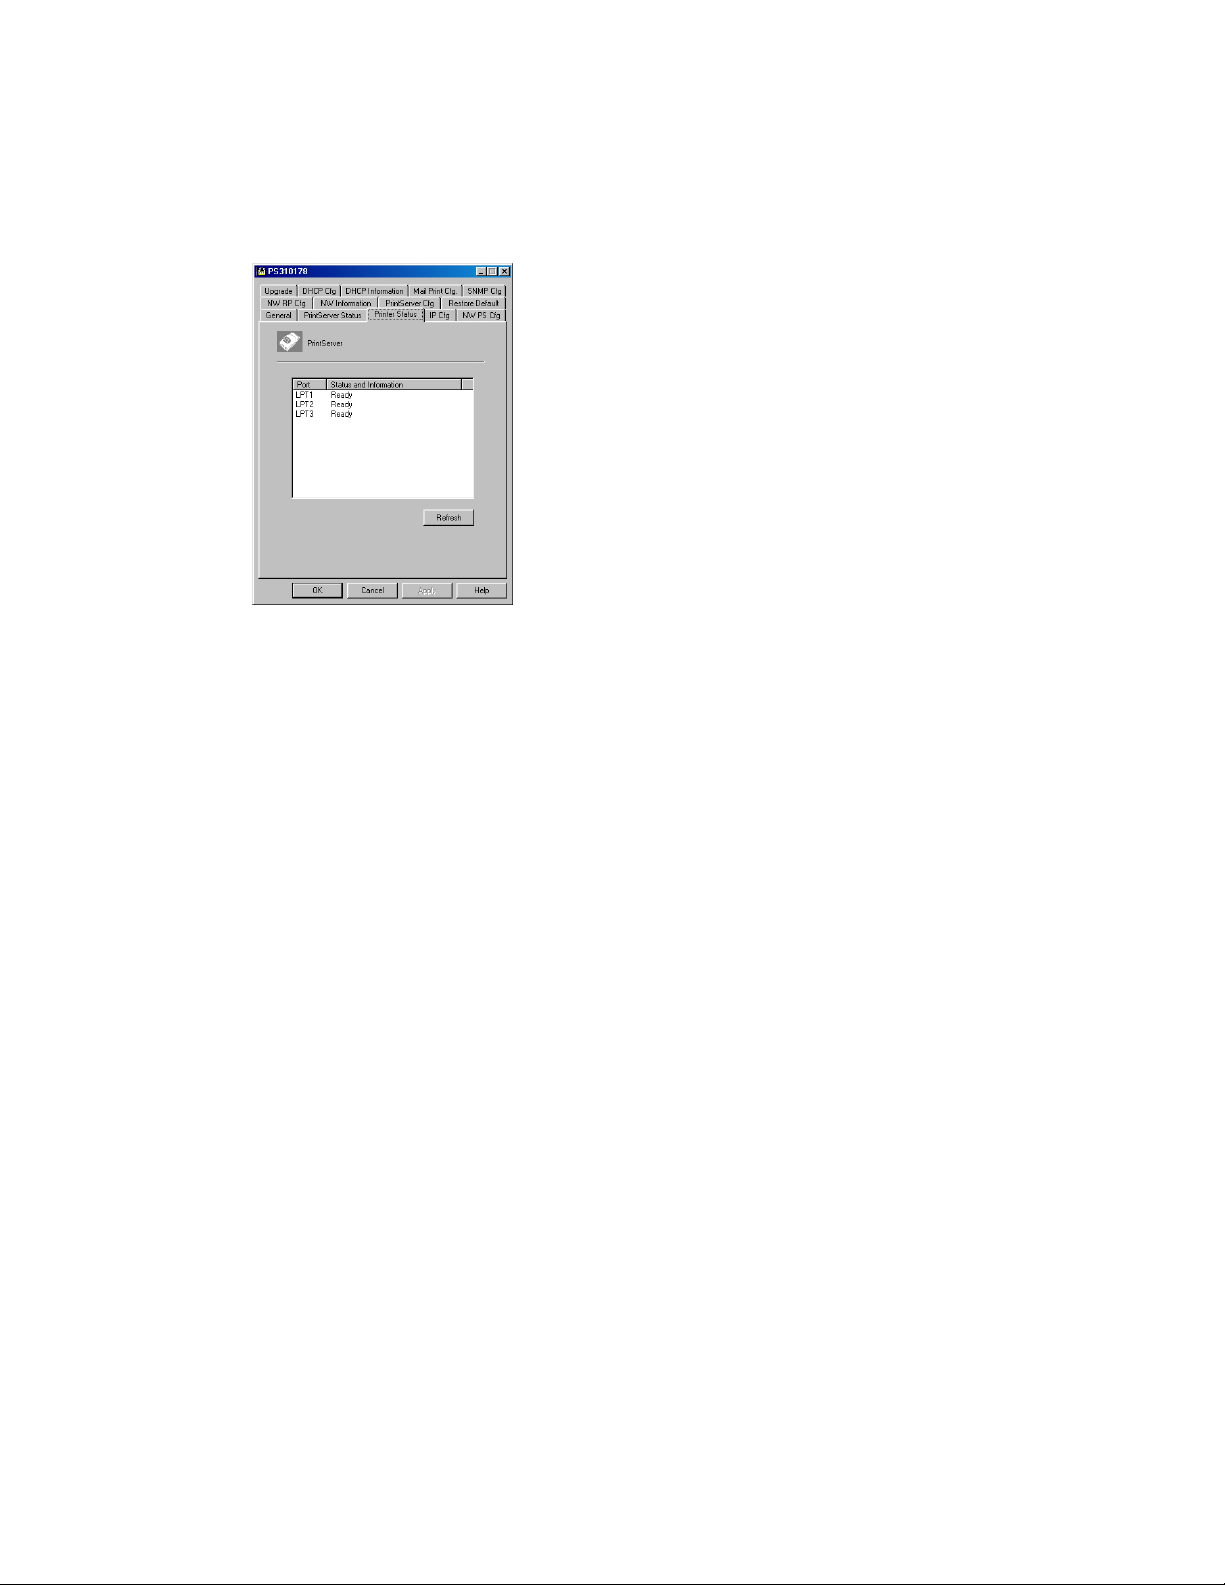
7.4 Printer Status - Attached Printer Status
The Printer Status page displays the printer status for
each port.
Page 96

7.5 IP Cfg - IP Address Configuration
The IP Cfg page allows you to configure the HPS3P’s IP
address. The print server will obtain its IP address
automatically if you configure the IP address as Auto.
Click the Write button to save the configuration to the
print server and Click the Reset button to reset the print
server and have the changes take effect.
Page 97

7.6 NW PS Cfg - NetWare Print Server
Configuration
The NW PS Cfg page allows you to set:
The Alias name, a nickname by which the print server can
be called (in addition to the PSxxxxxx name printed on
the label).
The operation mode, which determines how the print
server logs into the network between Bindery mode and
NDS mode.
The primary file server where the NetWare print server
object is located, or the print server’s NDS tree and
context.
The remote printer, which determines if the print server
works in remote printer mode.
The polling interval, which determines how often the
print server checks the print queues.
Page 98

The Write button: save the configuration to the print
server.
The Reset button: reset the print server to let the changes
take effect.
Page 99

7.7 NW RP Cfg - NetWare Remote Printer
Configuration
Only some print server models provide Remote Printer
function. The NW RP Cfg page allows you to set:
The Print Server, which will be serviced by the print
server configured as a remote printer.
The Printer Number, which is assigned in PCONSOLE.
The remote printer, which determines if the print server
works at remote printer mode.
The Write button: save the configuration to the print
server.
The Reset button: reset the print server to let the changes
take effect.
Page 100

7.8 NW Information - NetWare Printing
Summary
The NW Information page displays the print server
connection information for NetWare.
 Loading...