

Page 1
QUICK INSTALLATION GUIDE
Wireless Internet
Connection
Part No. HOW2R1
Start Here
1. System Requirements
• Pentium compatible PC or above w/ CD-ROM
• 802.11b, 802.11g or 802.11n Wireless Network
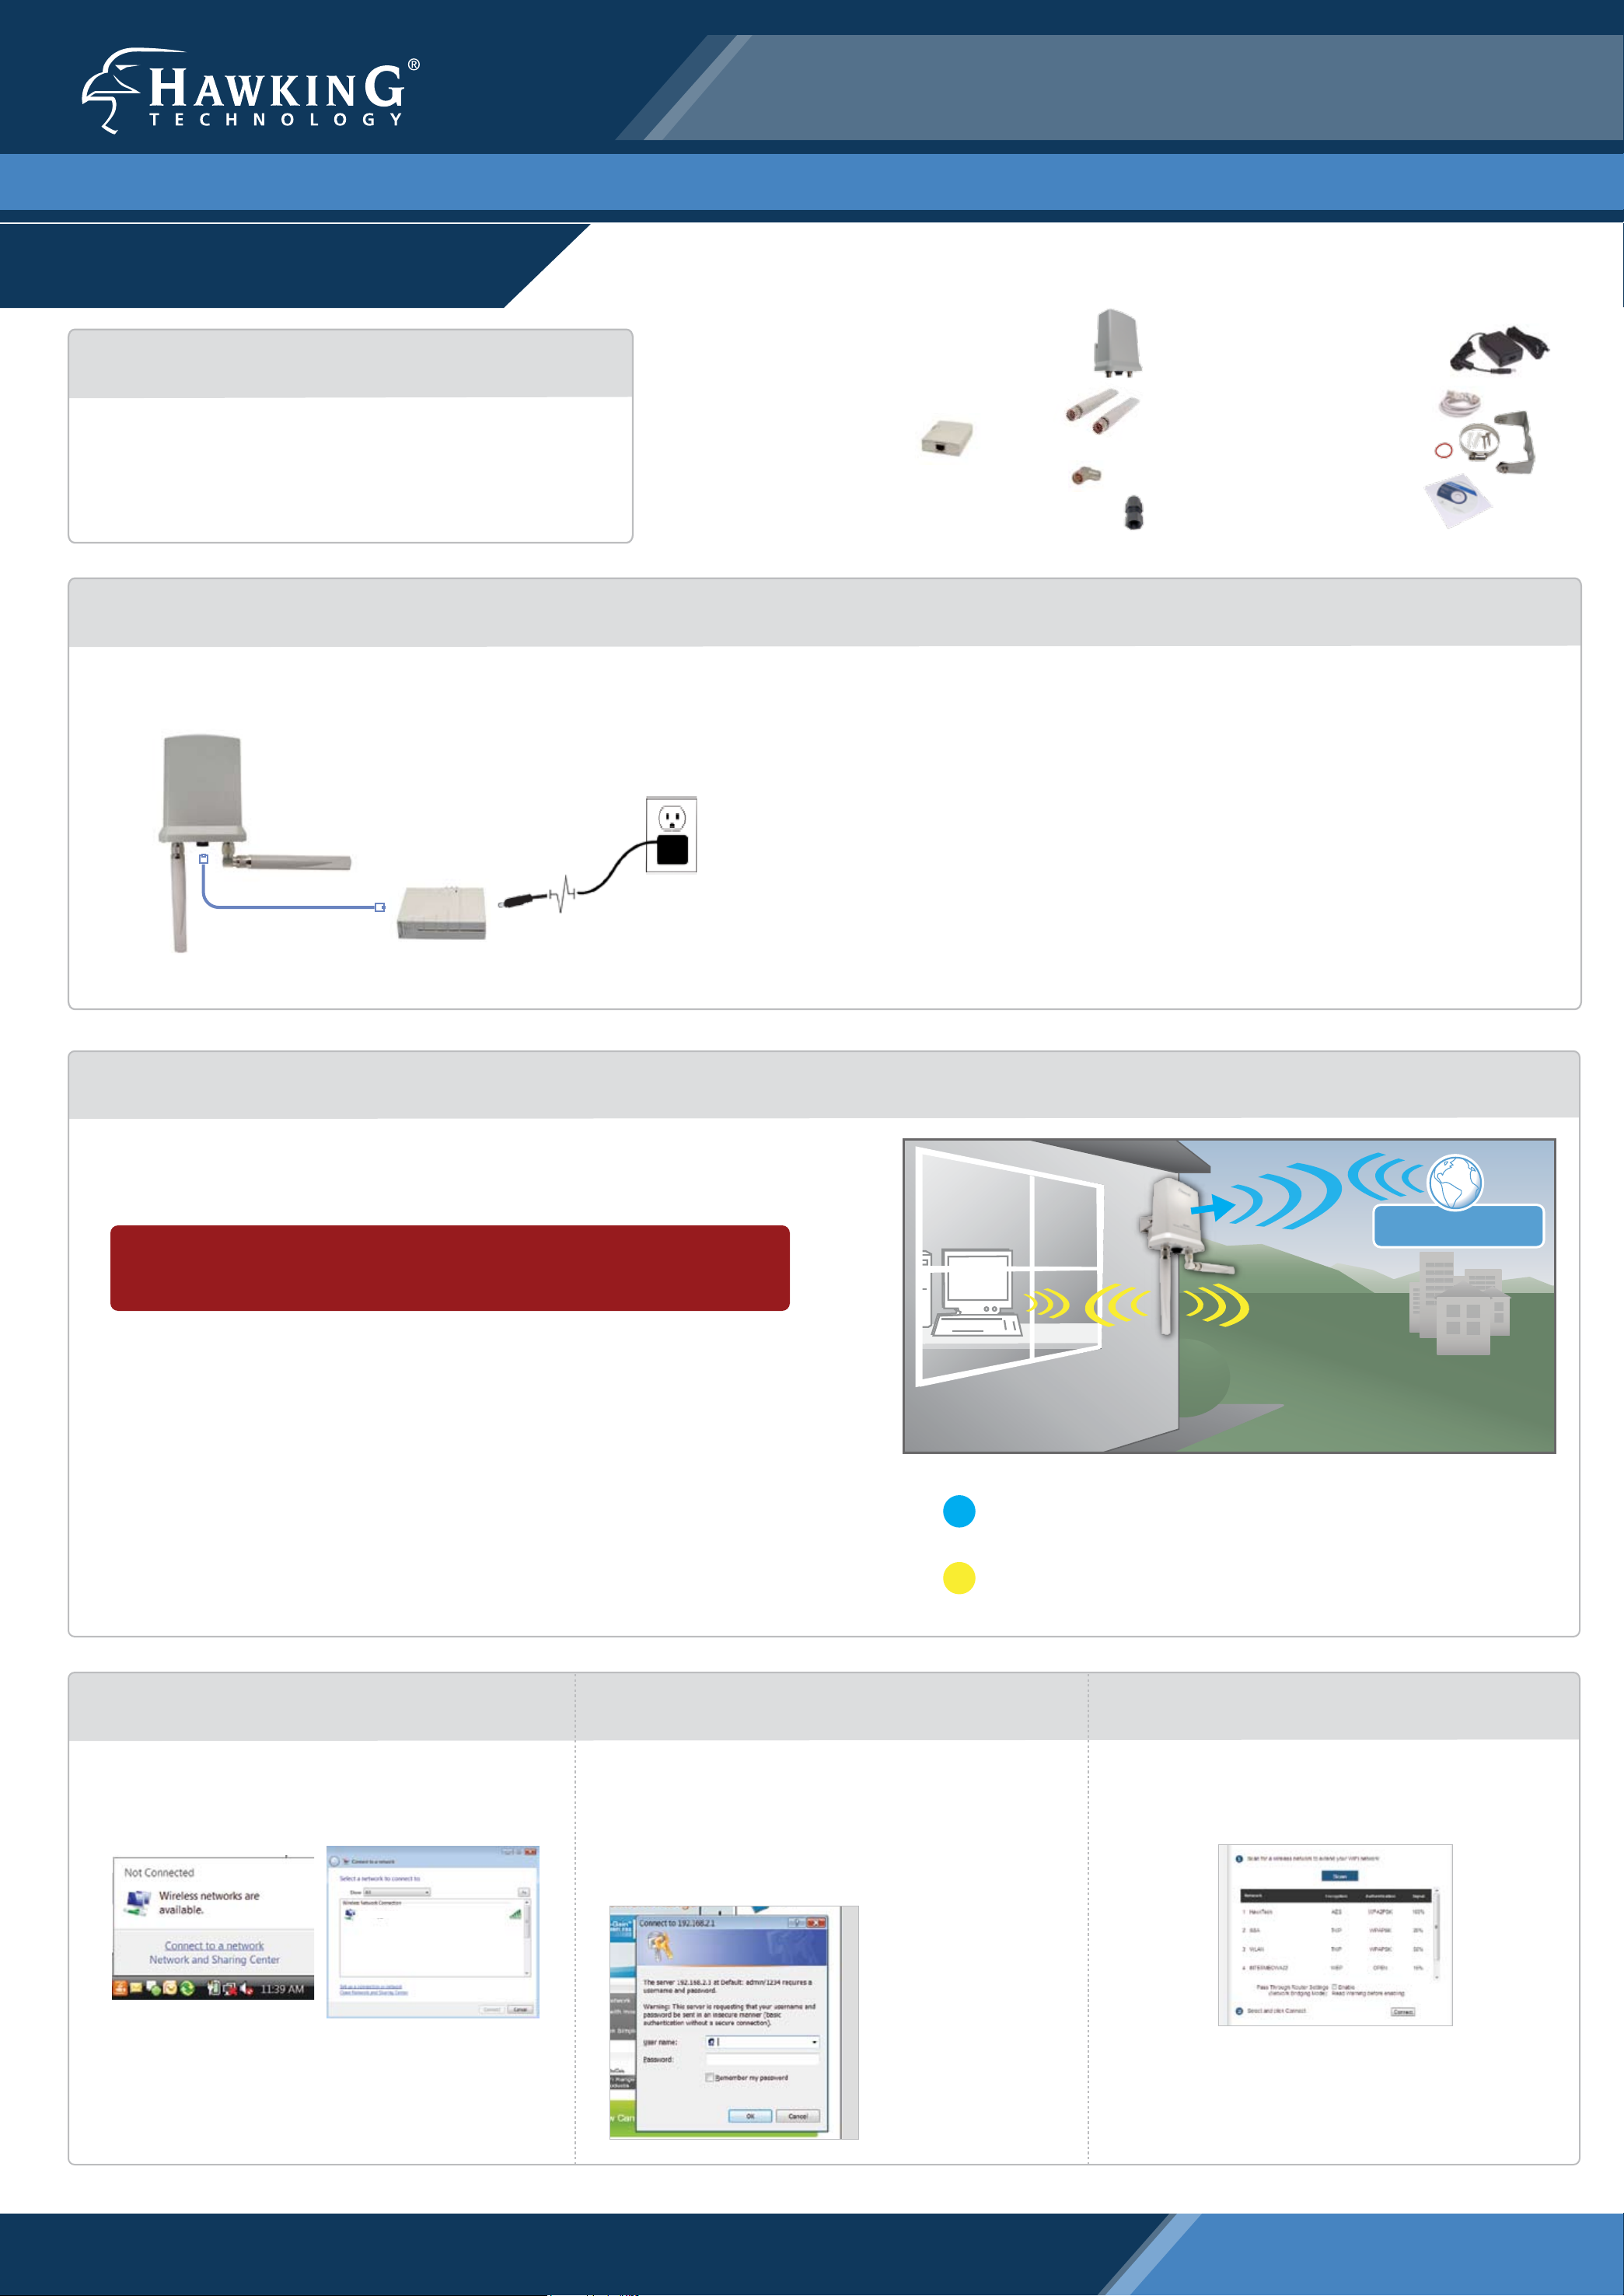
2. Initial Configuration: Hardware Setup
Hi-Gain™ Outdoor Wireless-N Dual Radio Smart Repeater
Check Package Contents
• 1 x Hi-Gain™ Outdoor Wireless-N
Dual Radio Smart Repeater
• 2 x Hi-Gain Outdoor Antennas
• 1 x PoE Injector
• 1 x L-shape antenna connector
• 1 x Waterproof Gasket Kit for RJ-45
• 1 x Power Cable and
Power Transformer
• 1 x Ethernet Cable
• 1 x Mounting Kit
• 1 x Setup CD-Rom
Hi-Gain™ Outdoor
Dual Radio Smart Repeater
A
A
B
Powe over Ethernet
Injector
C
2. Find an Installation Location
Set up your hardware according to the diagram on the left for the initial
setup of the Outdoor Smart Repeater. After the initial setup is complete,
you may mount the Outdoor Repeater in your desired location.
A. Attach the antennas to the antenna connectors
(optional: the L-shape antenna connector is used to estab-
lish signal diversity for more wireless range.)
B. Attach an Ethernet cable from the PoE Injector to the
Ethernet Port on the Outdoor Smart Repeater
C. Attach the power adapter and power cable to the PoE
Injector
Your Hi-Gain™ Outdoor Wireless-N Dual Radio Smart Repeater should be placed in an
optimal location in your home or office to obtain the best performance. Find a location
that is closest to the wireless Internet connection that you are trying to connect to.
Make sure the Repeater is placed in a location where it can receive a
strong signal from the wireless Internet connection you wish to connect
to. The Repeater will not work without a signal that it can repeat.
A. Direct the Outdoor Smart Repeater’s Directional Antenna towards the Source of
your Wireless Internet Connection
The Internal Hi-Gain Wireless Directional Internet Antenna is designed so that the
Hawking logo should be pointed towards your wireless source
See the diagram to the right for antenna orientation instructions
B. Plug in the Power Adapter
When you have completed the antenna setup, plug in the included power adapter from
the PoE injector in an available power outlet.
1
Securely mount and position the HOW2R1 facing a wireless
Internet connection
2
Scan and connect to an outside wireless network
3. Connect to the Repeater
Using a computer with wireless networking access,
connect to the Repeater by searching for the wireless
network named: Outdoor_Repeater
Outdoor_Repeater
To create a wired LAN connection, an ethernet cable
may be connected to the LAN port of the PoE injector.
Click Next to continue.
4. Open a Web Browser
Using the same computer, open a web browser and type
in the following web address in the web address bar:
http://setup.hawkingtech.com
(If the above address fails use the following address in your web browser
address bar: http://192.168.1.220)
Once the page loads,
enter the following
login information:
Login: admin
Password: 1234
Click Login to
continue.
5. Scan for your Network
Click Scan to find your wireless Internet connection.
After the list appears, select the connection and click
Connect.
If the signal strength is low or your network does not
appear, you may need to readjust your location of
your Repeater or the position of its antennas.
Click
Scan
to try again.
Click Next to continue.
Technical Support: 1.888.202.3344 or techsupport@hawkingtech.com
www.hawkingtech.com
Page 2
6. Configuration Settings
7. Complete Setup
8. Additional Setup Features
The Setup Wizard will now prompt you to automatically
configure your IP settings (recommended) and enter a
security key if the network you are connecting to is an
encrypted network. Enter the key and click Continue.
IP Settings Wireless Security
If you do not know the security key of the network you are connecting to,
consult your network administrator.
The setup of your Repeater is now complete. If you
wish to change the name (SSID) of your home/office
wireless network (Outdoor_Repeater) you may do so
here.
If you wish to add wireless
Click Finish to complete your setup then click Apply to
confirm settings and reboot. The wizard will prompt
you to test your Internet connection after the system
has rebooted.
security to your home/office
network you may enter one
here. All users logging in
through the Repeater will be
required to enter this
passcode.
The HOW2R1 has many additional setup features. To
access these settings you may click on any of the main
menu tabs located on the interface: General Setup,
Status and Tools.
For more information on the advanced features and
settings of the Hi-Gain™ Outdoor Wireless-N Dual Radio
Smart Repeater please refer to the User’s Manual.
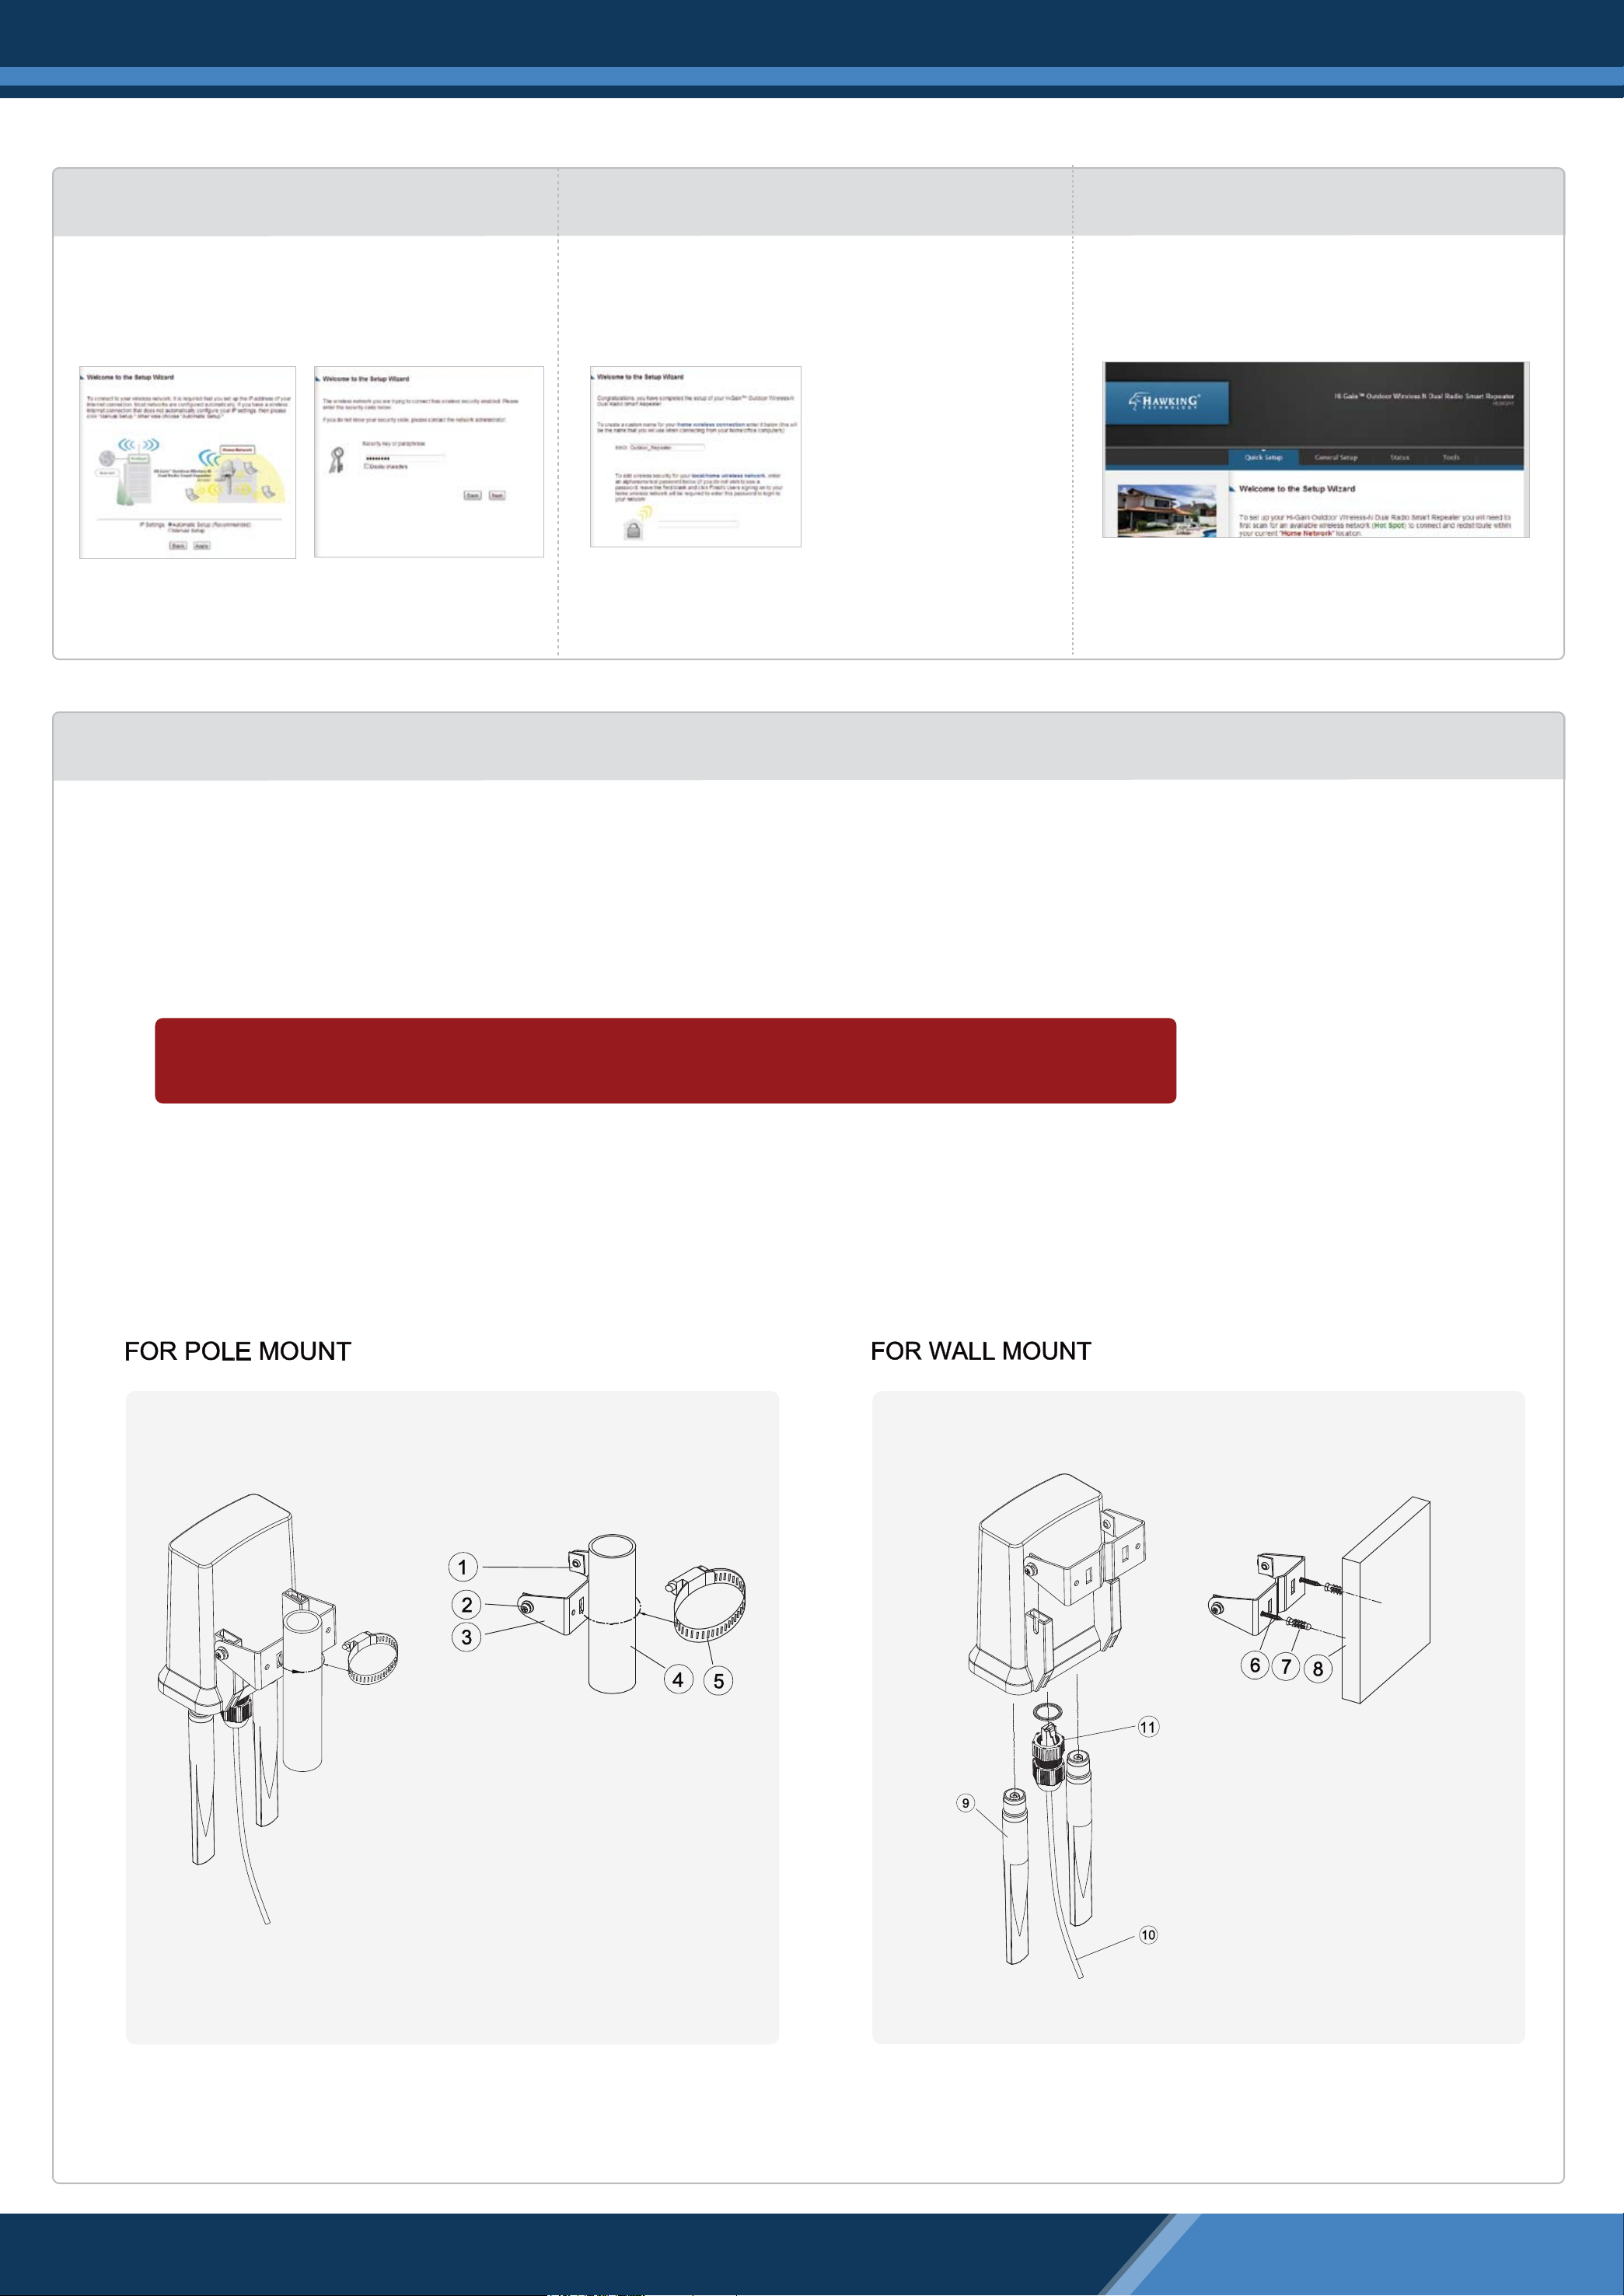
Mounting your Outdoor Dual Radio Smart Repeater
With the initial configuration complete, you may now mount your Outdoor Smart Repeater in your desired location.
Note: Face the Hawking logo on the Smart Repeater towards the source of your wireless Internet connection. The internal Hi-Gain Directional Antenna uses a
concentrated, narrow signal pattern and may need to be adjusted for the best wireless connection with your wireless Internet connection.
See the instructions below on how to use the included mounting kit.
Mounting and Assembly Instruction
Note: Do NOT mount your Smart Repeater until you have completed the initial configuration.
Double check the contents of your mounting kit before you begin installation.
1. Square Nut (2 pcs)
2. M5-12 Screw (2 pcs)
3. M Shape Mounting (1 pc)
5. Hose Clamp 2 (1 pc)
6. Wall Screw (2 pcs)
7. Wall Anchor ( 2 pcs)
9. Omni-Directional Antenna (2 pcs)
10. RJ-45 Connector (1 pc)
11. Water Proof Gasket Kit for RJ-45 (1 pc)
4. Pole (not included)
8. Wall (not included)
Technical Support: 1.888.202.3344 or techsupport@hawkingtech.com
© 2010 Hawking Technologies, Inc. All rights reserved. All trademarks herein are the property of
their respective owners. Apple and Mac are registered trademarks of Apple Computer, Inc. No
affiliation implied or expressed.
 Loading...