

Hawking HOD45B Quick Installation Manual

Q
Q
uick
uick I
nstallation
nstallation G
uide
uide
Hi-Gain
Hi-Gain
TM
TM
Outdoor Dual-Band Wireless-N Access Point/Bridge
Outdoor Dual-Band Wireless-N Access Point/Bridge
HOD45B
Package Contents
• 1x Outdoor Dual-Band Wireless-N
Access Point/Bridge
• 2x 5dBi Hi-Gain Dual-Band Dipole
Antennas
• 1x L-Shaped Antenna Connector
• 1x Power-Over-Ethernet (PoE) Adapter
• 1x Power Cable and Power Transformer
• 1x Waterproof Gasket
• 1x Three foot Ethernet Cable
• 1x Setup CD-ROM
• 1x Quick Installation Guide (QIG)
Requirements
• Ethernet Cable is required (length
will depending on mounting
location)
• Wired or Wireless Internet
Connection
• A Wired or Wireless Network Device
(Tablet, Smartphone, Mac or
Windows Computer
• Power Outlet
Start
Start
Here
Here
This Quick Installation Guide provides a quick
and easy way to set up the HOD45B in Access
Point, Bridge or Universal Repeater mode. If you
need to use the other modes, please refer to the
manual located on the CD.
i
1) Plug the provided antennas into the
HOD45B. One antenna will be connected to
an L-Shaped antenna connector. Screw the 2
antennas onto the bottom panel of the
HOD45B.
2) Installing the Waterproof Gasket.
Using a network cable, please attach the
waterproof gasket in the following order.
Connect the Ethernet
cable rst into the
Ethernet/Power port on
the HOD45B. Then
tighten the bottom cap
on the Waterproof Gasket
to secure.
1 Hardware Setup
3) Installing the Power-over-Ethernet (PoE) Adapter
Plug the other end of the Ethernet Cable into the PoE Adapter. It should
go into the port labeled “Power + Data Out”. Connect the power adapter
and power transformer to the PoE Adapter and into an available AC
Socket.
Optional: If you wish to connect to
the HOD45B using an Ethernet
cable from a computer, connect an
Ethernet cable to the port labeled
“LAN” and plug the other end into
your computer. Skip to Step 3.
Note: An outdoor Ethernet cable is not included with the HOD45B and
must be purchased serperately. The maximum recommended length if 150
Feet for the Ethernet Cable.
O
th
c
a
Et
“L
yo
Reset Button
Reset to manufacturer settings - Unscrew
cover and use a long, thin object to press
for a minimum of 15 seconds, unplug the
power for a few seconds then plug it in
Antenna Connectors
Two RP N-Jack Antenna Connectors
Ethernet/Power Port
Connects to PoE
adapter for power and
for wired connections
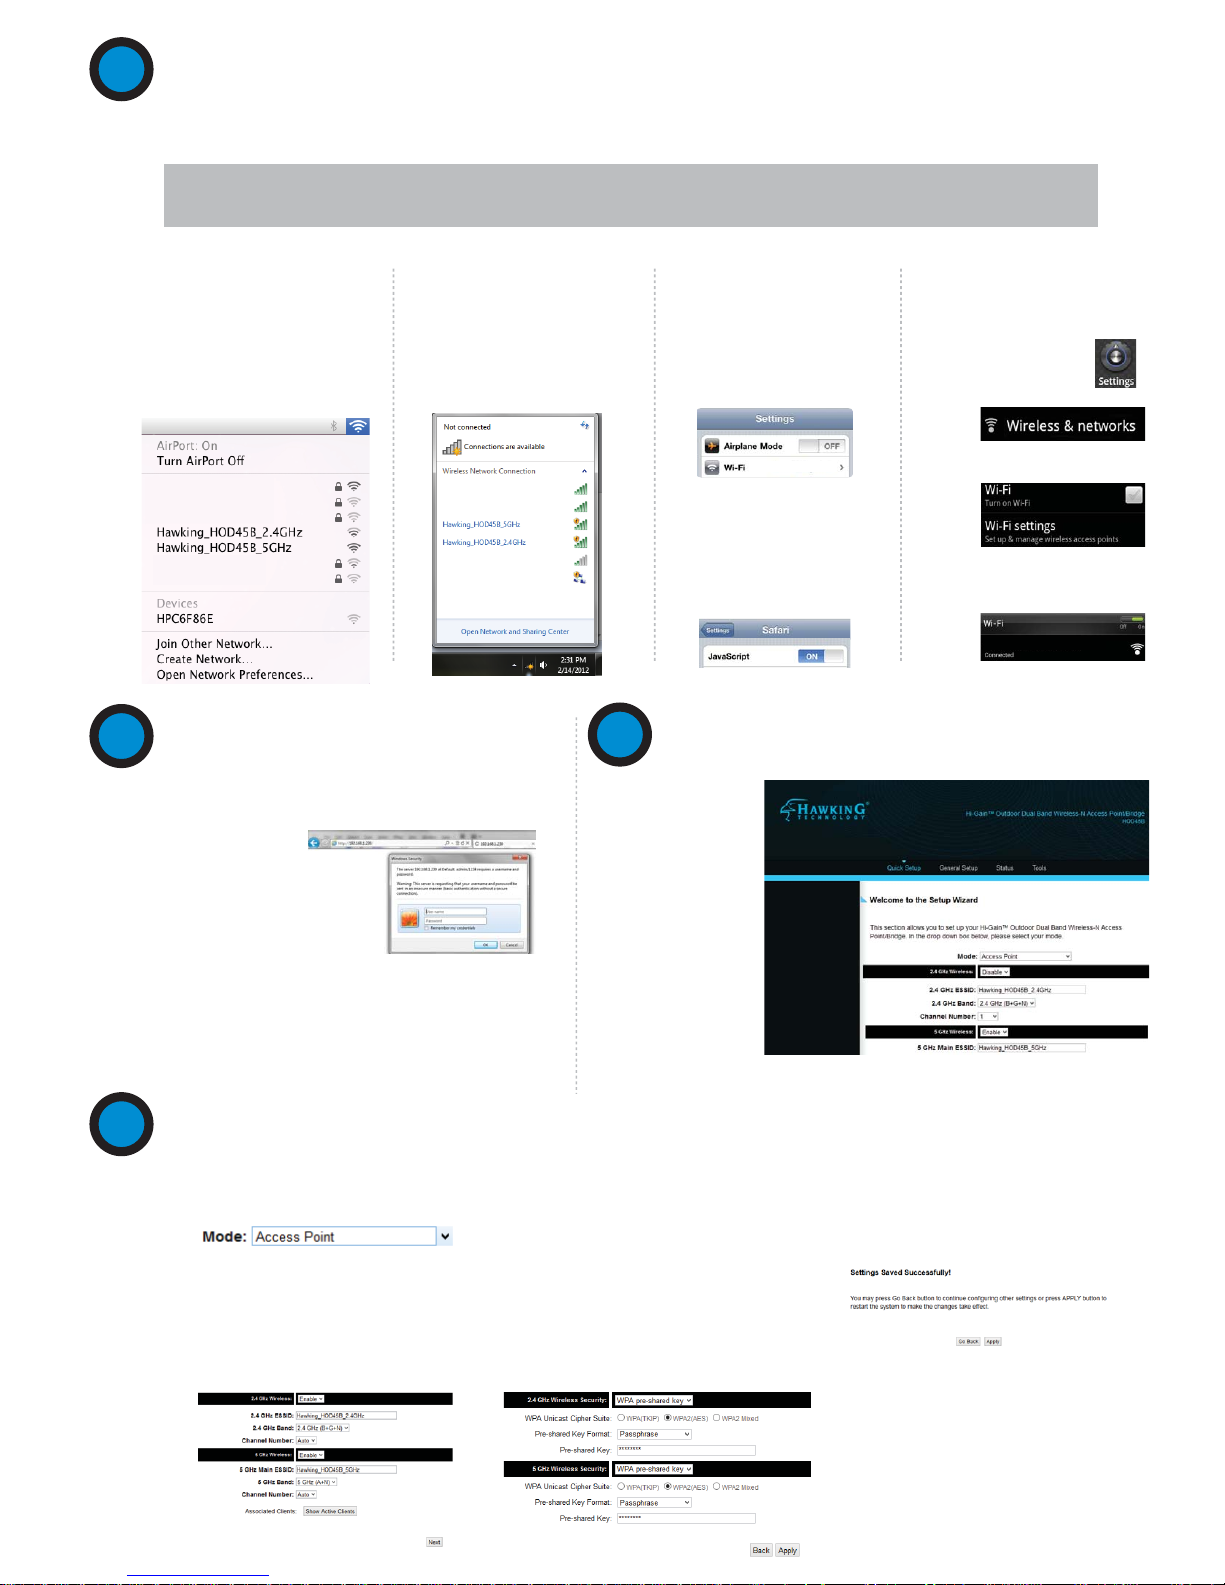
C. The HOD45B will ask you if you
wish to apply these settings. Click
“Apply”.
Now use an Ethernet Cable to connect
the HOD45B to your router through the
LAN port (on the PoE adapter and the
Router). Congratulations, you have
completed setup in Access Point Mode.
B. Hawking recommends you choose a
security setting to protect your network
from unauthorized users. In the drop down
box, please select “WPA (pre-shared key)”.
In the pre-shared key field, please type in a
password of at least 8 characters of your
choice. If you prefer to use a different type
of security or to have an open network, you
can choose your selection from the drop
down menu. Click “Apply”.
5 Configuring Mode Settings
2 Configuring the HOD45B Access Point/Bridge using a WiFi Enabled Device
Using a WiFi enabled device, access the HOD45B by connecting to the network named Hawking_HOD45B_ 2.4GHz or 5GHz.
The HOD45B transmits both 2.4GHz and 5GHz signal frequencies. Connecting to either frequency will bring you to the same
setup page.
For Mac Users
Click on the Wi-Fi icon in the
“Apple” toolbar. Click on the
“Hawking_HOD45B_2.4GHz” or
“Hawking_HOD45B_5GHz.”
network from the drop-down
menu. Then Continue to Step 3.
For Windows Users
On the lower right corner, go to
your wireless network select.
Click on
“Hawking_HOD45B_2.4GHz” or
“Hawking_HOD45B_5GHz.”
Then Continue on to Step 3.
Using an Android
device
On your mobile device, locate
the “settings” menu.
Using an iPad®
or an iPhone®
Go to your wireless setting,
select
“Hawking_HOD45B_2.4GHz”
Network. Then, go to Step 3.
3 Login into the HOD45B
4 Choosing your Mode
In the drop down box,
please select your
mode of operation for
the HOD45B. This
quick installation
guide will outline the
basic Access Point,
Station Infrastructure
(Bridge) and
Universal Repeater
modes. For other
modes and features,
please refer to the
manual on your CD.
Using the same device, open a web browser and type in
the following web address in the web address bar:
http://192.168.1.230
Note: If your device does not support 5GHz frequency, the “Hawking_HOD45B_5GHz” network will not be displayed. However you can
still complete your setup using the Wireless 2.4GHz frequency or Wired Connection. For Wired Connections, please plug your computer
into the PoE Adapter port labeled “LAN”, then go straight to Step 3.
Hawking_HOD45B_2.4GHz
(Make sure JavaScript is
ON. To check your
settings, go to Settings >
Select Safari >
then scroll down to view
Javascript.)
Select “Wireless & Networks”
Click “Turn on Wi-Fi” and then
click on the “Wi-Fi Settings”
option.
Look for
“Hawking_HOD45B_2.4GHz”.
Select it to connect.
Then Continue to Step 3
Hawking_HOD45B_2.4GHz
Login: admin
Password: 1234
Click Login to continue.
Once the page
loads, enter
the following login
information:
If the page doesn’t load, please check if JavaScript is
enabled. Generally, this should be enabled by default.
However, if it’s not, please go into your Browser Settings
and enable JavaScript.
ACCESS POINT MODE
A. In the drop down menu, choose
“Access Point”
The ESSID will be the wireless name of
your network. The HOD45B transmits in
both 2.4GHz and 5GHz. The default
wireless broadcast names:
2.4GHz: Hawking_HOD45B_2.4GHz
5GHz: Hawking_HOD45B_5GHz.
Click “Next”.
 Loading...