

Page 1
Page 2

Page 3

STEP 1
Check Package Contents for:
1.) One HMPS2U Wireless Multifunction USB Device Server
2.) Setup CD with Wireless Multifunction USB Device Server Software
3.) One DC 12V/1.5A Power Adaptor
4.) One Quick Installation Guide (QIG)
System Requirements:
- Windows 2000 / XP / Vista / 7
- Mac OS 10.5 - 10.7
For Airplay ®
-iTunes 10 + for Windows or Mac PC
-iOS 4.3+ for iPad, iPhone or iPod Touch
What You Will Need to Get Started:
1.) Up to four USB Printers/Multifunction Printers, USB Speakers*, USB Scanner or
USB Storage Devices along with manufacturer’s driver/software CD (if needed)
2.) A Computer with a CD-ROM drive that is connected to your home network
3.) One Ethernet cable
*USB speakers required for Airplay ®
GETTING STARTED
Page 4

Page 5
STEP 1
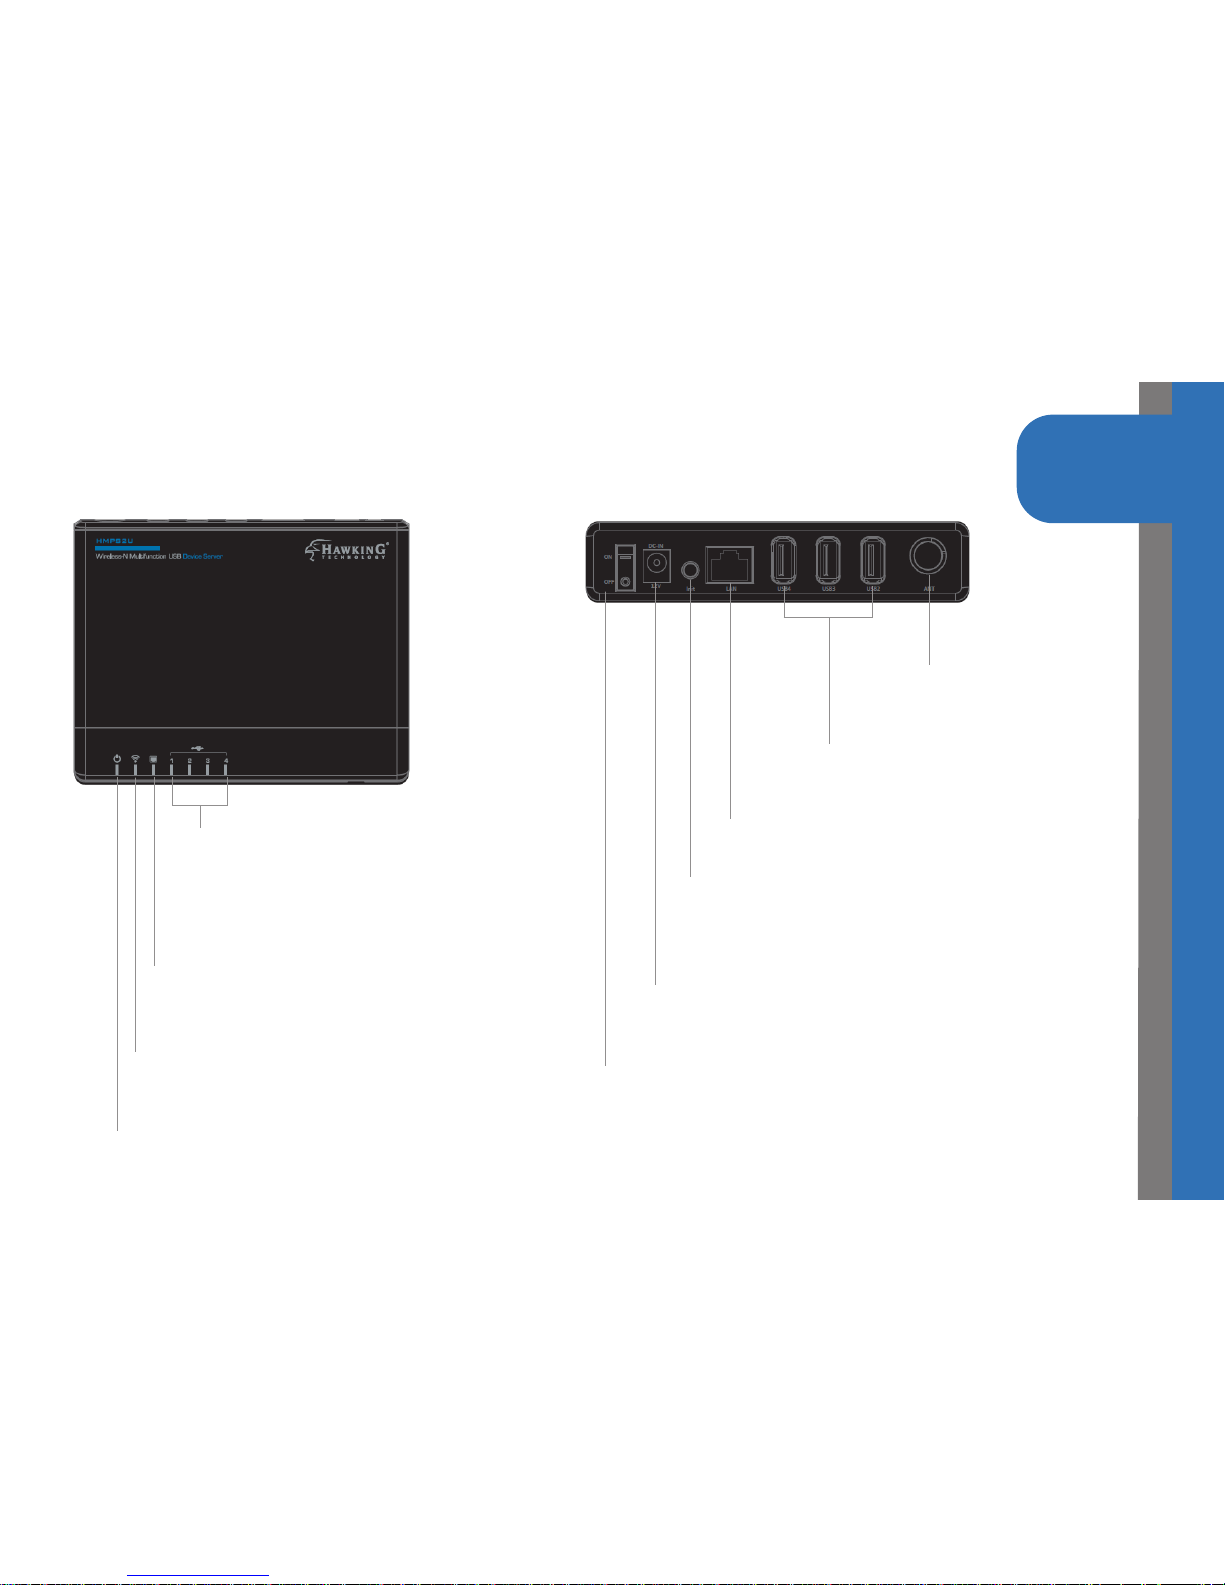
Front View
PRODUCT OVERVIEW
Back View
Power LED: Lit when powered on
Wireless LED: Lit when device is
being used wirelessly
LAN LED: Lit when device is plugged
into the ethernet port on the back
USB Port LED 1-4: Lit when a
USB device is plugged into
the corresponding port on
the back
On/Off Switch
Power Adapter Connector: DC
IN for 12V/1.5A adapter
Init: Reset button, press and hold for
30 seconds to restore to factory
default.
LAN: 10/100M Ethernet
USB 2-4: USB Ports for
USB Devices
Antenna for WiFi
capability
Page 6

STEP 2
HARDWARE INSTALLATION
Step 2: Connecting Your Server to a Network
1.) Use a Ethernet cable (not provided) and
connect one end to the “Network” port
of the HMPS2U. Connect the other end
to an available LAN Port on your network
router.
2.) Plug in the power adaptor (included in
package) to power on the print server. Make
sure the On/OFF switch is set to “ON”.
Page 7

STEP 3
Step 3A: Installing Software on Windows
1.) Insert Hawking software Setup CD.
2.) When the auto-load page appears, click
Setup Wizard.
3.) Click Next button in proceeding
installation windows until it completes.
SOFTWARE INSTALLATION
Page 8

STEP 3
Step 3B: Installing Software on Mac
1.) Insert Hawking software Setup CD.
2.) When the setup page appears, click
on the HMPS2u Software
3.) Click on the the installer, choose
“Install” when the window comes
up.
4.) Type in your username/password for
the software to install
SOFTWARE INSTALLATION
Page 9

Step 4: Configuring Your HMPS1U Print Server
1.) Open the Hawking Technologies HMPS2U
Control Center. While the program is running,
a Hawking icon should be displayed in your
system tray in Windows or in your dock on
Mac. Once opened it will automatically search
for the existing server and display its status.
SERVER CONFIGURATION
Windows
Mac
STEP 4
Page 10

STEP 4
2.) Double click on the device on the
control center and it will open a
web browser showing the user
interface of the product
SERVER CONFIGURATION
Step 4: Configuring Your HMPS2U
3.) Click on “Config.” You will be prompted
to put in a username/password.
Username: admin
Password: admin
Page 11

SERVER CONFIGURATION
STEP 4
4.) For general usage, the HMPS2U
is set to obtain an IP address
automatically from your network.
If you have a specific IP address,
you may enter it here. Click
submit if you have made changes.
Otherwise, continue to the next
step if you wish the HMPS2U to
be wireless (go on to Step 5 if
you wish to remained wired to
the network).
Step 4: Configuring Your HMPS1U Print Server Cont’d
Page 12

WIRELESS CONFIGURATION
STEP 4
Step 4: Wireless Setup
Click on the ‘Wireless’ Tab Under Config
Under Site Survey Setting, click Scan.
Wireless networks in your area will appear.
Check your network or click ‘scan’ if it
does not appear. Click ‘Set’. You will be
returned back to the ‘Wireless’ tab.
If your network uses security, under the
security settings, your security type will be
listed. Please type in your key or passphrase.
Click ‘Submit’ for your settings to take
effect.
Disconnect the ethernet cable and your
HMPS2U is now wireless.
Page 13

STEP 5
Step 5: Setting up a USB Device
1.) Plug your USB device into one of the available ports on the HMPS2U
Open your control center. You should see the
device appear beneath the HMPS2U.
Here, we use a printer as an example.
2.) Highlight the device with your mouse and
click the “Connect” button
Your computer will take a few minutes to
install the device. It should now show up as a
device on your computer to use.
Note: Some USB printers require the installa-
tion of the driver before plugging in the USB.
Refer to your device’s instructions prior to
plugging into the HMPS2U
CONNECTING TO YOUR USB DEVICE
Windows Mac
Page 14

DEFAULT PARAMETERS
Some of the important default parameters for your HMPS2U are shown below.
- Administrator: admin
- Password: admin
- Server Name: HMPS2U
- Workgroup: WORKGROUP
- Static IP: 192.168.1.100
DEfaulTS
Page 15

ConTaCT
TECHNICAL SUPPORT
For additional information or troubleshooting help regarding the advanced usage and
configuration of your device, please refer to the User’s Manual on the Setup CD.
If you have technical difficulties using the product, Hawking Technologies offers free
technical support to assist you.
24/7 Toll-Free (US and Canada): 888.202.3344
Email: techsupport@hawkingtech.com
Website: http://www.hawkingtech.com
For RMA Information (for Warranty Issues/Returns), please visit the “Support” section of our
website
Website: http://hawkingtech.com/support.html
Thank You for Choosing Hawking Technologies!
www.hawkingtech.com
Page 16

iPad, iPod, iPhone, Airplay and iTunes are trademarks of Apple Inc., registered in the U.S. and other countries. Windows and Internet
Explorer are registered trademarks of Microsoft Corporation in the U.S. and other countries. No affiliations are implied or expressed.
Copyright © 2012 Hawking Technologies, Inc. All rights reserved. All trademarks herein are the property of their respective owners.
www.hawkingtech.com
Product Support Links
Product Registeration http://hawkingtech.com//product_registration.html
RMA Information http://www.hawkingtech.com/rma.php
Sales Information sales@hawkingtech.com
 Loading...