

Hawking HawkVision Smart Cam Pro HNC5W Quick Installation Manual
USB
dismount
DC 12V GPIO
WPS
IN OUT
Reset Ethernet
Back
Side
Installing the Wall Mount Kit (Optional)
The camera comes with a Wall Mount Kit, which allows
you to place your camera anywhere by mounting the
camera through the three screw holes on the base of the
wall mount kit.
Connect the Camera to the Network
Use the provided Ethernet cable to connect the camera
to your local area network (LAN). Also, connect the
provided antenna into the antenna port. Plug in the
AC power and the camera will be powered on
automatically. You can verify the status from the Power
LED on the front panel of the camera. Once
connected, the LINK LED will also flash a green light,
indicating that the camera is ready for use.
PRE-CONFIGURATION
Package Contents
• 1x HNC5W HawkVision Smart Cam Pro
• 1x Power Adapter 5V/1.5A
• 1x External Antenna
• 1x Wall Mount Kit
• 1x Three Foot Ethernet Cable
• 1x setup CD-ROM
• 1x Quick Installation Guide (QIG)
System Requirements
• Windows XP or later with an available CD/DVD-Rom
Drive (only required for initial setup)
• A LAN Port on your network (only required for initial
setup)
• Wireless 802.11b/g/n network (only if you wish to
connect to your network wirelessly.)
• Power Outlet
• Computer Platform for viewing: Windows XP or later,
Mac OS 10.4 or later
CPU: Intel Pentium III 800MHz or above
RAM: 512MB
Resolution: 800x600 or above
Interface: Internet Explorer 6.0+, Firefox 2.0+, Safari
2.0+, or Chrome
• SmartPhone/Tablet Interface (optional): iOS or Android
EagleSense App
Quick Installation Guide
Model No. HNC5W
HawkvisionTM
Smart Camera Pro
Internet source
Wired/Wireless Router
Ethernet Cable
Front
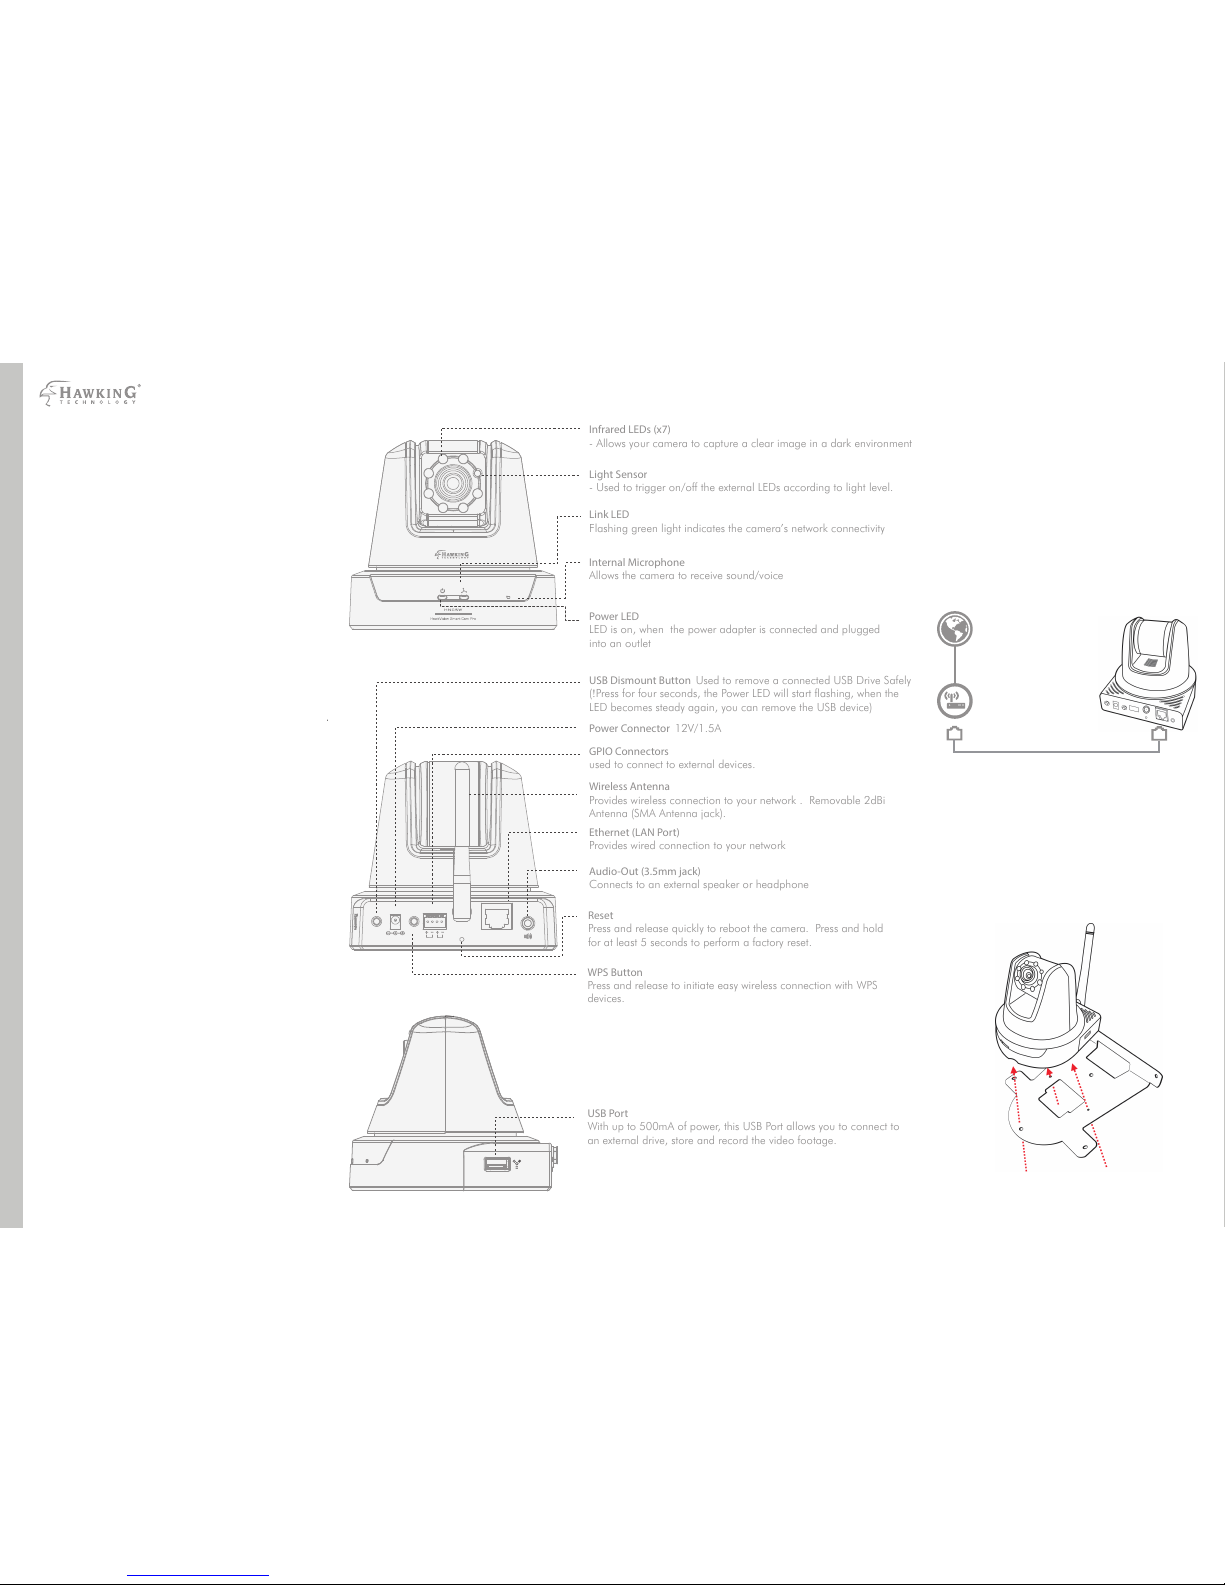
GPIO Connectors
used to connect to external devices.
Ethernet (LAN Port)
Provides wired connection to your network
Reset
Press and release quickly to reboot the camera. Press and hold
for at least 5 seconds to perform a factory reset.
USB Dismount Button Used to remove a connected USB Drive Safely
(!Press for four seconds, the Power LED will start flashing, when the
LED becomes steady again, you can remove the USB device)
WPS Button
Press and release to initiate easy wireless connection with WPS
devices.
Power Connector 12V/1.5A
Audio-Out (3.5mm jack)
Connects to an external speaker or headphone
Wireless Antenna
Provides wireless connection to your network . Removable 2dBi
Antenna (SMA Antenna jack).
USB Port
With up to 500mA of power, this USB Port allows you to connect to
an external drive, store and record the video footage.
Infrared LEDs (x7)
- Allows your camera to capture a clear image in a dark environment
Light Sensor
- Used to trigger on/off the external LEDs according to light level.
Internal Microphone
Allows the camera to receive sound/voice
Link LED
Flashing green light indicates the camera’s network connectivity
Power LED
LED is on, when the power adapter is connected and plugged
into an outlet
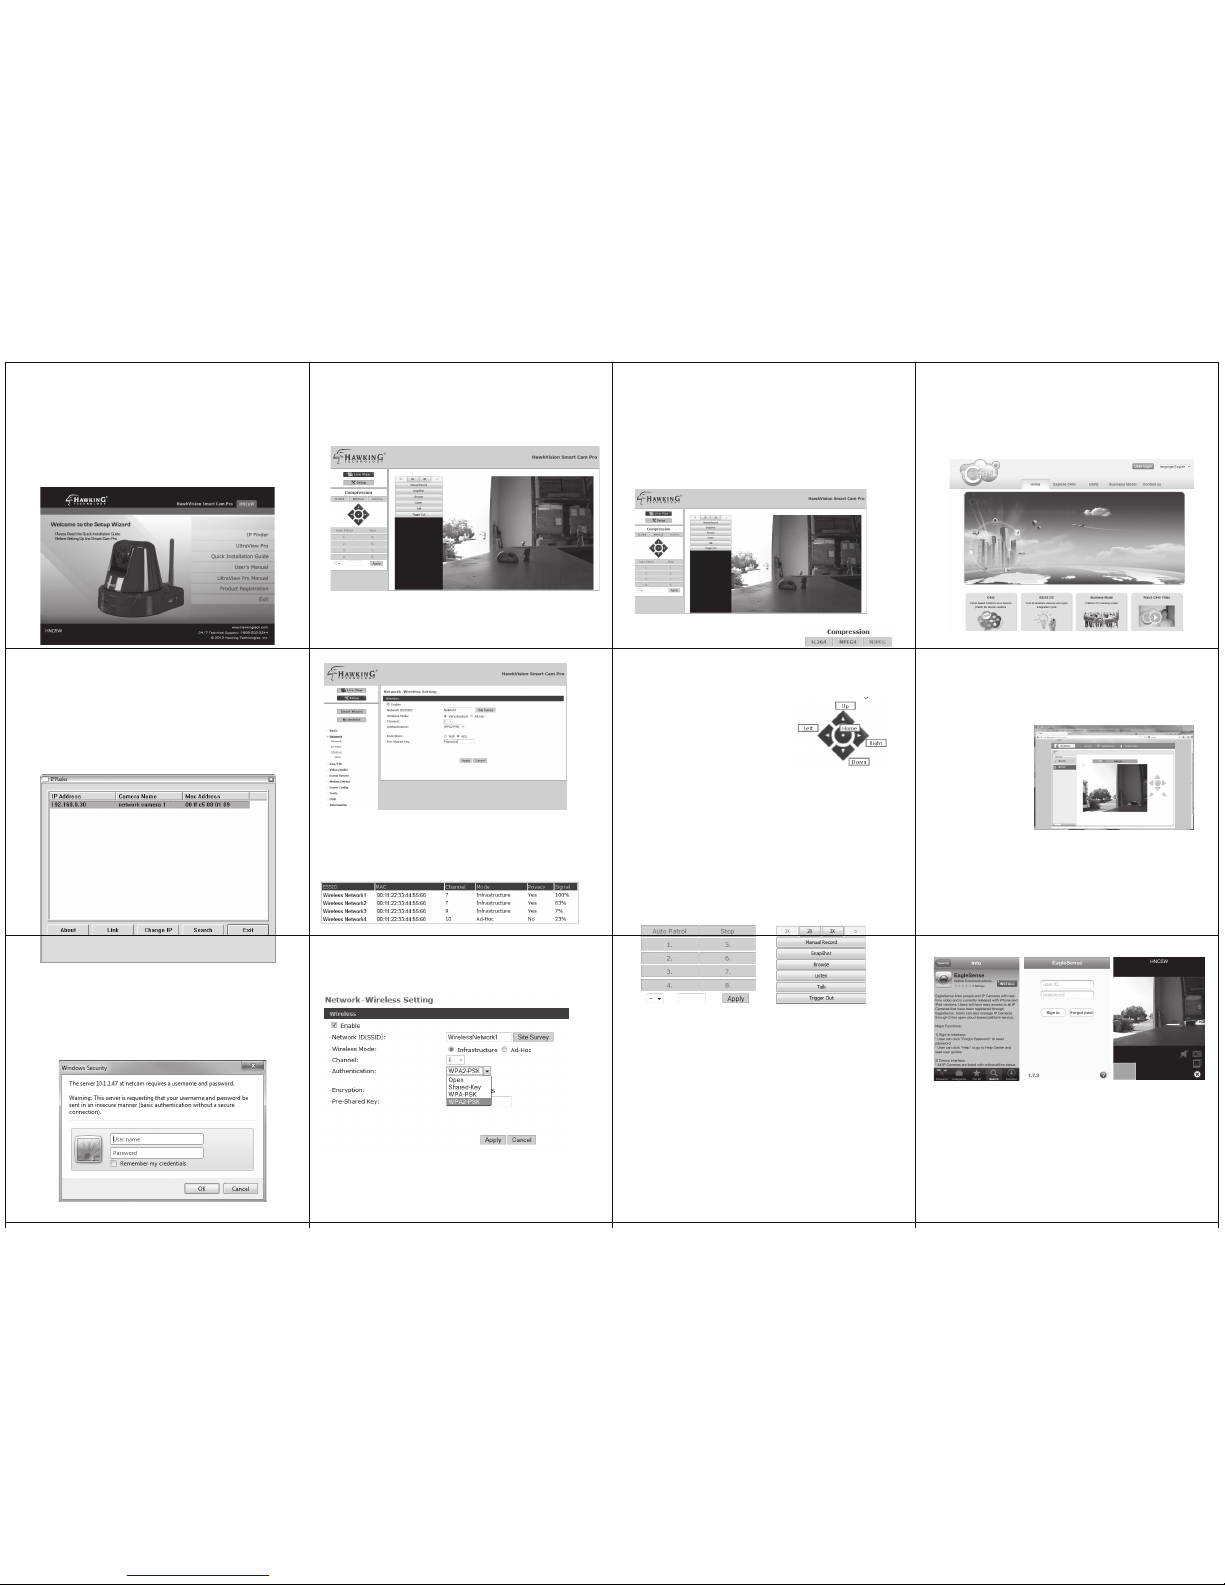
The Main screen of the Web Configuration provides you with
many useful information and functions, including:
Live View/Setup Switch
• Click the Setup button to configure the camera. For
details, refer to the Manual on the CD
• Click the Live View button to return to the Main screen
to view the live view image.
Function Buttons: Use these buttons to control the audio,
video, and trigger functions.
• Click the Zoom buttons to zoom in the live view image by 1x,
2x, or 3x.
• Manual Record allows you to record and save a video clip.
• Snapshot allows you to capture and save a still image.
• Browse allows you to assign the destination folder to store the
video clips and still images.
• Talk allows you to speak out through the camera. Please note
only one user is allowed to use this function at a time.
• Listen allows you to receive the on-site sound and voice from
the camera.
• Trigger Out allows you to trigger on/off the GPIO output
manually.
Compression Buttons: Select to
transmit and record the video using
H.264, MPEG4 or MJPEG compression.
Refer to manual on the CD.
Pan/Tilt Buttons: Provides the buttons to control the
camera lens.
Left/Right/Up/Down/Home
buttons allow you to move the
camera lens position. Clicking the
Home button will move the camera
lens to the assigned home position.
Auto Patrol button automatically rotates and scan the area
(approximately 270°), one time around. Click Stop button to
exitst scna mode
Click the Number button (1~8) to move the camera lens to
the preset position immediately.
To set up the preset positions, move the camera lens by
clicking the Left/Right/Up/Down buttons to the desired
position first, then select the number (1~8) from the
pull-down list and click the Apply button. You can enter a
descriptive name for the assigned position in the text box to
identify it easily.
4) Congratulations. You are done configuring the camera.
Now, you can start viewing the camera images, using any
computer on your local area network. If you wish to use the
camera wirelessly, please continue with the wireless
setup.
On the web browser, click on ‘Setup’. On the setup page, on
the left column, click on ‘Network’, then select ‘Wireless’.
On the wireless settings page, click on ‘Site Survey’. Wait a few
seconds, and a list of networks will appear. Double click on your
wireless network. It should be highlighted. Once that is done, the
Network ID should change to your selected network.
Note: if you have a secured wireless network, you must choose
your Authentication type. In the drop down box, select your
security type and then be sure to type in the wireless key/password
of your wireless network.
Click ‘Apply’. The device will then reboot. You may now remove the
Ethernet cable and go wireless. Now, you can start viewing the
camera images, using any computer on your local area network.
1) Insert the Setup CD into your Computer’s CD-Rom and
wait for it to autoload. Once the program starts, select
‘IPFinder’. Note: the initial camera setup requires a
Windows computer. Once setup, any Operating System will
be able to access the camera’s image via a web browser.
2) Once IPFinder starts, it will automatically find the
camera. The IP address and Mac Address will be listed on
the IPFinder. Make sure the MAC address matches the
one on your device. Select your camera and click ‘Link’.
Important: Please make note of this IP Address. You will
need this to access the camera from a different computer.
3) After you press ‘Link’, your web browser will prompt you to
enter in a username/password.
Default Username: admin Default Password: admin
Note: Some web browsers will prompt you to install an
add-on, you must allow this to properly configure the device.
CAMERA SETUP
WIRELESS SETUP
USING THE CAMERA
System Requirements
• Windows XP or later with an available CD/DVD-Rom
Drive (only required for initial setup)
• A LAN Port on your network (only required for initial
setup)
• Wireless 802.11b/g/n network (only if you wish to
connect to your network wirelessly.)
• Power Outlet
• Computer Platform for viewing: Windows XP or later,
Mac OS 10.4 or later
CPU: Intel Pentium III 800MHz or above
RAM: 512MB
Resolution: 800x600 or above
Interface: Internet Explorer 6.0+, Firefox 2.0+, Safari
2.0+, or Chrome
• SmartPhone/Tablet Interface (optional): iOS or Android
EagleSense App
Thanks for choosing Hawking Technologies, Inc.!
Technical Support Information
Website: www.hawkingtech.com
Phone: 1.888.202.3344
E-mail: Techsupport@hawkingtech.com
©2012 Hawking Technologies, Inc. All rights reserved. All trademarks herein are the property of
their respective owners. IOS is a trademark or registered trademark of Cisco in the U.S. and
other countries. Android is a trademark of Google Inc. No affiliations are implied or expressed.
SET UP
From your computer, access ‘http://www.c4mi.com’ in your
web browser. Select ‘User Login’ in the top right hand
corner of the window to create your account.
Locate the unique 16 character alpha-digital “activation
code” located on the bottom of your product. Use this
code to activate cloud service to view the camera image
from the web or portable devices.
ACCESS
Once you have created an account on C4mi.com, you can
access your camera from any computer by logging into your
account via C4mi.com. To access your camera from your iOS
and Android devices, simply download the ‘EagleSense’ app
on your chosen device and login with your C4mi.com account.
Please enter the
activation code
when prompted by
C4mi.com. After
you have successfully
created an account,
make note of your
chosen username
and password since
you will need this to
access your device in
the future.
INTERNET VIEW
 Loading...