


1
FIREFLY 8S
4K SPORTS DV
Ambarella A12S75
6 axis Gyro Image Stabilization
WiFi + BT 3.0 Remote control
2 inch high brightness LCD screen
SONY IMX117 12 Mega WDR CMOS Sensor
Ver 1.4

2
Contents
Features :
.......................................................................................................................
3
............................................................................................................................................
3
Performance and Specifications:
...................................................................................
4
Button Functions
..............................................................................................................
5
Video settings:
..................................................................................................................
5
Photo settings:
..................................................................................................................
7
System Setup settings:
....................................................................................................
8
BT Pair
...............................................................................................................................
9
How to update firmware:
...............................................................................................
10
Wi-Fi :
...............................................................................................................................
11
Battery Charging:
...........................................................................................................
11
Transferring Files:
..........................................................................................................
11
External Microphone:
.....................................................................................................
11
Accessories :
..................................................................................................................
12
Instruction for accessories:
........................................................................................
12
Accessories installation instructions(Not in stander package):
..............................
13
Trouble shooting:
...........................................................................................................
15

3
Features :
1.UP button.
2.DOWN button.
3.OK button
4.Photo(Green)/Video(Blue) LED.
5.HD output
6.Mini USB.
7.Battery door.
8.Power button/Mode button.
9.Selfie Mirror.
10.MicroSD card slot.
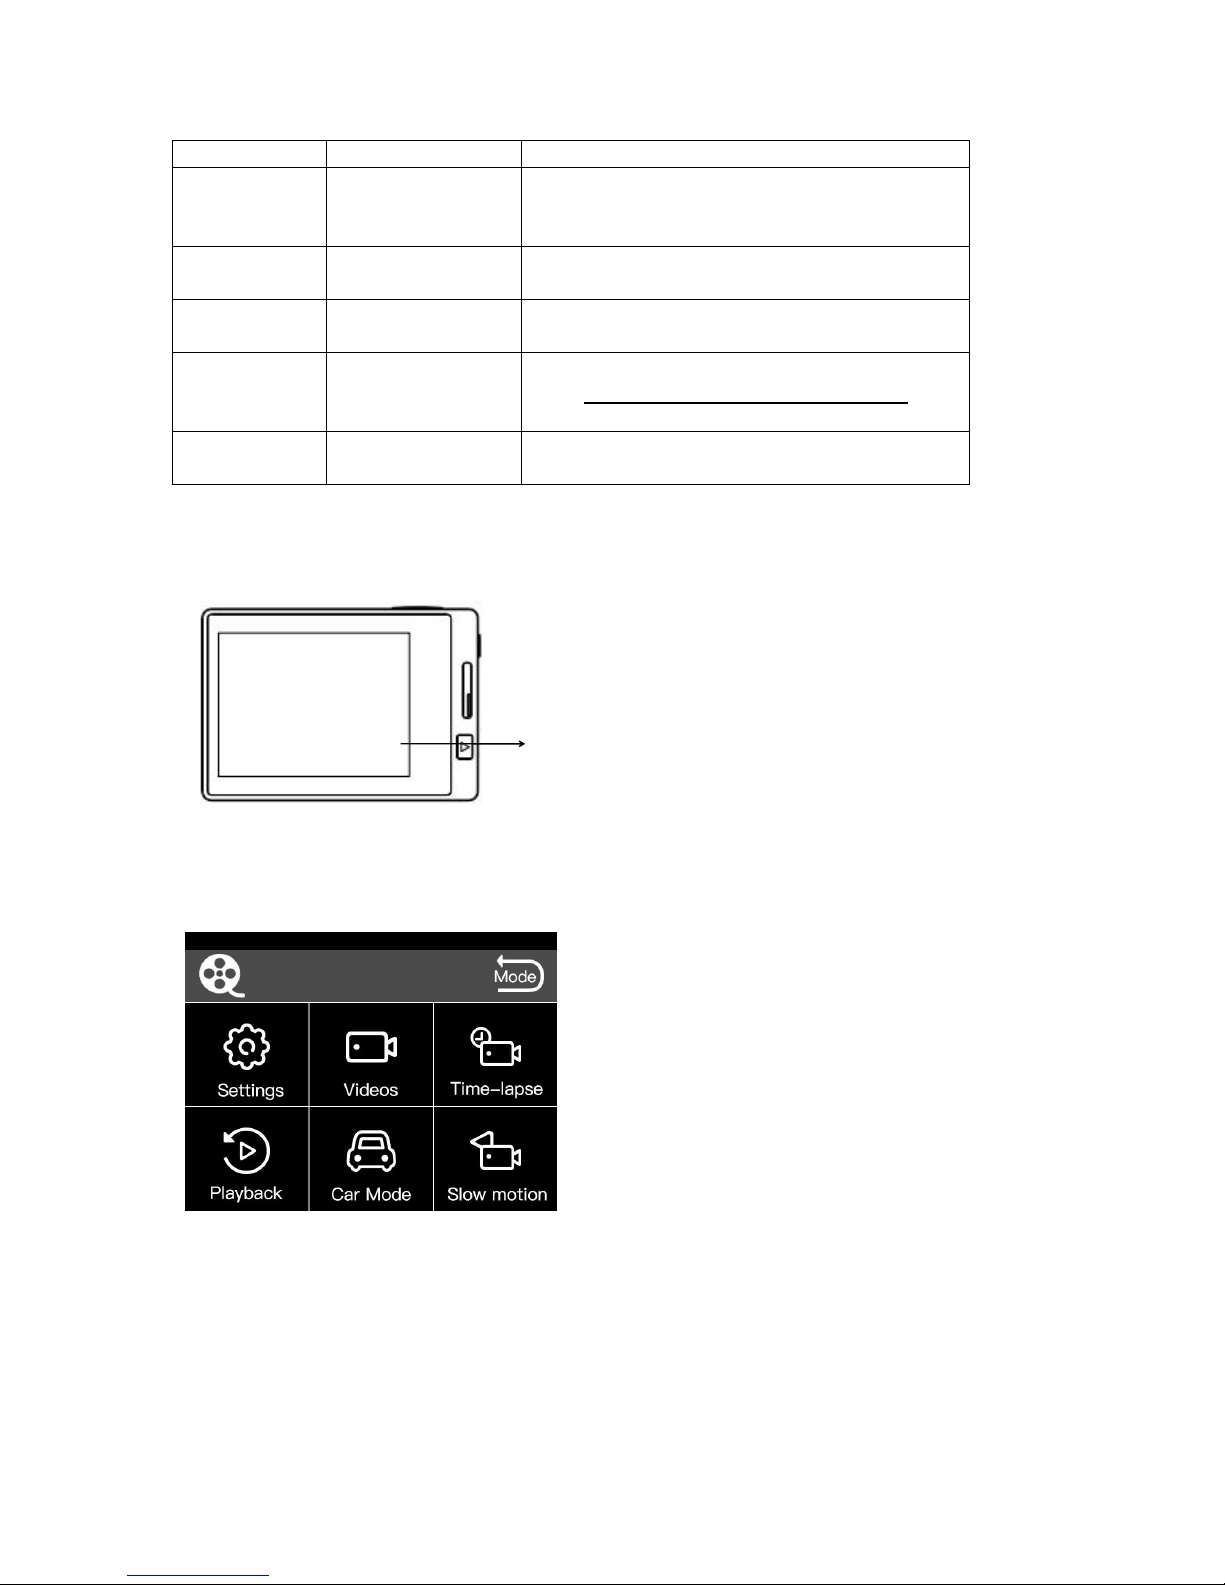
11.Playback button.
1 2 3 4 5 6
7 8 9
10 11

4
Performance and Specifications:
Photo resolution
16M/14M/12M/8.3M/5M/3M
AV output format
USB Port
PAL/NTSC
HD Output
YES
Kind of MicroSD card
supported
U3(Note:Low speed sd
card will cause unstable)
Maximum size of
MicroSD card supported
128G
Wi-Fi +BT 3.0 remote
control
YES
LCD screen size
2 inch 640*480
Specifications
Camera size
59×41×21 MM
Weight
70g
Battery Capacity (Battery
is detachable )
1200mAH,3.85V
Battery life
About 1.33 hours(25
℃
enviroment)
Time to complete
charging
About 3 hours (5V 1A power
supply, and power off while
charging)
Compressed format
H.264
Video/photo format
*.MP4 / *.JPG
Optical Parameter-
Wide angle version
Diaphragm
F/2.8 ,6 glasses
Angle
Diagonal 170 degrees
Optical Parameter -
distortionless version
Diaphragm
F/2.8,11 glasses
Angle
90 degrees
Electric Parameter
Working Voltage
5V
Power supply
1A
5
Button Functions
Name
Functions
Descriptions
Power/Mode
Button
Turn on/off
camera; select
modes
Press once, camera ON; press for 3
seconds, camera OFF; press to switch
photo /video mode.
OK Button
start/stop
recording
UP Button
move upwards
move upwards /Shortcut key for screen
save
DOWN Button
Move downwards
Enter menu setting/move downwards
Press for 3 sec, WIFI ON/OFF
Playback
Button
Playback
Video settings:
In video preview mode, press “Down button” will enter menu:
Settings: Press OK button to enter setting menu.
Videos: Select Videos and press OK button to enter normal video mode.
Time-lapse: Select time-lapse and press OK to enter time-laps mode. To adjust
time-lapse please refer to “Timelapse Video“ menu.
01H30
01H30 means:01 Hour 30 Minutes

6
Playback: Select playback and press OK button to enter.
Car Mode: Select Car Mode and press OK button to enter. In Car mode, Auto DVR
and Loop recording will be turned ON.
Slow Motion: Select Slow motion and press OK button to enter. In this mode, it will
record videos in slow motion.
Resolution: select from4K 30fps(16:9),4K 25fps Super-view, 2160P 30fps(4:3), 2.7K
30fps(4:3),2.7K 30fps Super-view, 2.7K 30fps(16:9),2.5K 60fps(16:9), 2.5K
30fps(16:9), 1440P 60fps(4:3),1440P 30fps(4:3),1080P 120fps(16:9),1080P
60fps(16:9),1080P 30fps(16:9), 1080P 60fps Super-view, 1080P 30fps
Super-view,960P 120fps(4:3),960P 60fps(4:3), 960P 30fps(4:3), 720P
240fps(16:9),720P 120fps(16:9),720P 60fps(16:9),720P 30fps(16:9),720P 120fps
Super-view, 720P 30fps Super-View ect.
Video Quality: Super.Fine, Fine, Normal.
Auto Lowlight: Off,On. When turn this function On, camera will drop the frame rates to
increase the video’s brightness.When this function turn ON, will save power
consumtion.
Gyro Sensor: Off,On. Avaliable in 1080P 60fps and 1080P 30fps.
Motion detect:Off ,Low,Medium,High. When turn this function ON and press OK
button, it will record video when motion detected.
Dual files: off,on. When turn on, it will save a low resolution file when recording. Small
file is easy to share via WiFi. We suggest to turn this function on while using APP
to download/playback videos.
Video stamp: Off,Date,Time,Date/Time. this option allows you to stamp the date/time
on the video.
Timelapse Video : to start/stop time-lapse video at 1 / 3 / 5 /10 / 30 /60sec intervals.
Note: this function will make videos look like fastforward.
Loop record: off,1min,2min,3min,5min. If cycle recording mode is selected, the video
will be cut into setting-minute segments. The earliest files will be covered when the TF
card is full. (This mode is suggested to be used in vehicle monitoring.)
7
Microphone Volume:off, 50%,60%,70%,80%,90%,100%.
Sharpness : Strong, Normal and Soft.
AWB:Auto White Balance.
Auto,Incandescent,D4000,D5000,Daylight,Couldy,D9000,D10000,Flash,Fluoresc
ent,Water,Outdoor.
EV Value: -2.0,-1.7,-1.3,-1.0,-0.7,-0.3,0.0,+0.3,+0.7,+1.0,+1.3,+1.7,+2.0.
ISO: Auto,100,20,400,800,1600.
Metering: Center,Multi,Sopt. Note: different meter ways will make the footage
brightness different.
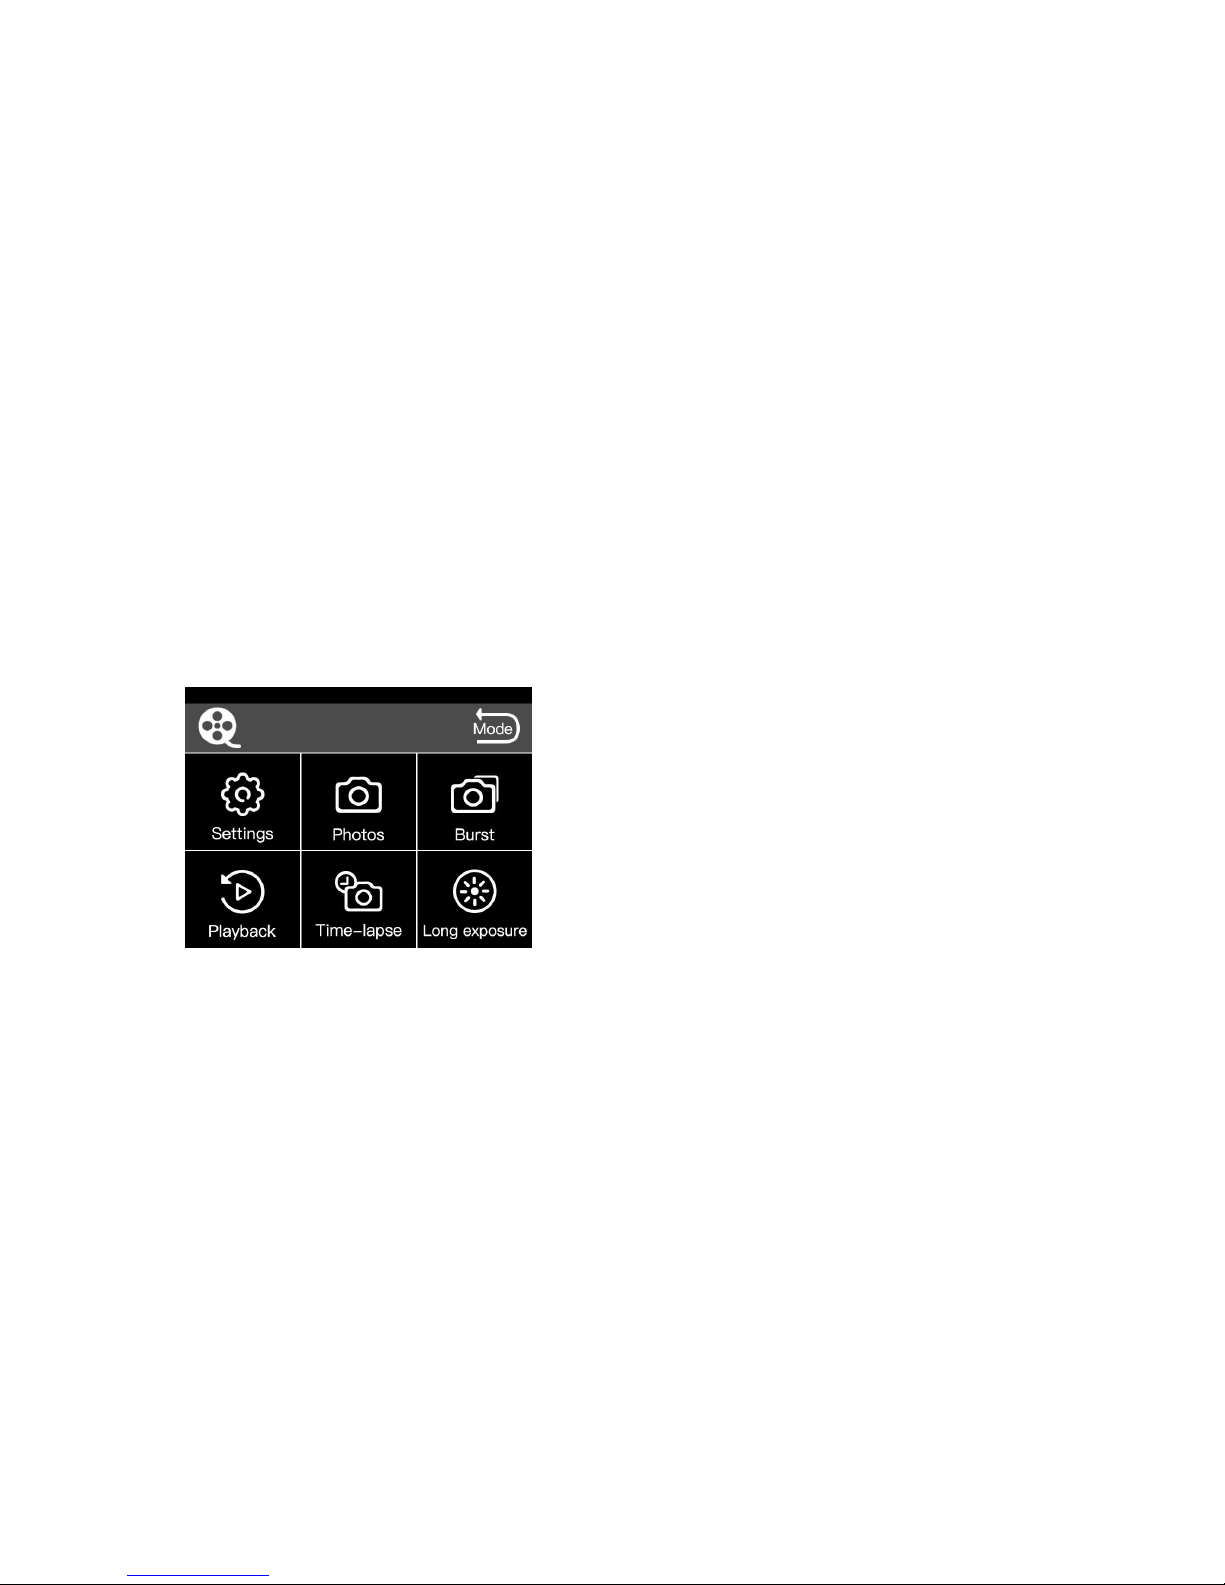
Photo settings:
In photo preview mode, press Down button to enter menu:
Settings: Press OK button to enter setting menu.
Photos: Select Photos and press OK button to enter normal photo mode.
Busrt: Select Burst and press OK button to enter Burst photo mode. To adjust it,
please refer to “Photo Burst”
Playback: Select playback and press OK button to enter.
Time-lapse: Select time-lapse and press OK to enter. To adjust time-lapse please
refer to “Timelapse Photo“ menu.
Long exposure: Select Long exposure and press OK to enter. To adjust Long
exposure please refer to “Long exposure” menu.(Use this mode at night).

8
Image size:16M,14M,12M,8.3M,5M,3M(1M=1Mega pixels).
Photo Quality: Super.Fine,Fine,Normal.
Long exposure: 1/30 second, 1 second,2 seconds,5 seconds, 10 seconds,30seconds,
60 seconds. Note:If you use long exposure mode at day time, photo will be over
exposure.
Photo Stamp: Off, Date, Time, Date/Time. When turn this function ON, you could
stamp the date time on videos.
Self Timer: Off, 2S,3S,5S,10S,30S,60S.
Photo Burst: 3 Pcs/Second, 5Pcs/Second, 10Pcs/Second.
Timelapse Photo: 3S,5S,10S,30S,60S.
Sharpness: Strong, Normal,Soft.
AWB(Auto White
Balance) :Auto,Incandescent,D4000,D5000,Daylight,Couldy,D9000,D10000,Flash,Fl
uorescent,Water,Outdoor.
EV Value: -2.0,-1.7,-1.3,-1.0,-0.7,-0.3,0.0,+0.3,+0.7,+1.0,+1.3,+1.7,+2.0.
ISO: Auto,100,20,400,800,1600.
Metering: Center,Multi,Sopt.Note: different meter ways will make the footage
brightness different.
System Setup settings:
Quick Capture: Off , On. ON: It will capture videos when power on.
Delay Off: off,5S,10S,20S,30S,60. (avalibale When Auto record turn ON).
TV Mode: NTSC,PAL.
Light Frequency: Auto, 50HZ, 60HZ.

9
LCD Brightness: Low, Medium, High. Set LCD brightness, when set it low, the
power consumption will be saved.
Auto shutdown: Off, 2Min,3Min,5Min,10Min. When there’re no operations, the
machine will auto shutdown.
Screen Off: Off,30S,1Min,3Min,5Min. When there’re no operations,will power off the
screen.
Status LED: Off, 1,2,3. Set the action LED light on the machine.
Beep: Off,On. Turn ON/OFF beep voice on the machine.
Time Setup. Set the date time of the machine, or you could upate date time with the
APP throught WiFi.
Date Format:Y/M/D,D/M/Y,M/D/Y.
Language: English, Chinese,Rusaian.
BT Pair.
How to pair BT remote controler: Set this menu ON, the machine will keep
searching BT remote controler. Press any key of the remote controler, and the
controler’s light will turn on. Keep pressing any key of the remote controler
until searching function finished and they will paired. Note: When Camera
power ON , it will keep searching BT remote controler for 20 seconds, if you
keep pressing contoler’s key (about 5 times), they will be pared automaticly.
Bluetooch remote controler is not in stander package.
WiFi: ON,OFF. Turn Wifi ON/OFF, or you press and hold “Down key” for 2 seconds.
Turn Off WiFi, the power consumption will be saved.
WiFi SSID. You can change WiFi name.
WiFi Password. You could change WiFi passwords here.
Format. Format the MicroSD card.
Default Setting. Set to default settings. Note: if the camera has any problems, you
could use this function.

10
Version. Check version number here and could update firmware here.
How to update firmware:
a.Delete all the files in MicroSD card , and then copy update file to MicroSD
card( “FIREFLY_FWUPDATE.bin” , you could download it on our website
www.CNfpv.com).
b.Put MicroSD card into camera and power on.
c.Switch to system menu: Version.
d.Press OK button to check the update fimware, if detected firmware is right,
select “yes” to update.
e.Once confirmed, camera will update automaticly.
f.It will take 1-2 minutes to update. When update finish, it will power on, and then
will reboot..
g.Detele firmware update files.

11
Wi-Fi :
Please check our website(www.CNfpv.com) or the QR code to find our APP.
You can use a Smart phone/tablet to view or take photos and videos via Wi-Fi
connection.
1. Download and install app from the app store on your smart phone/tablet, or
scan the QR code behind.
2. Turn camera’s Wi-Fi on.(in system setting menu or press and hold “Down
button” for 2 seconds).
3. In your smart phone’s or tablet’s Wi-Fi network settings, connect to the
camera’s Wi-Fi network named “FIREFLY_xxxx”, enter the password. Default
password is “12345678”.
4. Open the FIREFLY app on your smart phone/tablet. You will now be able to
control the camera with your smart phone/tablet plus view, playback and
share selected content.
Battery Charging:
Connect the camera to a computer or phone charger using the included USB
cable. Use 1A charger, and turn off the camera when charging will increase the
charging rate(Press and hold Mode key for 3 seconds could shutdown the
camera). The Charging Status Light it will turn OFF when the battery is fully charged.
Transferring Files:
1. Connect the camera to a computer via the included USB cable, and then turn on
the camera.
2. Double click “My Computer” and locate “Removable Disk”. Enter “Removable Disk”
and you will find all photo and video files in AMBA folder.
External Microphone:
Please buy our external microphone for FIREFLY 8S. When plug in the
microphone, the camera will Beep and the microphone works.

12
Accessories :
Instruction for accessories
:

13
Accessories installation instructions(Not in stander package):

14

15
Trouble shooting:
1.First of all if the camera has any problems: set it to default
settings first(refer to :System Setup settings ).
1.if the video quality is not satisfied or if the camra have any problems: try to set it to
default
settings first(refer to :System Setup settings ).
2.Videos are not smooth:(refer to :System Setup settings )
a.Set the video resolution to :1080P 60FPS b.Set Gyro :ON
c.Change a player(Quicktime player).
3.Battery endurance time is not enough: a.set LCD Brightness to Low; b.turn off the
camera when charging(Press and hold Mode key for 3 seconds could shutdown
the camera)c.Set to Photo mode when standby.d.Auto low light set ON. d.Turn WiFi
OFF.
4.Charging time too long: when charging, press and hold Mode key for 3 seconds to
turn the machine power off.
5.Video and sounds are no sync: A.copy the video to computer. B. Change a
player(Quicktime).
6.Can't record/Camera unstable/record and then stop: A.Make sure card speed is U3.
B. Format MiroSD card(One FIREFLY) once. Suggest MicroSD cards: Sandisk
Extreme U3,Sandisk Extreme Pro U3,Sandisk Extreme PLUS U3,Lexar 1000x
U3,SONY SR-64X U3
7.Machine is heat. a. Set to Photo Mode when standby. b.take it out of the waterproof
case. c.Not Use it in a sealed enviroment
8.Camera no response. Take battery off and assemble again.
9.For more information please visit our website: www.CNfpv.com/
www.HawkeyeFirefly.com
10.How to use BT remote controler: please refer to Bluttooth pair. Note: When
Camera power ON , it will keep searching BT remote controler for 20 seconds, if

16
you keep pressing contoler’s key (about 5 times), they will be pared
automaticly.
11.WiFi playback speed is slow. When you want to use WiFi to playback videos, we
suggest to turn “Dual Files” ON. When this function is turned ON, it will save a low
resolution file. The files named “xxxxB”, we call it B file. When playback via WiFi, play
the B file will be much faster.
12.Photos over expoure: Change Metering: Center,Multi,Sopt.
FCC STATEMENT:
This equipment has been tested and found to comply with the limits for a Class B
digital device, pursuant to Part 15 of the FCC Rules. These limits are designed to
provide reasonable protection against harmful interference in a residential installation.
This equipment generates uses and can radiate radio frequency energy and, if not
installed and used in accordance with the instructions, may cause harmful
interference to radio communications. However, there is no guarantee that
interference will not occur in a particular installation. If this equipment does cause
harmful interference to radio or television reception, which can be determined by
turning the equipment off and on, the user is encouraged to try to correct the
interference by one or more of the following measures:
-- Reorient or relocate the receiving antenna.
-- Increase the separation between the equipment and receiver.
-- Connect the equipment into an outlet on a circuit different from that to which the
receiver is connected.
-- Consult the dealer or an experienced radio/TV technician for help.
Changes or modifications not expressly approved by the party responsible for
compliance could void the user's authority to operate the equipment.
This device complies with part 15 of the FCC Rules. Operation is subject to the
following two conditions:
(1) This device may not cause harmful interference, and
(2) this device must accept any interference received, including interference that may
cause undesired operation.
 Loading...