

Page 1
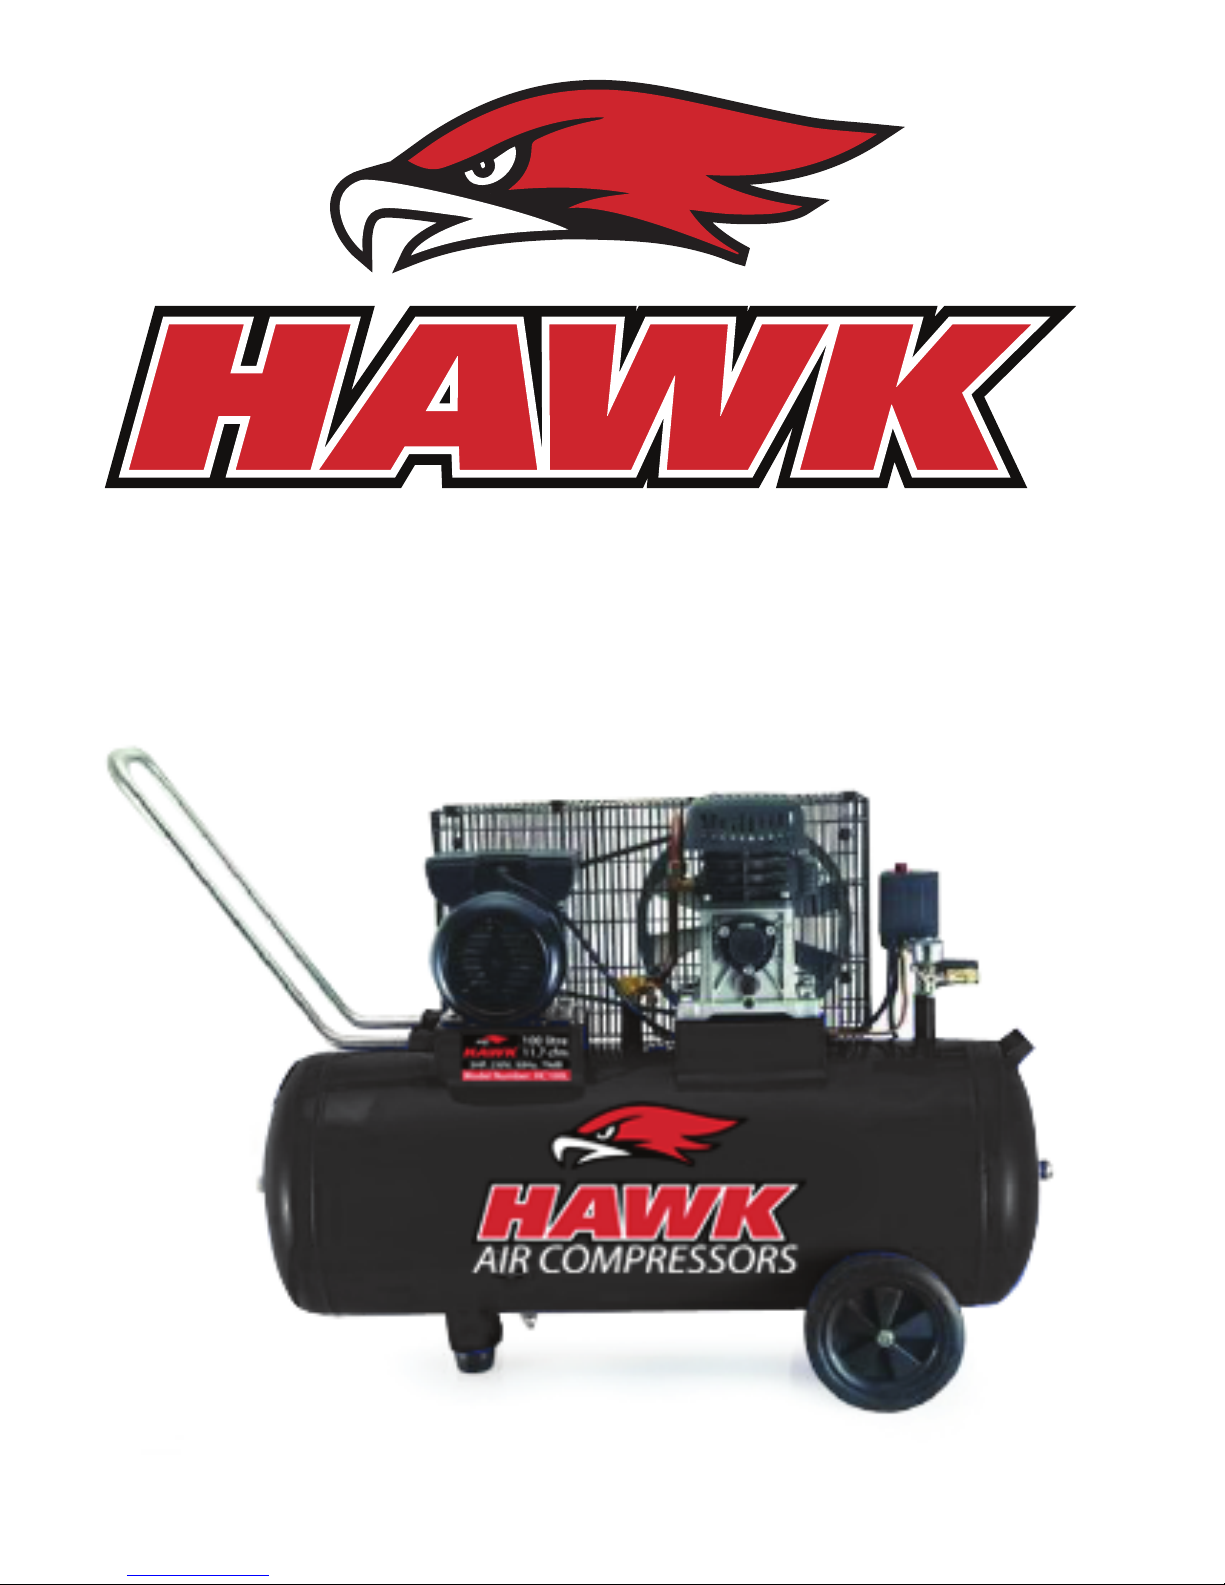
100 Litre
Air Compressor
Operator’s Manual
WARNING!
Before using this appliance, read the Operator’s manual and follow
all its safety rules and instructions.
™
Page 2
ITEM
DATA
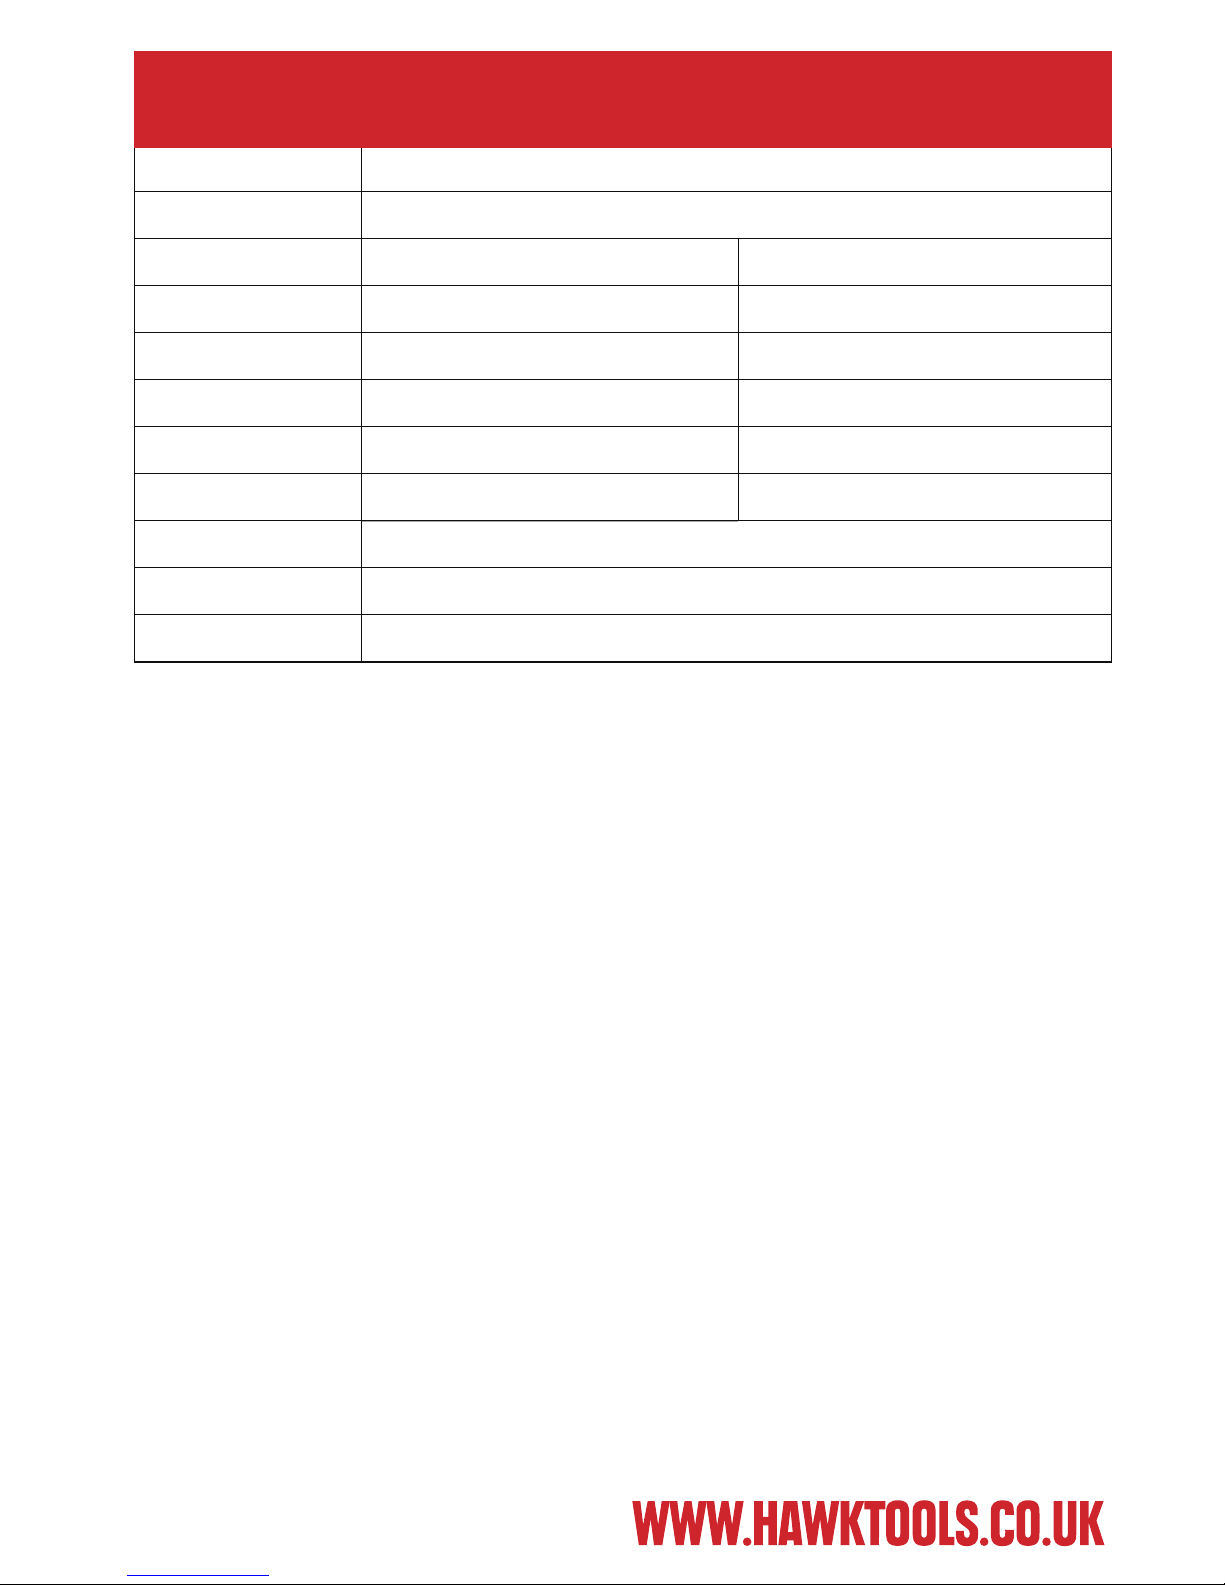
Model
HWKAC6
Power
2.2Kw/3HP
Voltage 120V/127V 220V/230V/240V
Frequency 60HZ 50Hz
Motor Poles 2P 2P
Rated Speed 1150r/min 950 r/min
Current 25A 15A
Theoretic Discharge
10.2CFM 290L/min
Discharge
Pressure
115PSI/0.8MPa
Restart Pressure 70 PSI/0.5MPa
Air Outlet Size 1/4”
SPECIFICATION
2
Page 3
MAIN COMPONENTS
3
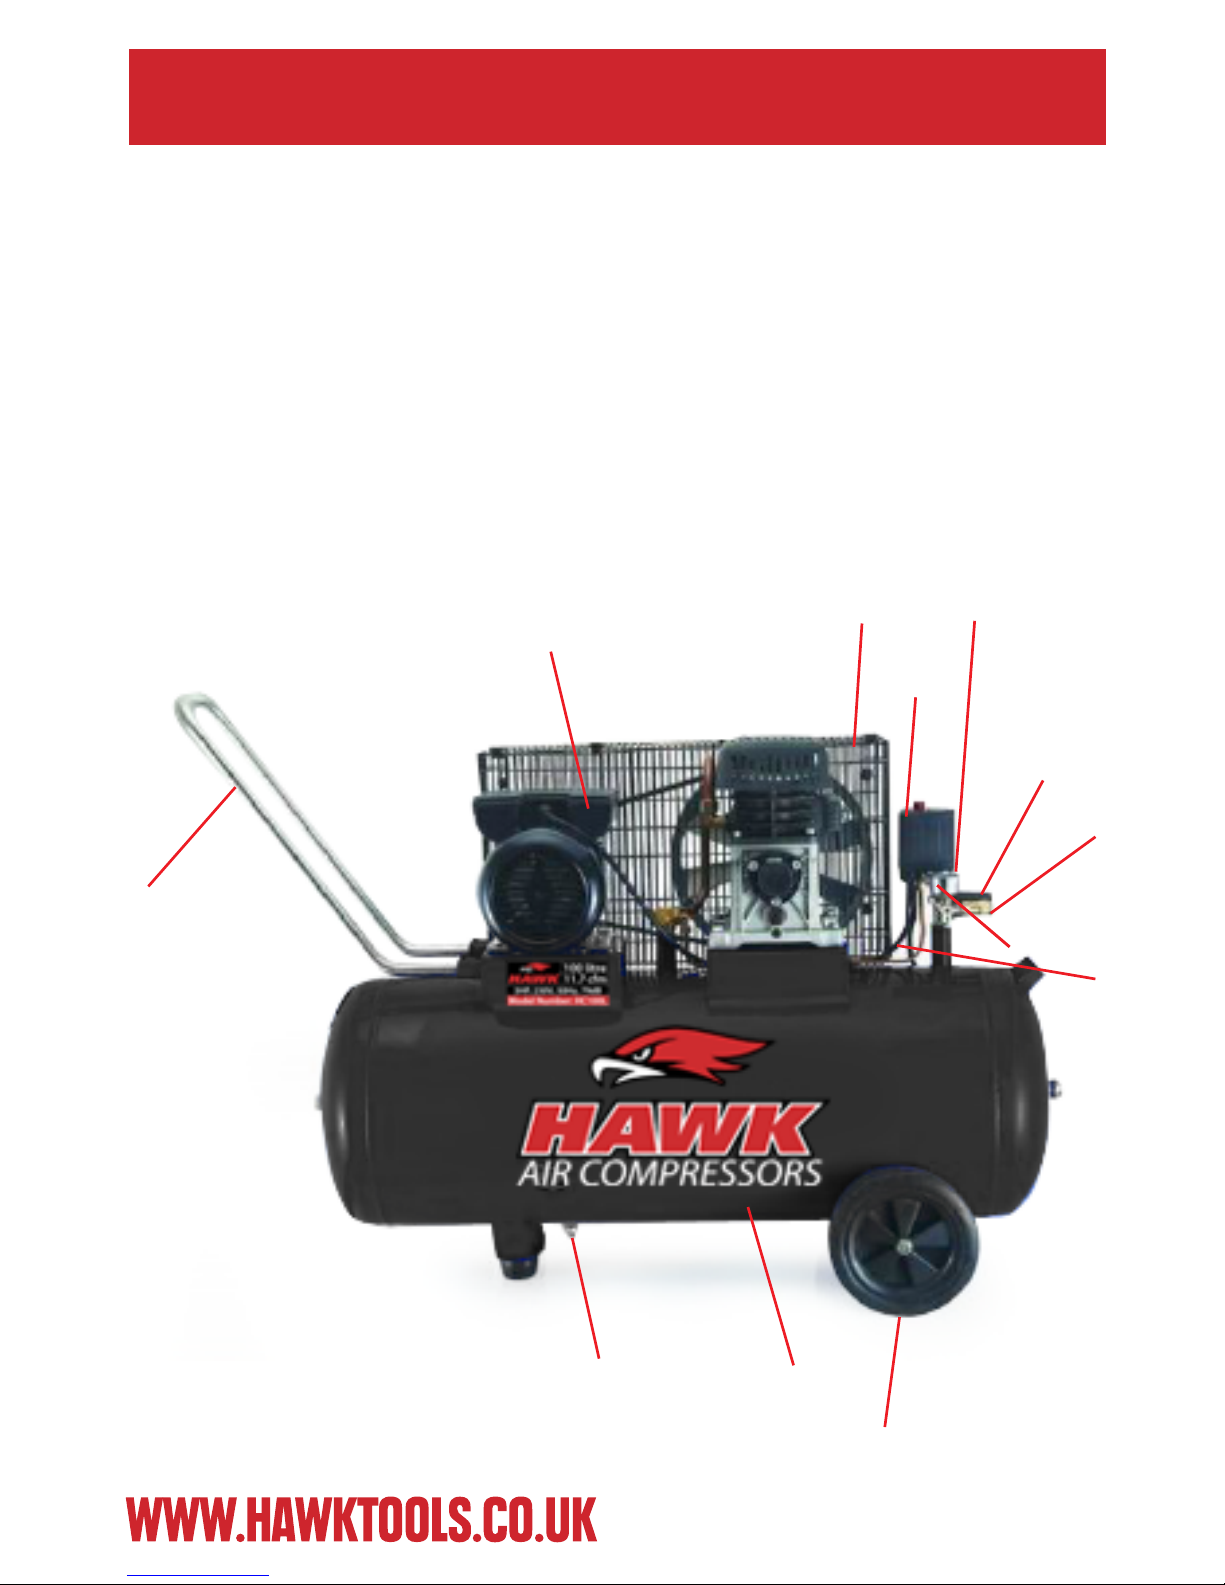
1. Pressure Gauge
2. Regulator Valve
3. Handle
4. Coupler
5. Safety Valve
6. Pressure Switch
7. Pump Head
8. Motor
9. Wheel
10. Tank
11. Power Cord
12. Drain Cock
8
7
6
5
4
2
1
11
9
10
12
3
Page 4
PREPARATION
4
1. Check all nuts and bolts are tight before starting.
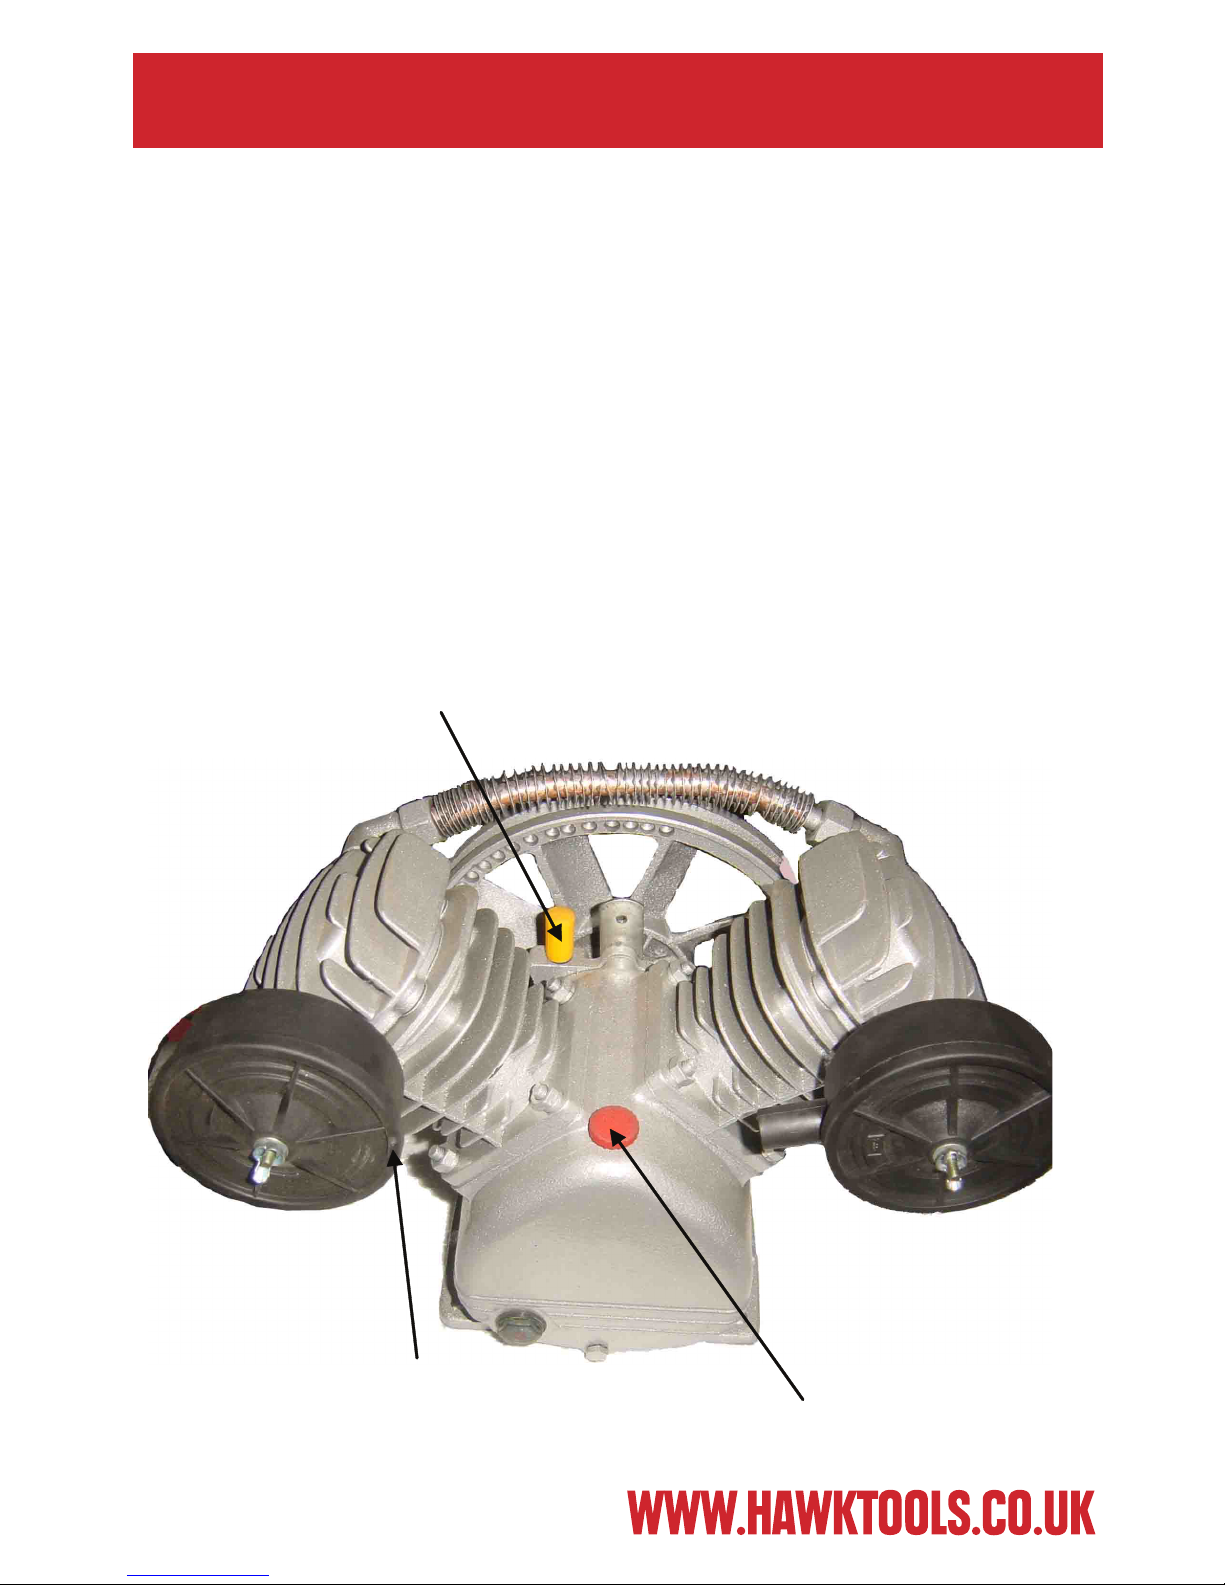
2. Before Starting the Compressor; remove cover, connect breather pipe
to the oil-hole and attach the air lter.
3. Make sure compressor is in a clean, dry and well ventilated area.
4. Keep voltage within +4% of the rated value.
5. Keep the oil level in the red circle of the oil leveller.
6. For use above 10°C use SAE30 or L-DAB100 compressor oil, For use
below 10°C SAE10 or L-DAB68 compressor oil is recommended.
7. Open the outlet valve, set the pressure switch to the “on” position
and let the compressor run for 10 minutes before attaching any air
tools to ensure all moving parts are well lubricated.
Air filter
Fig.3
Oil-hole
Breath pipe
Page 5
OPERATION & ADJUSTMENT
5
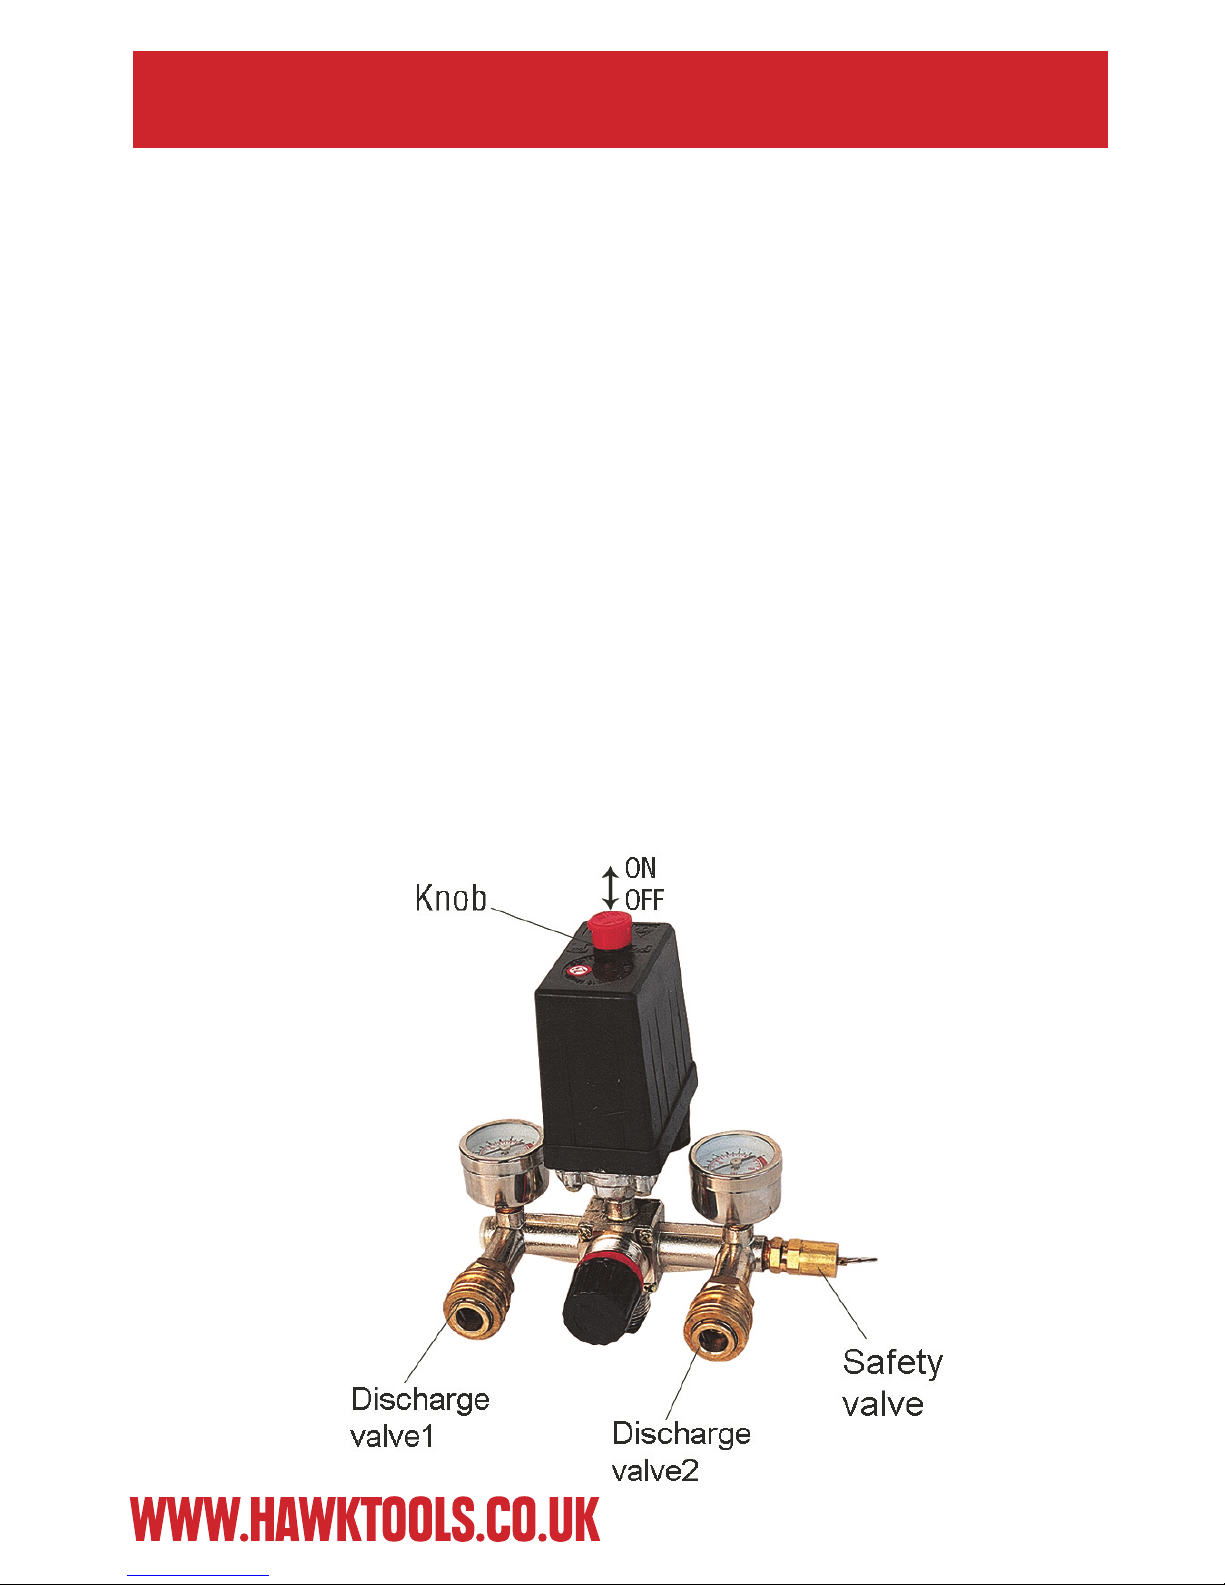
1. There are two pressure gauges on the compressor:
The gauge on the right hand side show the current pressure in the
reservoir tank. The gauge on the left shows the outlet pressure, this
can be adjusted with the regulating valve.
2. The output pressure of compressed air can be adjusted by the
regulating valve. Pull out the regulating valve knob and turn it
clockwise to increase pressure.
3. When the running compressor needs to be stopped, set the pressure
switch to the o position.
4. As soon as the compressor has been turned o, release any
any compressed air in the discharge pipe by turning the regulator
knob fully anticlockwise. Failure to do this will result in damage to the
motor.
5. Once all compressed air has been released, remove any condensation
by unscrewing the drain cock.
Page 6

6
1. Never unscrew any connecting parts while the tank is pressured.
2. Never disassemble any electrical parts before disconnecting the plug.
3. Never adjust the safety valve carelessly.
4. Never use the compressor when the voltage is too low or too high.
5. Never use an electric wire more than 5m long with less than a 1.5mm²
section rated to 16A.
6. Never disconnect the plug to stop the compressor. Set the switch knob
to “o” and follow instructions on page 5.
7. If the release valve doesn’t work when the motor is stopped nd the
cause immediately so as not to damage motor.
8. Lubricating oil must be clean; oil level should always be kept in the
red circle of the oil gauge.
9. Before restarting the motor by pushing the reset button, check the air
compressor carefully for the problems and check the pressure in the
air tank to ensure it is under 0.8Mpa.
10. After motor has been switched o and compressed air has been
safely discharged, Switch o and disconnect the plug to cut o the
power supply. Never leave compressor plugged in when not in use.
WARNINGS
Page 7

MAINTENANCE
7
1. Do not carry out any maintenance whilst compressor is on - ensure
motor is not running, compressed air and condensation is bled and
compressor is disconnected from any power supply (see pages 5 + 6).
2. Clean crank case and renew lubricating oil after the rst 10 working
hours.
3. Check the oil levels after every use and replenish if necessary.
4. To replenish oil, remove bolt from sump, drain o any old oil and
replace with new. Never mix old and new oil.
5. Clean air lter every 3 months.
6. Have the safety valve and pressure gauge checked by a certied repair
centre every 6 months to ensure they are in the correct working
condition.
7. Make sure the air tank is not damaged and no rust has formed.
8. Have the thickness of the air tank checked by a certied repair centre
every year to ensure the tank thickness is not less than 2.1mm.
Page 8

8
Trouble Possible causes Remedies
Motor unable running,
Running too Slow, or
Getting hot
(1) Fault in line, or voltage insufficient
(2) Power wire too thin or too long
(3) Fault in pressure switch
(4) Fault in motor
(5) Sticking of main compressor
(1) Check the line
(2) Replace the wire
(3) Repair or replace
(4) Repair or replace
(5) Check and repair
Sticking
of main
compressor
(1) Moving parts burnt due to the oil
insufficient
(2) Moving parts damaged, or stuck by
foreign body.
Check crankshaft, bearing,
connecting rod, piston,
piston ring, etc, And
replace if necessary.
Terrible shake or
abnormal noise
(1) Connecting part loosed
(2) Foreign body got into main compressor
(3) Piston knocking valve seat
(4) Moving parts seriously worn
(1) Check and retighten
(2) Check and clean away
(3) Replace with thicker
paper gasket
(4) Repair or replace
Pressure insufficient
or discharge capacity
decreased
(1) Motor running too slow
(2) Air filter chocked up
(3) Leakage of safety valve
(4) Leakage of discharge pipe
(5) Sealing gasket damaged
(6) Valve plate damaged, carbon buildup or
stuck.
(7) Piston ring and cylinder wor n or
damaged
(1) Check and remedy
(2) Clean or replace the
cartridge
(3) Check and adjust
(4) Check and repair
(5) Check and replace
(6) Replace and clean
(7) Repair or replace
Excessive
Oil
Consumpion
(1) Oil level too high
(2) Breath pipe chocked up
(3) Piston ring and cylinder wo rn or
damaged
(1) Keep the level within
set range
(2) Check and clean
(3) Repair or replace
TROUBLESHOOTING
Page 9
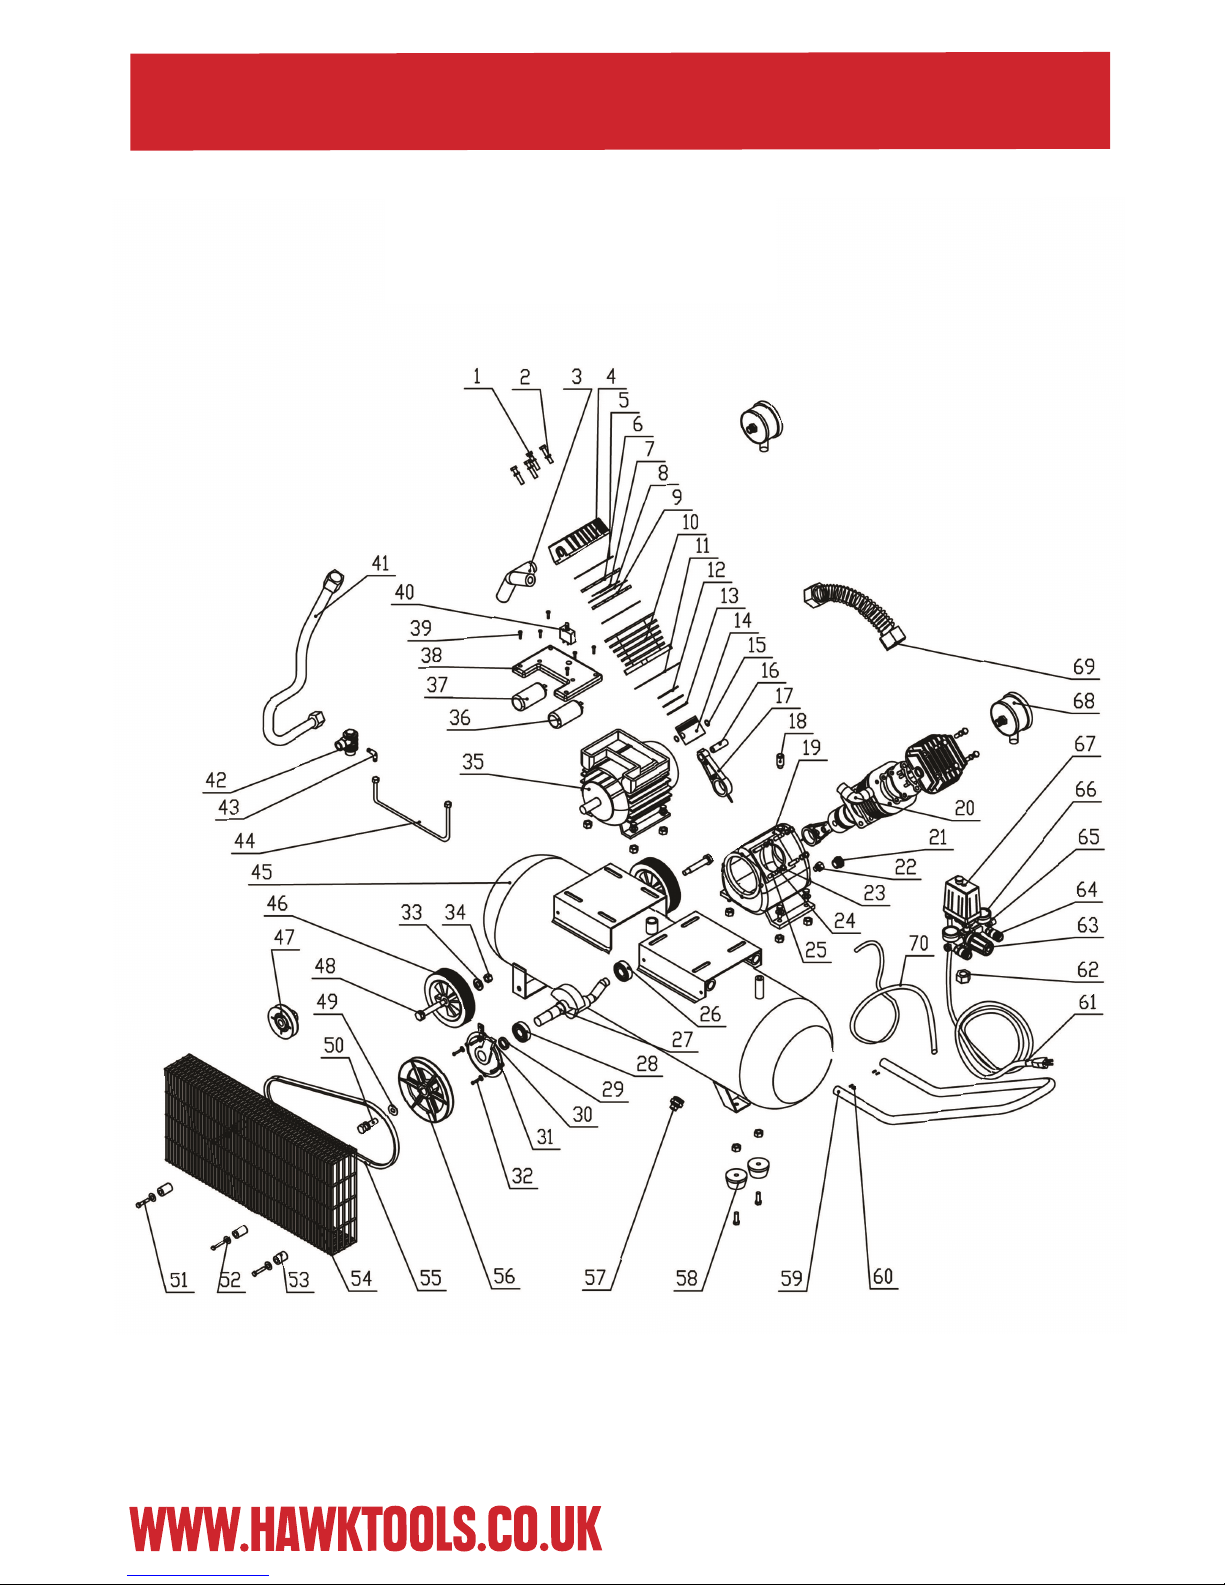
PARTS
9
Page 10
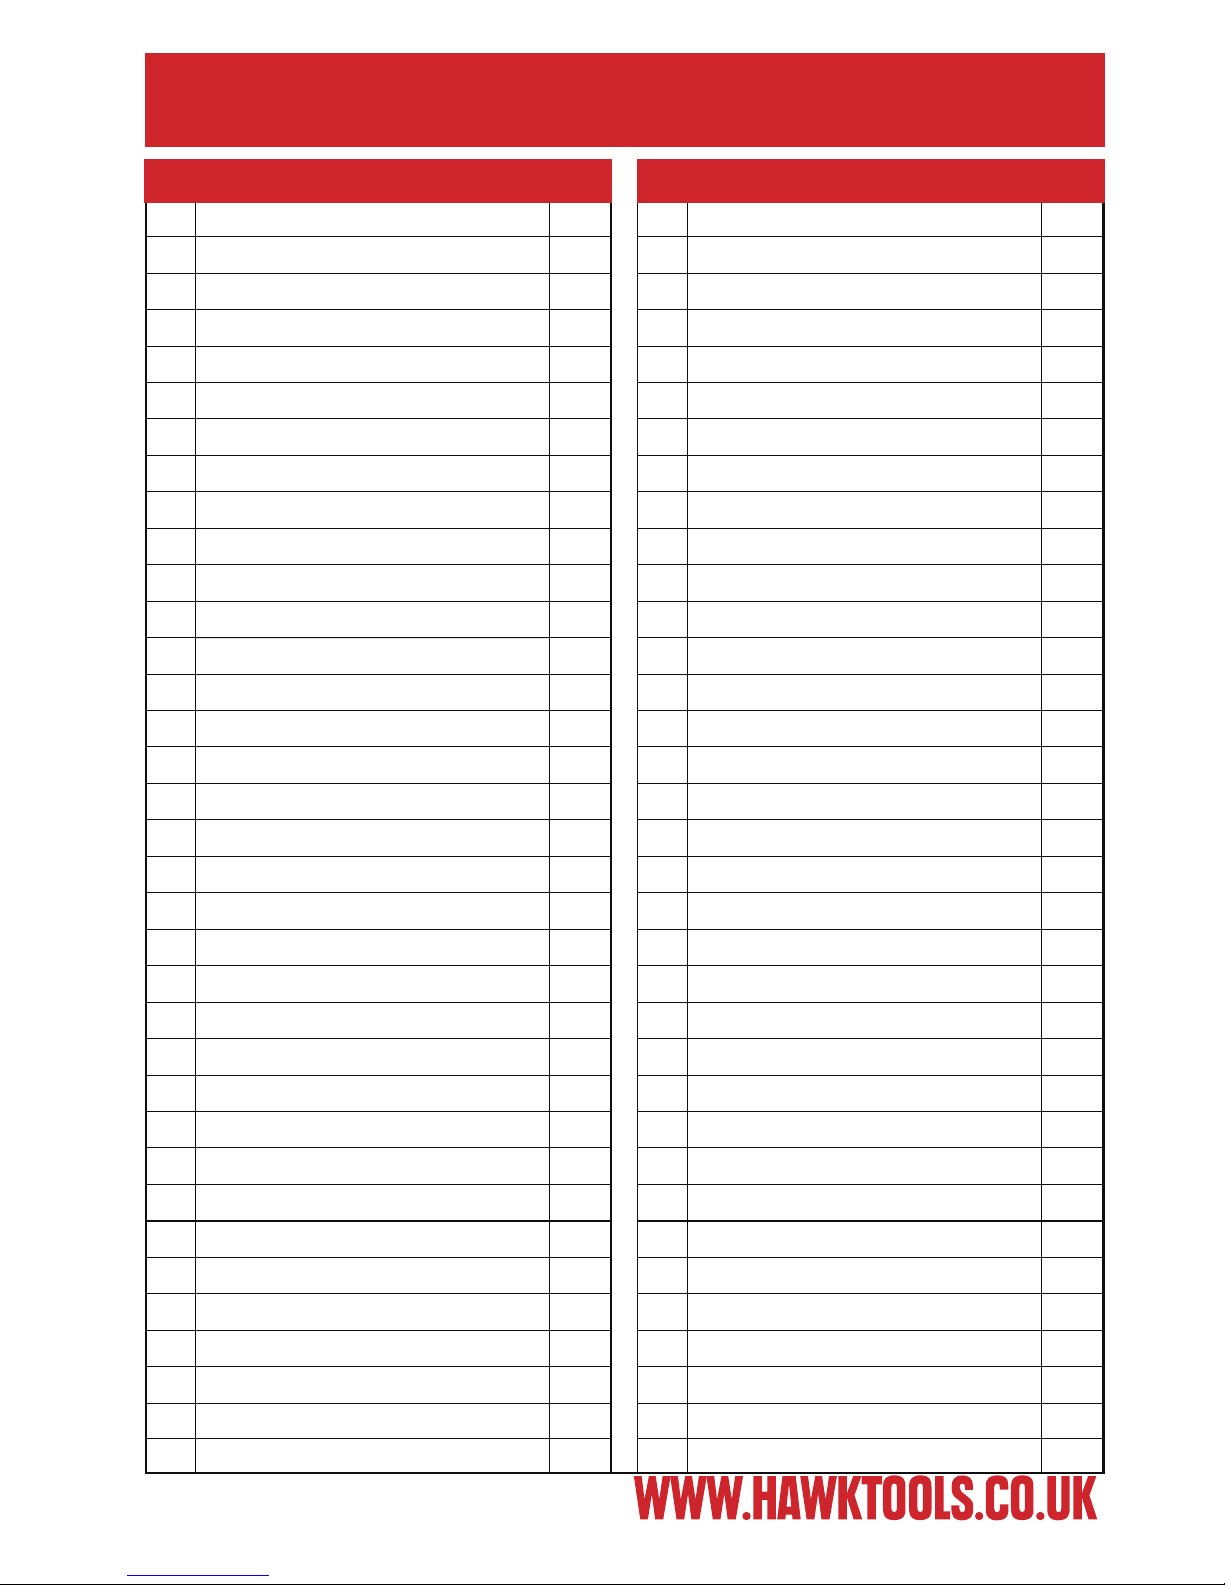
NO PART QTY
NO PART QTY
1 Bolt M6×45 8 36 Starting capacitance 1
2 Spring washer 6 8 37 Operation capacitance 1
3 Three angle connecter 1 38 Capacitance cover 1
4 Cylinder head 2 39 Screw ST3.9 x 16 6
5 Cylinder head gasket 2 40 Overload reset 1
6 Valve plate 4 41 Discharge pipe 1
7 Valve slice 4 42 One-way valve 1
8 Aluminium Foil 2 43 Right-angle connecter Rp1/8 1
9 Valve Gasket 2 44 Release pipe 1
10 Cylinder 65 2 45 Tank 1
11 Cylinder gasket 2 46 Wheel 2
12 Piston ring 65 x 2 4 47 Motor belt 1
13 Oil scraper ring 65 x 3 2 48 Axle
2
14 Piston 65 x 35.5 2 49 Washer 8 4
15 Piston Pin 2 50 Bolt M8 x 30 2
16 Ciclip 14 4 51 Screw M5 x 35 4
17 Connecting rod 2 52 Washer 5 4
18 Breath Pipe 1 53 Plastic mat 8
19 Crankcase 1 54 Net 1
20 Right-angle connecter 1 55 Belt 1
21 Oil leveler G1/2 1 56 Compressor belt wheel 1
22 Oil discharge screw 1 57 Drain cock 1/4″ 1
23 Nut M8 16 58 Washer foot subassembly 2
24 Spring washer 8 21 59 Handle 1
25 Screw M8 x 32 8 60 Screw M8 x 8 4
26 Bearing 6204-2RS 1 61 Power cord 1
27 Crank 1 62 Nut 1/4″ 1
28 Bearing 6205-2RS 1 63 Regulator Valve 1
29 Sealing Ring 1 64 Coupler 2
30 Fasten Plate 1 65 Safety valve 1
31 Bearing Bracket 1 66 Pressure gauge 2
32 Bolt M8 x 25 12 67 Pressure switch 1
33 Washer 10 2 68 Air filter 2
34
35
Nut M10
Motor
2
1
69
70
Connecter pipe
Power cord
1
1
PART
ITEM
QTY
PART
ITEM
QTY
PARTS LIST
10
Page 11

SAFETY
11
1. Prior to use, become familiar with the instructions given in this manual.
In particular, become familiar with the ON/OFF control for stopping
the compressor in the event of an emergency.
2. When operating the air compressor, always use eye protection such as
goggles, making sure that other people in the work area are also
using eye protection.
3. Eye protectors must provide protection from ying particles both
from the front and from the side.
4. Hearing protection should be worn when operating this compressor,
use ear plugs or ear defenders.
5. Never place your hand near any moving parts on the air compressor or
operate with the covers removed.
6. Never operate the air compressor in wet or damp locations.
7. Loose clothing or jewellery may be caught in moving parts. Always tie
long hair back, and wear suitable clothing.
8. Clear the work area of all unnecessary tools, debris and furniture.
9. During operation, the motor, connections, compressor body, cylinder
head and tubes may get hot, do not touch.
10. Do not direct the air stream at people or animals. Compressed air can
cause soft tissue damage and propel dirt and other particles at high
speed.
11. This compressor should not be used to supply breathing quality air.
Never use it as breathing apparatus.
12. When connecting the air compressor to the mains supply make sure
the red button on top of the air compressor is in the OFF (down) position.
13. When not in use the air compressor should be stored in a secure, dry
place out of the reach of children. Always lock up the storage area.
14. If the air compressor is damaged in any way, have it repaired by a
qualied engineer.
15. Using extension leads can cause your compressor motor to burn out.
Only use extension hoses.
Page 12

WARNING!
Before using this appliance, read the Operator’s manual and follow
all its safety rules and instructions.
™
 Loading...