

Page 1

© Commercial Electronics 2007
.
We therefore reserve the right to alter specifications and products without prior notice
It is the policy of Commercial Electronics to continually update and improve our security systems.
This instruction manual is important, please read it before installing the unit
e-mail: [email protected]
UK
LONDON SW19 8TT
WIMBLEDON
264 HAYDONS ROAD
COMMERCIAL ELECTRONICS
Manufacturer:
http://www.hawkcaralarm.eu
Tel: +44 020 8404 7105 Fax: +44 020 8404 7104
HA-MC01
USER GUIDE
Manufacturer:
COMMERCIAL ELECTRONICS
264 HAYDONS ROAD
WIMBLEDON
LONDON SW19 8TT
UK
Tel: +44 020 8404 7105 Fax: +44 020 8404 7104
http://www.hawkcaralarm.eu
INSTALLER’S MANUAL
Your motorcycle is fitted with a sophisticated anti-theft & unique anti-tamper alarm and
engine immobilisation system (Patent pending).
HA-MC01
UNAUTHORISED ALTERATIONS OR ADDITIONS TO THE HA-MC01 SYSTEM
In order to ensure maximum security, you are advised to gain a full understanding of the system
Tech Helpline for Friendly help & advice Mon-Fri Excl. Public holiday: 020 8180 5881
______________________________________________________________________________________
t is the policy of Commercial Electronics to continually update and improve our security systems.
i
We therefore reserve the right to alter specifications and products without prior notice.
© Commercial Electronics 200 7
MAY INVALIDATE THE WARRANTY.
by reading this User Guide.
e-mail: [email protected]
WARNING
Page 2

May we take this opportunity to thank you in purchasing the HAWK HA-MC01 motorcycle
alarm. HAWK HA-MC01 has been developed to provide your motorcycle with the ultimate
in security and convenience. The system design has been focused on a compact, easy
and safe to install unit with new features nearly unmatched in the industry.
HAWK HA-MC01 System consists of the following main components:
• Two Military grade encrypted Remote Transmitters
• Installed Waterproof HA-MC01 control unit
• Movement Detection built into control unit
• Installed in-line Fuses for patent pending Anti-temper Device
• Installed Ultra bright LED alarm indicator
• 125db unique six tone siren
• Warning Label
Page 3
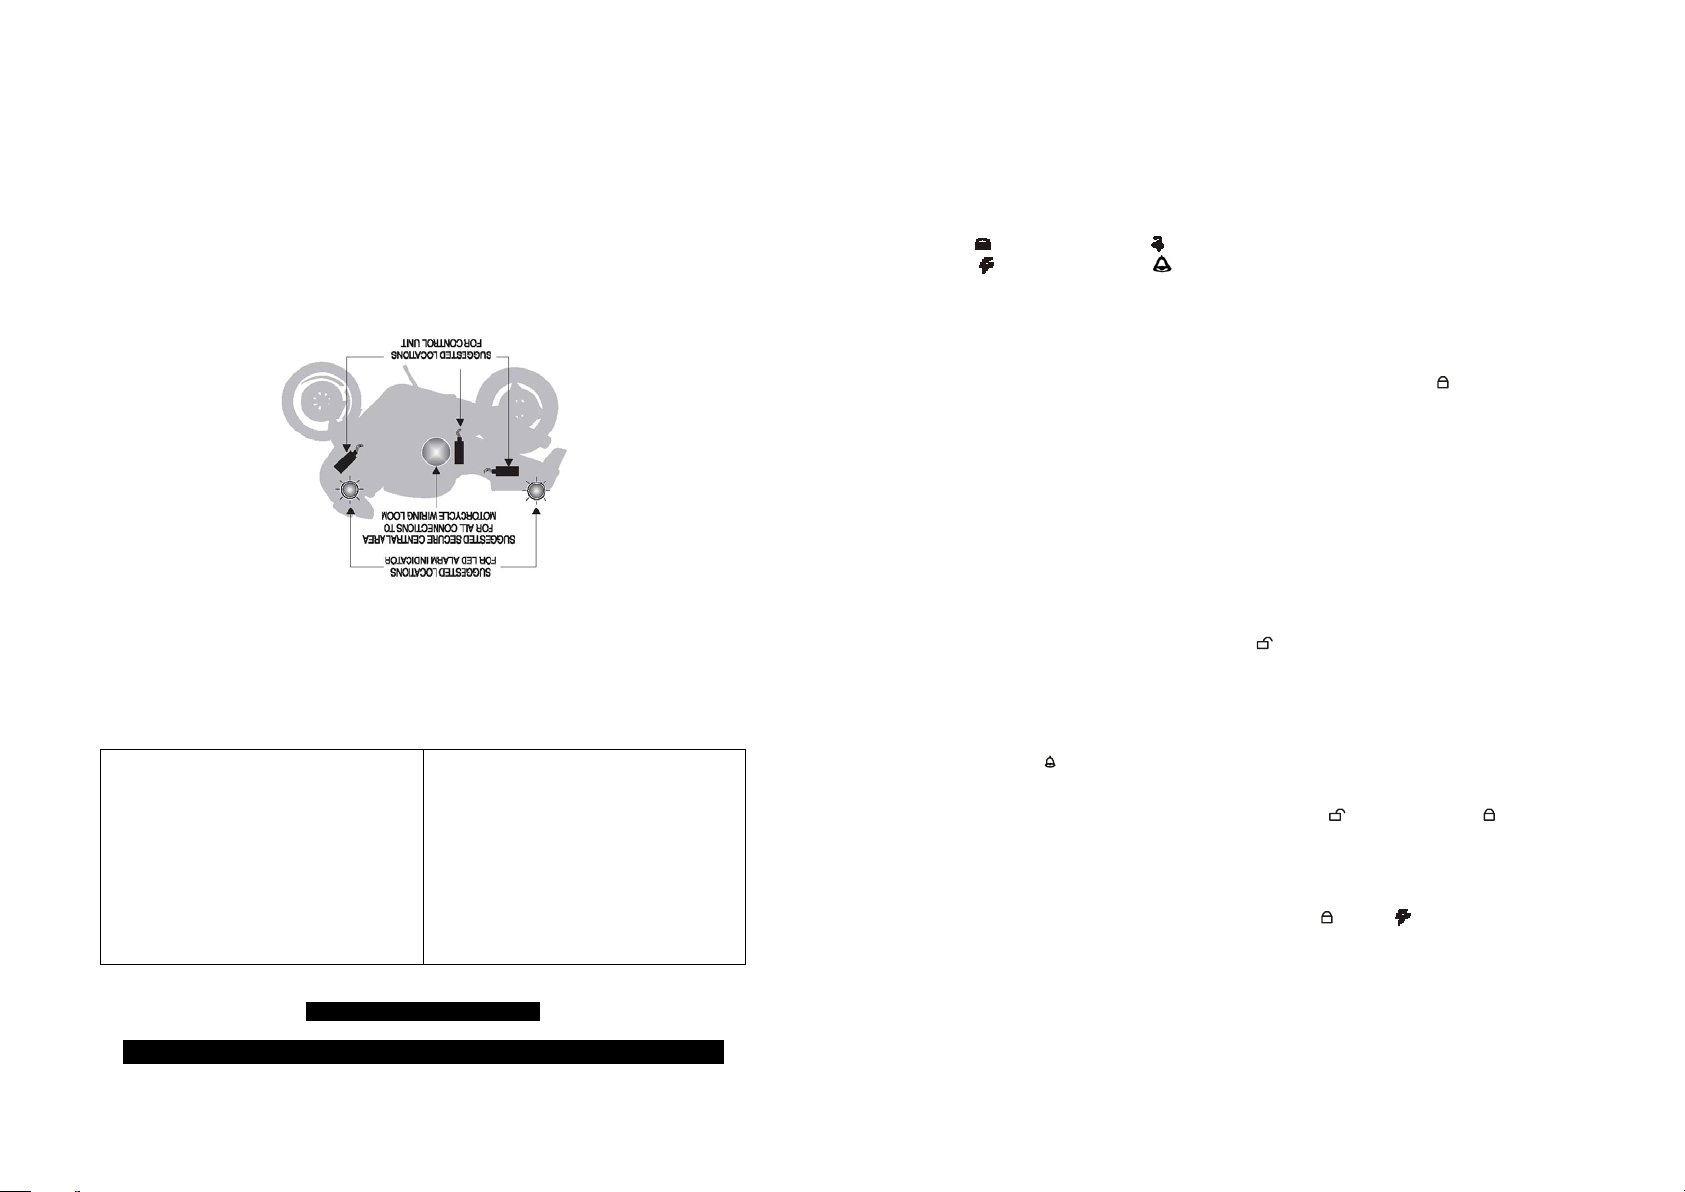
1
viewing access.
position; suggested locations are the instrument cluster or a rear body panel with good
The desired location of the LED Alarm Indicator should be mounted in a prominent
LED ALARM INDICATOR
the motor cycle. The control wiring must point down to avoid any water ingress.
to the elements, and make sure that the unit does not interfere with normal operation of
motorcycle wiring loom. Avoid extremes of heat i.e. exhaust engine and direct exposure
The control Unit should be located in a protected environment with good access to the
CONTROL UNIT
Set up Alarm
Remote startup Mute alarm
NORMAL OPERATION
Disarm
alarm
ARMING THE ALARM SYSTEM
NORMAL ARMING MODE
To arm the alarm system, turn the ignition switch OFF, press the
will flash once with single audible bleep LED starts to flash. The alarm system will enter
into the arming status after 5 seconds. If motorcycle is slightly moved, the alarm will
chirp & flash lights 5 times, if it’s moved hard then full reaction will occur and sound for
30 seconds. Engine will be completely immobilised and can not be driven away.
button, indicators
AUTOMATIC ARMING
In any case, the alarm system will arm itself automatically 30 seconds after the ignition
has been switched OFF.
system.
See the location diagram for suggested locations for the main components of the
Before commencing with the installation, plan where to secure the main components.
LOCATION OF MAIN SYSTEM COMPONENTS
• General Workshop Tools
• Multimeter
PLANNING THE INSTALLATION
• Warranty Information • Masking Tape
• Wiring Loom • Good quality insulating tape
• Siren • Self Adhesive Heat sink Tubing
• User Guide • Soldering Equipment
• Installation Instruction • Drill (9.5mm & 8mm bits)
• Two Remote Transmitters • Motorcycle wiring diagram
• The Control Unit • Pliers/Cable Cutters
The Box Contains Tools Required:
DISARMING THE ALARM SYSTEM
To disarm the alarm system, press the button, until indicators flash twice with two
audible bleeps.
SILENT ARMING/DISARMING
Press the button, the lights will flash once and the system will be armed. If the
motion detection sensor is triggered in silent arming mode for first time, indicator lights
flashes slowly. System will revert to normal arming mode automatically, when shaken
again. To disarm in silent arming mode press the
silent arming and back to normal arming mode.
button. Press the button to quit
ENERGY SAVING SECURITY MODE:
Turn the ignition switch OFF, Press and hold the button button simultaneously;
indicators will flash once with single audible bleep, indicators will flash once again.
System will enter automatically Energy saving mode after 3 seconds.
In the Energy Saving Security mode, if the engine switch on, warning alarm will
continuously sound for 30 seconds and the engine will be immobilised. The indicator
lights will not flash for energy saving.
How to Install Your HAWK compact Motorcycle Alarm System
1
Page 4

ALARM REACTION
Once triggered, the alarm will sound and the indicators will flash for 30 seconds
before switching off automatically.
To switch off alarm, press the
button on the transmitter.
EMERGENCY KEY RESET:
If the remote control is lost the owner can disarm the alarm with the key. Please refer to
steps below:
1. Keep the ignition switch off position for 1 second.
2. Turn the ignition switch ON/OFF 5 times and it will disable alarm immediately.
Make sure that each ON/OFF sequence is completed in 1 second otherwise the
system will ignore it.
BIKE FINDER/PANIC
Press button and button simultaneously with the alarm armed in normal mode
and the indicator lights will flash 8 times and siren will chirp 8 times. If alarm armed in
silent mode only the indicator lights will flash 8 times.
REMOTE START
Press the button twice within two seconds and hold, engine will start automatically,
and used for non-key driving and warm-up. Repeat the above operation if the engine
does not function due to cold weather or due to slow rotation of engine.
NOTE: when using the remote start up, the switch key of the motorcycle cannot be
pressed at the same time, otherwise the fuse will blow.
How to turn off the remote start function: press the
stop.
button once then engine will
ANTI HOTWIRE
When system in armed mode if system detects the ignition is forcibly switched on
(hotwired) siren will activate and indicator lights will remain solid, the engine is
automatically immobilised and motorcycle cannot be started up.
2
Page 5
ANTI HIJACK
Press the
immediately, siren will sound continuously and indicator lights will flash continuously.
Press the
button for 2 seconds when ignition is on engine will immobilise
button to de-activate anti hijack mode.
FOUR –SELECTION SENSITIVITY SET:
3
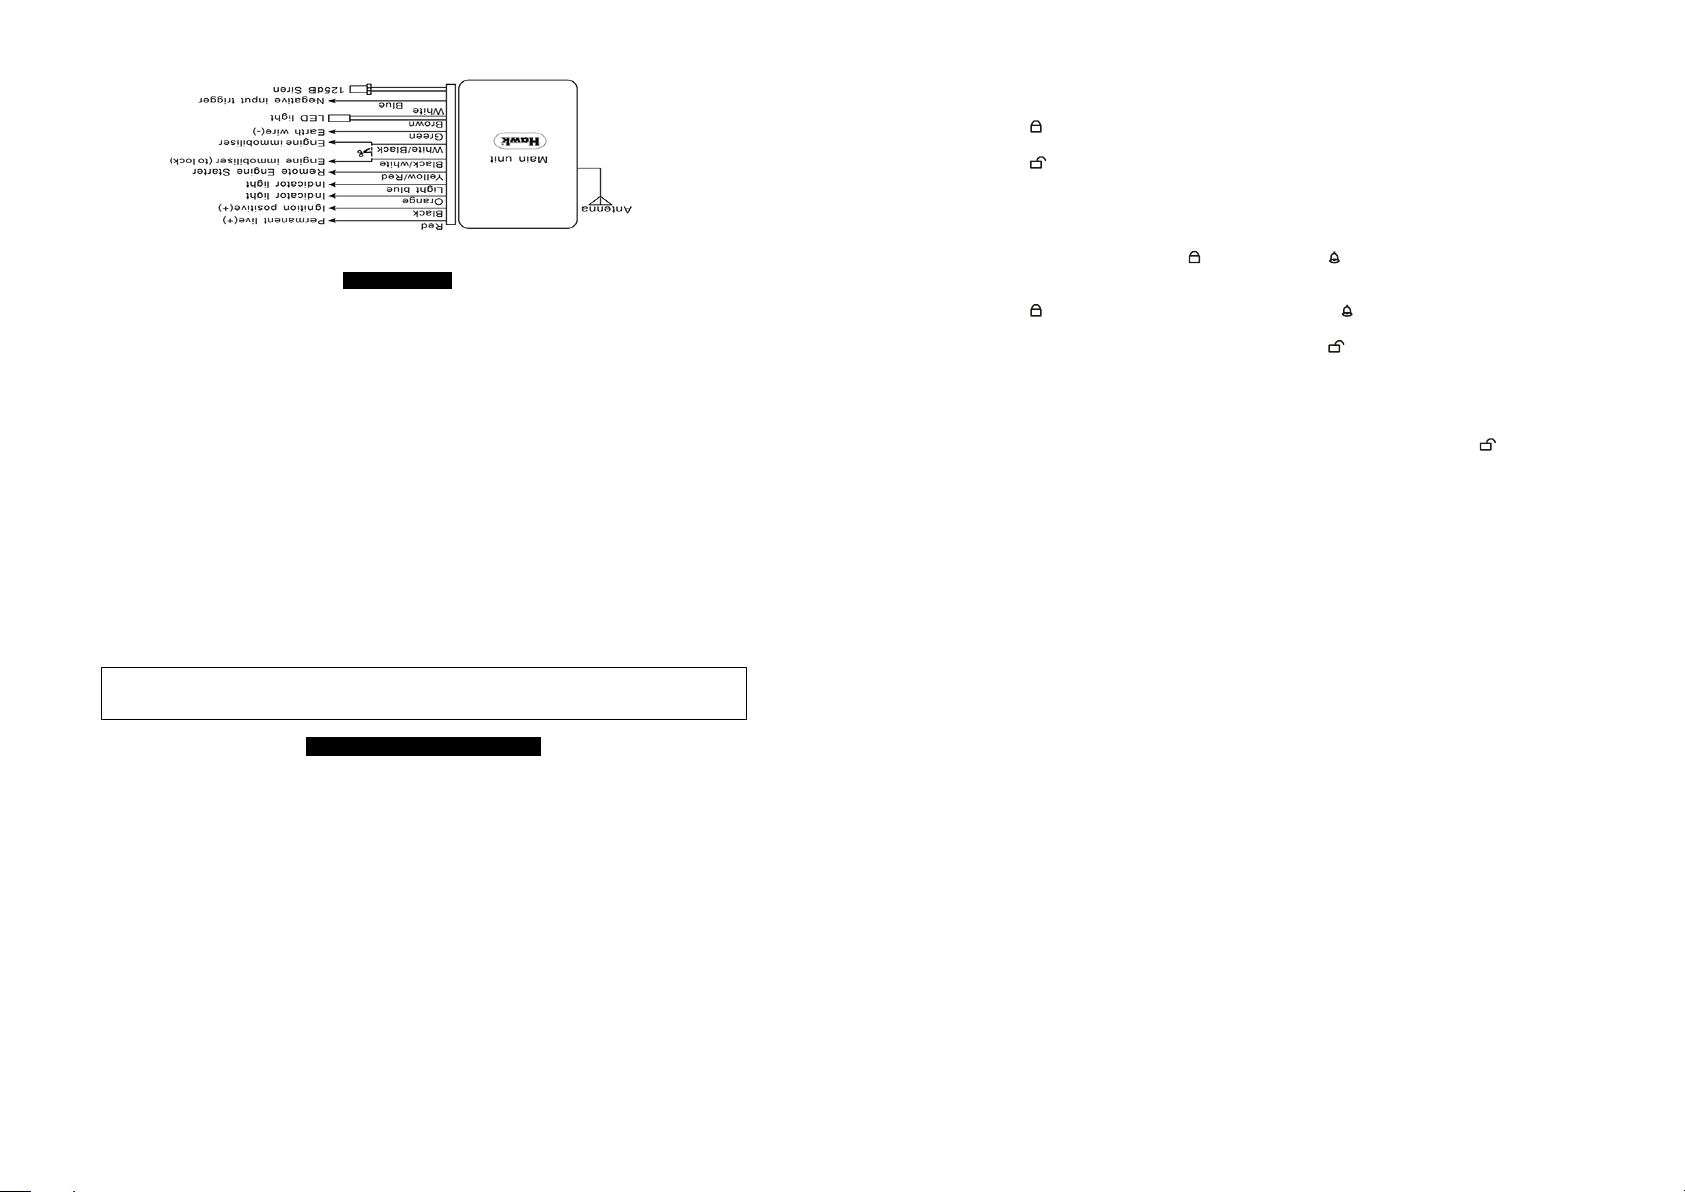
Wiring Diagram
10. Connect large 2 pin connector to Siren
9. Blue wire for optional negative input sensor e.g. tilt or microwave sensor
8. Connect small 2 pin connector to LED
terminal.
7. Connect GREEN earth wire to the motorcycle frame or the battery negative
on Harley Davidsons is not recommended.)
side stand switch etc. ( The CPU on Italian motorcycles or the Hall Effect ignition
manufacturer uses to switch off the engine, such as kill switch, fall down sensor,
If in doubt which circuit to immobilise, consider any circuit that the motorcycle
WHITE/BLACK wire. Recommended circuits are the fuel pump or fuel pump relay.
6. Engine immobilisation- there are 2 cables 1) BLACK/WHITE wire 2)
5. Connect YELLOW/RED wire to the remote starter (+) lead output.
use the motorcycle indicator negative (-) wire.
4. Connect LIGHT BLUE wire to right indicator positive (+) output. Take care not to
use the motorcycle indicator negative (-) wire.
3. Connect ORANGE wire to left indicator positive (+) lead output. Take care not to
power feed from ignition switch to fuse box.
the ignition is switched ON, and remains live when the starter is pressed e.g.
2. Connect BLACK wire to any wire in the ignition system which becomes live when
1. Connect RED wire to constant power input (+) 12v supply from the battery.
alarm loom or the motorcycle loom.
Make sure that you have planned the wiring connections before adapting / cutting the
IMPORTANT
ALARM WIRING INSTALLATION
NOTE: Soldered joints are recommended for all wiring connections.
on the motorcycle loom, such as under the petrol tank.
motorcycle wiring loom integrity. Normally all connections can be made to a central area
should run alongside the original motorcycle loom taking full advantage of the
Plan where to make the connections to the motorcycle wiring loom. The alarm loom
ALARM WIRING
2. position and attach the LED Alarm indicator
1. position and attach the Control unit
and give long term benefit to the user.
installation and good working practices will enhance the operation of the alarm system
Great care has been take in the design and manufacture of HAWK products, Correct
INSTALLATION OF MAIN SYSTEM COMPONENTS
When alarm disarmed Press the button and the button at the same time, the
siren will chirp three times and indicator lights flash three times. System is set for
sensitivity adjustment mode.
Press the
Level of sensitivity indicated by number of siren chirps, there are 4 levels of sensitivity.
To exit from sensitivity adjustment mode press the
button sensitivity increase and press the button sensitivity decrease.
button.
STATUS MEMORY:
When the motorcycle is set into arming normal or silent mode, press the button, if
the siren gives one extra chirp then motorcycle was tampered.
MEMEORY FUNCTION
The alarm will memorise the condition before the power is cut off.
LEARNING TRANSMITTER CODES:
This alarm system can support up to 4 remote controls. The included transmitter is pre
programmed into the systems memory at the factory. Follow the below steps to add or
delete a new transmitter.
1. In disarming mode, ACC OFF position. Turn the ACC ON/OFF 8 times and lastly turn it
ON, the car enters into code learning mode.
2. Press and hold a button on the first remote for 1 second, parking light flash once,
siren chirp once. The first remote is learned.
3. Press and hold a button on the second remote for 1 second, parking light flash twice,
siren chirp twice, indicating the second remote learned.
4. Follow the above procedures, the times the parking light flash or the siren chirps
indicate the sequence of the remote learned.
5. Altogether 4 remotes can be learned. If the 5th remote learned, it will automatically
replace the first one.
TROUBLESHOOTING
Can not disarm or arm the alarm system
• Check the alarm fuse. Check you are within range of the motorcycle (10m max).
Check the ignition switch is in the OFF position. Check the integrity of the
transmitter battery.
Starter motor fails to function
• Check the motorcycle battery in good condition. Ensure that engine ‘Run/Stop
switch is in the ‘run’ position, side stand is up and motorcycle is not in gear.
3
Page 6

TRANSMITTER BATTERY REPLACEMENT
To clean the battery contacts, or to replace the battery, open the casing using the two
screws.
Make sure that the replacement battery is of the correct type and located in the correct
position with the polarity maintained. This transmitter uses 1 x 27a alkaline battery.
GENERAL CARE AND MAINTENANCE
TRANSMITTER
The transmitter contains delicate electronic circuits and must be protected from impact
and water damage. Change the battery every year.
CONTROL UNIT
The control unit also contains delicate electronic circuits and must never be pressure
washed or steam cleaned.
MOTRCYCLE BATTERY
The Alarm System consumes >3mA when the motorcycle is being protected. If the
motorcycle is parked or stored for a long period, or has a small or old battery, the
motorcycle battery can eventually discharge.
GENERAL SECURITY
The HAWK HA-MC01 alarm/immobiliser system will provide an effective deterrent
against theft. It will not in itself guarantee that your motorcycle is not stolen or
damaged. We strongly advise that your alarm is used conjunction with basic anti-theft
precautions.
WARRANTY TERMS AND CONDITIONS
Please keep your purchase invoice carefully. This will help us to handle any warranty
enquiries quickly. The warranty does not affect your statutory eights. The warranty
period is 12 months from date of purchase, only applies to UK registered motorcycles
and is only applicable to the original purchase/owner. If within the warranty period the
system proves to be defective by reason of faulty design, workmanship or materials. We
undertake subject to the following conditions to have the defective system repaired or at
our discretion, replaced.
• The system must have been in accordance with the installation and operating
instructions.
• Any attempt by an unauthorised individual to repair or modify the system will
render the warranty null and void.
• No liability will be accepted for any costs incurred where no fault is found; the
fault lies with the motorcycle or the fuses to the system or motorcycle
transmitters have been lost, damaged or have discharged batteries. Assistance
has been provided other than through the HAWK dealer network, without prior
approval from HAWK, any defect or failure has been caused by outside force to
or misuse of the system.
4
 Loading...