

Page 1

INSTALL INSTRUCTIONS KK-K9-C20-K-PT
K9/PRISONER TRANSPORT UNIT
2007-2008 CHEVROLET/GMC TAHOE/YUKON
TOOLS REQUIRED:
Ratcheting wrench
Socket & Metric socket sets
Drill bit set
HARDWARE:
QTY DESCRIPTION PART #
20 ¼-20 x ½” Stainless Carriage Bolts GSM32022
30 ¼-20 x ¾” Stainless Carriage Bolts GSM32024
50 ¼-20 Hex Flange Serrated Nuts Zinc GSM30023
6 ¼” x 1” Hex Head Lag Bolt GSM33060
22 #12 x ¾” Stainless Sheet Metal Screws GSM34177
24 #10 x ¾” Sheet Metal Screws Stainless GSM34170
12 #10 x ½” Sheet Metal Screws Stainless GSM34169
10 10-32 x ¾” Machine Screw Screws Stainless GSM34098
6 #10 x ¾” Sheet Metal Screws Zinc GSM33195
1 Tube Silver Caulk PRM97343
COMPONENTS:
QTY DESCRIPTION PART #
1 Main K9 housing assembly KK-K9-C14-K-DS
1 K9 Tunnel assembly KNM02038-C14
1 Driver-side floor mounting bracket KNM01081-C14
1 Passenger-side floor mounting bracket C-3061-9
2 Passenger-side “B” pillar mounting brackets C-3061-5 and C-3061-7
1 Upper prisoner filler panel KNM001213
1 Rear prisoner filler panel KNM000977
1 Lower prisoner filler panel KNM001207
1 Front prisoner filler panel KNM000978
1 Front prisoner seal panel KNM001220
1 32” x 45” x 3/16” Rubber Mat KNM01029-SUV
Powered drill
Screwdriver set
Page 2
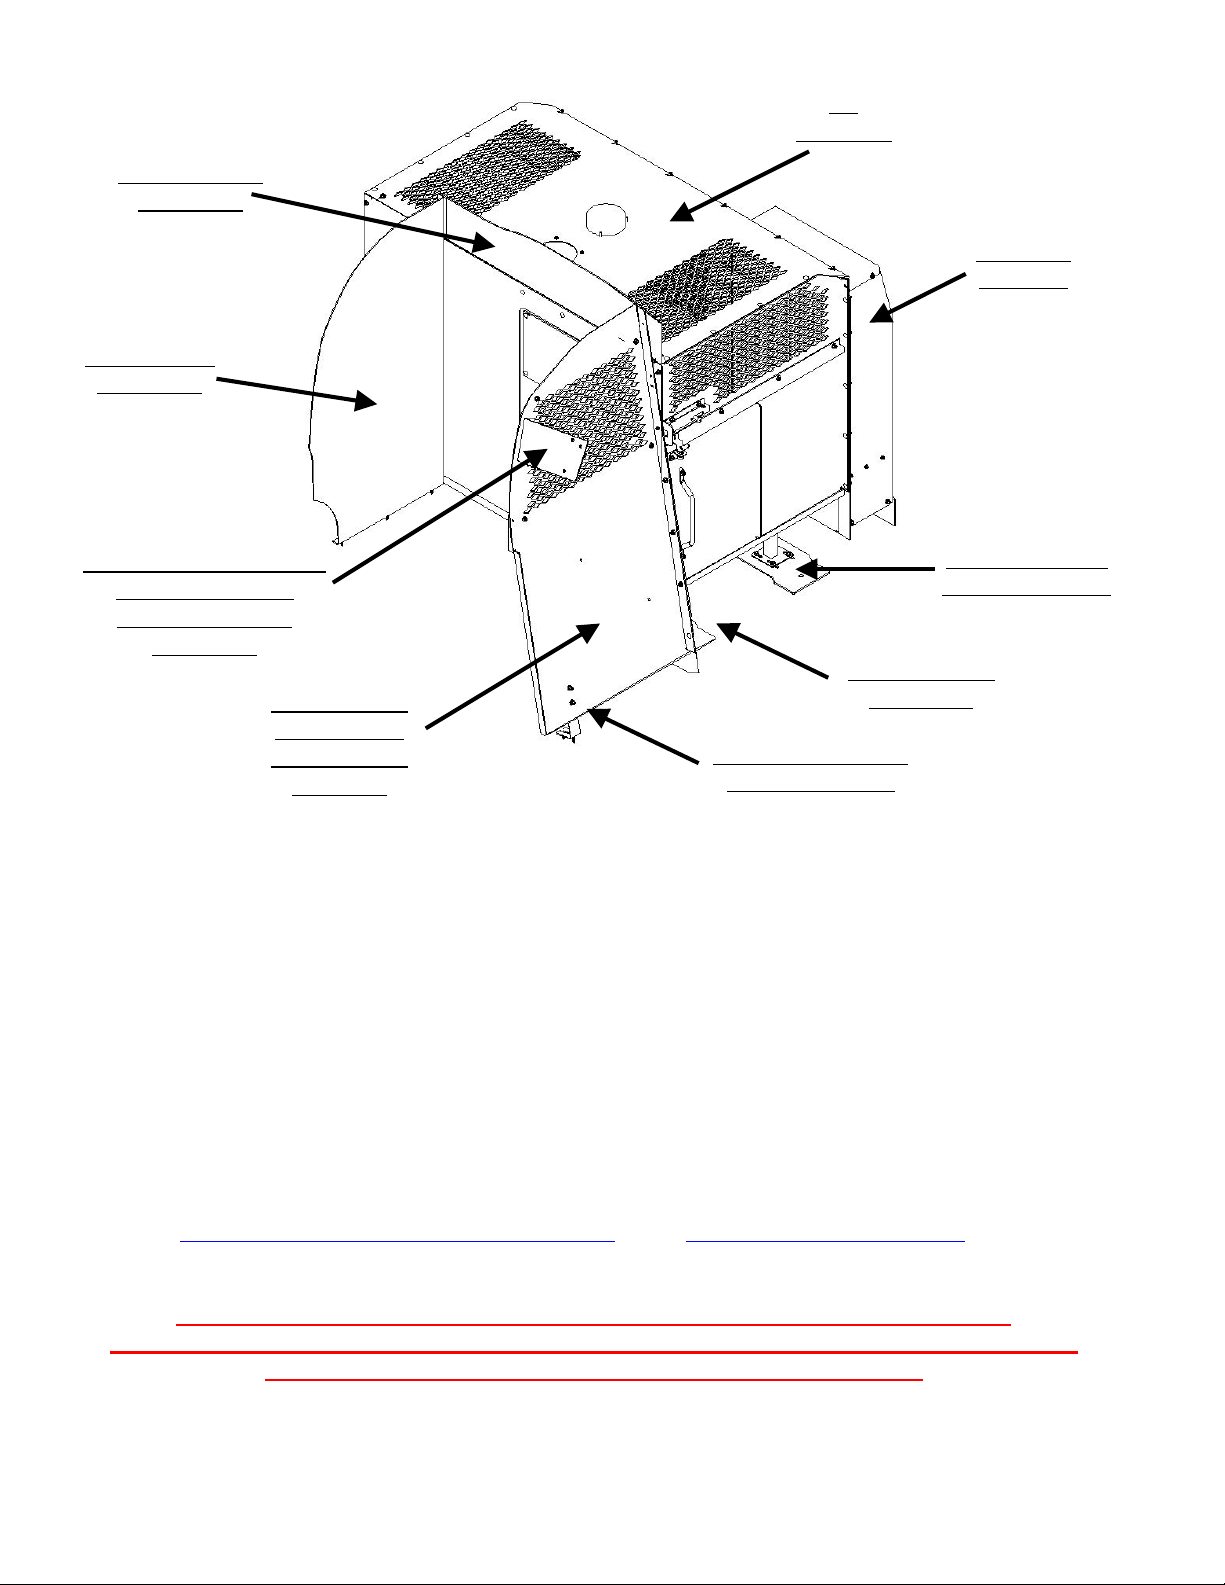
K9
Assembly
Upper prisoner
filler panel
K9 tunnel
assembly
Rear prisoner
filler panel
Passenger-side “B” pillar
mounting brackets
Two “L” Brackets
See photos
Front prisoner
filler panel &
Front prisoner
seal panel
Lower prisoner
filler panel
Passenger-side floor
mounting bracket
Driver-side floor
mounting bracket
Always!
Read all instructions before installing any Havis-Shields Equipment Corp products
Disconnect the vehicle battery. Removing seat bolts on some vehicles may give the vehicles
computer a false reading, causing a warning light on the instrument cluster. This requires the
vehicles’ computer to be reset with a vehicle diagnostics tool.
Check for obstructions (Wire, brake lines, fuel tank, etc.) before drilling any holes!
Use only hardware provided with install kit.
For product support, visit the Install Instructions Section of our website at
http://havis.com/Installation/Installation.html, email technicalsupport@havis.com or call 1-
800-524-9900 and ask for technical support.
***CAUTION!!! ON PASSENGER SIDE REAR, UNDER THE VEHILCE, ARE
REFRIGERANT LINES THAT MAY LINE UP WITH REAR PARTITION FILLER PANEL
DO NOT DRILL THROUGH VEHILCE IN THIS LOCATION
KK-K9-C20-K-PT_INST_10-07
Page 3
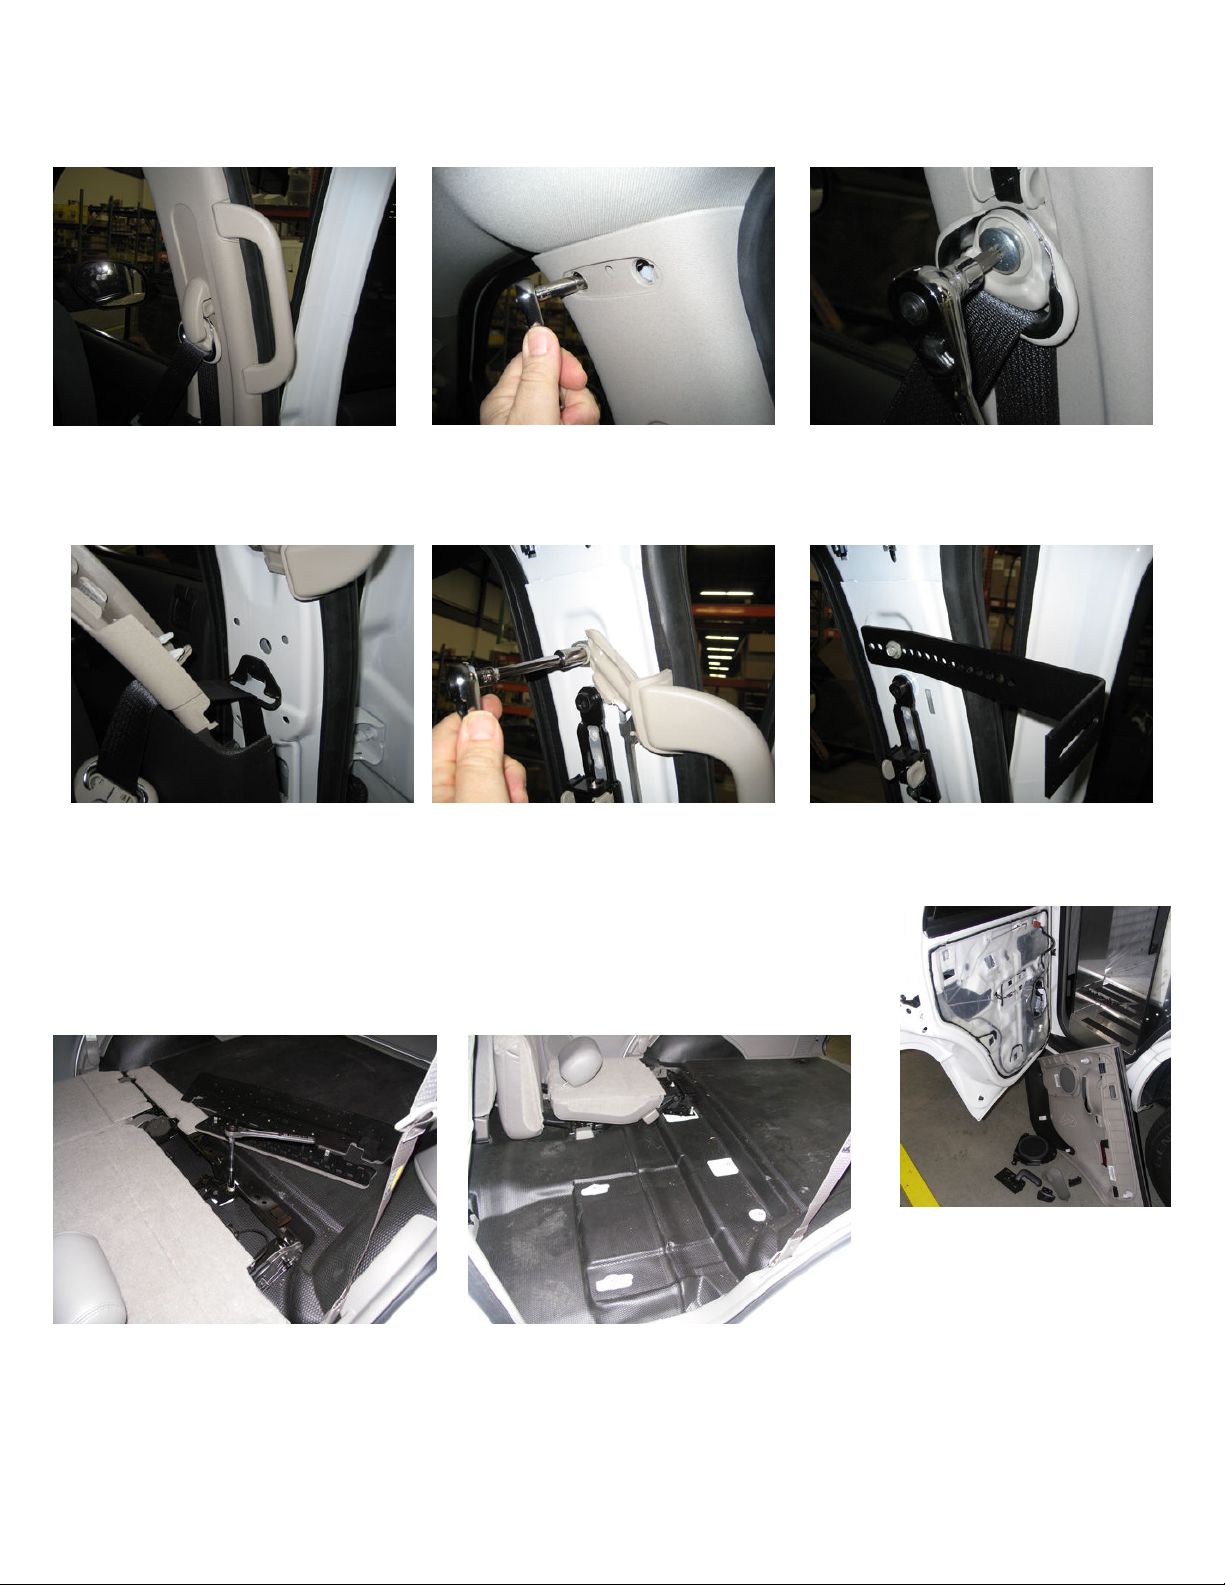
speakers Note: Reconnect
window switches and wire
Note: Wrap OEM switch
Remove “B” Pillar Trim, Seat belt bolt and Grab Handle
Reuse OEM Grab handle bolts and attach “L” brackets to grab handle mount holes
Remove passenger door
panels, door handles and
tie parts so they do NOT
interfere with window
Remove dual passenger
Leave the single
operation.
seat assembly
passenger-side seat
installed
with Plastic bag to
protect from water
KK-K9-C20-K-PT_INST_10-07
Page 4

1. Mount 7” bracket at Top and 5” bracket at bottom
2. Seat belt mount bracket lower tab may need to be slightly bent out of the way
3. Reattach seat belt bolt and trim and Cut Plastic Trim at “L” bracket if necessary.
4.
Mount Partition to “L” brackets.
Passenger-side
Driver-side
Assemble Mounting feet to floor plates in
locations shown above
Set height at 7.5”
Attach to existing seat
Slide in Main K9 Housing and rest on mounting feet.
bolt studs with O.E.M
seat bolt nuts
KK-K9-C20-K-PT_INST_10-07
Page 5

carriage bolts. Position K9 unit so tunnel lines up with
rocker panel plastic trim. Move driver seat to rear most
isting
Line up driver and passenger-side floor mounting brackets and loosely
attach to K9 main housing, using ¼” x ¾” stainless carriage bolts and
serrated nuts.
**Do not tighten hardware until the side tunnel is set in place**
Attach driver side tunnel with ½” long and ¾ “ long
position.
Attach upper prisoner
filler panel using ex
¼ x ¾” stainless carriage
bolts and serrated nuts
KK-K9-C20-K-PT_INST_10-07
Page 6

way and attach lower prisoner filler to
1.
1
panel to K9 main housing
.Attach to floor using ¼” x
#1
#2
.Attach rear prisoner filler
using ¼ x ¾” stainless
carriage bolts and serrated
nuts.
2
1” hex head lag bolts. Be
sure to check under vehicle
for obstacles.
#1
#2
Attach front prisoner filler panel to K9 main housing
using ¼ x ¾” stainless carriage bolts and serrated nuts.
2. Attach front prisoner partition to previously mounted
“B” pillar mounting brackets using ¼ x ¾” stainless
carriage bolts and serrated nuts.
Caution…Always Check under vehicle for obstructions
1. Attach front floor mounting bracket
to forward prisoner filler panel using
¼” x ¾” carriage bolts and nuts.
2. Attach to vehicle using ¼” x 1” hex
lag bolts. Be sure to check for
obstacles.
Flip front portion of seat out of the
K9 main housing, using #10 x ½”
sheet metal screws.
KK-K9-C20-K-PT_INST_10-07
Page 7

With door panel installed, hold up window guard assembly with top
Center door panel on door.
Push down and drill mount
holes with 1/8” bit. Attach with
#10 x ¾” Sheet metal screws
bracket between rubber and metal frame. Guard hinge will sit on
top of door panel. Mark location of top bracket and hinge.
Remove top bracket
from window guard
Hinge up window guard and
attach to top bracket with 10/32 x
½ machine screws
Hold top bracket in its location, mark the four mount holes and
drill with 1/8” drill bit. Carefully hold rubber gasket away from
drill. Drill 1/8” holes for hinge mounting. Attach Top bracket
and hinge with #10 x ½” sheet metal screws.
Final Door
panel and
window
guard
assembly
KK-K9-C20-K-PT_INST_10-07
 Loading...