

Page 1

INSTALL INSTRUCTIONS C-3311-2 & C-3311-18-2
SLIDE-OUT TRUNK TRAY
2006-2008 CHEVROLET IMPALA
TOOLS REQUIRED:
7/16” wrench
Powered drill w/ 3/16” drill bit
Ratcheting wrench
HARDWARE:
QTY DESCRIPTION PART #
12 ¼-20 x ¾” Hex head bolts GSM33001
16 ¼” Flat washers GSM31005
12 ¼-20 Serrated nuts GSM30023
4 8-32 x 3/8” Machine Screws GSM33540
4 8-32 Keps Nuts GSM30027
4 ¼” x ¾” Hex head lag bolts (only on C-3311-18-2) GSM33060-1
2 Front Mounting Leg CM001390
1 Rear Driver-side bracket CM001391
1 Rear Passenger-side bracket CM001392
4 Mounting plate w/ pem ¼” pem studs (Use 2 on C-3311-18-2) CM001393
1 P.S. Front Mounting Bracket (only on C-3311-18-2) CM001394
1 P.S. Rear Mounting Adapter Bracket (only on C-3311-18-2) CM93712
Standard socket set
Screwdriver set
Always!
Read all instructions before installing any Havis-Shields Equipment Corp products.
Check for obstructions (Wire, brake lines, fuel tank, etc.) before drilling any holes!
Use hardware provided with install kit
For product support, visit the Install Instructions Section of our website at
http://havis.com/Installation/Installation.html
SUB ASSEMBLY: (Use Iso views on page #1 & 2 for sub assemblies)
- 1 -
Page 2
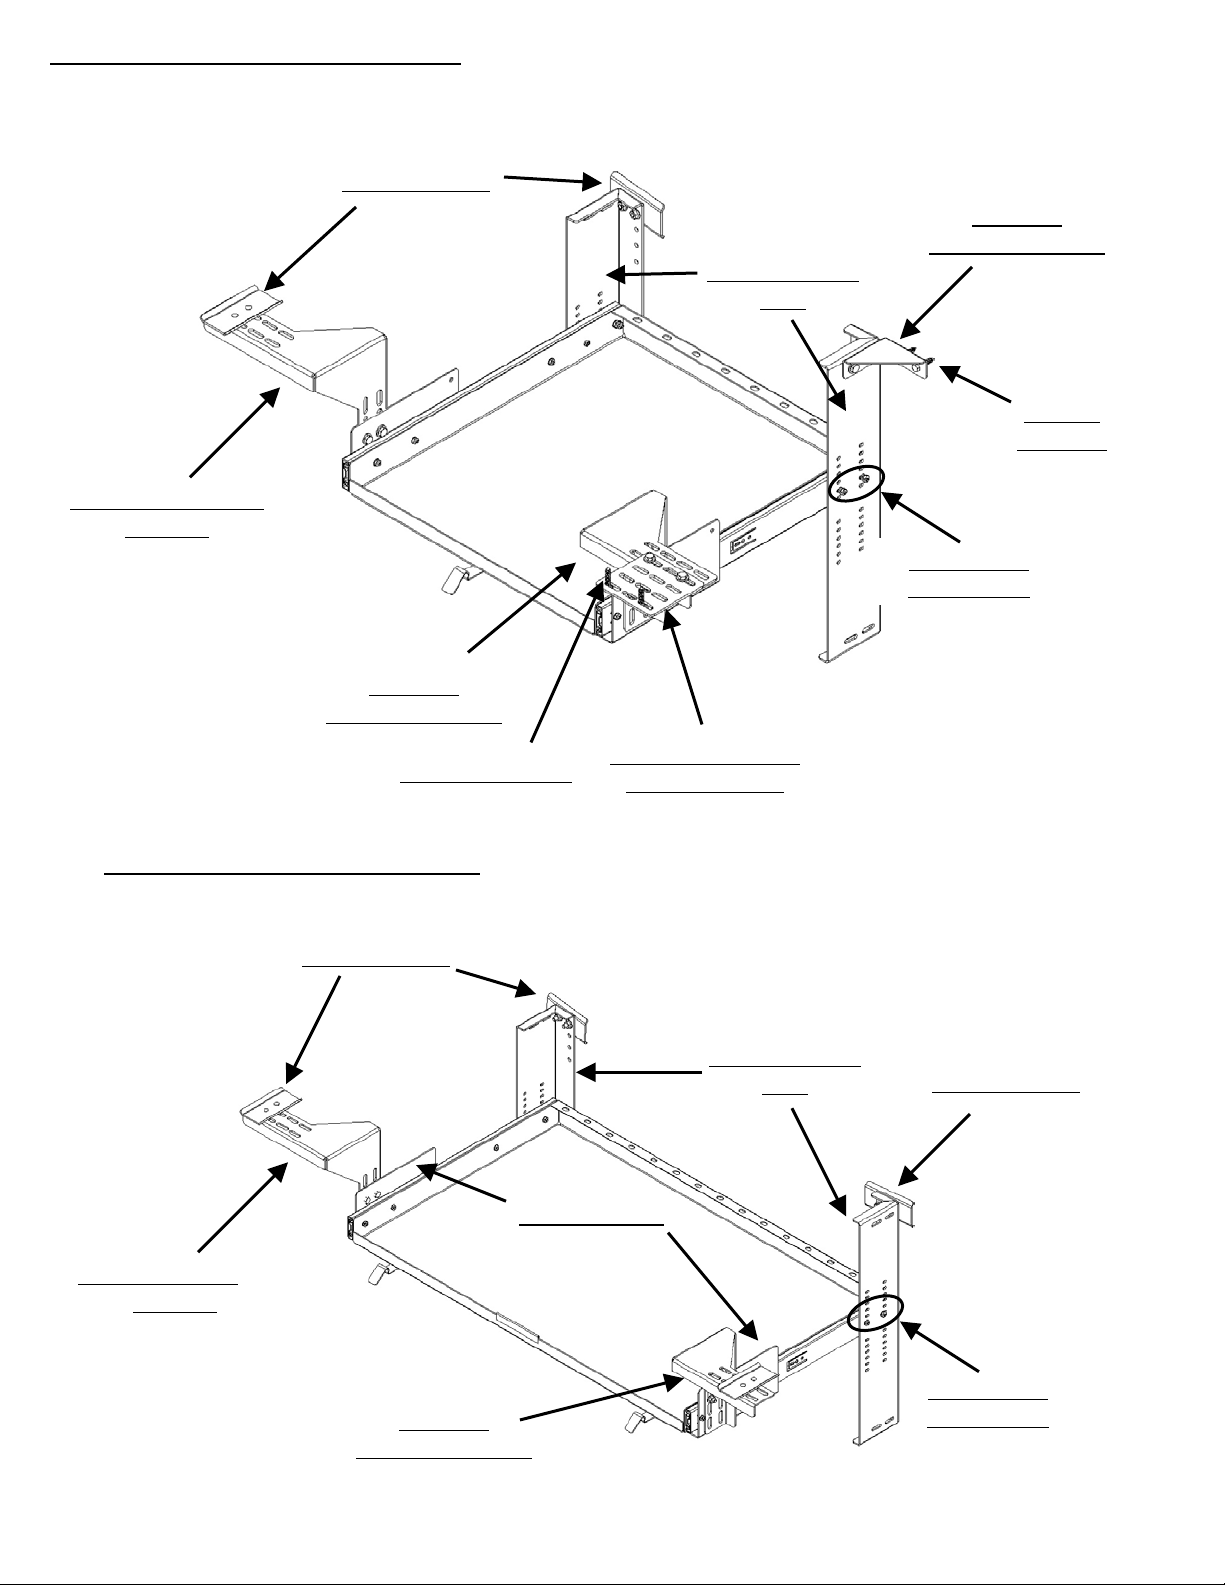
C-3311-18-2 HALF SIZE SLIDE TRAY
Mounting Plate
D.S. Rear Mounting
Brackets
P.S Front
Mounting Bracket
Front Mounting
Legs
¼” x 1”
Lag bolts
8-32 Screws
and hex nuts
P.S. Rear
Mounting Bracket
¼” x 1” Lag bolts
C-3311-2 FULL SIZE SLIDE TRAY
Mounting Plate
P.S. Rear Mounting
Adapter Bracket
Cradle Bracket
Front Mounting
Legs
Mounting Plate
D.S. Rear Mounting
Brackets
P.S. Rear
Mounting Bracket
8-32 Screws
and hex nuts
- 2 - C-3311-2^3311-18-2_INST_9-07
Page 3

1. Attach forward mounting legs to the slide out tray.
• Attach forward mounting legs with provided 8-32 screws and hex nuts to slide track.
• The front legs will be square to the slide tray.
• On the front passenger side of the half tray, passenger side front mounting brackets
(CM001394) will attach to the front mounting legs.
2. Attach rear-mounting brackets to the slide out tray.
• Loosely attached the rear mounting brackets to the “Cradle Bracket” using ¼” x ¾”
hex head bolts, washers and serrated nuts.
•
On the rear passenger side of the half tray, passenger side rear mounting adapter
bracket (CM93712) will attach to the rear mounting brackets.
INSTALLATION:
1. Mount slide tray in vehicle trunk.
• Slide trunk tray into vehicle with the tall front mounting legs in first. Prop up tray in
position using block of wood.
• Once you have the tray square, and pushed to the forward most position in trunk,
attach mounting brackets to vehicle using the supplied mounting plates.
• On the half tray, passenger side, you will bolt the passenger side front mounting
brackets (CM001394) to the vehicle using ¼” x ¾” Hex head lag bolts. (Pre-drill w/
3/16” drill bit)
• Position mounting plates into locations shown in photos #1 and 2.
• Loosely attach front and rear mounting brackets to mounting plates using ¼” serrated
nuts.
• On the passenger side, attach passenger side rear mounting adapter brackets
(CM93712) to vehicle using ¼” x ¾” hex head lag bolts. (Pre-drill w/ 3/16” drill bit)
Forward Mounting Brackets
Mounting
Plate
Rear mounting brackets
Mounting
Plate
- 3 - C-3311-2^3311-18-2_INST_9-07
Page 4

P
• Tighten all loose hardware.
• Be sure tray slides smoothly and locks in the closed position. If the tray does not slide
smooth then most likely the tray is not square or level.
#8 screws &
hex nuts
hoto #3
¼” bolts, washers,
& nuts
- 4 - C-3311-2^3311-18-2_INST_9-07
 Loading...