

Havis DS-APP-102, PKG-DS-APP-102, PKG-DS-APP-112, PKG-DS-APP-122, PKG-DS-APP-132 Owner's Manual
Page 1

Owner’s Manual
Havis Docking Station For the
Havis iPad Protective Case
www.havis.com
1-800-524-9900
DS-APP-102
PKG-DS-APP-102
PKG-DS-APP-112
PKG-DS-APP-122
PKG-DS-APP-132
DS-APP-100 Series
Page 2
DS-APP-102
PKG-DS-APP-102
PKG-DS-APP-112
PKG-DS-PAN-122
PKG-DS-PAN-132
Before Beginning
(Original Instructions)
2 11
Havis is pleased to provide this Owner’s Manual to aid in the proper
installation and use of the DS-APP-100 Series Docking Station for
the Havis iPad Protective Case.
For questions regarding the set-up of your DS-APP-100 Series Docking Station,
please contact Havis at 1-800-524-9900 or visit www.havis.com for additional
product support and information.
Use the supplied power cable to charge your iPad once its securely docked.
Plug barrel connector into the back of the Docking Station, and the cigarette
lighter adaptor into the vehicle power source.
This Owner’s Manual applies to the following Part Numbers:
• NEVER STOW OR MOUNT THE DOCKING STATION DIRECTLY IN A VEHICLE
AIRBAG DEPLOYMENT ZONE.
• DO NOT USE COMPUTER WHILE DRIVING.
Supplying Power to iPad
• READ ALL INSTRUCTIONS THOROUGHLY BEFORE BEGINNING INSTALLATION.
EC DECLARATION OF CONFORMITY in accordance with EN 45014
Manufacturers Name: Havis, Inc.
Manufacturers Address: 47801 Anchor Court, Plymouth Twp, MI 48170 USA
Declares under our sole responsibility that the product:
Product name: Havis Docking Station For Havis iPad Protective Case
Model: DS-APP-1XX, where ‘X’ may be any alphanumeric character and which describes product options.
May be followed by any alphanumeric characters which describe product options.
Product Options: This declaration covers all options of the above product which bear the CE Marking.
Is in conformity with the following standards or other normative documents:
EMC Directive 2004/108/EC: EN 55022:2010, Class B, Information technology equipment Radio disturbance characteristics - Limits and methods of measurement
EN 55024:2010, Information technology equipment - Immunity characteristics Limits and methods of measurement
Directive 2011/65/EU Restriction of the use of certain hazardous substances (RoHS)
BS EN 50498:2010: Section 7, after market electronic equipment in vehicles.
Supplementary Information:
The product herewith complies with the requirements of the EMC Directive 2004/108/EC. This product requires the
use of the provided e-Marked automotive power supply when used within vehicles.
Plymouth twp, MI, USA March 14, 2014 Bruce Jonik, Director of Engineering , Havis, Inc.
FCC 47CFR, Part 15 compliance: This is an FCC Class B device. Any changes or modications
to the model DS-APP-1XX not expressly approved by Havis, Inc. could void
the user's authority to operate this equipment.
Page 3

www.havis.com • 1-800-524-9900
Table of Contents
Specications
Port Replication Capability
Parts Included
Installation
Cable Management
Operation - Docking
Operation - Undocking
Supplying Power to iPad
3
4
4
6
8
9
10
11
Specications
Power Supply Input 12.0 V DC-In
Dimensions 10.8” ( 27.5 cm) H x 6.9” ( 17.6 cm ) W x 3.1” ( 8.0 cm ) D
Weight 1.6 lbs ( 0.68 kg )
Operating Environment 0° C to 35° C ( 32° F to 95°F )
Storage Environment -40° C to 85° C ( -40° F to 185° F )
• Do not place metal objects or containers of liquid on top of the Docking Station
• If a malfunction occurs, immediately unplug the Power Supply and remove the tablet
• Do not store the Docking Station where water, moisture, steam, dust, etc. are present
• Do not connect cables into ports other than what they are specied for
• Do not leave the Docking Station in a high temperature environment (greater than 85°C, 185°F)
for a long period of time
Precautions
Page 4
4 9
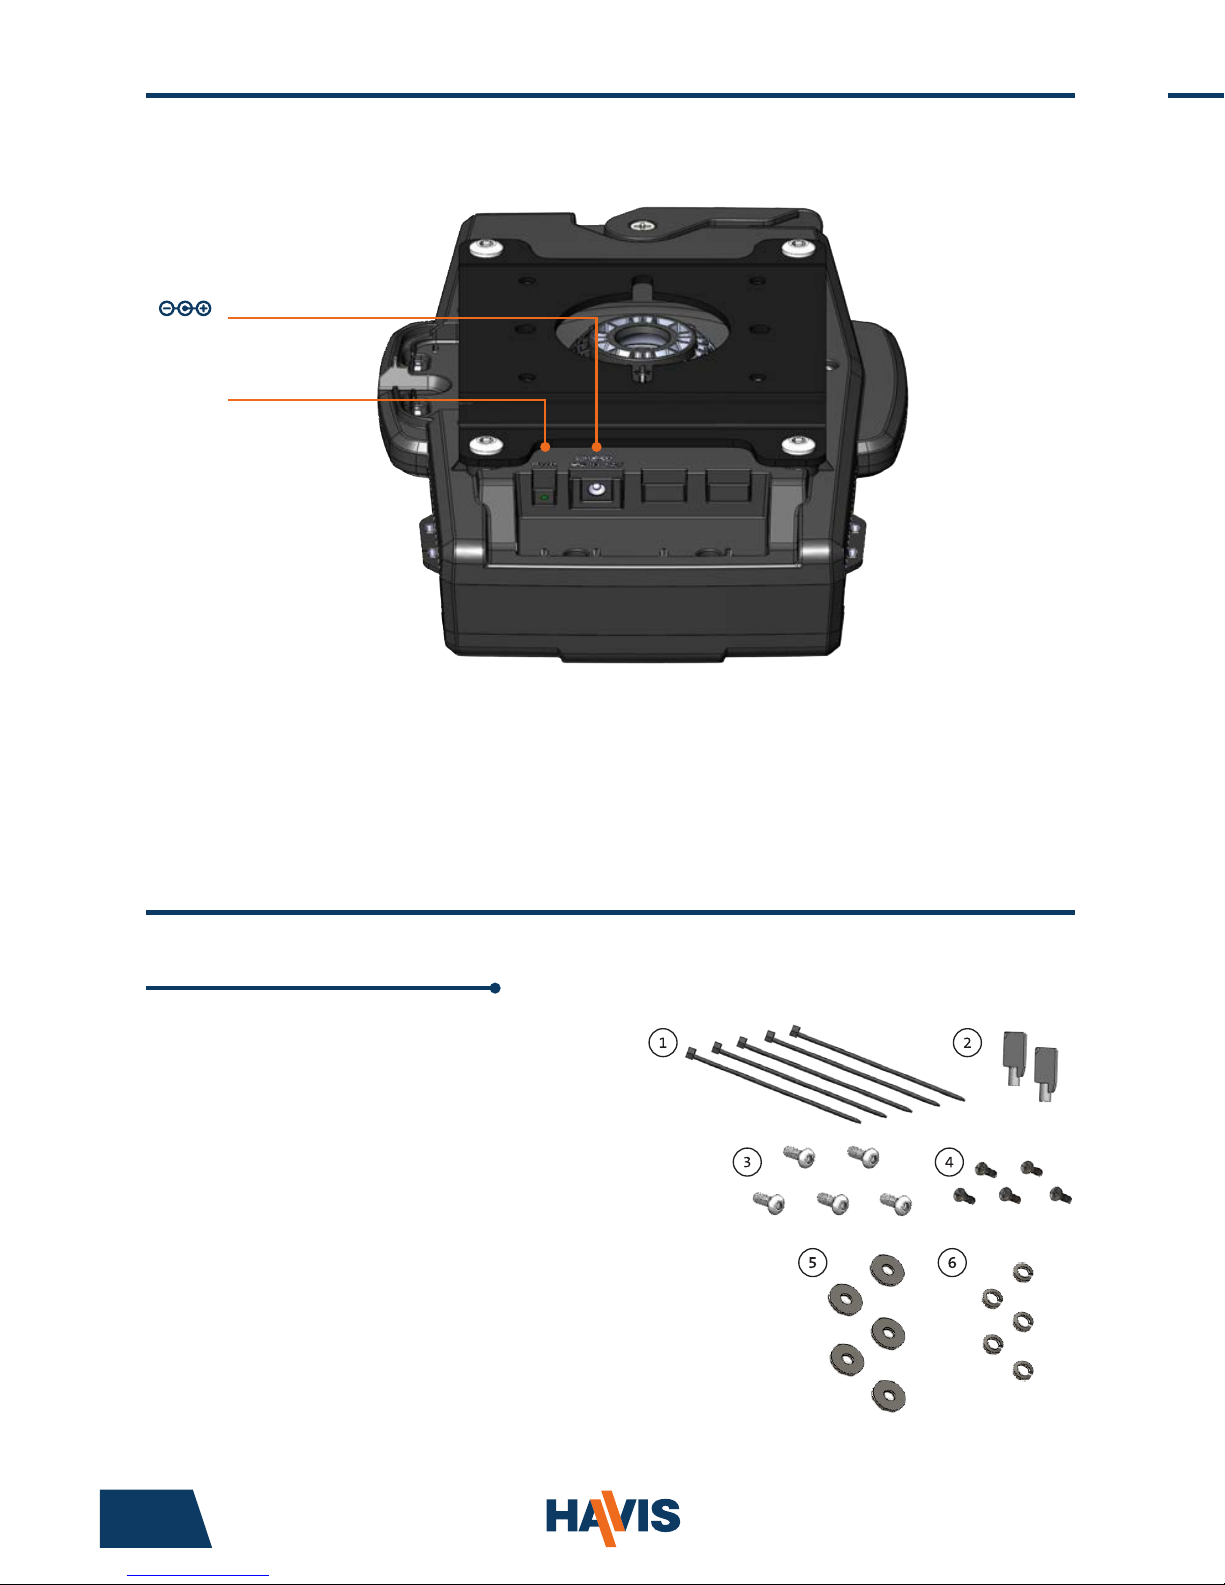
1. Zip Ties (5)
2. Keys (2)
3. 1/4”-20 x 5/8” long Button Head Screws (5)
4. M4 x 0.7 x 12mm long Pan Head Screws (5)
5. Washers, M4 (5)
6. Lock Washers, M4 (5)
Extra hardware (screws) provided
Tools required for installation:
• 5/32” Hex Drive
(For attaching Docking Station to Mount with Button Head 1/4”-20 Screws)
• #2 Philips Screwdriver
(For attaching Docking Station to VESA 75mm hole pattern equipment
with Pan Head M4 x 0.7 x 12mm Screws)
Hardware Kit
Port Replication Capability
Parts Included
TOP
of Docking Station
BOTTOM
of Docking Station
LED
Power Indicator
Operation - Docking
1) Ensure Docking Station is unlatched by lifting Latch Handle.
2) Hold tablet in landscape orientation, with bottom angled toward
Docking Station. Lower tablet into the bottom of the Docking Station.
Alignment Posts
DS-PAN-500 Series Docking Station
NOTE: Ensure a proper connection by aligning the tablet’s
Alignment Sockets with the Docking Station’s Alignment Posts
Power Input
PWR
DC IN 12V
Page 5

www.havis.com • 1-800-524-9900
Docking Station
Parts Included
FRONT
All Models
Barrel Lock
Docking Connector
Latch Handle
Latch Tab
Locator Pin
BACK
Strain Relief
Ports
Mounting Hole (x4)
Page 6

6 7
Installation (continued)
OPTION B INSTALLATION:
A) Align the Rigid Mount Bracket holes with the VESA 75mm holes on the
mounting device. Using the (4) M4 Pan Head Screws (Hardware Item 4),
(4) Washers, M4 (Hardware Item 5) and (4) Lock Washers, M4 (Hardware
Item 6) secure the Rigid Mount Bracket to the mounting device from
the rear. Torque screws to 20 in-lbs (2.3Nm) ± 10%.
OPTION C INSTALLATION:
A) Using (2) fasteners appropriate for the mounting surface (not included),
secure the Rigid Mount Bracket through the access holes via the front of
Docking Station.
Docking
Station
Access to Rigid Mount
Bracket via front of
Docking Station
Installation
1) Identify your required mounting conguration and select the appropriate
fasteners from the Hardware Kit.
OPTION A: Havis vehicle motion/mounting equipment.
Use Hardware Kit Item 3 (1/4-20x5/8” long Button Head Screws)
OPTION B: Motion/mounting device with VESA 75mm hole pattern.
Use Hardware Kit Item 4 (M4 x 0.7x12mm long Pan Head Screw),
Hardware Kit Item 5 (Washers, M4), and Hardware Kit Item 6 (Lock Washers, M4)
OPTION C: Other mounting surfaces without rear access.
Hardware not supplied, use appropriate hardware for preferred mounting surface.
OPTION A INSTALLATION:
A) Using a 5/32” Hex Drive (not provided), remove the Rigid Mount Bracket from
the Docking Station by removing the four (4) 1/4-20 x 1/2” Button Head Screws
and set aside for use in Step C.
B) Align the Rigid Mount Bracket holes with the holes on the mounting device.
Using the (4) 1/4-20 x 5/8” Button Head Screws (Hardware Kit Item 3), secure
the Rigid Mount Bracket to the mounting device. Torque screws to 80 in-lbs
(9.0Nm) ± 10%.
1/4-20 x 5/8”
Button Head
Screws
Rigid Mount
Bracket
Motion/Mounting
Device
Docking
Station
Mounting
Bracket
1/4-20 x 1/2”
Button Head
Screws
C) Align the Docking Station Mounting Locations with the holes on the Rigid
Mount Bracket. Using the (4) 1/4-20 x 5/8” Button Head Screws (retained from
Step A), secure the Docking Station to the Rigid Mount Bracket. Torque screws
to 40 in-lbs (4.5Nm) ± 10%.
Docking
Station
1/4-20 x 1/2”
Button Head
Screws
Rigid Mount
Bracket
Page 7

www.havis.com • 1-800-524-9900
Installation (continued)
OPTION B INSTALLATION:
A) Align the Rigid Mount Bracket holes with the VESA 75mm holes on the
mounting device. Using the (4) M4 Pan Head Screws (Hardware Item 4),
(4) Washers, M4 (Hardware Item 5) and (4) Lock Washers, M4 (Hardware
Item 6) secure the Rigid Mount Bracket to the mounting device from
the rear. Torque screws to 20 in-lbs (2.3Nm) ± 10%.
OPTION C INSTALLATION:
A) Using (2) fasteners appropriate for the mounting surface (not included),
secure the Rigid Mount Bracket through the access holes via the front of
Docking Station.
Docking
Station
M4 x 0.7x12mm
Pan Head
Screws
Mounting Device
(VESA 75 mm)
Lock Washer, M4
Washer, M4
Mounting Surface
appropriate fasteners
Access to Rigid Mount
Bracket via front of
Docking Station
Mounting Surface
hole pattern
(For reference only)
3.0”
Page 8

8 5
Cable Management
1) Tip the Docking Station to a position that is comfortable to work with.
2) Install power cable are necessary for your computing needs.
3) Use Zip Tie (Hardware Kit Item 1) to strain relieve cable. Use a Strain Relief
Point to anchor the cable. If desired for routing purposes, additional Strain
Relief Points on each side of Docking Station may be used.
4) Create a service loop with the cable to ensure that no tension is on the
connector and to enable intended motion.
5) Tie off the cable onto a stationary part of the mounting system.
Collect cable and secure
to the mounting system.
(Note: Mounting system not included)
This loop must be large enough
to allow full range of expected
rotation and extension without
stressing connection.
Docking Station
Parts Included
Docking Connector
Latch Handle
Locator Pin
Ports
Page 9

www.havis.com • 1-800-524-9900
Operation - Docking
1) Ensure Docking Station is unlatched by lifting Latch Handle.
2) Hold tablet in landscape orientation, with bottom angled toward
Docking Station. Lower tablet into the bottom of the Docking Station.
DO NOT FORCE TABLET ONTO DOCKING STATION. IF THERE IS RESISTANCE,
CHECK ALIGNMENT OF TABLET ON DOCKING STATION.
Alignment Sockets
Back Side of Panasonic Toughpad FZ-A1
Alignment Posts
DS-PAN-500 Series Docking Station
NOTE: Ensure a proper connection by aligning the tablet’s
Alignment Sockets with the Docking Station’s Alignment Posts
Page 10

Table of Contents
10 3
Specications
Port Replication Capability
Parts Included
Installation
Cable Management
Operation - Docking
Operation - Undocking
Supplying Power to iPad
Specications
Power Supply Input 12.0 V DC-In
Dimensions 10.8” ( 27.5 cm) H x 6.9” ( 17.6 cm ) W x 3.1” ( 8.0 cm ) D
Weight 1.6 lbs ( 0.68 kg )
Operating Environment 0° C to 35° C ( 32° F to 95°F )
Storage Environment -40° C to 85° C ( -40° F to 185° F )
• Do not place metal objects or containers of liquid on top of the Docking Station
• If a malfunction occurs, immediately unplug the Power Supply and remove the tablet
• Do not store the Docking Station where water, moisture, steam, dust, etc. are present
• Do not connect cables into ports other than what they are specied for
• Do not leave the Docking Station in a high temperature environment (greater than 85°C, 185°F)
for a long period of time
Precautions
3) Pivot tablet so the top aligns with the Locator Pin at the top of the
Docking Station. Lower the Latch Handle to secure tablet in place.
4) For theft deterrence, secure tablet by locking Docking Station with
supplied key (Hardware Kit Item 2).
Operation - Docking (continued)
Operation - Undocking
1) If previously locked, unlock Docking Station using supplied key.
2) While holding tablet with one hand, lift the Latch Handle on the top
of Docking Station.
3) Once unlatched grab both sides of tablet, rock the top forward and carefully
lift out of Docking Station, top end rst.
Latch Tab will
engage in front of
Protective Case
Page 11

www.havis.com • 1-800-524-9900
Use the supplied power cable to charge your iPad once its securely docked.
Plug barrel connector into the back of the Docking Station, and the cigarette
lighter adaptor into the vehicle power source.
Supplying Power to iPad
To Vehicle Power Source
To Docking Station
Page 12

Owner’s Manual
Havis Docking Station For the
Havis iPad Protective Case
DS-APP-100-SERIES_OMN_3-15
DS-APP-102
PKG-DS-APP-102
PKG-DS-APP-112
PKG-DS-APP-122
PKG-DS-APP-132
DS-APP-100 Series
Related Products
Havis offers a wide variety of accessory products specically for use
with the DS-APP-100 Series Docking Station. For more information or
to order, please visit www.havis.com.
DS-DA-218
Desktop Stand for Tablet Docking Stations
Durable stand for mounting tablet Docking Stations
for use in the home or office.
DS-DA-700 Series
Apple iPad Protective Case
Protective Cases for Havis DS-APP-102 will accommodate
Apple iPad 2, 3, 4, Air & Air 2
DS-DA-503
Replacement Keys
Set of two (2) replacement keys for DS-APP-100
Series Docking Stations.
Havis, Inc.
75 Jacksonville Road
Warminster, PA 18974
www.havis.com 1-800-524-9900
 Loading...