

Havis KK-K9-C22-K Installation Instructions Manual

TOOLS Needed:
Phillips Screw Driver Power Drill with Drill Bits Trim panel removal tool
Standard Socket set Wire Cutters /Crimpers Caulk Gun
Metric Socket set Awl and 90° Scribe
PARTS & HARDWARE:
QTY DESCRIPTION PART #
1 Floor KNM004323
1 Ceiling KNM004497
1 Front wall / bulkhead with sliding door KNM004493
1 Rear wall KNM004324
1 Rear wall upper support bracket KNM004326
2 Rear floor support bracket KNM004589
2 Upper “B” pillar bracket KNM004496
1 Passenger side floor support bracket KNM004505
1 Driver side floor support bracket KNM004506
1 Passenger side upper filler KNM004499
1 Driver side upper filler KNM004501
1 Passenger side lower filler KNM004498
1 Driver side lower filler KNM004500
1 Rubber Mat KNM004762
1 Driver side door panel DP-C22-1A
1 Passenger side door panel DP-C22-6A
1 Driver side hinged window guard WGI-C22-1-K9
1 Passenger side hinged window guard WGI-C22-6-K9
1 Dome Light Kit KK-K9-DOME
1 Silicone caulk (sealant) PRM97343
18 1/4 x 3/4” Carriage bolt – Stainless Steel GSM32024
18 1/4” serrated nut GSM30170
19 1/4 x 3/4” Phillips pan head screw - Stainless Steel GSM34102
18 1/4 Flat washer - Stainless Steel GSM31048
28 #10 x 1/2 Phillips pan head sheet metal screws - SS GSM34169
21 #10 x 3/4 Phillips pan head sheet metal screws- SS GSM34170
15 #10 Flat washer-SS GSM31046
2 7/16” x 3” Hex head bolt GSM34034
2 7/16” Flat washer GSM31008
2 2” long x 1.25” OD Aluminum spacer CM003247
2 8 mm x 25 mm Hex head bolt GSM33721
2 3/8” Flat washer GSM31007
KK-K9-C22-K INSTALLATION INSTRUCTIONS
K9 Kit for 2011-2016 Chevy Caprice
KK-K9-C22-K_INST_6-12.docx rev 2-14
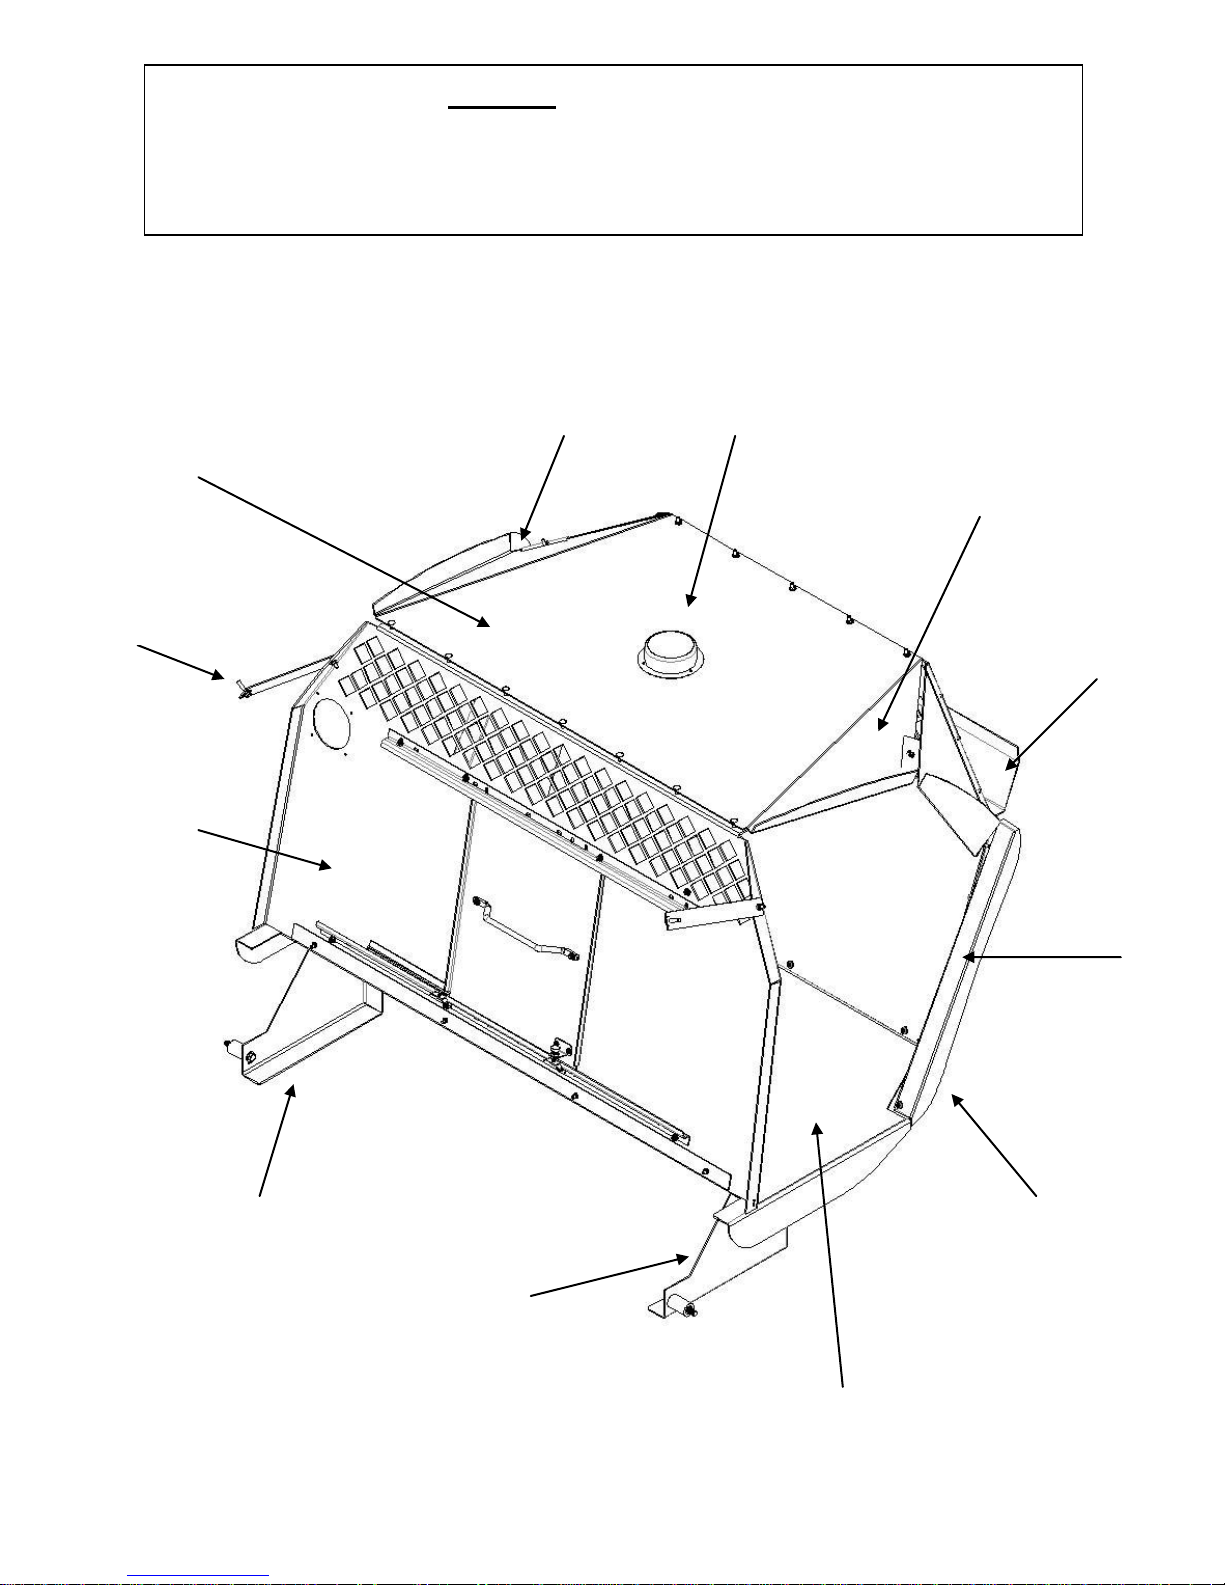
KK-K9-C22-K Assembly
(Door panels and window guards not shown)
KNM004493
Front Wall
KNM004326
Rear wall upper
support bracket
KNM004324
Rear Wall
KNM004323
Floor
KNM004505
Passenger side floor
support bracket
KNM004500
Driver side
lower filler
KNM004589
Rear floor support brackets
(One each side not shown)
NOTES!
Read all instructions before installing any Havis, Inc. products.
Use hardware provided with install kit.
Vehicle battery should be disconnected during installation. It will need to be temporarily
reconnected to move electric seats or check electric door locks.
KNM004497
Ceiling
KK-K9-DOME
Dome Light kit
KNM004506
Driver side floor
support bracket
KNM004501
Driver side
upper filler
KNM004499
Passenger side
upper filler
KNM004496
“B” Pillar Brackets
(One each side)
KK-K9-C22-K_INST_6-12.docx rev 2-14

Remove screw under door
armrest. (T20 Torx)
Remove / unsnap entire door
panel from door.
(Trim removal tool)
Disconnect latch and lock cables
from door panel.
Remove window switch from door
panel. Remove door speaker.
(T20 Torx)
Remove rear passenger door panels
first.
Underneath door handle, remove
plastic cover and screw.
(T20 Torx)
Note: A small 90° scribe helps to
pick plastic covers off.
Remove screws at bottom of door
panel. (T20 Torx)
Reattach window switch to
original plug. Neatly wire tie the
switch assembly, speaker wire and
latch / lock cables so they do not
interfere with the window
operation. Double check latch,
lock and window operation
prior to attaching door panel.
Place K9 kit door panel onto
door. The top will hook onto
rubber molding. Position so it is
centered on the door. Push down
firmly on panel. Drill mounting
holes with 5/32” drill bit. Attach
door panels with #10 x 3/4
Phillips pan head sheet metal
screws.
NOTE: Window guards are
shipped flat. On the edge of a
work bench, bend a contour in the
middle of the guard so it will
match the window frame contour.
KK-K9-C22-K_INST_6-12.docx rev 2-14
 Loading...