

Page 1
C-DMM-2007_INST_1-17
TOOLS REQUIRED: (some tools are not needed for all vehicle installations)
• Socket set - metric & standard • Drill & drill bits • 1.5” hole saw • Tape measure
• Phillips screwdriver • Trim removal tools • Pencil / Marker
MOUNT BRACKET PARTS and HARDWARE:
Installation parts with * come loose in hardware kit bag. Other parts are preassembled
QTY: DESCRIPTION: PART #:
1 Main dash mount bracket MT-0314-SA
1 Pivot / display mount bracket MT-0320-SA *
1 PVC spacer washer CM008582
1 Tilt swivel adaptor CM008531
2 1/4" x 3/4" Carrage bolts GSM32000
2 1/4" Nylock nut GSM30016
2 1/4" Flat washer GSM31005
2 Nylon 1/16” spacer washer CM86600
1 Tilt swivel hinge GSM22005
1 F-250 Display mount support bracket MT-0316-SM
2 Standoff plate MT-0317-SM
1 F-250 Rear mount support bracket MT-0315-SM
1 M8 hex nut SS GSM30113
1 M8 lock washer SS GSM31217
4 Machine Screw 10-32 x 3/4" GSM33119
4 #10 Flat washer GSM31003
1 Vinyl cap (.50” high x .312 - .375 id) GSM41127
1 Stop bracket MT-0291-SM
2 M5 x 10mm Thread forming screw GSM33774
2 Pull through bumper (3mm head) GSM21109
2 Push in bumper (10mm head) GSM21108
1 8-32 x .312” Phillips truss head machine screw GSM34077 *
1 M6 hex nut GSM30201
1 1/4" Flat washer GSM31005
2 1/4” Serrated nut GSM30023
INSTALL INSTRUCTIONS
C-DMM-2007 Dash Monitor Mount
2008-2016 Ford F-250, 350 and 450 Super Duty Pickup truck
Notes:
1. The C-DMM-2000 series Dash Monitor Mount brackets are specifically designed to work with Havis,
Inc, model # TSD-101 Touch Screen Display.
2. The display mount bracket includes a VESA 75 hole pattern that can also be used for some light
weight tablet docking station applications under 5 lbs. . Acceptable positioning must be determined
by end user.
3. The C-DMM-2007 will work with all Havis, Inc. consoles made for the Super Duty.
4. The C-DMM-2007 Does NOT work with the upgraded radio with touchscreen. Please review photos to
confirm what OEM dash is required for this application.
Page 2
C-DMM-2007_INST_1-17
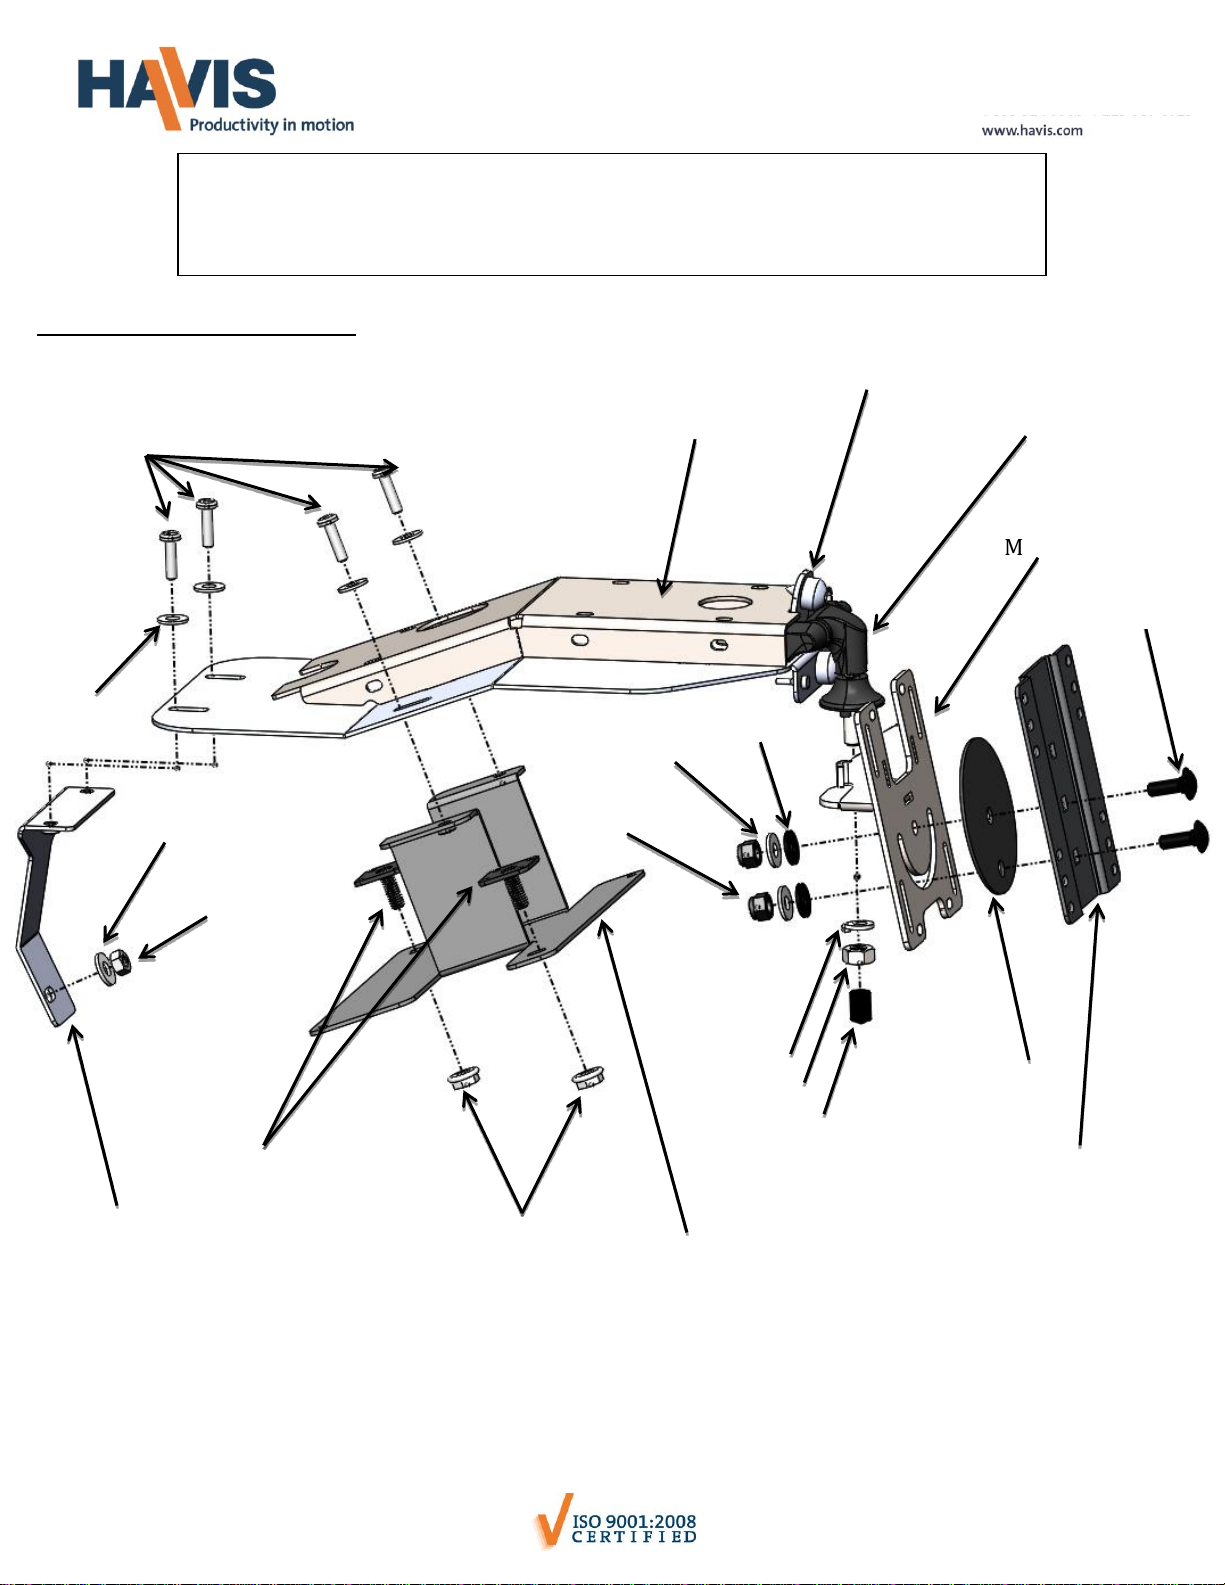
C-DMM-2007 assembly
GSM30113
GSM41127
MT-0320-SA *
GSM31217
GSM30023
MT-0317-SM
MT-0316-SM
GSM31005
MT-0315-SM
GSM30201
GSM33119
ALWAYS!
• Read all instructions before installing any Havis, Inc products.
• Use hardware provided with install kit
GSM33119
GSM22005
MT-0314-SA
GSM21108
CM86600
GSM31005
GSM30016
CM008582
CM008531
GSM32000
Page 3

C-DMM-2007_INST_1-17
View of F-250 Super Duty prior to
installation.
Remove panel containing OEM 12v socket.
Remove fastener.
(7 mm socket)
Remove dash panel by gently prying along
edges with a panel removal tool.
Remove four (4) fasteners and remove radio.
Following measurements above, drill four (4) 5/16”
holes in top tray area.
Remove panel containing aux input.
Remove fastener.
(7 mm socket)
Page 4

C-DMM-2007_INST_1-17
Install forward mount support bracket onto
OEM stud on brace.
Use M6 nut and 1/4" washer to attach bracket
to existing threaded stud.
Tighten hardware.
(10mm socket)
Insert MT-0317-SM standoff plates into the
forward hole in upper radio frame.
Repeat process for rear hole.
Attach display mount support bracket MT-0316-SM
to the stand off plates using 1/4" serrated nuts.
Do not overtighten
Page 5

C-DMM-2007_INST_1-17
Attach the main mount bracket to the dash using
10-32 machine screws and washers.
Re-assemble dash at this time
Connect harnesses to the back of the TSD-101 display.
It is important to also double wire tie the harnesses to provide
sturdy strain relief for the plugs.
USB connection from remote Docking station must plug
into USB plug closest to front of display.
Attach pivot / display mount bracket to display with M4 x
0.7 x 10mm Phillips head machine screws, lock washers
and flat washers. Display mount hardware is included
with TSD-101 hardware kit
Attach bracket with display to the tilt swivel hinge
with M8 hex nut and lock washer. Tighten nut and
attach vinyl cap on M8 bolt threads.
Refer to TSD-101 owner’s manual for
power and computer connection details.
Installation of C-DMM-2007 with TSD-101
complete.
Recommended location for
hole for wire harness run.
 Loading...