


1
3
4
5
6
9
10
16
16
User Manual
HAVEN CONNECT Z
®
™
High-strength, Z-WAVE enabled smart lock.
Safety, Warnings, Regulations
Warranty
Getting Started
Preparing Your HAVEN
Installation
LED and Sounds
Z-WAVE Operation
Troubleshooting
Important Safeguards
HavenLock Inc - 10x stronger than the deadbolt
Patent pending in one or more countries
v 2.3
1 HAVEN CONNECT Z
Important Safety Instructions
Explanation of Attention Words and Symbols used in this guide
This is the safety alert symbol. It is used to alert you to potential personal
injury hazards. Obey all safety messages that follow this symbol to avoid
!
possible injury or death.
WARNING
CAUTION
WARNING indicates a hazardous situation which, if not avoided, could result
in death or serious injury.
CAUTION, used with the safety alert symbol, indicates a hazardous situation
which, if not avoided, could result in minor or moderate injury.
CAUTION
NOTICE
WARNING
CAUTION, used without the safety alert symbol, indicates a hazardous
situation which, if not avoided, could result in harm to yourself and others.
NOTICE is used to address safe-use practices not related to personal injury.
HAVEN will not prevent someone from accessing your home via other means.
HAVEN will not prevent someone from getting through your door if they use special tools.
HAVEN is designed as barrier to prevent a closed door from being forced inward into a
dwelling when blunt forced is used against the middle section of the door near the outside
door handle. Any other entry attempt does not fall under the product definition or purpose of
HAVEN Lock. For instance, a person who uses a special tool to remove the door or any
elements of the door or attempts to cross the barrier of the door through an opening does
not fall under the defined use of HAVEN Lock.
If you experienced a break in attempt with HAVEN installed we recommend that you replace
your HAVEN.
Do not attempt to disassemble unit or remove components that are not explicitly stated in the
installation manual.
Do not press down on the pedal and locking gate at the same time.
Owner is responsible for providing alternative access to the building in the event of fire,
potential smoke inhalation, carbon dioxide event, or other home emergency not listed
explicitly here.
Owner is responsible to ensure proper fit and correct installation.
Owner is responsible for safety of themselves and others. If you are unsure if this product is
Need help? Contact us at support@havenlock.com

CAUTION
CAUTION
NOTICE
Use caution when placing HAVEN in doorway during installation and use.
Owner is responsible for reading and following the operating and safety instructions as well as proper use of unit.
Wear appropriate protective items during installation to avoid injury.
Do not install near live electrical cords. Ensure installation area is free of wires, cables, pipes, and other objects
that may cause hazards.
Use only the tools referenced in the installation guide. Use of other tools or not following installation instructions
may result in improper installation and decreased functionality.
Owner is responsible for proper use and avoidance of HAVEN as a trip hazard.
Do not place HAVEN on unapproved surfaces to avoid additional trip hazards.
Owner is responsible for ensuring the unit is clean for full functionality and capabilities.
Owner is responsible for providing access to your own home. Owner is responsible for ensuring alternate
access into your home when needed.
Owners are responsible for whoever has access or use to engage or disengage the unit.
The unit is designed to act as a deterrent, but should still be used in conjunction with other safety measures.
The unit is intended as supplementary security for use in conjunction with current lock hardware.
HavenLock Inc is not liable for any personal injuries, property damage, economic loss or any consequential
damages sustained as a result of any individual in contact with the unit.
Do not consume any area of the unit.
Do not put the unit near sensitive bodily areas.
To avoid damage to the unit, do not use on wet surfaces or damp locations. The product is designed for indoor
use only. Do not expose to weather elements as this may affect functionality.
To avoid potential damage to your unit, do not simulate a break in. Damage to the unit may affect later
functionality.
Owner is responsible for ensuring unit is operating properly. HavenLock Inc expressly disclaims all guarantees,
whether implied or expressed, to include but not limited to fitness or merchantability for a particular purpose.
USER MANUAL 2
REGULATORY INFORMATION
HAVEN Connect Z
HavenLock Inc
Model: HL1-CNT-001-Z
FCC ID: 2ARFQHL1CNT001Z
IC: 24389-HL1CNT001Z
This device complies with part 15 of the FCC Rules.Operation is subject
to the following two conditions: (1) This device may not cause harmful
interference, and (2) this device must accept any interference received,
including interference that may cause undesired operation.
WARNING: Changes or modifications which are not expressly approved by HavenLock Inc could void the user’s authority to operate the equipment.
AVERTISSEMENT: Les changements ou modifications qui ne sont pas approuvés par HavenLock Inc pourrait annuler l'autorité de l'utilisateur de faire fonctionner l'équipement
This device contains licence-exempt transmitter(s)/receiver(s) that comply with Innovation, Science and Economic Development Canada’s licence-exempt RSS(s). Operation is subject to the
following two conditions:
1) This device may not cause interference.
2) This device must accept any interference, including interference that may cause undesired operation of the device.
Cet appareil contient des émetteurs / récepteurs exemptés de licence conformes aux RSS (RSS) d'Innovation, Sciences et Développement économique Canada. Le fonctionnement est soumis
aux deux conditions suivantes:
1) Cet appareil ne doit pas causer d'interférences.
2) Cet appareil doit accepter toutes les interférences, y compris celles susceptibles de provoquer un fonctionnement indésirable de l'appareil.
This system has been evaluated for RF Exposure per RSS-102 and is in compliance with the limits specified by Health Canada Safety Code 6. The system must be installed at a minimum
separation distance from the antenna to a general bystander of xx inches (xx cm) to maintain compliance with the General Population limits.
L’exposition aux radiofréquences de ce système a été évaluée selon la norme RSS-102 et est jugée conforme aux limites établies par le Code de sécurité 6 de Santé Canada. Le système doit être
installé à une distance minimale de xx pouces (xx cm) séparant l’antenne d’une personne présente en conformité avec les limites permises d’exposition du grand public
Note: This equipment has been tested and found to comply with the limits for a Class B digital device,
pursuant to part 15 of the FCC Rules. These limits are designed to provide reasonable protection
against harmful interference in a residential installation. This equipment generates, uses and can
radiate radio frequency energy and, if not installed and used in accordance with the instructions, may
cause harmful interference to radio communications. However, there is no guarantee that interference
will not occur in a particular installation. If this equipment does cause harmful interference to radio or
television reception, which can be determined by turning the equipment off and on, the user is
encouraged to try to correct the interference by one or more of the following measures:
• Reorient or relocate the receiving antenna
• Increase the separation between the equipment and receiver
• Connect the equipment into an outlet on a different circuit from the one the receiver is connected
• Consult the dealer or an experienced radio/TV technician for help

3 HAVEN CONNECT Z
WARRANTY INFORMATION
Any major malfunction of HAVEN Connect Z caused by a defective part or construction of the unit will be fixed by HavenLock Inc up to
one year from the date of receiving the unit. This warranty only covers the original purchaser of HAVEN Connect Z. Only private use by
the original purchaser is covered by this warranty. If HAVEN Connect Z is installed improperly, used in any way not in accordance with
our guidelines, or altered in any way, this warranty is void. Damage caused by misuse, neglect, or battery malfunction are not covered
by this warranty.
If a HAVEN Connect Z unit is claimed defective by the original purchaser under this warranty, HavenLock Inc may require the unit to be
shipped back to their headquarters or fulfillment center for investigation. The costs associated with this shipment may or may not be
incurred by the original purchaser.
This warranty only covers HAVEN Connect Z and no other equipment. Any other device used with HAVEN Connect Z in any way is not
covered by this warranty.
Limited Warranty
Subject to terms and conditions of this warranty, HAVEN provides a one year warranty on the product caused by manufacturers
defects in the mechanical and electronic components of the product. Normal wear and tear, daily use, and damage to the product not
caused by workmanship defects are not covered by the warranty.
What HAVEN Will Do
Upon return of the defective product to HAVEN, HAVEN’s sole obligation, at its option, is to either repair or replace the Product, or
refund the original purchase price in exchange for the Product.
What is NOT Covered
The following costs, expenses and damages are not covered by the provisions of the warranty:
(1) labor costs including, but not limited to, such costs as the removal and reinstallation of product; (2) shipping and freight expenses
required to return product(s) to HAVEN; (3) other incidental, consequential, indirect, special and/or punitive damages, whether based
on contract, warranty, tort (including but not limited to, strict liability or negligence), patent infringement or otherwise, even if advised
of the possibility of such damages.
The Provisions of this Warranty do not apply to Products:
(1) Used for purposes for which they are not designed or intended; (2) which have been subject to alteration, abuse, misuse,
negligence or accident: (3) which have been improperly stored, installed, maintained or operated; (4) which have been used in violation
of written instructions provided by HAVEN; or (5) based on HAVEN’s examination, do not disclose to HAVEN’s satisfaction
non-conformance to the warranty. Additionally, this warranty DOES NOT COVER scratches, abrasions or deterioration due to use of
paints, solvents or other chemicals.
Additional Terms:
HAVEN does not authorize any person to create for it any obligation or liability in connection with the Product. HAVEN’s maximum
liability hereunder is limited to the original purchase price of the Product. No action arising out of and claimed breach of this warranty
by HAVEN may be brought by the purchaser more than one (1) year after the cause of action has risen.
Program and warranty claims:
If you encounter issues with HAVEN product or have a claim under this warranty, please contact HAVEN Customer Service for
assistance, repair, replacement or refund of the original purchase price in exchange for the return of Product to HAVEN.
BATTERY INFORMATION & DISPOSAL
Correct disposal of this product: This symbol indicates that this product must not be disposed of with household waste, according to the WEEE
Directive (2012/19/EU) and your national law. This product should be taken to a collection center licensed for the recycling of waste electrical and
electrical equipment (EEE). The mishandling of this type of waste could have possible negative impact on the environment and human health due to
potentially hazardous substances that are generally associated with EEE. At the same time, your cooperation in the correct disposal of this product will
contribute to the efficient use of natural resources. For more information about where you can take your waste equipment for recycling, please contact
your local city office, or your household waste collection service
RISK OF EXPLOSION IF BATTERY IS REPLACED BY AN INCORRECT TYPE.
DISPOSE OF USED BATTERIES ACCORDING TO THE INSTRUCTIONS.
RISQUE D’EXPLOSION DE LA PILE, SI CELLE-CI, EST REMPLACÉE PAR UN
DISPOSEZ DES PILES USAGÉES EN SUIVANT LES INSTRUCTIONS.
CAUTION
ATTENTION/IMPORTANT
MODÈLE/MARQUE NON CORRESPONDANT.
800596
UL Standard Tested by a NRTL
Need help? Contact us at support@havenlock.com
GETTING STARTED
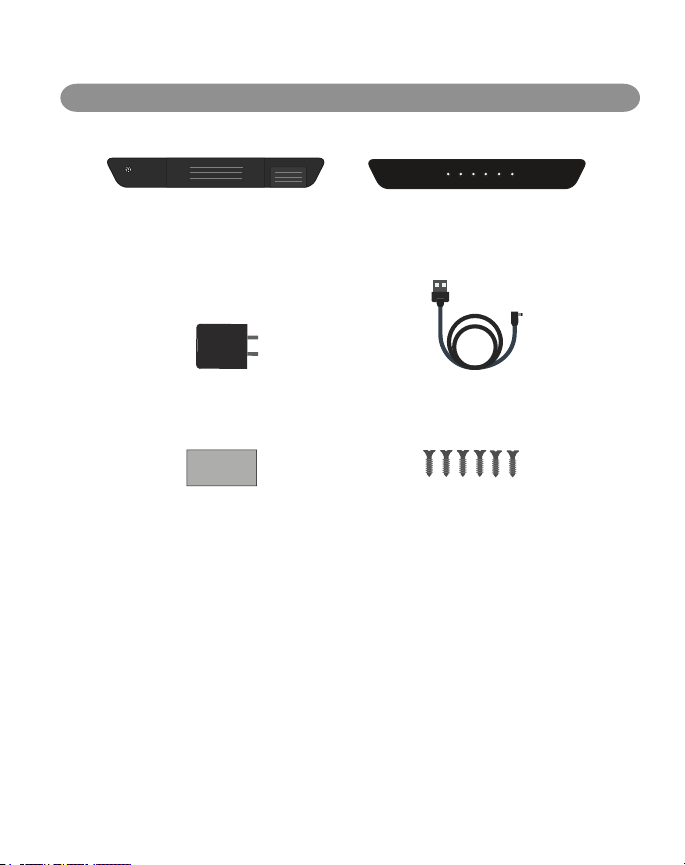
Upon opening your HAVEN Connect Z, you should find the following items inside:
USER MANUAL 4
HAVEN Connect Z
Your lock which will be mounted at the
base of your door.
Power Adapter
120v AC USB Adapter for use with
included charging cable
Door Spacer
Plastic spacer used during installation to
measure the proper distance from the base
of door.
If you are missing any of the items above, please email us
at support@havenlock.com and let us know!
Installation Riser
Optional riser used for thresholds that are
higher than 0.8” and as a template marker
for alignment and drilling of holes
Charging Cable
USB Charging cable used to charge
your HAVEN Connect Z
Installation Screws (6)
Six Phillips head screws used for
attaching your HAVEN Connect Z to
your wood floor*
*for tile or concrete installation, please see our advanced
tutorials at install.havenlock.com
Need help? Contact us at support@havenlock.com

5 HAVEN CONNECT Z
PREPARING YOUR HAVEN CONNECT Z
A Status Indicator LED
C
Control Panel Cover
Control Panel (with cover lifted)
D
Charging Port
B
Pairing Button
Charging
1
Plug the included charging cable (USB end) into the included power adapter. Open the HAVEN Control Panel
cover (C) and plug the charging cable into the Charging Port (D). The status indicator LED will flash Yellow
every 2.5 seconds when charging. Allow HAVEN to fully charge 6-8 hours before use. This is now a good
time to set up your Haven account at myhavenlock.com or on the HavenLock mobile app.
Cycling the Lock
2
Cycling the lock a minimum of 10 times prior to installation ensures that the nylon straps inside the lock
are properly stretched and calibrated. During shipment parts can settle and this cycling allows the parts to
“stretch” and maximize their effectiveness. A “cycle” is simply locking and unlocking the lock via the foot pedal
(F) and lock gate (E). Cycling the lock via the app a minimum of 5 times helps ensure the servo motor is
properly engaged and ready for use.
Include in Z-WAVE Network
3
Push the reset button through the pinhole and see “Network Inclusion/Exculsion” in the Z-WAVE section.
E
Locking Gate
R
Reset Button (use pin)
F
Manual Foot Locking Pedal
Need help? Contact us at support@havenlock.com

INSTALLING YOUR HAVEN CONNECT Z
Tools Required For Install
USER MANUAL 6
Power Drill
Installation Screws (6)
Pencil
Phillips
Screwdriver
Measuring Tape
Phillips Drill Bit1/8” Drill Bit
Installation Overview
Measure
1
A. Center lock on door
B. Confirm height
DISCLAIMER
Use of this guide at your own risk. HavenLock Inc and its parent or partner companies are not liable for any damages to property or
bodily injuries that occur during or after installation. HavenLock Inc assumes no responsibility in providing the correct tools and
accessories needed for installation unless otherwise noted. Use proper protective gear when completing the steps detailed in this
guide. This guide is simply suggestive and not in any way authoritative. Always use your own best judgment. Incorrect installation or lack
of safety precautions can lead to serious injury or death for you or anyone around the installation area. If you are not comfortable
installing HAVEN Lock, we advise you to seek out a professional skilled worker with home construction experience to assist you.
Ensure Clearance Path
1
1.1 HAVEN is 0.8 inches high and should fit in the
clearance path of most modern doors. A standard USD
nickel can be used to gauge the gap perfectly. Take a
nickel, stand it on its end and make sure that it can pass
under your door. Medium resistance against the
weather-stripping/door seal is acceptable.
If it fits, make sure the Haven device, when in the locked
position and placed against the threshold, touches at
least .25 inches of your door to be fully secure. If the
lock is not touching that amount of the door, you may
need to increase the height of the lock by using one or
more risers.
Drill
A. Drill pilot holes
B. Clean surface
Secure
A. Place unit
B. Drill in screws
7 HAVEN CONNECT Z
1.2 Ensure the door is shut and use a tape measure to
find the center of the door and mark it.
Spacing Distance From the Door
2
2.1
Using the included orange spacer you want to find the
distance from the door that the lock needs to be placed so
that the locking gate doesn’t interfere with the bottom of
the door when it is closed. To do so, press the orange
spacer provided against the door to find the distance
required.
2.2
With the orange spacer pressed against the door,
place the template down and align with the centering
marks you have made.
2.3
Mark the 6 holes of the template on the floor with a
pencil.

Drill Holes into Floor
3
3.1 Take a power drill with a 1/8" drill bit and drill pilot
holes 2 inches down in at least 4 of the 6 holes ensuring
that there are more screws attachment points on the
side closest to the doorknob for strength.
4
Remove Locking Gate Cover
4.1 When ready to mount and install the HAVEN Connect Z,
remove the HAVEN locking gate cover by removing the 4
small screws (Phillips head screwdriver) on the back of the
locking gate.
Line up Haven with your pilot holes. Make sure the locking
gate is down. If you determined you needed a riser place
that down first - then place the lock on top of the riser(s).
5
Secure Haven to Floor
5.1 Firmly secure Haven to the floor using the 4-6 install
screws. DO NOT over tighten the screws. It may cause
damage to the internal mechanisms in the unit.
5.2 Replace the locking gate cover while locking gate is up.
Installation is complete!
USER MANUAL 8
If needed, the online installation manual will also walk you through the many different install scenarios you might encounter.
Need to access the manual online?
install.havenlock.com
9 HAVEN CONNECT Z
LED and SOUNDS
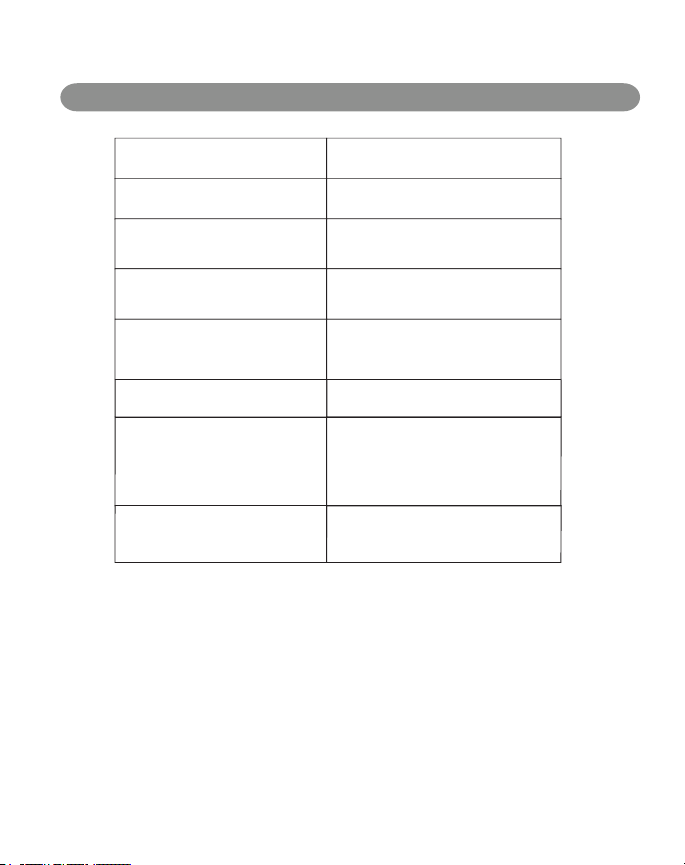
3 Yellow, 1 Chirp
3 Green, 2 Chirps
Alternating Green/Red
Red flash every 4 seconds
Same as above with chirp
every 30 seconds
Blue every second
Solid Red
Yellow Every 2.5 Seconds
Gate closed successfully
Gate opened successfully
Gate did not move to
commanded position
Battery below 25%
Battery below 10%
Device has entered
include/exclude mode
If Pairing button is held for 10
seconds, Red LED will light and the
lock will return to default settings.
Use caution, this also removes
it from the network.
Battery is charging.

USER MANUAL 10
Z-WAVE OPERATION
Haven Lock Connect + Z-WAVE
This product can be operated in any Z-WAVE network with other Z-WAVE certified devices from other manufacturers.
All mains operated nodes within network will act as repeaters regardless of vendor to increase reliability of the network.
Button Functions
There are two buttons on the Haven Lock device. A small button (hereinafter referred to as
Reset button ) that is accessed via a small hole and pressed with a paperclip or similar object, and
a larger button (Hereinafter referred to as Pairing button ) that may be operated with a finger
press.
Pairing button is used for network inclusion, network exclusion, and defaulting and removing the
Haven Lock from the network (Device Reset Locally Command Class). Reset button is used to
perform a microprocessor reset.
1. Reset microprocessor: Tap Reset button (with paperclip).
2. Default settings and remove from network: Hold Pairing button until Red LED comes on
and then release (about 10 seconds). Please use this procedure only when the network primary
controller is missing or otherwise inoperable.
3. When controller is in Add or Remove mode, tapping the Pairing button will remove the
node if it’s included in the network or add the node if it’s not. This assumes SmartStart is
not being used to add the node. Details on inclusion/exclusion below.
Network Inclusion / Exclusion
The device can be included in the Z-WAVE network using S0 or S2 Access Control security.
Inclusion can be via standard inclusion, NWI (Network Wide Inclusion) or SmartStart:
• If the Device Specific Key has been added to the controller’s provisioning list, it will be
added automatically added to the network within 5 minutes.
• Setting your controller to include mode (standard or NWI) and momentarily pressing the
Pairing button will add the Haven Lock to the network. If the controller supports S2
security, you will be prompted to enter the first 5 digits of the DSK to complete the
authentication, known as the Pin Code.
• The device can be removed from a network by setting the controller to exclude mode
(standard or NWE) and momentarily pressing the Pairing button. The device can also be
removed by pressing and holding the Pairing until the Red LED Illuminates and then
releasing. This will initiate the Device Reset Locally Command Class. The device will be
removed and all parameters will be reset to default.
the network primary controller is missing or othwerwise inoperable.
Please use this procedure only when

11 HAVEN CONNECT Z
Network Inclusion / Exclusion continued
• SmartStart-enabled products can be added into a Z-WAVE network by scanning the
Z-WAVE QR Code present on the product with a controller providing SmartStart inclusion.
No further action is required and the StartStart product will be added automatically within
10 minutes of being switched on in the network vicinity.
• Locate the DSK via the QR code label under the Haven electronics hood adjacent to the
buttons and LEDs. If the controller supports S2 security, you will be prompted to enter
the first 5 digits of the DSK to complete the authentication, known as the Pin Code.
Z-WAVE Lock Operation
1. To Lock: Sending command class = COMMAND_CLASS_DOOR_LOCK, command =
DOOR_LOCK_OPERATION_SET, mode = 0xFF (DOOR_SECURED) or BASIC_SET value
0xFF will raise the gate. Notification Type Access Control, Event 0x03 (RF lock operation)
is sent to the Lifeline and then one second later, a Door Lock Operation Report is sent to
the Lifeline.
2. To Unlock: Sending command class = COMMAND_CLASS_DOOR_LOCK, command =
DOOR_LOCK_OPERATION_SET, mode = 0x00 (DOOR_UNSECURED) or BASIC_SET
value 0x00 will lower the gate. Notification Type Access Control, Event 0x04 (RF unlock
operation) is sent to the Lifeline and then one second later, a Door Lock Operation Report
is sent to the Lifeline.
Manual Lock Operation Reports
1. If the gate is raised manually, Notification Type Access Control, Event 0x01 (Manual lock
operation) is sent to the Lifeline then one second later, a Door Lock Operation Report is
sent to the Lifeline.
2. If the gate is lowered manually, Notification Type Access Control, Event 0x02 (Manual
unlock operation) is sent to the Lifeline and then one second later, a Door Lock Operation
Report is sent to the Lifeline.

USER MANUAL 12
Battery State and Charging
Battery state is checked upon startup and Battery CC V2 report is sent to the Lifeline Group.
Battery is then checked every 5 minutes. A battery report is also sent every 24 hours.
Indications and operation are as follows:
1. If battery falls below 25%, Battery report is sent to the Lifeline. One second later,
Notification CC sends Power Management (0x08) event “Charge battery soon” (0x0E).
Red LED flashes every 5 seconds.
2. If battery falls below 10%, Battery report is sent to the Lifeline. One second later,
Notification CC sends Power Management (0x08) event “Charge battery now” (0x0F). Red
LED flashes every 5 seconds and beeper chirps every 30 seconds. At this point, the gate
will no longer raise but can still be lowered.
3. When charger is plugged in, Battery report is sent to the Lifeline. One second later,
Notification CC sends Power Management (0x08) event “Battery is charging” (0x0C).
Yellow LED flashes every 2.5 seconds.
4. When charge is complete, Battery report is sent to the Lifeline. One second later,
Notification CC sends Power Management (0x08) event “Battery is fully charged” (0x0D).
LED return to flashing Magenta every (heartbeat interval) seconds.
Battery CC V2 support extended information in the Battery Report and can be queried at any
time with the Battery Get command. Additional information about the battery can be retrieved
with the Battery Health Get command.
Association Groups
Supports 1 group (#1, Lifeline) with up to 5 nodes. Command classes reported to the Lifeline:
1. NOTIFICATION_REPORT
2. BATTERY_REPORT
3. DEVICE_RESET_LOCALLY
4. INDICATOR_REPORT
5. DOOR_LOCK_OPERATION_REPORT

13 HAVEN CONNECT Z
Command Class List (Security: None)
Name
COMMAND_CLASS_ZWAVEPLUS_INFO
COMMAND_CLASS_TRANSPORT_SERVICE
COMMAND_CLASS_SECURITY
COMMAND_CLASS_SECURITY_2
COMMAND_CLASS_SUPERVISION
Command Class List (Security: S0 or Access Control)
Name Version
COMMAND_CLASS_VERSION
COMMAND_CLASS_MANUFACTURER_SPECIFIC
COMMAND_CLASS_DEVICE_RESET_LOCALLY
COMMAND_CLASS_INDICATOR
COMMAND_CLASS_POWERLEVEL
COMMAND_CLASS_BATTERY
COMMAND_CLASS_NOTIFICATION
COMMAND_CLASS_DOOR_LOCK
COMMAND_CLASS_CONFIGURATION
COMMAND_CLASS_ASSOCIATION
COMMAND_CLASS_MULTI_CHANNEL_ASSOCIATION
COMMAND_CLASS_ASSOCIATION_GRP_INFO
COMMAND_CLASS_FIRMWARE_UPDATE_MD
Version
2
2
1
2
1
3
2
1
3
1
2
8
4
4
2
3
3
5

Notification Command Class
All notifications are sent unsolicited.
Notification Name
Type (Value)
Access Control (0x06)
Home Security (0x07)
Power Management (0x08)
Notification Name
Manual lock operation
Manual unlock operation
RF lock operation
RF unlock operation
Lock jammed
Impact detected
Power has been applied
Battery is charging
Battery is full charged
Charge battery soon
Charge battery now
USER MANUAL 14
Value
0x01
0x02
0x03
0x04
0x0B
0x0A
0x01
0x0C
0x0D
0x0E
0x0F

15 HAVEN CONNECT Z
Configuration Parameters
Parameter 1:
Name: Heartbeat LED interval
Description: Heartbeat (magenta) LED flash rate in seconds. Set to zero to disable.
Default: 0x1E (30 seconds)
Min: 0x00 (disabled)
Max: 0x3C (60 seconds)
Parameter 2:
Name: Gate Operation Minimum Battery Level%
Description: m battery level at which the gate will activate.
Default: 0x0A (10%)
Min: 0x00 (0%)
Max: 0x32 (50%)
Parameter 3:
Name: Transient Debounce
Description: Impact detect parameter. Do not adjust unless advised by Haven Lock.
Default: 0x02
Min: 0x01
Max: 0x0A
Parameter 4:
Name: Transient Threshold
Description: Impact detect parameter. Do not adjust unless advised by Haven Lock.
Default: 0x08
Min: 0x02
Max: 0x12
Impact Detection
The impact detection function uses an accelerometer that is tuned using parameters 3 and 4 set
in the Configuration Command Class. When the gate is up and transient threshold (parameter 4)
is exceeded, a Home Security (0x07) Notification, event type Impact Detected (0x0A) is sent to
the Lifeline.
Glossary
NWI - Network Wide Inclusion
NWE - Network Wide Exclusion
S2 - Z-WAVE Security Version 2
S0 - Z-WAVE Security Version 1
DSK - Device Specific Key. This is unique to every Z-WAVE S2 device

USER MANUAL 16
TROUBLESHOOTING
If the unit fails to lock/unlock you will need to check the straps and screws nearest the servo motor. Make sure your nylon strap is not
bunched up within the unit. Manually open the locking gate and pull/tug on the open gate to stretch or flex the nylon straps. They could
be kinked up in the gate or one strap could be too tight and need to be loosened. You can also take off the gate cover and pull the
straps with your fingers. This usually evens out the nylon and allows the servo motor to reach its locked position. Alternatively, also make
sure that the screw closest to the servo motor is not too tight. Sometimes if the screw closest to the servo (the left side of the unit when
it is facing the door) is overtightened, the servo can fail to lift when you attempt to lock it via the smartphone app or key fob. If the unit
bows in the wingtips, it is a good indication you over tightened the lock.
Below are some common issues you might encounter while installing or operating your HAVEN Connect Z. If you do not see your issue
below, contact us at support@havenlock.com.
HAVEN will not turn on or no indication of
power.
HAVEN will not fit under my door or does not
reach the base of my door.
How do I turn HAVEN off?
I can’t get the foot pedal to work.
I need to reset my HAVEN. Can I perform a
factory reset?
HAVEN Connect Z Issues
Make sure you have fully charged the unit ( Note: Backup
batteries are no longer required for Haven Connect Z). Simply,
toggle the gate manually. You should see an LED flash and a
beep. Try resetting the device with the pin hole reset button.
This action also generates an LED flash and beep. If none of
this works, please contact us at support@havenlock.com.
Be sure to visit our detailed installation guide at
https://install.havenlock.com that will walk you
through various scenarios involving uncommon door
and threshold sizes. In most cases this fixes the
situation, but if you still need help, contact us!
HAVEN is designed to be “always on” so that it is
ready to receive commands from your Z-WAVE
network. It automatically uses sleep and low-power
modes to achieve long built-in battery life.
The foot pedal is designed to be pressed at a certain
angle to prevent false locking by children or pets. Try
pressing close to the top of the pedal, inward with
your toes first. This can take some practice to get it
right.
See Z-WAVE operation section for more details.
Please use this procedure only when the network
primary controller is missing or otherwise in-op.
IMPORTANT SAFEGUARDS
Charge low batteries immediately. HAVEN Connect’s main battery lasts for 3-5 months on a single charge
under normal use. Please charge your unit every two to three months.
Protect your password. You are responsible for your own security. HAVEN Connect Z is not a replacement
for personal responsibility. Do not share your password with anyone you do not trust or know well. To be
safe, do not share it with anyone.
Who is getting access? See the Z-WAVE provisioning steps.
Make sure to turn on notifications in your Zwave controller app as well as your smartphone settings. This
will help you keep track of any changes that occur to your HAVEN Lock. You can receive alerts when
someone is coming and going, but most importantly you will be notified of any admin actions that occur.
WAVE®
The Z-
word mark and logos are registered trademarks owned by Silicon Laboratories, Inc. and its subsidiaries and any use of such
marks by HavenLock, Inc is under license. Other trademarks and trade names are those of their respective owners.

HavenLock Inc.
Patent Protected: European Patent Number: 3,194,692
Nashville, TN
www.havenlock.com
®
 Loading...