

Page 1
Storage Electric Water Heater
Model: Rio
Rio
Page 2
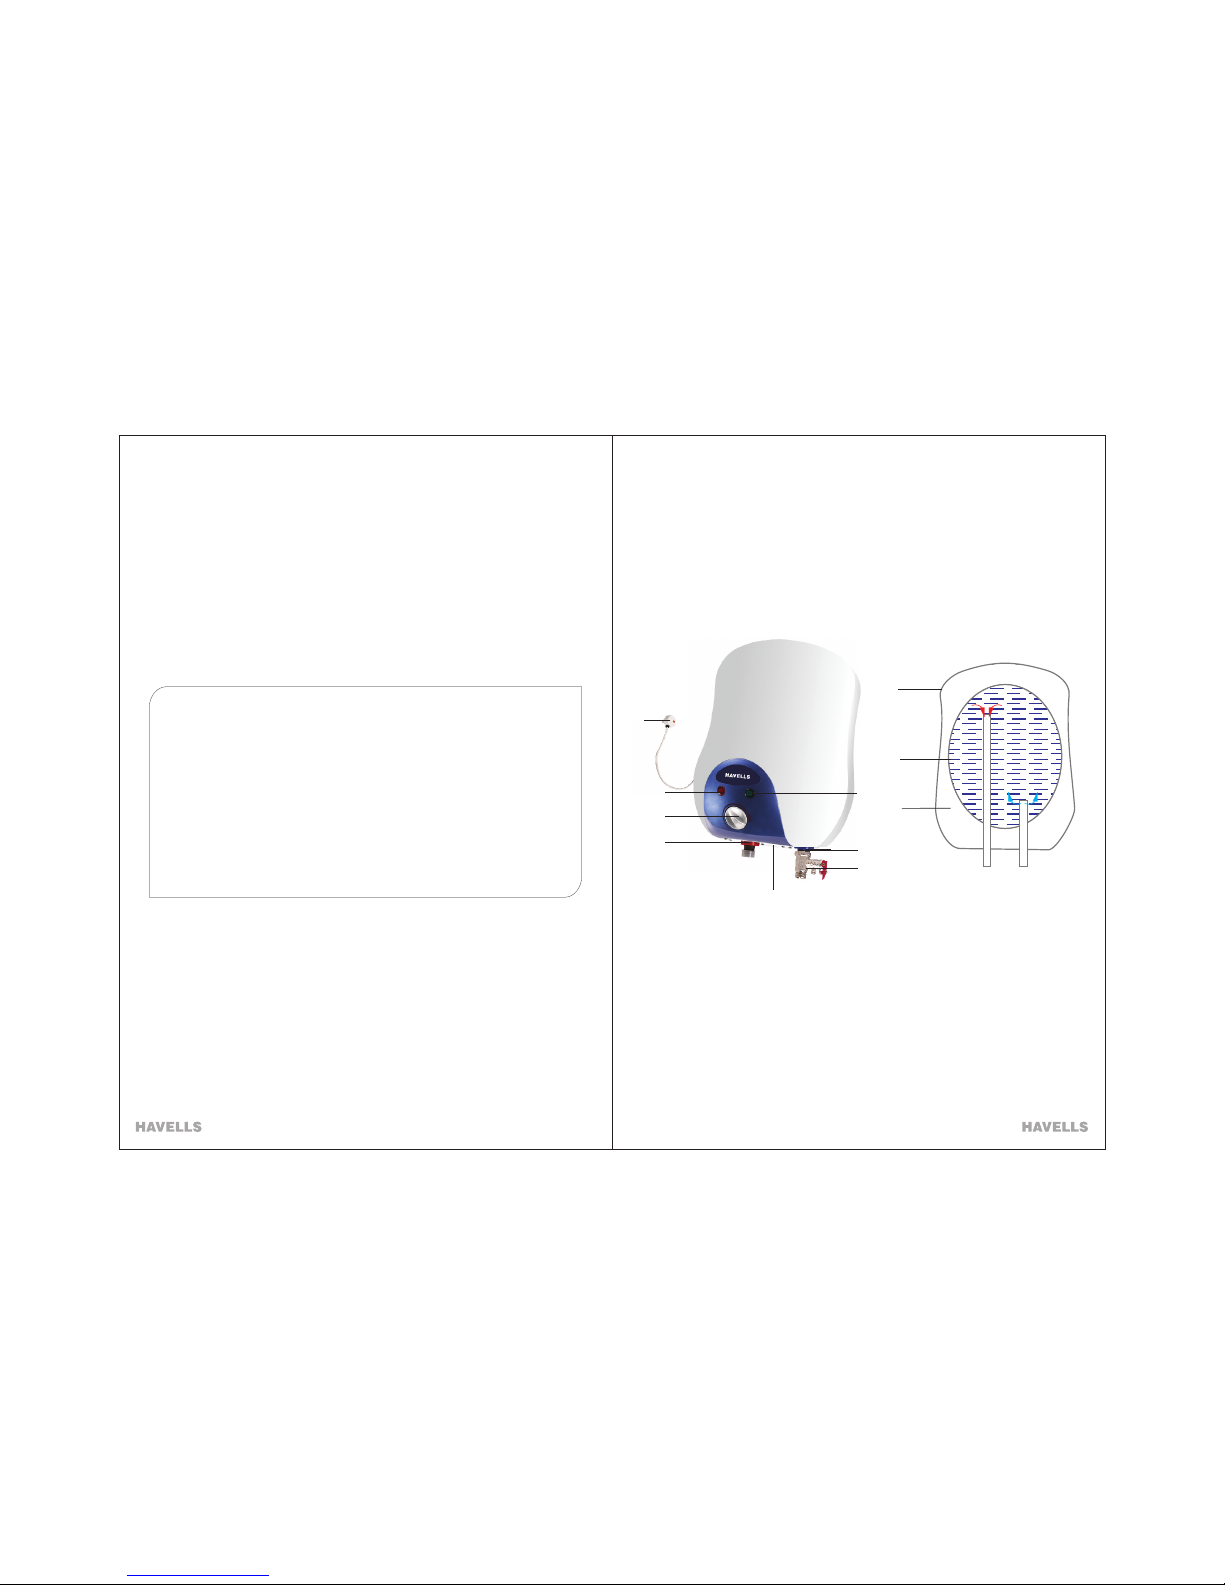
PARTS LIST :
1. Thermostat with adjustable temperature knob
2. Heating On Indicator lamp
3. Ready to use Indicator lamp
4. Cold water inlet (blue)
5. Hot water outlet (red)
6. Multi-functional safety valve
7. Outer shell
8. Inner tank
9. Power cord
10. Energy saving high density PUF insulation
11. Inspection cover
7
10
8
1
2
3
4
5
11
6
9
Dear Customer,
We congratulate you on choosing a HAVELLS Electric Water Heater, one of the
highly prestigious brand in India.
Meticulously designed, using only the highest quality materials and components,
your electric water heater is designed to have many years of trouble free operation.
To enable your electric water heater to give you many years of perfect trouble free
service, we recommend you to follow the advice contained in this Instruction
manual very carefully.
Page 3

WARNING
The installer should review the contents of this manual along with the owner after completion
of installation and the manual should be left with the owner and placed at a place close to the installation.
Technical Specifications :
Rated Capacity in Ltr.
Mounting
Rated Voltage in Volts &
frequency in Hz.
Rated Power Input in Watts
Rated Input Current in Amps
Mean Hot Water Output
Temp. (°C)
Rated Pressure in MPa
Standing Loss in KWH/24
hrs/45° C
Initial heating in Mins. (Max.)
Weight of water heater in Kg.
- Empty
- Water Filled
Water Proof Degree
Class of Appliance
Reheating Time in Mins. to
0
raise 50 C (Min.)
Mixing Factor Maximum (%)
1.
2.
3.
4.
5.
6.
7.
8.
9.
11.
12.
13.
10.
S.No. PARAMETER
230V, 1Ph 50 Hz A.C.
6
30%
25
2500
10.9
0.7
0.53
15
5.6
11.6
IP X 4
Class I
Rio-625
Vertical
70
Rio-6 270 350 100 240 241 22
in mm
Model A B C D E F
Product Dimensions :
Rio
A
B
C
D
E
F
Page 4

8. Adjustable Temp. Knob with Thermostat :
Allows a manual setting for heating of water between ambient temperature to 75°C.
7. Multifunctional Safety Valve (MFV) :
The MFV used with this unit is a unique safety valve. This has four functions
1.
Pressure Release Valve ( PRV)
2.
Non return Valve (NRV)
3.
Vacuum Release Valve (VRV)
4.
Drain Device
Safety Devices :
B. Thermal Cutout
A non-self resetting thermal cutout is provided as a safety device. When the thermostat fails to
function, this cut-off the power at 90°C.
The thermal cutout has to be manually reset before the heater can start operating again.
Havells Water Heater is built-in with a host of Safety Devices to ensure your safety at all times.
The operation of these devices are described below :
A. Thermostat
Capillary type thermostat :
This device “cut-off” and “cut-in” the power supply between a narrow band of temperature range.
The indicator lamp provided with this circuit glow and un-glow during cut-in and cut-off.
This shows the proper working of the thermostat. This device is provided with an adjustable knob to
set the desired water temperature.
9.
4 Bolt Flange :
Provides an easier way for product maintenance.
4
10.
Protection against water
splashing from every direction
Vitreous
Enamel Coating
2. Anti Alkaline Test
4. Energy Saving High Density Puf Insultation :
CFC free thicker PUF insulation offers complete protection against radiant heat loss.
Incoloy Heating Element :
Incoloy 800 Coated Heating element offers superior heating performance with its excellent
resistance to both oxidation & carbonization at high temp. setting. Also r esister erosion
against eme and hard water conditions thus extending life span of heating element
with minimum energy loss.
most extr
3.
2.
Heavy Duty Anode Rod Protects Tank From Corrosion :
With steel core, magnesium anoderod protects enamelled tank from rust and corrosion.
1.
Vitreous Enamel Coated Tank with single Weld Line Design:
A. Made of super cold r olled steel plates of 1.5 mm thickness.
B.
Provides more corrosion resistance and anti-rust property compared to standard
inner tank esulting in longer lifedesigns r
C. Single weld line on the inner tank eliminates the risk of water leakage
D.
A die-hard life span for inner tank and more than 25% strength than S.S. tank, ensured by
multiple on line testing including
1. Uric Acid Test
3. Fatigue Test
4. Environment Synchronization Test
Water Tubes with Whirl Flow :
heating and maximum energy saving effect.
5.
6. Thermal Cutout :
Cuts off electric power to guarantee safety, in case the water temp. exceeds the highest temp.
beyond pre-set of the thermostat.
Key Features :
Page 5

A. Do not
B Do Not SWITCH ON water Heater without water filled in tank.
1. In case inlet water pressure is more than 5.5MPa or water pressure head 80 meter, install the dead weight
valve before inlet as shown in Picture 2 (not provided with this unit).
2. Minimum height between the water heater and water supply tank should be at least 4 meter.
3. For connecting the inlet & outlet between water heater and bathroom fittings, use metal flexible pipes.
4. Cold water inlet is marked blue and hot water outlet is marked with red.
5. First, fix the multifunction valve (MFV) to inlet of water heater.
6. Connect cold water inlet to other end of MFV with metal flexible pipe.
7. Open inlet water tap and allow the water to fill in the water heater. Make sure that the water starts
flowing from outlet of water heater.
8. Connect the outlet with metal flexible pipe to hot water outlet point of bath fitting. Open the tap & valve and
check the water flow through the hot water tap
9. Connect MFV with PVC pipe for drain see Picture 3.
connect the inlet directly to water lifting pump.
Water Connections
Ensure no leakage of water through inlet and outlet joints.
Dead Weight Valve
Picture 2
To water Inlet
To Flexible Pipe
Multifunctional Safety Valve
Picture 3
Lever for drain out of
water at annual maintenance
Electrical Connections
1. This unit is provided with all internal connections/wiring made in the factory itself.
2. The water heater is provided with a supply cord, with 3 pin plug top of 15 Amp.
3. Make sure that the electrical contact of 3-pins plug and switch is secure with proper earthing
4. To energize water heater plug in the 3-pin in socket for electric supply.
Internal Wiring Diagram -
The schematic diagram shows the internal wiring.
Make sure that the Water Heater is switched off and plugged-off from electrical supply before opening the
Inspection cover.
Follow the Internal wiring connections as shown in the diagram below while carrying out the maintenance.
CAUTION
Mounting
Now the water heater can be hooked on the wall bracket.
1. After hooking on bracket, tug downward the water heater and ensure both fingers of bracket are properly
seated in the mounting slot.
Installation :
A.
B. For easy installation and servicing enough space should be provided around this unit (50mm from ceiling,
500mm from sides & minimum 1.8 m from ground).
C. Ensure following tools and accessories are made available before installation of this unit.
(not provided by company)
1. Drilling machine with concrete drill bit, set spanner and tool kit.
2. Two numbers of metal flexible pipes.
3. PVC pipe for drain
Preparation of Wall Structure
For installation of this unit, you need to prepare the wall suitably.
A. In case of hollow brick walls.
1. Dig up sufficient space to accommodate the wall mounting bracket (bracket supplied with water heater)
of minimum depth 100mm.
2. Fill up the complete dig up space with cement concrete.
3. Ensure cement concrete is properly cured/set.
4. Then, the wall bracket can be fixed with the help of bolts provided along with the unit.
B. In case of solid walls
Follow process as below :
1. Drill hole in wall as shown Picture 1.
2. Insert the nut/bolt assembly in drilled hole,
take out the bolt (as shown) Picture 1.
3. Fix the wall plate with the bolt and washer by testing testing
till the wall plate is firmly fixed, in order to carry the
weight of water heater safely (with water).
Always use services of qualified plumber/electrician to install this unit.
C. Multi Function Valve (MFV)
1. This valve prevents the built-up of excessive pressure within the water heater by releasing water from the drain.
2. It also acts as a non-return valve to avoid the return of water from the water heater back to supply,
thereby prevent the dry heating.
3. It acts as an expansion valve to allow the hot water expansion during heating which flows back through drain.
4. Customer can ensure proper working of the MFV by cleaning of salt deposits, by lifting the drain lever up.
Customer can drain out the water from tank in case of prolonged non-use of water heater.
A. Hollow brick walls. B. Solid walls.
Drill Hole Insert Nut Fasten Bracket
Picture1
Mount Water Heater
Mount Water Heater
CAUTION
Internal Wiring Diagram
1
4
2
Thermal cut-out
L
Thermostat
Heating Element
Ready Indicator
Heating indicator
N
E
L
X
T°
N
E
E
RRDR
RD
K
Page 6

5. Remove the water heater from the hanger hook, after water heater is emptied
6. Remove the inspection cover from bottom , unscrew the heating assembly flange.
7. Clean the container and the heating element assembly to remove scale formation, by using a suitable
acid or by gently scraping the scale. Check the heating element surface after cleaning for
“No Surface Damage”
8. Replace Magnesium anode in case it is worn out.
9. Remount the heating assembly flange. Ensure the Internal wiring connection are made as per the
wiring diagram shown in the manual.
10. Hang the water heater on the mounting bracket/ hook provided on the wall. Move the water heater down ward to ensure that it is seated on bracket properly.
11. Open cold water supply until water flows without interruption from outlet valve.
12. Close the outlet valve and check for “No eventual leakage” around the flange and water connections.
13. When there is no leakage, then switch on electric supply.
DO’S
1. The gate valve at the inlet should always be kept open.
2. To minimize scaling of heating element & the tank, (which takes place rapidly in areas of hard water), drain
the water from heater unit periodically. However get this done through a qualified technician /plumber only
3. Always get the water heater serviced once in a year from a Havells authorized service representative
4. Use genuine spares when spares replacement is necessary.
5. Switch OFF the power supply to the unit & drain out the water when not in use for a longer period of time.
This prevents scaling of the element.
6. In case both the lamps do not glow, do not start the unit by resetting the thermal cutout. Instead contact
the nearest customer care centre.
DON’T
1. Safety devices like safety valve, thermostat, thermal cut-out etc are pre-set from factory & sensitive dvices.
Do not tamper with them, this could be hazardous.
2. Do not switch ON the heater till it is completely filled with water.
3. In case you observe any abnormality of operation, immediately switch OFF the main power supply to the
unit and contact the nearest customer care centre.
4. Never install a pressure reducer valve at the inlet.
Operation of Water Heater :
A. Using the heater for the first time :
1. Do not switch “ON” before filling the heater with water.
2. Leave the hot water tap open. Now fill the heater by opening the control valve at the inlet.
3. When the heater is full, water will start flowing through the hot water tap.Close the hot water tap.
4. Now the heater will always have water inside. Water drawn will be replaced by water from the over head
tank.
5. Always keep the inlet control valve open.
6. Now switch “ON” the power supply to the heater.
B. Using the heater regularly :
1. Always keep the inlet valve open so that water drawn from the hot water tap is automatically replaced
from the mains.
2. When the water reaches the required temperature the thermostat will cut-off the power supply
automatically.
3. The thermostat setting can be changed by the user to suit outlet water temperature.
(DO NOT TAMPER THE SETTING FREQUENTLY)
4. Lowering the setting of the thermostat will give a lower hot water temperature; increasing the setting will
give a higher hot water temperature.
5. Initially it may take a long time for the water to get hot, it is recommended to switch “ON” the water heater
at least an hour before you want to use it.
6. If you require hot water early in the morning, switch “ON” previous night itself, thermostat would cut-off the
power automatically, when the water reaches the set temperature.
7. The heater can also be kept “ON” always, if required since the heater is completely insulated, the water
will remain hot. The thermostat will cut-in and cut-off automatically to keep the water at constant
temperature. In this way you can always get hot water.
Maintenance & Cleaning :
1. To benefit from the highest standards of service and to ensure your guarantee remains in focus, please
always contact HAVELLS approved dealer or HAVELLS Authorised Franchise
2. Always keep the inlet control valve open.
3. Never switch “ON” the water heater without water in the heater. It will damage the heating element.
4. Check condition of metal flexible pipe at-least once in a year. If found damaged replace with new pipes.
5. Check the condition of power & supply cord for “No Damages”. Replace it by an authentic supply cord in
case of damage
6. If the water heater is not going to be used for a long time,
a. Plug Off the power supply,
b. Stop Inlet water supply
c. Unscrew the drain lever, lift the lever upward to remove the water through drain system provided in MFV.
7. To increase the life of heating element, de-scaling should be done periodically. if required,
you may take the assistance of the nearest authorized service center
8. During reuse of water heater
a. Ensure Drain Plug lever is reset and screwed
b. Open Inlet Valve and fill the water heater till the clean water flows from outlet tap.
c. Plug-in the power supply to heat the water
9. Periodically check the MFV to ensure that it is in operating condition. The MFV should be operated
regularly to remove salt deposits and to verify that it is not blocked.
10. Check proper functioning of the safety valve in every two months by opening and closing the test lever.
11. The heating element should be checked every year for “No Scale Formation” caused by impurities in the
water supply.
12. We recommend to check Magnesium anode rode in every year & once it has been used up over 60%,
the Magnesium anode should be replaced with a new one.
For cleaning the element or replacing the anode use the following procedure :
1. Switch off the electric supply to the water heater.
2. Open the hot water taps until the hot water is removed completely.
3. Close cold water supply.
4. Drain the cold water from tank through MFV drain pipe by lifting the drain lever. Remove flexible pipe.
 Loading...