

Page 1

• WinTV-HVR-1250 board
For the standard WinTV-HVR-1250 products, you will
find:
• WinTV-HVR Windows Installation CD-ROM with
WinTV v7 application with SoftPVR™ and TV Scheduler
•
Hauppauge remote control transmitter with 2 AAA
batteries
•
Remote control receiver cable
For Windows Media Center kits, you will find:
• Media Center Remote Control transmitter and two
AA batteries
•
Media Center Remote control receiver/blaster
•IR transmitter cable (blaster cable)
•
USB cable for the Media Center remote control receiv-
er/blaster box
WinTV-HVR-1250 has a built-in tuner for analog cable TV, digital ATSC and digital clear QAM TV. To
receive ATSC, you will need an antenna. To receive digital clear QAM or analog cable TV, you will
need a cable TV connection.
WinTV-HVR uses your PC or laptop’s CPU for displaying TV programs on your PC screen. The
decoding of high definition ATSC is very processor intensive, and the smoothness of high definition
TV programs depends upon how fast your PC or laptop system is. Other PC activities that consume
CPU resources might affect the display of ATSC digital TV. Slow video, jerky video and momentary
pausing of video are all results of a CPU which is temporarily being used by other activities.
For the best ATSC digital TV reception, a roof top ‘Wideband’ or ‘High gain’ antenna is
recommended. In the U.S., a good ATSC digital antenna selector can be found at
TitanTV.com
under Resources.
S-Video/Composite: Video input connector. For either S-Video or
composite (composite video requires the S-Video to composite
adapter).
Left/right audio input: Stereo audio input using 1/8” mini
stereo jack, from the audio output of your source.
Connecting the remote control receiver cable
Plug the remote control receiver cable into the
Remote control receiver connector on the WinTV-
HVR-1250.
Position the round receiver sensor (at the end of the remote control
receiver cable) where is can be “seen” by the remote control transmitter.
This is normally at the front of your PC.
PC, double click on the WinTV icon on your Windows desk top.
Device Setup Wizard
When you run WinTV for the first time, the WinTV Device Setup Wizard appears.
Select the TV source that you are using. On some model WinTVs, you have multiple
tuners and therefore you can select multiple
sources. For the WinTV-HVR-1250, you can
chose either ATSC or Digital QAM and Analog TV.
You cannot chose both Digital ATSC and Digital
QAM.
N
ote: If you’d like to use the A/V inputs,
please select External inputs
(Composite/S-Video).
ATSC digital over-the-air TV
Select Digital ATSC and click Next. In the
ATSC Setup menu, click
Next. You will see the
Digital ATSC Scan scanning for digital over-
the-air channels.
The digital TV scanning process will scan from
channels 2 to 51. As TV channels are found, they
will appear in the Channel box.
When complete, click
Next / Next and OK.
N
ote: if you do not receive any ATSC digi-
tal TV channels, an antenna signal
booster might be needed. After adding a signal booster, see below for instructions on rescanning and the Troubleshooting section for information on choosing an antenna.
Clear QAM Digital Cable TV
Clear QAM digital cable TV channels are those TV
channels broadcast on a digital cable network
which are unencrypted (‘free to view’). If you have a
cable operator who transmits clear QAM digital TV
programs, chose Digital QAM and Next.
Encrypted channels are automatically not selected.
The resulting channels in the list might be both
standard and high definition channels.
N
ote: Windows Media Center requires TV
Pack 2008 or Windows 7 to support
QAM TV channels. You can also use the
Hauppauge WinTV v7 application, or
SageTV or BeyondTV for QAM TV reception.
Analog cable TV
Select your Country and TV Source from the
drop down list. To automatically scan for channels,
click
Next to continue.
Click the
Scan button and WinTV will
automatically scan for analog channels. The
ATSC digital TV is over-the-air digital TV for North America. ATSC digital TV typically
requires an antenna for reception, and is currently broadcast in 200 cities, with over 1500 TV
stations.
Note: ATSC digital TV is NOT digital cable TV or digital satellite TV. The WinTV-HVR can receive
clear QAM digital cable TV (if you are using WinTV v7 or Windows Media Center with Windows 7 or
TV Pack 2008), but it cannot receive digital satellite TV unless WinTV-HVR-1250 is connected to a
satellite TV set top box.
ATSC digital TV is transmitted in several resolutions, from “standard definition” which is similar to
cable TV, up to high definition which has about 16 times the resolution of normal cable TV. In any
resolution, ATSC digital TV gives sharper pictures than analog cable TV and near CD quality sound.
Clear QAM TV channels are digital cable TV channels which are broadcast “in
the clear”.
These digital cable TV channels are broadcast in various resolutions, from standard
definition up to high definition.
To install, switch off the computer and remove the computer cover. The manufacturer of your PC
supplies instructions on removing the PC cover.
N
ote: Your PC could be damaged by electrostatic discharge. Avoid this by
contacting the earthed chassis of your PC, before you open it or touch
the pci card.
• Locate a free PCIe slot. Unscrew and remove the metacover plate which covers the back
of the empty slot.
• Plug the WinTV-HVR-1250 board into the PCIe slot, and screw the WinTV-HVR-1250 metal
cover plate to the PC.
• Replace the computer cover.
TV connector: either cable TV for analog and clear QAM digital or a TV antenna for ATSC TV.
N
ote: clear QAM digital cable TV is only
available in some areas and through some
cable TV operators. Contact your local cable TV
company to see if they support clear QAM digital cable TV. To watch clear QAM digital cable
TV, you need to be using Windows Media
Center TV Pack 2008, Microsoft Windows 7 or
Hauppauge’s WinTV v7.
Remote control receiver connector: to the
Hauppauge Remote Control receiver cable (on some
models).
If you are using an external audio/video
source like a satellite or cable TV set top
box ...
then you will need to connect the S-Video input
connector
or Composite video input connector for video and the Audio input (Line-
In)
for the sound.
1. Contents of the WinTV-HVR-1250 package
3. Installing the WinTV-HVR-1250 board
4. Connecting the cables
TV Connector
for analog or digital TV
Left/Right
audio input (Line-In)
connector
Remote control receiver
connector
(on some models)
S-Video/Composite
video input connector
Turn on your Windows XP or Vista based PC, and boot into Windows.
N
ew: If a 'Found New Hardware' wizard appears, please cancel it and allow windows to
load fully before proceeding.
Insert the WinTV Installation CD-ROM in your PC’s CD-ROM drive.
N
ote: if the CD does not autorun, navigate to the CD and run the 'Setup.exe' file.
“Hauppauge WinTV Installation CD” window will appear on the screen.
Install the WinTV driver
Click the button labeled
Step 1: Install drivers.
A blue screen will open and begin installing
the drivers for your WinTV.
Once the drivers have installed, click on the
Finish bar to exit.
Install the WinTV applications
Click the button labeled Step 2: Install
WinTV
The setup application will then open and begin automattically installing the WinTV application
components.
Once complete, click
OK then Exit.
N
ote: the latest driver updates are available at: www.hauppauge.com
To run the WinTV v7 application for watching TV, recording videos and playing them back on your
6. Running WinTV for the first time
5. Installing the WinTV driver and applications
WinTV-HVR-1250 and
WinTV-HVR-1250 MC-Kits
Quick Installation Guide
QI-WINTV-HVR1250-V3 · 2/15/2010 © Hauppauge Computer Works, Inc. 2009 - 2010
Hauppauge Computer Works, Inc. Telephone: 631-434-1600
91 Cabot Court Fax: 631-434-3198
Hauppauge, NY 11788 Tech Support: 631-434-3197
techsupport@hauppauge.com
Sales: sales@hauppauge.com Web site: www.hauppauge.com
2. What is ATSC digital TV?
Page 2
scanning process takes about 10 minutes.
External audio/video sources
You can bring video into the WinTV from an
external audio/video source such as a cable TV or
satellite set top box.
In the
Device Setup Wizard, select External
Inputs and click Next.
You will be presented with the option to add a
Composite and an S-Video Input. Please
select your country (if not correct) and click
Next.
If you wish to connect a source not normally designed for operation in your country, you can
configure the Video Format manually from the drop down list. Change the value from “AUTO”.
Note: Pal BGHIDK is the commonly used format in Europe. NTSC is the broadcast format used in
North America.
Rescanning TV channels
If you want to rescan for TV channels, click the Setup menu (the gear button in the lower left
corner of WinTV v7).
Then click on the
Devices tab. Choose your WinTV device by clicking on it, then click Tuner
setup. Chose the TV format you want to scan, then click Next. Click Next and a new scan will be
started. When the scan is complete, click
Next / Next and OK.
To watch TV, click the
Watch TV button.
To see the
TV
Channel list, click
your
right mouse
button
in the TV
window to display the
Options menu.
Select
Find
Channel. You will
see the channel list.
To display the channel
list all the time, while
the channel list is
displayed, click the
Channel list display always on button.
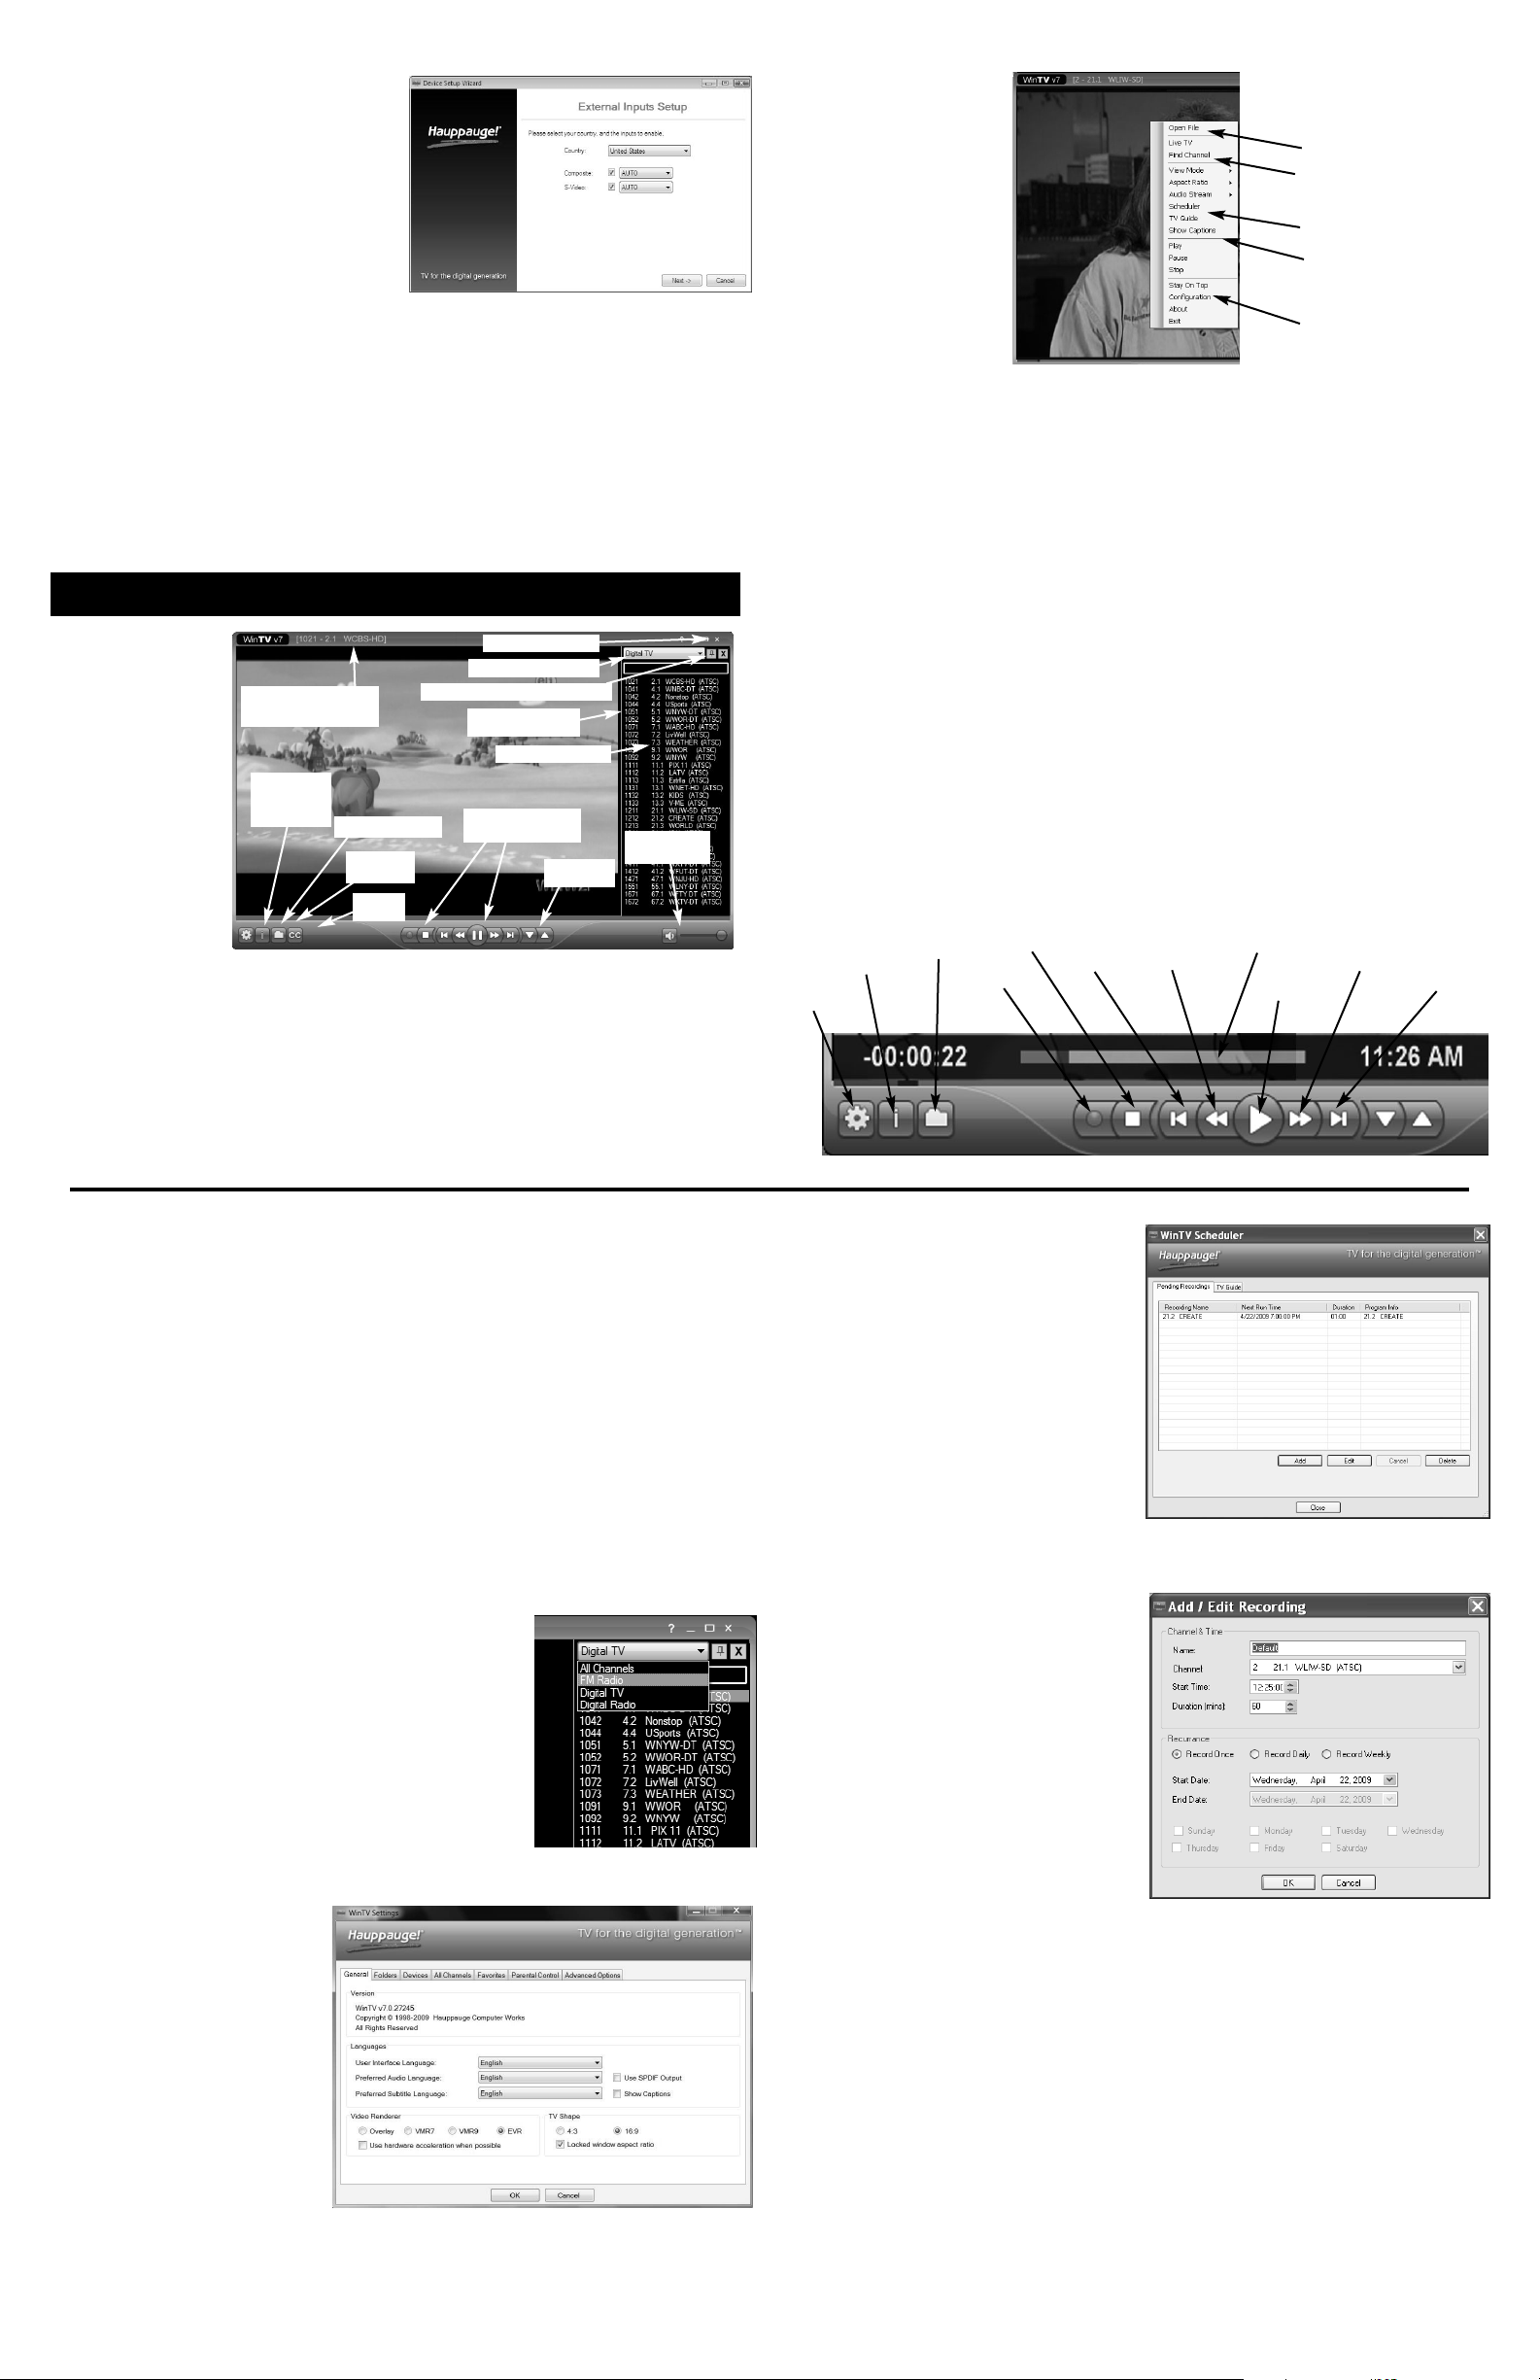
Options menu
The Options menu is the main menu where you can select channels, turn on closed captions,
open the TV Scheduler and many other of the most important TV control functions.
To bring up the Options Menu, click your
right mouse button once in the TV window .
To see the channel list, click on Find channel. You will see the list of channels which have been
scanned.
Using the WinTV v7 application
To show the Channel menu as
part of the TV window, click the
Channel list always on icon
at the top of the channel list.
To turn on Closed captions,
click on
Show Captions.
To manually schedule a TV
recording, or to see which
programs have been
scheduled, click on
Scheduler.
To turn on the
Always on
To p
mode, click on Stay on
To p.
Watch, Pause and Record TV
WinTV v7 is always recording video to your PC’s hard drive while TV is being displayed. In this way,
you can immediately skip back and replay the TV program you are watching.
Clicking on the
Pause button will cause the video to pause, while clicking the Record
button will cause the current TV program to be recorded to hard disk.
Recording your TV shows
If you want to record a TV show you are watching:
- Click the Record button. The recorded file name will popup on the video for a few sec-
onds as the recording starts.
- When you are finished recording, click the
Stop button.
- Click the
Playback file button and select the last file recorded to play the video you
just recorded
- To play a video you recorded earlier, click the
Playback File button and then move
your mouse and click once on the video you want to play. Click
Open and the file will
start playing.
The recorded video file is saved in the directory set in Recordings directory. The default
directory is
MyVideos. To change this directory, click the Settings button and then the Folders
tab. Every time you record a file, a new file is automatically created. The file will be formatted as
(ChannelNumber)_(ChannelName)YearMonthDay_TIme.
For digital TV programs, the quality level recorded is the same as it is transmitted by the TV station.
For example, if the TV station is transmitting a high-definition program, WinTV will record the
program in high-definition.
Close captions, parental control information and SAP audio is recorded with digital TV programs.
For analog cable TV using the built-in hardware MPEG-2 encoder, the quality of the video recording
is set to 6Mbits/sec. This will be a configurable setting in a future version of WinTV v7.
If you want to pause a TV show you are watching:
- Click the Pause button. Your TV video will stop and the Time counter will start counting.
- To start the video from where you paused, click the
Play button
- To rewind the video to the beginning, click the
Skip to the beginning button. If your
video was paused, click the
Play button.
- To rewind the video 1 minute, click the
Skip back 1 minute
button. If your video was paused, click the Play button.
The Delay counter displays how much time you are behind the live video. For example, if the delay
counter says 00:01:23, then the video window is showing video 1 minute and 23 seconds behind
live video.
Selecting FM radio programs
On those WinTV products which support FM radio, if you have
scanned for FM radio staions in the section entitled “Using WinTV
for the first time” you can change the WinTV v7 application to FM
by clicking FM radio in the Source selector, found in the upper right
hand corner of the WinTV application.
Configuration menu
The WinTV v7 Configuration menu is
accessed by clicking the gear
button in the lower left hand
corner of WinTV v7.
General tab: you can set the
Video Renderer which allows
WinTV v7 to display video with
a wide range of graphics systems.
Devices tab: allows is where
you can re-scan for TV channels and set up the TV sources
in WinTV v7.
Parental control tab: is
where you can set the Parental Control level.
Advanced options: you can set options such as Convert TV recordings to .MPG file
type and Game mode here.
TV Scheduler
WinTV v7’s built-in TV Scheduler allows you to
schedule the recording of TV shows. Once a
record event is set, WinTV v7 can be closed and
the WinTV application will “wake up” at the desired
time and tuned to the desired channel.
When a scheduled record event takes place, the
WinTV v7 application records “in background” so
that you can continue to watch your live TV
program, even as the recording progresses.
The TV Scheduler can be found in the
WinTV v7
Options menu. Right click your mouse
button in the TV window to see the
Options menu.
Click Scheduler. To set up an event for timed watching or recording, click the Add button.
The items that need to be set for each event are:
- Name: you can add a name to the record-
ing. If you do not enter a name, the name
will be in the channel/date format.
-
Channel: chose one of your scanned
channels.
-
Start time: set to the desired start time.
Click on the hour to set the hour, the
minute to set the minute. Note: It takes
about 15 seconds to launch the WinTV and
start recording.
-
Duration: number of minutes in the
recorded program.
-
Recurrance: one time, daily, weekly.
Note: If you set for Record Weekly, you
must also specify the Day of the Week for the recording.
-
Date to Begin Program: today's date is the default. Change this if you want to sched-
ule on another date.
-
Source selection: leave set at WinTV to bring up the WinTV at the requested time and
on the requested channel.
Once these are set, click OK. You can add more recordings, clicking OK after each event is set.
When you are finished click Close. The WinTV program does not have to be running for the
Schedular to work. If WinTV is not running, it takes about 15 seconds to start WinTV and to start the
recording of TV.
Options menu
click your right mouse button to view
Playback menu
Channel list
TV Scheduler
Close captions
Always on top
Record
Playback
file
Program
info
Skip back
1 minute
Pause/Play
Stop
Skip
ahead 1
minute
Skip back 10
seconds
Skip ahead
30 seconds
Settings
Time bar
Current channel
name and number
Record/Pause/Play
controls
Channel list display always on
TV Channel list
Volume adjust
and mute
Channel
up/down
Fast channel select
numbers
Close WinTV
WinTV source selector
Playback
file menu
Watch
TV
Program Info
Configuration
menu
(Settings
menu)
 Loading...