


WinTV
Installation and Reference
Manual
Copyright (c) Hauppauge Computer Works, Inc. 2000-2003
Hauppauge Computer Works, Inc. Telephone: 631-434-1600
91 Cabot Court Fax: 631-434-3198
Hauppauge, NY 11788 Tech Support: 631-434-3197
Hauppauge Computer Works, GmbH Telephone: 02161-694880
Krefelder Straße 673e Fax: 02161-6948815
41061 Mönchengladbach, Germany BBS: 02161-177353
Technical Support: 02161-6948840
Hauppauge Computer Works, Ltd Phone: 0207-378-1997
6 Bank Chambers Fax: 0207-357-9171
Borough High Street Technical Support: 0207-378-0202
London, U.K. SE1 9QQ BBS: 0207-357-6587
Internet addresses:
Sales: sales@hauppauge.com
Technical Support: techsupport@hauppauge.com
Web site:
http://www.hauppauge.com

FCC Statement
Radio Interference Statement:
The WinTV boards have been tested and found to comply with the limits
for a Class B digital device, pursuant to part 15 of the FCC Rules. These
limits are designed to provide reasonable protection against harmful
interference in a residential installation. This equipment generates, uses,
and can radiate radio frequency energy and, cause harmful interference
to radio communications. However, there is no guarantee that interference will not occur in a particular installation. If this equipment does
cause harmful interference to radio or television reception, which can be
determined by turning the equipment off and on, the user is encouraged to try to correct the interference by one or more of the following
measures:
• reorient or relocate the receiving antenna.
• increase the separation between the equipment and receiver.
• connect the equipment into an outlet on a circuit different from that
to which the receiver is connected.
• consult the dealer or an experienced radio/TV technician for help.
FCC ID: H90WINCAST M A D E I N U S A
CAUTION: Changes or modifications not expressly approved by the
party responsible for compliance to the FCC Rules could void the user’s
authority to operate the equipment.
CE Statement:
This equipment has been tested and complies with EN 55013, EN
55020 and IEC 801-3 part 3 standards.
CE
WinTV Installation and Reference Manual

Table of Contents
WinTV Installation and Reference Manual Revision 5.0
FCC Statement .........................................................................................
CE Statement .............................................................................................
Installing the WinTV boards 1
Installation overview..............................................................................1-1
Board connections................................................................................1-1
WinTV board diagram.........................................................................1-2
Installing the WinTV board in your PC................................................1-2
Installing the WinTV board under WindowsXP...................................1-3
Primary Surface ....................................................................................1-4
Connecting WinTV to a VCR, Video Camera or Camcorder................1-5
Connecting the WinTV board to a Sound Card ...................................1-6
Adjusting the Audio Volume ...............................................................1-7
Checking the WinTV Plug-and-Play Setup 2
The WinTV2000 application 3
The WinTV2000 window .......................................................................3-1
Running the WinTV application ...........................................................3-2
Still Frame Image Capture mode..........................................................3-4
Motion Video Capture mode ...............................................................3-5
Using the mouse in WinTV .................................................................3-5
Single click TitleMode/NoTitleMode makes WinTV easy to use! .......3-5
Setting up your TV channels ................................................................3-7
Setting preferences in Title mode ........................................................3-8
Setting full screen TV mode .................................................................3-9
Image Save, Print, Copy to Clipboard................................................3-10
Adjusting the video image color.........................................................3-11
Options menu ....................................................................................3-11
Keyboard control of the WinTV application........................................3-12
Setting up a shortcut to the WinTV application].................................3-12
Teletext Data Reception using VTPlus 4
Installation of the VTPlus software........................................................4-2
Running VTPlus ....................................................................................4-2
Quikselect .............................................................................................4-5
Dynamic Data Link to Teletext ..............................................................4-5
Using the WinTV-radio Application 5
i

Running the WinTV-radio application ..................................................5-1
The WinTV-radio window ......................................................................5-1
Using the WinTV-radio buttons.............................................................5-2
Programming the Presets.....................................................................5-2
How WinTV Works 6
How WinTV displays Video-in-a-Window............................................6-1
Video Overlay mode of operation.........................................................6-1
Primary Surface mode of operation .....................................................6-2
Troubleshooting 7
Troubleshooting the WinTV driver ........................................................7-1
Error message: “WinTV card not installed or drivers not loaded” .......7-2
Updating the WinTV driver 8
Removing the WinTV driver with HCWCLEAR .....................................8-2
Restarting the WinTV driver with HCWRESET ....................................8-4
Checking the Plug-and-Play Setup 9
Technical Support A
Technical support telephone ...............................................................A-1
Service ....................................................................................A-1
Using DirectX to install an updated DirectDraw driver ........................C-1
Trademarks: WinTV and the Hauppauge logo are registered trademarks
of Hauppauge Computer Works, Inc. Intercast and the Intercast logo
are trademarks of Intel Corp. Microsoft is a registered trademark and
Windows and the Microsoft logo are trademarks of Microsoft
Corporation. IBM and PC are trademarks of International Business
Machines Corporation.
Some WinTV models are manufactured under license from Dolby
Laboratories. "Dolby," "Pro Logic" and the double-D symbol are trademarks of Dolby Laboratories.
dbx-TV is a trademark of THAT Corp.
10/1/05
ii
WinTV Installation and Reference Manual

Introduction
This manual is covers all of the WinTV models based on the “PCI
Push” technology for displaying TV on your PC’s VGA screen. It covers,
but is not limited to, the following models:
WinTV-Go
WinTV-Express
WinTV-dbx
WinTV-radio
WinTV-pci
WinTV-primio
WinTV-Theater
References to the WinTV apply to all models. The Windows driver for
all of the WinTV boards will be referred to as the WinTV driver, and
the installation CD-ROM will be referred to as the WinTV Installation
CD-ROM.
For models which have particular features (such as the chapter on the
Radio application), we will note which models these features are available on.
For a description of how the WinTV boards display video on your VGA
screen, see the chapter entitled How WinTV Works.


WinTV Installation and Reference Manual
v

Installing the WinTV boards
The WinTV boards are Plug-and-Play devices designed for
WindowsXP. Plug-and-Play simplifies the installation and hardware
setup of WinTV by having hardware settings assigned by Windows,
instead of needing to set jumpers. This chapter describes how to install
these boards and how the automated Plug-and-Play installation procedure works .
Installation overview
To install WinTV under WindowsXP, you will follow these steps:
✓ Install the WinTV board in your PC
✓ After booting Windows, you will install WinTV’s Windows device
driver from the WinTV Installation CD-ROM
✓ After the Windows driver is installed, you will then install the WinTV
application software from the WinTV Installation CD-ROM
✓ Finally, if necessary, an updated Windows Direct Draw Driver can be
installed from the WinTV Installation CD-ROM
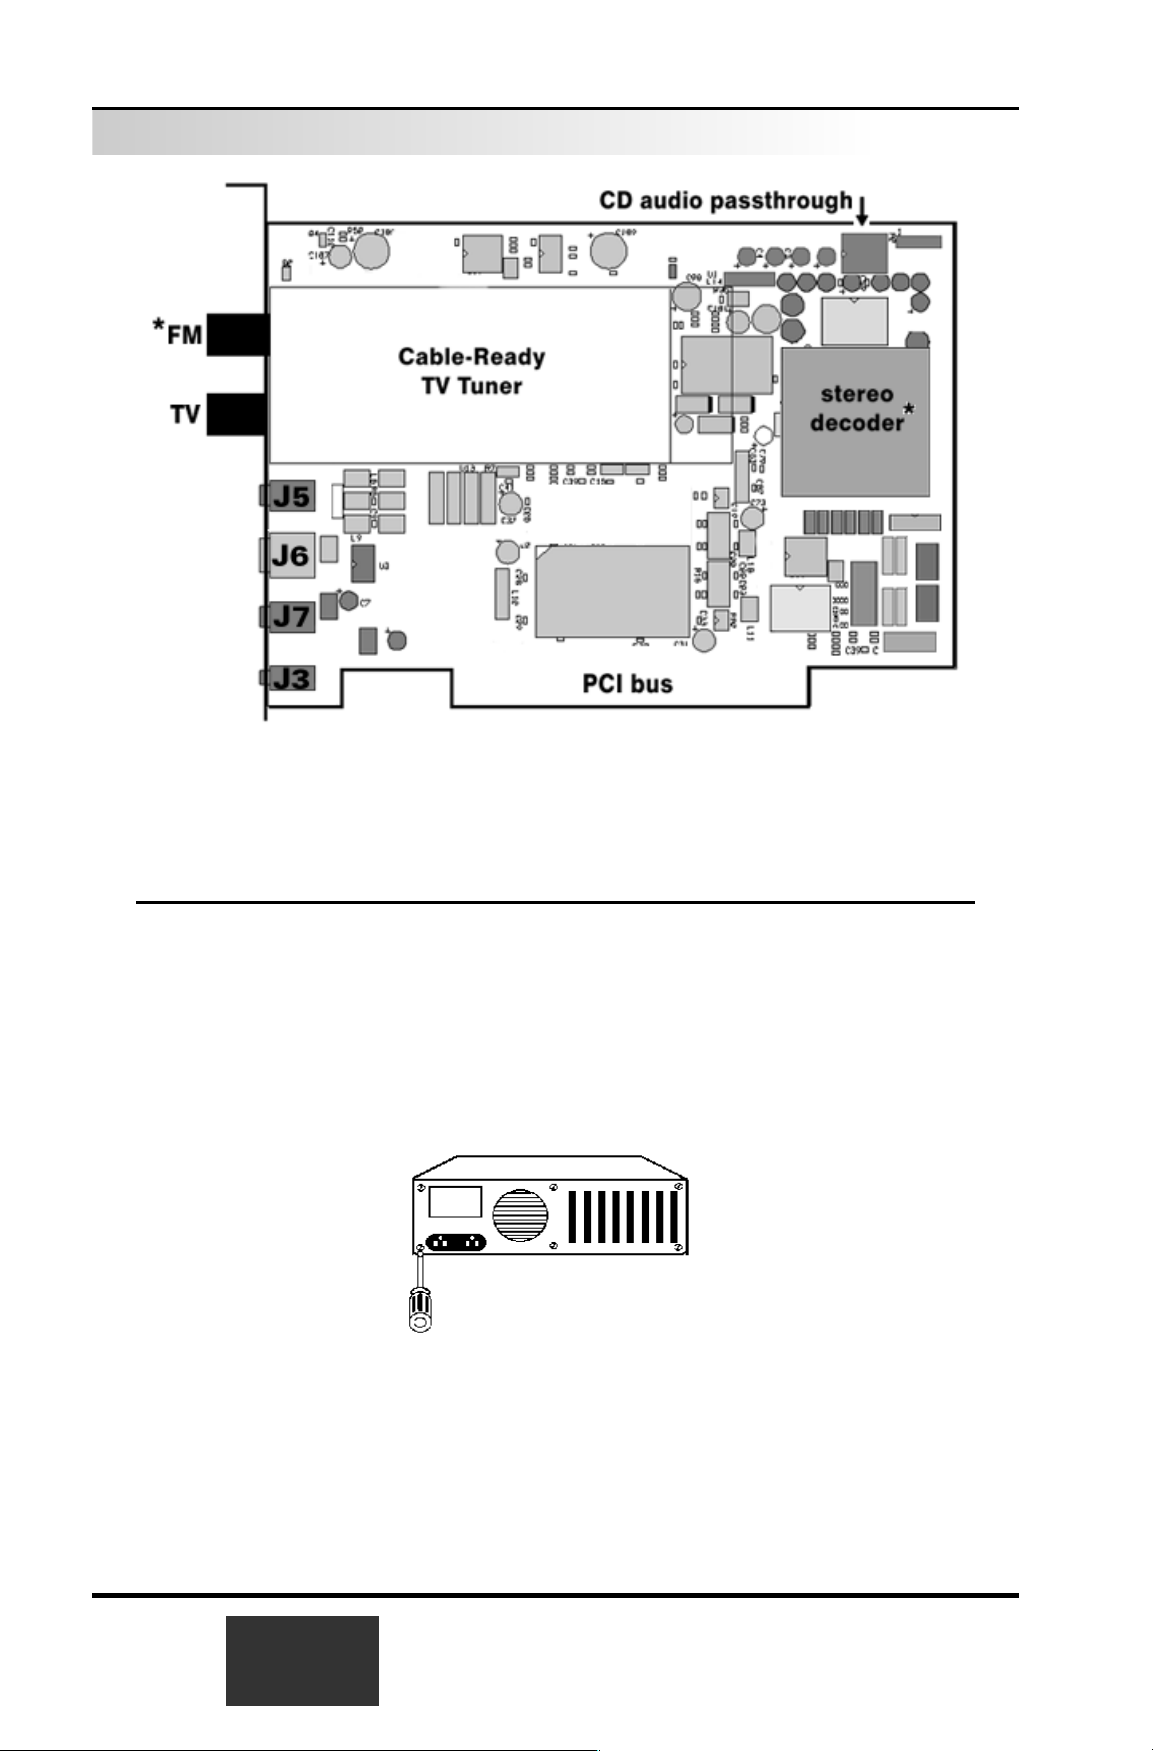
WinTV board diagram
The following diagram shows the main functions and connectors of the
WinTV board. Since there are several different models with different
features and functions, your board may not have all of the components
installed.
Board connections
FM: FM radio antenna connection (some models)
TV: TV antenna or cable TV connection
Audio LineOut: Audio output 1/8” minijack (connects to sound
card LineIn jack)
Video In: VideoInput jack (S-Video on some models)
Audio Line In: Audio input 1/8' minijack J2, left/right channel
Remote Control: Minijack J3 (optional on some models)
1-1
*
Installing the WinTV board in your PC
Before installing the WinTV board, turn off the power to your PC and
remove the cover. Since the WinTV board is sensitive to static electricity, we recommend that before you remove it from its protective anti-static bag, you touch the chassis with your hand to discharge any static
electricity.
Once the cover is removed, plug the WinTV board into any free PCI
slot.
Now connect the Audio Cable between the WinTV board and your
PC’s sound card. Plug one end of the audio cable into the Audio
LineOut jack of the WinTV. The other end (a 1/8” audio jack) then
1-2
WinTV Installation and Reference Manual
*Note: not available on all models.
Note: this outline may not reflect the current revision of your WinTV board. For the most up to
date information, see the WinTV QuickInstall Guide provided with your WinTV board.
*
Audio LineOut
* Video In
Audio LineIn
Remote
plugs into the LineIn jack of your sound card.
Most sound cards have three round jacks on the outside of the PC. They are: Microphone Input, Audio
Output and Line Input. The Audio Output would go to
your speakers, while the Microphone input might go to
a microphone (if you are using one). The LineIn jack is normally a
blue connector, and is indicated on the sound card by the words IN
or LineIn stamped into the metal bracket on the outside of your PC.
This is where you would plug your WinTV Audio cable.
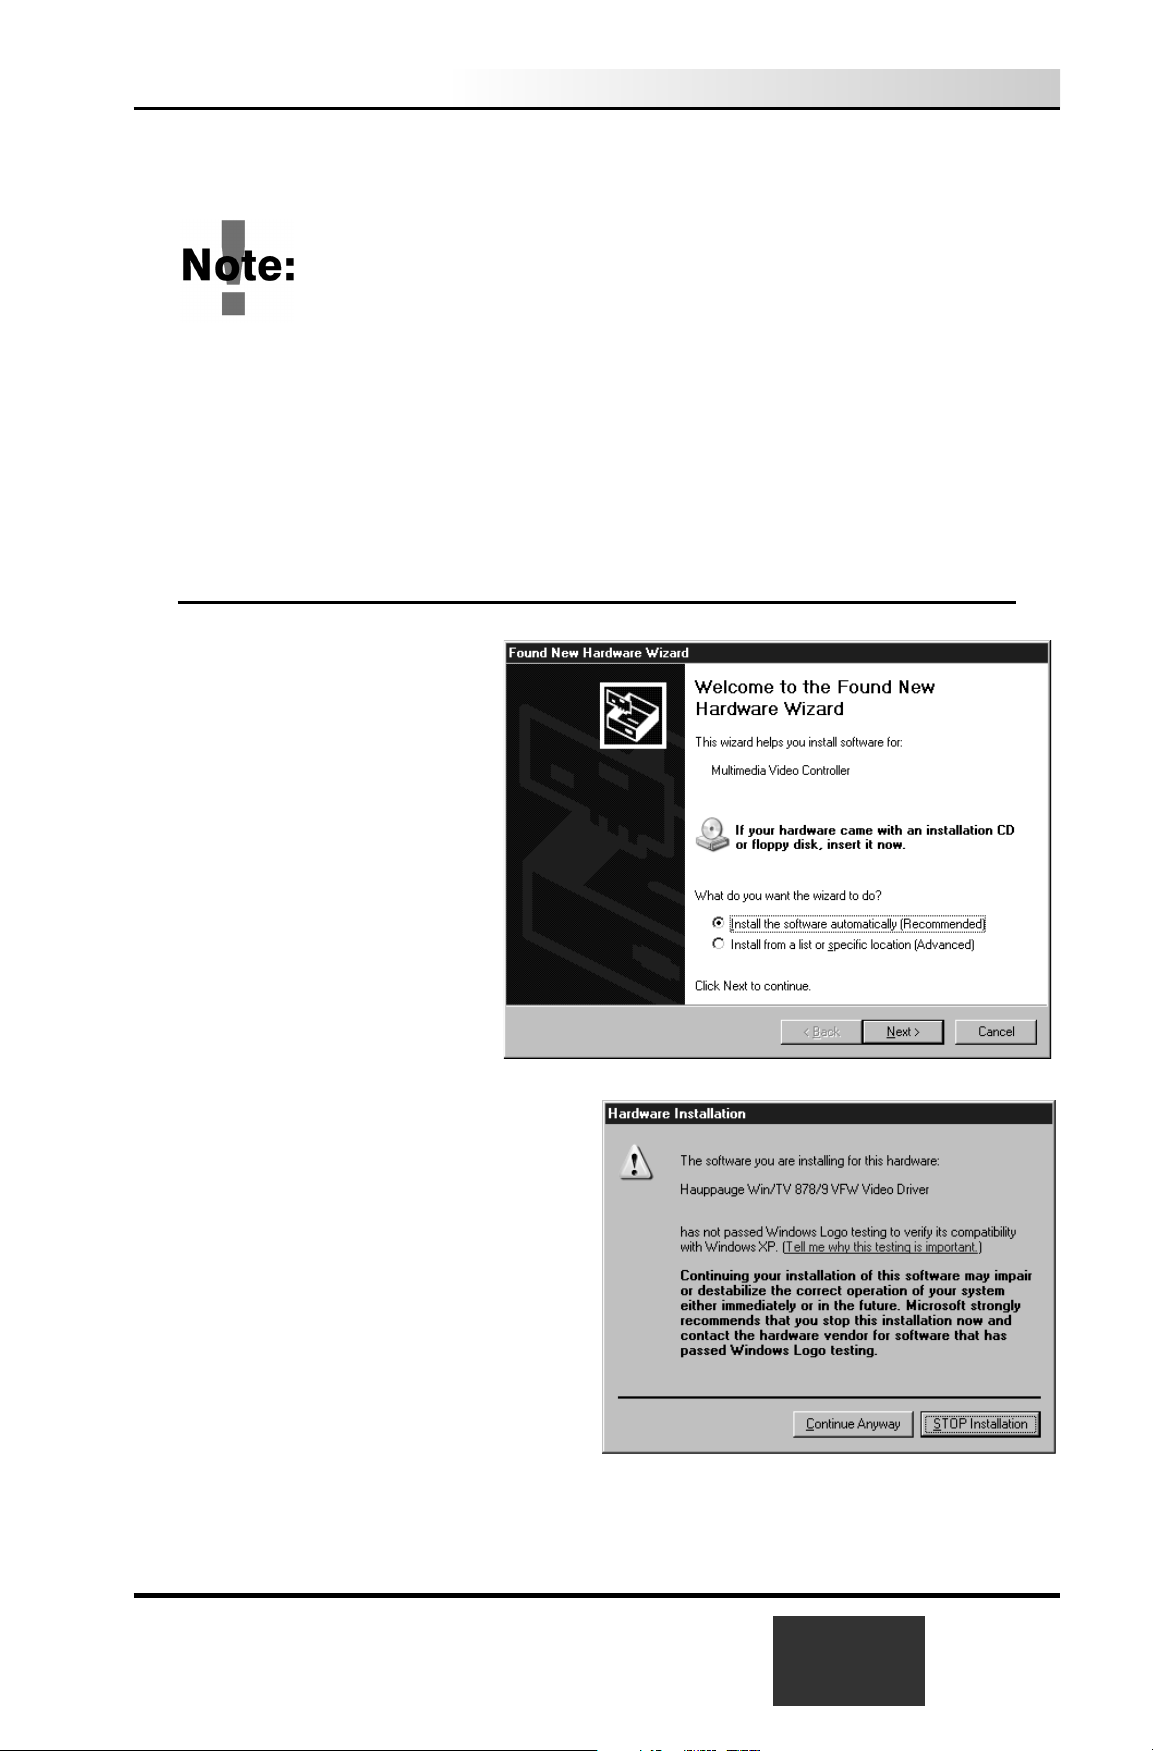
Installing the WinTV driver under WindowsXP
When the Found New
Hardware Wizard
appears,
insert the WinTV
Installation CD-ROM
in
your PC’s CD-ROM drive
and make sure
Install the
software automatically
(Recommended)
is
checked.
Then click NEXT.
If the Hardware Installation dialog
box opens, click
Continue Anyway.
WinTV Installation and Reference Manual
1-3

Click Finish.
After the video driver is
installed, the Found New
Hardware Wizard will detect
the WinTV audio driver.
Click
Next, then Continue anyway
and then Finish to complete the audio
driver installation.
Primary Surface
It is sometimes useful to force WinTV to use a mode of operation of your
VGA card known as Primary Surface mode. This can be helpful in
eliminating VGA compatibility problems.
To force WinTV to use
Primary Surface mode, run the program "PRI-
MARY"
, which is installed with the WinTV application. Click Start/
Programs and then WinTV. Double click on Primary.EXE. Click on Force
1-4
WinTV Installation and Reference Manual

Primary then close the program by clicking on the X.
The Primary program simply makes a setting in the Windows Registry
that tells the WinTV application to always use the Primary mode of operation. This can be changed at any time to "Allow Overlay" by re-running
Primary and clicking
Allow Overlay
.
When using Primary Surface mode, you will not be
able to view live Closed Caption data overlaid on your
TV Window.
Connecting the WinTV board to a VCR, Video
Camera or Camcorder
Most VCR’s or camcorders have a female RCA jack labeled “Video
Out”. Most also have a jack labeled “Audio Out”. Most video cameras
simply have one output connection labeled "Video Out".
To connect the video to the WinTV board, use shielded video cables
(not supplied) with male RCA connectors on both ends:
- connect from the “Video Out” jack on your video camera, VCR
or camcorder to the Composite Video input jack on the
WinTV board.
Note: Some WinTV models have a yellow RCA jack on the back
panel bracket. Others have a high-quality S-Video input jack, which
requires a supplied S-Video to Composite video adapter to connect
to your camcorder.
To connect the audio from your VCR or camcorder to the WinTV, use a
1/8” stereo minijack extension cable (1/8” male minijacks on each end)
and:
- connect the “Audio Output” 1/8” minijack on the VCR or camcorder
to the Audio LineIn jack on the WinTV board.
Note: Some camcorders use RCA connectors instead of 1/8” mini-
jacks to connect the audio. If so, you will need an female RCA to
1/8” minijack adapter. These adapters can be found at most Radio
Shack stores.
WinTV Installation and Reference Manual
1-5

Connecting the WinTV board to a Sound Card
The WinTV board's audio output should be connected to a sound card
using the supplied Audio Cable
:
- plug one end of the Audio Cable into the jack marked LineOut
(Audio Line Out jack) on the back panel bracket of the WinTV
board
- plug the other end of the Audio Cable into your soundcard’s
LineIn jack.
Most sound cards have three round jacks on the outside of the PC. They are: Microphone Input, Audio
Output and Line Input. The Audio Output would go to
your speakers, while the Microphone input might go to a microphone (if you are using one). The LineIn jack is normally a blue
connector, and is indicated on the sound card by the words IN or
LineIn stamped into the metal bracket on the outside of your PC.
This is where you would plug your WinTV Audio Cable.
Adjusting the Audio Volume
Once the audio cable is connected to your Sound Card, the WinTV
application can change the audio volume coming from the WinTV
board by adjusting the LineInput sound volume of the
VolumeControl program in Windows.
The VolumeControl program is normally installed with Windows or
by the sound card installation program, and allows the control of volume from the various sound sources. If you cannot hear sound when
running the WinTV application, you might need to check the volume
level of LineInput in VolumeControl
.
The VolumeControl application is started by clicking either:
Programs/Accessories/Multimedia/VolumeControl
or
Start/Programs/Accessories/Entertainment/VolumeControl
1-6
WinTV Installation and Reference Manual
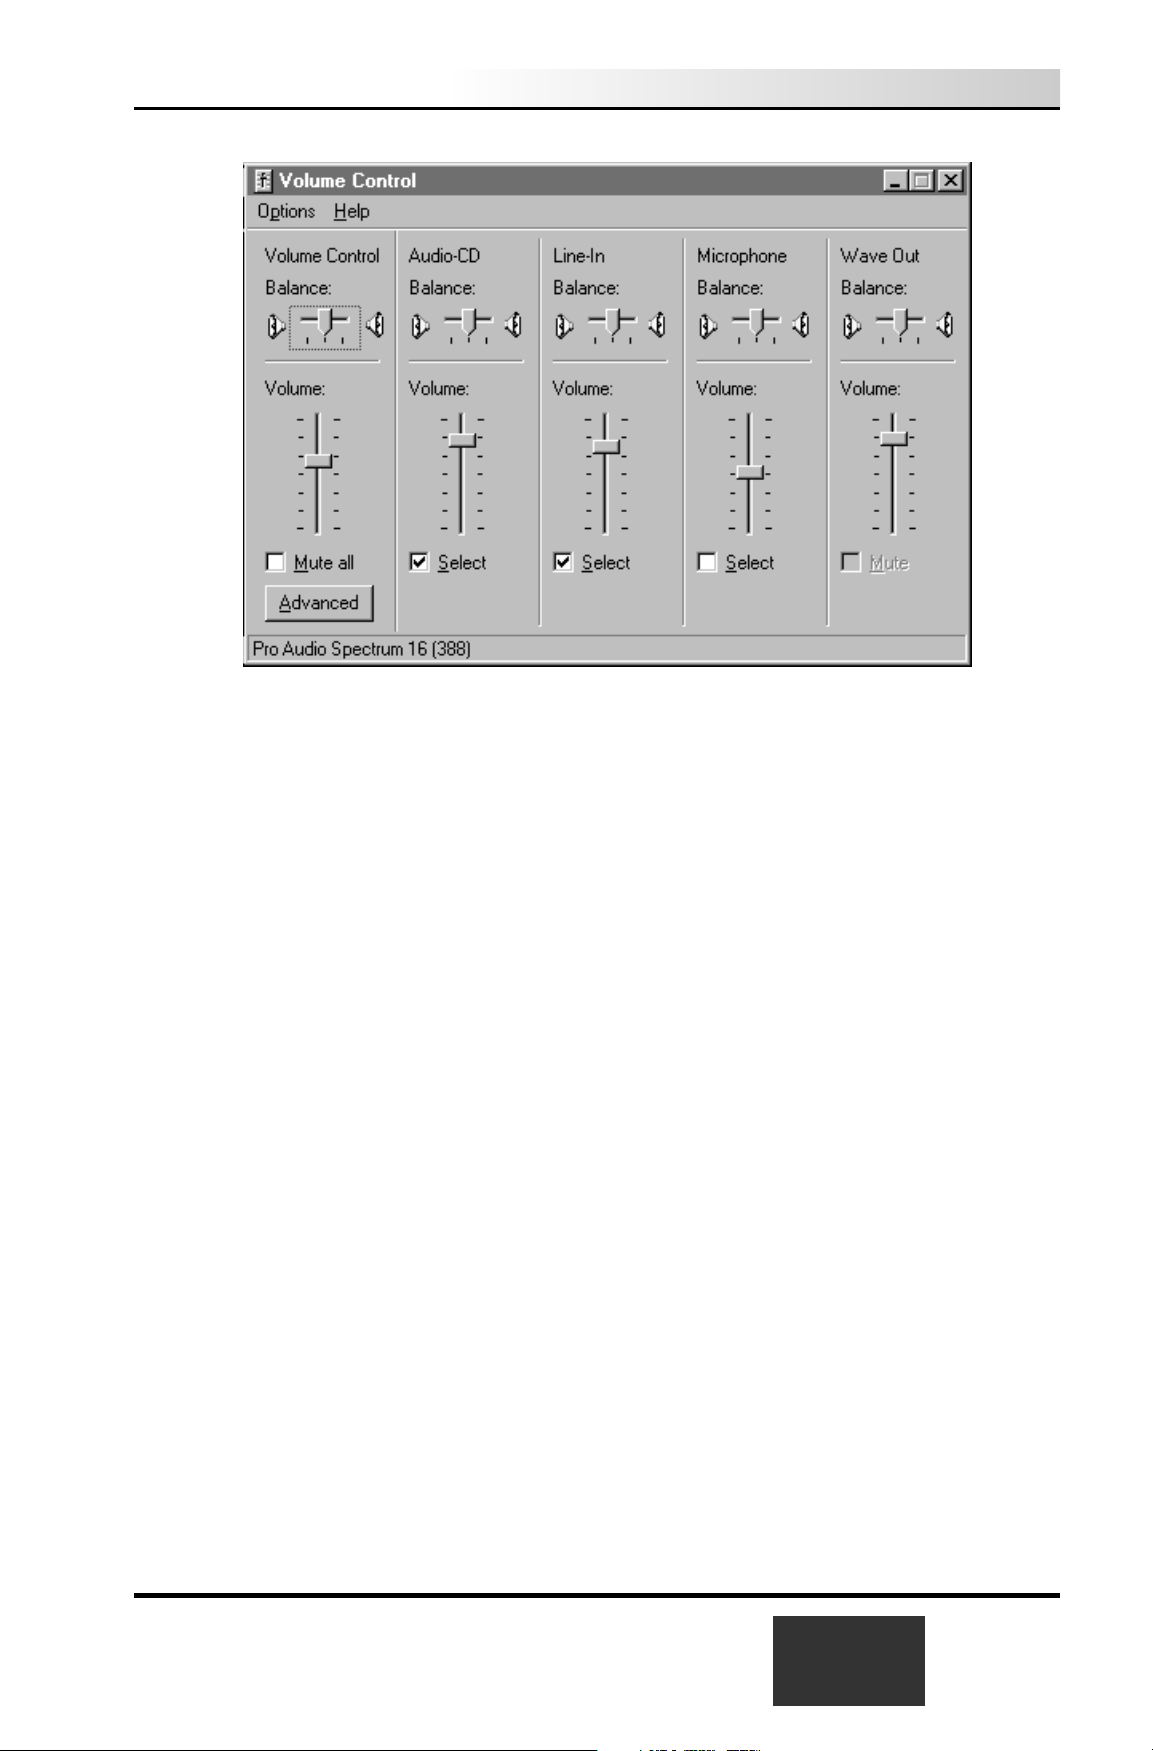
If LineIn is muted, unmute it to hear audio from the WinTV.
You should see Line-In balance as one of the selections. If not, then
click on Options/Properties and under Show the following vol-
ume controls check Line-In. Then click OK.
You should now see a selection for Line-In. Make sure the Select
box is checked, then raise the volume to about 1/2 of the way to the
top. This should be a good starting point for the volume control.
In the WinTV application under the Configure/Audio menu, the Mixer
ID should be set at Line-In.
As you adjust the audio volume in the WinTV application, you should
see the slide bar in the VolumeControl window rise and fall.
WinTV Installation and Reference Manual
1-7

1-8
WinTV Installation and Reference Manual
Checking the WinTV Plug-and-Play
Setup
After the WinTV board has been installed, you can find out what memory range and interrupt have been assigned by Windows Plug-and-Play
by looking at the configuration in the Control Panel. Plug-and-Play will
not let you change the Interrupt it has assigned, but you can, if necessary, change the Memory Address chosen by Windows.
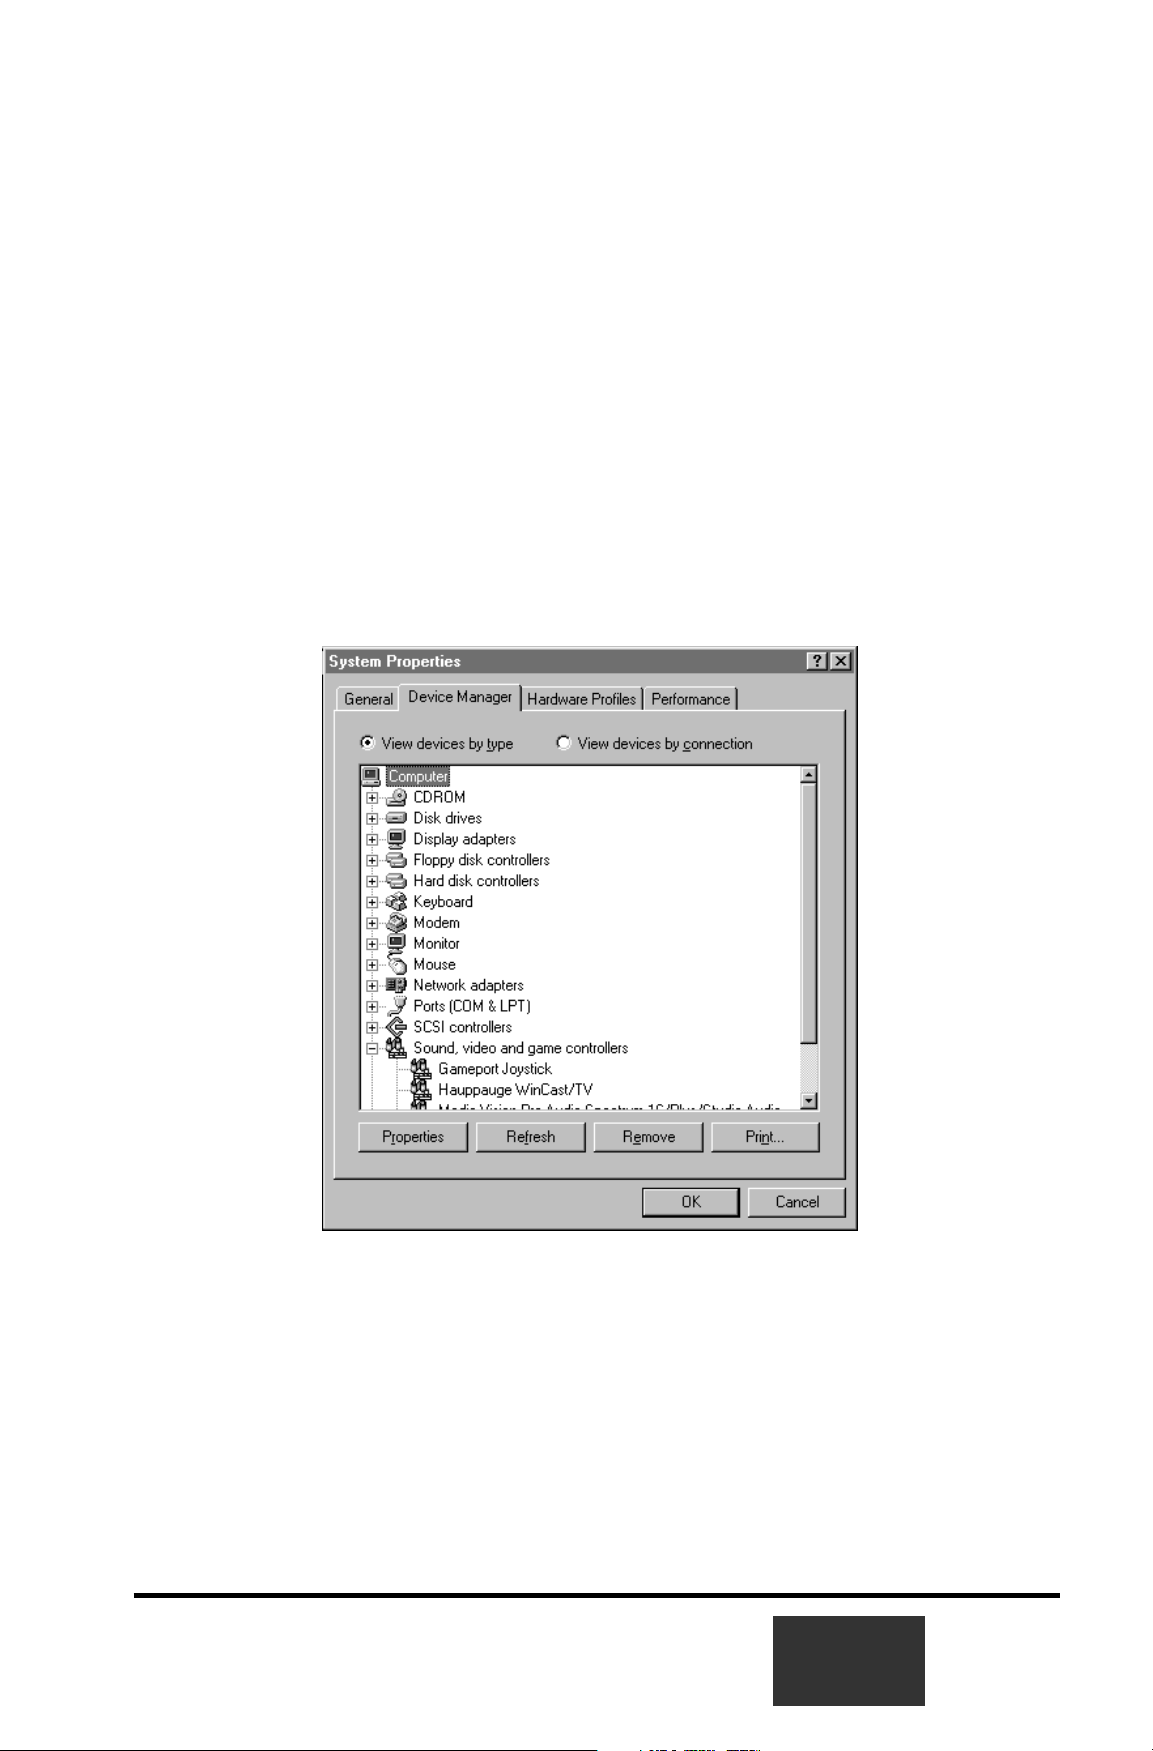
Open up
Control Panel by clicking on Start/Settings/ControlPanel.
Now open up the
System properties setup by double clicking on its
icon, then click on the Device Manager folder:
Then select Sound, video and game controllers, then click on
Hauppauge WinTV and then Properties:
2-1
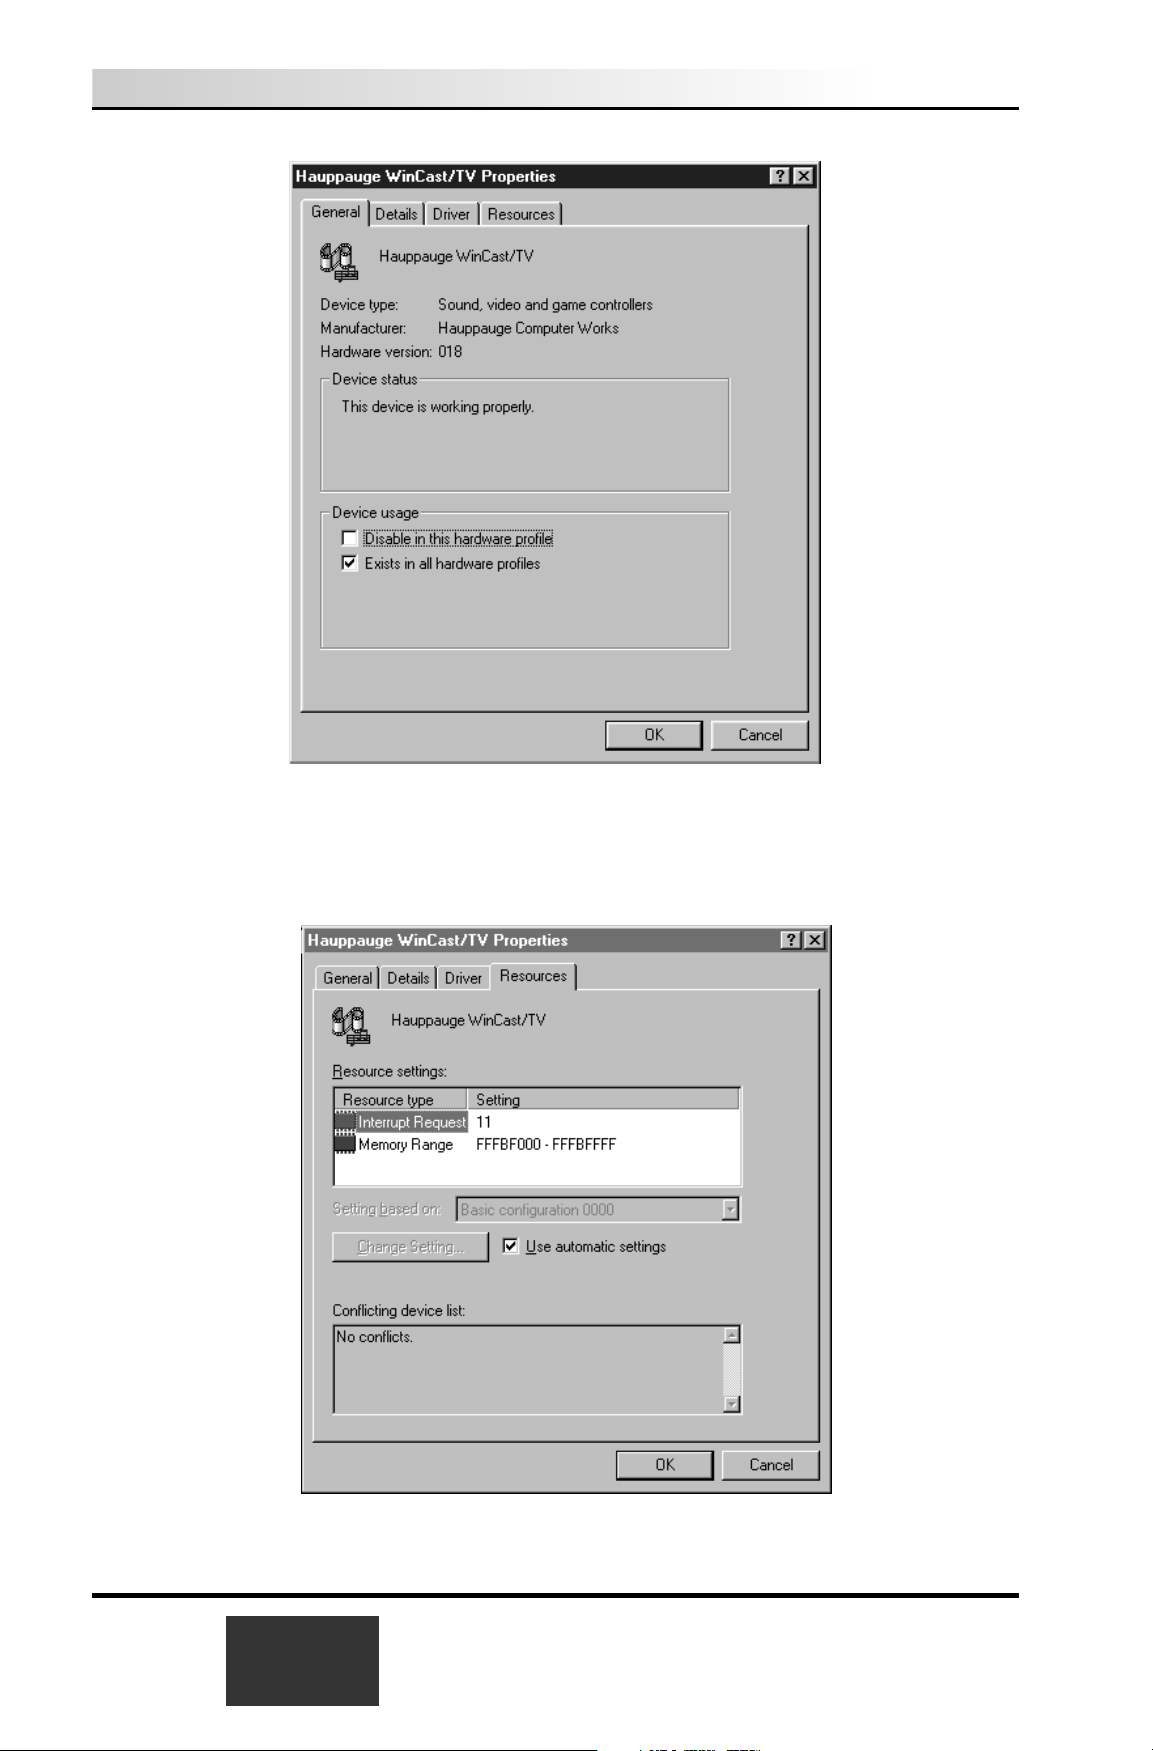
Click on Resources to see which resources Windows has assigned to
the WinTV. Remember: the Interrupt setting cannot be changed (since
it is assigned by Windows Plug-and-Play) but the Memory Address can.
To see which versions of drivers are being used, click on Drivers:
2-2
WinTV Installation and Reference Manual

Click the Details tab to see the configuration of the WinTV driver
This window will show the type of TV tuner, the serial number and revision of your WinTV board.
WinTV Installation and Reference Manual
2-3

2-4
WinTV Installation and Reference Manual

The WinTV2000 Application
To run the WinTV2000 application for watching TV and for recording videos,
double click the WinTV2000 icon.
Scanning for channels
When running WinTV for the first time, you will need to scan for your TV channels. If you are using Cable TV, in the Broadcast/Cable box select
Cable (or
Cable HRC)
. Otherwise select
Antenna
.
Choose the Video Format for your geographic region:
North America uses NTSC M
Europe uses PAL B/G
the U.K. uses PAL I
in South America, either PAL M or PAL N is used
3-1
Snap
Snapshot
Button
Freeze
video
CFG
Configure
Snapshot
Pref
Preferences
menu
Menu
Setup Menu
Always-on-top
Full screen TV
Remove toolbars
"no toolbar" mode
Minimize
Record
open the record
controls
Channel surf
Video source select
Channel down
Channel up
Previous channel
Close
WinTV
Snapshot viewer
window
Double click on
each "thumbnail" to
see image full size.
Click and hold your
right mouse button
to see image
options.
Current TV channel
or video source
Click your right mouse
button here to see the
channel selector
Remove toolbars
Click your right mouse button in the TV
window to remove toolbars.
Click again to restore toolbars.
RC: Software remote control
One Touch
Record

Then click Start to start the channel scan.
Setting up the channels
After you have scanned for channels, you can add channel names and fine tune
for better reception. To do this, click the
Menu button on WinTV2000, then click
Suite Manager. You can also click and hold your right mouse button,
then click
SuiteManager.
Click on the
desired channel, then Edit. Change the ChannelName to the
name of the station, change the description or fine tune. Then click
OK.
New features on the WinTV2000 application
Selecting an External Video source (VCR
, camcorder, etc.)
Click the green Video source select button to select TV, Composite and SVideo sources. The video sources will use the TV standard chosen when you
scanned for your TV channels (NTSC or PAL).
Rescanning for channels
Click the Menu button and click on Suite Manager and then Auto scan.
Make sure you select cable or antenna in Broadcast / cable. Choose the correct Video format for your region and then click
Scan.
Displaying TV full screen
When you click the Full screen TV button, TV will appear full screen. When
finished watching TV full screen, click your
right mouse button in the TV win-
dow.
If you see video with a black box around it, click the
Pref button then click TV
mode tab
. Check the box which says "Allow resolution change".
"Always-on-
Top" mode:
With Always on Top, the WinTV window can always be visible on your Windows
desktop. To turn on Always-on-Top, simply click the
Always-on-top button. It
will turn green. To turn off Always on Top, click this button again.
A convenient way to use Always-on-Top is to make the TV window in the no-title
mode small, and to make the TV window in the title mode larger. Then you can
switch very quick from a small window to a larger one simply by clicking the
right mouse button.
Menu button
Click the Menu button to open the TV Setup menu. Here is the main control
for TV channels, and duplicate controls for other functions:
3-2
WinTV Installation and Reference Manual

Suite Manager: configure the TV tuner (scanning, naming, fine tuning, etc.),
setting up 'favorite channel lists' and set an external A/V source to a TV
channel.
Configuration: duplicate configuration menus for color, audio, MPEG set-
tings, etc.
View: for setting the TV window size
Pref button
Click the Pref button to open the Preferences menu. You will have tabs for:
View: these are the settings for the On Screen Display of the TV channel and
Audio Volume, where you can enable Close Captions, plus controls for
the Toolbar mode (Title mode), NoToolbar mode (No Title) and Full
Screen (TV mode).
Movies: here is where you configure the video and audio settings for SoftPVR.
You can set the movie record directory (DVCR Record File Path), the
MPEG Quality settings, and the Audio setings.
Snap Shot: set the size of captured images plus single or two field captures.
Audio: your audio settings are configured here.
Color: adjust the color of your TV picture here.
T
o hide the WinTV toolbar:
Simply click your right mouse button in the WinTV’s video window for the notitle mode. To restore the toolbars (the title mode), once again click
your
right mouse button
in the WinTV’s video window. You can set the size of the
window differently in each mode.
Recording MPEG video with SoftPVR™
Note: The following functions are not currently enabled with SoftPVR: the OTP
and Pause buttons, plus the Fast Forward and Rewind functions.
WinTV Installation and Reference Manual
3-3

Note: a Pentium III 800MHz minimum system is recommended for best SoftPVR
operation.
To start recording, either click the
OTR (One Touch Record) or the red
Record button on WinTV2000. You can also start a recording by using WinTV
Scheduler.
To stop recording, click
Stop. To close the recording controls, click the TV
mode
button.
If you click OTR more than once, a record timer will be set and the record
timer will be set 15 minutes for each time the OTR button is clicked. For example, if you click the OTR button 3 times, the WinTV will record for 30 minutes.
The recorded video file is saved in the DVCR Recorded File Path directory. To
set this directory, click the
PREF button (Preferences menu), then the Movies
tab. In DVCR Record Path set the directory for your recordings.
Record Button:
Clicking the Record button will automatically
generate a file name and start recording your audio/video program. Everytime you record a file, a new file is automatically created
and the file name is displayed in the record window. The file name
has the format
channel/date/time. For example:
ANT_21_20050927_153807 where ANT_21 is antenna channel 21,
20050927 is the date 09/27/2005 and 153807 is the 15th hour, 38th
minute and 07 second.
While recording:
- Live video continues to play in the WinTV window
- The Counter will display the length of your recording in hours:minutes:seconds
- If you had started recording with the OTR button, and had clicked it
more than once, the total time for the recording will also be
displayed. You can also click OTR after a record has been started, and
the record timer will be set.
Click the Stop button to stop your recording. The recorded audio/video
file is then saved to disk using the automatically assigned file name. The
Time counter is reset to 00:00:00 after the recording is saved.
Play Button: Clicking the Play button will playback from disk
the last video file created. With SoftPVR, you can only Play and
Pause your videos.
3-4
WinTV Installation and Reference Manual

File Button: Clicking the File button opens the File menu. The
last file recorded is listed in the File name box. In the File menu
you can: Rename your recorded video file, Play a video file previously recorded, Delete recorded video files.
If you have problems with audio:
If you find that there is no audio while playing your video recordings, this is
often due to the sound card not being setup to record audio from its 'Line-in'
socket. To enable audio recording, open the Recording Control panel by click-
ing
Start / Run and then SNDVOL32 /REC. This will open the Recording
Control panel. Make sure that 'Line-in' is enabled (this is sometimes called 'Line'
or 'Aux').
Installing the IR Remote
Note: the IR remote control is found only on some WinTV models.
Note: Before installing the IR Remote for WinTV, make sure that the WinTV
application and radio application (only for the WinTV card with FM radio tuner)
work properly when using your mouse or keyboard.
To install the WinTV IR Remote hardware:
- turn off your computer. Plug the sub-mini jack at the end of the
IR
Receiver cable
into the Remote control (IR) receiver socket of
the WinTV card.
- place the
IR Receiver on your desktop so that the infrared light from
the IR Remote transmitter can reach the IR Receiver.
- turn on your computer.
- If you have previously installed the WinTV applications, the IR software should automatically run every time you reboot your PC. You
will see the
WinTV Remote icon in the Device Tray. If not, look in
the IR32 directory of the WinTV Installation CD-ROM version 2.2
or later. Run
IR32.EXE from this directory. The install procedure will
add a shortcut to IR.EXE to the Startup group, so that IR.EXE is
loaded every time after Windows has booted.
Checking the function of WinTV’s IR Remote
When your PC is booted, the WinTV’s Remote software is automatically
launched. You will see a Remote icon in the device tray. Point the Remote
transmitter at the IR Remote receiver. When you click the TV button on
the Remote transmitter, after 3-4 seconds the Remote icon should flash,
WinTV Installation and Reference Manual
3-5

indicating that the Remote application is running and then the WinTV application will be run.
WinTV remote control for SoftPVR™
Remote control buttons when watching live TV
0 - 9 buttons: channel numbers.
Full button: makes WinTV go full screen. Clicking the Full button again brings
WinTV into a window.
Record button: opens the SoftPVR tray.
3-6
WinTV Installation and Reference Manual
Application
on/off
0 - 9
“Quick
Skip”
buttons
Audio mute
Menu
Channel
up/dn
Volume
up/dn
Fast
forward
Fast
rewind
Stop
Pause
Play
Skip
ahead
Skip
back
Go button
Record
Go buttonPower button
0 - 9
buttons
Menu
button
Fast
rewind
Record
Play
Fast
forward
Stop
Skip
back
Skip
ahead
Pause
New style Hauppauge
remote control
Old style Hauppauge
remote control

Remote control buttons when playing video recordings
Skip ahead button: skips ahead in the video 30 seconds per click. Holding
the skip ahead button will autorepeat, and advances the video about 5 minutes
per 10 seconds the button is depressed.
Skip back button: skips back 30 seconds per click. pressing and holding
the Skip back button makes the video go back about 5 minutes for 10 seconds
the button is depressed.
Go button: brings up the WinTV task list. Allows you to start WinTV2000,
WinTV32 or WinTV-radio.
Menu button: brings up the Windows Task list. Use the left and right arrows
to change to other Widnows tasks.
Green power button: will turn off the WinTV application
0 - 9 buttons: When playing back a recording, the “1” button will skip to 10%,
the “2” button 20%, etc. of the length of the recording.
WinTV Installation and Reference Manual
3-7

3-8
WinTV Installation and Reference Manual

Teletext Data Reception using VTPlus
(European WinTV boards
)
Teletext is used in Europe and other parts of the world to transmit digital
data along with a television picture. Teletext data is transmitted in an
invisible part of the TV picture called the "Vertical Blanking Interval" or
VBI.
Teletext data is normally formatted into pages. A master index is also
transmitted which lists the various categories that can be received, and
which Teletext page they are being transmitted on. Teletext data must
be inserted into the VBI by your TV broadcaster, and can only be
received on the Win/TV boards if the Hauppauge Teletext decoder is
installed.
An example of a Teletext page follows. Each Teletext page has a page
number, a date and the current time in the right hand corner:
VTPlus for Win/TV is a sophisticated Teletext software application which
runs exclusively on the Hauppauge Win/TV card. VTPlus allows you to
view multiple Teletext pages, save or print Teletext pages and create
Dynamic Data Links so that Teletext data can be used in other Windows
applications. The Win/TV application does not have to be active while
4-1

the VTPlus Teletext application is running.
Installation of the VTPlus software
If the VTPlus application is provided on CD-ROM, then it will automatically be installed from the WinTV Installation CD-ROM.
If it is provided on diskette, click on the Start button, then Run and
then type: A:\VTSETUP.EXE The program will install in the default directory c:\VTPLUS. The installation creates a group headed VTPlus for
Win/TV
and three icons will be created. The main icons are:
VTPlus program: VTPlus On line help:
VTPlus window
4-2
WinTV Installation and Reference Manual

VTPlus toolbar
1. Reception indicator: when this symbol is red, your requested
page is being received.
2. Script: shortcut for Options/Script. See Help for information on
programming the Script.
3. Select previous Subpage: indicates, when dark, that there are
subpages before the current subpage. When a light grey, there are
no subpages before the current page.
4. Select next Subpage: indicates, when dark, that there are sub-
pages after the current subpage. When light grey, there are no subpages after the current page. For example, if the current page is
100 and there are no subpages in page 100, the Select next
Subpage icon will be light grey.
5. Reveal button: shortcut for Show/HiddenCharacters. When
you use this button you might see hidden text, such as VPS time
codes or answers from a Quiz.
Reveal invisible text
Current Teletext service
Current page number
Center Teletext page
TOP text selectSelect TV channel
Set Time/Date
Next Subpage
Previous Subpage
Script
Reception indicator
WinTV Installation and Reference Manual
4-3

6. Arrange in Center: shortcut for Window/ArrangeInCenter.
When you click on this button, the actual page will be positioned
full size in the center of the Window. The centralized page will return
to its original position as something else is activated.
7. Channel Selection: shortcut for Options/Change TV
Station.
8. Toptext window: shortcut for
Toptext/ToptextWindowVisible. When you click the TOP button, the Toptext window will appear. Toptext is also being received
with invisible Windows. Toptext is a protocol being used in Germany
by TV stations like ZDF/ARD to help the user get a clear, fast
overview of the available information being transmitted and to give
the user fast access to this transmitted information.
9. Set System Clock: shortcut for Options/SetSystemClock.
Click on this button with your mouse and the received Time from
the Teletext channel will be used by the System clock of your PC.
Setting up VTPlus TV channels
By double clicking on the VTPlus for Win/TV icon, the VTPlus
Teletext application will be launched. The channels that have been previously tuned in by the Win/TV application now have to be selected for
VTPlus. To do this, select Options/ChangeTVstation:
A menu will pop up called Setup TV stations. Now select all the sta-
4-4
WinTV Installation and Reference Manual

tions required and click use in VTPlus box for each station desired.
Up to three letters can be used as the channel ID, to allow you to identify which channel you are viewing.
Quickselect Teletext pages
By using the Ctrl+N key a Create and Receive page pops up requesting a page number. Type the requested page number. If this page is to
be received continuously (every time the page is received, the page is
automatically updated), click the Update Continuously box.
Many Teletext pages have a reference to other pages. For example, the
TV guide section has a number of page referrals to movie background
information which is being transmitted in other pages. Quickselect
allows you to select these pages directly. Double click the left mouse
button on the desired page number in the current Teletext page, and a
new Window appears with the selected page.
If you do not want to open a new Window, but simply change to the new
page, push the Shift-Key while double-clicking on the page number in
the current Teletext page, and the new selected page will appear in the
original window.
With Quickselect, several pages can be called at once. If a Teletext page
refers to a page sequence such as “Share Prices: 500-505”, mark the
first page number with a single mouse click, click a page number and
start the reception with a left Doubleclick on the end page. The distance
between the selected pages may not be more than 11.
Example: “News from Page 300-303” are selected with by a single
click on 300 and a Doubleclick on 303. The multiple page reception will
open individual windows for each of the pages within the selected page
numbers.
Dynamic Data Exchange with Teletext
DDE links can be created between the Teletext pages and any Windows
program supporting DDE. Programs supporting a live DDE link from a
Teletext page include the Microsoft EXCEL spreadsheet and Microsoft
WORD.
To create a link, use your mouse to highlight the section of the Teletext
WinTV Installation and Reference Manual
4-5

page of interest. For example, if the current Teletext page has financial
data, highlight with the mouse the financial item of interest by click on
the beginning of the field on the Teletext page, holding your mouse button down, and releasing the mouse button at the end of the field.
Then click on Edit/Copy option from the Edit menu and click the left
button mouse. The information is now in the PC memory. To create a
link to the DDE supported applications (such as your spreadsheet),
select “edit past link” in your application. VTPlus will now create a direct
link to your program.
When the data changes in the selected field on the Teletext page,
VTPlus will deliver the data automatically to your DDE supported program. Updates through the DDE occur when all subpages are being
received and at every update, when the option Update
Continuously is marked.
4-6
WinTV Installation and Reference Manual

Using the WinTV-radio Application
(on boards equipped with FM radio)
If you have purchased the WinTV-radio board, in addition to watching
TV you can also tune in radio stations on the FM band.
The WinTV-radio board has two aerial inputs, one for TV and one for FM
radio. If your TV antenna (or cable TV network) carries both TV and FM
radio, you can connect to the TV antenna connector only:
Running the WinTV-radio application
Click on Start / Programs / WinTV and then Radio to run the radio
application.
The WinTV-radio window
Note: Radio cannot be hooked up to the cable TV source. It must use
either a supplied FM antenna or a digital FM antenna.
5-1

Using the WinTV-radio Buttons
Volume: The audio volume is adjusted by setting the LineIn level
in the Volume Control applet.
Tune: Fine tune the current radio channel.
Seek: Search for the next active FM radio channel.
Mem: Sets a FM radio channel preset. To assign the current
station to a preset, click on Mem and then on one of the Preset but-
tons (1-10).
Mute: Turn off the sound.
Mono: Force mono reception.
Scan: Searches for new stations until you click on Stop. Click
the RIGHT mouse button anywhere on the WinTV-radio window to
set the Scan mode.
Min: Minimizes the WinTV-radio window.
CD: Starts the Audio CD-Player for playing back
Audio-CD´s.
TV: Closes the radio application and starts the WinTV appli-
cation.
OFF: Closes the radio application.
1 - 10: Preset 1 - 10
Programming the Presets
To assign a radio station to a special Preset button do the following:
1. Tune in the desired station with the Seek button (or by using Tune).
2. Click on the Mem button. It will change to red.
3. Click on one of the Preset buttons (1-10).
Using the right Mouse button
When you click the RIGHT mouse button in the WinTV-radio window,
this menu comes up:
5-2
WinTV Installation and Reference Manual

1. Scan Mode: Presets - When Presets is chosen and the Scan
button is clicked, WinTV-radio tunes in only the stations which are
assigned to the Preset buttons.
2. Scan Mode: All - When All is chosen and the Scan button is
clicked, WinTV-radio tunes in all radio stations.
3. Frequencies - A list of all frequencies assigned to the preset but-
tons is shown.
4. Tool Tips - Turn on/off bubble help.
5. Minimize - Minimizes the WinTV-radio application window.
WinTV Installation and Reference Manual
5-3

5-4
WinTV Installation and Reference Manual

How WinTV Works
How WinTV displays Video-in-a-Window
To display live video on your PC monitor, the WinTV boards use a technique called PCI Push. With this technique, the live video is digitized
by the WinTV
board and then moved over the PCI bus into the
memory of your VGA display adapter. Here are the steps in getting
live TV onto your VGA screen:
- the TV Tuner is controlled by software to tune to a specified TV
channel. It takes a modulated television broadcast signal and turns
it into demodulated video and audio signals.
- the demodulated video from the TV tuner goes into the 848,
871 or 881 Video Digitizer chip, where it is converted into a
digital form using YUV 4:2:2 sampling. This is a high quality sampling format which results in resolution equivalent to 24-bits of RGB
per video pixel.
- the demodulated audio goes into an on-board audio switcher.
WinTV’s audio switcher can receive audio from the TV tuner or the
Audio Input Jacks (Left, Right). The output of this audio switcher
goes to both the Audio Out Jack (Line Out) and the CD-audio
passthrough connector for connection to a sound card.
- the Video Digitizer chip is also a PCI-bus Master device.
After the video pixels are digitized, it “pushes” them over the PCI
bus into the memory of your PC’s VGA display adapter. It does this
without requiring your PC’s processor to do any work, therefore live
video can be displayed in a window on your VGA screen without
slowing down your PC.
Video Overlay mode of operation
Live TV can be displayed on your VGA screen by using either the
Video
Overlay
or the Primary Surface mode. The mode which is used is
dependent upon your PC’s hardware and software. If your VGA has
enough display memory to hold the digitized video image, then WinTV’s
Video Digitizer “pushes” YUV 4:2:2 video pixels for temporary storage
into an off-screen part of the VGA memory called a Secondary Surface.
This method is called Video Overlay. The VGA display adapter will then
convert the video image from YUV 4:2:2 into RGB video and continu-
6-1

ously overlay the VGA screen with the video image. Using Video
Overlay, the VGA controller treats the live TV image just like any other
window, which results in a 24-bit video image on your VGA screen. You
will also be able to display full screen TV at all VGA resolutions.
Primary Surface mode of operation
If your VGA display adapter but does not have either a Video Port or
enough memory to hold the video image off-screen, then the WinTV
board converts the YUV 4:2:2 video pixels into an RGB format which is
compatible with your VGA display adapter’s operating mode (8 bits per
pixel, 16 bits per pixel or 24-bits per pixel), and then moves the pixels
directly into the display memory or Primary Surface of your VGA.
This results in a high quality video image whose color depth is dependent upon your VGA display adapter’s operating mode. For example,
your TV image when running in a 256 color mode will not be as good as
when running your VGA in 16-bit per pixel mode.
Also, because the video is moved directly onto the Primary Surface, features such as close captioning and full-screen TV in resolutions greater
than 640x480 will be disabled.
6-2
WinTV Installation and Reference Manual

Troubleshooting
This chapter includes troubleshooting help for solving common problems.
Trouble shooting the WinTV driver
Error message: “No memory available” after running the
WinTV application or “WinTV card not installed or drivers
not loaded”
Sometimes, during the installation of the WinTV driver (see chapter 2
and the New Hardware Found menu) you do not answer all of the
questions correctly and the WinTV driver does not get correctly
installed.
In this case you might find the WinTV listed in? Other Devices. To
delete this driver, highlight PCI Multimedia Video device and then
click on Remove.
Then browse the Hauppauge WinTV installation CD-Rom, open the
folder Win98, and run VFW95/98.exe file.
7-1

Problem: Poor TV picture quality
A poor TV image could be caused if your VGA display adapter does not
have enough video RAM to hold the TV image. In this case, WinTV
resorts to Primary Surface mode, which lowers image quality. A memory
upgrade on your VGA display adapter might fix this problem.
Problem: TV picture displays a blue screen
The TV picture might display a blue screen under the following conditions:
Momentary loss of signal
A weak video signal
Channel changing
A scrambled channel
Changing channels may cause a temporary blue screen. To fix
the problem, switch the channel up or down, then return to the
original channel.
The audio might continue to broadcast, even though the video picture displays a
blue screen. This indicates a strong audio signal and a weak video signal.
A scrambled channel is not a valid channel.
7-2
WinTV Installation and Reference Manual

Updating the WinTV driver
From time to time, there might be a new WinTV driver which is an
improvement over the existing driver. Driver updates can be downloaded from the Hauppauge Internet Web site (see the front page of this
manual for the URL).
The WinTV update is combined with the driver uninstaller and the
driver installer. Once you have downloaded the updated WinTV driver, you can install the update simply by running the downloaded
program. You will see the following message:
Click Next.
8-1

Click Next.
The WinTV Update program now uninstalls the existing WinTV dri-
ver, then copies a number of files to your hard disk:
After the WinTV Driver installation program has copied all of the files
over to your disk drive, you will be asked to reboot:
Click OK to reboot your PC.
8-2
WinTV Installation and Reference Manual

After rebooting Windows, an automatic installation of the new
WinTV driver takes place. You will see the New hardware
Found message, followed by the WinTV Inspection program
and the WinTV Direct Draw Check program.
After installing a new WinTV driver, it is advisable to install the latest
WinTV applications, including the WinTV32, the WinTV-radio and
IR remote control applications (if your WinTV board has these
features).
Removing the WinTV driver with HCWCLEAR
On occasion, it might be necessary to remove all traces of the
WinTV driver on your PC’s hard disk. To do this, there is a program
on the WinTV Installation CD-ROM called HCWCLEAR.
Before running HCWCLEAR, you must manually stop the WINTV IR
Remote Control application. This can be done by double clicking
on the IR icon in the Windows toolbar, and clicking on Stop.
The HCWCLEAR application can be found in the MISC/UTILITY
directory:
Once you have stopped the IR application, run HCWCLEAR by double clicking on its icon:
WinTV Installation and Reference Manual
8-3

Click OK.
You will then see the following message:
Click Yes .
If there are any errors which come up during the running of HCWCLEAR, then it means that there is an application running which is using
the WinTV drivers. For example, if you see the following error:
it means that one of the WinTV driver files in use (in this case it is the IR
remote driver). You can either ignore the error, or can can double check
to make sure there are no applications running in the system that might
be using the WinTV driver. In general, to make sure the re-installation is
done correctly, all applications using the WinTV driver should be
stopped before HCWCLEAR is run.
8-4
WinTV Installation and Reference Manual

Checking the WinTV
Plug-and-Play Setup
After the WinTV board has been installed, you can find out what I/O port
and interrupt has been assigned by Windows Plug-and-Play by looking
at its configuration in the Control Panel. Windows Plug-and-Play will
not let you change the Interrupt it has assigned, but you can, if necessary, change the
Memory Address selected.
Open up Control Panel by clicking on Start/Settings/ControlPanel.
Now open up the
System properties setup by double clicking on its
icon, then click on the Device Manager folder. Then click on Sound,
video and game controllers:
then click on Hauppauge WinTV and then Properties:
9-1

Click on Resources to see which resources Windows has assigned to
the WinTV. Remember: the Interrupt setting cannot be changed (since
it is assigned by Windows Plug-and-Play) but the Memory Address
can be changed if there is a memory conflict between the WinTV and
another board.
9-2
WinTV Installation and Reference Manual

To see which versions of drivers are being used, click on Drivers:
You can also see the hardware configuration of the WinTV by clicking
on the Details tab:
WinTV Installation and Reference Manual
9-3

This window will show the type of TV tuner, the serial number and revision of your WinTV board and other information which can be used to
help diagnose hardware problems.
9-4
WinTV Installation and Reference Manual

Technical Support
Technical support telephone
If you have questions regarding installation or compatibility, please contact our technical support staff at:
(631) 434-3197
(631) 434-3198 Fax
Service
If you should need assistance with the installation, operation, or application of your Hauppauge WinTV board, there are several options available to you. Your primary source for information and problem assistance is always your dealer. Should the need arise, contact your dealer
for on-site or repair service.
Hauppauge’s Technical Support and Customer Service staff can aid in
solving many problems. Our service department is available to repair
any Hauppauge product. For completion of repair, the product must be
returned to our factory.
If this WinTV board is not in working order, your only recourse is repair
or replacement, as described above. UNDER NO CIRCUMSTANCES
will Hauppauge be liable for consequential damages, including any lost
savings, lost profits, or any other damages, caused by the use of the
WinTV board or inability to use it, even if the dealer or Hauppauge has
been advised of such liability or other claims.
A-1

A-2
WinTV Installation and Reference Manual

B-1

B-2
WinTV Installation and Reference Manual

Using DirectX setup to install an
updated Direct Draw VGA Driver
To install an updated DirectDraw driver
An updated version of DirectX is installed automatically for Windows
users. If you would like to re-install DirectX for your VGA card, or if you
did not get a “Good News” message after the WinTV DirectDraw
Inspection was run, follow this procedure.
DirectDraw drivers for your PC’s VGA card is installed as part of the
DirectX setup. DirectX is provided on the WinTV Installation CD-
ROM in the DIRECTX directory.
To install DirectX, look in the DIRECTX directory on the WinTV
Installation CD-ROM rand double click on DXSETUP. You will then
see the following menu:
Click OK.
C-1

The DirectX setup will spend several minutes looking for drivers in your
system which can be updated. As it finds drivers, you will see messages
such as:
Click on OK.
After DirectX has updated all drivers, it will ask you to restart your
PC. Do so.
After rebooting, you can check to see if your VGA card driver has
been updated by running the DDCHECK program. Click the Start
button, then Run then type DDCHECK. Look for the “Good News”
message.
C-2
WinTV Installation and Reference Manual
 Loading...