

Hauppauge 1512 Quick Installation Manual
Overview
The Hauppauge HD PVR 2 model 1512 records video in HD from a cable or satellite set top
box, PC or video game console. There are two video recording applications which come
with HD PVR 2 model 1512. WinTV v8 is used to schedule TV recordings from a set top box.
Hauppauge Capture was designed to record video from game consoles and has a convenient one-click upload to YouTube plus includes Hauppauge’s StreamEez to stream on
Twitch and YouTube.
The software which comes with HD PVR 2 only runs on Windows PCs, but there are third
party applications which run on the Mac. Please see our website for more information.
HD PVR 2 recordings are made onto a computer’s hard drive in a compressed H.264 format. It records from HDMI or Component Video (also called YPrPb). You can also record
S-Video or composite video using and optional A/V cable (you can purchase this on the
Hauppauge Webstore). It will record at 1080p30, 720p or 480p at datarates from 1Mbit/sec
up to 13.5Mbits/sec.
N
ote: if you are recording from a cable or satellite box, it is recommended that
you use Component Video. Many cable and satellite set top boxes (though not
all) do not allow recording from the HDMI port.
Audio can be supplied to the HD PVR 2 from stereo audio connectors on the Hauppauge
AV cable, optical audio cable or HDMI. Audio can be recorded through HDMI and optical
audio as surround sound (AC3) if your video source includes surround sound audio.
There are two types of HD PVR 2 record formats:
TS: this is a native H.264 format used by WinTV v8 and Hauppauge Capture. TS files are
often used to burn Blu-ray discs. The TS files recorded with the HD PVR 2 can be edited
with Sony Vegas (all versions).
MP4: this is similar to the TS file but has an index at the beginning of the file. In the Edit
tab of Hauppauge Capture, click ‘Export to MP4’ to create an MP4 file without losing
video quality.
HD PVR 2
model 1512
Quick Installation Guide
Hauppauge Inc.
909 Motor Parkway, Hauppauge, NY 11788 USA
tel: 1-6310434-1600 • email: support@hauppauge.com
www.hauppauge.com
QI-HDPVR_1512-V2.2-ENG 10/2018
Included with HD PVR 2 model 1512
Included with HD PVR 2 model 1512:
• HD PVR 2 recorder: H.264 high definition video recorder, USB
• HDMI cable
• Hauppauge A/V adapter for Component video
• Component Video cable set to connect to your set top box
• IR blaster cable to control the channels on your set top box
• USB 2.0 cable
• 6v 1.66 amp Power Supply
• Hauppauge Capture (download)
• WinTV v8 application (download)
Using Hauppauge Capture
After restarting your PC, you will see the Hauppauge Capture icon on your Windows desktop.
Click this icon to start Hauppauge Capture. For more information on Hauppauge Capture,
how-to videos and the latest version of Hauppauge Capture, please look here:
www.hauppauge.com/capture
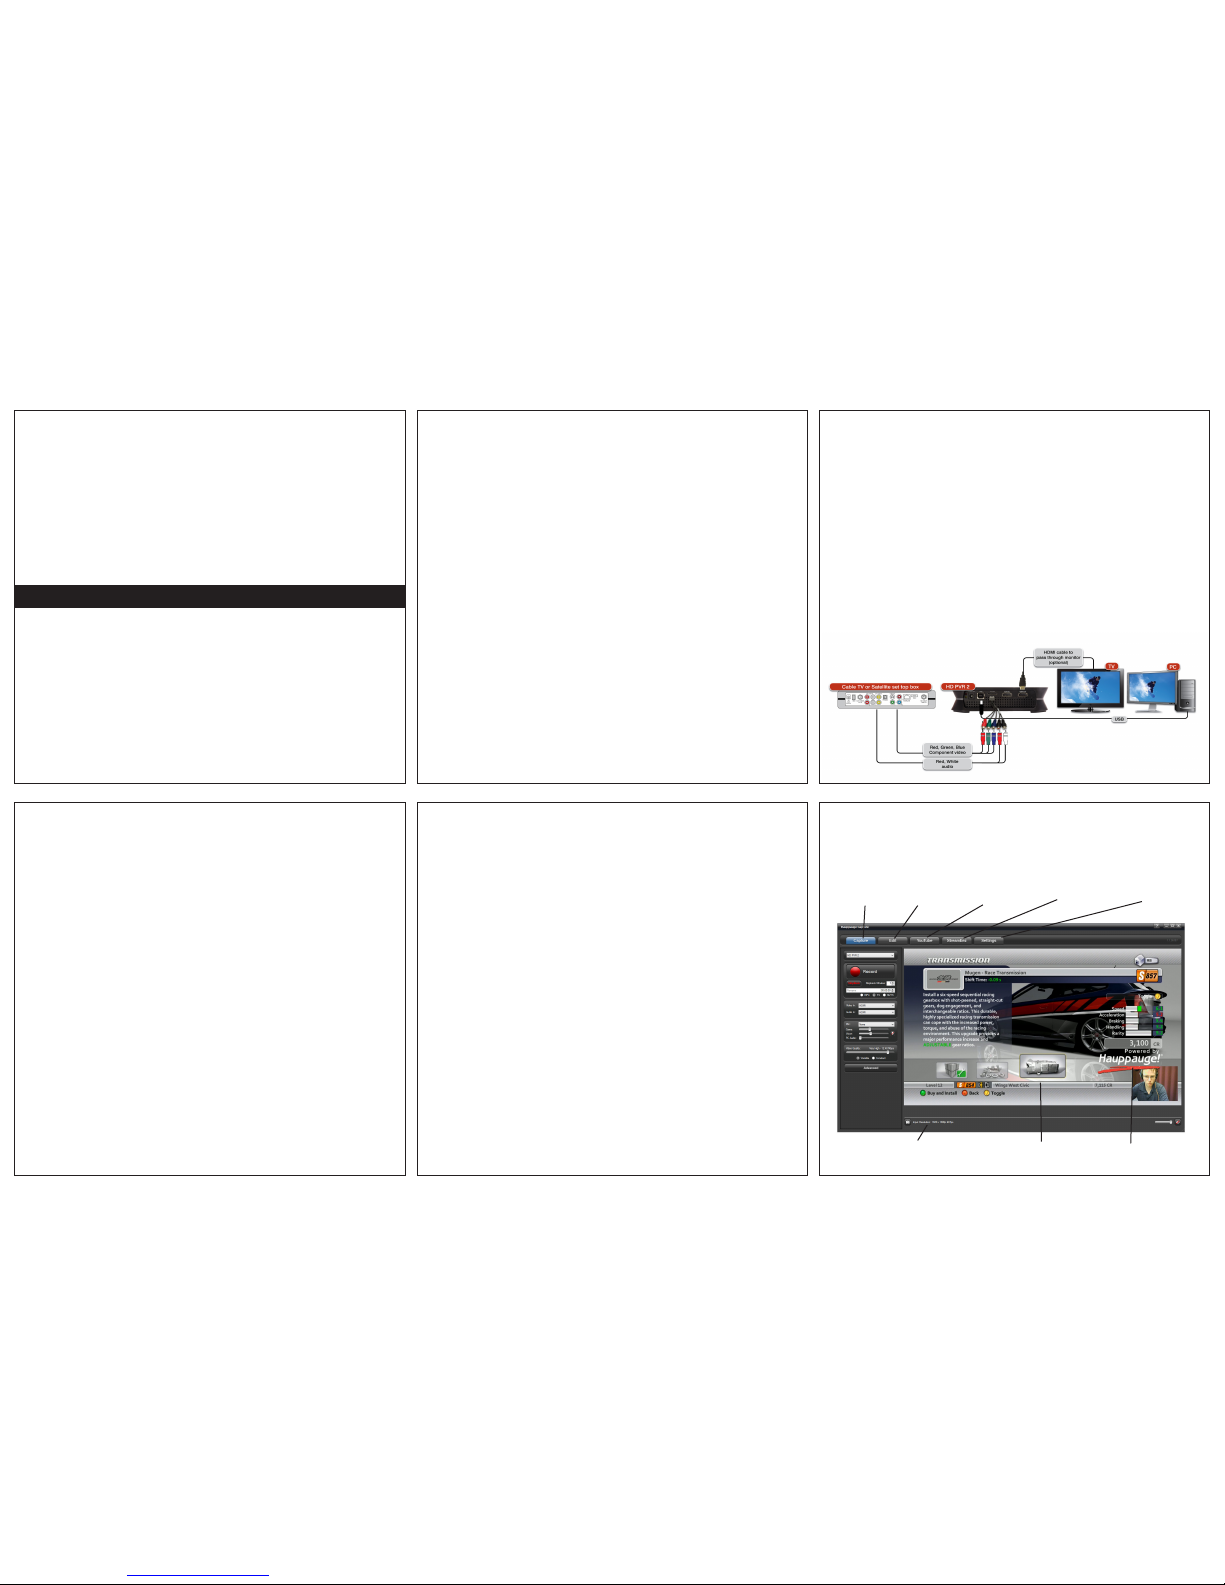
(HDMI might or might not be able to record, depending upon your TV provider). The Component Video cable set (supplied) has Red/Green/Blue video and White/Red audio con-
nectors at the end. Plug these colored cables into the corresponding Green/Blue/Red
(video) and White/Red (audio) RCA connectors of the Hauppauge A/V adapter.
Plug the Hauppauge A/V adapter into the AV In connector on the back of the HD PVR 2.
Plug the other end of the Component Video cable set into the YPrPb or Component video
output of your set top box (Red/Green/Blue connectors). Now connect the Red and White
audio connectors.
3b. HDMI connection
Connect your PC or game console to HD PVR 2 using HDMI. Plug the HDMI cable (supplied) into the HDMI out of your PC’s graphics card or your game console into the HDMI in
on the HD PVR 2.
N
ote: your PC or game console must be set to 1080p, 720p or 480p at 50 or
60Hz. Please see this page for setting up the video and audio on a PC gaming
system: www.hauppauge.com/pcsetup
Step 4: Install the HD PVR 2 Windows driver and applications
There are two applications provided with the HD PVR 2 model 1512: Hauppauge Capture
and WinTV v8.
• Hauppauge Capture is used to record, trim, upload and stream your HD video.
• WinTV v8 allows you to watch HD video in a window (or full screen) on your PC screen.
You can also record a video manually or set up a scheduled automatic recording in high
definition from a cable or satellite TV box.
For more information, please see the Hauppauge HD PVR 2 support page:
http://www.hauppauge.com/pages/support/support_hdpvr2.html
4a: Download and install Hauppauge Capture
You can find Hauppauge Capture at: www.hauppauge.com/capture
Hauppauge Capture is normally downloaded to your Downloads directory. It will be called
hauppaugecapture_1_1_zzzzz.exe where zzzzz is the version number.
Run this file to start the installation.
4b Download and install WinTV v8 application
The WinTV v8 application includes a TV scheduler which allows you to record TV programs
from a cable or satellite set top box.
Once comp lete, you will be asked to restart. Please do so.
Using WinTV v8 to watch and record TV programs from your set top box
Please go to our Internet website for instructions on the setup and use of the WinTV v8 application:
www.hauppauge.com/wintv8
Using Hauppauge Capture
After restarting your PC, you will see the Hauppauge Capture icon on your Windows desktop.
Click this icon to start Hauppauge Capture.
For more information on Hauppauge Capture, how-to videos and the latest version of Hauppauge Capture, please look here:
www.hauppauge.com/capture
Installing the HD PVR 2
Step 1: Boot into Windows on your PC
HD PVR 2 works with laptops or desktop PCs with Windows 10, 8 and 7.
Step 2: Plug the power supply and USB cable into HD PVR 2
After your PC has booted to Windows, plug the supplied Power Supply into the Power input
on HD PVR 2 . The power supply is 6V @ 1.66A.
N
ote: you will not see video on your PC screen or on your TV set until you install
the software from the HD PVR 2 Installation CD.
USB connection: Plug one end of the supplied USB cable into the HD PVR 2’s USB cable
connector. Plug the other end into your PC’s USB 2.0 and USB 3.0 port.
Step 3: Connect the HD PVR 2 audio and video cables
3a. Component Video connection
If you are using a cable or satellite set top box, you can use Component video to record
Capture:
to record videos
Edit:
trim the beginning and
end of your videos
YouTube:
to upload your videos
StreamEez:
stream your videos with
Twitch and YouTube
Settings menu:
Personal Logo setup
Facecam setup
Recording directory
Logo:
insert your logo while
recording and streaming
Preview window:
you can see your video here
Input Resolution:
this is the video resolution
of your video source
Troubleshooting
What do the lights on front of HD PVR 2 mean?
• Blue light: When HD PVR 2 is powered on and the Windows driver is running, the blue
light is on. If the blue light is blinking, the HD PVR 2 is not ‘seen’ by your PC. Check the
USB cable!
• Yellow light is on after you start Hauppauge Capture: this is good and means HD PVR 2
detects video and you are ready to record. If you do not have a yellow light, then your
video source is not being ‘seen’ by the HD PVR 2. If you are recording from a PC gaming
system, make sure your graphics card is set to 1080p60 or 720p and the refresh rate is
60Hz. Otherwise, make sure you have set the correct Video and Audio Input.
• Blue record ring: indicates that HD PVR 2 is recording or streaming video.
• Red light: this means the video encoder inside HD PVR 2 cannot send data to your PC.
There are a number of reasons this could happen. If your PC is running slowly and cannot
get data from HD PVR 2 quickly enough, the red light might go on for a few seconds until
the PC can accept data. Change to another USB port on your PC, then power down HD
PVR 2, wait a few seconds and power up again. If you continue to see the Red light while
recording and have checked your cabling, contact Hauppauge technical support.
No video in the Hauppauge Capture preview window:
Step 1: Make sure HD PVR 2 is listed in the Capture tab. If not, then please check your USB
cables and make sure the blue light is on on the front of HD PVR 2. If you cannot see HD PVR
2 listed, reinstall Hauppauge Capture. Power cycle the HD PVR 2 and reboot your PC after reinstalling the drivers.
Step 2: Check the video mode of your console. It must be set at either 1080p60 or 720p. If
you are using a PC game system, check our website at: www.hauppauge.com/pcsetup
Step 3: Check your cables. Remove each cable and make sure it’s firmly reseated into each
device you are using. If using HDMI cables, try swapping the HDMI cables.
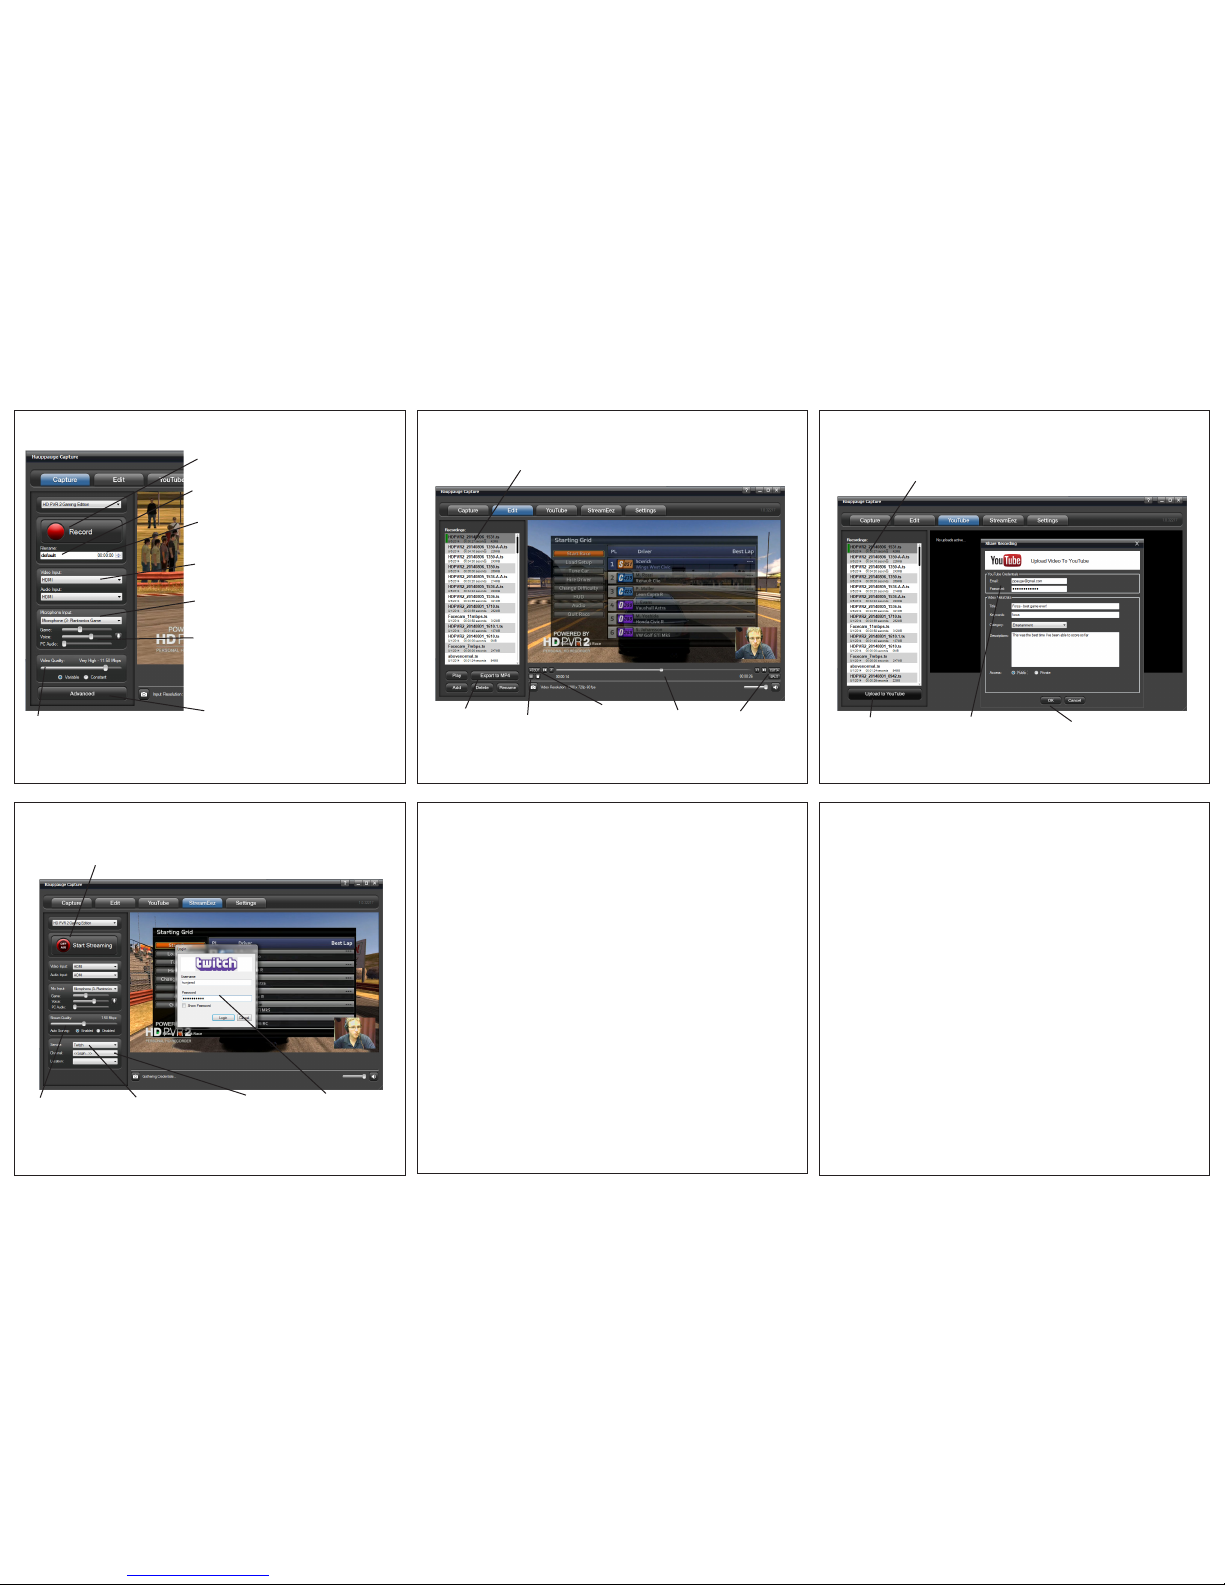
Capture tab Edit tab
The Edit tab uses a fast cut and trim, which is very fast and preserves the video quality of
your recording
YouTube tab
The YouTube allows you to enter your YouTube credentials and quickly upload your video
recordings to your YouTube channel.
Step 4: Check the Video input setting. If the Video input setting is wrong, you will get a black
preview window. Set Video input to Component video for a cable or satellite box and HDMI for
all other devices. Is the yellow light on on the front of HD PVR 2? If the yellow light is not on,
then either you have the wrong Video input source set or your game console is not turned on.
Step 5: If using HDMI, verify your source device does not use HDCP copy protection. If your
video source has HDCP copy protection, you will see a black screen.
Step 6: If the yellow light is on the front of HD PVR 2 and you still see a black preview window,
try recording some video. If you can successfully playback a recording but you cannot see live
video in the Preview window, enable hardware acceleration (select “hardware acceleration” in
the Settings menu in Hauppauge Capture).
If capture fails, it is likely something is wrong with the video input to HD PVR 2. This could be a
broken or loose video cable or you plugged the cables into the wrong connector.
Pass through video problems
No video on my TV set
Open Hauppauge Capture and verify the correct Video input is selected. Video and audio
input must be set initially for passthrough to work (if you power cycle the HD PVR 2, it may revert to its default setting and will need to be set again). Also, check the video mode on your
PS3 or Xbox 360. The video mode should be 1080p or 720p.
No video on my TV set but I can see video in the Capture tab
Check that the HDMI cable from the HD PVR 2 (HDMI out) is connected to your TV monitor
and the TV is set to the correct HDMI port if multiple are available on yourTV. Try changing the
output resolution from your game console. Some TV monitors may not support all HDMI output resolutions.
Wrong colors with Component Video
Check the Component video cable: unplug and replug the Red, Green and Blue video cables.
Make sure the Red audio cable is not plugged into the Red video cable.
Video Quality:
This is where you set the bit rate of your recordings.
The higher the bitrate, the better your video quality
will be but the more disk storage your recordings
will consume.
For recording with the HD PVR 2, we recommend
‘Variable’
Start/Stop recording:
You can also use the record button on top of the HD PVR 2
to start or stop recordings)
Name of your recording:
A name consisting of date and time will automatically be
created. But you can enter your own name here.
Timed recording:
If you would like to have your recording made for a certain
time (example: 60 minutes), set this to the time. If you leave
this at 00:00:00, then you will can manually start/stop the
recording.
Video and Audio sources:
For cable or satellite TV box, change Video input to Component. Set Audio input to either Line in or SPDIF. For a PC or
game console, set for HDMI.
Microphone input:
If you want to record an audio track (example: game commentary), set the microphone source here.
Audio volume:
Set the audio volume of your main audio source (Game), your
microphone and your PC audio here. To disable PC audio,
turn this all the way to the LEFT (this is 0 volume).
Advanced menu:
This is where you can set the video scaler (converts your
video from its original format to another format), color
controls and audio settings.
File selector:
Your most recent recording will be at the top of the list. You
can also choose any other recording.
Cut from the RIGHT:
When you click
this button, you
will delete all of
the video to the
RIGHT of the
Video Mark.
Video Mark:
This shows
you the current
position in your
recording of the
video you see
in the preview
window
Export to MP4:
Some video editors need an
MP4 file. When you are finished trimming your videos,
click this button and your
video will be converted to
MP4 without any loss in
video quality.
Cut from the LEFT:
When you click
this button, you
will delete all of
the video to the
LEFT of the Video
Mark.
Play and pause your
video:
You can start or
pause your videos
with this button
File selector:
Your most recent recording will be at the top of the list. You
can also choose any other recording.
Enter the Title, Keywords and
Description:
This is the minimum information
required by YouTube to upload your
videos. Then click OK.
Enter your YouTube credentials:
Enter your user name and password.
Note: if you have multiple YouTube accounts
linked to one user name and password, you
cannot use this function to upload to YouTube. You will need to manually upload using
a web browser. Your videos can be found in
the MyVideos folder on your PC.
Upload to YouTube:
After you have
trimmed your videos,
click here to upload
them to YouTube.
StreamEez tab
Live stream with your logos and microphone commentary on Twitch and YouTube.
First, set your streaming quality:
We recommend starting at
1.5Mbps and checking to see
if your stream looks good.
If it is, then your Internet
connection is good and you
can increase the Quality to
2.0Mbps or more.
Select your streaming service:
You can stream with Twitch or
YouTube. You can also add your
commentary by selecting your
microphone in the ‘Mic input’
box above. For more information
on YouTube streaming setup, go
here:
www.hauppauge.com/youtube
Click <Login>:
Once you have selected your service,
click here and the
Login box will open.
If you are using
Twitch, you can also
choose your Ingest
server in the Location box.
Login box:
This is where you
enter your user name
and password. Once
you have entered
this information, you
will see “Gathering
credentials’ as we
try to log onto your
account.
Start Streaming:
Once you have logged into your account, click the Start Steaming
button. You will then be streaming to your service.
 Loading...