

Page 1
Page 2 Page 3 Page 4
Page 5
WinTV-NOVA-T-USB2
Quick Installation Guide for Windows XP
© Hauppauge Computer Works, Inc. 2004
● WinTV-NOVA-T-USB2 unit
● IR remote control-and 2 x AAA Batteries
● WinTV for Windows Installations CD-ROM with:
· WinTV2000 Application
· Remote control-Software
· WinTV Utilities
Installation Overview WinTV-NOVA-T-USB2
Please ensure that Windows XP is correctly installed and started before connecting the
WinTV-NOVA-T-USB2 to your computer.
Connect the provided USB cable to the WinTV-NOVA-T-USB2 and connect the other end of
the USB cable to your computer.
Connect your terrestrial antenna to the antenna connection of the WinTV-NOVA-T-USB2.
Insert the batteries Type AAA into the remote control
Connecting the WinTV-NOVA-T-USB2
You will need to ensure that you are located in a area that has Digital Terrestrial coverage.
Please visit www.dtg.org.uk/retailer/coverage.html.
WinTV-NOVA-T-USB2 Antenna Signal
N
ote: If you have any anti-virus software enabled, please disable it
during the installation of the software.
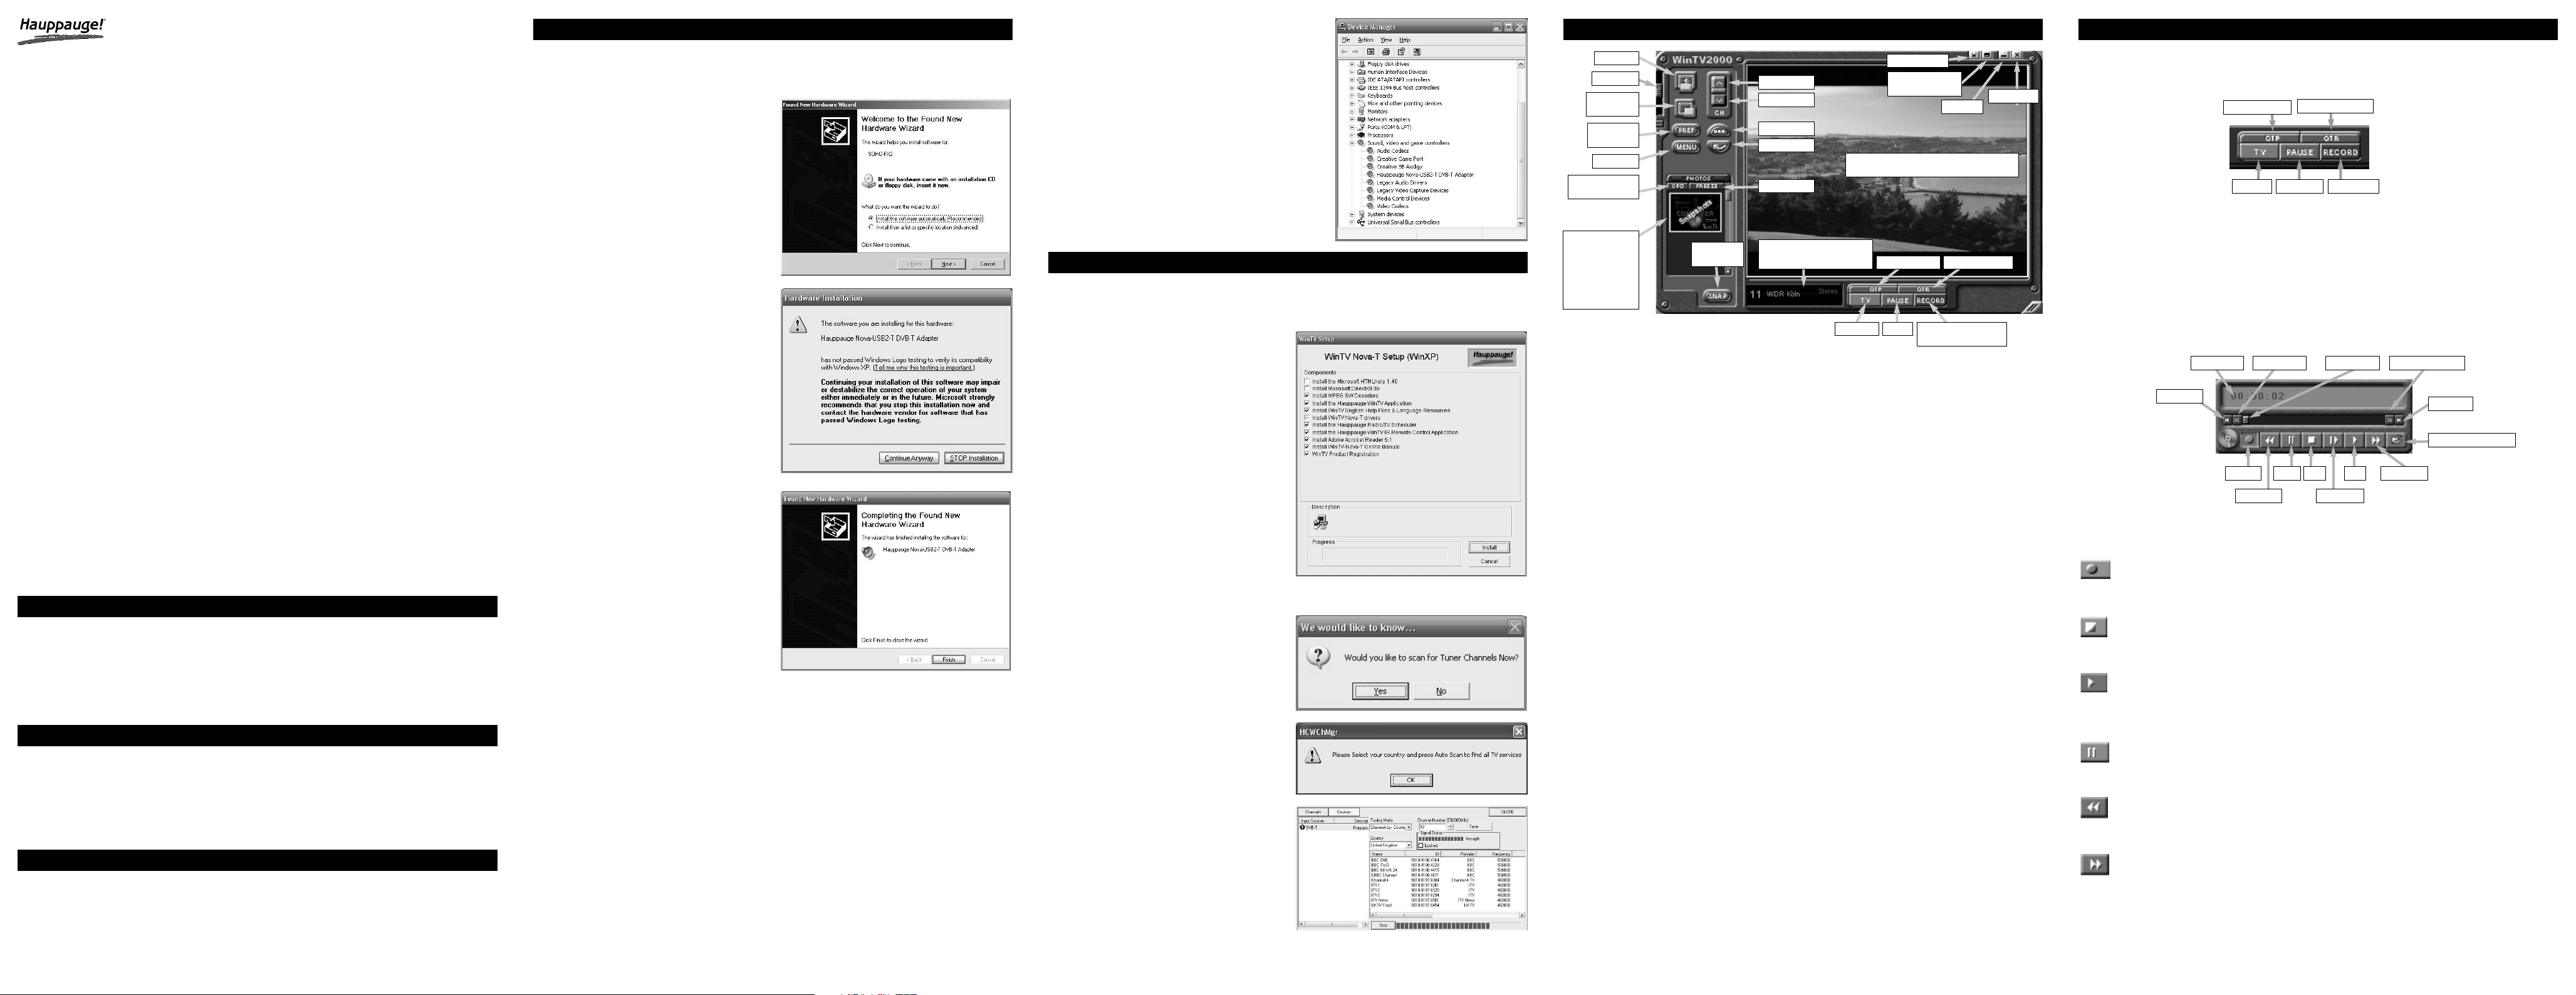
Driver-Installation under Windows XP
When you first connect the WinTV-NOVA-TUSB2 to your computer a Hardware
Assistant will appear, the "USB Device
SOHO-FX2"will be recognized.
Insert the WinTV-NOVA-T Installations-CDROM into your CD drive.
If prompted select “No, not this time” and
select “Next”. Select the option "Install the
software automatically" and click "Next".
A window may appear about the
“Hauppauge Nova-USB2-T DVB-T Adapter”
not passing the windows logo testing, select
"Continue Anyway".
When “Completing the Found New
Hardware wizard” window appears click the
"Finish" button to complete the driver instal-
lation.
You will now need to check that the drivers are
installed correctly.
Right Click on My Computer and Left Click on
Properties.
Click on Hardware tab and then Device Manager.
In the Device Manager click on the + symbol on the
Sound Video and Game controllers section. If the
driver is installed correctly you should see the
“Hauppauge Nova-USB2-T DVB-T Adapter
If it has a Yellow mark next to it then this means that
the driver is not installed correctly. You will need to
remove the driver and disconnect the Nova-USB2
from the computer and re-connect it to install the
driver again.
To s tart the Nova-USB2 software installation, click Start / Run then type your CD-ROM drive
letter (for example: D:\) and then Setup.exe.
WinTV Software Installation
Select your language for the installation
“English is default” and Click “Next "
It is recommended to leave the default components ticked and select “Install” and follow the on screen instructions.
Once the installation is complete the
WinTV2000 Icon will appear on the desktop
which will allow you to run “Hauppauge
WinTV”.
To start the WinTV 2000 application double click on the WinTV 2000 icon.
A message will appear asking you to scan
for tuner channel now, click "YES”.
If you now click on the the AutoScan icon
the automatic channel scan will start and
find any available services. This may take up
to 5 minutes to complete so please wait until
the channel scan has finished.
If no services are found please ensure that
your aerial is connected to the Nova-t-USB2
and then contact the technical support
department for further asisstance.
Snapshot Still
capture
Freeze picture
CFG
Configure Snapshot
Pref
Configuration
Setup Menu
TV Mode
Remove toolbars
“no title mode”
Minimise
Channel surf
Channel down
Channel up
Last channel
Close WinTV
Current TV channel
Click your right mouse button
here to see the channel selector
Click your right mouse button in the TV window to
remove toolbars.Click again to restore toolbars.
One Touch Pause
Record
Opens the record controls
Volume
Full screen TV
Always on
Top
WinTV®2000
Changing TV channels
You can change channels by using the channel up or channel down buttons on WinTV2000.
You can also type a channel number (e.g. 27) and WinTV2000 will change to that channel. If
the entered channel does not exist, you will see a black window.
Changing the TV window size
You can change the size of the TV window by grabbing any corner and dragging the video
window to the desired size.
Displaying TV full screen
When you click the Full Screen button, TV will appear full screen on your PC monitor. When
finished watching TV full screen, click on your right mouse button in the TV window.
To Hide the WinTV toolbar (No-title mode)
Simply click your right mouse button in the WinTV’s video window for the non-title mode. To
restore the toolbars (the title mode), once again click your right mouse button in the WinTV’s
video window. You can set the size of the window differently in each mode.
‘Always on Top’ mode
With Always on Top, WinTV will always be visable on your Windows desktop on top of any
applications. To turn on Always on Top, click the Always on Top button. It will turn green. To
turn it off click this button again.
Pref button
Click the Pref button to open the preferences menu:
View:
These are the settings for the on screen display of the TV channel and Audio Volume, where
you can enable Close Caption subtitles (if supported in your country TV system broadcasts),
plus controls for the toolbar mode (Title mode), NoToolbar mode (No title) and Full Screen
(TV mode).
Movies:
Here is where you configure the video and audio settings for SoftPVR. You can set the movie
record directory (DVCR Record File Path), the MPEG Quality settings, and the audio settings.
Snap Shot:
Set the size of your captured images, plus single or two field captures for capturing motion or
still image video.
Audio:
Your audio settings are here, default should be WinTV Wave.
Menu button:
Click the Menu button to open the TV Setup menu. Here is the main control for TV channels, aspect ratio and duplicate controls for other functions:
Suite Manager:
Configure the TV tuner (scanning, naming, fine tuning etc) setting up favourite channel lists.
Configure:
Duplicate configuration menu for audio, MPEG settings etc.
There are three buttons to control the Watching, Recording and Pausing of TV. Clicking on
the Pause button will cause the Pause menu to roll down from the WinTV2000 application,
while clicking on the Rec button will cause the Record menu to roll down.
The One Touch Pause (OTP) button prepares the WinTV2000 pausing live video.
The One Touch Record (OTR) button will start a record session. If you click OTR more than
once, a record timer will be set and the recording will be done for 15 minutes for each time
the OTR button is clicked. For example, if you click the OTR button 3 times, the WinTV
2000 will record for 30 minutes.
RReeccoorrdd mmooddee
Click on the Record button or the OTR button on the WinTV-2000 application to open the
Record and Playback control bar.
Time counter
The time is specified in a Hour:Minute:Second format.
Record
Clicking the Record button will automatically generate a file name and start recording your
audio/video program.
Stop
Clicking the Stop button will stop the video you are recording or playing back.
Play
Clicking the Play button will playback from disk the last video file created. When playing a
video, you can rewind, fast forward, replay 10 sec or skip forward 10 sec using the buttons
on the control bar.
Pause
Clicking the Pause button while Playing will pause your audio/video
Rewind button
Clicking the Rewind button will play the video file in reverse. Clicking the Rewind button
again will continue the playing of the video.
Fast forward
Clicking the Fast Foward button one time will fast foward your video at 2X speed. Clicking
the Fast Foward button two times will fast foward your video at 8X speed. Clicking the button again will continue playing back at normal speed.
Watch, Pause and Record
One Touch Pause
One Touch Recording
TV Mode Pause Mode Record Mode
Record PlayPause Stop
File menu (save / open)
Time counter
Skip to end
Skip back 10 Video-Position
Fast forward
Slow motion
Fast re wind
Skip forward 10 secs
Skip to start
Snapshot viewer
window:
Double click on each
"thumbnail" to see
image full size.Click
and hold your right
mouse button to see
image options.
One Touch Record
Note” If any further components are found please repeat the above process until you receive
the message “Found new hardware: Your hardware is installed and configured to use”.
PauseTV-Mode
Select channels and country location, for
instance, select "United Kingdon" and then,
select "OK".
Hauppauge Digital Sarl
10 Borough High Street
Bank Chambers
London, UK, SE1 9QQ
www.hauppauge.co.uk
Tel.- Support: +44 (0)207 378 0202
Tel.: +44 (0)207 378 1997
Fax: +44 (0)207 357 9171
Hauppauge Digital Sarl
91 Cabot Court
Hauppauge, NY 11788
www.hauppauge.com
Telephone: 001 631-434-1600
Fax: 001 631-434-3198
Tech Support: 001 631-434-3197
Hauppauge Digital Asia, Pte. Ltd.
Blk 1093, Lower Delta Road #04-05
Tiong Bahru Industrial Estate
Singapore 169204
Telephone: (+65) 276-9163
Fax: (+65) 276-9167
Tech.-Support: (+65) 276-4412

Page 6
Page 7 Page 8 Page 9
Page 10
Slow motion button
Clicking the Slow Motion button will play video at 1/2 speed. Click the Slow Motion button
again to play your video at normal speed.
File button
Clicking the File button opens the File menu. The last file recorded is listed in the File name
box. In the File menu you can:
● Rename your recorded video file. To rename a video file, find the file you would like to
rename, highlight it with your mouse, click and hold the right mouse button. Go down
to Rename and then you can type in a new name. Remember:you must keep the MPG
extension on the file.
● Play a video file previously recorded: find the file you would like to play, highlight it
with your mouse (one click of the mouse button) and click Open. Then click the Play
button.
● Delete recorded video files which you no longer want (and which consume hard disk
space). Click your right mouse button on the video file once, go down the menu and
click on Delete.
“Pause”-Mode
Clicking the Pause button or OTP (One touch Pause) button on the WinTV-2000 application
starts the Pause mode. The Pause Menu will drop down.
“Pause” buffer
The Pause buffer is space on your hard disk where video is stored during the Pause mode.
The maximum amount of time which your TV program can be delayed is dependent upon
how much storage space you have set for the Pause buffer.
Pause
Clicking the Pause button or OTP (One touch Pause) button makes WinTV 2000 to start
recording into WinTV's Replay Buffer. It takes about 10 seconds for the Replay Buffer to be
initialized and for Pause to become effective.
Unclicking the Pause button will cause the audio/video program to start playing from the
point where the button was originally pushed.
Most WinTV 2000 functions are active while in the Pause or Pause Live mode. For example, you can change volume, resize the TV window, go into "no-title mode", etc.
While in Pause mode, the Video Position bar shows the amount of the Replay Buffer which
is filled with video. For example, if the Video Position indicator shows halfway, it means
that half of the Replay Buffer is filled. If you find you cannot Pause as many minutes as you
would like, increase the size of the Replay Buffer.
While in Pause mode, the A/V stream is always saved in the Replay Buffer. To stop saving
the A/V stream in the Replay Buffer, you must exit the Pause mode by clicking the TV
mode button.
Replay button
While in the Pause mode, hitting the Replay button acts like the Instant Replay you see on
TV broadcast sporting events: the audio/video goes back in time and you repeat what you
have previously seen. Each click of the Replay button causes audio/video to go back 10
seconds. For example, if you want to repeat the audio/video you saw 10 seconds ago, you
would click the Replay button once. If you want to see the video you saw one minute ago,
you would need to click the Replay button six times.
For extended replay times, you might find it more convenient to grab the Video Position
indicator control bar and move it to the left. Once you let the control bar go, audio/video
starts to play (it might take a few seconds for the WinTV2000 application to start playing).
You might have to move the Video Position indicator to the left and right to find the desired
spot to start replaying audio/video.
While Replaying, your audio/video program continues to be recorded in the Replay Buffer.
Therefore, if you have clicked the Replay button 3 times (so that you are replaying the
audio/video seen 30 seconds ago), the video you see in the WinTV window will be 30 seconds behind the "live" audio/video program.
Skip
Clicking the Skip button will skip the video ahead 10 seconds.
Rewind button
Clicking the Rewind button while playing video will rewind the recorded video. Clicking the
Rewind button again will continue the playing.
SlowMotion
Clicking the SlowMotion button while playing video will play in Slow Motion.
Clicking the SlowMotion button again, will continue playing normally.
Fast forward button
Clicking the Fast foward button one time will fast foward your video at 2X speed. Clicking
the Fast Foward button two times will fast foward your video at 8X speed.
Rewind Replay last 10 secondsPaus e Stop
Skip ahead 10 seconds
Delay-Counter
Skip to end
Replay last 10 seconds
Video-Position
Fast forward
Playforward slow motion
Skip ahead 10 seconds
Skip to start
WinTV-Scheduler allows you to schedule the recording of TV shows. WinTV-Scheduler, once
it is set, can be closed, and the WinTV application will “wake up” at the desired time and
tuned to the desired channel.
After installation, WinTV-Scheduler can be found by going to Start / Program files /
Hauppauge WinTV.
WinTV-Scheduler works by using the Windows Task Scheduler to launch WinTV at the chosen
time. WinTV-Scheduler sets up a command line in Task Scheduler to run WinTV2000, specifying a TV channel and a length of time to record.
To set up an event for timed watching or recording, run WinTV-2000 Scheduler and click on
the Add Program.
The items that need to be set for each event are:
- Time to Begin Program: set to the desired start time. The default time is about 3 minutes
from the current time. Click on the hour to set the hour, the minute to set the minute and the
second (if you feel this is necessary) to set the minute to start the program. Note: It takes
about 10 seconds to launch the WinTV and set up for recording, so set the Time to Begin
Progam to 10 seconds before the time your TV show actually starts.
- Time to End Program: set to the time to end this event. Note: you need to leave at least 30
seconds between scheduled programs to give the recorder time to set up its disk buffers.
- Program Period: one time, daily, weekly
- Date to Begin Program: todays date is the default. Change this if you want to schedule on
another date.
- Source selection: leave set at WinTV2000 to bring up the WinTV at the requested time and
on the requested channel.
- Channel selection: chose one of your scanned channels.
- Recording options: click on Record to File to record your show. Leave this button
unchecked to watch TV at the requested time. You can also name your file to record.
Once these are set, click Set Program. You can add more Events, clicking Set Program after
each event is set. When you are finished click Close. The WinTV program does not have to
be running for the Schedular to work. If WinTV is not running, it takes about 10 seconds to
start WinTV-2000 and to start the recording of TV.
WinTV-Scheduler
The WinTV-2000’s remote control software is installed automatically during the installation of
the WinTV applications. You will see the WinTV Remote icon in the Device Tray. The installation will add a shortcut to IR.EXE to the Startup group, so that IR.EXE is loaded every time
after Windows has restarted.
If you need to restart the remote control, run IR32.EXE from the C:\Program Files\WinTV
directory.
Checking the function of the IR Remote
WinTV’s Remote application is loaded everytime Windows is restarted. You will see a Remote
Control icon in the device tray. To check the remote control operation, point the Remote transmitter at the Remote control receiver.
When you click the Go button on the Remote transmitter, after 3-4 seconds the Remote icon
should flash, indicating that the Remote application is running. After the remote icon flashes,
the WinTV appplication selector will appear in a window on your screen.
Remote control when watching live TV
0-9 buttons: channel numbers
Full button: makes WinTV go full screen. Clicking the full button again brings WinTV into a
window.
Record button: opens the SoftPVR tray.
Remote control when playing video recordings
Skip ahead button: skips ahead in the video 30 seconds per click. Holding the skip ahead
button will autorepeat, and advances the video about 5 minutes per 10 seconds the button is
depressed.
Skip back button: skips back 30 seconds per click. Pressing and holding the skip back button makes the video go back about 5 minutes for 10 seconds the button is depressed.
Go button: brings up the WinTV task list. Allows you to start WinTV2000, WinTV32 or
WinTVRadio.
Menu button: brings up the Windows task list. Use the left and right arrows to change to
other Windows tasks.
Green power button: will turn off the WinTV application
0 - 9 buttons: When playing back a recording, the “1” button will skip to 10%, the “2” button
20% etc of the length of the recording.
Installation of the Remote Control software
To remove the driver and application
Insert the installation CD, click Start / My Computer, double click your CD-ROM drive, doubleclick on a file called 'hcwclear.exe' put a tick in 'Search for.
If you now re-start the computer with the Nova disconnected and wait until Windows has fully
loaded. Connect the Nova gain and follow the instructions from the start of this guide to install
the driver and application software again.
Problem: No TV station are found. Please ensure that you are located in a area that has
Digital Terrestrial TV coverage.
Please visit www.dtg.org.uk/retailer/coverage.html
If your area does have digital Terrestrial TV coverage, please check yout TV antenna as most
antenna’s that are over 10 years old may not support the Digital TV broadcasts and you need
to update yours to a Wideband or Highgain.
Troubleshooting
Radio Interference Statement:
The WinTV boards have been tested and found to comply with the limits for a Class B digital
device, pursuant to part 15 of the FCC Rules. These limits are designed to provide reasonable
protection against harmful interference in a residential installation. This equipment generates,
uses, and can radiate radio frequency energy and cause harmful interference to radio communications. However, there is no guarantee that interference will not occur in a particular
installation. If this equipment does cause harmful interference to radio or television reception,
which can be determined by turning the equipment off and on, the user is encouraged to try
to correct the interference by one or more of the following measures:
• reorient or relocate the receiving antenna.
• increase the separation between the equipment and receiver.
• connect the equipment into an outlet on a circuit different from that to which the receiver is
connected.
• consult the dealer or an experienced radio/TV technician for help.
FCC ID: H90WINTV
CAUTION: Changes or modifications not expressly approved by the party responsible for
compliance to the FCC Rules could void the user’s authority to operate the equipment.
CE Statement:
This equipment has been tested and complies with EN 55013, EN 55020 and IEC 801-3 part 3
standards.
QI-NOVA-T-USB2-V1.0-ENG · 01/06/05
Optional command lines when starting WinTV32/WinTV2000 Application
It is possible to start the WinTV application with different parameters for example, to start the
WinTV on channel 21click Start / run and type in :
C:\Program Files\WinTV\WinTV2k.EXE -c21
Always ensure that the command is listed after the hyphen::
NoSplashScreen = -nss
WinTV32Mode = -nc
WinTV2000Mode = -cg
NoTipOfDay = -ntod
Suite = -sSuiteName
Channel = -cChannelNumber
WindowMode = -mMode (for Mode set "tv", "NoTitle", "Title", or "Off"
("Off" closes the current WinTV application)
For example:
C:\Program Files\WinTV\WinTV2k.EXE -mtv -nss
Start WinTV2000 windows mode, with no splash screen
WinTV Command Line Commands
FCC Statement
 Loading...