

Page 1
(8)
Package Contents:
PARTS
(2) LOAD BARS
(4) LEGS
(4) “T” BRACKETS
(4) HD BRACES
(8) MOUNTS
(8) LOAD SECURE POSTS
HARDWARE KIT
(40) 3/8”-16 NUTS
(40) 3/8” SPLIT LOCK WASHERS
(16) 3/8”-16 x 1-1/4” HEX BOLTS
(16) 3/8” x 1-1/4” HEX LAG BOLTS
(16) 3/8”-16 x 1-3/4” HEX BOLTS
(16) 5/16”-18 x 1” HEX BOLTS
(16) 5/16”-18 SQUARE NUTS
(16) 5/16” SPLIT LOCK WASHERS
3/8”-16 x 2” CARRAIGE BOLTS
ALUMINUM REMOVABLE
UNIVERSAL TRUCK RACK INSTRUCTIONS
P/N UTRAHDFULL-1 / UTRAHDMINI-1
Before you begin:
Remove all components from the shipping carton.
The rack should be assembled on a padded surface such as carpet to prevent scratching of aluminum surfaces. Remove bands securing
components together.
Read the instructions thoroughly to familiarize yourself with the assembly sequence.
Note that you DO NOT tighten any nuts and bolts until the completed rack is installed on the vehicle unless specified. This allows for minor
adjustments to the rack during the installation process.
Gather the following tools used to assemble and install the rack.
9/16” Socket or open end wrench
1/2” Socket or open end wrench
3/8” Drill bit and drill
Pencil or marker
Tape measure
Center punch and hammer (optional)
Level (optional)
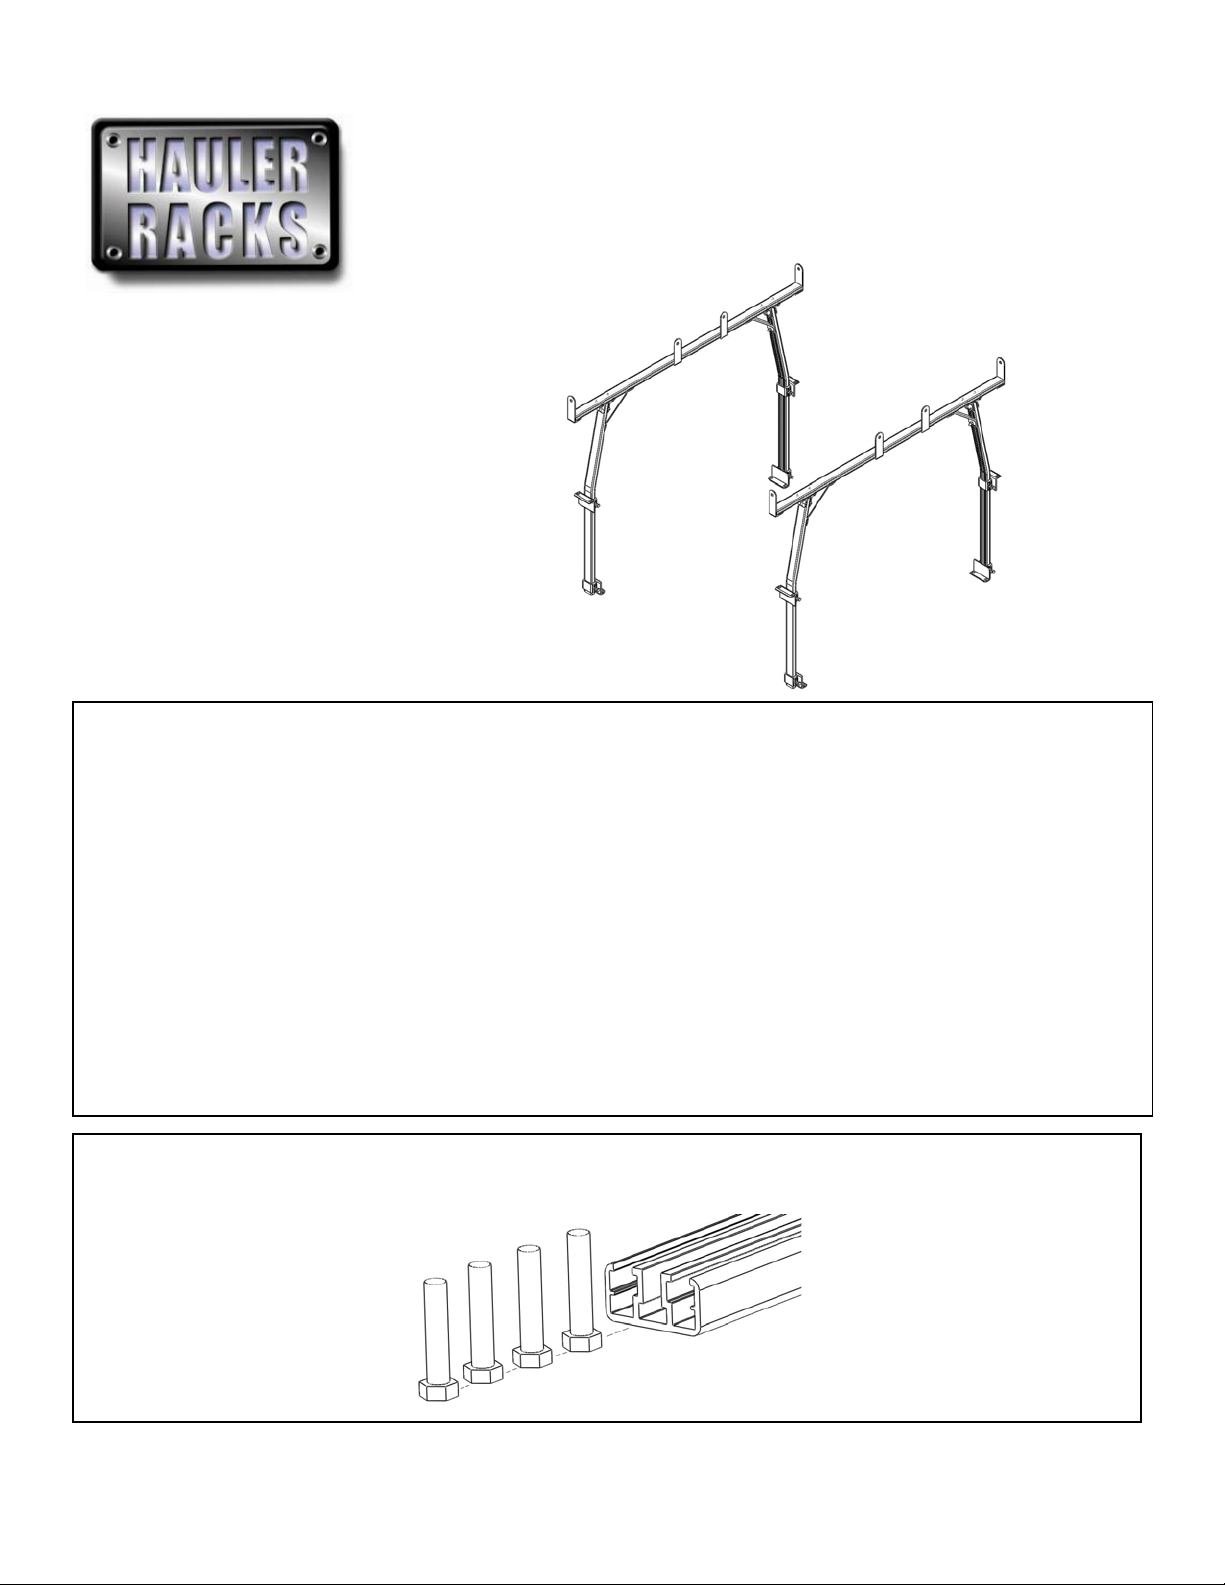
1. Center bolts
Slide in (4) 3/8”-16 x 1-3/4” bolts into the center channel of the load bar as shown below. Slide the bolts towards the center of the load bar.
Repeat for other load bar.
HAULER RACKS, INC.
st
7109 31
Minneapolis, MN 55427-2848
WWW.HAULERRACKS.COM
Avenue North
1 of 8
Toll Free: 1-800-843-5445
Phone: 763-546-5620
Fax: 763-546-0933
Page 2
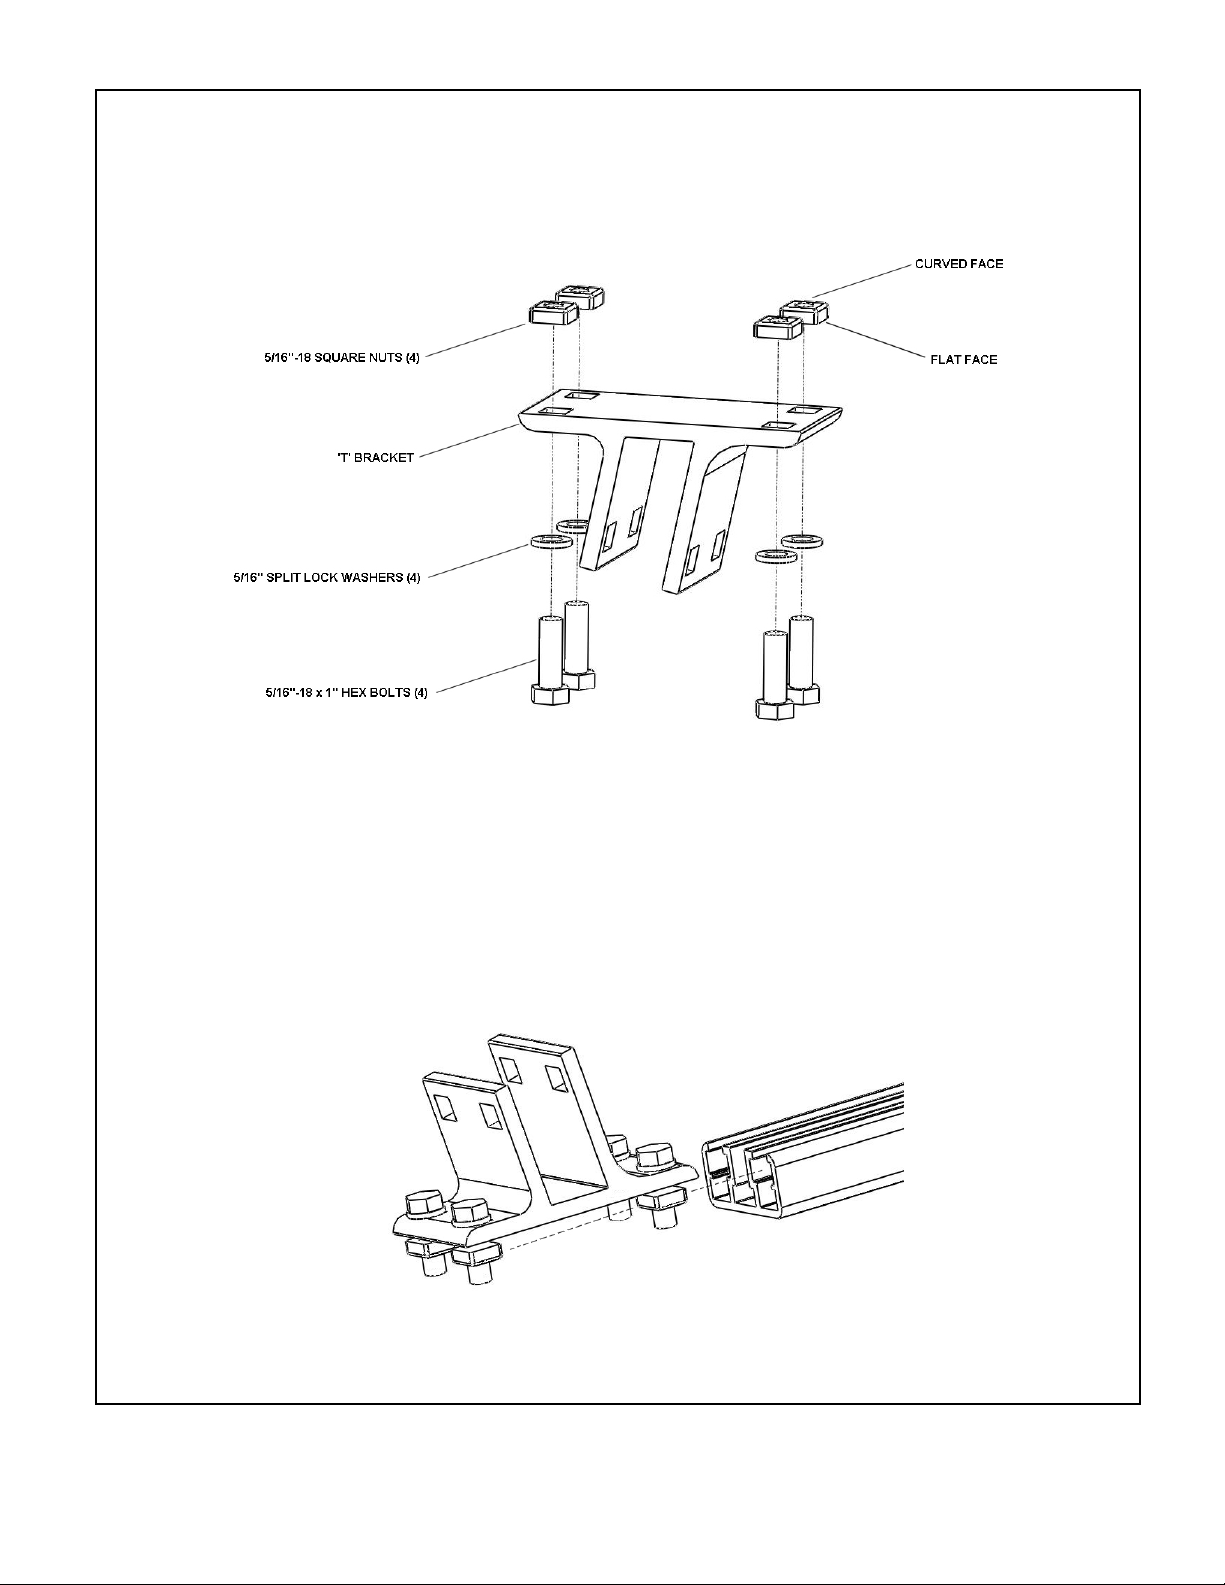
2. “T” bracket assembly
Loosely assemble the ‘T’ bracket as shown.
Note the flat portion of the 5/16”-18 square nut faces toward the ‘T’ bracket.
Repeat for remaining ‘T’ brackets.
3. Load bar assembly
Orientate the ‘T’ bracket as shown with the angle ends pointing away from the center of the load bar.
Slide the 5/16”-18 square nuts into the outer channels of the load bar.
Slide the ‘T’ bracket assembly into the load bar. Repeat for other side of load bar.
Repeat for other load bar.
HAULER RACKS, INC.
st
7109 31
Minneapolis, MN 55427-2848
WWW.HAULERRACKS.COM
Avenue North
2 of 8
Toll Free: 1-800-843-5445
Phone: 763-546-5620
Fax: 763-546-0933
Page 3
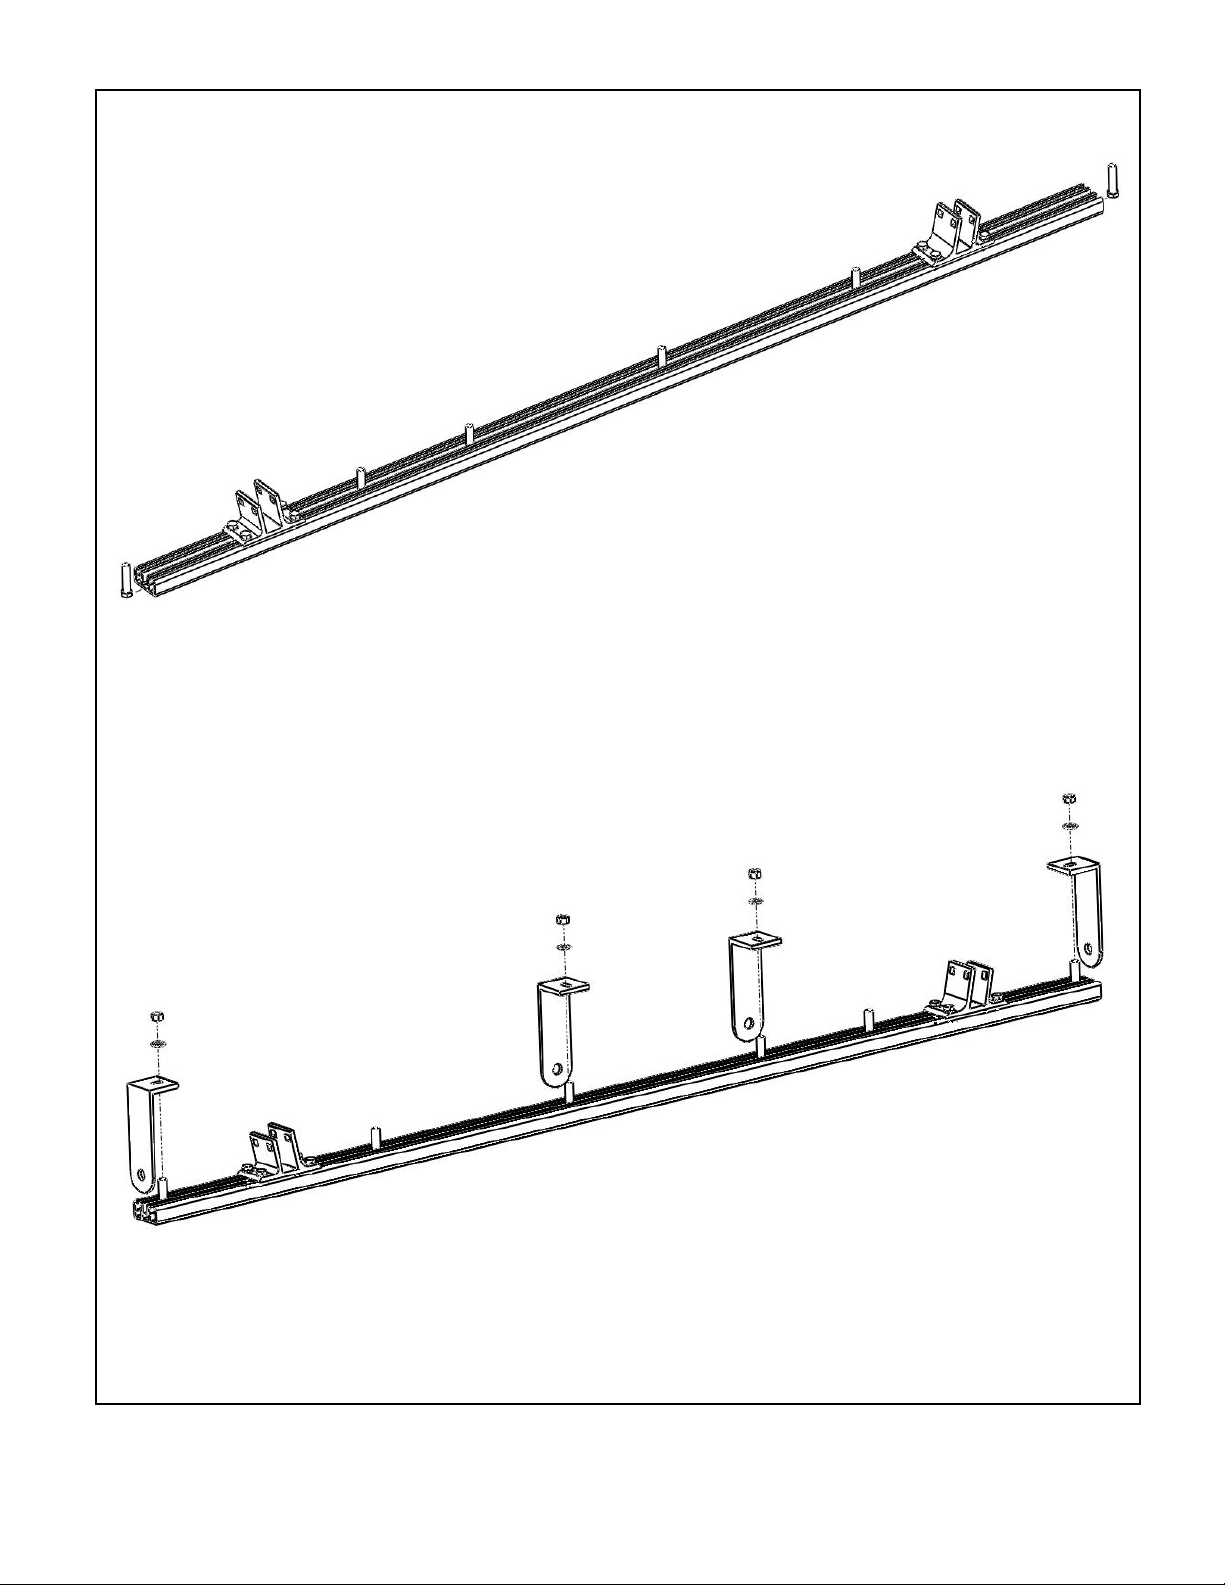
3. Load bar assembly continued
Slide in (1) 3/8”-16 x 1-3/4” bolt into the center channel of the load bar on each end as shown below. Repeat on other load bar.
Install the load secure posts as shown. Place the end load secure posts so they are flush against the load bar.
Tighten the load secure posts with 3/8” split lock washers and 3/8”-16 nuts and tighten hardware. Repeat for other load bar.
HAULER RACKS, INC.
st
7109 31
Minneapolis, MN 55427-2848
WWW.HAULERRACKS.COM
Avenue North
3 of 8
Toll Free: 1-800-843-5445
Phone: 763-546-5620
Fax: 763-546-0933
Page 4
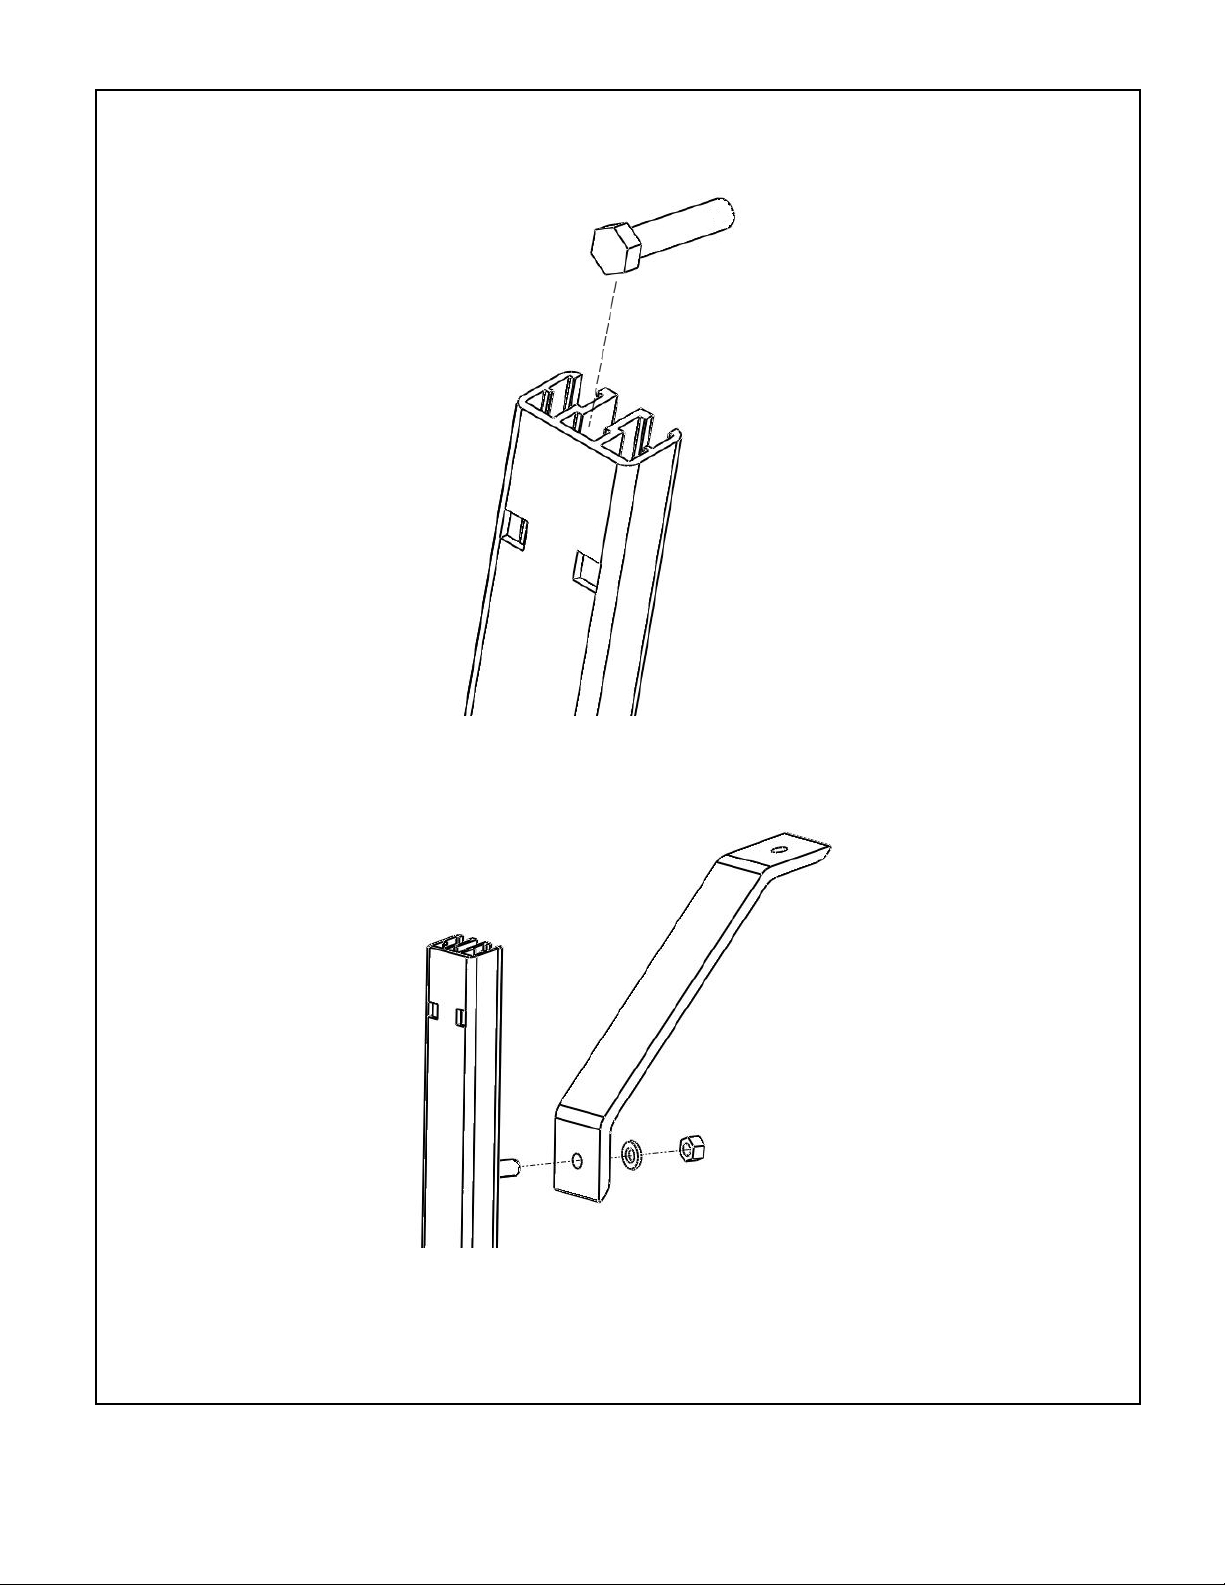
4. Leg assembly
Slide in (1) 3/8”-16 x 1-3/4” bolt into the center channel of the leg with the punched end as shown below. Repeat for other legs.
Install the HD brace to the leg by placing the HD brace on the 3/8”-16 x 1-3/4” bolt in the leg. Loosely secure with a 3/8”-16 nut and a 3/8” split
lock washer. Repeat for other legs.
HAULER RACKS, INC.
st
7109 31
Minneapolis, MN 55427-2848
WWW.HAULERRACKS.COM
Avenue North
4 of 8
Toll Free: 1-800-843-5445
Phone: 763-546-5620
Fax: 763-546-0933
Page 5
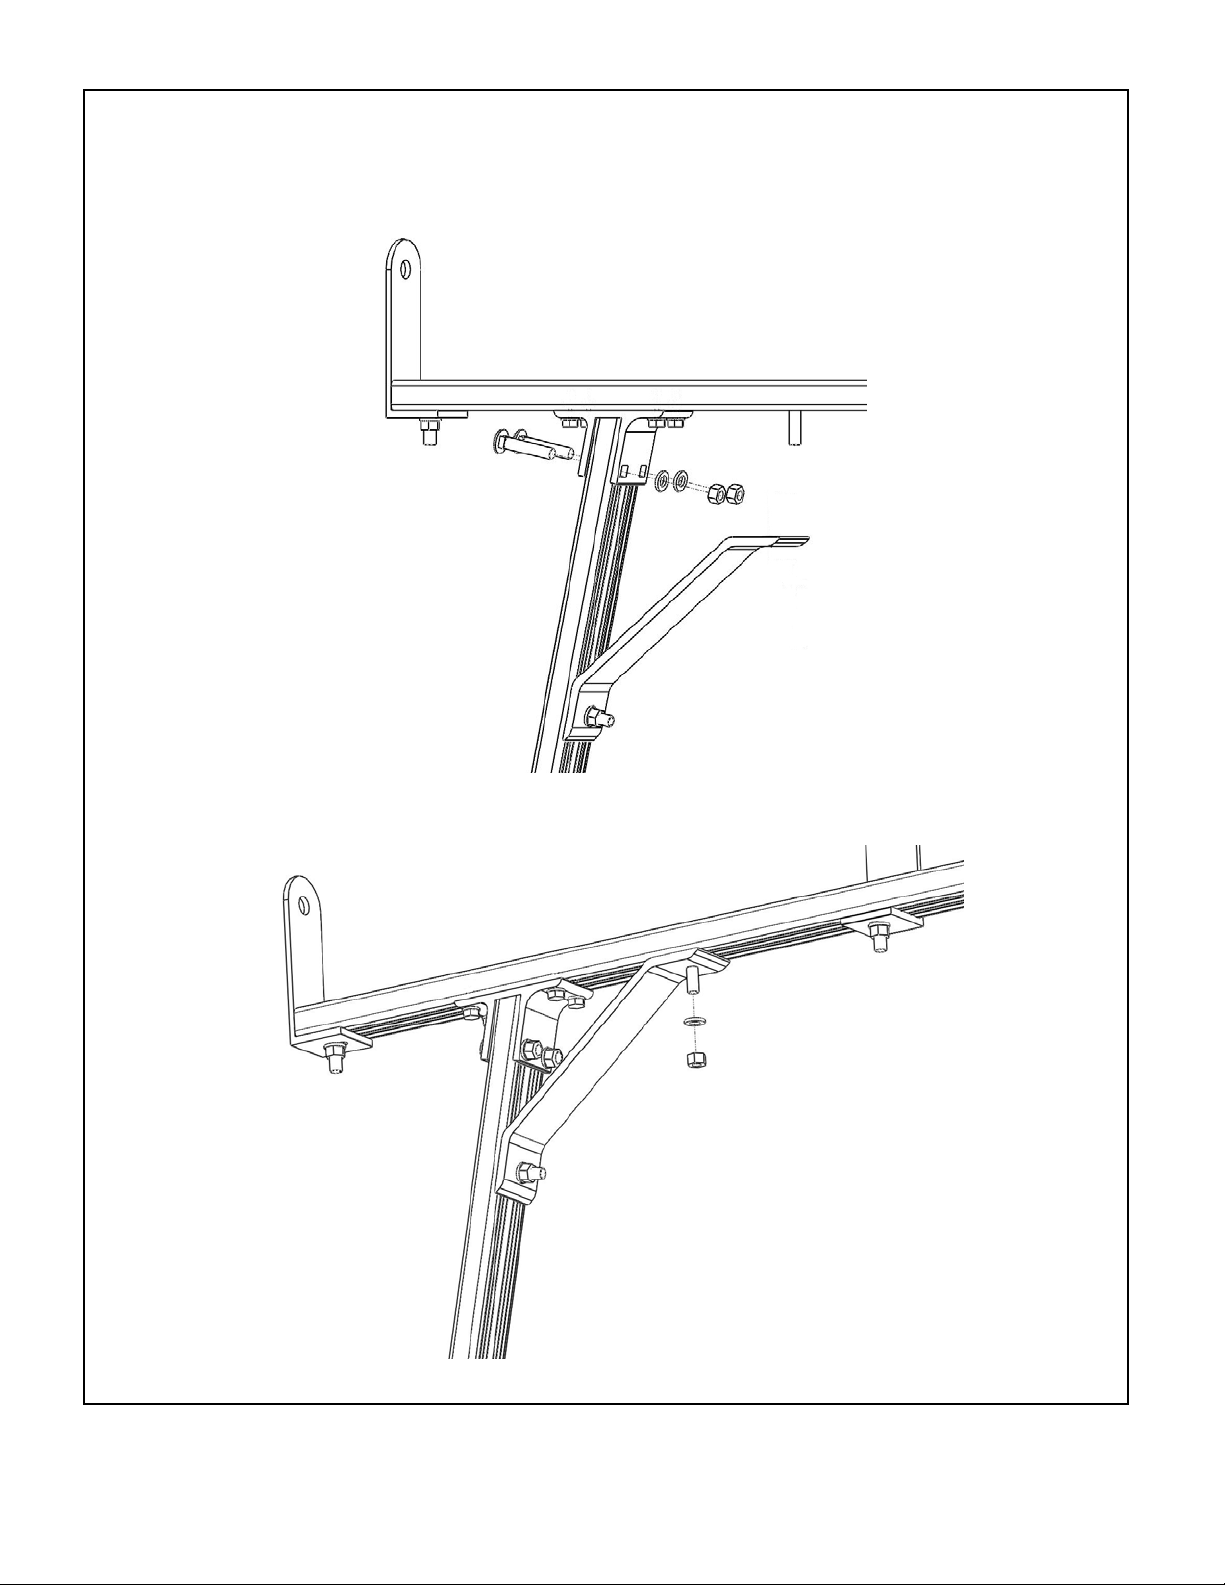
5. Rack assembly
Slide the leg into the “T” bracket.
Join the leg to the “T” bracket by installing (2) 3/8”-16 x 2” carriage bolts, (2) 3/8” split lock washers and (2) 3/8”-16 nuts. Leave the bolts
loose. Repeat for other legs.
Slide the HD brace along the leg towards the load bar. Align the 3/8”-16 x 1-3/4” bolt in the load bar with the top bolt hole on the HD brace.
Loosely secure the HD brace with a 3/8”-16 nut and a 3/8” split lock washer. Repeat for other legs.
HAULER RACKS, INC.
st
7109 31
Minneapolis, MN 55427-2848
WWW.HAULERRACKS.COM
Avenue North
5 of 8
Toll Free: 1-800-843-5445
Phone: 763-546-5620
Fax: 763-546-0933
Page 6
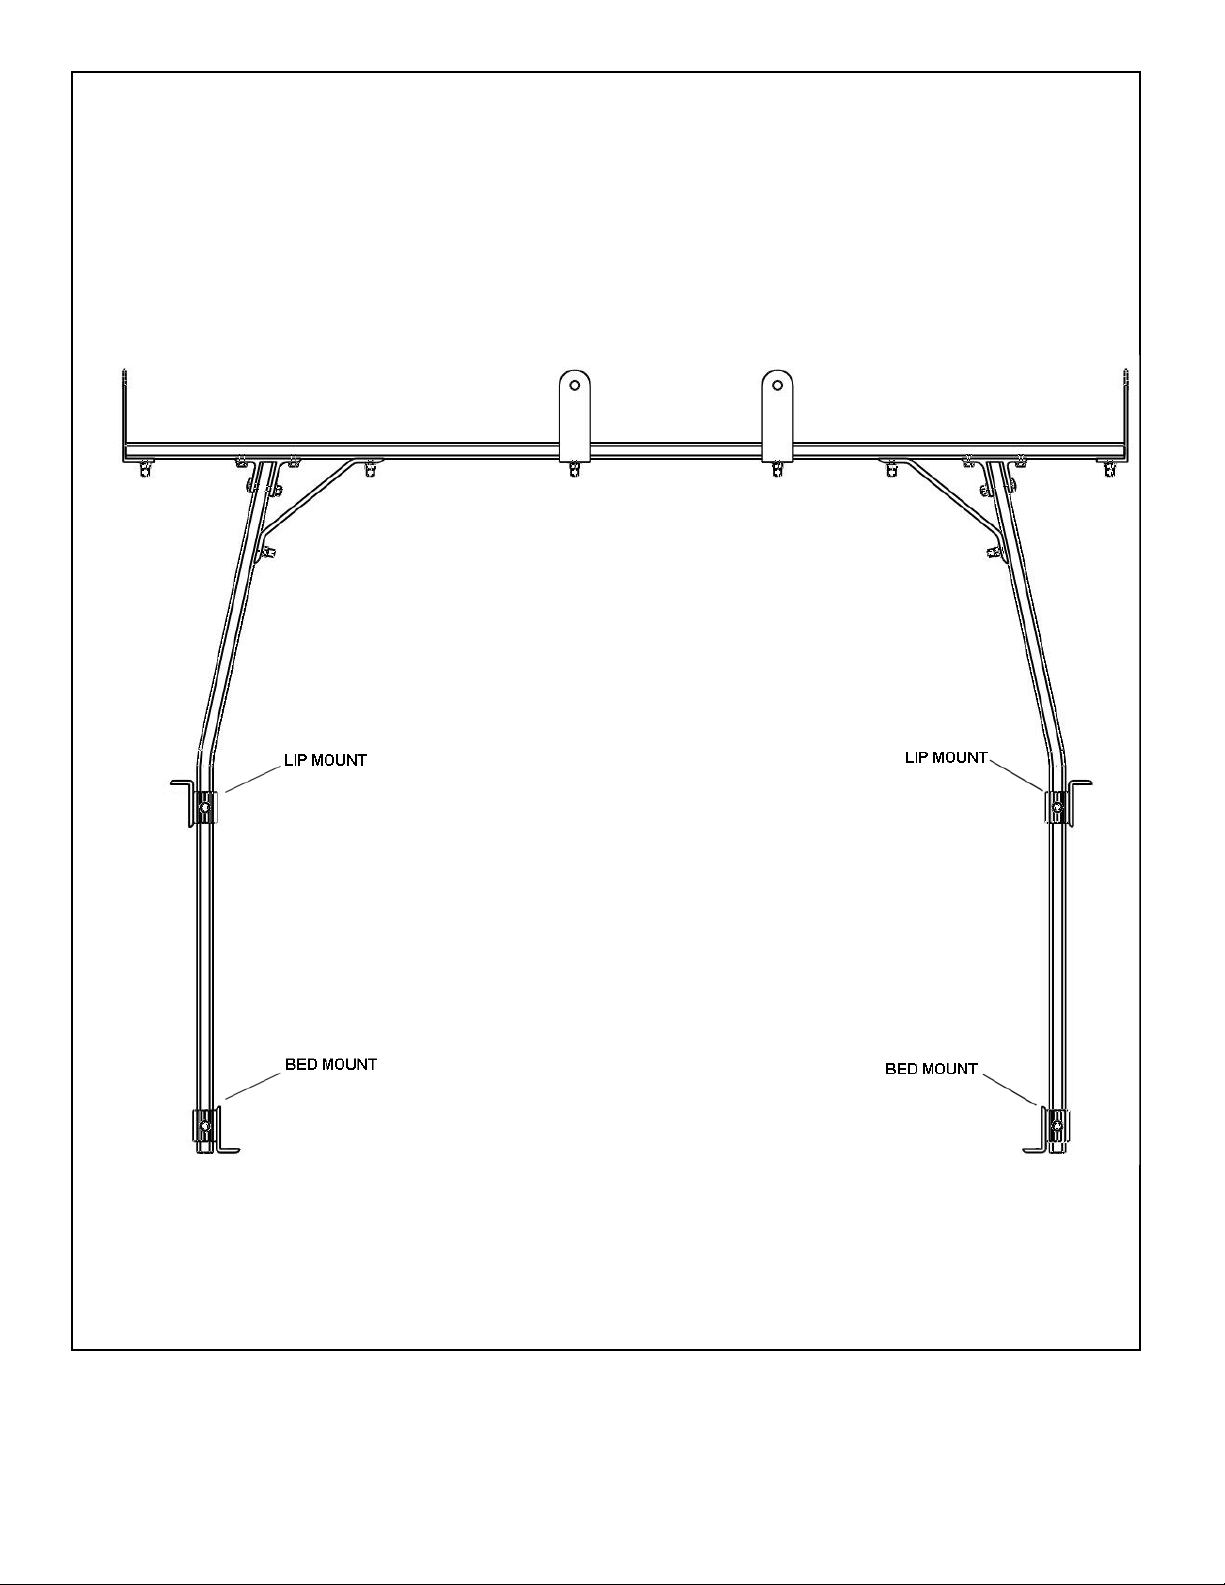
6. Mount placement
Lip mounts.
The lip mounts face outward and rest on the truck bed lip as shown below. Loosen the bolts on the lip mounts and slide one on each leg.
Finger tighten the 3/8”-16 x 1-1/4” hex head bolt on the located on the side of each mount. Repeat for other rack assembly.
Bed mounts.
The bed mounts face inward and rest on the bed floor as shown below. Loosen the bolts on the bed mounts and slide one on each leg.
Finger tighten the 3/8”-16 x 1-1/4” hex head bolt on the located on the side of each mount. Repeat for other rack assembly.
HAULER RACKS, INC.
st
7109 31
Minneapolis, MN 55427-2848
WWW.HAULERRACKS.COM
Avenue North
6 of 8
Toll Free: 1-800-843-5445
Phone: 763-546-5620
Fax: 763-546-0933
Page 7
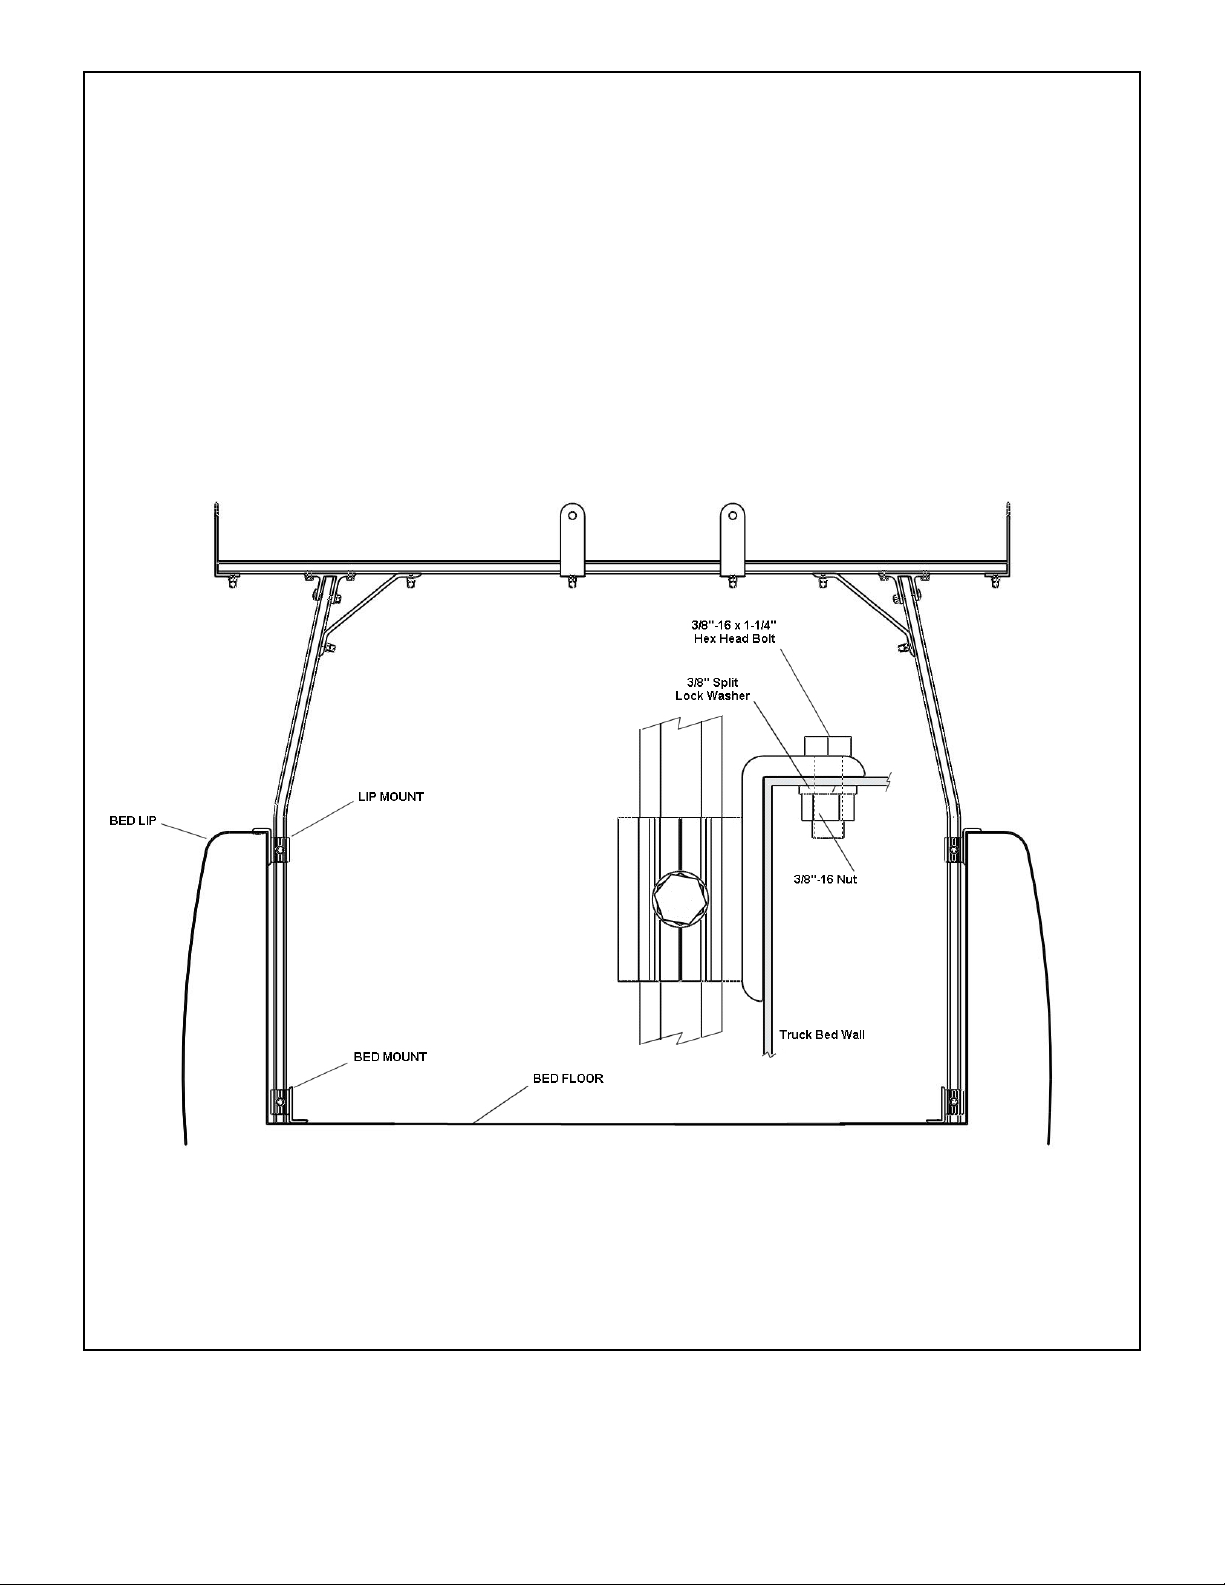
7. Mounting to truck bed
Place the rack assemblies on the truck in the desired positions.
Adjust the lip mounts so that it rests on the lip of the truck bed. Make sure the legs are straight up and down. For best results, use a level to
check plumb.
Using the lip mounts and bed mounts as templates, mark holes to be drilled.
Check for access underneath marked holes for clearance needed to install washers and nuts. Adjust position if needed. If access is not
available, use the 3/8” x 1” lag bolts. If using the lag bolts, install by drilling ¼” diameter holes.
Use a drill and make (2) 3/8” diameter holes in the lip of the truck bed and (2) holes in the floor of bed at the marked locations. Repeat for
other rack assembly.
Mount the lip mount to the lip of the truck bed using 3/8”-16 x1-1/4” hex bolts, 3/8” split lock washers and 3/8”-16 nuts.
Mount the bed mount to the bed floor using 3/8”-16 x1-1/4” hex bolts, 3/8” split lock washers and 3/8”-16 nuts.
Check straightness and then tighten all mounting and rack hardware. Position the adjustable center load secure posts as needed.
HAULER RACKS, INC.
st
7109 31
Minneapolis, MN 55427-2848
WWW.HAULERRACKS.COM
Avenue North
7 of 8
Toll Free: 1-800-843-5445
Phone: 763-546-5620
Fax: 763-546-0933
Page 8

Customer Limited Warranty and Standard Return Policy
Hauler Racks, Inc. offers to preferred customers a special limited warranty. It is our goal to provide effective service for
any warranty or standard return. This statement of warranty and return policy is divided into two sections: Warranty
Returns of Defective Product and Standard Returns of Unused Product.
Warranty Returns of Defective Product
Hauler Racks, Inc. will repair or replace, at its option and without charge, any properly installed Hauler component that
fails due to defect in material or workmanship up to 30 days from the initial registered consumer purchase. All of our
aluminum product line is guaranteed not to rust or corrode for 1 year. Proof of Purchase must be provided for warranty
to be honored.
Loads should never exceed 1/3 of your vehicle’s manufacturer’s total load capacity. Loads should never extend more
than 1 foot on either end of rack. This warranty is void if any damage to the product is due to misuse, abuse, neglect,
accident, improper installation, or any uses contrary to the instructions accompanying the product. The warranty is also
void if racks are altered in any manner. The racks have been load tested for the racks capacity to hold loads when not
on a vehicle. Hauler Racks, Inc. does not warranty load capacities. As the factory has no way of knowing if the product
was properly assembled, installed, used according to instructions, or if loads were secured properly.
This warranty covers the cost of the defective component and not the cost of removal, installation or other incidental
charges unless other arrangements have been made with Hauler Racks.
This warranty gives you specific legal rights and you may have other rights which vary from state to state.
All warranty claims must receive a Return Authorization number from Hauler Racks, Inc. BEFORE the product is
returned to the Company. Please follow this procedure:
1. Call Hauler at 800-843-5445 to request a Return Authorization number. You will need to provide the following
information
• Specific nature of the defect • Product installation date
• Product part number • Original sales invoice number
2. When a replacement or repair strategy is determined, a Return Authorization number will be assigned to the claim.
3. A replacement invoice and shipping document will be generated at Hauler Racks to initiate any replacement product.
Replacement product will be sent according to standard shipping cycles.
4. The purchaser is responsible for packing and return shipping of the product. The RETURN AUTHORIZ ATION
NUMBER MUST BE CLEARLY MARKED ON THE OUTSIDE OF THE PACKAGE. Unmarked packages will be
refused. Any product damage that occurs during the shipping is not covered under warranty. The purchaser must
pursue claims for shipping damage with the shipping center.
5. The purchaser is responsible for payment of both the original product invoice and the replacement invoice according
to established credit terms.
6. Upon receipt of the returned product, Hauler Racks will review the claim for warranty conformance. If the claim meets
warranty criteria, a credit for the original invoice amount will be posted to the purchaser’s account and a credit memo
will be mailed. If the claim does not meet warranty criteria, the purchaser will receive a statement detailing reasons
for partial credit or denial. At the purchaser’s option, denied product may be returned to the purchaser.
Standard Returns of Unused Product
Unused product may be eligible for return to Hauler Racks, Inc. Follow the procedure described in the section on
Warranty Returns to receive an Authorization Number.
Returned product which is less than 6 (six) months old is subject to a 20% restocking fee.
Returned product which is more than 6 (six) months old may not be eligible for return or may incur additional restocking
charges.
© 2008 Hauler Racks. Revised 10-9-2008
HAULER RACKS, INC.
st
7109 31
Minneapolis, MN 55427-2848
WWW.HAULERRACKS.COM
Avenue North
8 of 8
UTR-A-HD FULL & MINI
HMIS06
Toll Free: 1-800-843-5445
Phone: 763-546-5620
Fax: 763-546-0933
 Loading...