


USER MANUAL
Compact Fanless Computers
HT B17 xxy-zzzz
HT B18 xxy-zzzz
xx=standard or customized
y=operating system
zzzz=configuration dependent
User Manual HT B17 / HT B18
Updated: 03 Jun 2015 Doc Id: INB100032-5 (Rev 20)
Created: 363
Approved: 6987
Please visit www.hatteland-display.com for the latest electronic version of this manual.
Hatteland Display AS, Stokkastrandvegen 87B, N-5578 Nedre Vats, Norway
Tel: (+47) 4814 2200 - mail@hatteland-display.com - www.hatteland-display.com

Copyright © 2015 Hatteland Display AS
Stokkastrandvegen 87B, N-5578 Nedre Vats, Norway.
All rights are reserved by Hatteland Display AS. This information may not, in whole or in part, be
copied, photocopied, reproduced, translated or reduced to any electronic medium or machine-
readable form without the prior written consent of Hatteland Display AS. Review also:
www.hatteland-display.com/pdf/misc/doc100703-1_permission_to_create_user_manuals.pdf
The products described, or referenced, herein are copyrighted to the respective owners.
The products may not be copied or duplicated in any way. This documentation contains proprietary
information that is not to be disclosed to persons outside the user’s company without prior written consent
of Hatteland Display AS.
The copyright notice appearing above is included to provide statutory protection in the event of
unauthorized or unintentional public disclosure.
All other product names or trademarks are properties of their respective owners !
WARNING: This is a class A product. In a domestic environment this product may cause radio interference
in which case the user may be required to take adequate measures.
Last revised 6 Jan 2015

Contents
Contents .................................................................................... 3
Contents of package ..........................................................................5
General ...................................................................................... 7
About this manual ...............................................................................8
About Hatteland Display .....................................................................8
www.hatteland-display.com ................................................................8
Contact Information ............................................................................ 8
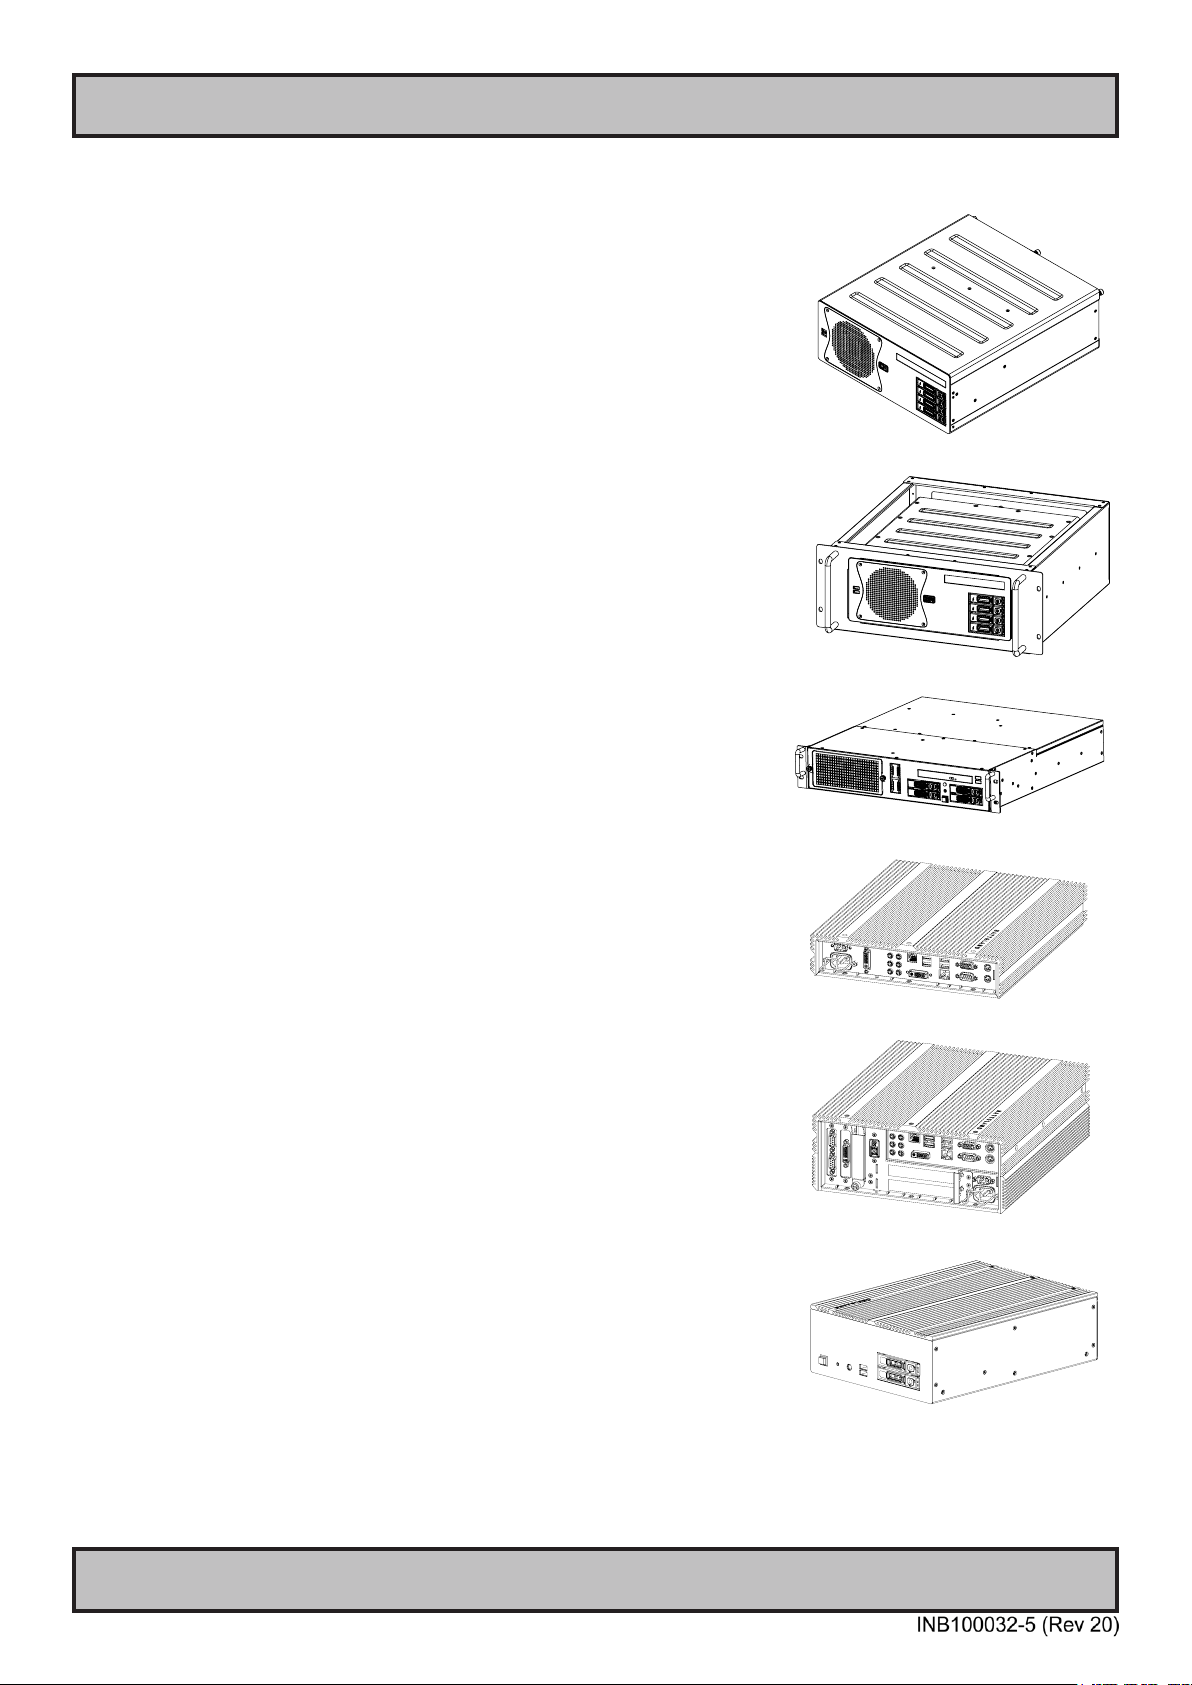
Computers introduction ...................................................................... 9
Basic Construction - HT B17 ............................................................ 10
Basic Construction - HT B18 ............................................................ 11
Product Labels (Examples) .............................................................. 12
Serial Number Label Placement (external) ..................................12
Operating System Serial Number Label Placement .....................12
Installation ............................................................................... 13
Installation and mounting of computers ............................................14
Cables ..............................................................................................15
Conguring DC power input housing connector ...........................15
Ferrites ............................................................................................. 15
Accessible SSD (Hard Drive HDD) removal / replacement HT B18 . 16
Internal PCI Cards / Brackets dismounting and mounting HT B18 ..17
Internal SSD (Hard Drive HDD) removal / replacement HT B1x ...... 18
Physical Overview - HT B17 .............................................................19
Physical Overview - HT B18 .............................................................23
Specications ......................................................................... 27
Specications - HT B17 ....................................................................28
Specications - HT B18 ....................................................................29
3
IND100206-23

Contents
Technical Drawings ................................................................ 31
Technical Drawings - HT B17 ........................................................... 32
Technical Drawings - HT B18 ........................................................... 33
- HWCode00 ................................................................................33
- HWCode90 ................................................................................34
Technical Drawings - Accessories ........................................ 35
Technical Drawings - Mounting Bracket Kit ...................................... 36
for HT B17 and HT B18 ................................................................36
Technical Drawings - Mounting Plate/Cable Tension Relievers .......37
for HT B17 ....................................................................................37
for HT B18 HWcode00 .................................................................38
for HT B18 HWcode90 .................................................................39
Technical Drawings - Mounting Plate/Cable Tension Relievers .......40
for HT B22, HT B17, B18, B07, B08 ............................................40
Technical Drawings - Mounting Plate/Cable Tension Relievers .......41
HW00 for HT B17, B18, B07, B08 ................................................41
Technical Drawings - Mounting Plate ............................................... 42
for HT B17, B18, B07, B08 ...........................................................42
Appendixes ............................................................................. 43
SSD Selection Guide ........................................................................44
Pinout Assignments - Common Connectors .....................................48
Trouble-shooting ..............................................................................51
Declaration of Conformity .................................................................52
Return Of Goods Information ........................................................... 53
General Terms and Conditions .........................................................54
Notes ................................................................................................ 55
Revision History ...............................................................................57
4
IND100206-23

Contents of package
This product is shipped with:
Item Description Illustration
EUR TYPE F
US TYPE B
FS-CABLE EU
80099
FCE17-E2W2SS-2N0 &
L17DPPK09JSU (cover)
MEDIA STD01
1 pcs of power cable European Type F “Schuko” to IEC.
Length 1.8m
1 pcs of power cable US Type B plug to IEC.
Length 1.8m
1 pcs of DC Power Input housing with internal cable screw terminal.
Documentation and Driver DVD for factory installed components like mainboard, IDE,
network etc. For most recent drivers, please visit “www.hatteland-display.com/archive”.
Note: To use this DVD disc you will need an external USB CD/DVD drive or provide means of
getting contents copied over via USB memory stick/network to the operating system. You can
alternatively download the drivers from our website www.hatteland-display.com
Test Reports papers:
1 pcs of Product Declaration
1 pcs of Computer Checklist
1 pcs of BurnInTest Certificate
IEC
IEC
Menu browser for
Microsoft® Windows®
1 pcs of Mounting Bracket Kit suitable for Wall or Desktop mounting, consists of:
- 8 pcs M4x16 screws
- 2 pcs small brackets
- 8 pcs M4 lock nuts
HT 00245 OPT-A1 (B17) or
HT 00246 OPT-A1 (B18)
- 2 pcs mounting brackets
Package may also include: (based on accessories/options ordered)
Item Description Illustration
Recovery/Restore Kit (1 x USB Memory Stick with original installation).
For reverting back to factory/customized Operating System installations.
For more information, visit http://www.hatteland-display.com/os
HT 00300 MSOS IMAGE
HT 00228 OPT-A1
Note: Only applicable for factory delivered units with HDD/SSD hardware.
Kit contains:
1 x Mounting Plate with cable relief, RAL 9011.
6 x M3x12 (Torx DIN 965 Stainless Steel) screws
(additional screws are provided for similar computer models,
please use M4x12 for HT B17 / HT B18).
Mounting Plate / Bracket RAL 9011.
HT 00244 OPT-A1
HT 00237 OPT-A1
?
IND100207-11
Mounting bracket for PCI cards (HT B18 model only).
For computers that include 3rd party hardware; the package / accessories box may also
include additional CD / HW / Information from 3rd party supplier(s).
5

This page left intentionally blank
6

General
7

Hatteland Display AS
About this manual
The manual contains electrical, mechanical and input/output signal specications. All specications in this manual,
due to manufacturing, new revisions and approvals, are subject to change without notice. However, the last update
and revision of this manual are shown both on the frontpage and also in the “Revision History” chapter at the end of
the manual.
Furthermore, for third party datasheet and user manuals, please see dedicated Documentation and Driver DVD
delivered with the product or contact our sales/technical/helpdesk personnel for support.
About Hatteland Display
Hatteland Display is the leading technology provider of specialized display and computer products, delivering high
quality, unique and customized solutions to the international maritime, naval and industrial markets.
The company represents innovation and quality to the system integrators world wide. Effective quality assurance and
investment in sophisticated in-house manufacturing methods and facilities enable us to deliver Type Approved and Mil
tested products. Our customer oriented approach, technical knowledge and dedication to R&D, makes us a trusted
and preferred supplier of approved solutions, which are backed up by a strong service network.
www.hatteland-display.com
You will nd our website full of useful information to help you make an informed choice as to the right product for your
needs. You will nd detailed product descriptions and specications for the entire range on Displays, Computers and
Panel Computers, Military solutions as well as the range of supporting accessories. The site carries a wealth of
information regarding our product testing and approvals in addition to company contact information for our various
ofces around the world, the global service centers and the technical help desk, all ensuring the best possible
support wherever you, or your vessel, may be in the world.
Contact Information
Head ofce, Vats / Norway:
Hatteland Display AS
Stokkastrandvegen 87B
N-5578 Nedre Vats, Norway
Sales ofce, Frankfurt / Germany:
Hatteland Display GmbH
Werner Heisenberg Strasse 12,
D-63263 Neu-Isenburg, Germany
Tel: +47 4814 2200
Fax: +47 5276 5444
mail@hatteland-display.com
Sales ofce, Oslo / Norway:
Solbråveien 20
N-1383 Asker
Norway
Tel: +47 4814 2200
Fax: +47 5276 5444
Sales ofce, Vista / USA:
Hatteland Display Inc
380 South Melrose Drive,
Suite 349
Vista, CA 92081
USA
Tel: +1 760-643-4061
Fax: +1 858-408-1834
For an up-2-date list, please visit www.hatteland-display.com/locations
General
8
Tel: +49 6102 370 954
Fax: +49 6102 370 968
Sales ofce, Aix-en-Provence / France:
Hatteland Display SAS
ACTIMART, 1140 RUE AMPERE, BP 50 196
13795 AIX-EN-PROVENCE, CEDEX 3
France
Tel: +33 (0) 4 42 16 47 57
Fax: +33 (0) 4 42 16 47 00
IND100077-1
Computers
Computers introduction
Hatteland Display’s range of type-approved computers is designed to perform in
harsh environments while providing the performance and flexibility you expect.
We offer rack mount and black box/standalone computer solutions for every
need. Our computers are used by system integrators, boat builders and endusers and can be found on all vessel types, all over the world.
If you are looking for a high quality computer for navigation, monitoring or
entertainment solutions, Hatteland Display can fulfil your high expectations at a
reasonable cost.
Our computer range covers all eventualities and requirements. We offer a wide
range of processor choices, HDD and power options, and solid state technology,
neatly engineered within industry standard form factors such as 19” rack mount,
2U and 4U solutions.
We continually develop our computers portfolio to make the best use of emerging
computer technology so you can be sure that your Hatteland Display computer
offers the power needed to run modern applications, with the flexibility to be
installed wherever you want, for any marine use.
Designed to perform in harsh environments...
IND101057-2
General
9
Basic Construction - HT B17
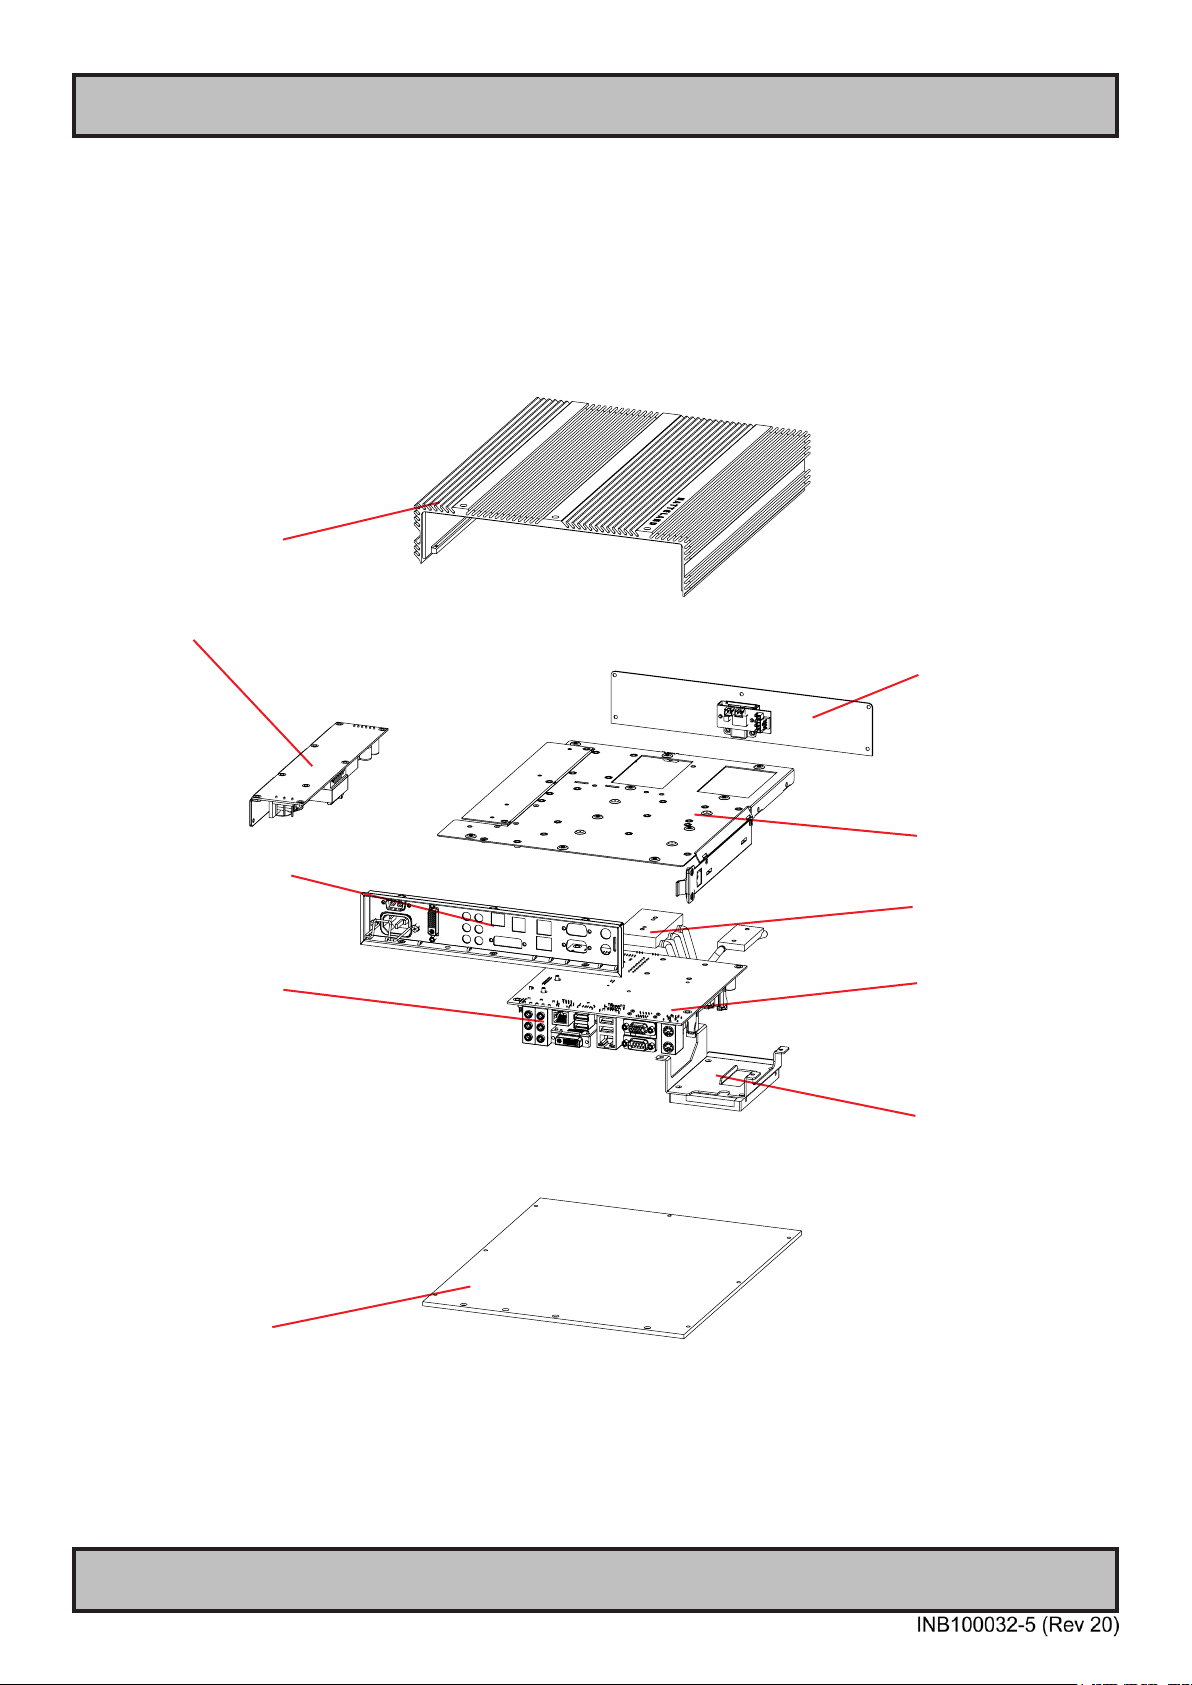
Basic Construction
Compact Fanless Computer
Chassis with
cooling design
Power Module
Connector plates
I/O Connectors
Front plate
with Serial
Number Label
Chassis Support
Mechanics
Heat Pipe Cooling
Mainboard
and CPU
SSD/HDD and Casing
Bottom chassis
plate
IND100077-102
General
Standard model, customized versions may vary
10

Basic Construction - HT B18
Basic Construction
Compact Fanless Computer
Chassis with
cooling design
Replaceable
and casing
I/O Connectors
Power Module
SSD/HDD
Connector plates
Front plate
with Serial
Number Label
Chassis Support
Mechanics
Heat Pipe Cooling
Mainboard
and CPU
Memory
IND100077-99
Power Inputs
General
PCI Card & Slots
Bottom chassis
plate
Standard model, customized versions may vary
11
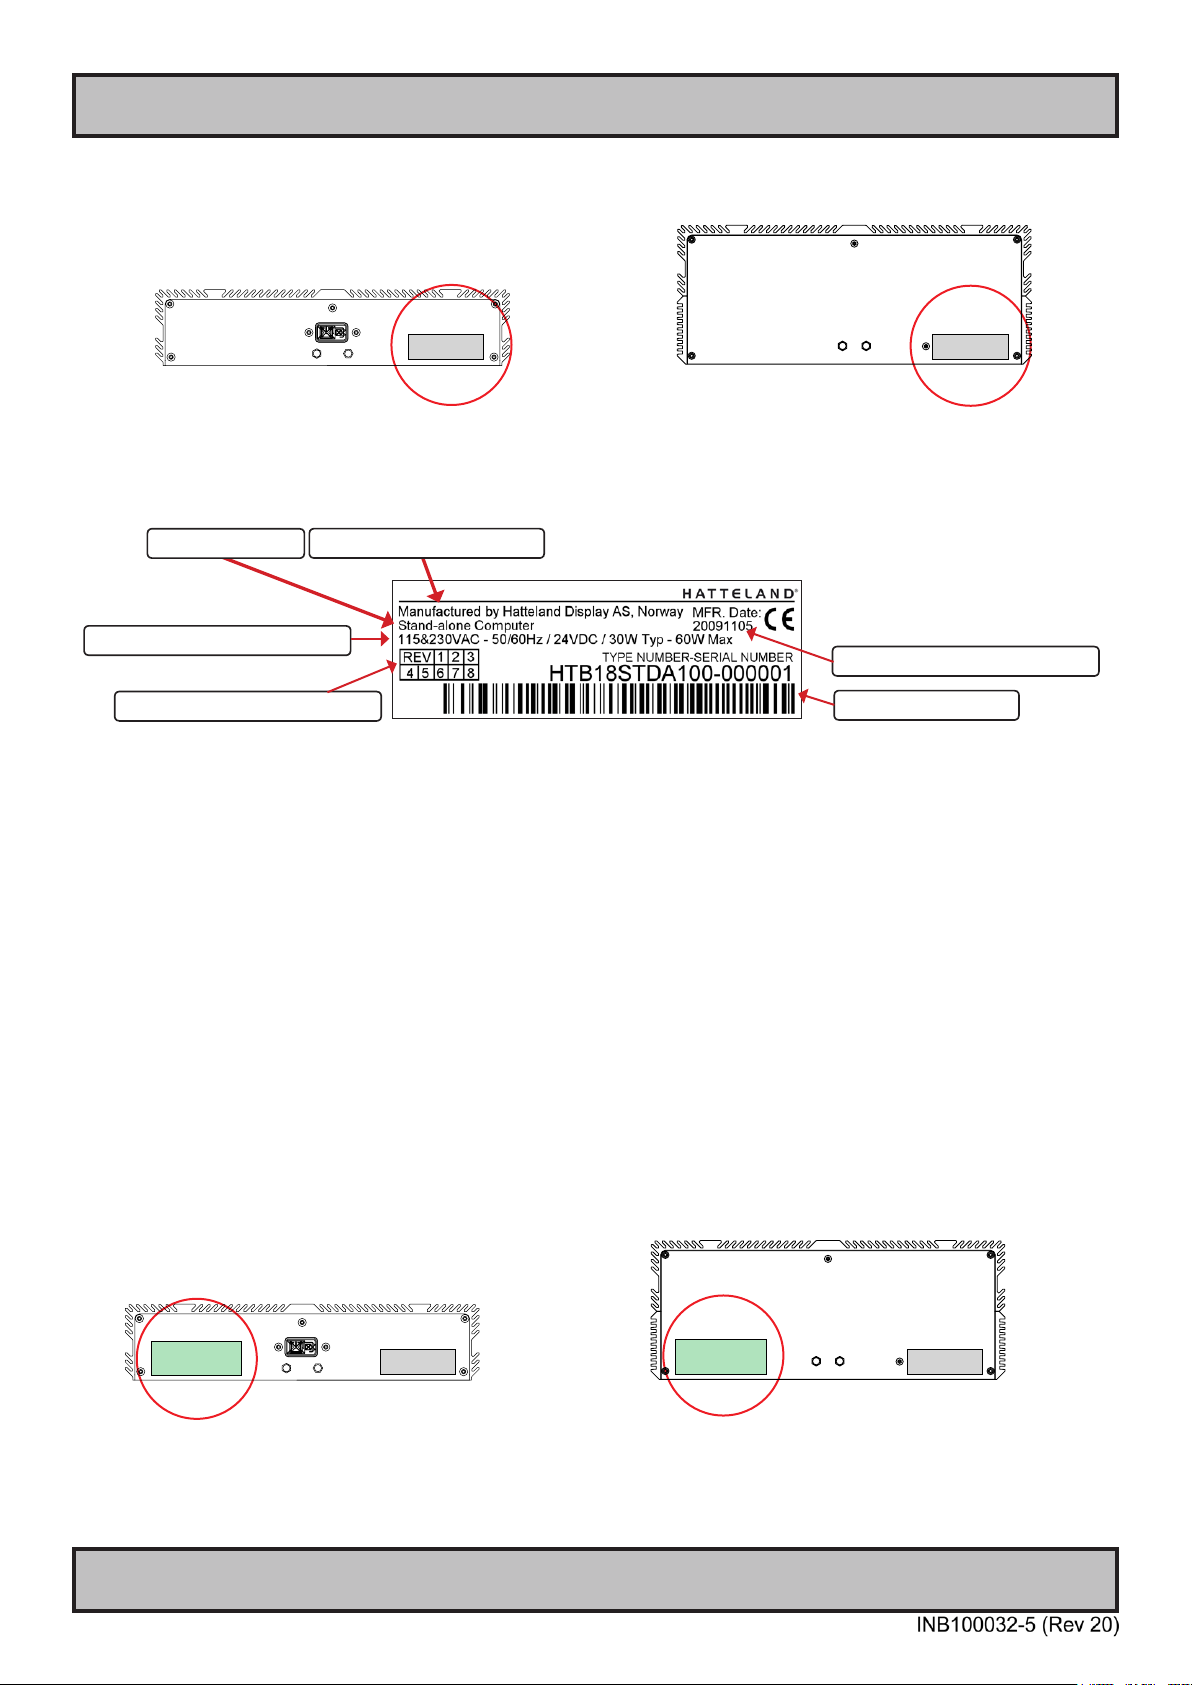
Product Labels (Examples)
Product Labels (Examples)
Serial Number Label Placement (external)
HT B17
HT B18
Serial Number Label Layout
Product Type
Input Voltages & Power Rating
Product Hardware Revision
Manufacturer & Country
Manufactured Date yyyymmdd
Barcode (TYP+SNO)
Label Size: 6cm x 2cm
Serial Number Label Nomenclature
XX XYY XXX-XYYY-YYYYYY NOMENCLATURE - X=Letters, Y=Numbers
HT B18 STD-A100-000001 Example
|| ||| ||| |||| ||||||
|| ||| ||| |||| ¤¤¤¤¤¤- Serial Number. Due to revisions, numbers may be 1 to 7 digits
|| ||| ||| |¤¤¤-------- Conguration ID (for components like memory, storage etc.)
|| ||| ||| ¤----------- Power Input ID (115&230VAC - 50/60Hz + 24VDC)
|| ||| ||¤------------ Installed Operating System ID / No Installed OS ID
|| ||| ¤¤-------------- Abbreviation for Standard (ST) or reserved customer ID
|| |¤¤----------------- Electronics / Mainboard / Technology Revision ID
|| ¤------------------- Chassis Type ID
¤¤--------------------- Manufacturer ID / Product Series ID
Operating System Serial Number Label Placement
Label Size: 7cm x 2.8cm
HT B17
General
IND100240-7
HT B18
12

Installation
13

General Installation Recommendations
Installation and mounting of computers
1. Units may be intended for various methods of installation or mounting (rack mounting, panel mounting,
bracket mounting, ceiling/wall mounting); for details, please see the relevant mechanical drawings.
2. Adequate ventilation is a necessary prerequisite for the life of the unit. The air inlet and outlet openings must
denitely be kept clear; coverings which restrict ventilation are not permissible. The product might be without
any ventilation aperatures which means pt.2 does not apply.
3. Exposure to direct sunlight can cause a considerable increase in the temperature of the unit, and might under
certain circumstances lead to overtemperature. This point should already be taken into consideration when
the bridge equipment is being planned (sun shades, distance from the windows, ventilation, etc.)
4. Space necessary for ventilation, for cable inlets, for the operating procedures and for maintenance, must be
provided.
5. To further improve the cooling of the unit we recommend installing Cooling Fans underneath blowing upwards
into the unit air inlet. This may be required in high temperature applications and also when there is reason to
expect temperature problems due to non-optimal way of mounting.
6. This Product shall be grounded to protective Earth. For AC Power cables this is done trough the ground wire
in the connector, for DC input the ground bolt shall be used. A shorter and thicker cable gives better
grounding. A 6mm² is recommended, but a 4mm² or even 2.5mm² can be used for this purpose.
7. Expose to heavy vibration and acoustic noise might under certain circumstances affect functionality and
expected lifetime. This must be considered during system assembly and installation. Mounting position must
carefully be selected to avoid any exposure of amplied vibration.
General mounting instructions
1. The useful life of the components of all Electronics Units generally decreases with increasing ambient
temperature; it is therefore advisable to install such units in air-conditioned rooms. If there are no such
facilities, these rooms must at least be dry, adequately ventilated and kept at a suitable temperature in order
to prevent the formation of condensation inside the unit.
2. With most Electronic Units, cooling takes place via the surface of the casing. The cooling must not be
impaired by partial covering of the unit or by installation of the unit in a conned cabinet.
3. In the area of the wheel house, the distance of each electronics unit from the magnetic standard compass or
the magnetic steering compass must not be less than the permitted magnetic protection distance. This
distance is measured from the centre of the magnetic system of the compass to the nearest point on the
corresponding unit concerned. The exact distance is often mentioned in the specic product specications.
4. Transportation damage, even if apparently insignicant at rst glance, must immediately be examined and be
reported to the freight carrier. The moment of setting-to-work of the equipment is too late, not only for
reporting the damage but also for the supply of replacements.
5. The classication is only valid for approved mounting brackets provided by Hatteland Display. The unit shall
be mounted stand-alone without any devices or loose parts placed at or nearby the unit. Any other type of
mounting might require test and re-classication.
IND100210-1
Installation
14

General Installation Recommendations
Cables
Use only high quality shielded signal cables. For RGB/DVI cables use only cables with separate coax for Red, Green
and Blue.
Conguring DC power input housing connector
Note: Only applicable for certain models!
For installations that require DC power input, use the provided
2-pin DC Power Input housing with internal cable screw terminal.
1: Open the housing
2: Unmount the fasteners. (FIG 1)
3: Mount power cables to screw terminal (FIG 2). Note polarity!
4: Secure the cable tightly with fasteners (FIG 3, FIG 1)
5: Close the housing
Note: Please check polarity before connecting any cables
to the screw terminal.
Ferrites
On selected products, the ferrites prevent high frequency
electrical noise (radio frequency interference) from exiting or
entering the equipment. To verify if your product require this,
please see the “Physical Overview” chapter in this manual. The
ferrites are part of the contents of the package also specied in the
“Contents Of Package” chapter early in this manual. The ferrites
must be mounted on specic cables to fully comply with the
Type Approvals!
+ -
-
FIG1
FIG 3
+
FIG 1
FIG 2
Screw terminal
+ -
FIG2
The ferrites should be mounted (clipped in place on the cable as
shown in illustration) as close as possible to the cable connector
on the rear side of the computer product. Open up the ferrite,
place the cable inside as shown in FIG1, and then gently close it
until a click can be heard (FIG2).
To computer
To computer
IND100210-1
Installation
15
General Installation Recommendations
Accessible SSD (Hard Drive HDD) removal / replacement HT B18
Note: Areas of interest are marked in this section with symbols in RED color. Please power off and disconnect ALL
cables from the computer unit before proceeding!
▼ 1: Unscrew 1 pcs of knob screw anti-clockwise as
indicated with your ngers.
▼ 3: Pull out the SSD and its casing as indicated.
▼ 2: Lift the bracket upwards as indicated.
▼ 4: Unscrew 4 pcs x M3x4mm Phillips countersunk
screws as indicated and replace or remove the SSD drive
as needed.
IND100210-6
- Repeat the procedure backwards to nalize operation -
Installation
16

General Installation Recommendations
Internal PCI Cards / Brackets dismounting and mounting HT B18
Note: Areas of interest are marked in this section with symbols in RED color. Please power off and disconnect ALL
cables from the computer unit before proceeding!
▼ 1: Unscrew the bottom cover plate (10 pcs of
M3x6mm Torx countersunk screws and lift the cover
up.
▼ 3: Now remove the PCI dummy bracket(s) as needed
for the PCI card(s) you want to install. Only remove the
respective dummy bracket for the PCI card(s) you install,
otherwise dust and cooling issues might occur.
▼ 2: Unscrew 6 pcs countersunk screws and remove
both the EMC Bracket (top 2 screws) and PCI Bracket
holder (2 screws inside + 2 x M3x6mm Torx screws in
rear) as indicated.
▼ 4: Position the PCI card(s) until it stops into the
rear of the computer as arrow#1 indicates. Then, slide
the connector area of the PCI card(s) into the PCI Slot
header(s) gently until it’s fully inserted as arrow #2
shows. Use a rm grip and do not bend/force the cards.
- Repeat the procedure backwards to nalize operation -
Installation
#1
#2
17
IND100210-6

General Installation Recommendations
Internal SSD (Hard Drive HDD) removal / replacement HT B1x
Note: Areas of interest are marked in this section with symbols in RED color. Please power off and disconnect ALL
cables from the computer unit before proceeding! HT B17 used as illustration in this procedure, but it is valid for both
HT B17 and HT B18 computers.
▼ 1: Unscrew the bottom cover plate (10 pcs of
M3x6mm Torx countersunk screws and lift the cover
up.
▼ 3: Unscrew 4 pcs x M3x4mm Phillips countersunk
screws as indicated and replace or remove the SSD
drive as needed.
▼ 2: Unscrew 2 pcs x M3x4mm Phillips countersunk
screws and 2 pcs x M3 Fastener Nut as indicated. Then
lift the entire SSD Device bracket up.
▼ 4: Connect your Serial ATA cable ~20cm (not included)
to the SSD. Power Cable is already available from the
internal power module.
IND100210-6
- Repeat the procedure backwards to nalize operation -
Installation
To SSD To HT B1x Motherboard
18

Physical Overview - HT B17
Front area of computer
Reset Button, Power LED & Button
2.5” internal S-ATA SSD Hard Drive
Power LED & Button:
To turn ON the computer, press down button and release it immediately. The Power LED indication riing will illuminate
green and the operating system will automatically boot. To turn OFF the computer, press down this button and hold it
for 4 seconds. The operating system may require additionally tasks to be performed before computer shuts down and
turns off the unit.
Reset Button: (Hard Reset)
To reset the computer in case of severe software failure, press this button. This reset button is a hard reset which
means the operating system will NOT be warned. Using this reset method may damage les and / or operating system
in worst case scenarios. Precaution should be taken when using this. To perform a safe software reset, press either
the power button, or use the operating system own reset functionality if possible.
2.5” internal S-ATA SSD Hard Drive:
The B17 unit can use 1 x SSD, 2.5” as the main data storage device. The operating system and all other les will
be placed on this, normally visible as drive C: This device is normally factory installed option. The storage device is
located inside the unit and can not be accessed/replaced from the outside.
IND100133-41
19

Physical Overview - HT B17
Operation/Connection area of computer
DC Power Input DVI-D OUT (D2) USB 1,2,3,4
AC Power Input
Network #2
DVI-D OUT (D1) COM1 RS-232Audio IN/OUT Connectors
RGB/VGA OUT
Keyboard Port
HDD LED
Mouse Port
Network #1
COM1 Serial Port INPUT/OUTPUT:
Supports RS-232 using D-SUB 9P Male connectors. Fasten the cable to the connector using the provided screws on
the cable housing itself.
DVI-D OUT:
Connect your DVI cables to the DVI-D 24P Connectors (female) on the rear side of the unit. Screw the DVI cables to
the connectors and make sure you don’t bend any of the pins inside the cable connector when connecting. Note: For
1920x1200 and 1600x1200 resolutions, DVI must be set to CVT-RB (Coordinated Video Timing-Reduced Blanking)
mode manually to avoid intermittent flickering of the displayed image.
RGB OUTPUT:
Will output a signal from the computer for use with external display or monitor. Connects via a High Density D-SUB
15P Female connector. Fasten the cable to the connector using the provided screws on the cable housing itself.
Note for DVI and RGB outputs:
You can either use 2 x DVI-D outputs or 1 x DVI-D + 1 x DB15F (RGB/VGA), but not all 3 at once. It is important that
you connect display units BEFORE you boot up the computer. Once inside a booted Operating System (OS),
detection of connected or disconnected units will not be successfull as the hardware and OS driver does not allow
for realtime detection. In case of loss of signal, turn the unit off by pressing the front power button, reconnect signal
cables and power on+boot up again.
Network #1 / #2 INPUT/OUTPUT:
Supports 10/100/1000Mbps Ethernet (GBLAN). Suitable for twisted pair cables CAT.5E. Make sure the network cable
connector ”clicks” into the RJ-45 connector.
20
IND100133-41

Physical Overview - HT B17
Audio INPUT/OUTPUT:
All connectors are 3.5” Jack Stereo. AC’97 audio support. 7.1 channel. HD Audio. It can be congured via the
operating system to act as 2-channel, 4-channel, 6-channel or 8-channel. Please review 3rd party driver software/
manual to congure the channel setup.
Light Pink / Mic In Gray / Center / LFE Out
Light Green / Line Out Black / Rear Surround Out
Light Blue / Line IN Orange / Side Surround Out
USB1,2,3,4 INPUT/OUTPUT:
Supports any USB1.1 (12Mbps) or USB2.0 (480Mbps) compliant peripherals. Drivers for most USB devices are
usually included in operating system or on separate installation CD’s delivered with Third Party products. USB 1.1
devices will operate in USB 1.1 mode (12 Mbps).
PS/2 Mouse and PS/2 Keyboard INPUTS:
Connect the PS/2 mouse cable to the PS/2 5P Connector (female) marked with MS.
Connect the PS/2 keyboard cable to the PS/2 5P Connector (female) marked with KB.
HDD LED:
The Power LED Indication will illuminate green when HDD is reading/writing. When there is no HDD activity the LED
will be off.
AC Power INPUT:
The internal AC power module supports both 115VAC/60Hz and 230/50Hz power input using a standard IEC power
housing and is part of the Multipower functionality for the unit.
IND100133-41
21

Physical Overview - HT B17
Connect your DC power cable to the 2P Amphenol FCC17 D-SUB Connector (male). Secure the cable to the hex
spacers provided on the unit, and secure the other end to your power supply. The internal DC power module supports
24VDC and is part of the Multipower functionality for the unit.
GROUNDING SCREW:
Please review “General Installation Chapter”, pt. 6 for more information.
+ -
DC POWER INPUT:
Multi-power note: (For units supporting AC & DC input simultaneously)
The unit has a dual input power supply which will accept both AC and DC input. If both inputs are connected, the
unit will be powered by AC. If AC is disconnected it will automatically switch over to DC without affecting the operation
of the unit. This makes it possible to use AC power as primary power and a 24V battery as secondary power,
eliminating the need for expensive UPS systems.
IND100133-41
22

Physical Overview - HT B18
Operation/Connection area of computer
Reset Button, Power LED & Button
Replaceable 2.5 SSD
Hard Drive
COM2
RS-232
RS-422
RS-485
Network #2
DVI-D OUT (D2)
USB 1,2,3,4
Network #1
RGB/VGA OUT
COM1 RS-232
Keyboard Port
Mouse Port
HDD LED
DC Power Input
AC Power Input
Audio IN/OUT Connectors
DVI-D OUT (D1)
2 x PCI Slots
COM1,2 Serial Port INPUT/OUTPUT:
Supports RS-232 or RS-232/RS-422 or RS-485 using D-SUB 9P Male connectors. Fasten the cable to the connector
using the provided screws on the cable housing itself.
DVI-D OUT:
Connect your DVI cables to the DVI-D 24P Connectors (female) on the rear side of the unit. Screw the DVI cables to
the connectors and make sure you don’t bend any of the pins inside the cable connector when connecting. Note: For
1920x1200 and 1600x1200 resolutions, DVI must be set to CVT-RB (Coordinated Video Timing-Reduced Blanking)
mode manually to avoid intermittent flickering of the displayed image.
RGB OUTPUT:
Will output a signal from the computer for use with external display or monitor. Connects via a High Density D-SUB
15P Female connector. Fasten the cable to the connector using the
provided screws on the cable housing itself.
Note for DVI and RGB outputs:
You can either use 2 x DVI-D outputs or 1 x DVI-D + 1 x DB15F (RGB/VGA), but not all 3 at once. It is important that
you connect display units BEFORE you boot up the computer. Once inside a booted Operating System (OS),
detection of connected or disconnected units will not be successfull as the hardware and OS driver does not allow
for realtime detection. In case of loss of signal, turn the unit off by pressing the front power button, reconnect signal
cables and power on+boot up again.
23
IND100133-40

Physical Overview - HT B18
2.5” Replaceable internal S-ATA SSD Hard Drive:
The B18 unit can use 1 x SSD, 2.5” as the main data storage device. The operating system and all other les will be
placed on this, normally visible as drive C: This device is normally factory installed option. The storage device can be
easily be upgraded or replaced by loosing the fasten screw and pull the slot out.
Power LED & Button:
To turn ON the computer, press down button and release it immediately. The Power LED indication riing will illuminate
green and the operating system will automatically boot. To turn OFF the computer, press down this button and hold it
for 4 seconds. The operating system may require additionally tasks to be performed before computer shuts down and
turns off the unit.
Reset Button: (Hard Reset)
To reset the computer in case of severe software failure, press this button. This reset button is a hard reset which
means the operating system will NOT be warned. Using this reset method may damage les and / or operating system
in worst case scenarios. Precaution should be taken when using this. To perform a safe software reset, press either
the power button, or use the operating system own reset functionality if possible.
Audio INPUT/OUTPUT:
All connectors are 3.5” Jack Stereo. AC’97 audio support. 7.1 channel. HD Audio. It can be congured via the
operating system to act as 2-channel, 4-channel, 6-channel or 8-channel. Please review 3rd party driver software/
manual to congure the channel setup.
Orange / Side Surround Out Light Blue / Line IN
Black / Rear Surround Out Light Green / Line Out
Gray / Center / LFE Out Light Pink / Mic In
Network #1 / #2 INPUT/OUTPUT:
Supports 10/100/1000Mbps Ethernet (GBLAN). Suitable for twisted pair cables CAT.5E. Make sure the network cable
connector ”clicks” into the RJ-45 connector.
IND100133-40
24

Physical Overview - HT B18
USB1,2,3,4 INPUT/OUTPUT:
Supports any USB1.1 (12Mbps) or USB2.0 (480Mbps) compliant peripherals. Drivers for most USB devices are
usually included in operating system or on separate installation CD’s delivered with Third Party products. USB 1.1
devices will operate in USB 1.1 mode (12 Mbps).
PS/2 Mouse and PS/2 Keyboard INPUTS:
Connect the PS/2 mouse cable to the PS/2 5P Connector (female) marked with MS.
Connect the PS/2 keyboard cable to the PS/2 5P Connector (female) marked with KB.
HDD LED:
The Power LED Indication will illuminate green when HDD is reading/writing. When there is no HDD activity the LED
will be off.
AC Power INPUT:
The internal AC power module supports both 115VAC/60Hz and 230/50Hz power input using a standard IEC power
housing and is part of the Multipower functionality for the unit.
Connect your DC power cable to the 2P Amphenol FCC17 D-SUB Connector (male). Secure the cable to the hex
spacers provided on the unit, and secure the other end to your power supply. The internal DC power module supports
24VDC and is part of the Multipower functionality for the unit.
GROUNDING SCREW:
Please review “General Installation Chapter”, pt. 6 for more information.
+ -
DC POWER INPUT:
Multi-power note: (For units supporting AC & DC input simultaneously)
The unit has a dual input power supply which will accept both AC and DC input. If both inputs are connected, the
unit will be powered by AC. If AC is disconnected it will automatically switch over to DC without affecting the operation
of the unit. This makes it possible to use AC power as primary power and a 24V battery as secondary power,
eliminating the need for expensive UPS systems.
PCI Slot #1 & #2:
Supports 2 x PCI (Full Height & Length Prole) in two available slots. PCI cards is normally installed from factory or
returned to factory for upgrading if needed.
25
IND100133-40

This page left intentionally blank
26

Specications
27

Specications - HT B17
SPECIFICATIONS
Note: All specifi cations are subject to change without prior notice!
Please visit www.hatteland-display.com for the latest electronic version.
• 270.00 (W) x 57.95 (H) x 310.00 (D) mm
• 10.63" (W) x 2.28" (H) x 12.20" (D)
• Weight: Approx 5 kg
• Aluminium Cooling Chassis
• Power push button, power led, reset button and SSD Led
Multi-power Supply:
• 115&230VAC - 50/60Hz + 24VDC : Model HT B17 STx-Axxx (60W) (STD IEC + 1 x 2p D-SUB (male) - Amphenol FCC17)
Note: You may connect either AC power or DC power or both. In case both sources are connected, power will be sourced from the
AC input. If AC input is lost, there will be a uninterrupted switch-over to DC input.
• Power Consumption - Operating : 30W
• Operating : Temperature -15 deg. C to +55 deg. C
Humidity up to 95%
• Storage : Temperature -20 deg. C to +60 deg. C
Humidity up to 95%
Compass Safe Distance HT B17 STx-Axxx - Standard: 75cm - Steering: 45cm - MTBF (Mean Time Between Failures) = 44622 hours
HT B17 ST0-A100 with:
1 x Intel® Core™2 Duo Desktop Processor P8400 - 2.26GHz
2 x 1GB installed (Dual Channel DDR2 800/667MHz SO-DIMM 200-pin)
1 x SSD 40GB or more* 2.5" SATA
HT B17 STD-A101 with:
1 x Intel® Core™2 Duo Desktop Processor P8400 - 2.26GHz
2 x 1GB installed (Dual Channel DDR2 800/667MHz SO-DIMM 200-pin)
1 x SSD 40GB or more* 2.5" SATA
1 x Microsoft® Windows® Embedded Enterprise (XP Professional Eng w/SP2c, 32bit)
• Installed OS : None for standard version (check Accessories / Options below for OS options)
• Processor : 1 x Intel® Core™2 Duo Desktop Processor P8400 - 2.26GHz, Bus Speed 1066MHz, 3MB L2 Cache
• Memory : 2 x 1 GB installed (Dual Channel 200-pin DDR2 800MHz SO-DIMM)
• Graphics : Intel® Graphics Media Accelerator GMA 4500MHD Integrated/Daughter Board (CH7307C) 2 x DVI-D or 1 x DB15F + 1 x DVI-D
• Graphics Res. : Max 1920 x 1200 @ 60Hz (Note: For 1600x1200/1920x1200, DVI must be set to CVT-RB (Coordinated Video Timing-Reduced Blanking) mode manually).
• System Chipset : Intel® GM45 / ICH9 support Intel® Active Management Technology
• IO Chipset : Winbond W83627DHG
• BIOS : AWARD BIOS
• PCI Slots : None
• Ethernet #1 : 1 x 10/100/1000Mbps, ICH9M Intel® 82567L 1 x RJ-45
• Ethernet #2 : 1 x 10/100/1000Mbps, Intel® 82574L PCI-E Gigabit LAN Controller 1 x RJ-45
• Serial Ports : 1 x RS-232 (COM1) 1 x DB9M
• USB Ports : 4 x USB ports - Supports 2.0 & 1.1 4 x USB Type A
• Keyboard Port : Standard PS/2 mini DIN connector 1 x PS/2
• Mouse Port : Standard PS/2 mini DIN connector 1 x PS/2
• Audio : I
CH9M+AC97 Codec ALC888, 7.1, RCA Jack (Front Out,Line In,Mic,Center/LFE,Surround,Surround back 6 x JACKS
• Speaker : No
• Power Manager : ACPI
• Watchdog Timer : Reset: 1 sec.~255 min. and 1 sec. or 1 min./step
• H/W Status Mont. : Temperatures, voltages & cooling fan status. Auto throttling control if CPU overheats
These products have been tested / type approved by the following classification societies:
IEC 60945 4th (EN 60945:2002) IACS E10 ClassNK - Nippon Kaiji Kyokai DNV - Det Norske Veritas
GL - Germanischer Lloyd BV - Bureau Veritas ABS - American Bureau of Shipping LRS - Lloyd’s Register of Shipping
EU RO MR - Mutual Recognition
• HT 00244 OPT-A1 = 1 x Mounting Plate, RAL 9011
• HT 00228 OPT-A1 = 1 x Mounting Plate with cable relief, RAL 9011
• HT 00245 OPT-A1 = 1 x Mounting Bracket Kit (included with delivery)
• JH C01MF A-A = 1 x USB Cable 1m, Type A to Chassis mount receptacle
• HT 00300 MSOS = OS options -> http://www.hatteland-display.com/os
*Please see user manual/datasheet for more information
• 4GB (Dual Channel 200-pin DDR2 800MHz SO-DIMM)
T E C H N I C A L D E S C R I P T I O N
Power Specifications:
Physical Specifications:
Environmental Considerations:
Lifetime Considerations:
Even although the test conditions for bridge units provide for a maximum
operating temperature of 55°C, continuous operation of all electronic
components should, if possible, take place at ambient temperatures of only
25°C. This is a necessary prerequisite for long life and low service costs.
M E C H A N I C A L D E S C R I P T I O N
Available Models:
* Size indicated is the lowest size available/approved for current revision of data sheet. The unit will support increased disk space in future. Please contact sales for up-to-date status.
Computer Specifications: (Standard model)
External Connector Type:
A P P R O V A L S & C E R T I F I C A T E S
Available Accessories:
Capabilities / Prepared for:
• HT B17 ST0-Axxx = No OS
• HT B17 STD-Axxx = Microsoft® Windows® Embedded Enterprise (Win XP Pro Eng w/SP2c, 32bit)
• HT B17 ST3-Axxx = Microsoft® Windows® Embedded Enterprise (Win Server 2003 Eng, 32bit)
• HT B17 ST7-Axxx = Microsoft® Windows® Embedded Enterprise (Win 7 Pro Eng, 32bit)
• HT B17 ST8-Axxx = Microsoft® Windows® Embedded Enterprise (Win Server 2008 Eng, 32bit)
Models without/with OS:
For a full overview of typenumbers, please review the following link: www.hatteland-display.com/pdflink/ind100780-5.php
IND100129-120
28

Specications - HT B18
SPECIFICATIONS
Note: All specifi cations are subject to change without prior notice!
Please visit www.hatteland-display.com for the latest electronic version.
• 4GB (Dual Channel 200-pin DDR2 800MHz SO-DIMM)
• HT 00253 OPT-A1 = 4 x COM isolated, incl. cable, RS232/422/485
• HT 00252 OPT-A1 = 8 x COM isolated, incl. cable, RS232/422/485
• 1 x 1TB HDD (SATA 2.5")
• Operating : Temperature -15 deg. C to +55 deg. C
Humidity up to 95%
• Storage : Temperature -20 deg. C to +60 deg. C
Humidity up to 95%
Multi-power Supply:
• 115&230VAC - 50/60Hz + 24VDC : Model HT B18 STx-Axxx (60W) (STD IEC + 1 x 2p D-SUB (male) - Amphenol FCC17)
Note: You may connect either AC power or DC power or both. In case both sources are connected, power will be sourced from the
AC input. If AC input is lost, there will be a uninterrupted switch-over to DC input.
• Power Consumption - Operating : 30W
• Power Consumption PCI : Max Total Power Consumption (the sum of both slots) shall not exceed 15W.
• 270.00 (W) x 105.95 (H) x 310.00 (D) mm
• 10.63" (W) x 4.17" (H) x 12.20" (D)
• Weight: Approx 5 kg
• Aluminium Cooling Chassis
• Power push button, power led, reset button and SSD Led
• HT 00244 OPT-A1 = 1 x Mounting Plate, RAL 9011
• HT 00228 OPT-A1 = 1 x Mounting Plate with cable relief, RAL 9011
• HT 00237 OPT-A1 = 1 x Mounting bracket for PCI cards
• HT 00246 OPT-A1 = 1 x Mounting Bracket Kit (included with delivery)
• JH C01MF A-A = 1 x USB Cable 1m, Type A to Chassis mount receptacle
• HT 00300 MSOS = OS options -> http://www.hatteland-display.com/os
*Please see user manual/datasheet for more information
T E C H N I C A L D E S C R I P T I O N
Power Specifications:
Physical Specifications:
Environmental Considerations:
Safety Considerations:
Even although the test conditions for bridge units provide for a maximum
operating temperature of 55°C, continuous operation of all electronic
components should, if possible, take place at ambient temperatures of only
25°C. This is a necessary prerequisite for long life and low service costs.
M E C H A N I C A L D E S C R I P T I O N
Compass Safe Distance HT B18 STx-Axxx - Standard: 75cm - Steering: 45cm
Available Models:
HT B18 ST0-A100 with:
1 x Intel® Core™2 Duo Desktop Processor P8400 - 2.26GHz
2 x 1GB installed (Dual Channel DDR2 800/667MHz SO-DIMM 200-pin)
1 x Replaceable SSD 40GB or more* 2.5" SATA
HT B18 STD-A101 with:
1 x Intel® Core™2 Duo Desktop Processor P8400 - 2.26GHz
2 x 1GB installed (Dual Channel DDR2 800/667MHz SO-DIMM 200-pin)
1 x Replaceable SSD 40GB or more* 2.5" SATA
1 x Microsoft® Windows® Embedded Enterprise (XP Professional Eng w/SP2c, 32bit)
HT B18 STD-A103 with:
1 x Intel® Core™2 Duo Desktop Processor P8400 - 2.26GHz
2 x 1GB installed (Dual Channel DDR2 800/667MHz SO-DIMM 200-pin)
1 x Replaceable SSD 40GB or more* 2.5" SATA
1 x HT 00253 OPT-A1 Serial I/O Card (4 x COM ports - Supports RS-232/422/485)
1 x Microsoft® Windows® Embedded Enterprise (XP Professional Eng w/SP2c, 32bit)
Available Accessories:
* Size indicated is the lowest size available/approved for current revision of data sheet. The unit will support increased disk space in future. Please contact sales for up-to-date status.
Computer Specifications: (Standard model)
External Connector Type:
• Processor : 1 x Intel® Core™2 Duo Desktop Processor P8400 - 2.26GHz, Bus Speed 1066MHz, 3MB L2 Cache
• Memory : 2 x 1GB installed (Dual Channel 200-pin DDR2 800/667MHz SO-DIMM)
• Graphics : Intel® Graphics Media Accelerator GMA 4500MHD Integrated/Daughter Board (CH7307C) 2 x DVI-D or 1 x DB15F + 1 x DVI-D
• Graphics Res. : Max 1920 x 1200 @ 60Hz (Note: For 1600x1200/1920x1200, DVI must be set to CVT-RB (Coordinated Video Timing-Reduced Blanking) mode manually).
• System Chipset
: Intel® GM45 / ICH9 support Intel® Active Management Technology
• IO Chipset : Winbond W83627DHG
• BIOS : AWARD BIOS
• PCI Slots : 2 x PCI Rev2.3 Slot 32-bit, 3V and 5V Interface, Full Height & Half Length (Default Configuration)
Note: Please also review max power consumption in "Power Specifications" table below.
• Ethernet #1 : 1 x 10/100/1000Mbps, ICH9M Intel® 82567L 1 x RJ-45
• Ethernet #2 : 1 x 10/100/1000Mbps, Intel® 82574L PCI-E Gigabit LAN Controller 1 x RJ-45
• Serial Ports : 1 x RS-232 + 1 x RS-232/RS-422/RS-485 2 x DB9M
• USB Ports : 4 x USB ports - Supports 2.0 & 1.1 4 x USB Type A
• Keyboard Port : Standard PS/2 mini DIN connector 1 x PS/2
• Mouse Port : Standard PS/2 mini DIN connector 1 x PS/2
• Audio :
ICH9M + AC97 Codec ALC888, 7.1, RCA Jack (Front Out,Line In,Mic,Center/LFE,Surround,Surround back 6 x JACKS
• Speaker : None
• Power Manager : ACPI
• Watchdog Timer : Reset: 1 sec.~255 min. and 1 sec. or 1 min./step
• H/W Status Mont. : Temperatures, voltages & cooling fan status. Auto throttling control if CPU overheats
A P P R O V A L S & C E R T I F I C A T E S
These products have been tested / type approved by the following classification societies:
IEC 60945 4th (EN 60945:2002) IACS E10 DNV - Det Norske Veritas EN61162 ClassNK - Nippon Kaiji Kyokai
ABS - American Bureau of Shipping GL - Germanischer Lloyd BV - Bureau Veritas LRS - Lloyd’s Register of Shipping
EU RO MR - Mutual Recognition
Capabilities / Prepared for:
• HT B18 ST0-Axxx = No OS
• HT B18 STD-Axxx = Microsoft® Windows® Embedded Enterprise (Win XP Pro Eng w/SP2c, 32bit)
• HT B18 ST3-Axxx = Microsoft® Windows® Embedded Enterprise (Win Server 2003 Eng, 32bit)
• HT B18 ST7-Axxx = Microsoft® Windows® Embedded Enterprise (Win 7 Pro Eng, 32bit)
• HT B18 ST8-Axxx = Microsoft® Windows® Embedded Enterprise (Win Server 2008 Eng, 32bit)
Models without/with OS:
For a full overview of typenumbers, please review the following link: www.hatteland-display.com/pdflink/ind100780-5.php
IND100129-119
29

This page left intentionally blank
30

Technical Drawings
31

Technical Drawings - HT B17
Dimensions might be shown with or without decimals and indicated as mm [inches]. Tolerance on drawings is +/- 1mm. For accurate measurements, check relevant DWG file.
IND100132-185
32
This document is the property of Hatteland Display AS. This document and any authorized reproduction thereof, must not be used in any way against the interest of Hatteland Display AS.
Any authorized reproduction, in whole or in part, must include this legend. Hatteland Display Proprietary information. Not to be distributed to any third party without written permission.

Technical Drawings - HT B18
1/2
Dimensions might be shown with or without decimals and indicated as mm [inches]. Tolerance on drawings is +/- 1mm. For accurate measurements, check relevant DWG fi le.
Hatteland Display AS, Åmsosen, N-5578 Nedre Vats, Norway
Tel: (+47) 4814 2200 - mail@hatteland-display.com - www.hatteland-display.com
Chassis Difference
* HWcode00 manufactured from March 2010.
* HWcode90 manufactured from June 2010. Shown on datasheet
HWcode00
HWcode90
Dimensions might be shown with or without decimals and indicated as mm [inches]. Tolerance on drawings is +/- 1mm. For accurate measurements, check relevant DWG file.
- HWCode00
IND100132-182
This document is the property of Hatteland Display AS. This document and any authorized reproduction thereof, must not be used in any way against the interest of Hatteland Display AS.
Any authorized reproduction, in whole or in part, must include this legend. Hatteland Display Proprietary information. Not to be distributed to any third party without written permission.
33

Technical Drawings - HT B18
1/2
Dimensions might be shown with or without decimals and indicated as mm [inches]. Tolerance on drawings is +/- 1mm. For accurate measurements, check relevant DWG fi le.
Hatteland Display AS, Åmsosen, N-5578 Nedre Vats, Norway
Tel: (+47) 4814 2200 - mail@hatteland-display.com - www.hatteland-display.com
Chassis Difference
* HWcode00 manufactured from March 2010.
* HWcode90 manufactured from June 2010. Shown on datasheet
HWcode00
HWcode90
Dimensions might be shown with or without decimals and indicated as mm [inches]. Tolerance on drawings is +/- 1mm. For accurate measurements, check relevant DWG file.
- HWCode90
IND100132-182
This document is the property of Hatteland Display AS. This document and any authorized reproduction thereof, must not be used in any way against the interest of Hatteland Display AS.
Any authorized reproduction, in whole or in part, must include this legend. Hatteland Display Proprietary information. Not to be distributed to any third party without written permission.
34

Technical Drawings - Accessories
35

Technical Drawings - Mounting Bracket Kit
Dimensions might be shown with or without decimals and indicated as mm [inches]. Tolerance on drawings is +/- 1mm. For accurate measurements, check relevant DWG file.
for HT B17 and HT B18
IND100132-192
36
This document is the property of Hatteland Display AS. This document and any authorized reproduction thereof, must not be used in any way against the interest of Hatteland Display AS.
Any authorized reproduction, in whole or in part, must include this legend. Hatteland Display Proprietary information. Not to be distributed to any third party without written permission.

Technical Drawings - Mounting Plate/Cable Tension Relievers
Dimensions might be shown with or without decimals and indicated as mm [inches]. Tolerance on drawings is +/- 1mm. For accurate measurements, check relevant DWG file.
for HT B17
IND100132-192
37
This document is the property of Hatteland Display AS. This document and any authorized reproduction thereof, must not be used in any way against the interest of Hatteland Display AS.
Any authorized reproduction, in whole or in part, must include this legend. Hatteland Display Proprietary information. Not to be distributed to any third party without written permission.

Technical Drawings - Mounting Plate/Cable Tension Relievers
Dimensions might be shown with or without decimals and indicated as mm [inches]. Tolerance on drawings is +/- 1mm. For accurate measurements, check relevant DWG file.
for HT B18 HWcode00
IND100132-192
38
This document is the property of Hatteland Display AS. This document and any authorized reproduction thereof, must not be used in any way against the interest of Hatteland Display AS.
Any authorized reproduction, in whole or in part, must include this legend. Hatteland Display Proprietary information. Not to be distributed to any third party without written permission.

Technical Drawings - Mounting Plate/Cable Tension Relievers
Dimensions might be shown with or without decimals and indicated as mm [inches]. Tolerance on drawings is +/- 1mm. For accurate measurements, check relevant DWG file.
for HT B18 HWcode90
IND100132-192
39
This document is the property of Hatteland Display AS. This document and any authorized reproduction thereof, must not be used in any way against the interest of Hatteland Display AS.
Any authorized reproduction, in whole or in part, must include this legend. Hatteland Display Proprietary information. Not to be distributed to any third party without written permission.

Technical Drawings - Mounting Plate/Cable Tension Relievers
Dimensions might be shown with or without decimals and indicated as mm [inches]. Tolerance on drawings is +/- 1mm. For accurate measurements, check relevant DWG file.
for HT B22, HT B17, B18, B07, B08
IND100132-266
40
This document is the property of Hatteland Display AS. This document and any authorized reproduction thereof, must not be used in any way against the interest of Hatteland Display AS.
Any authorized reproduction, in whole or in part, must include this legend. Hatteland Display Proprietary information. Not to be distributed to any third party without written permission.

Technical Drawings - Mounting Plate/Cable Tension Relievers
Dimensions might be shown with or without decimals and indicated as mm [inches]. Tolerance on drawings is +/- 1mm. For accurate measurements, check relevant DWG file.
HW00 for HT B17, B18, B07, B08
IND100132-183
41
This document is the property of Hatteland Display AS. This document and any authorized reproduction thereof, must not be used in any way against the interest of Hatteland Display AS.
Any authorized reproduction, in whole or in part, must include this legend. Hatteland Display Proprietary information. Not to be distributed to any third party without written permission.

Technical Drawings - Mounting Plate
Dimensions might be shown with or without decimals and indicated as mm [inches]. Tolerance on drawings is +/- 1mm. For accurate measurements, check relevant DWG file.
for HT B17, B18, B07, B08
IND100132-183
42
This document is the property of Hatteland Display AS. This document and any authorized reproduction thereof, must not be used in any way against the interest of Hatteland Display AS.
Any authorized reproduction, in whole or in part, must include this legend. Hatteland Display Proprietary information. Not to be distributed to any third party without written permission.

Appendixes
43

SSD Selection Guide
Solid State Disk (SSD) Devices
Last revised : 4 November 2014
SSD's has many benets over conventional hard drives, but when it comes to write
endurance it is important to choose the technology to be used with care. It is of very high
importance to consider several aspects when using an SSD for a particular
application, below the most critical ones, such as:
- Nature of the application, data written to disk during a dened time period (worst case).
- Operating System (OS) and applications settings, optimized for SSD.
- SSD selection, there are several choices of price and performance.
- Expected system life, using worst case calculations.
SSD devices have limited life time. The life time of the SSD device is direct dependent of the application software.
- Selection / dimensioning of SSD device is required for each unique application.
- Selection / dimensioning of SSD device have to be done of the system house.
- Selection / dimensioning of SSD device shall be done towards data rate , size of footprint is
secondary and in most cases not the dimensioning factor.
Hatteland Displays Recommendations, MLC device
Use of OS image adapted for HDD without any modications for SSD:
> Do not use SSD.
Basic SSD conguration of OS but not considered SSD in application SW and no estimation of
amount of written data:
> Do not use SSD.
Basic SSD conguration of OS and basic consideration of SSD in application SW. Estimation based
at guess, but actual amount of written data not known:
> Select next larger device, i.e if calculation gives 80GB, select 120GB instead.
> Minimum size 80GB.
Actual data known, based at measurements at actual application, running in worst case scenario:
> Select device according to calculation.
IND100077-130
Appendix
44

SSD Selection Guide
Calculation of required size of SSD (Multi-Level Cell - MLC) device)
The table below details the write endurance of the an enterprise environment. All values are veried by Hatteland
Display during the qualication / selection process.
Write Endurance Specications
Intel® SSD 320 Series
Device Size Value in TBW (Terabytes) Device Size Value in TBW (Terabytes)
40 GB 5 80 GB 45
80 GB 10 120 GB 70
120 GB 15 160 GB 100
160 GB 15 240 GB 140
300 GB 30 300 GB 225
600 GB 60 600 GB 330
Write endurance is measured while running 100%
random 4KB (4096 bytes) writes spanning 100% of
the drive using Iometer.
Formula for calculating disk size:
z = y * x
Where y = Requested minimum lifetime (with respect to wear out, [year]).
Where x = Data rate (GB /per year).
Where z = Total amount of data written data to SSD during its whole lifetime.
JESD218 standard1 and based on JESD219 workload.
Write Endurance Specications
Current 2.5” SSD (MLC)
Step-by-Step Calculation
Step 1: Measure (preferred) or estimate data rate y, [GB /per year].
Step 2: Dene minimum expected lifetime for SSD device x [year].
Step 3: Calculate total amount of data written to the SSD during its whole lifetime, z = y * x.
Step 4: Use table, column 2, the z value shall be less or equal to the value in the table to achieve requested lifetime.
Write Endurance Specications
Intel® SSD 320 Series
Device Size Value in TBW (Terabytes) Device Size Value in TBW (Terabytes)
40 GB 5 80 GB 45
80 GB 10 120 GB 70
120 GB 15 160 GB 100
160 GB 15 240 GB 140
300 GB 30 300 GB 225
600 GB 60 600 GB 330
Step 5: Select the SSD device, column 1, which corresponds to the selected value in column 2.
Step 6. Check that the size of the selected SSD is greater than required size of the SSD, if not select the size of the
SSD that match customer requirements.
Write Endurance Specications
Current 2.5” SSD (MLC)
IND100077-130
Appendix
45

SSD Selection Guide
Example (based on Intel® SSD 320 Series)
A general assessment based on requirements to determine the most suitable SSD device. When these factors are
known or specied in detail, we can calculate and conclude which SSD device is most suitable (see bottom of page).
Question Client Answer
We need to know how much data is written to disk
(worst case) during a known time period (per second,
minute, hour etc.) and the nature of this data?
How much space is used on as xed for your
application?
How long time shall this disk work with no problems? 5 years
Example Calculation and Conclusion
Calculation / Estimation of data rate:
Step Factors Formula Result
1 Chart Data: 2GB /Week 2GB * 52 = 104 GB /Year
Log data and User Data: 10kB /Sec 10kB * 60 * 60 * 24 * 365 = 315 GB /Year
Swap Data: 100kB /Sec 100kB * 60 * 60 * 24 * 365 = 3.15 TB /Year
2 Required lifetime: 5 years
3 Calculate total amount of data
written to the SSD during its whole
lifetime:
4 Select Disk Using Table Conclusion = 300GB SSD Device shall be used.
3.57TB * 5 = 17.8 TB
Chart Data : 2GB /Week
Log/User Data: : 10kB /Sec
Swap Data : 100kB /Sec
40GB over : Chart Data Area (typical Chart size is 30GB)
1GB : Log Data and User Data area
4GB : Swap Area
Total = 3.57 TB/Year
Measure of number of write cycles (Intel® Solid-State Drive Toolbox software)
Download Software from: https://downloadcenter.intel.com/Detail_Desc.aspx?agr=Y&DwnldID=18455
Appendix
46
IND100077-130

SSD Selection Guide
Preparation
1: Install "Intel® Solid-Sate Drive Toolbox" at target system.
2: Install the unit in valid conguration, i.e. the application shall running valid use case, if possible use worst
case scenario (with respect to disk activity).
3: Before start of measurement, check and store actual SMART data.
- Start "Intel® Solid-Sate Drive toolbol".
- Refresh (button at home screen).
- Export SMART data, store current data at le (button at home screen).
Measurement
1: Check and save time for start test scenario.
2: Execute the test scenario long enough to cover all valid use cases which may affect disk activity.
(Recommended measurement period is at least 1 week without interruption).
3: When the measurement is completed...
- Check and save time for completion of the test scenario.
- Start Intel® Solid-Sate Drive toolbox.
- Refresh (button at home screen).
- Export SMART data, store current data at le (button at home screen).
Calculation
1: Calculate number of written bytes during the measurement period, use E1 or F1 parameter (stored log le).
Number of written bytes per second = (F1compleation - F1start) / (Timecompletion - Timestart)
2: Convert to bytes per year.
3: Calculate expected life time (see previous time, section "Step-by-Step Calculation").
IND100077-130
Appendix
47

Pinout Assignments - Common Connectors
Note: Not all connectors may be available on your specic product. This depends on the amount of additional hardware installed from factory,
or customized solutions. These pin assignments are for the common connectors used. Connectors are seen from users Point Of View (POV).
RJ45 10/100 LAN
Use category 5 - twisted pair cable
1 2 3 4 5 6 7 8
Pin 01 - TDP Transmit Differential Pair (Positive)
Pin 02 - TDN Transmit Differential Pair (Negative)
Pin 03 - RDP Receive Differential Pair (Positive)
Pin 04 - NC Not Connected
Pin 05 - NC Not Connected
Pin 06 - RDN Receive Differential Pair (Negative)
Pin 07 - NC Not Connected
Pin 08 - NC Not Connected
RJ45 10/100/1000 GBLAN
1 2 3 4 5 6 7 8
Pin 01 - D0P Differential Pair 0 (Positive)
Pin 02 - D0N Differential Pair 0 (Negative)
Pin 03 - D1P Differential Pair 1 (Positive)
Pin 04 - D2P Differential Pair 2 (Positive)
Pin 05 - D2N Differential Pair 2 (Negative)
Pin 06 - D1N Differential Pair 1 (Negative)
Pin 07 - D3P Differential Pair 3 (Positive)
Pin 08 - D3N Differential Pair 3 (Negative)
15P HD RGB VGA
5 4 3 2 1
10 9 8 7 6
4P USB TYPE A
Pin 2: Negative Data
Pin 1: VCC +5V
Pin 4: Ground
Pin 3: Positive Data
4P USB TYPE B
Pin 2: Negative Data
Pin 3: Positive Data
Pin 1: VCC +5V
Pin 4: Ground
5P PS/2 MOUSE
Pin 6: Not Connected
Pin 4: Vcc +5V
Pin 2: Not Connected
Pin 5: Mouse Clock
Pin 3: Ground
Pin 1: Mouse Data
5P PS/2 KEYBOARD+MOUSE Combined
Pin 6: Mouse Clock
Pin 4: Vcc +5V
Pin 2: Mouse Data
Pin 5: Keyboard Clock
Pin 3: Ground
Pin 1: Keyboard Data
2P DC Power Input on unit
Amphenol FCC17 D-SUB MALE
Pin 1: +24VDC
Pin 2: Ground
+ -
2P DC Power Input Housing
FCE17-E2W2SS-2N0
Pin 2: Ground
Pin 1: +24VDC
- +
Pin 01 Red, analog
15 14 13 12 11
Green, analog
Pin 02
Blue, analog
Pin 03
Reserved for monitor ID bit 2 (grounded)
Pin 04
Digital ground
Pin 05
Analog ground red
Pin 06
Analog ground green
Pin 07
Analog ground blue
Pin 08
+5V power supply for DDC (optional)
Pin 09
Digital ground
Pin 10
Reserved for monitor ID bit 0 (grounded)
Pin 11
DDC serial data
Pin 12
Horizontal sync or composite sync, input
Pin 13
Vertical sync, input
Pin 14
DDC serial clock
Pin 15
9P Serial COM RS-232
This connector is commonly used for:
5 4 3 2 1
Pin 01 - DCD Data Carry Detect
Pin 02 - SIN Serial In or Receive Data
Pin 03 - SOUT Serial Out or Transmit Data
Pin 04 - DTR Data Terminal Ready
Pin 05 - GND Ground
Pin 06 - DSR Data Set Ready
Pin 07 - RTS Request To Send
Pin 08 - CTS Clear To Send
Pin 09 - RI Ring Indicate
Note: The table above lists commonly-used RS-232 signals and pin
assignments, however Serial Communication for Hatteland Display
products may vary from product to product to support different
end user systems. Please check additional pin assignments section
in this manual for specic RS-232/RS-422/RS-485 pin assignments
for your exact product.
9 8 7 6
5P PS/2 KEYBOARD
Pin 6: Not Connected
Pin 4: Vcc +5V
Pin 2: Not Connected
5P S-VHS/S-VIDEO
Pin 4: C - Color (chrominance)
Pin 2: Ground (C)
RCA/BNC 1P COMP. VIDEO
Pin 1: Video Signal
Pin 5: Keyboard Clock
Pin 3: Ground
Pin 1: Keyboard Data
Pin 3: Y - Intensity (luminance)
Pin 1: Ground (Y)
Ground Shield
IND100241-2
Appendix
48

Pinout Assignments - Common Connectors
25P Parallel
13 12 11 10 9 8 7 6 5 4 3 2 1
25 24 23 22 21 20 19 18 17 16 15 14
Pin 01 - STROBE This signal indicates to the printer that data at PD7..0 are valid.
Pin 02 - DATA0 Parallel data bus from PC board to printer. The data line are able to operate in PS/2 compatible bi-directional mode.
Pin 03 - DATA1 Same as Pin 02
Pin 04 - DATA2 Same as Pin 02
Pin 05 - DATA3 Same as Pin 02
Pin 06 - DATA4 Same as Pin 02
Pin 07 - DATA5 Same as Pin 02
Pin 08 - DATA6 Same as Pin 02
Pin 09 - DATA7 Same as Pin 02
Pin 10 - ACK Signal from printer indicating that the printer has received the data and is ready to accept further data.
Pin 11 - BUSY Signal from printer indicating that the printer cannot accept further data.
Pin 12 - PE Signal from printer indicating that the printer is out of paper.
Pin 13 - SELECT Signal from printer to indicate that the printer is selected.
Pin 14 - AUTO FEED This active low output causes the printer to add a line feed after each line printed.
Pin 15 - ERR# Signal from printer indicating that an error has been detected.
Pin 16 - INIT# This active low output initialises (resets) the printer.
Pin 17 - SLIN# Signal to select the printer sent from CPU board to printer.
Pin 18 - GND Ground
Pin 19 - GND Ground
Pin 20 - GND Ground
Pin 21 - GND Ground
Pin 22 - GND Ground
Pin 23 - GND Ground
Pin 24 - GND Ground
Pin 25 - GND Ground
24P DVI-D & DVI-I
1 2 3 4 5 6 7 8 C1 C2
9 10 11 12 13 14 15 16 C5
17 18 19 20 21 22 23 24 C3 C4
Pin 01 T.M.D.S. Data2 - (Digital - RED link 1)
Pin 02 T.M.D.S. Data2 + (Digital + RED link 1)
Pin 03 T.M.D.S. Data2/4 Shield
Pin 04 T.M.D.S. Data4 - (Digital - GREEN link 2)
Pin 05 T.M.D.S. Data4 + (Digital + GREEN link 2)
Pin 06 DDC Clock
Pin 07 DDC Data
Pin 08 Analog Vertical Sync (DVI-I only)
Pin 09 T.M.D.S. Data1 - (Digital - GREEN link 1)
Pin 10 T.M.D.S. Data1 + (Digital + GREEN link 1)
Pin 11 T.M.D.S. Data1/3 Shield
Pin 12 T.M.D.S. Data3 - (Digital - BLUE link 2)
Pin 13 T.M.D.S. Data3 + (Digital + BLUE link 2)
Pin 14 +5V Power (for standby mode)
Pin 15 Ground (for +5V and analog sync)
Pin 16 Hot Plug Detect
Pin 17 T.M.D.S. Data0 - (Digital - BLUE link 1) and digital sync.
Pin 18 T.M.D.S. Data0 + (Digital + BLUE link 1) and digital sync.
Pin 19 T.M.D.S. Data0/5 Shield
Pin 20 T.M.D.S. Data5 - (Digital - RED link 2)
Pin 21 T.M.D.S. Data5 + (Digital - RED link 2)
Pin 22 T.M.D.S. Clock Shield
Pin 23 T.M.D.S. Clock + (Digital clock + (Links 1 and 2)
Pin 24 T.M.D.S. Clock - (Digital clock - (Links 1 and 2)
Pin C1 Analog RED
Pin C2 Analog GREEN
Pin C3 Analog BLUE
Pin C4 Analog Horizontal Sync.
Pin C5 Analog Ground (return for RGB signals)
DDC = Display Data Channel /// T.M.D.S = Transition Minimized Differential Signal /// PIN C1,C2,C3,C4 = Only present on DVI-I connectors.
NOTE: Connector shows a DUAL LINK design, but some units may not support it. Only products with 1920x1200 or more in resolution
require / support DUAL LINK.
Additional connector pinouts may be available in third party motherboard manuals, primarily for computers only.
Please see manual/drivercd delivered with your product or own section in this user manual.
IND100241-2
Appendix
49

Pin Assignments - Common Connectors (Additional)
Pin Assignments - 9P Serial COM RS422
5 4 3 2 1
9 8 7 6
Pin 01 - N/C Not Connected
Pin 02 - TX- Transmit Data Pin 03 - RX+ Receive Data +
Pin 04 - N/C Not Connected
Pin 05 - GND Ground
Pin 06 - N/C Not Connected
Pin 07 - TX+ Transmit Data +
Pin 08 - RX- Receive Data Pin 09 - N/C Not Connected
Pin Assignments - 9P Serial COM RS485
5 4 3 2 1
9 8 7 6
Pin 01 - N/C Not Connected
Pin 02 - N/C Not Connected
Pin 03 - DAT+ Data+
Pin 04 - N/C Not Connected
Pin 05 - GND Ground
Pin 06 - N/C Not Connected
Pin 07 - N/C Not Connected
Pin 08 - DAT- DataPin 09 - N/C Not Connected
Note: These pin assignments applies for products with customer specied COM ports (pre-setup by the factory).
These COM ports are set/congurable on the motherboard located inside the product. If the main cover of the product
has to be unmounted and removed, the warranty will be void.
IND100241-3
Appendix
50

Trouble-shooting
IND101744-1 rev 04 - 18 Sep 2014 - 6987/6923/363
RECOVERY / RESCUE IMAGE - QUICK START
The Recovery Kit (USB Flash) will attempt to restore the HDD/SSD partition back to factory default overwriting all
current data available on the HDD/SSD device. The recovery image is located either on a hidden partition image
located on the computer unit (HT/HM C01 with WinXP only) or it is included as a image on the USB Flash Kit for
HT 221, HT 216, HT B17, HT B18, HT B22 and HT/HM C01/C02 (Win7 only) computer models. The recovery
image le is not accessible from any operating system, only by the Recovery Kit (USB Flash) provided by Hatteland
Display. For more information, visit http://www.hatteland-display.com/os
Note that all les created after initial factory boot will be DELETED - make sure you do backup!
Restore from external USB recovery image:
1: Insert the USB Flash media into the computer usb connector.
2: Restart the computer.
3: On the rst screen that appear, press “Delete” or “F2” on the keyboard (depending on BIOS model) to bring up
the BIOS setup screen.
4: Select “Advanced BIOS features” or “Boot“ (depending on BIOS model).
5: Set “Harddisk boot priority” to “USB HDD” as number 1
or select "Hard Disk Drives", then modify "1 st" to "USB: ...." depending on BIOS model.
6: Press F10 and then Enter on keyboard, or “F4” to save settings (depending on BIOS model).
7: Follow the on screen instructions that will be executed from the USB Flash media, such as;
8: After the restore operation is complete, remove the USB Flash Media and restart.
9: The computer is now restored to its original factory state.
10: If rescue failed, an error message will be displayed.
GENERAL TROUBLE-SHOOTING
CD-ROM FAILURE OR READ/DETECTION PROBLEMS?
If the product are operated/located in a area with extreme condensation, the CD/DVD-ROM drive may not work
correctly due to condensation on the read head. Keep the product on for a while until it’s reached normal operating
temperature, and retry accessing discs. Otherwise, consider using USB memory sticks or alternative storage devices.
NO CD-ROM AVAILABLE ON YOUR PRODUCT FOR INSTALLING DRIVERS/SOFTWARE?
Please use USB memory sticks, USB Floppy drive, USB CD-Rom Drive or alternative storage devices to transfer or
install software on CD-ROM-less units. You may also download drivers from: http://www.hatteland-display.com/archive
RECOVERY/RESCUE IMAGE
IND100077-91
Appendix
51

Declaration of Conformity
We, manufacturer, Hatteland Display AS, Stokkastrandvegen 87B, N-5578 Nedre Vats, Norway
declare under our sole responsibility that the
JH MMD, JH MMC, JH STD, JH MIL, HM NMD, HM MIL, HM CMD, HT STD, HD MMD, HM MMD, HT MMC, HD MMC
and HT/HM (computers) product ranges is in conformity with the following standards in accordance with the EMC Directive.
Low Voltage Directive 2006/95/EC
EN 60950:2006/A2:2013
EMC Directive 2004/108/EC
EN 55022:2010 / AC:2011 Class A
EN 55024:2010
Signature:........................................................
Frode Grindheim
Vice President Product Management
Nedre Vats, Norway
CE MARK FIRST AFFIXED DATE (11 March 2010)
Signature:........................................................
Arne Kristiansen
Site Manager - Test & Commission Division
Oslo, Norway
Declaration of Conformity
We, manufacturer, Hatteland Display AS, Stokkastrandvegen 87B, N-5578 Nedre Vats, Norway
declare under our sole responsibility that the JH MMD, JH MMC, JH STD, JH MIL, HM NMD, HM MIL, HM CMD, HT STD,
HD MMD, HM MMD, HT MMC, HD MMC and HT/HM (computers) product ranges is in conformity with
IEC 60945 4th (EN 60945:2002) and IACS E10 (where applicable)
Declaration of Conformity
We, manufacturer, Hatteland Display AS, Stokkastrandvegen 87B, N-5578 Nedre Vats, Norway
declare under our sole responsibility that the products listed below comply with
FCC 47 CFR Part 15, Subpart B, Class A:
JH MMD, JH MMC, JH STD, JH MIL, HM NMD, HM MIL, HM CMD, HT STD, HD MMD,
HM MMD, HT MMC, HD MMC and HT/HM (computers) product ranges
Note: This equipment has been tested and found to comply with the limits for a Class A digital device, pursuant to part 15 of the FCC Rules.
These limits are designed to provide reasonable protection against harmful interference when the equipment is operated in a commercial
environment. This equipment generates, uses, and can radiate radio frequency energy and, if not installed and used in accordance with the
instruction manual, may cause harmful interference to radio communications. Operation of this equipment in a residential area is likely to
Signature:........................................................
Vice President Product Management
IND100237-1
cause harmful interference in which case the user will be required to correct the interference at his own expense.
Frode Grindheim
Nedre Vats, Norway
FCC MARK FIRST AFFIXED DATE (16 February 2012)
This document was last approved, reviewed and found valid on 06 Jan 2015 by the signed participants as stated above.
Signature:........................................................
Arne Kristiansen
Site Manager - Test & Commission Division
Oslo, Norway

Return Of Goods Information
Return of goods:
(Applies not to warranty/normal service/repair of products)
Hatteland Display referenced as “manufacturer” in this document.
Before returning goods, please contact your system supplier before sending anything directly to manufacturer. When
you return products after loan, test, evaulation or products subject for credit, you must ensure that all accessories
received from our warehouse is returned. This applies to cables, powermodules and additional equipment except
screws or similar, user manual, datasheets or other written paper documents. Furthermore, the product must not have
any minor / medium or severe scratches, chemical spills or similar on the backcover, front frame or glass.
This is needed to credit the invoice 100%. Missing parts will not be subject for credit, and you will not get total credit
for returned product. You will either be charged separately or the amount is withdrawn from the credit. If you decide to
ship the missing items on the after hand, you will get 100% credit for that particular invoice or items received at
manufacturer incoming goods control. Please contact our service/sales department if additional questions or review
the following links at bottom of page for more information online.
Handling and packing units for return/credit
To prevent damage during shipping and transportation, respect the guidelines below.
Make sure you surround the product with the following material (whenever possible):
Use the original packaging from manufacturer, rm foam material, bubble wrap, lots of PadPack paper
or foam chips/polyester wrapped in sealed plastic bags. Please make sure that the unit is protected
with a surrounding plastic bag to prevent dust accumulation around the unit.
If you do not have the original packaging or are uncertain how to secure the unit properly,
please consider seeking advice from nearby shipping or transportation ofces, if in doubt!
Do not under any circumstances use loose foam chips, expanded polyester, clothes, cardboard with
sharp edges/spikes, too little or nothing to secure the unit inside the box. Do not use cardboard
boxes that are clearly too weak or not suitable for securing the unit properly during overseas shipment.
Reference Links:
http://lcm.hatteland-display.com/CustomerRMA/CustomerRMA.aspx
http://www.hatteland-display.com/rma_procedure.php
http://www.hatteland-display.com/terms
IND100077-14
Appendix
53

General Terms and Conditions
As of January 2015, Hatteland Display AS’ “Terms of Sales and Delivery” and “Warranty Terms” has been substituted
by the updated ”General terms and conditions for sale of goods and performance of additional services” (the “General
Terms and Conditions”).
Further, from January 2015 onward, the previous “Terms of Sales and Delivery” and “Warranty Terms”, as well as
other standard terms and conditions, policies and instructions issued by Hatteland Display AS, will be removed from
the User Manuals.
Instead, the updated General Terms and Conditions and the other standard terms and conditions, policies and
instructions issued by Hatteland Display AS will be available via our website only.
Please visit http://www.hatteland-display.com/terms to review the latest revision of this documentation.
Long Term Storage Recommendations
For Minimum storage life for Hatteland Display products, Storage Conditions, Periodic maintenance and Periodic
maintenance - test procedure, please visit:
http://www.hatteland-display.com/pdf/misc/ind100350-5_long_term_storage_recommendations.pdf
INSTRUCTIONS FOR THE CONSIGNEE
1) CONTROL
Control the goods immediately by receipt. Examine the quantity towards the invoice/packinglist/shipping documents. Look for outward
defects on the packing which may indicate damage on or loss of contents. Control the container and the seals for any defects.
2) SECURING EVIDENCE
When defects on the goods have been found, evidence must be secured, and seller must be informed. Call the transporter and point out the
defects. Add a description of the defects on the goods receipt, the forwarder’s copy of the way-bill or on the driving slip.
3) RESCUE
Bound the damage. Try to restrict the damage and the loss. Seller will compensate expences incurred due to reasonable security efforts in
addition to damage and loss.
4) COMPLAINT
Write immediately a complaint to the transporter or his agent. Forward immediately the complaint to the transporter or his agent, and hold
the transporter responsible for the defects. The complaint must be sent at the latest:
- for carriage by sea: within 3 days
- for overland / air transportation within 7 days
5) DOCUMENTATION
For any claims the following documentation is required, and must be forwared to the company or their agent: invoice, way-bill and/or bill of
landing, and/or statement of arrival, inspection document, besides a copy of the letter of complaint to the transporter.
IND100077-7
Appendix
54

Notes
General Notes:
- License Terms for the installed OEM Operating System (OS) can be found in the following default factory paths:
Note: This is a general listing for a varity of OS’s Hatteland Display can factory install depending on unit.
Please check specication for your unit to verify type of OS installed in order to retrieve the license terms.
Microsoft® Windows® 7 Professional: C:\Windows\System32\en-US\Licenses\_Default\Professional\license.rtf
Microsoft® Windows® 7 Ultimate: C:\Windows\System32\en-US\Licenses\_Default\Ultimate\license.rtf
Microsoft® Windows® Embedded 8.1 Industry Pro.: C:\Windows\System32\en-US\Licenses\_Default\EmbeddedIndustry\license.rtf
Microsoft® Windows® XP Pro: C:\Microsoft Windows XP Embedded and Windows Embedded Standard 2009 - License Terms.doc
Note: Does not apply for Microsoft® Windows® XP Professional for Embedded Systems.
- For certain computers, the on-board signal output (RGB, VGA, DVI) will be disabled if additional graphics card is
installed and present in one of the PCI/PCIe slots. Please check “Physical Overview” in this manual to determine if
your unit has the option for installing a additional graphics card in either PCI or PCIe slot.
IND100077-126
Appendix
55

User Notes
IND100077-24
Appendix
56

Revision History
Rev. By Date Notes
00 _1 JE
SE
01 JE
SE
02 JE
SE
03 JE
SE
4 JE
SE
5 FG
GOS
SE
6 JE
BB
SE
7 AKSE19 Aug 2010 Remove pending for ABS Type Approval, specications page 28,29
29 Oct 2009 Internal review release.
05 Nov 2009 First ofcial release.
08 Jan 2010 Revised contents of package, added HT 00237 and info about 3rd party hardware (page 4)
Added text about ground (GND) in installation chapter (page 18,21).
Added HT B17 specications, drawings and illustrations (page 10,15,16,17,18,24,28)
28 Jan 2010 Added Basic Construction illustration HT B18 (page 11)
Added PCI and SSD mount/dismount procedures (page 15,16)
Added Compass Safe Distance and MTBF value to specs. (page 26,27)
11 Feb 2010 Added SSD internal mount /dismount procedure (page 16)
Added indication of polarity for DC input power +/- (page 21,24)
15 Apr 2010 Added note for Multipower (page 21,22,25,28,29)
Revised drawings HT 00228 OPT-A1, screws information update (page 36)
Added HT 00244 OPT-A1 drawings and info (page 5,28,29,37)
01 Jul 2010 Revised illustration (HT B18 HWcode90) page 1,9,12,16,19,20,23,42
Replaced drawings to show with no bracket (moved to appendix instead) page 32,33
Added drawings for HWcode90 HTB18 + illustrational difference HWcode00 and 90 (page 34)
Added drawings with bracket (HT 00228 OPT-A1 for HTB1x models) page 37,38,39
8 JE
GOS
SE
9 BB
AK
PT
SE
10 SE 23 Feb 2011 Fixed pages 17,18 (was switched around and data was missing)
11 JE
SE
12 JE
SE
13 MM
ME
SE
14 JE
SE
15 MJLSE26 Aug 2013 Added note for using resolutions 1920x1200 and 1600x1200 that DVI must be set to CVT-RB (Coordinated
16 JE
SE
17 BQ
SE
18 JE
LS
SE
19 LS
SE
20 MJ
SE
02 Sep 2010 Changed text “Mounting Bracket” to “Mounting Plate” for HT 00244 and 00228 OPT throughout manual.
Added drawings for Mounting Bracket Kit HT B1x (HT 00245 / 246 OPT-A1) page 5,28,29,36
26 Jan 2011 Revised/updated text for Multi-power page 1,22,25,28,29
Revised Contents of Package (“Printed User Manual” removed / change text “MEDIA STD01”) (Page 5)
Removed (pending) for ABS, GL, DNV Type approvals (page 28,29)
Revised text for “Documentation and Driver” instructions (page 44)
30 Mar 2011 Revised specications, added LRS type approval and Operating System ID (page 12, 28,29)
21 Jun 2011 Revised contents of package (HT 00215OPT) (page 5)
Revised Recovery Kit (USB Flash) HT 00215 OPT User Guide (page 48)
20 Mar 2012 Revised contents of package, removed text “hidden recovery partition” notice, page 5
Revised network ports numbering (was switched), page 20,23
Revised trouble-shooting text to difference between locations of Recovery Image, page 48
Added FCC notice and logo, page 49
13 Aug 2013 Added note for “License Terms OEM OS” + External Graphics Card, page 89
Removed Graphical Drivers and notice (DVI-D1, DVI-D2), on both driver and inside manual, as new ofcial
graphics driver (WinXP_32bit_144212.exe) solves the previous workaround drivers called -D1 and -D2.
Added note for connecting RGB/VGA and DVI output before boot, page 20,22
Added SSD Selection Guide, page 44-47
Video Timing-Reduced Blanking) mode manually to avoid intermittent ickering of display image,
page 20,23,28,29 (ref: QAR/115207)
17 Jan 2014 Removed references to PCIe (option) throughout the manual.
02 Apr 2014 Added ilustration for DC 2P power input Amphenol FCC17 D-SUB MALE / FCE17-E2W2SS-2N0, page 48
Revised Declaration of Conformity, page 52
07 Aug 2014 Revised contents of package, new HT 00300 MSOS IMAGE (USB) option and HT 00228 OPT-A1, page 5
Added Sales Drawing for HT 00228 OPT-A1 (rev 4), Mounting Plate w/cable relief, page 40
Revised Sales Drawing for HT 00228 OPT-A1 (rev 3) to HW00, as rev 4 takes over, page 41
Revised Specications regarding Testing & Type Approvals (EU-RO-NR), page 28,29
13 Aug 2014 Revised Sales Drawing for HT 00228 OPT-A1 (rev 5), changed M4x10 to M4x8 screws, page 40
03 Jun 2015 General update of text elements based on latest company prole
Revised Grounding, General Mounting Instructions chapter, point 6, ref: QAR/128155, page 14
Revised Grounding Screw text, page 22, 25
Revised “Return of goods information”, page 53
Revised “General Terms and Conditions”, page 54
IND100077-100
57

www.hatteland-display.com
 Loading...