

Page 1
HATER
PAINTBALL
“HATRED Marq/Protege Board”
HATRED Software Version 3
Instruction Manual
• Designed from the ground up for the Bob Long Protégé and
Bob Long Marq.
• Fully compatible with both the BL 2C and 4C eye systems.
• The first ever paintball circuit board with a fully integrated
wireless transceiver!
• Fully compatible with all SYMBIO wireless products.
• Includes 22 firing modes including fully customizable ramp
modes.
• Proprietary multi-tasking algorithms continuously monitor all
trigger and eye events to ensure that all pulled shots register
and are processed.
• TEN TIMES faster than the top-ranked competitor! This
translates to 900,000 more operations per second than
anyone else.
• Fully adjustable ABS features add to the marker’s dwell to
eliminate that pesky first shot drop-off.
• Anti-mechanical bounce (AMB) algorithms solve the
problem of physical switch bounce. No need to worry when
the refs pull that old slow trigger pull trick on your gun.
• A “forced shot” feature allows the user to clear the marker of
eye faults.
• Instant on feature. After all, you wanna play now!
• Instantaneous battery status.
• Tournament lock feature allows the user to “lock out” the
programming mode in order to meet specific
field/tournament guidelines.
MAKE SURE THE MARKER IS NOT CONNECTED TO AN AIR
SOURCE AND DOES NOT HAVE PAINTBALLS IN THE BREACH
DURING INSTALLATION!!!!!!
1. Remove the screws that secure the grips. This will expose
the board.
2. Unplug the main wiring harness.
3. Unscrew the screws that mount your board in place.
4. Wiggle your old board out.
5. Slide your new HATRED board in. Do not force the board
in. It may help to angle the board in microswitch first.
6. Be very careful to not break off the vertical component on
the bottom of your HATRED board. This component is very
fragile.
7. Plug your main wiring harness into your HATRED board.
8. Attach new battery.
9. Replace grips.
Power On:
feature. Simply press the power button (top button) and your marker
will instantly power on. You will see a flickering GREEN or RED led.
The GREEN indicates a good battery and the RED means replace the
battery as soon as possible. Regardless of GREEN/RED battery
indication, your marker WILL REGISTER YOUR FIRST TRIGGER
PULL! Please be careful!
The HATRED board comes equipped with an Instant On
Features:
Installation:
Power:
Power Off:
the LED goes through a rainbow power down sequence. Please note
that this particular rainbow LED sequence does NOT indicate that
you’re entering the programming menu.
To turn the marker off, press and hold the power button until
Programming
The bottom dip switch must be in the OFF position in order to enter the
programming menu. If the bottom dip switch is ON, “tournament lock”
will be enabled and the user will be unable to program the marker.
To enter the programming menu, hold the trigger down and THEN turn
the marker on. The LED will inform the user that the programming
mode has been accessed by flashing several colors rapidly.
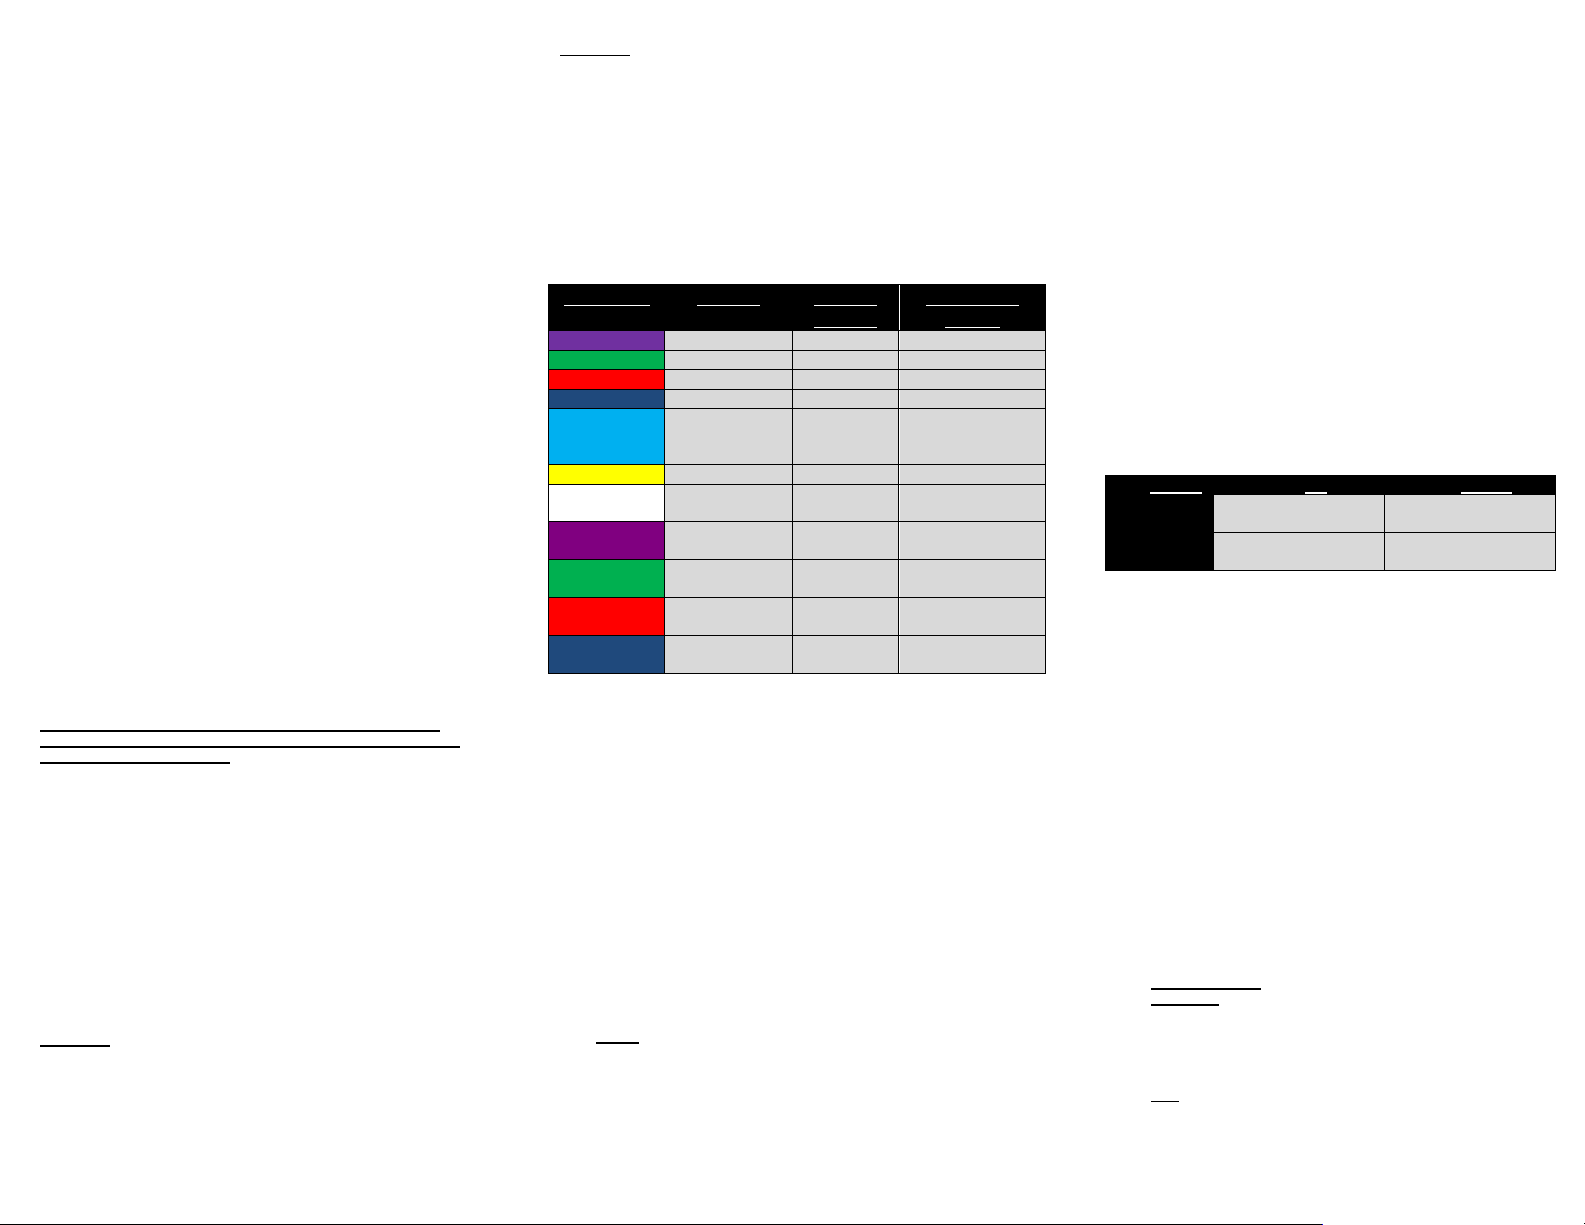
LED Color Setting Default
Setting
Adjustable
Range
Purple Fire Mode 1 1-22
Green Debounce 8 ms 1-50 ms
Red Dwell 8 ms 5-35 ms
Blue Max ROF 20 cps 10-35 cps
Teal AMB 1 ms
1-60ms
(1 = AMB
Disabled)
Yellow Eye Delay 4 ms 1-20 ms
White Wireless
1 1-32
Address
Flickering
ABS 10 ms 1-20 ms
Purple
Flickering
Green
Flickering
Red
Flickering
Ramp
9 bps 6-15 bps
Activation
Ramp Percent 10% 1-20
(10-200%)
Reset Defaults n/a n/a
Blue
1.) Pulling and releasing the trigger will allow the user to toggle
through the different programming options.
2.) Once the desired setting/LED color is reached, pull and hold the
trigger to select that setting. The LED will then go blank.
3.) Once the LED goes blank, pull the trigger for the desired setting.
For example, if the user wishes to set the debounce to 2, he or
she must pull the trigger two times.
ÆIf the user wants to view their current value for a particular
setting, he or she need only to continue holding the trigger in after
the setting is selected from the menu. The software will then
blink back the user’s current value for that particular setting.
4.) The software will indicate that the new value has successfully
been entered by blinking the value back to the user then rapidly
flashing the LED through a spectrum of colors.
ÆAs the software blinks back the new setting, the user may abort
this process by simply clicking the trigger once. The new settings
will still be saved.
5.) After a setting has been changed, the user may change another
option or power the gun off to save the settings.
NOTE:
All “programming clicks” correspond exactly to their settings. If
you want to cap the ROF at 15, pull the trigger 15 times. If the user
sets the value too low (2 cps ROF cap for example), the software will
automatically default to the lowest accepted value. The inverse is also
true for user inputs which are beyond the adjustable range.
To set the firing mode to PSP mode.
1. Turn the marker off.
2. Hold the trigger down; then turn the marker on. Once the LED flashes many
colors, release the trigger.
3. Tap the trigger until the LED turns purple.
4. Hold down the trigger until the LED goes blank.
5. Tap the trigger two times.
6. Once the LED flashes many colors, turn the marker off.
To set the eye delay to 5 ms.
1. Turn the marker off.
2. Hold the trigger down; then turn the marker on. Once the LED flashes many
colors, release the trigger.
3. Tap the trigger until the LED turns yellow.
4. Hold down the trigger until the LED goes blank.
5. Tap the trigger 5 times.
6. Once the LED flashes many colors, turn the marker off.
To set the max ROF to 15 bps.
1. Turn the marker off.
2. Make sure the top dipswitch (dipswitch 1) is in the ON/UP position.
3. Hold the trigger down; then turn the marker on. Once the LED flashes many
colors, release the trigger.
4. Tap the trigger until the LED turns blue.
5. Hold down the trigger until the LED goes blank.
6. Tap the trigger 15 times.
7. Once the LED flashes many colors, turn the marker off.
Dip Switch Settings:
Programming Examples:
Switch UP DOWN
1
ROF Cap ON ROF Cap OFF
(top)
2
(bottom)
Tournament
Lock
Programming
Mode
Eye Sensor Operation:
When the HATRED Board is powered on, the eyes are enabled by
default. To disable the eyes, press and hold the button on your marker.
ÆWhen the eyes are disabled (blinking red LED), your ROF will default
to the user programmed global ROF cap.
ÆWhen there is an EYE FAULT (blinking blue LED), your ROF will
automatically default to 15 cps.
Solid Blue Eyes on; Paint in breach.
Blinking Blue Eyes on w/ blocked/dirty error.
Solid Teal Top eye blocked, Bottom eye unblocked
Solid Red Eyes on; No paint in breach.
Blinking Red Eyes disabled.
LED Representation:
Firing Modes:
(Please note the firing mode order on the back of the HATRED box does not
1. Semi Auto/NPPL
2. PSP Mode
the gun will shoot in 3 shot bursts. This burst mode will continue
as long as the trigger is being pulled. After a one second delay of
trigger inactivity, the 3 shots semi-auto sequence will restart.
ÆThe global ROF cap must be set to 15 bps to comply with PSP
rules.
3. NXL
user may hold in the trigger and the gun will shoot in full auto until
the trigger is released. After a one second delay of trigger
inactivity, the 3 shots semi-auto sequence will restart.
ÆThe global ROF cap must be set to 15 bps to comply with NXL
rules.
correspond the actual order.)
– 1 trigger pull = 1 shot fired.
– The first three shots are semi auto. On the 4th shot,
– The first three shots are semi auto. On the 4th shot, the
Page 2

4. Millennium – Ramping mode specifically designed for Europe’s
Millennium Series.
5. Ramping
6. Full Automatic
7. Auto Response
8. PSP Style Ramping
9. PSP Style Auto Response
10. PSP Breakout Mode
11. Laning Mode
12. Fast Start Mode
13. Semi/Auto Response Transition
14. Semi/Ramping Transition
15. Semi/Full Auto Transition
16. Ramping/Semi Transition
17. Full Auto/Ramping/Semi Transition
18. Semi/Full Auto/Ramping Transition
19. Two Shot Burst
20. Three Shot Burst
21. Four Shot Burst
22. Musket Ball Mode
– Uses a linear ramping algorithm to increase your rate
of fire. You can choose when you want your marker to start
ramping and how fast your marker will ramp.
ÆThe ramp deactivation is always 2 bps lower than the ramp
activation.
ÆEach “programming click” corresponds to a 10% increase in
ramping speed. Eg: 1 click = 10%, 10 clicks = 100%, 20 clicks =
200%
ÆThe ramping percentage and ramp activation settings in the
programming menu are GLOBAL settings. Any other firing mode
which has a ramping subroutine will use the ramp activation and
percentages as dictated by the programming menu.
as you hold down the trigger.
pulled and once when the trigger is released. This is essentially a
100% ramping mode with a 0 bps activation.
th
4
shot, the marker will fire in ramping mode. After a one second
delay of trigger inactivity, the three shot semi-auto will restart.
On the 4
a one second delay of trigger inactivity, the three shot semi-auto
will restart.
marker will convert to PSP mode.
next three trigger pulls are full auto; then, the marker converts to
semi-automatic.
next 100 trigger pulls are Auto Response; then, the marker
converts to semi-automatic.
auto; the gun then converts to Auto Response mode.
the marker then converts to ramping mode.
number of shots in semi auto as long as the trigger pulls are all
LESS than 8bps. Once 8 bps is achieved, the marker will convert
to full auto.
will be in ramping mode; after the 300
convert to semi auto.
the next 300 pulls are ramping; then the marker will convert to
semi auto.
auto; the next three pulls are full auto; the marker then locks into
ramping mode.
paintballs.
three paintballs.
paintballs.
user must hold in the trigger to “charge” their marker. The gun
actually fires on the trigger release. When the trigger is first
pulled and held down, the software will start at the user set dwell
(8 ms default) minus 10 ms. Over the course of five seconds, the
software will add 2 ms of dwell up to the user set dwell for every
second the trigger is continually depressed. After 5 seconds, the
marker will be fully charged.
ÆIf the user just pulls the trigger and immediately releases, the
paintball probably won’t make it out of the barrel; if the user holds
the trigger for 3 seconds, the velocity of the paintball will be
extremely low, etc.
– The gun will shoot in full automatic for as long
– The marker will fire once when the trigger is
– The first three pulls are semi auto. On the
th
shot, the marker will fire in Auto Response mode. After
– The first three trigger pulls are semi auto; the
- The first three trigger pulls are semi auto; the
– For every trigger pull, the marker will fire two
– For every trigger pull, the marker will fire four
- The first three pulls are semi auto.
– The first trigger pull is full auto then the
– The first three pulls are semi
– The first three shots are semi auto;
– The marker will shoot an unlimited
– For the first 300 pulls, the marker
– For every trigger pull, the marker will fire
– This is essentially a dwell ramp mode. The
th
pull, the marker will
- The first pull is full auto;
- The first 10 pulls are semi
The hardware on the HATRED board was developed with two prime
concerns: overall speed and wireless expandability. Your HATRED board
comes equipped with a high-performance wireless transceiver which is fully
capable of an almost unlimited array of wireless applications. The board you
just purchased is wholly capable of computer and PDA synchroni zation,
wireless “intellifeeds,” and statistical transmission and analyses.
The HATRED board comes pre-loaded with SYMBIO SYNC loader board
software. To synchronize your HATRED board with your SYMBIO loader
board:
1.) Make sure your SYMBIO is fully powered off. Press and continue
to hold the SYMBIO loader board’s button in until the LED flashes
white. Release the button; the LED should now be solid white.
2.) Enter the programming menu on your HATRED gun board and
scroll to the WIRELESS ADDRESS SELECT (white LED).
3.) Set your HATRED gun board to the desired wireless address.
Your SYMBIO will pulse to signify acceptance of the change and
Each and every HATRED gun board broadcasts that gun’s current rate
of fire with every wireless transmission. Simply, the faster you shoot,
the faster the SYMBIO loader board will load paintballs – an industry
first. The ROF transmissions allow your loader to infer EXACTLY how
fast your marker is shooting and load paintballs accordingly. Your
SYMBIO will never starve your marker and simultaneously will never
overfeed and smash brittle paint.
The REVISION 2 HATRED gun board will send a wireless LOAD command
on every shot fired –and- on every trigger pull. If your eyes are on with no
paint in the breech and you pull the trigger, the HATRED will assume you are
trying to fill up the feedstack and will send a wireless LOAD command in an
attempt to do so. This feature enables you run your loader dry and then refill
without starving your marker.
then enter normal wireless mode.
Eye Operation:
Wireless Operation:
The HATRED board is 100% compatible with both 2C™ and 4C™ eye
systems. The software of the HATRED board will automatically detect
whether a two eye or four eye system is installed on your marker.
When using the 4C eye system at high rates of fire, the HATRED board will
initiate the firing cycle based off the top set of eyes. This allows the marker
to shoot at much higher rates of fire.
Definitions:
Debounce – The HATRED’s debounce algorithm assists in eliminating
unwanted shots caused by “trigger noise,” while simultaneously ensuring that
every pull is read. If the marker has intermittent or continuous “full auto” like
fire, increase the debounce setting.
Dwell
– Dwell is the amount of time that the solenoid is “charged.” A dwell
that is too low may result in a gun that doesn’t fire, is inconsistent and/or has
drop off. If the dwell is set too high, the overall rate of fire will decrease and
the marker may become less air efficient. The factory default of 8ms should
be considered a starting point for setting your dwell. Increase your dwell in 1
ms increments until your velocity is no longer affected. For Marq’s and
Protégé’s, your dwell should remain in the 6ms-13ms window.
Eye Delay
sensing a ball before it will fire. The stock eye delay of 4 ms is a
conservative setting. On most guns, the Eye Delay can be lowered until the
user experiences chopping. When using an agitated loader, the eye delay
should be set to 5 ms or higher. The higher the eye delay, the slower the
marker and less chance of paint breakage.
ABS
shot after a period of inactivity. The ABS feature assists in eliminating first
shot drop-off. The higher the ABS, the “harder” the marker’s first shot.
AMB
mechanical bounce. Mechanical bounce is caused by the marker recoiling.
EXTREMELY IMPORTANT
Release 3 is different from any other AMB algorithm on the market. The
AMB value which the user sets is actually the KICK IN TIME for the
– The eye delay is the amount of time the gun will pause after
– The Anti-Bolt Stick feature increases the dwell of the marker’s first
– Anti-Mechanical Bounce feature assists the user in eliminating
. The AMB software in the HATRED Software
placement of an AMB window in the firing cycle. While the user sets the
initiation value, the software automatically calculates the correct duration of
the window itself. The faster the gun’s firing cycle (as in the faster the bol t
travels forward and retracts), the lower the AMB time. 15 ms is an ideal
time for Protégé’s whereas 25 ms is an ideal value for Marq’s. If your
gun has bounce issues, please increase and decrease your AMB values by 2
ms increments until your AMB window is positioned correctly in your firing
cycle and your bounce issues are eliminated. A higher AMB value does not
mean the gun will bounce less!
Note: Setting your AMB value to 1 will disable AMB altogether.
Max ROF
their marker. Some leagues, such as the PSP, require that guns not exceed
15.4 bps. The Max ROF feature is adjustable from 10-35 bps in 1 bps
increments.
Note: Dip switch 1 must be ON for your ROF cap to be enabled.
IMPORTANT:
below. Anything higher than this CAN blow your solenoid. Hater Paintball
simply cannot be responsible for damaged solenoids.
Forced Shot
may force a shot by holding in the trigger for approximately one second. This
feature is useful in the event that a ball has been pushed into the detents and
is unreadable by the eyes. A forced shot will clear the breach and load the
next paintball as normal.
Ramp Activation
modes. Your ramping will not kick in until this activation point has been
reached. A lower ramp activation “kicks in” easier than a high activation.
Note: The ramp deactivation is always two bps less than the ramp activation.
Ramp Percentage
fast to ramp. The higher the setting, the faster your marker will shoot.
Factory Default Reset:
into the programming menu and select the flickering blue LED. Click the
trigger once to reset everything back to its factory default value.
– This feature allows the user to cap the maximum rate of fire of
We highly recommend leaving your Max ROF at 20 cps or
– If the eyes are enabled, but the breach is empty, the user
– This feature sets your ramp activation for all ramping
: This applies to all ramping modes and tells your gun how
To reset all settings back to their factory defaults, go
Warranty:
The HATRED gun board is warranted free from any and all
manufacturing defects or software bugs for the lifetime of the product.
Warranties are non-transferable.
Problems caused by customer negligence are not covered under
warranty. “Negligence” includes, but may not be limited to, using
batteries other than a single Alkaline 9V, breaking components off the
board, and other improper usage.
If you need repair or support, please contact first by phone at
317.354.5201 or email at info@haterpaintball.com .
4C, the four eye system, and all associated intellectual property are sole
property of Extreme Paintball Designs.
HATER PAINTBALL LLC
2752 Michigan Avenue
Unit Four
Kissimmee, Florida 34744
United States
317-354-5201 (p)
317-203-0719 (f)
info@haterpaintball.com
www.haterpaintball.com
 Loading...