

Page 1
Register Online!
www.hatcocorp.com
Installation and Operating Manual
™
DRAWERMAX
Drawer Warmers
HDM and HDM-B Series
For and Non- Models
P/N 07.04.490.00
Heizladen
Serien HDM und HDM-B
Installations- und Bedienungshandbuch
P 12
Registrieren Sie sich online!
Tiroirs chauffants
Séries HDM et HDM-B
Manuel d'installation et d'utilisation
P 32
S'inscrire en ligne!
Schuifverwarmers
Modelreeksen HDM en HDM-B
Handleiding voor Installatie en Bediening
P 53
Registreer online!
Cajones Térmicos
Series HDM y HDM-B
Manual de Instalación y Operación
P 22
¡Regístrese en línea!
Riscaldatori a cassetto
Serie HDM, HDM-B
Manuale per l'installazione e l'uso
P 42
Registratevi online!
Register your unit online!
See IMPORTANT OWNER INFORMATION
section for details.
© 2012 Hatco Corporation
Page 2
WARNING
NOTICE
CAUTION
CONTENTS
Important Owner Information ..............................................2
Introduction...........................................................................2
Important Safety Information...............................................3
Model Description.................................................................4
Model Designation................................................................4
Specifications........................................................................5
Plug Configurations ............................................................5
Electrical Rating Chart........................................................5
Dimensions.........................................................................5
Installation.............................................................................6
General...............................................................................6
Installing HDM-2 Models ....................................................6
Installing HDM-2B Models..................................................7
IMPORTANT OWNER INFORMATION
Record the model number, serial number (located on the back
of the unit for free-standing units and on the inside of the left
panel for built-in units), voltage, and purchase date of the unit
in the spaces below. Please have this information available
when calling Hatco for service assistance.
Model No. ________________________________________
Serial No. ________________________________________
Voltage __________________________________________
Date of Purchase __________________________________
Register your unit!
Completing online warranty registration will prevent delay in
obtaining warranty coverage. Access the Hatco website at
www.hatcocorp.com, select the Parts & Servicepull-down
menu, and click on “Warranty Registration”.
Operation...............................................................................8
General...............................................................................8
Food Holding Guide ...........................................................8
Maintenance ..........................................................................9
General...............................................................................9
Cleaning .............................................................................9
Options and Accessories.....................................................9
Troubleshooting Guide ......................................................10
International Limited Warranty ..........................................11
Service Information ............................................................11
Business 8:00
Hours: Central Standard Time (C.S.T.)
Telephone: (414) 671-6350
E-mail: partsandservice@hatcocorp.com
Fax: (414) 671-3976 (Parts and Service)
Additional information can be found by visiting our web site at
www.hatcocorp.com.
AM to 5:00 PM
(Summer Hours: June to September –
8:00
AM to 5:00 PM C.S.T.
Monday through Thursday
8:00
AM to 2:30 PM C.S.T. Friday)
INTRODUCTION
Hatco DRAWERMAX™ Drawer Warmers are designed to keep
foods at optimum serving temperatures without affecting quality.
They are built for tough kitchen duty with rugged stainless steel
construction, heavy-duty hardware, stainless steel slides, and
positive-closing drawers. DRAWERMAX Drawer Warmers
keep everything from meat to vegetables to rolls hot and flavorfresh until served.
Hatco DRAWERMAX Drawer Warmers are products of
extensive research and field testing. The materials used were
selected for maximum durability, attractive appearance, and
optimum performance. Every unit is inspected and tested
thoroughly prior to shipment.
This manual provides the installation, safety, and operating
instructions for DRAWERMAX Drawer Warmers. Hatco
recommends all installation, operating, and safety instructions
appearing in this manual be read prior to installation or
operation of the unit.
Safety information that appears in this manual is identified by
the following signal word panels:
WARNING indicates a hazardous situation which, if not
avoided, could result in death or serious injury.
CAUTION indicates a hazardous situation which, if not
avoided, could result in minor or moderate injury.
NOTICE is used to address practices not related to personal
injury.
2
Form No. HDMCEM-0412
Page 3
WARNING
NOTICE
CAUTION
WARNING
IMPORTANT SAFETY INFORMATION
Read the following important safety information before using this equipment to avoid serious
injury or death and to avoid damage to equipment or property.
ELECTRIC SHOCK HAZARD:
• Plug unit into a properly grounded electrical receptacle
of the correct voltage, size, and plug configuration. If
plug and receptacle do not match, contact a qualified
electrician to determine and install proper voltage and
size electrical receptacle.
• Turn OFF power switch, unplug power cord/turn off
power at circuit breaker, and allow unit to cool before
performing any cleaning, adjustments, or maintenance.
• DO NOT submerge or saturate with water. Unit is not
waterproof. Do not operate if unit has been submerged
or saturated with water.
• Unit is not weatherproof. Locate unit indoors where
ambient air temperature is a minimum of 21°C (70°F).
• Do not steam clean or use excessive water on unit.
• This unit is not “jet-proof” construction. Do not use jetclean spray to clean this unit.
• Do not pull unit by power cord.
• Discontinue use if power cord is frayed or worn.
• Do not attempt to repair or replace a damaged power
cord. Cord must be replaced by Hatco, an Authorized
Hatco Service Agent, or a person with similar
qualifications.
• Do not clean unit when it is energized or hot.
• Do not allow liquids to spill into unit.
• Use only Genuine Hatco Replacement Parts when
service is required. Failure to use Genuine Hatco
Replacement Parts will void all warranties and may
subject operators of the equipment to hazardous
electrical voltage, resulting in electrical shock or burn.
Genuine Hatco Replacement Parts are specified to
operate safely in the environments in which they are
used. Some aftermarket or generic replacement parts
do not have the characteristics that will allow them to
operate safely in Hatco equipment.
FIRE HAZARD:
• Locate unit a minimum of 25 mm (1″) from combustible
walls and materials. If safe distances are not
maintained, discoloration or combustion could occur.
• Do not use harsh chemicals such as bleach (or
cleaners containing bleach), oven cleaners, or
flammable cleaning solutions to clean this unit.
Make sure food product has been heated to the proper
food-safe temperature before placing in unit. Failure to heat
food product properly may result in serious health risks.
This unit is for holding pre-heated food product only.
This unit is not intended for use by children or persons
with reduced physical, sensory, or mental capabilities.
Ensure proper supervision of children and keep them away
from the unit.
Make sure all operators have been instructed on the safe
and proper use of the unit.
This unit must be serviced by qualified personnel only.
Service by unqualified personnel may lead to electric
shock or burn.
This unit has no “user-serviceable” parts. If service is
required on this unit, contact an Authorized Hatco Service
Agent or contact the Hatco Service Department at
414-671-6350; fax 414-671-3976.
BURN HAZARD:
• Some exterior surfaces on the unit will get hot. Use
caution when touching these areas.
• Use caution when opening drawer. Hot air escapes
when drawer is open.
Standard and approved manufacturing oils may smoke up
to 30 minutes during initial startup. This is a temporary
condition. Operate unit without food product until smoke
dissipates.
Locate unit in an area that is convenient for use. The
location should be level and strong enough to support the
weight of the unit and contents.
Do not lay unit on front or back side. Damage to unit could
occur.
Use non-abrasive cleaners and cloths only. Abrasive
cleaners and cloths could scratch finish of unit, marring its
appearance and making it susceptible to soil accumulation.
Form No. HDMCEM-0412
3
Page 4
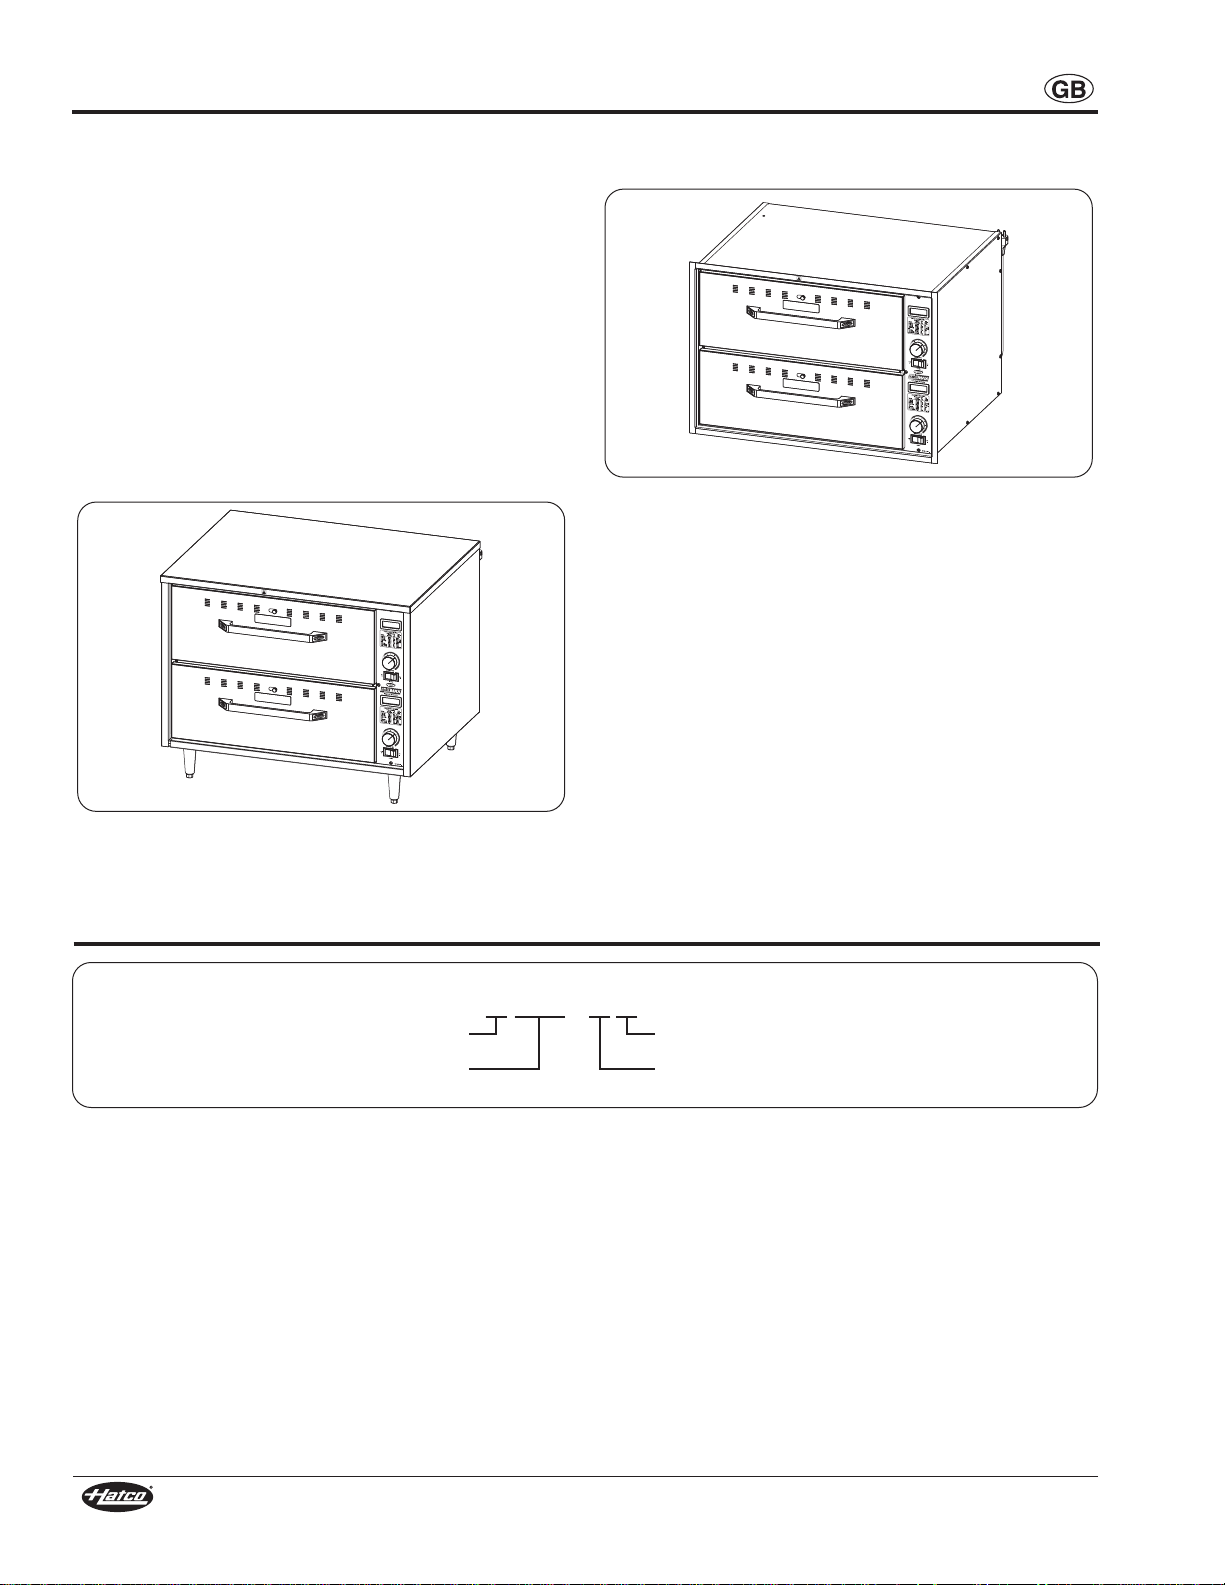
MODEL DESCRIPTION
H D M - X B
Hatco
DRAWERMAX
Built-In
Quantity of Drawers
All Models
All Hatco DRAWERMAX™ Drawer Warmers are built of rugged
construction with durable nylon rollers, 12 gauge stainless steel
slides, and heavy-duty hardware. Each drawer features
adjustable drawer vents for humidity control, a POWER
ON/OFF switch, a TEMPERATURE control knob, and a
temperature gauge. Standard size pans 152 mm (6″) deep are
supplied with each drawer. The insulated top and sides provide
maximum energy efficiency and the heating elements are
warranted for two years. All HDM Series models include an
attached 1829 mm (6′) power cord with plug.
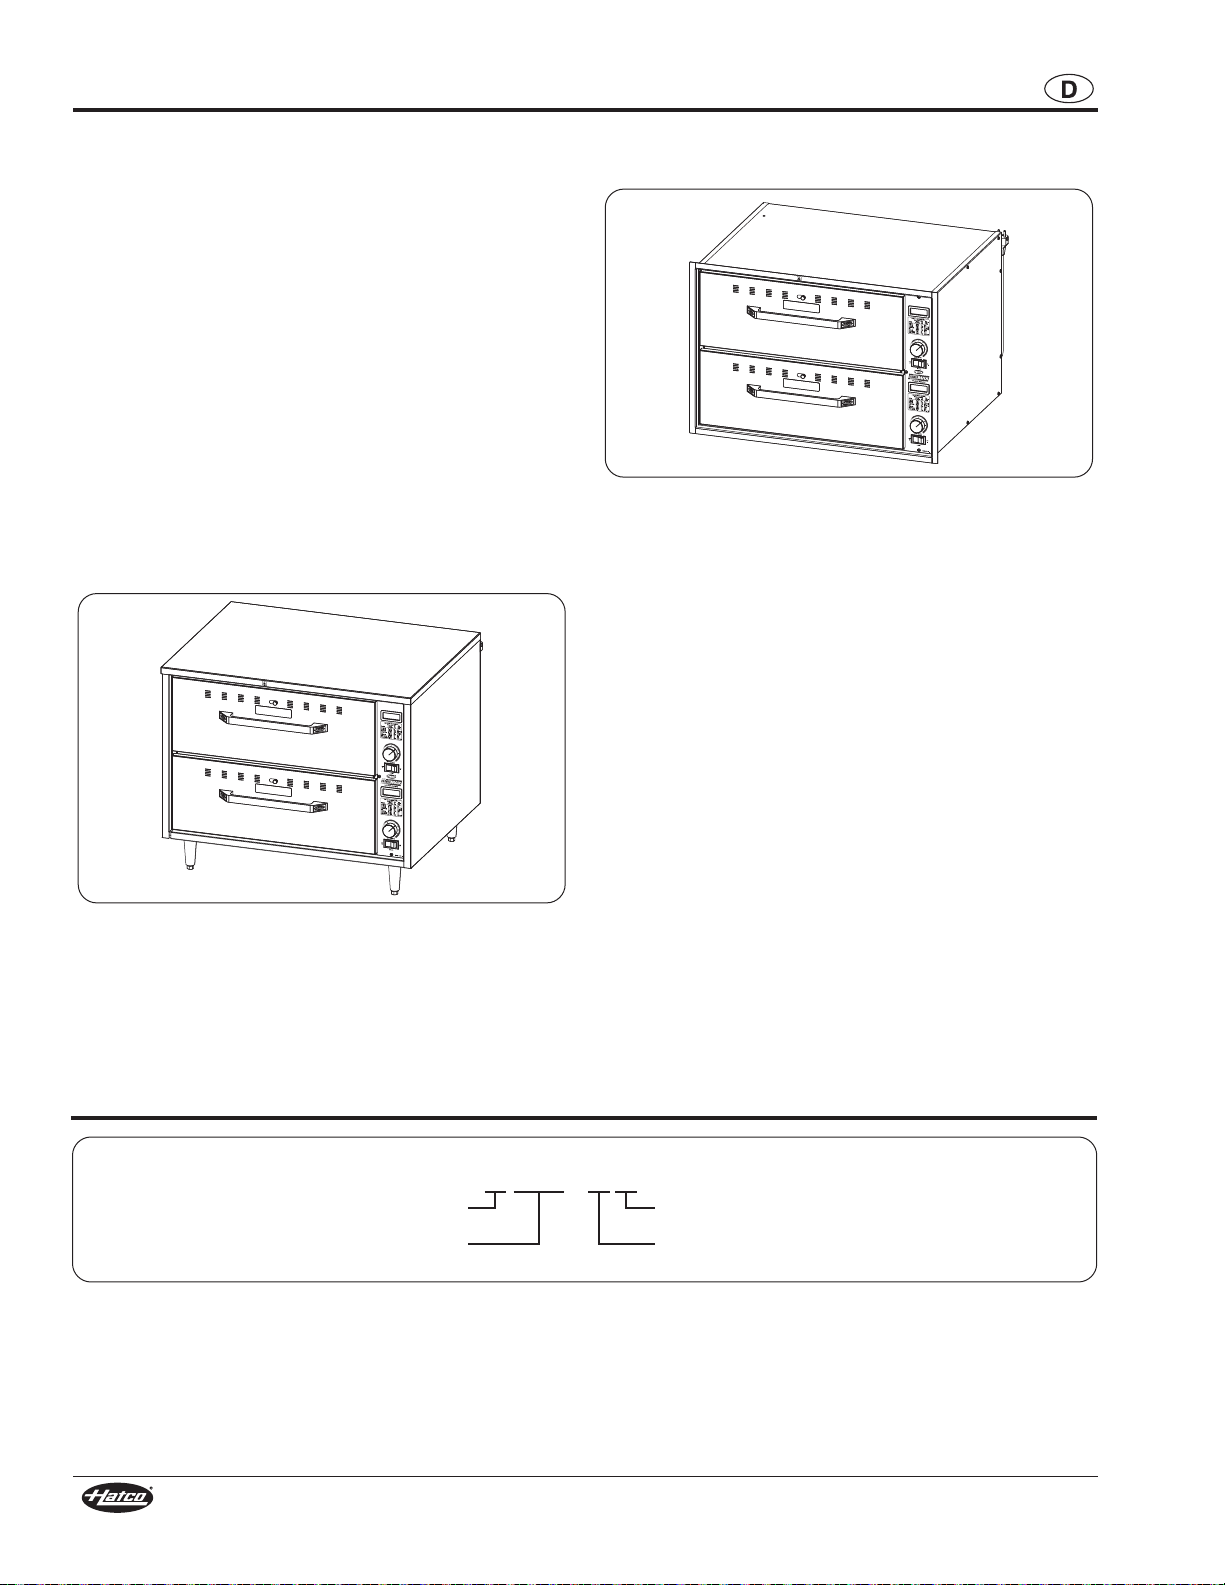
Model HDM-2
Model HDM-2 is a two-drawer, free-standing unit. It is equipped
with 102 mm (4″) legs.
NOTE: Refer to the OPTIONS AND ACCESSORIES section
for additional available features.
Model HDM-2B
Model HDM-2B is two-drawer, built-in unit.
Model HDM-2B
Model HDM-2
MODEL DESIGNATION
4
Form No. HDMCEM-0412
Page 5
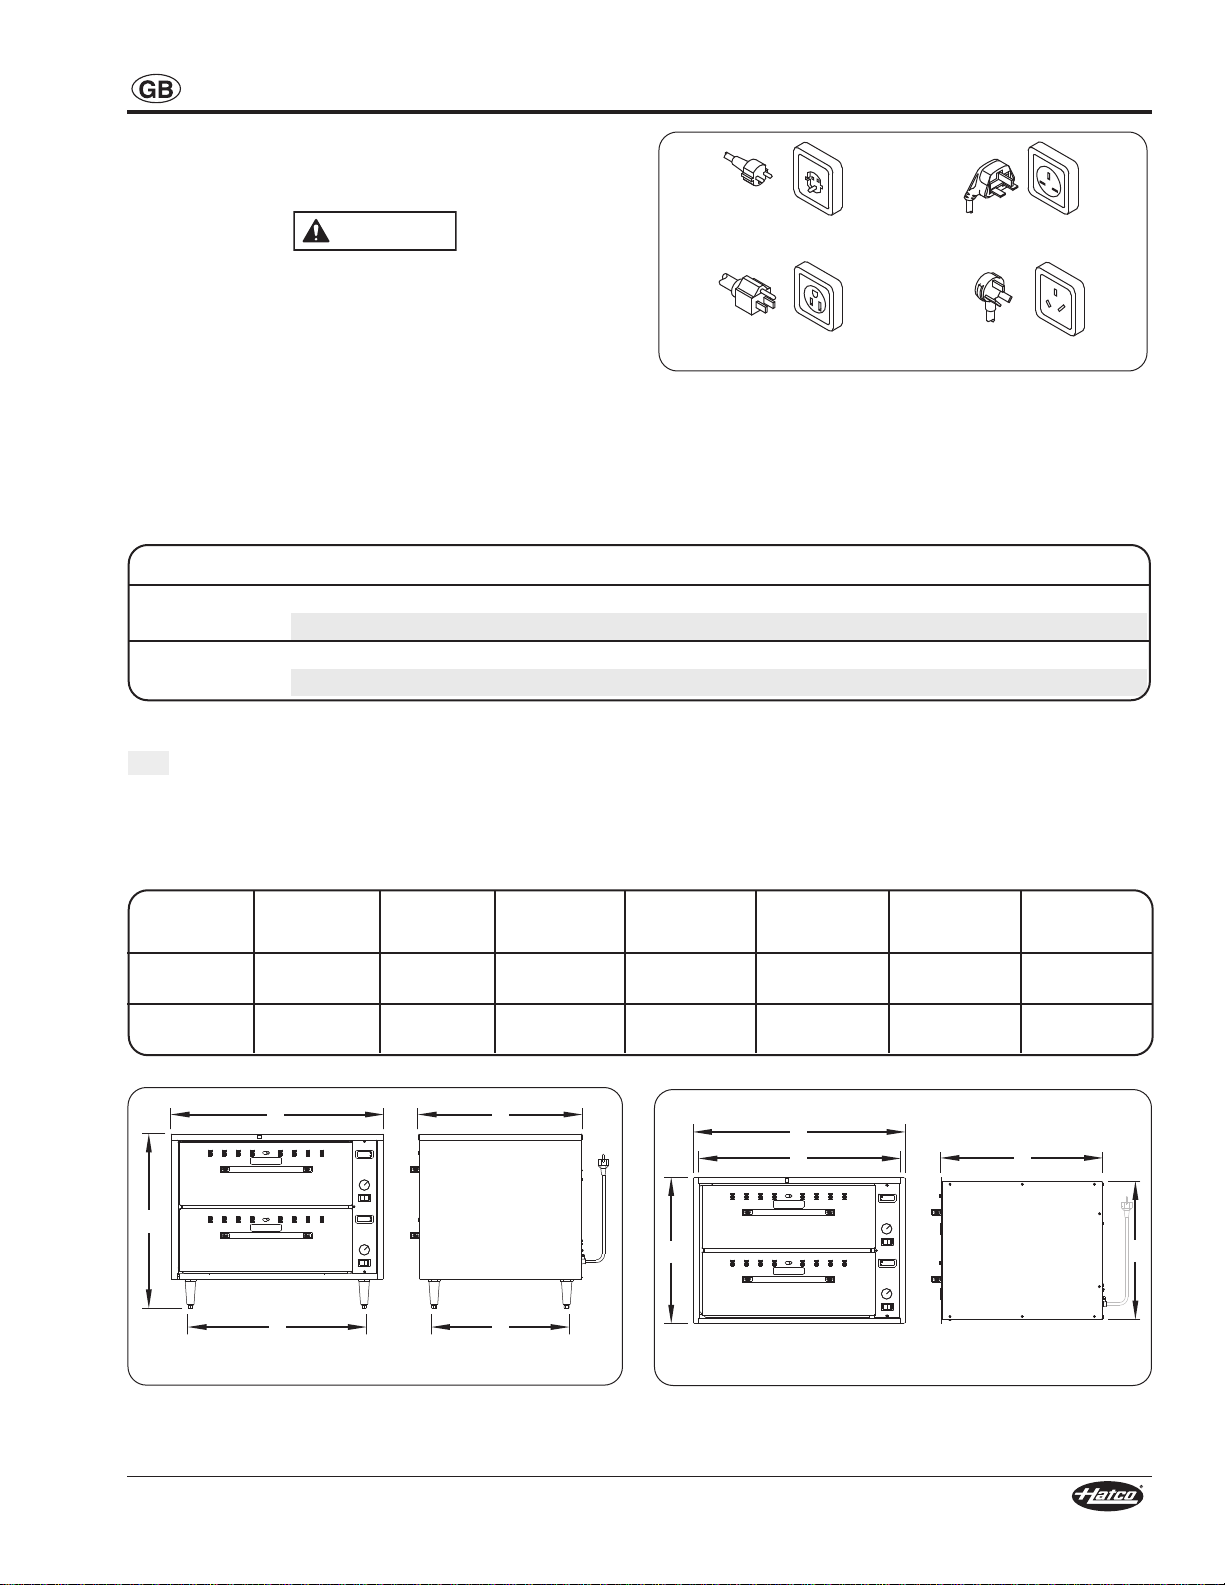
Plug Configurations
WARNING
CEE 7/7 Schuko BS-1363
AS 3112
NEMA 5-15P
A B
D E
C
Front View Side View
A
B
F
C
G
Front View Side View
Units are supplied from the factory with an electrical cord and
plug installed. Plugs are supplied according to the application.
ELECTRIC SHOCK HAZARD: Plug unit into a properly
grounded electrical receptacle of the correct voltage, size,
and plug configuration. If plug and receptacle do not
match, contact a qualified electrician to determine and
install proper voltage and size electrical receptacle.
NOTE: The specification label is located on the back of the unit
for free-standing units and on the inside of the left panel
for built-in units. See label for serial number and
verification of unit electrical information.
Electrical Rating Chart
SPECIFICATIONS
Plug Configurations
NOTE: Receptacle not supplied by Hatco.
Model
HDM-2
HDM-2B
NOTE: Shipping weight includes packaging.
The shaded areas contain electrical information for International models only.
Voltage Watts Amps
120 900 7.5
230 (CE) 984 4.3
120 900 7.5
230 (CE) 984 4.3
Plug Configuration
CEE 7/7 Schuko, BS-1363, or AS 3112
CEE 7/7 Schuko, BS-1363, or AS 3112
Dimensions
Width
Model
HDM-2 749 mm
HDM-2B 743 mm
(A)
(29-1/2″)
(29-1/4″)
Depth
(B)
576 mm
(22-3/4″)
568 mm
(22-3/8″)
Height
(C)
614 mm
(24-3/16″)
512 mm
(20-3/16″)
Footprint
Width (D)
629 mm
(24-3/4″)
--- ---
NEMA 5-15P
NEMA 5-15P
Footprint
Depth (E)
484 mm
(19-1/16″)
Shipping Weight
68 kg (150 lbs.)
68 kg (150 lbs.)
67 kg (147 lbs.)
67 kg (147 lbs.)
Built-In
Width (F)
--- ---
715 mm
(28-1/8″)
Built-In
Height (G)
483 mm
(19-1/16″)
Form No. HDMCEM-0412
HDM-2 Dimensions
HDM-2B Dimensions
5
Page 6
NOTICE
WARNING
102 mm (4″) Leg
Lengthen
Shorten
Adjustable Tip
INSTALLATION
General
DRAWERMAX™ Drawer Warmers are shipped with most
components pre-assembled. Care should be taken when
unpacking the shipping carton to avoid damage to the unit and
components enclosed.
ELECTRIC SHOCK HAZARD: Unit is not weatherproof.
Locate the unit indoors where the ambient air temperature
is a minimum of 21°C (70°F).
FIRE HAZARD: Locate the unit a minimum of 25 mm (1″)
from combustible walls and materials. If safe distances are
not maintained, combustion or discoloration could occur.
Do not lay unit on front or back side. Damage to unit could
occur.
1. Remove the unit from the carton.
NOTE: To prevent delay in obtaining warranty coverage,
complete online warranty registration. See the
IMPORTANT OWNER INFORMATION section for
details.
2. Remove tape and protective packaging from all surfaces of
unit.
3. Make sure the desired installation location is appropriate.
• Locate the unit in an area where the ambient air
temperature is constant and a minimum of 21°C (70°F).
Avoid areas that may be subject to active air movements
or currents (i.e., near exhaust fans/hoods and air
conditioning ducts).
• Make sure the unit is located on solid, level flooring or
in sturdy cabinetry.
• Make sure the unit is at the proper height in an area
convenient for use.
4. Install the unit. Refer to the appropriate installation
procedure in this section.
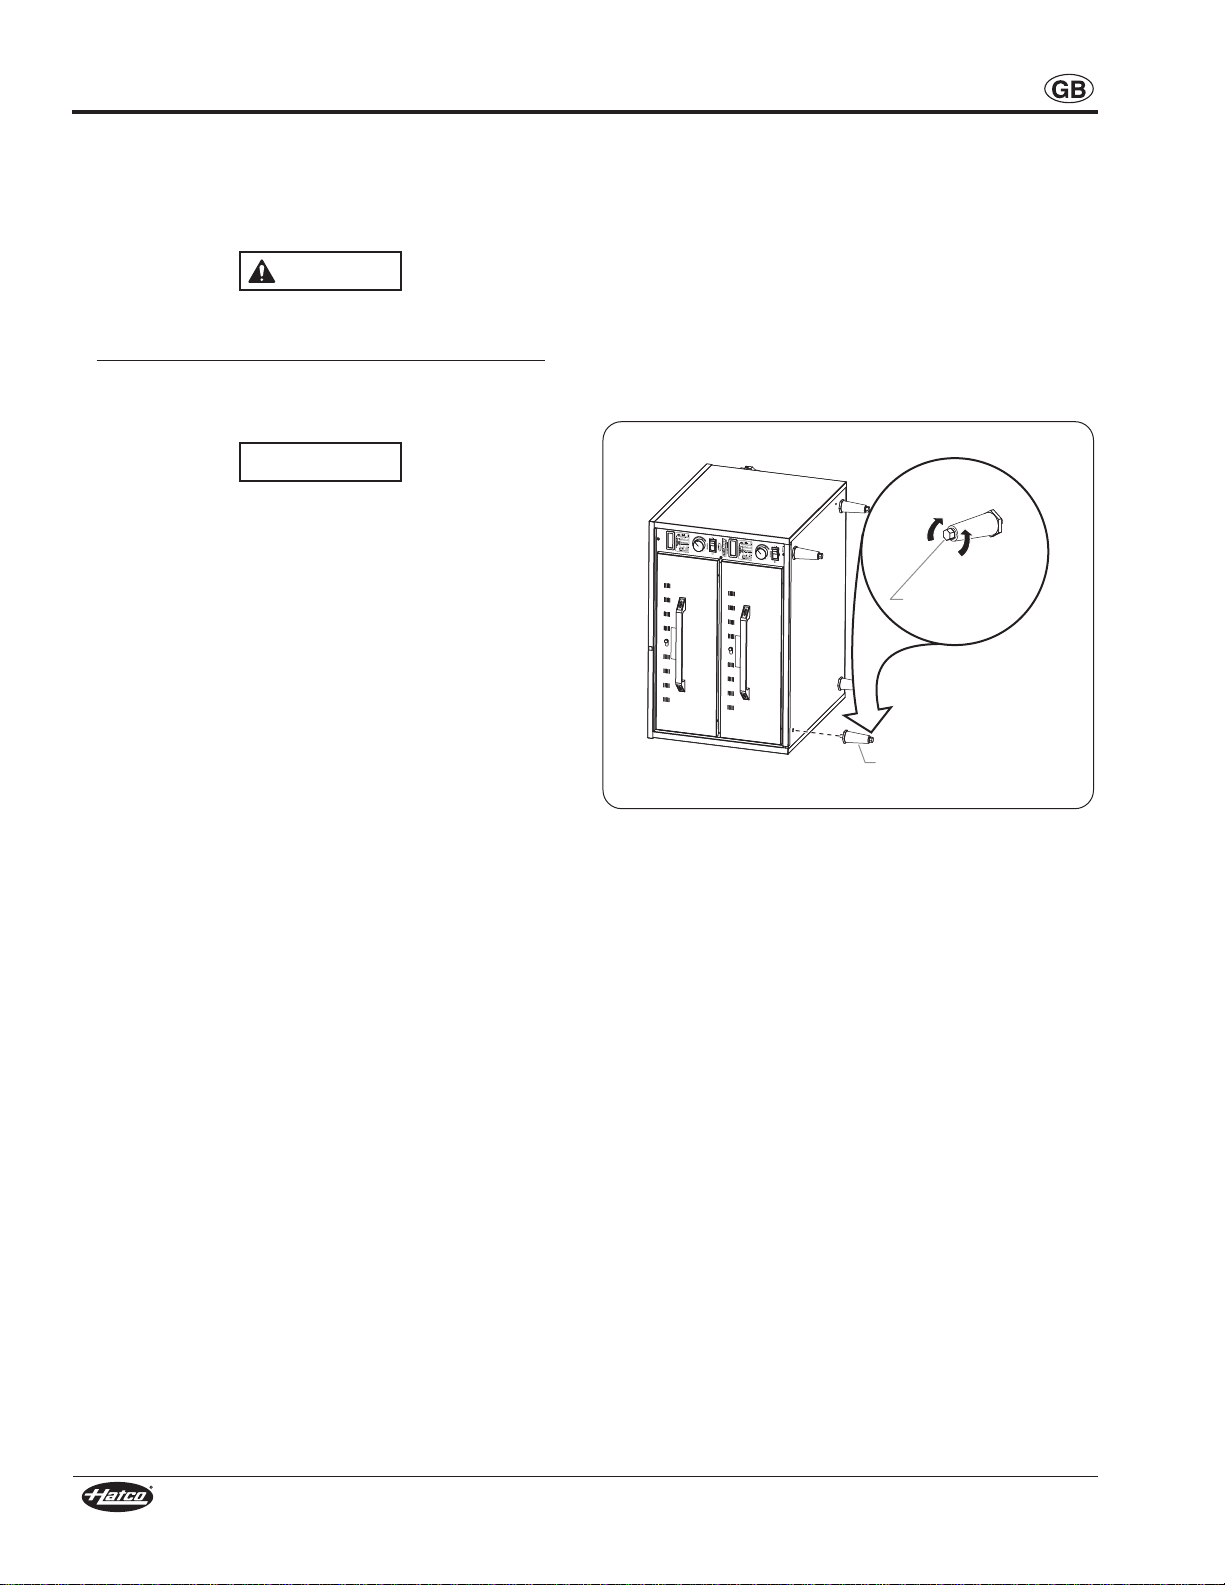
Installing HDM-2 Models
HDM-2 models are freestanding units that require the
installation of 102 mm (4″) legs before operation.
1. Remove the plastic bag containing the four legs from the
drawer of the unit.
2. Remove any pans from the drawers and carefully lay the
unit on its side (requires two people).
3. Install each leg. Hand-tighten the legs until snug. Do not
over-tighten.
4. Return the unit to its upright position (requires two people).
If the unit is not level or rocks, turn the adjustable tip of the
appropriate leg(s) to level the unit.
Leg Assembly
6
Form No. HDMCEM-0412
Page 7
721 mm
(28-3/8″)
25 mm
(1″)
489 mm
(19-1/4″)
603 mm
(23-3/4″)
Front View
Side View
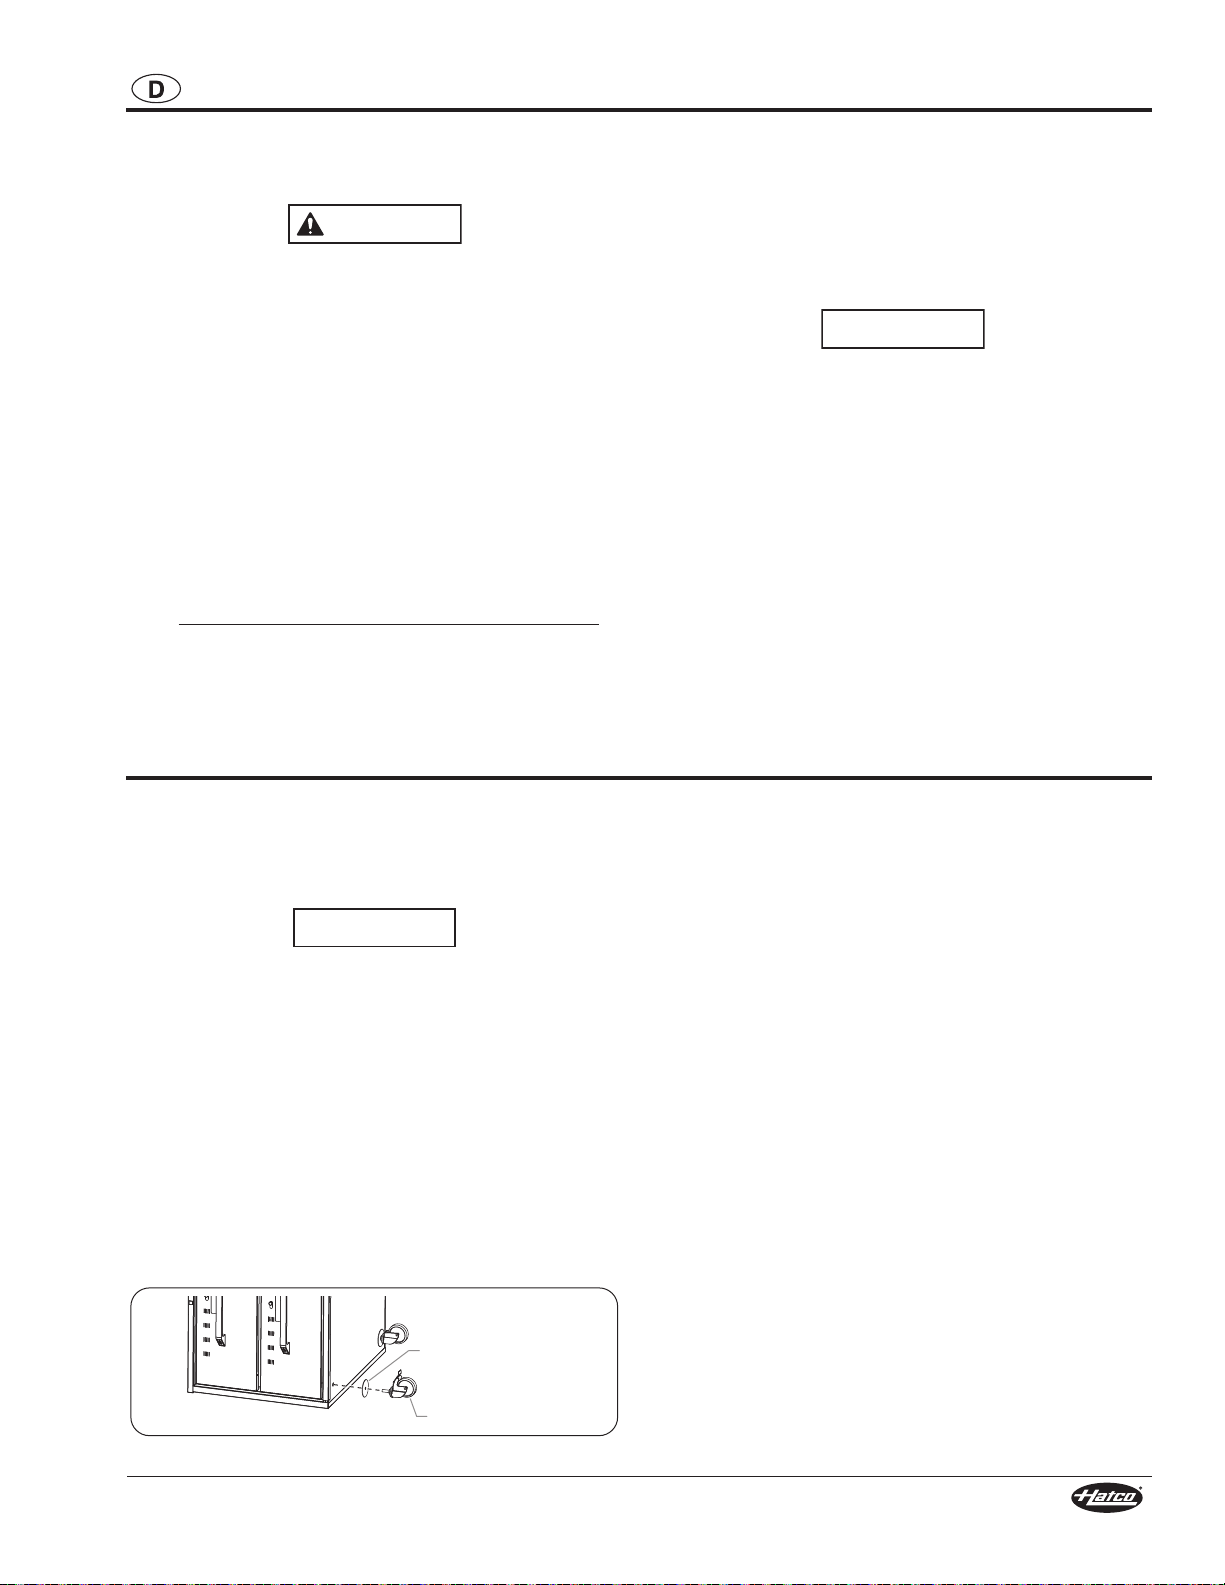
Locking
Strip
Locking
Strip
22.2 mm
(0.875″)
3.2 mm
(0.125″)
Drawer
Warmer
Flange
Locking
Strip
Cabinet
Facing
Locking Studs
(underneath)
INSTALLATION
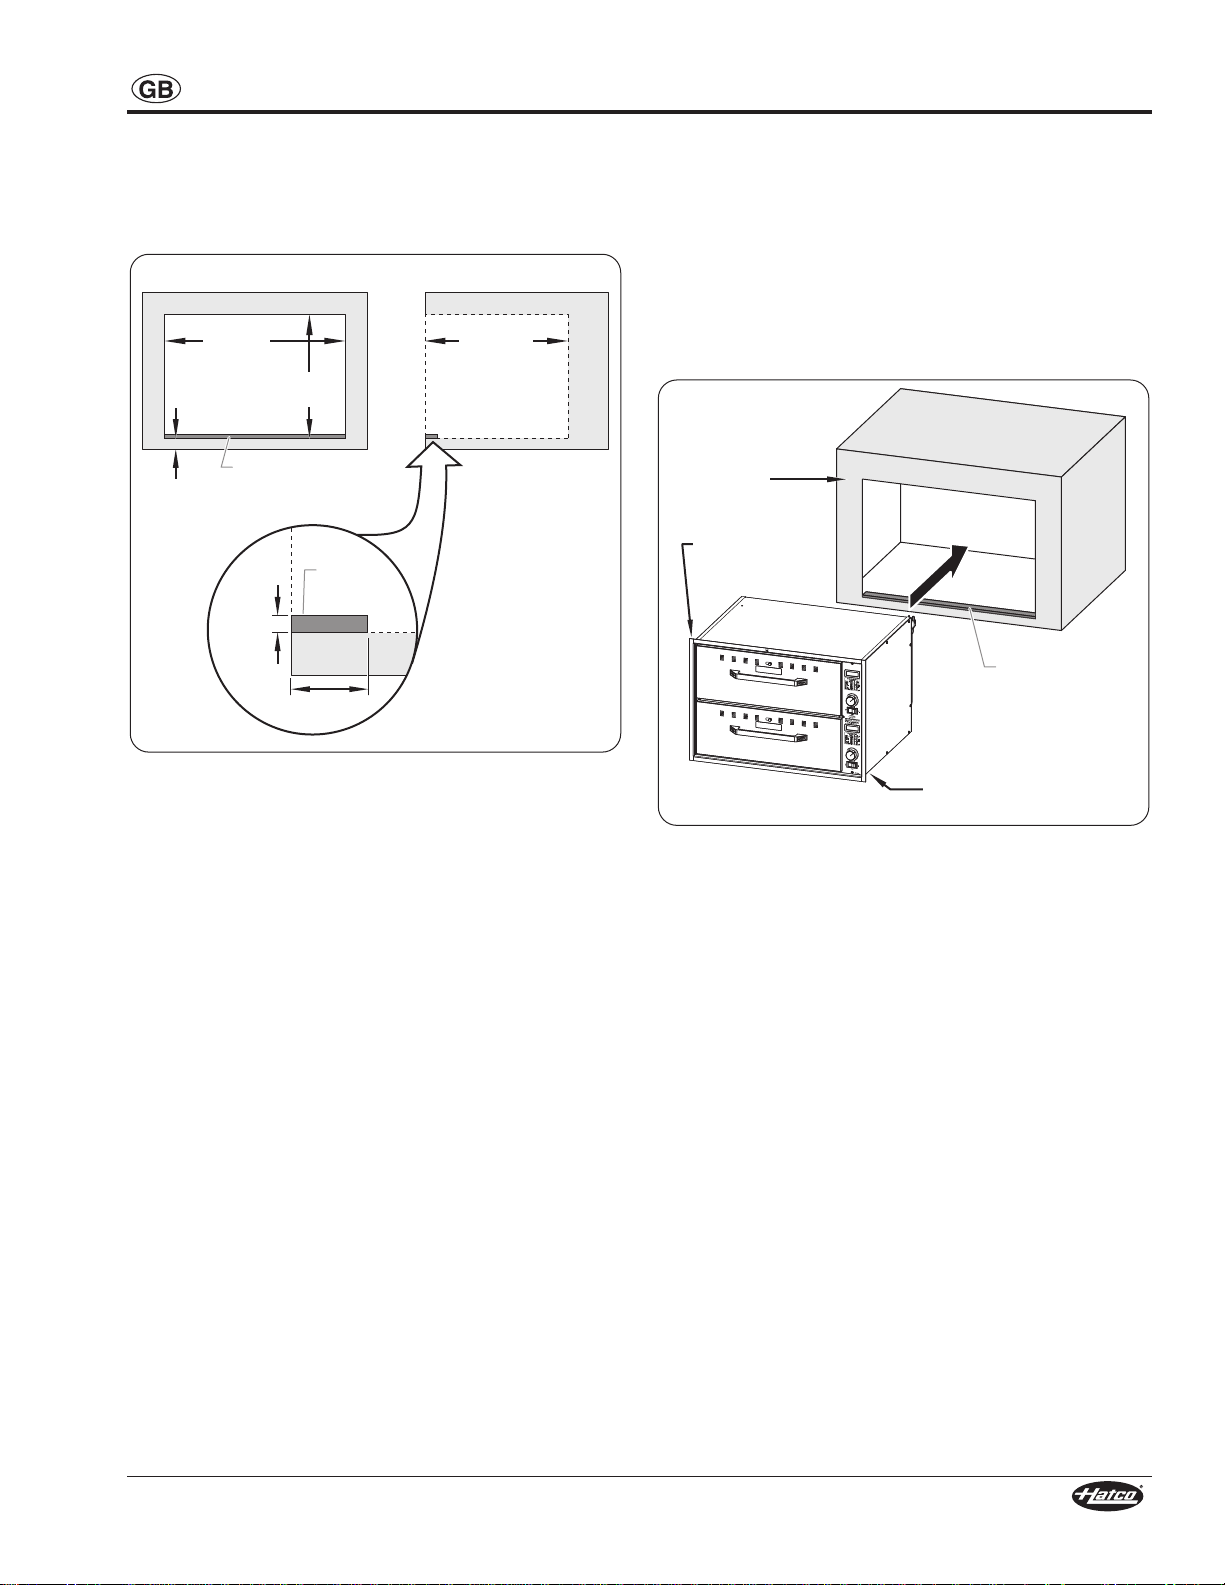
Installing HDM-2B Models
HDM-2B models are built-in units that require installation into a
cabinet before operation.
1. Cut the appropriate opening in the cabinet. Refer to the
illustration below for dimensions.
4. Plug the power cord on the unit into the electrical
receptacle.
5. Partially insert the unit into the opening, making sure the
power cord is fed into the opening first.
6. Before installing the unit into the opening completely, apply
a bead of National Sanitation Foundation-approved sealant
between the drawer warmer flange and the cabinet facing.
7. Slide the unit into the opening until the front locking studs
drop behind the locking strip. To verify installation, pull out
bottom drawer completely and gently pull to ensure the unit
is locked in place.
Cutout and Locking Strip Dimensions
NOTE: Maintain a minimum clearance of 25 mm (1") between
the cutout opening and the floor.
2. Fasten a locking strip (not supplied) to the lower front
inside lip of the cabinet opening.
3. Make sure a properly grounded electrical receptacle of the
correct voltage, size, and plug configuration is installed
inside the cabinet cutout. See the SPECIFICATIONS
section for details.
Built-In Installation
Form No. HDMCEM-0412
7
Page 8
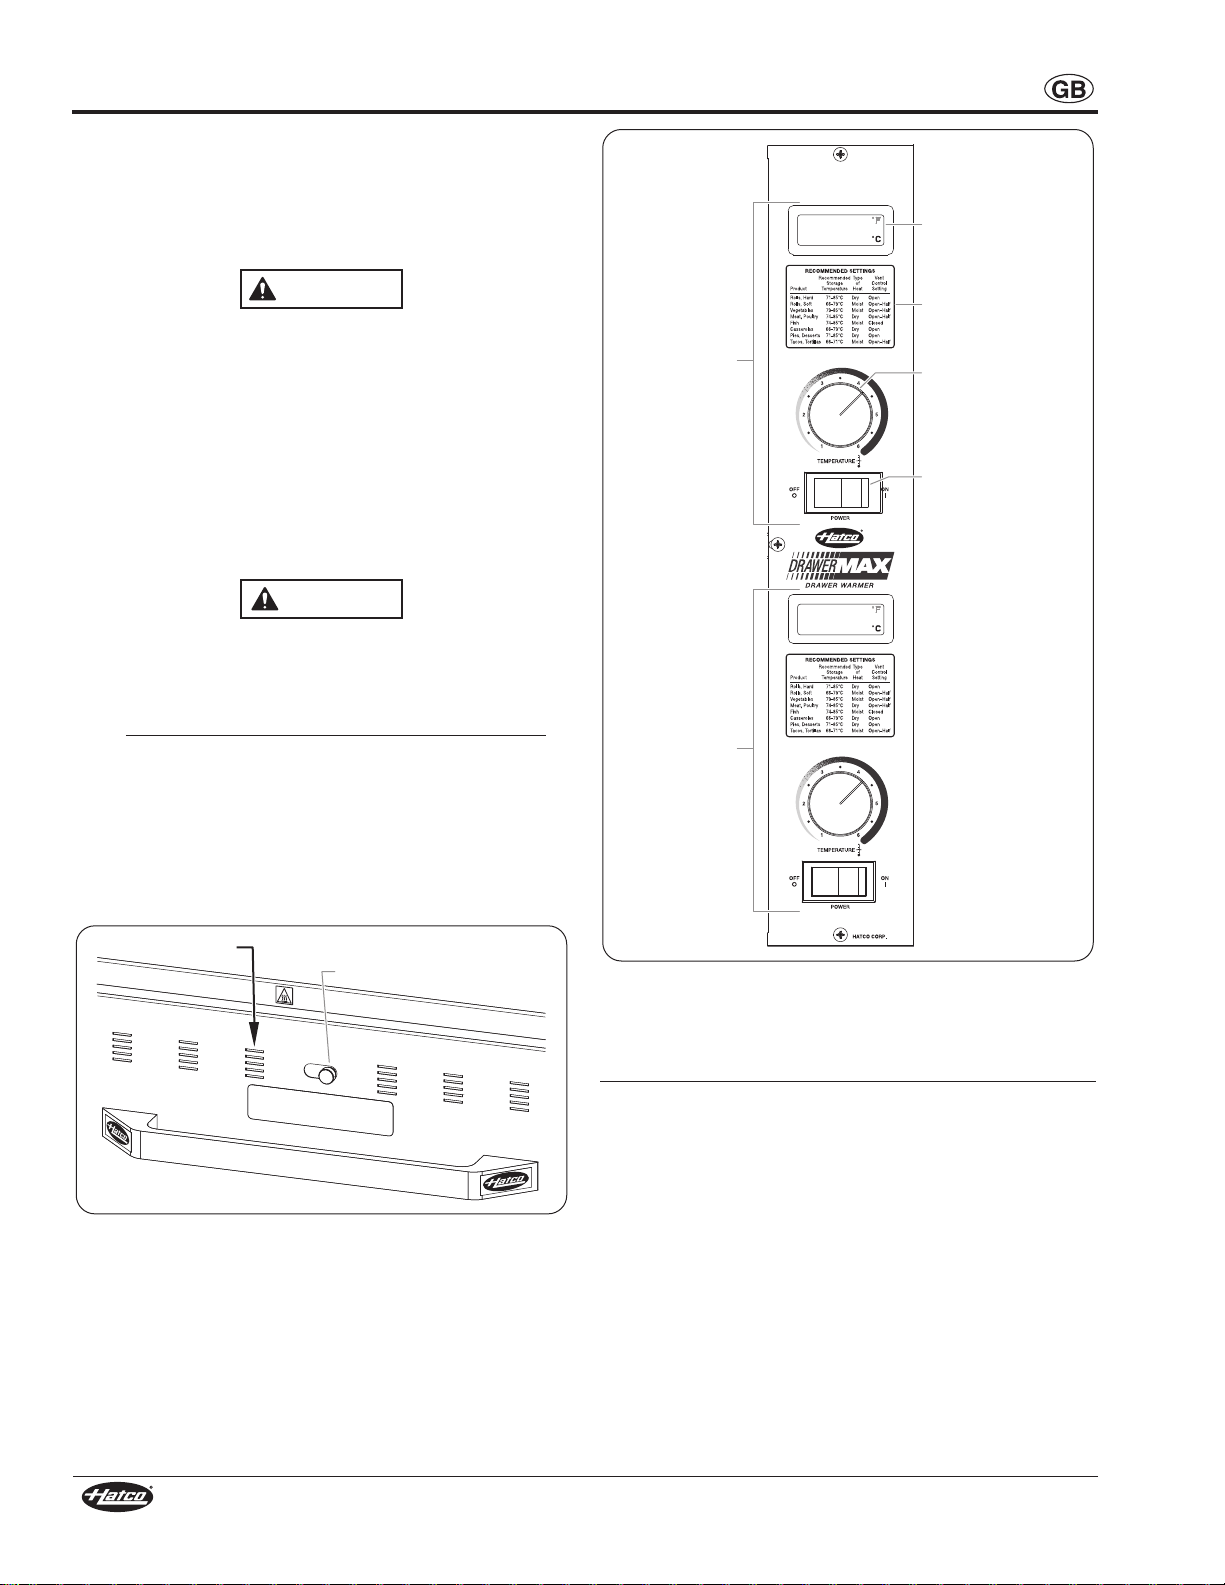
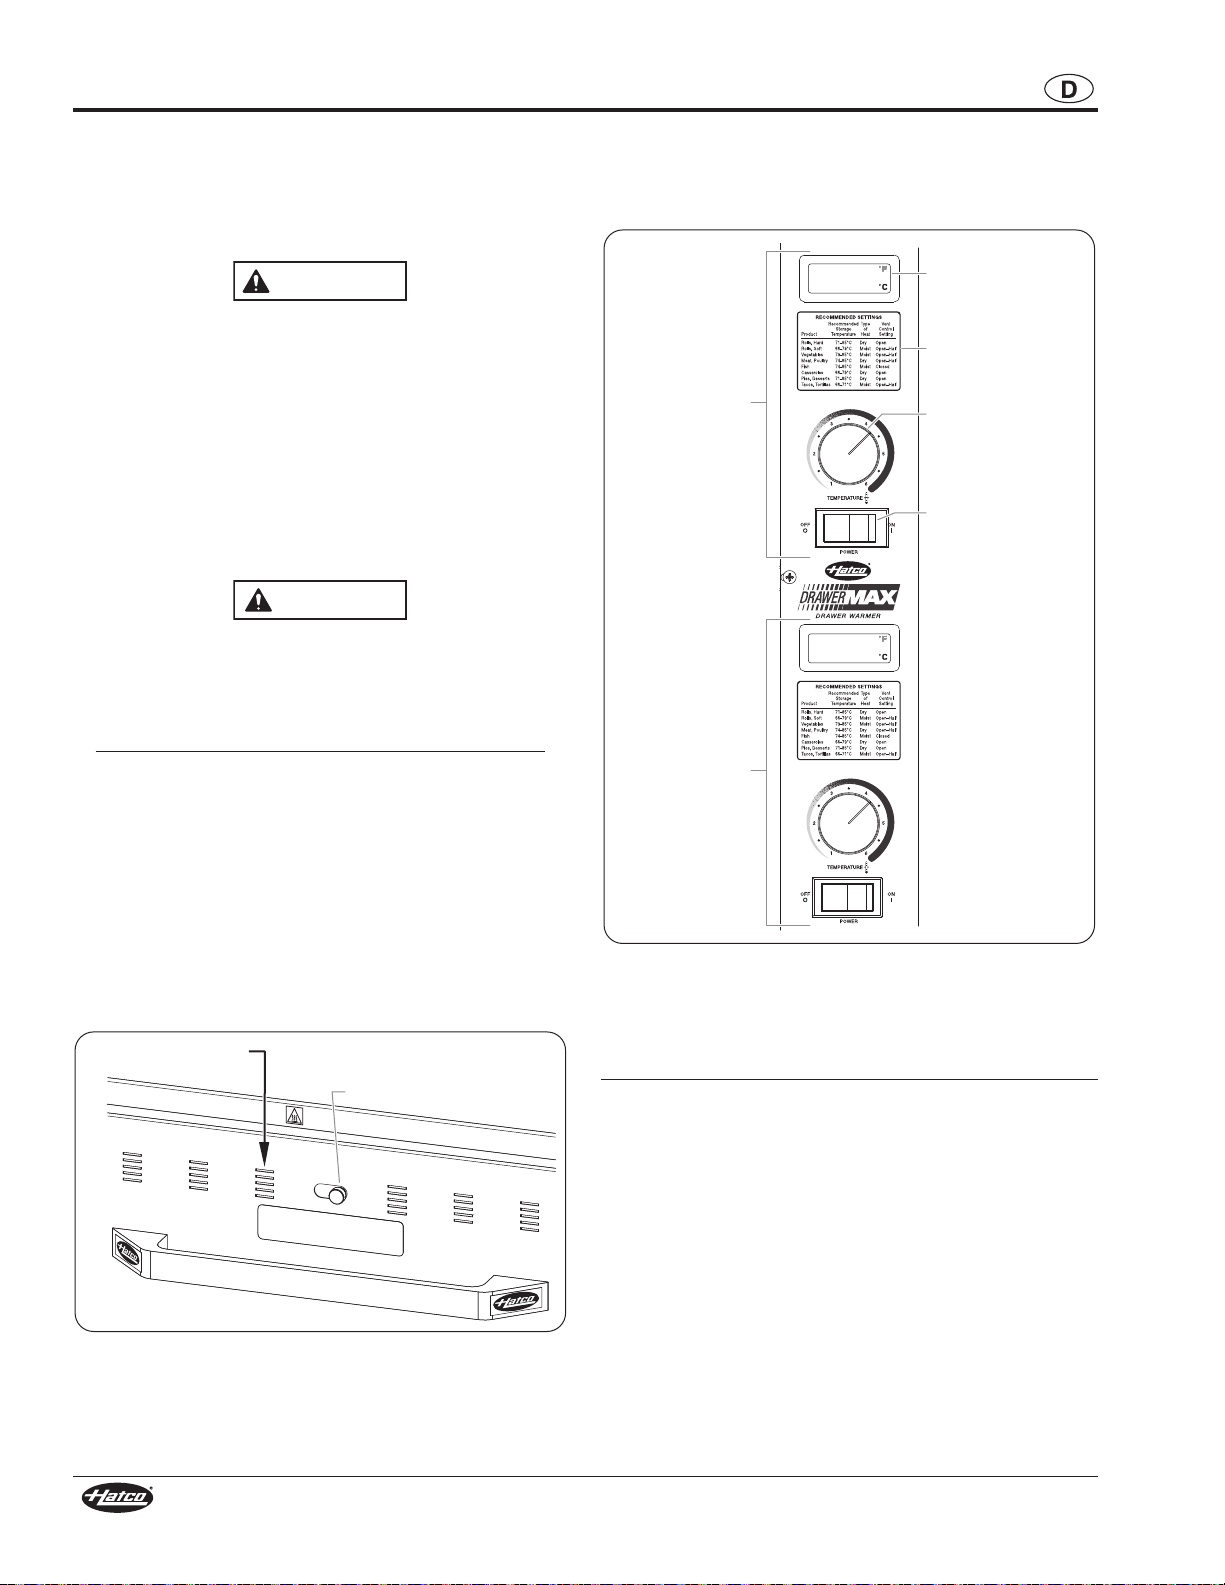
Drawer Vents
Vent Knob (open position)
CAUTION
WARNING
Upper Drawer
Controls
Lower Drawer
Controls
Temperature
Gauge
RECOMMENDED
SETTINGS Chart
TEMPERATURE
Control Knob
Power ON/OFF
(I/O) Switch
OPERATION
General
Use the following procedure to operate DRAWERMAX™
Drawer Warmers. Each drawer can be controlled and
monitored individually using the adjustable drawer vents for
humidity control as well as the POWER ON/OFF switch,
TEMPERATURE control knob, and temperature gauge.
Read all safety messages in the IMPORTANT SAFETY
INFORMATION section before operating this equipment.
Startup
1. For freestanding units, plug the unit into a properly grounded
electrical receptacle of the correct voltage, size, and plug
configuration. See the SPECIFICATIONS section for details.
2. Move the POWER ON/OFF (I/O) switch(es) to the ON (I)
position.
3. Turn the TEMPERATURE control knob(s) to the desired
setting(s). See the RECOMMENDED SETTINGS chart on
the control panel or the Food Holding Guide in this section.
BURN HAZARD:
• Some exterior surfaces on the unit will get hot. Use
caution when touching these areas.
• Use caution when opening drawer. Hot air escapes
when drawer is open.
Standard and approved manufacturing oils may smoke up
to 30 minutes during initial startup. This is a temporary
condition. Operate unit without food product until smoke
dissipates.
4. Allow unit 15–20 minutes to reach operating temperature.
5. Adjust the drawer vents for the desired humidity by sliding
the vent knob on the drawer front. Opening the vents all
the way allows maximum moisture to escape.
NOTE: Proper vent adjustment depends on the type and
Shutdown
amount of food held, as well as the frequency of drawer
opening.
1. Move the POWER ON/OFF (I/O) switch(es) to the OFF (O)
position.
2. Allow the unit to cool before performing any cleaning or
maintenance.
Drawer Vents
HDM-2 Control Panel
Food Holding Guide
Recommended Type of Vent
Product Storage Temperature Heat Setting
Rolls, Hard 71°–85°C (160°–185°F) Dry Open
Rolls, Soft 66°–79°C (150°–175°F) Moist Open–Half
Vegetables 79°–85°C (175°–185°F) Moist Open–Half
Meat, Poultry 74°–85°C (165°–185°F) Dry Open
Fish 74°–85°C (165°–185°F) Moist Closed
Casseroles 66°–79°C (150°–175°F) Dry Open
Pies, Desserts 71°–85°C (160°–185°F) Dry Open
Tacos, Tortillas 66°–71°C (150°–160°F) Moist Open–Half
Food Holding Capacity
A standard drawer has the following capacity:
Dinner Rolls: 6–8 dozen
Ribs: 11–14 kg (25–30 lbs.)
Potatoes: 3–3-1/2 dozen
8
Form No. HDMCEM-0412
Page 9
WARNING
NOTICE
MAINTENANCE
NOTICE
76 mm (3″) Caster
Washer
General
DRAWERMAX Drawer Warmers are designed for maximum
durability and performance with minimum maintenance.
ELECTRIC SHOCK HAZARD:
• Turn OFF power switch, unplug power cord/turn off
power at circuit breaker, and allow unit to cool before
performing any cleaning, adjustments, or maintenance.
• DO NOT submerge or saturate with water. Unit is not
waterproof. Do not operate if unit has been submerged
or saturated with water.
• Do not steam clean or use excessive water on unit.
• This unit is not “jet-proof” construction. Do not use jetclean spray to clean this unit.
• Do not clean unit when it is energized or hot.
This unit has no “user-serviceable” parts. If service is
required on this unit, contact an Authorized Hatco Service
Agent or contact the Hatco Service Department at
414-671-6350; fax 414-671-3976.
Cleaning
To preserve the finish of the unit as well as maintain
performance, it is recommended that the unit be cleaned daily.
1. Turn off the unit, unplug the power cord (freestanding
models), and allow the unit to cool.
2. Remove and wash all food pans and accessories.
Use non-abrasive cleaners and cloths only. Abrasive
cleaners and cloths could scratch finish of unit, marring
its appearance and making it susceptible to soil
accumulation.
3. Wipe down surfaces using a damp cloth. A non-abrasive,
cream cleaner may be used for difficult stains.
• Make sure to check and clean the interior of the unit.
Food pieces may fall from the food pans into the drawer
cavity. CAUTION! Burn Hazard — Do not clean
drawer cavity when unit is on or plugged in!
4. Wipe dry the entire unit using a dry, non-abrasive cloth.
OPTIONS AND ACCESSORIES
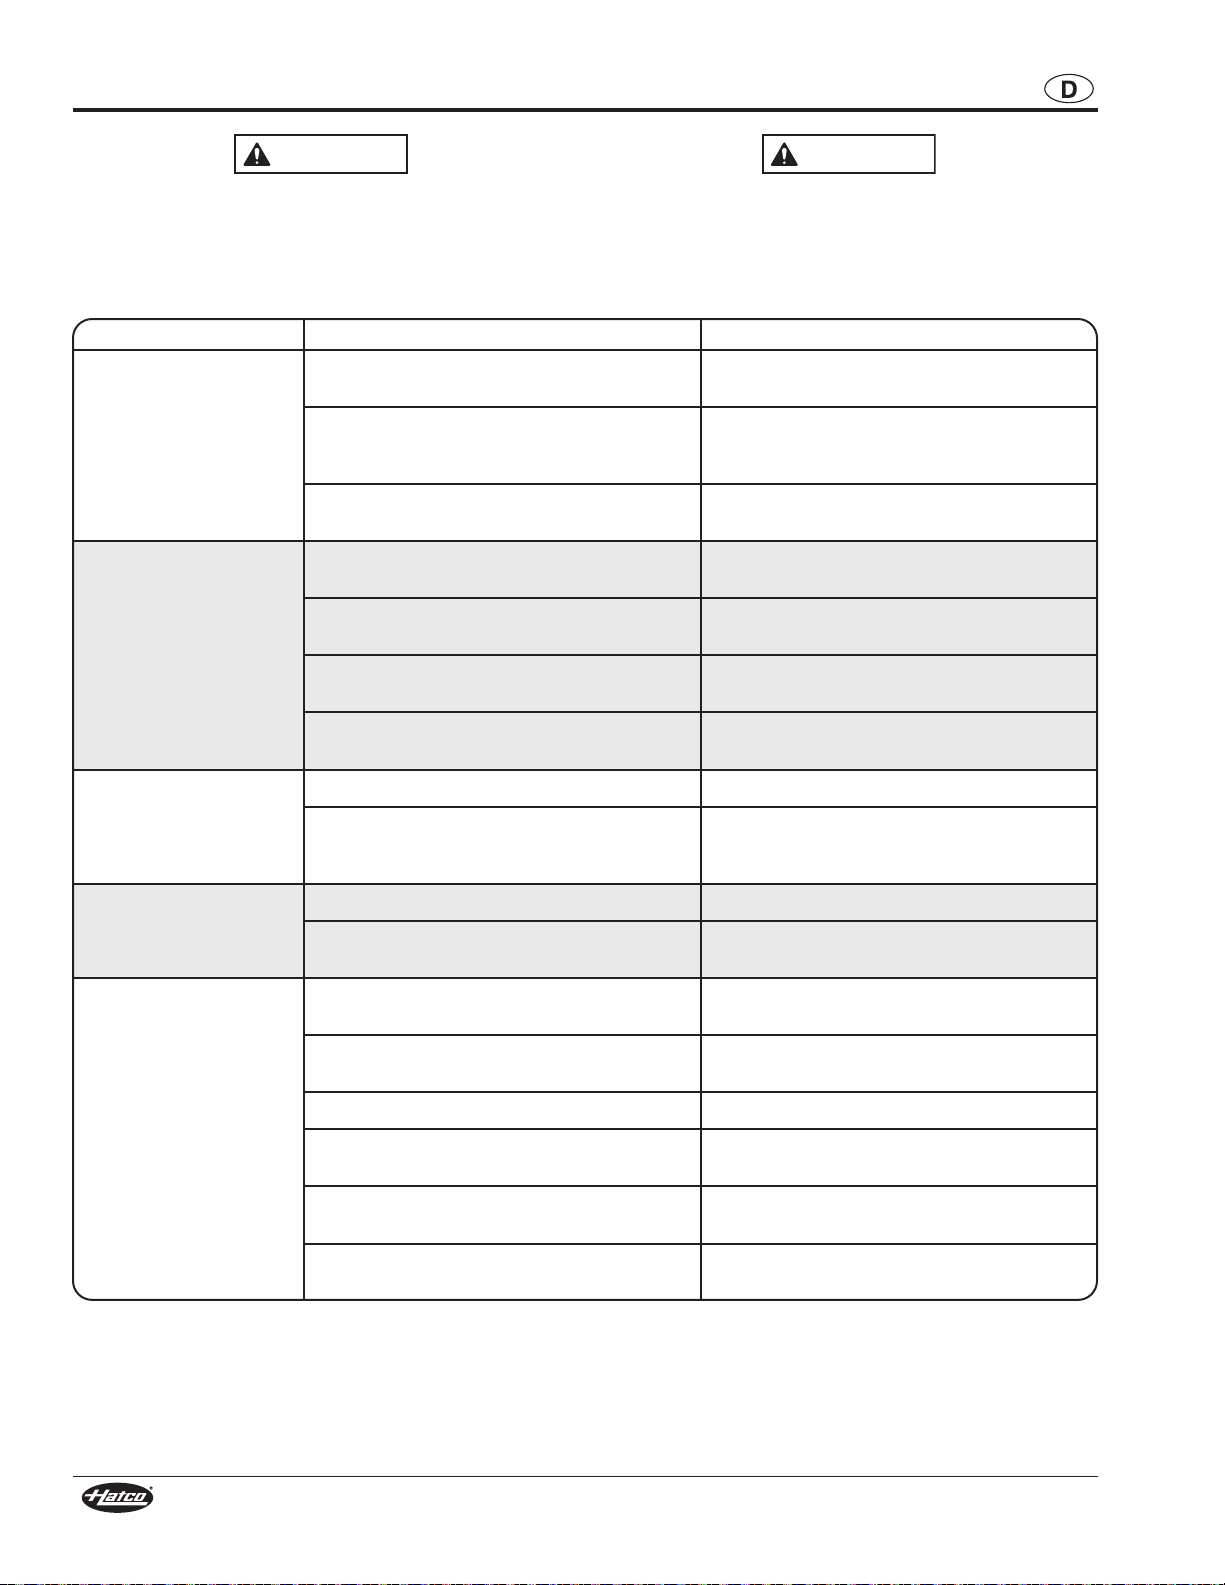
Casters
76 mm (3″) or 102 mm (4″) casters are available for the
freestanding unit in place of the legs. Use the following
procedure to install casters onto the bottom of the unit.
Do not lay unit on the front or back side or damage to the
unit could occur.
1. Remove any pans from the drawers of the unit.
2. Carefully lay the unit on its left or right side (requires two
people).
3. Remove the legs, if installed.
4. Install a caster.
To install a 76 mm (3″) caster:
a. Place a washer (supplied) over the threaded stud on the
caster.
b. Thread the caster with washer into a hole where a leg
was removed. Tighten securely.
To install a 102 mm (4″) caster:
a. Align the holes on the caster mounting plate with the
holes on the base of the unit.
b. Secure the caster using the supplied screws. Tighten
securely.
5. Repeat step 4 for the remaining three casters.
6. Return the unit to the upright position (requires two
people).
Water/Spillage Pan
The water/spillage pan fits in the drawer underneath the food
pan and can be used to humidify the heating area or keep
spillage from the cabinet interior. A splash baffle is
recommended for use with a water/spillage pan.
Splash Baffle
The splash baffle is used with the optional water/spillage pan.
Fabricated of stainless steel, the baffle fits into the bottom of
the water/spillage pan, over the water bath. The splash baffle
prevents water from splashing into the cabinet interior when
opening and closing a drawer, while allowing humidity to
escape.
Form No. HDMCEM-0412
Installing 76 mm (3″) Casters
9
Page 10
WARNING
WARNING
TROUBLESHOOTING GUIDE
This unit must be serviced by qualified personnel only.
Service by unqualified personnel may lead to electric
shock or burn.
ELECTRIC SHOCK HAZARD: Turn OFF power switch,
unplug power cord/turn off power at circuit breaker, and
allow unit to cool before performing any cleaning,
adjustments, or maintenance.
Symptom Probable Cause Corrective Action
Unit too hot. TEMPERATURE control knob set too high. Move TEMPERATURE control knob to a lower
Unit plugged into incorrect power supply. Verify with qualified personnel that power supply
Internal thermostat defective. Contact Authorized Service Agent or Hatco for
Unit not hot enough. Unit not allowed enough time to preheat. Allow unit 15–20 minutes to reach operating
TEMPERATURE control knob set too low. Move TEMPERATURE control knob to a higher
Drawer(s) not closed completely. Make sure all drawers are closed completely.
Internal thermostat defective. Contact Authorized Service Agent or Hatco for
Product too dry. Drawer vent in open position. Move drawer vent to closed position.
Product too moist. Drawer vent in closed position. Move drawer vent to open position
setting.
matches unit specification.
assistance.
temperature.
setting.
assistance.
Unit not working at all. Unit not plugged in. Plug unit into proper power supply.
Unit not turned on. Move POWER ON/OFF switch to the ON
Circuit breaker tripped. Reset circuit breaker.
POWER ON/OFF switch defective. Contact Authorized Service Agent or Hatco for
Internal thermostat defective. Contact Authorized Service Agent or Hatco for
Heating element burned out. Contact Authorized Service Agent or Hatco for
position.
assistance.
assistance.
assistance.
10
Form No. HDMCEM-0412
Page 11
INTERNATIONAL LIMITED WARRANTY
1. PRODUCT WARRANTY
Hatco warrants the products that it manufactures (the
“Products”) to be free from defects in materials and
workmanship, under normal use and service, for a period of
one (1) year from the date of purchase when installed and
maintained in accordance with Hatco’s written instructions or
18 months from the date of shipment from Hatco. Buyer must
establish the Product’s purchase date by registering the Product
with Hatco or by other means satisfactory to Hatco in its sole
discretion.
Hatco warrants the following Product components to be free
from defects in materials and workmanship from the date of
purchase (subject to the foregoing conditions) for the period(s)
of time and on the conditions listed below:
a) Two (2) Year Parts Warranty:
Conveyor Toaster Elements (metal sheathed)
Drawer Warmer Elements (metal sheathed)
Drawer Warmer Drawer Rollers and Slides
Strip Heater Elements (metal sheathed)
Display Warmer Elements (metal sheathed air heating)
Holding Cabinet Elements (metal sheathed air heating)
Heated Well Elements — HWB Series (metal sheathed)
b) One (1) Year Parts PLUS Four (4) Years Parts
Warranty on pro-rated terms that Hatco will explain
at Buyer’s request:
3CS and FR Tanks
c) Ten (10) Year Parts Warranty:
Electric Booster Heater Tanks
Gas Booster Heater Tanks
d) Ninety (90) Day Parts Warranty:
Replacement Parts
THE FOREGOING WARRANTIES ARE EXCLUSIVE AND IN
LIEU OF ANY OTHER WARRANTY, EXPRESSED OR
IMPLIED, INCLUDING BUT NOT LIMITED TO ANY IMPLIED
WARRANTY OF MERCHANTABILITY OR FITNESS FOR A
PARTICULAR PURPOSE OR PATENT OR OTHER
INTELLECTUAL PROPERTY RIGHT INFRINGEMENT.
Without limiting the generality of the foregoing, SUCH
WARRANTIES DO NOT COVER: Coated incandescent light
bulbs, fluorescent lights, heat lamp bulbs, coated halogen light
bulbs, halogen heat lamp bulbs, xenon light bulbs, LED light
tubes, glass components, and fuses; Product failure in booster
tank, fin tube heat exchanger, or other water heating equipment
caused by liming, sediment buildup, chemical attack, or
freezing; or Product misuse, tampering or misapplication,
improper installation, or application of improper voltage.
2. LIMITATION OF REMEDIES AND DAMAGES
Hatco’s liability and Buyer’s exclusive remedy hereunder will be
limited solely to replacement of part or Product using, at Hatco’s
option, new or refurbished parts or Product by Hatco or a Hatcoauthorized service agency with respect to any claim made
within the applicable warranty period referred to above. Hatco
reserves the right to accept or reject any such claim in whole or
in part. In the context of this Limited Warranty, “refurbished”
means a part or Product that has been returned to its original
specifications by Hatco or a Hatco-authorized service agency.
Hatco will not accept the return of any Product without prior
written approval from Hatco, and all such approved returns shall
be made at Buyer’s sole expense. HATCO WILL NOT BE
LIABLE, UNDER ANY CIRCUMSTANCES, FOR
CONSEQUENTIAL OR INCIDENTAL DAMAGES, INCLUDING
BUT NOT LIMITED TO LABOR COSTS OR LOST PROFITS
RESULTING FROM THE USE OF OR INABILITY TO USE THE
PRODUCTS OR FROM THE PRODUCTS BEING
INCORPORATED IN OR BECOMING A COMPONENT OF
ANY OTHER PRODUCT OR GOODS.
The warranty on Hatco DRAWERMAX™ Drawer Warmers is
for one year from date of purchase or eighteen months from
date of shipping from Hatco, whichever occurs first.
If you experience a problem with a Drawer Warmer during the
warranty period, please do the following:
Contact Local Hatco Dealer
When contacting the Hatco dealer for service assistance,
please supply the dealer with the following information to
ensure prompt processing:
• Model of unit
• Serial number
• Specific problem with the unit
• Date of purchase
• Name of business
• Shipping address
• Contact name and phone number
Form No. HDMCEM-0412
SERVICE INFORMATION
The Hatco dealer will do the following:
• Provide replacement part(s) as required
• Submit warranty claim to Hatco for processing
Non-Warranty Problems
If you experience a non-warranty problem that requires
assistance, please contact the nearest Authorized Hatco
Service Agency.
To locate the nearest Service Agency:
• access our website at www.hatcocorp.com, select the
Resources pull-down menu, and click on “Find Service
Agent/Distributor”
• call Hatco Service at 414-671-6350
• e-mail Hatco Service at partsandservice@hatcocorp.com
11
Page 12
INHALT
HINWEIS
VORSICHT
WARNUNG
Wichtige Informationen für den Benutzer........................12
Einleitung ............................................................................12
Wichtige Sicherheitshinweise ...........................................13
Modellbeschreibung...........................................................14
Modellbezeichnung ............................................................14
Technische Daten ...............................................................15
Steckerkonfigurationen.....................................................15
Tabelle der elektrischen Anschlüsse ................................15
Abmessungen .................................................................15
Aufstellen des Gerät...........................................................16
Allgemeines......................................................................16
Einbau der Modelle HDM-2..............................................16
Einbau der Modelle HDM-2B ...........................................17
Betrieb .................................................................................18
Allgemeines......................................................................18
Leitfaden zum Warmhalten von Speisen..........................18
Wartung ...............................................................................19
Allgemeines......................................................................19
Reinigung .........................................................................19
Optionen und Zubehör .......................................................19
Richtlinien zur Störungsbeseitigung ................................20
Hinweise zur Garantieleistung ..........................................21
Internationale Beschränkte Garantie ................................21
WICHTIGE INFORMATIONEN FÜR DEN BENUTZER
Schreiben Sie die Modellbezeichnung, die Seriennummer
(befindet sich bei freistehenden Geräten auf der Rückseite und
bei Einbaugeräten an der Innenseite der linken Abdeckung),
die Spannung und das Kaufdatum in die folgenden Zeilen.
Haben Sie bitte dies Information zur Hand, wenn Sie Hatco
wegen einer Service-Unterstützung anrufen.
Modellbezeichnung
Seriennummer
Spannung
Kaufdatum
____________________________________
____________________________________
____________________________
________________________________
Registrieren Sie Ihr Gerät!
Wenn Sie die Online-Garantieregistrierung ausfüllen,
vermeidet das Verzögerungen beim Erhalt der
Garantiedeckung. Rufen Sie die Hatco Website unter
www.hatcocorp.com auf, wählen Sie das Pulldown-Menü
„Parts & Service“ (Ersatzteile und Wartung) aus und klicken
Sie auf „Warranty Registration“ (Garantieregisrtierung).
Geschäftszeiten:
8.00 Uhr bis 17.00 Uhr
Central Standard Time (CST)
(im Sommer: Juni bis September –
8.00 Uhr bis 17.00 Uhr (CST)
Montag bis Donnerstag
8.00 Uhr bis 14.30 Uhr (CST) Freitag)
Telefon: (414) 671-6350
E-mail: partsandservice@hatcocorp.com
Fax: (414) 671-3976 (Ersatzteile und Service)
Weitere Informationen finden Sie auf unserer Website unter
www.hatcocorp.com.
EINLEITUNG
Hatco DRAWERMAX™ Heizladen sind zum Warmhalten von
Speisen bei optimaler Serviertemperatur ohne
Qualitätseinbußen vorgesehen. Sie sind für anspruchsvollen
Kücheneinsatz als robuste Edelstahlkonstruktion, mit robusten
Befestigungselementen, Gleitbahnen aus Edelstahl und als
bündig schließende Laden ausgeführt. DRAWERMAX
Heizladen halten Fleisch und Gemüse, aber auch Brötchen bis
zum Servieren warm und frisch.
Hatco DRAWERMAX Heizladen basieren auf umfangreicher
Forschung und praktischen Tests. Die verwendeten Werkstoffe
wurden gewählt, um optimale Dauerhaftigkeit, attraktives
Aussehen und optimale Leistung zu gewährleisten. Jedes
Gerät wird vor der Auslieferung gründlich inspiziert und
getestet.
Dieses Handbuch enthält die Einbau-, Sicherheits- und
Betriebsanweisungen für die DRAWERMAX Heizladen. Hatco
empfiehlt, alle in diesem Handbuch enthaltenen Einbau-,
Sicherheits- und Bedienungsanweisungen vor der Installation
und Inbetriebnahme zu lesen.
Sicherheitshinweise sind in diesem Handbuch durch ein
Warnsymbol mit den folgenden Signalwörtern gekennzeichnet:
WARNUNG bedeutet, dass eine Gefahr schwerer oder
tödlicher Verletzungen besteht, wenn die Situation nicht
vermieden wird.
VORSICHT bedeutet, dass eine Gefahr leichter oder
mittelschwerer Verletzungen besteht, wenn die Situation
nicht vermieden wird.
HINWEIS bedeutet, dass eine Gefahr von Geräte- oder
Sachschäden besteht.
12
Form-Nr. HDMCEM-0412
Page 13
WICHTIGE SICHERHEITSHINWEISE
HINWEIS
VORSICHT
WARNUNG
WARNUNG
Vor der Anwendung dieser Ausrüstung lesen Sie die folgenden wichtigen
Sicherheitsinformationen, um ernste Verletzung oder Tod zu vermeiden und Schaden der
Ausrüstung oder des Eigentums zu vermeiden.
GEFAHR VON ELEKTROSCHOCKS:
• Das Gerät muss an eine ordnungsgemäß geerdete
Steckdose mit der richtigen Spannung, Größe und
Steckerkonfiguration angeschlossen werden. Wenn
Stecker und Steckdose nicht übereinstimmen, wenden
Sie sich an einen qualifizierten Elektriker, um die
richtige Netzspannung und Steckerart zu ermitteln und
die korrekte Steckdose zu installieren.
• Den Netzschalter AUSSCHALTEN, das Netzkabel
abziehen/die Spannungsversorgung am Trennschalter
untebrechen und das Gerät abkühlen lassen, bevor
Wartungs- oder Reinigungsarbeiten durchgeführt werden.
• Tauchen Sie das Gerät NICHT in Wasser und reinigen
Sie das Gerät NICHT mit übermäßig viel Wasser. Das
Gerät ist nicht wasserdicht. Es darf nicht betrieben
werden, wenn es in Wasser getaucht oder mit
übermäßig viel Wasser gereinigt wurde.
• Das Gerät ist nicht witterungsfest. Stellen Sie das Gerät
in einem Raum an einer Stelle auf, an der die
Umgebungstemperatur mindestens 21 °C beträgt.
• Reinigen Sie das Gerät nicht mit Dampf oder übermäßig
viel Wasser.
• Dieses Gerät ist nicht für direktes Absprühen mit einem
Wasserstrahl geeignet. Es darf nicht mit einem
Sprühstrahl gereinigt werden.
• Ziehen Sie das Gerät nicht am Kabel.
• Betreiben Sie das Gerät nicht, wenn das Netzkabel
durchgescheuert oder abgenutzt ist.
• Versuchen Sie nicht, ein beschädigtes Netzkabel zu
reparieren oder zu ersetzen. Das Kabel muss durch
Hatco, einen autorisierten Servicebetrieb oder einen
qualifizierten Techniker ersetzt werden.
• Reinigen Sie das Gerät nicht, wenn es sich in Betrieb
befindet oder heiß ist.
• Achten Sie darauf, dass keine Flüssigkeiten in das
Gerät geschüttet werden.
• Verwenden Sie bei der Reparatur von Hatco Geräten
ausschließlich Hatco Ersatzteile. Wenn Sie keine
Original-Hatco-Ersatzteile verwenden, werden alle
Garantien ungültig und Sie setzen die Bediener der
Geräte möglicherweise gefährlichen elektrischen
Spannungen aus, welche zu Stromschlag oder
Verbrennungen führen können. Original-HatcoErsatzteile sind für den sicheren Betrieb unter den
gegebenen Einsatzbedingungen ausgelegt. Manche
Ersatzteile anderer Hersteller oder Nachbauteile
verfügen nicht über die geforderten Eigenschaften und
funktionieren nicht sicher in Hatco Geräten.
BRANDGEFAHR:
• Stellen Sie das Gerät mit mindestens 25 mm Abstand zu
entflammbaren Wänden oder Materialen auf. Wenn
dieser Sicherheitsabstand nicht eingehalten wird,
können Verfärbungen entstehen und brennbare Stoffe
können sich entzünden.
• Keine aggressiven Chemikalien (oder Reiniger mit
Bleichmittel), Ofenreiniger oder brennbare Reinigungslösungen zum Reinigen dieses Geräts benutzen.
Sicherstellen, dass das Nahrungsmittelprodukt auf die
korrekte Temperatur für sicheren Konsum erwärmt wurde,
bevor es in den Wärmer gestellt wird. Wenn die Speisen
nicht korrekt erwärmt werden, bestehen schwere
Gesundheitsrisiken. Dieses Gerät dient nur zum Halten von
vorgewärmten Speiseprodukten.
Dieses Gerät ist nicht für den Gebrauch durch Kinder oder
Personen mit eingeschränkten körperlichen, sensorischen
oder geistigen Fähigkeiten vorgesehen. Für eine
ordnungsgemäße Beaufsichtigung von Kindern sorgen
und diese von dem Gerät fern halten.
Sicherstellen, dass alle Bediener im sicheren und
fachgerechten Gebrauch des Geräts geschult sind.
Reparaturen am das Gerät dürfen nur von qualifiziertem
Personal durchgeführt werden. Von unqualifiziertem
Personal durchgeführte Reparaturen können zu
Elektroschocks oder Verbrennungen führen.
Falls eine Reparatur dieses Geräts erforderlich sein sollte,
wenden Sie sich an Ihren autorisierten Hatco
Servicebetrieb oder an die Hatco Serviceabteilung unter
+1-414-671-6350 (Telefon) oder +1-414-671-3976 (Fax).
VERBRENNUNGSGEFAHR:
• Einige Außenflächen des Geräts werden heiß. Beim
Berühren dieser Flächen Vorsicht walten lassen.
• Beim Öffnen der Lade vorsichtig sein. Aus der
geöffneten Lade entweicht heiße Luft.
Standardmäßige und zugelassene Fertigungsöle rauchen
bei der anfänglichen Inbetriebnahme bis zu 30 Minuten
lang. Das ist ein vorübergehender Zustand. Zur
Gewährleistung des sicheren Betriebs muss das Gerät
solange ohne Speisen betrieben werden, bis kein Rauch
mehr entsteht.
Stellen Sie das Gerät unter Einhaltung der richtigen
Thekenhöhe an einer geeigneten Stelle auf. Der
Aufstellungsort sollte eben sein, um versehentliches
Umkippen des Geräts bzw. Herausfallen des Inhalts zu
verhindern, und standfest genug, um das Gewicht von
Gerät und Speisen zu tragen.
Das Gerät nicht auf die Vorder- oder Rückseite legen.
Dadurch könnte das Gerät beschädigt werden.
Verwenden Sie nur nichtscheuernde Reinigungsmittel.
Scheuernde Reinigungsmittel können die Oberfläche des
Geräts verkratzen und es damit unansehnlich und anfällig
für das Festsetzen von Verunreinigungen machen.
Form-Nr. HDMCEM-0412
13
Page 14
MODELLBESCHREIBUNG
H D M - X B
Hatco
DRAWERMAX
Einbaumodell
Anzahl der Laden
Alle Modelle
Alle Hatco DRAWERMAX™ Heizladen haben eine robuste
Konstruktion mit langlebigen Nylonrollen, Gleitschienen der
Stärke "Gauge 12" und robuste Befestigungselemente. Jede
Lade ist mit verstellbaren Entlüftungsschlitzen zur
Feuchtigkeitsregelung, einem EIN/AUS-Netzschalter (I/O),
einem TEMPERATUR-Regelknopf und einer
Temperaturanzeige ausgestattet. Mit jeder Lade werden
Wannen in Standardgröße, 152 mm (6″) tief, mitgeliefert. Die
isolierte Oberseite und Seitenwände bieten maximale
Energieeffizienz und die Heizelemente sind durch eine
Zweijahresgarantie gedeckt. Alle Modelle der HDM-Serie sind
mit einem befestigten, 1829 mm (6′) langen Netzkabel mit
Stecker ausgestattet.
Modell HDM-2
Modell HDM-2 ist ein freistehendes Gerät mit zwei Laden. Es
ist mit 102 mm (4″) Standbeinen versehen.
ANMERKUNG : Im Abschnitt OPTIONEN UND ZUBEHÖR
finden Sie Informationen zu allen verfügbaren
Optionen und Zubehör.
Modell HDM-2B
Modell HDM-2B ist ein Einbaumodell mit zwei Laden.
Modell HDM-2B
Modell HDM-2
MODELLBEZEICHNUNG
14
Form-Nr. HDMCEM-0412
Page 15
TECHNISCHE DATEN
WARNUNG
CEE 7/7 Schuko BS-1363
AS 3112
NEMA 5-15P
A B
D E
C
Vorderansicht Seitenansicht
A
B
F
C
G
Vorderansicht Seitenansicht
Steckerkonfigurationen
Geräte werden werkseitig mit einem Netzkabel mit
angebrachtem Stecker ausgerüstet. Die gelieferten Stecker
entsprechen der jeweiligen Anwendung.
GEFAHR VON ELEKTROSCHOCKS: Das Gerät muss an
eine ordnungsgemäß geerdete Steckdose mit der richtigen
Spannung, Größe und Steckerkonfiguration
angeschlossen werden. Wenn Stecker und Steckdose
nicht übereinstimmen, wenden Sie sich an einen
qualifizierten Elektriker, um die richtige Netzspannung und
Steckerart zu ermitteln und die korrekte Steckdose zu
installieren.
ANMERKUNG: Die Steckdose wird nicht von Hatco
ANMERKUNG : Das Typenschild befindet sich auf der
Rückseite von freistehenden Geräten und
bei Einbaumodellen an der Innenseite der
linken Seitenwand. Das Typenschild enthält
die Seriennummer und alle Daten zum
Überprüfen der elektrischen Informationen.
bereitgestellt.
Steckerkonfigurationen
Tabelle Der Elektrischen Anschlüsse
Modell Spannung Watts Ampere Steckerkonfiguration Versandgewicht
HDM-2
HDM-2B
120 900 7.5
230 (CE) 984 4.3
120 900 7.5
230 (CE) 984 4.3
NEMA 5-15P
CEE 7/7 Schuko, BS-1363, or AS 3112
NEMA 5-15P
CEE 7/7 Schuko, BS-1363, or AS 3112
68 kg (150 lbs.)
68 kg (150 lbs.)
67 kg (147 lbs.)
67 kg (147 lbs.)
Die elektrischen Daten in den schattierten Feldern betreffen nur Internationale modelle.
ANMERKUNG : Das Versandgewicht ist einschließlich Verpackung angegeben.
Abmessungen
Breite
Breite
Modell
HDM-2 749 mm
HDM-2B 743 mm
(A)
(29-1/2″)
(29-1/4″)
Tiefe
(B)
576 mm
(22-3/4″)
568 mm
(22-3/8″)
Höhe
(C)
614 mm
(24-3/16″)
512 mm
(20-3/16″)
zwischen
Füßen (D)
629 mm
(24-3/4″)
--- ---
Tiefe
zwischen
Füßen (E)
484 mm
(19-1/16″)
Breite
zwischen
Füßen (F)
--- ---
715 mm
(28-1/8″)
Tiefe
zwischen
Füßen (G)
483 mm
(19-1/16″)
Form-Nr. HDMCEM-0412
Abmessungen HDM-2
Abmessungen HDM-2B
15
Page 16

AUFSTELLEN DES GERÄTS
HINWEIS
WARNUNG
102 mm (4”) Standbein
Verlängern
Verkürzen
Verstellbare
Spitze
Allgemeines
DRAWERMAX™ Heizladen werden mit den meisten
Komponenten zusammengebaut ausgeliefert. Beim Auspacken
des Versandkartons darauf achten, um Schäden am Gerät und
den beiliegenden Komponenten zu verhüten.
GEFAHR VON ELEKTROSCHOCKS: Das Gerät ist nicht
witterungsfest. Stellen Sie das Gerät in einem Raum an
einer Stelle auf, an der die Umgebungstemperatur
mindestens 21 °C beträgt.
BRANDGEFAHR: Stellen Sie das Gerät mit mindestens 25
mm Abstand zu entflammbaren Wänden oder Materialen
auf. Wenn dieser Sicherheitsabstand nicht eingehalten
wird, können Verfärbungen entstehen und brennbare
Stoffe können sich entzünden.
Das Gerät nicht auf die Vorder- oder Rückseite legen.
Dadurch könnte das Gerät beschädigt werden.
1. Nehmen Sie das Gerät aus dem Versandbehälter.
2. Das Informationspaket aus der Lade nehmen.
ANMERKUNG : Um Verzögerungen beim Garantiebeginn
zu vermeiden, führen Sie die OnlineGarantieregistrierung bitte sofort durch.
Einzelheiten dazu finden Sie unter
WICHTIGE INFORMATIONEN.
Einbau der Modelle HDM-X
HDM-2 Modelle sind freistehende Geräte, bei denen vor der
Inbetriebnahme die 102 mm (4″) Standbeine angebracht
werden müssen.
1. Den Kunststoffbeutel mit den vier Standbeinen aus der
Lade nehmen.
2. Das Gerät behutsam auf die Seite kippen (dazu sind zwei
Personen erforderlich)
. 3. Die einzelnen Standbeine einbauen. Die Standbeine von
Hand festziehen. Nicht zu stark festziehen.
4. Das Gerät wieder aufrecht stellen (dazu sind zwei
Personen erforderlich). Wenn das Gerät nicht nivelliert ist
oder wackelt, die verstellbare Spitze des entsprechenden
Standbeins verdrehen, bis das Gerät nivelliert ist.
3. Entfernen Sie Klebeband und Schutzfolien von allen
Oberflächen des Geräts.
4. Stellen Sie das Gerät am gewünschten Ort auf.
• Das Gerät in einem Bereich mit konstanter
Umgebungslufttemperatur (mindestens 21°C [70°F])
anbringen. Bereiche, die aktiven Luftbewegungen oder
-strömen ausgesetzt sind (z. B. in der Nähe von
Gebläsen/Lüftern und Klimatisierungsrohren) sind zu
meiden.
• Achten Sie darauf, dass das Gerät auf einem stabilen,
waagrechten Boden oder in ausreichend starken
Schränken aufgestellt wird.
• Wählen Sie einen Ort mit der richtigen Thekenhöhe und
bequemem Zugang.
5. Das Gerät einbauen. Dazu auf das entsprechende
Einbauverfahren in diesem Abschnitt Bezug nehmen.
Einbau der Standbeine
16
Form-Nr. HDMCEM-0412
Page 17
AUFSTELLEN DES GERÄTS
721 mm
(28-3/8″)
25 mm
(1″)
489 mm
(19-1/4″)
603 mm
(23-3/4″)
Vorderansicht
Seitenansicht
Sicherungsleiste
22.2 mm
(0.875″)
3.2 mm
(0.125″)
Heizladenflansch
Sicherungsleiste
Schrank-
Stirnseite
Arretierzapfen (darunter)
Einbau der Modelle HDM-XB
HDM-2B Modelle sind Einbaugeräte, die vor der
Inbetriebnahme in einen Schrank eingebaut werden müssen.
1. Eine dementsprechende Öffnung in den Schrank
schneiden. Bezugsmaße sind der Abbildung unten zu
entnehmen.
6. Vor dem vollständigen Einbau des Geräts in die Öffnung
einen Wulst Dichtmittel (mit Zulassung nach National
Sanitation Foundation) zwischen den Heizladenflansch und
die Schrankstirnseite auftragen.
7. Das Gerät in die Öffnung schieben, bis die vorderen
Arretierzapfen hinter der Sicherungsleiste nach unten
fallen. Zur Überprüfung des Einbaus die untere Lade
komplett herausziehen und sacht weiter ziehen, um
sicherzustellen, dass sie arretiert ist.
Bezugsmaße von Ausschnitt und Sicherungsleiste
ANMERKUNG : Einen Mindestfreiraum von 25 mm (1")
zwischen der Ausschnittsöffnung und dem
Boden beibehalten.
2. Eine Sicherungsleiste (nicht mitgeliefert) an der Innenseite
der unteren Vorderkante in der Schranköffnung befestigen.
3. Sicherstellen, dass in der Schranköffnung eine
Schukosteckdose mit korrekter Spannung, Größe und
Bauart vorgesehen wird. Einzelheiten sind dem Abschnitt
TECHNISCHE DATEN zu entnehmen.
4. Das Netzteil des Geräts an die Steckdose anschließen.
5. Das Gerät teilweise in die Öffnung schieben; dabei darauf
achten, dass das Netzkabel als erstes in die Öffnung
eingeführt wird.
Anbringen des Einbaumodells
Form-Nr. HDMCEM-0412
17
Page 18
BETRIEB
Laden-
Entlüftungsschlitze
Entlüftungsknopf
VORSICHT
WARNUNG
Bedienelemente
für die
obere Lade
Bedienelemente
für die
untere Lade
Temperaturanzeige
Tabelle der
EMPFOHLENEN
EINSTELLUNGEN
TEMPERATURRegelknopf
Netzschalter
EIN/AUS (I/O)
Allgemeines
Die DRAWERMAX™ Heizladen dem folgenden Verfahren
gemäß betreiben. Jede Lade kann mit den verstellbaren
Schlitzen zur Feuchtigkeitsregelung sowie dem EIN/AUSNetzschalter (I/O), dem TEMPERATUR-Regelknopf und der
Temperaturanzeige einzeln gesteuert und überwacht werden.
Lesen Sie alle Sicherheitshinweise im Abschnitt WICHTIGE
SICHERHEITSHINWEISE, bevor Sie das Gerät verwenden.
Inbetriebnahme
1. Das freistehende Gerät an eine geerdete Steckdose mit
korrekter Spannungsversorgung und passender
Ausführung anschließen. Einzelheiten sind dem Abschnitt
TECHNISCHE DATEN zu entnehmen.
2. Den EIN/AUS-Netzschalter (I/0) auf EIN (I) stellen.
3. Den/die TEMPERATUR-Regelknöpfe auf die gewünschten
Werte einstellen. Siehe dazu die Tabelle mit den
empfohlenen Einstellungen oder den Leitfaden zum
Warmhalten von Speisen in diesem Abschnitt.
Standardmäßige und zugelassene Fertigungsöle rauchen
bei der anfänglichen Inbetriebnahme bis zu 30 Minuten
lang. Das ist ein vorübergehender Zustand. Zur
Gewährleistung des sicheren Betriebs muss das Gerät
solange ohne Speisen betrieben werden, bis kein Rauch
mehr entsteht.
VERBRENNUNGSGEFAHR:
• Einige Außenflächen des Geräts werden heiß. Beim
Berühren dieser Flächen Vorsicht walten lassen.
• Beim Öffnen der Lade vorsichtig sein. Aus der
geöffneten Lade entweicht heiße Luft.
4. 15–20 Minuten warten, bis die Betriebstemperatur erreicht
wurde.
5. Die Entlüftungsschlitze der Laden mit dem
Entlüftungsknopf an der Ladenvorderseite auf die
gewünschte Feuchtigkeit einstellen. Wenn die
Entlüftungsschlitze ganz geöffnet werden, kann möglichst
viel Feuchtigkeit entweichen.
Abschalten
1. Den EIN/AUS-Netzschalter (I/0) auf AUS (O) stellen.
2. Das Gerät abkühlen lassen, bevor Reinigungs- oder
Wartungsarbeiten durchgeführt werden.
HDM-2 Bedienfeld
Leitfaden zum Warmhalten von Speisen
Empfohlene Art
Aufbewahrungs der Entlüftungs
Produkt temperatur Hitze schlitz
Brötchen, hart 71°–85°C (160°–185°F) Trocken Geschlossen
Brötchen, weich 66°–79°C (150°–175°F) Feucht Halboffen
Gemüse 79°–85°C (175°–185°F) Feucht Halboffen
Fleisch, Geflügel 74°–85°C (165°–185°F) Trocken Geschlossen
Fisch 74°–85°C (165°–185°F) Feucht Offen
Kasserolen 66°–79°C (150°–175°F) Trocken Geschlossen
Nachspeisen 71°–85°C (160°–185°F) Trocken Geschlossen
Tacos, Tortillas 66°–71°C (150°–160°F) Feucht Halboffen
ANMERKUNG : Die angemessene Einstellung der
Laden-Entlüftungsschlitze
Entlüftungsschlitze hängt von der Art und
Menge der Speisen sowie der Häufigkeit
ab, mit der die Lade geöffnet wird.
Fassungsvermögen
Eine Standardlade hat folgendes Fassungsvermögen:
Kleine Brötchen: 6–8 Dutzend
Rippchen: 25–30 lbs. (11–14 kg)
Kartoffel: 3–3-1/2 Dutzend
18
Form-Nr. HDMCEM-0412
Page 19
WARTUNG
WARNUNG
HINWEIS
HINWEIS
76 mm (3″) Laufrollen
Unterlegscheibe
Allgemeines
DRAWERMAX™ Heizladen sind für maximale Haltbarkeit und
Leistung bei minimaler Wartung ausgelegt.
GEFAHR VON ELEKTROSCHOCKS:
• Den Netzschalter AUSSCHALTEN, das Netzkabel
abziehen/die Spannungsversorgung am Trennschalter
untebrechen und das Gerät abkühlen lassen, bevor
Wartungs- oder Reinigungsarbeiten durchgeführt werden.
• Tauchen Sie das Gerät NICHT in Wasser und reinigen
Sie das Gerät NICHT mit übermäßig viel Wasser. Das
Gerät ist nicht wasserdicht. Es darf nicht betrieben
werden, wenn es in Wasser getaucht oder mit
übermäßig viel Wasser gereinigt wurde.
• Reinigen Sie das Gerät nicht mit Dampf oder übermäßig
viel Wasser.
• Dieses Gerät ist nicht für direktes Absprühen mit einem
Wasserstrahl geeignet. Es darf nicht mit einem
Sprühstrahl gereinigt werden.
• Reinigen Sie das Gerät nicht, wenn es sich in Betrieb
befindet oder heiß ist.
Falls eine Reparatur dieses Geräts erforderlich sein sollte,
wenden Sie sich an Ihren autorisierten Hatco
Servicebetrieb oder an die Hatco Serviceabteilung unter
+1-414-671-6350 (Telefon) oder +1-414-671-3976 (Fax).
Reinigung
Um die Oberfläche des Geräts zu präservieren und die
Leistungsfähigkeit zu erhalten, sollte das Gerät täglich gereinigt
werden.
1. Das Gerät abschalten, das Netzkabel abziehen und das
Gerät abkühlen lassen.
2. Alle Speisewannen entnehmen und waschen.
Verwenden Sie nur nichtscheuernde Reinigungsmittel.
Scheuernde Reinigungsmittel können die Oberfläche des
Geräts verkratzen und es damit unansehnlich und anfällig
für das Festsetzen von Verunreinigungen machen.
3. Die Oberflächen mit einem feuchten Tuch abwischen. Für
hartnäckige Flecken kann eine nicht scheuernde
Reinigungspaste benutzt werden.
• Sicherstellen, dass das Innere des Geräts geprüft wird.
Speiseteilchen können aus den Speisewannen
in die Ladenkammer fallen. VORSICHT!
Verbrennungsgefahr — Die Ladenkammer nicht
reinigen, wenn das Gerät eingeschaltet oder
angeschlossen ist!
4. Wischen Sie die komplette Gerät das trockene Verwenden
eines sauberen, trockenen Tuch.
Laufrollen
76 mm (3″) oder 102 mm (4″) Laufrollen sind für das
freistehende Gerät anstelle von Standbeinen erhältlich. Die
Laufrollen anhand des folgenden Verfahrens unten am Gerät
befestigen.
Das Gerät nicht auf die Vorder- oder Rückseite legen.
Dadurch könnte das Gerät beschädigt werden.
1. Alle Wannen aus den Laden nehmen.
2. Das Gerät behutsam auf die linke oder rechte Seite legen
(dazu sind zwei Personen erforderlich).
3. Die Standbeine entfernen, sofern welche angebracht sind.
4. Einbau einer Laufrolle.
So bauen Sie eine Laufrolle mit 76 mm (3″) ein:
a. Eine Unterlegscheibe (mitgeliefert) über den
Gewindebolzen auf der Laufrolle schieben.
b. Drücken Sie die Laufrolle mit Unterlegscheibe in eine
der Öffnungen, aus der ein Standbein entfernt wurde.
Sicher festziehen.
OPTIONEN UND ZUBEHÖR
So bauen Sie eine Laufrolle mit 102 mm (4″) ein:
a. Richten Sie die Bohrungen der Befestigungsplatte an
den Bohrungen in der Bodenplatte des Geräts aus.
b. Befestigen Sie die Laufrolle mit den beigefügten
Schrauben. Ziehen Sie die Schrauben fest an.
5. Wiederholen Sie Schritt 4 für die übrigen 3 Laufrollen.
6. Das Gerät wieder aufrecht stellen (dazu sind zwei
Personen erforderlich).
Wasser-/Überlaufwanne
Die Wasser-/Überlaufwanne passt in die Lade unter der
Speisenwanne und kann zur Befeuchtung des Heizraums oder
zur Aufnahme von Verschüttungen im Gerät dienen.
Spritztablett ist empfehlenswert.
Spritztablett
Das Spritztablett wird gemeinsam mit der optionalen Wasser-/
Überlaufwanne verwendet. Das Spritztablett besteht aus
Edelstahl und passt unten in die Wasser-/Überlaufwanne über
das Wasserbad, um zu verhindern, dass Wasser in das
Schrankinnere spritzt, wenn eine Lade geöffnet und
geschlossen wird; gleichzeitig kann Feuchtigkeit entweichen.
Form-Nr. HDMCEM-0412
Einbau der 76 mm (3″) Laufrollen
19
Page 20
RICHTLINIEN ZUR STÖRUNGSBESEITIGUNG
WARNUNG
WARNUNG
Reparaturen am das Gerät dürfen nur von qualifiziertem
Personal durchgeführt werden. Von unqualifiziertem
Personal durchgeführte Reparaturen können zu
Elektroschocks oder Verbrennungen führen.
GEFAHR VON ELEKTROSCHOCKS: Das Netzkabel
abziehen oder die Stromversorgung am
Trennschalter/Unterbrecher AUSSCHALTEN und warten,
bis das Gerät abgekühlt ist, bevor Wartungs- und
Reinigungsarbeiten durchgeführt werden.
Symptom Mögliche Ursache Abhilfemassnahme
Gerät ist zu heiß. Temperatur-Regelknopf auf zu hohe Temperatur
Gerät ist nicht ausreichend
heiß.
eingestellt.
Gerät ist an eine inkorrekte Stromversorgung
angeschlossen.
Interner Thermostat ist defekt. Wenden Sie sich an Ihren Hatco Händler vor Ort
Gerät wurde nicht ausreichend lang vorgewärmt. 15–20 Minuten warten, bis die
Temperatur-Regelknopf auf zu niedrige
Temperatur eingestellt.
Lade(n) nicht komplett geschlossen. Sicherstellen, dass alle Laden komplett
Interner Thermostat ist defekt. Wenden Sie sich an Ihren Hatco Händler vor Ort
Temperatur-Regelknopf auf einen niedrigeren
Wert einstellen.
Mit qualifiziertem Personal überprüfen, dass die
Stromversorgung den technischen Daten des
Geräts entspricht.
oder an den Kundendienst von Hatco.
Betriebstemperatur erreicht wurde.
Temperatur-Regelknopf auf einen höheren Wert
einstellen.
geschlossen sind.
oder an den Kundendienst von Hatco.
Produkt zu trocken. Ladenentlüftungsschlitz ist geschlossen. Ladenentlüftung öffnen.
Optionale Wasserwanne ist leer oder wurde nicht
eingesetzt.
Produkt zu feucht. Ladenentlüftungsschlitz ist offen. Ladenentlüftungsschlitz schließen.
Optionale Wasserwanne ist eingesetzt, wird aber
nicht benötigt.
Gerät funktioniert nicht. Gerät ist nicht angeschlossen. Gerät an die korrekte Stromversorgung
Gerät ist nicht eingeschaltet. Netzschalter ON/OFF in die Position ON (Ein)
Trennschalter ausgelöst. Trennschalter zurücksetzen.
Netzschalter ON/OFF ist defekt. Wenden Sie sich an Ihren Hatco Händler vor Ort
Interner Thermostat ist defekt. Wenden Sie sich an Ihren Hatco Händler vor Ort
Heizelement ist ausgebrannt. Wenden Sie sich an Ihren Hatco Händler vor Ort
Wasswanne mit sauberem Wasser einsetzen
und/oder füllen. Luftfeuchtigkeit mit den
Ladenentlüftungsschlitzen regeln.
Wasserwanne aus der Lade nehmen.
anschließen.
stellen.
oder an den Kundendienst von Hatco.
oder an den Kundendienst von Hatco.
oder an den Kundendienst von Hatco.
20
Form-Nr. HDMCEM-0412
Page 21

INTERNATIONALE BESCHRÄNKTE GARANTIE
1. PRODUKTGARANTIE
Hatco gewährleistet, dass die von ihr hergestellten Produkte (die
"Produkte") bei normalem Gebrauch und Einsatz für einen
Zeitraum von einem (1) Jahr ab dem Kaufdatum keinerlei
Materialfehler aufweisen werden, vorausgesetzt, dass sie gemäß
der schriftlichen Anleitung von Hatco installiert und gewartet
wurden, bzw. für einen Zeitraum von 18 Monaten ab dem Datum
der Lieferung durch Hatco. Der Käufer muss das Kaufdatum des
Produkts bestätigen, indem das Produkt bei Hatco registriert wird,
oder durch andere Maßnahmen, die ausschließlich nach eigenem
Ermessen von Hatco als zufrieden stellend angesehen werden.
Hatco garantiert, dass die folgende Produktteile ab dem Kaufdatum
(gemäß den obigen Bedingungen) für folgenden Zeitabschnitte und
unter folgenden Bedingungen frei von Materialfehlern sind:
a) Beschränkte Zweijahres-Garantie auf Teile:
Durchlauftoaster-Elemente (Metallmantel)
Metall-ummantelte Wärme-Elemente der Lade
Ladenrollen und -bahnen der Wärme-Lade
Metall-ummantelte Speisenwärmer-Elemente
Metall-ummantelte Luft-Wärme-Elemente für Schaukästen
Metall-ummantelte Luft-Wärme-Elemente für
Aufbewahrungskästen
Eingebaute, metallummantelte Heizschachtelemente —
Serien HWB
b) Ein (1) Jahr auf Teile PLUS vier (4) Jahre nur auf Teile
anteilsmäßig für anteilsmäßige Bedingungen, die Hatco
dem Käufer auf Anfrage erläutert:
3CS- und FR-Tanks
c) Zehn (10) Jahre Garantie auf Teile:
Elektrische Booster-Heiztanks
Booster-Gasheiztanks
d) Neunzig (90) Tage Garantie auf Teile:
Ersatzteile
DIE OBIGEN GARANTIEBEDINGUNGEN GELTEN ALLEIN UND
AUSSCHLIESSLICHE ANSTELLE ALLER ANDEREN
GARANTIEBEDINGUNGEN, AUSDRÜCKLICH ODER IMPLIZIT,
INKLUSIVE, ABER NICHT DARAUF EINGESCHRÄNKT, JEDER
IMPLIZIERTEN GARANTIE AUF VERWERTBARKEIT ODER
EIGNUNG FÜR EINEN BESTIMMTEN ZWECK ODER PATENT
ODER VERLETZUNG EINES ANDEREN RECHTS AUF
GEISTIGES EIGENTUM. Ohne die Allgemeingültigkeit der obigen
Bedingungen einzuschränken, GELTEN SOLCHE GARANTIEN
NICHT FÜR: Beschichtete Glühlampen, Leuchtstoffröhren,
Leuchtenwärmer-Heizlampen, beschichtete Halogenleuchten,
Halogenheizleuchten, Xenon-Lampen, LED-Röhren,
Glaskomponenten und Sicherungen; Produktausfälle im
Durchlauferhitzer-Tank, Lamellenwärmetauscher oder andere
Wasserheizvorrichtungen, verursacht durch Verkalkung,
Sedimentablagerung, chemischen Angriff oder Frieren,
Produktmissbrauch, Manipulation oder falsche Anwendung,
unsachgemäße Installation oder Anlegen einer falschen
Stromspannung.
2. EINSCHRÄNKUNG DER ERSATZLEISTUNGUND DES
SCHADENERSATZES
Die Haftung seitens Hatco und das ausschließliche Rechtsmittel
des Käufers ist nach Ermessen von Hatco oder einer von Hatco
autorisierten Serviceagentur nur der Ersatz des von der Garantie
geschützten Teils oder Produktes, sofern die oben angeführten
Garantiefristen eingehalten wurden. Hatco behält sich das Recht
vor, Garantieansprüche zur Gänze oder teilweise abzulehnen. Im
Sinne dieser beschränkten Garantie bezieht sich der Begriff
„überholt“ auf ein Teil oder Produkt, dessen ursprüngliche technische
Daten von Hatco oder einem von Hatco autorisierten
Reparaturdienst wieder hergestellt wurden. Die Kosten jeder
bewilligten Rücksendungen hat ausschließlich der Käufer zu tragen.
UNTER KEINEN UMSTÄNDEN IST HATCO FÜR FOLGE- ODER
WEITERE SCHÄDEN, INKLUSIVE, ABER NICHT DARAUF
BESCHRÄNKT, KOSTEN DER ARBEITSZEIT ODER
ENTGANGENER GEWINNE, WELCHE AUS DER VERWENDUNG
ODER NICHT MÖGLICHEN VERWENDUNG DER PRODUKTE
ODER DEM EINBAU ODER DEM EINSATZ ALS TEIL EINES
ANDEREN PRODUKTS ODER WARE ENTSTEHEN, HAFTBAR.
Die Garantie für die Hatco Heizlade der DRAWERMAX™ Serie
gilt ein Jahr ab dem Kaufdatum oder achtzehn Monate ab der
Auslieferung von Hatco, je nachdem, was zuerst eintritt.
Falls während der Garantielaufzeit ein Problem an einer
Heizlade auftritt, bitte Folgendes machen:
Setzen Sie sich mit Ihrem Hatco-Händler vor Ort in
Verbindung
Bei der Kontaktaufnahme mit einem Hatco-Händler zur
Anforderung von Kundendienstleistungen halten Sie bitte
folgende Informationen bereit, um eine umgehende
Bearbeitung zu gewährleisten:
• Modellbezeichnung des Geräts
• Seriennummer (unter dem Gerät)
• Beschreibung des am Geräts auftretenden Problems
• Kaufdatum
• Name Ihres Unternehmens
• Versandadresse
• Kontaktperson und Telefonnummer
Form-Nr. HDMCEM-0412
HINWEISE ZUR GARANTIELEISTUNG
Der Hatco-Händler Dealer wird:
• Nach Bedarf Ersatzteil(e) bereitstellen
• Den Garantieanspruch zur Bearbeitung an Hatco
weiterleiten
Nicht-Garantie Probleme
Falls ein nicht von der Garantie gedecktes Problem auftritt, für
das Unterstützung erforderlich ist, wenden Sie sich bitte an die
nächste von Hatco autorisierte Serviceagentur.
Aufsuchen der nächsten Serviceagentur:
• Rufen Sie unsere Website unter www.hatcocorp.com auf,
wählen Sie das Pulldown-Menü „Resources“
(Ressourcen) aus und klicken Sie auf „Find Service
Agent/Distributor“ (Serviceagentur/Vertriebsgesellschaft
suchen)
• Rufen Sie Hatco-Service unter der Rufnummer
+1 414-671-6350 an
• Senden Sie eine E-Mail an Hatco Service:
partsandservice@hatcocorp.com
21
Page 22

AVISO
ATENCIÓN
ADVERTENCIA
CONTENIDO
Información Importante para el Propietario .....................22
Introducción ........................................................................22
Información Importante de Seguridad..............................23
Descripción del Modelo .....................................................24
Denominación del Modelo .................................................24
Especificaciones.................................................................25
Configuraciones del Enchufe ...........................................25
Cuadro de Clasificación Eléctrica ....................................25
Dimensiones ....................................................................25
Instalación ...........................................................................26
Generalidades ..................................................................26
Instalación de los Modelos HDM-2 ..................................26
Instalación de los Modelos HDM-2B ................................27
Operación ............................................................................28
Generalidades ..................................................................28
Guía de Conservación de los Alimentos ..........................28
Mantenimiento ....................................................................29
Generalidades ..................................................................29
Limpieza ...........................................................................29
Opciones y Accesorios ......................................................29
Guía de Resolución de Problemas ...................................30
Garantía Internacional Limitada ........................................31
Información del Servicio de Garantía...............................31
INFORMACIÓN IMPORTANTE PARA EL PROPIETARIO
Anote el número de modelo, número de serie (situado en la
parte trasera en las unidades independientes y en la cara
interna del panel izquierdo en las unidades integrables), voltaje
y fecha de compra de su unidad en los espacios a
continuación. Por favor, tenga esta información disponible
cuando llame a Hatco para recibir asistencia técnica.
Modelo No.
Serie No.
Voltaje
Fecha de compra
____________________________________
______________________________________
________________________________________
________________________________
¡No olvide registrar su aparato!
Registre la garantía en nuestro sitio web para evitar retrasos
en la obtención de la cobertura de la garantía. Visite el sitio
web de Hatco: www.hatcocorp.com, seleccione el menú
desplegable “Piezas & Mantenimiento” (Parts & Service) y
haga clic en “Registrar la Garantía” (Warranty Registration).
Horario de atención:
Teléfono: (414) 671-6350
Correo
Electrónico: partsandservice@hatcocorp.com
Fax: (414) 671-3976 (Piezas y servicio)
Puede encontrar información adicional si visita nuestro sitio
Web en www.hatcocorp.com.
8:00
AM a 5:00 PM
Horario de la zona central
(Horario de verano: junio a septiembre
8:00
AM a 5:00 PM horario de la
zona central, lunes a jueves
8:00
AM a 2:30 PM horario de la
zona central, viernes)
INTRODUCCIÓN
Gracias al diseño de los Cajones Térmicos DRAWERMAX™
de Hatco, los alimentos se conservan a una temperatura de
servicio óptima y su calidad permanece intacta. Su diseño
permite un alto rendimiento en la cocina e incluye acero
inoxidable de gran resistencia, uniones sólidas, guías
correderas en acero inoxidable y cajones de cierre hermético.
Los Cajones Térmicos DRAWERMAX pueden conservar todo
tipo de alimentos como carnes, verduras o panecillos,
manteniendo su temperatura y sabor hasta el momento de
servirlos.
Los Cajones Térmicos DRAWERMAX de Hatco son el fruto de
importantes trabajos de investigación y ensayos de campo. Los
materiales empleados han sido seleccionados por su gran
resistencia, aspecto atractivo y rendimiento óptimo. Todas las
unidades son sometidas a cuidadosas inspecciones y pruebas
antes de proceder a su envío.
Este manual contiene las instrucciones relativas a la
instalación, las medidas de seguridad y el manejo de los
Cajones Térmicos DRAWERMAX de Hatco. Hatco recomienda
leer todas las instrucciones referentes a la instalación, el
funcionamiento y la seguridad contenidas en este manual antes
de comenzar la instalación o utilizar la unidad.
La información de seguridad que aparece en este manual se
identifica a través de los siguientes paneles con señales y
palabras:
ADVERTENCIA indica una situación peligrosa que, en caso
de no evitarse, puede resultar en lesiones graves e incluso
la muerte.
ATENCIÓN indica una situación peligrosa que, en caso de
no evitarse, puede resultar en lesiones menores o
moderadas.
AVISO se usa para abordar prácticas que no están
relacionadas con lesiones personales.
22
Nº de formulario. HDMCEM-0412
Page 23

INFORMACIÓN IMPORTANTE DE SEGURIDAD
AVISO
ATENCIÓN
ADVERTENCIA
ADVERTENCIA
Lea la siguiente importante información de seguridad para evitar lesiones personales o la
muerte, y para evitar daños al equipo o la propiedad.
PELIGRO DE DESCARGA ELÉCTRICA:
• Enchufe la unidad a un tomacorriente adecuadamente
conectado a tierra del voltaje, tamaño y configuración
del enchufe correctos. Si el enchufe y el tomacorriente
no coinciden, comuníquese con un electricista
calificado para determinar e instalar el voltaje y el
tamaño de tomacorriente correctos.
• Coloque el interruptor de alimentación en posición de
apagado, desenchufe la unidad y/o desconecte el
interruptor automático y deje que la unidad se enfríe
antes de realizar cualquier operación de mantenimiento
o limpieza.
• NO sumerja ni sature la unidad con agua. La unidad no
es impermeable. No opere la unidad si ésta se
sumergió o saturó con agua.
• La unidad no es a prueba de intemperie. Coloque la
unidad en interiores donde la temperatura del aire
ambiente sea de un mínimo de 21° C (70° F).
• No limpie con vapor ni use agua en exceso en la
unidad.
• Esta unidad no tiene una construcción “a prueba de
chorros”. No use un pulverizador de limpieza a chorro
para limpiar la unidad.
• No tire la unidad por el cable de alimentación.
• No use la unidad si el cable de alimentación está
deshilachado o desgastado.
• No intente reparar ni reemplazar un cable de
alimentación dañado. El cable deberá reemplazarlo
Hatco, un agente de servicio Hatco autorizado o una
persona con calificaciones similares.
• No limpie la unidad cuando esté energizada o caliente.
• No permita que se derramen líquidos dentro de la
unidad.
• Use sólo repuestos Hatco originales cuando se
necesite realizar mantenimiento. En caso de no
utilizase repuestos Hatco originales, se anularán todas
las garantías y se puede someter a los operadores del
equipo a voltajes eléctricos peligrosos, dando como
resultado descargas eléctricas o quemaduras. Los
repuestos Hatco originales están especificados para
operar en forma segura en los entornos en los que se
usan. Los repuestos de mercado secundario o
genéricos no cuentan con las características que les
permiten operar en forma segura en los equipos Hatco.
RIESGO DE INCENDIO:
• Coloque la unidad a un mínimo de 25 mm de paredes y
materiales que sean combustibles. Si no se mantienen
las distancias seguras, podría provocarse combustión
o decoloración.
• No utilice productos químicos agresivos tales como
lejía (o productos de limpieza que contengan lejía),
limpiahornos o soluciones de limpieza inflamables para
limpiar esta unidad.
Asegure que los productos alimenticios han sido
calentados a la temperatura adecuada para la seguridad de
los alimentos antes de colocarlos en la unidad. No calentar
el producto alimenticio de forma correcta podría resultar
en graves riesgos para la salud. Esta unidad es sólo de
mantenimiento de productos alimenticios precalentados.
Esta unidad no debe ser utilizada por niños o personas con
capacidades físicas, sensoriales o mentales disminuidas.
Asegúrese de los niños están supervisados y manténgalos
alejados de la unidad.
Asegúrese de que los usuarios de esta unidad han recibido
la formación necesaria para garantizar el manejo de esta
unidad de forma segura y apropiada.
Sólo personal calificado debe realizar mantenimiento en
esta unidad. El mantenimiento por parte de personal que
no esté calificado puede causar descargas eléctricas o
quemaduras.
Esta unidad no tiene piezas a las que el usuario pueda
realizar mantenimiento. Si necesita realizar mantenimiento
en esta unidad, comuníquese con un agente de servicio
autorizado de Hatco o con el Departamento de Servicio de
Hatco al 414-671-6350; fax 414-671-3976.
PELIGRO DE QUEMADURAS:
• Algunas superficies exteriores de la unidad se
calientan. Tenga precaución al tocar estas áreas.
• Tenga cuidado al abrir los cajones: saldrá aire muy
caliente.
El aceite empleado en la fabricación de la unidad está
homologado y puede generar humo durante un periodo de
hasta 30 minutos durante el encendido inicial. El humo
sólo aparecerá durante el encendido inicial. No introduzca
alimentos en la unidad hasta que el humo se haya
disipado.
Coloque la unidad a la altura correcta del mesón en un área
que sea cómoda para su uso. La ubicación debe estar
nivelada para evitar que la unidad o su contenido caigan
accidentalmente y ser lo suficientemente firme para
soportar el peso de la unidad y el contenido.
No apoye la unidad sobre uno de los paneles laterales o
sobre el panel posterior. Podría dañar la unidad.
Use sólo limpiadores no abrasivos. Los limpiadores
abrasivos podrían rayar el acabado de la unidad, estropear
su apariencia y hacerla susceptible a la acumulación de
suciedad.
Nº de formulario. HDMCEM-0412
23
Page 24

H D M - X B
Hatco
DRAWERMAX
Integrable
Cantidad de Cajones
DESCRIPCIÓN DEL MODELO
Todos los Modelos
Todos los Cajones Térmicos DRAWERMAX™ de Hatco están
fabricados con materiales resistentes, rodillos de nylon de gran
durabilidad, guías correderas en acero inoxidable de 2,78 mm
de espesor y uniones sólidas. Cada uno de los cajones cuenta
con conductos de ventilación regulables para el control de la
humedad, un interruptor de alimentación encendido/apagado
(I/O), un mando de control de temperatura y un indicador de
temperatura. Cada cajón incluye bandejas estándar de 152 mm
(6″) de profundidad. El aislamiento del panel superior y de los
laterales garantiza un mejor aprovechamiento de la energía y
las resistencias están garantizadas durante un periodo de dos
años. Todos los modelos de la serie HDM llevan instalado un
cable de alimentación de 1.829 mm (6′) con clavija.
Modelo HDM-2
El modelo HDM-2 es una unidad independiente con dos
cajones. Está equipado con patas de 102 mm (4″).
NOTA: Consulte la sección OPCIONES Y ACCESORIOS para
conocer todas las opciones y los accesorios
disponibles.
Modelo HDM-2B
El modelo HDM-2B es una unidad integrable con dos cajones.
Modelo HDM-2B
Modelo HDM-2
DENOMINACIÓN DEL MODELO
24
Nº de formulario. HDMCEM-0412
Page 25

ESPECIFICACIONES
ADVERTENCIA
CEE 7/7 Schuko BS-1363
AS 3112
NEMA 5-15P
A B
D E
C
Vista frontal Vista lateral
A
B
F
C
G
Vista frontal Vista lateral
Configuraciones del Enchufe
Las unidades salen de fábrica con un cable eléctrico y un
enchufe instalados. Los enchufes se suministran de acuerdo
con las aplicaciones.
PELIGRO DE DESCARGA ELÉCTRICA: Enchufe la unidad
a un tomacorriente adecuadamente conectado a tierra del
voltaje, tamaño y configuración del enchufe correctos. Si
el enchufe y el tomacorriente no coinciden, comuníquese
con un electricista calificado para determinar e instalar el
voltaje y el tamaño de tomacorriente correctos.
NOTA: La etiqueta con las especificaciones está situada en el
panel posterior en el caso de las unidades
independientes y en la cara interna del panel izquierdo
en el caso de las unidades integrables. Para comprobar
el número de serie y la información relativa a la
electricidad de este aparato, consulte la etiqueta.
NOTA: Hatco no proporciona el tomacorriente.
Cuadro de Clasificación Eléctrica
Modelo Voltaje Vatios Amperios Configuraciones del Enchufe Peso de Envío
Configuraciones del Enchufe
HDM-2
HDM-2B
La información eléctrica en las áreas sombreadas se refiere solamente a los modelos
para Internacionales.
NOTA: El peso de envío incluye el material de embalaje.
120 900 7.5
230 (CE) 984 4.3
120 900 7.5
230 (CE) 984 4.3
NEMA 5-15P
CEE 7/7 Schuko, BS-1363, or AS 3112
NEMA 5-15P
CEE 7/7 Schuko, BS-1363, or AS 3112
Dimensiones
Ancho
Modelo
HDM-2 749 mm
HDM-2B 743 mm
(A)
(29-1/2″)
(29-1/4″)
Profundidad
(B)
576 mm
(22-3/4″)
568 mm
(22-3/8″)
Altura
(C)
614 mm
(24-3/16″)
512 mm
(20-3/16″)
Ancho de
las Patas
(D)
629 mm
(24-3/4″)
--- ---
Profundidad
de las Patas
(E)
484 mm
(19-1/16″)
68 kg (150 lbs.)
68 kg (150 lbs.)
67 kg (147 lbs.)
67 kg (147 lbs.)
Anchura
Incorporada
(F)
--- ---
715 mm
(28-1/8″)
Profundidad
Incorporada
(G)
483 mm
(19-1/16″)
Nº de formulario. HDMCEM-0412
HDM-2 Dimensiones
HDM-2B Dimensiones
25
Page 26

AVISO
ADVERTENCIA
Pata de 102 mm (4”)
Alargar
Acortar
Base
Regulable
INSTALACIÓN
Generalidades
Los Cajones Térmicos DRAWERMAX™ se envían con todas
sus piezas montadas en fábrica. Tenga cuidado al desembalar
la caja de envío para evitar posibles daños a la unidad y a los
accesorios incluidos.
PELIGRO DE DESCARGA ELÉCTRICA: La unidad no es a
prueba de intemperie. Coloque la unidad en interiores
donde la temperatura del aire ambiente sea de un mínimo
de 21° C (70° F).
RIESGO DE INCENDIO: Coloque la unidad a un mínimo de
25 mm de paredes y materiales que sean combustibles. Si
no se mantienen las distancias seguras, podría provocarse
combustión o decoloración.
No apoye la unidad sobre uno de los paneles laterales o
sobre el panel posterior. Podría dañar la unidad.
1. Retire la unidad de la caja.
2. Saque el paquete informativo que encontrará en uno de
los cajones de la unidad.
NOTA: Para evitar retrasos en la obtención de la cobertura de
la garantía, registre la garantía en nuestro sitio web.
Para obtener más información, consulte la sección
"Información Importante para el Usuario".
3. Quite la cinta y el material de embalaje de todas las
superficies de la unidad.
4. Coloque la unidad en la ubicación que desea.
• Sitúe la unidad en un lugar donde la temperatura
ambiente sea constante y no sea inferior a 21°C
(70°F). Evite las zonas en las que se produzcan
movimientos o corrientes de aire (como lugares
próximos a ventiladores o campanas de evacuación de
humos o conductos de aire acondicionado).
• Asegúrese de que la unidad repose sobre una
superficie estable y nivelada o en una estructura firme.
• Asegúrese de que la unidad está situada a una altura
adecuada y en un lugar apropiado para su uso.
5. Instale la unidad. Consulte el correspondiente
procedimiento de instalación en esta sección.
Instalación de los Modelos HDM-2
Los modelos HDM-2 son unidades independientes que
requieren la instalación de patas de 102 mm (4″).
1. Saque la bolsa de plástico que contiene las cuatro patas y
que encontrará dentro de uno de los cajones de la unidad.
2. Apoye la unidad sobre uno de sus paneles laterales (para
esta operación se necesitan dos personas).
3. Instale cada una de las patas. Apriete las patas a mano
hasta que queden ajustadas. No las apriete con excesiva
fuerza.
4. Vuelva a colocar la unidad en posición vertical (para esta
operación se necesitan dos personas). Si la unidad no está
nivelada o se balancea, gire la base regulable de las patas
hasta que la unidad quede nivelada.
Instalación de las Patas
26
Nº de formulario. HDMCEM-0412
Page 27

721 mm
(28-3/8″)
25 mm
(1″)
489 mm
(19-1/4″)
603 mm
(23-3/4″)
Vista frontal
Vista lateral
Lengüeta de
Retención
22.2 mm
(0.875″)
3.2 mm
(0.125″)
Reborde de los
Cajones
Térmicos
Lengüeta de
Retención
Cara Frontal
del Armario
Pasadores de Bloqueo
(en la cara inferior)
INSTALACIÓN
Instalación de los Modelos HDM-2B
Los modelos HDM-2B son unidades integrables que deben ser
instaladas en el armario correspondiente antes de comenzar a
ser utilizadas.
1. Realice al abertura correspondiente en el armario. Para
obtener información sobre las dimensiones, consulte la
ilustración inferior.
5. Introduzca la parte trasera de la unidad en la cavidad del
armario, asegurándose de que el cable de alimentación
entra en primer lugar.
6. Antes de introducir completamente la unidad en la cavidad
del armario, aplique unas gotas de adhesivo (cualquiera
que haya sido aprobado por la NFS estadounidense) entre
el reborde de la unidad y la cara frontal del armario.
7. Introduzca la unidad en la cavidad del armario hasta que
los pasadores de bloqueo queden por detrás de la lengüeta
de retención. Para verificar que la instalación se ha
realizado correctamente, tire del cajón inferior hasta el
máximo permitido; a continuación vuelva a tirar con
suavidad y compruebe que la unidad permanece inmóvil
en su posición.
Dimensiones de la abertura y de la lengüeta de retención
NOTA: La distancia mínima entre la cavidad del armario y el
suelo debe ser de 25 mm (1").
2. Instale una lengüeta de retención (no suministrada con la
unidad) en el borde inferior frontal del interior de la abertura
realizada en el armario.
3. Asegúrese de que la cavidad del armario dispone de una
toma de corriente puesta a tierra y de que el voltaje,
tamaño y configuración de clavija son los adecuados.
Consulte la sección Especificaciones de este manual para
obtener más información.
4. Enchufe el cable de alimentación de la unidad en la toma
de corriente.
instalación de las unidades integrables
Nº de formulario. HDMCEM-0412
27
Page 28

OPERACIÓN
Mandos del
Cajón Superior
Mandos del
Cajón Inferior
Indicador de
Temperatura
Tabla de Ajustes
Recomendados
Mando de Control
de Temperatura
Interruptor de
Alimentación
Encendido/
Apagado (I/O)
Conductos de
Ventilación del Cajón
Regulador de
Ventilación
ATENCIÓN
ADVERTENCIA
Generalidades
Para utilizar los Cajones Térmicos DRAWERMAX™, siga el
procedimiento descrito a continuación. Cada uno de los cajones
puede ser controlado y supervisado de forma independiente
mediante los conductos de ventilación regulables, que permiten
controlar el nivel de humedad, el interruptor de alimentación de
encendido/apagado (I/O), el mando de control de temperatura y
el indicador de temperatura.
Lea todos los mensajes de seguridad de la sección
Información de seguridad importante antes de operar el equipo.
Encendido
1. En el caso de las unidades independientes, enchufe la
unidad en una toma de corriente debidamente puesta a
tierra y que tenga una configuración adecuada de voltaje,
tamaño y clavija. Consulte la sección Especificaciones de
este manual para obtener más información.
2. Coloque el interruptor de alimentación encendido/apagado
(I/O) en la posición de encendido (I).
3. Sitúe el mando de control de temperatura en la posición de
temperatura deseada. Consulte la tabla de Ajustes
Recomendados situada en el cuadro de mandos o la Guía
de Conservación de los Alimentos incluida en esta sección.
El aceite empleado en la fabricación de la unidad está
homologado y puede generar humo durante un periodo de
hasta 30 minutos durante el encendido inicial. El humo sólo
aparecerá durante el encendido inicial. No introduzca
alimentos en la unidad hasta que el humo se haya disipado.
PELIGRO DE QUEMADURAS:
• Algunas superficies exteriores de la unidad se
calientan. Tenga precaución al tocar estas áreas.
• Tenga cuidado al abrir los cajones: saldrá aire muy caliente.
4. Deje transcurrir de 15 a 20 minutos para que la unidad
alcance la temperatura de funcionamiento.
5. Ajuste los conductos de ventilación de la unidad deslizando
el regulador de ventilación situado en la cara frontal de los
paneles hasta que alcance el nivel de humedad deseado.
Los conductos de ventilación completamente abiertos
dejan escapar el máximo de humedad.
NOTA: El nivel de ventilación adecuado dependerá del tipo y
Apagado
1. Coloque el interruptor de alimentación encendido/apagado
(I/O) en la posición de apagado (O).
Conductos de Ventilación del Cajón
cantidad de alimentos que contenga la unidad, además
de la frecuencia con que abra los cajones.
2. Deje que la unidad se enfríe antes de realizar cualquier
operación de limpieza o mantenimiento.
HDM-2 Cuadro de Mandos
Guía de Conservación de los Alimentos
Temperatura de Posición del
Conservación Tipo de Conducto de
Alimento Recomendada Calor Ventilación
Panecillos 71°–85°C Seco Cerrado
Bollos 66°–79°C Húmedo Semiabierto
Verduras 79°–85°C Húmedo Semiabierto
Carne, Pollo 74°–85°C Seco Cerrado
Pescado 74°–85°C Húmedo Abierto
Guisos 66°–79°C Seco Cerrado
Pasteles, Postres 71°–85°C Seco Cerrado
Tacos, Tortillas 66°–71°C Húmedo Semiabierto
Capacidad Máxima de Conservación
El cajón estándar tiene la siguiente capacidad:
Panecillos: 6–8 docenas
Costillas: 11–14 kg (25–30 lbs.)
Patatas: 3–3-1/2 docenas
28
Nº de formulario. HDMCEM-0412
Page 29

MANTENIMIENTO
ADVERTENCIA
AVISO
AVISO
Rueda de 76 mm (3″)
Arandela
Generalidades
El diseño de los Cajones Térmicos DRAWERMAX garantiza
una resistencia y un rendimiento óptimos con un
mantenimiento mínimo.
PELIGRO DE DESCARGA ELÉCTRICA:
• Desenchufe el cable de alimentación o APAGUE el
interruptor con fusibles/cortocircuito y deje que la
unidad se enfríe antes de realizar ninguna operación
de mantenimiento o limpieza.
• NO sumerja ni sature la unidad con agua. La unidad no
es impermeable. No opere la unidad si ésta se
sumergió o saturó con agua.
• No limpie con vapor ni use agua en exceso en la
unidad.
• Esta unidad no tiene una construcción “a prueba de
chorros”. No use un pulverizador de limpieza a chorro
para limpiar la unidad.
• No limpie la unidad cuando esté energizada o caliente.
Esta unidad no tiene piezas a las que el usuario pueda
realizar mantenimiento. Si necesita realizar mantenimiento
en esta unidad, comuníquese con un agente de servicio
autorizado de Hatco o con el Departamento de Servicio de
Hatco al 414-671-6350; fax 414-671-3976.
Limpieza
Se recomienda que la unidad se limpie diariamente para
preservar el acabado de la unidad así como para mantener su
rendimiento.
1. Apague la unidad, desenchufe el cable de alimentación y
deje que se enfríe la unidad.
2. Extraiga y limpie todas las bandejas de alimentos.
Use sólo limpiadores no abrasivos. Los limpiadores
abrasivos podrían rayar el acabado de la unidad, estropear
su apariencia y hacerla susceptible a la acumulación de
suciedad.
3. Limpie las superficies con un paño húmedo. Se puede
utilizar una crema limpiadora no abrasiva para manchas
difíciles.
• No olvide inspeccionar el interior de la unidad por si
fuera necesario limpiarlo. Es posible que se caigan
trozos de comida de la bandeja y que vayan a parar a la
cavidad del cajón. ¡ADVERTENCIA! Riesgo de
quemaduras — ¡No limpie la cavidad del cajón
cuando la unidad esté encendida o enchufada!
4. Limpie la unidad entera utilización seca de una tela limpia,
seca.
Ruedas
Las unidades independientes disponen de ruedas de 76 mm
(3″) o 102 mm (4″) opcionales. Siga el procedimiento que se
describe a continuación para instalar las ruedas en el panel
inferior de la unidad.
No apoye la unidad sobre uno de los paneles laterales o
sobre el panel posterior. Podría dañar la unidad.
1. Extraiga cualquier bandeja que haya dentro de los cajones
de la unidad.
2. Con cuidado, apoye la unidad sobre uno de sus paneles
laterales (para esta operación se necesitan dos personas).
3. Si las patas están instaladas en la unidad, retírelas.
4. Instalación de una rueda.
Para instalar una rueda de 76 mm (3″):
a. Introduzca una arandela (suministrada) en el espárrago
de la rueda.
b. Enrosque la rueda con una arandela en el orificio en
donde se retiró la pata. Apriete hasta que quede bien
sujeta.
OPCIONES Y ACCESORIOS
Para instalar una rueda de 102 mm (4″):
a. Alinee los orificios de la placa de montaje de la rueda
con los orificios de la base de la unidad.
b. Asegure la rueda con los tornillos suministrados. Ajuste
en forma segura.
5. Para instalar las demás ruedas, repita la paso 4
6. Vuelva a colocar la unidad en posición vertical (para esta
operación se necesitan dos personas).
Bandeja para Agua/Protectora
La bandeja para agua/protectora se instala en el interior del
cajón, por debajo de la bandeja para alimentos; puede usarse
para proporcionar humedad en la zona de calentamiento o para
impedir que se derrame agua al interior del armario. Hatco
recomienda el uso de la pantalla anti-salpicaduras.
Pantalla Anti-Salpicaduras
La pantalla anti-salpicaduras se usa junto con la bandeja para
agua/protectora opcional. La pantalla de acero inoxidable
encaja en la parte inferior de la bandeja para agua/protectora,
por encima del agua contenida en la bandeja; impide que se
derrame agua al interior del armario al abrir o cerrar los cajones,
a la vez que libera humedad en el interior del cajón.
Nº de formulario. HDMCEM-0412
Instalación de las Ruedas de 76 mm (3″)
29
Page 30

ADVERTENCIA
ADVERTENCIA
GUÍA DE RESOLUCIÓN DE PROBLEMAS
Sólo personal calificado debe realizar mantenimiento a la
unidad. El mantenimiento realizado por personal no
calificado puede causar descargas eléctricas o
quemaduras.
Síntoma Causa Probable Acción Correctiva
Unidad demasiado
caliente.
Unidad no suficientemente
caliente.
Nivel de temperatura seleccionado demasiado
alto.
Unidad enchufada en fuente de alimentación
incorrecta.
El termostato interno está defectuoso. Póngase en contacto con un agente de servicio
No ha dejado transcurrir el tiempo necesario
para precalentar la unidad.
Nivel de temperatura seleccionado demasiado
alto.
El cajón no está completamente cerrado. Compruebe que todos los cajones están
El termostato interno está defectuoso. Póngase en contacto con un agente de servicio
PELIGRO DE DESCARGA ELÉCTRICA: Desenchufe el cable
de alimentación o APAGUE el interruptor con
fusibles/cortocircuito y deje que la unidad se enfríe antes de
realizar ninguna operación de mantenimiento o limpieza.
Seleccione una posición de temperatura más
baja.
Verifique con personal cualificado que la fuente
de alimentación corresponde a las
especificaciones de la unidad.
autorizado o con Hatco para asistencia.
Deje transcurrir de 15 a 20 minutos para que la
unidad alcance la temperatura de
funcionamiento.
Seleccione una posición de temperatura más
alta.
completamente cerrados.
autorizado o con Hatco para asistencia.
Los alimentos están
demasiado secos
Los alimentos están
demasiado jugosos
La unidad no funciona. Unidad no enchufada. Enchufe la unidad en la fuente de alimentación
Los conductos de ventilación del cajón están
cerrados.
La bandeja para agua opcional está vacía o no
está instalada.
Los conductos de ventilación del cajón están
abiertos.
La bandeja para agua opcional está instalada,
pero no es necesaria.
Unidad no encendida. Mueva el interruptor de alimentación ON/OFF a
El interruptor automático del cuadro de
distribución se ha desconectado .
Interruptor de alimentación ON/OFF defectuoso. Póngase en contacto con un agente de servicio
El termostato interno está defectuoso. Póngase en contacto con un agente de servicio
Resistencia fundida. Póngase en contacto con un agente de servicio
Abra los conductos de ventilación.
Instale o llene la bandeja para agua con agua
limpia. Controle el nivel de humedad regulando
los conductos de ventilación.
Cierre los conductos de ventilación.
Saque la bandeja para agua del cajón.
correcta.
la posición ON.
Vuelva a conectar el interruptor automático.
autorizado o con Hatco para asistencia.
autorizado o con Hatco para asistencia.
autorizado o con Hatco para asistencia.
30
Nº de formulario. HDMCEM-0412
Page 31

GARANTÍA INTERNACIONAL LIMITADA
1. GARANTÍA DEL PRODUCTO
Hatco garantiza que los productos que fabrica estarán libres de
defectos en los materiales, bajo condiciones normales de uso y
servicio, durante un período de un (1) año a partir de la fecha de
compra cuando se instalan y reciben mantenimiento de acuerdo
con las instrucciones por escrito de Hatco, o por 18 meses a partir
de su envío por Hatco. El comprador debe establecer la fecha de
compra del producto registrando el producto con Hatco o por
otros medios que Hatco considere satisfactorios a su discreción
exclusiva.
Hatco garantiza que los siguientes componentes del producto
están libres de defectos en materiales a partir de la fecha de
compra (sujetos a las condiciones precedentes) durante los
períodos de tiempo y las condiciones que figuran a continuación:
a) Garantía de Dos (2) Años para las Piezas:
Componentes de la Tostadora de Correa Transportadora
(recubiertos de metal)
Resistencias de los Cajones Térmicos
(recubiertos de metal)
Cajones Térmicos, rodillos del cajón y piezas deslizantes
Elementos calentadores de banda (recubiertos de metal)
Resistencias del vitrinas expositoras
(calor por aire recubierto de metal)
Resistencias de vitrinas mantenedoras
(calor por aire recubierto de metal)
Elementos de embalse acalorados — Series HWB
(recubiertos de metal)
b) Garantía de Un (1) Año ADEMÁS DE una Garantía de
Cuatro (4) Años para las Piezas cuyas condiciones
dependen de un prorrateo que Hatco explicará a petición
del Comprador:
Depósitos 3DS y FR
c) Garantía de Diez (10) Años para las Piezas:
Calentadores de agua eléctricos de refuerzo
Calentadores de agua a gas de refuerzo
d) Garantía de Noventa (90) Días para las Piezas:
Piezas de Repuesto
LAS GARANTÍAS ANTERIORES SON EXCLUSIVAS Y
SUSTITUYEN A CUALQUIER OTRA GARANTÍA, EXPRESA O
IMPLÍCITA, INCLUYENDO PERO SIN LIMITARSE A
CUALQUIER GARANTÍA IMPLÍCITA DE COMERCIABILIDAD O
ADECUACIÓN PARA UN FIN PARTICULAR O PATENTE U
OTRA INFRACCIÓN DEL DERECHO DE PROPIEDAD
INTELECTUAL. Sin limitar la generalidad de lo anterior, TALES
GARANTÍAS NO CUBREN: Bombillas incandescentes revestidas,
bombillas fluorescentes, bombillas para lámparas de calor,
bombillas halógenas revestidas, bombillas halógenas para
lámparas de calor, bombillas de xenón, tubos de LED,
componentes de vidrio y fusibles; mal funcionamiento del Producto
en los calentadores de agua, en los intercambiadores de calor de
tubos aleteados o en cualquier otro equipo de calefacción de agua
causado por acumulación de cal, acumulación de sedimentos,
productos químicos o congelación; o por el uso indebido,
manipulación, aplicación indebida, instalación deficiente o
suministro de tensión eléctrica inadecuado al Producto.
2. LIMITACIÓN DE REMEDIOS Y DAÑOS
La responsabilidad de Hatco y los derechos del Comprador
descritos a continuación se limitarán exclusivamente al reemplazo
de la pieza o del Producto empleando, a discreción de Hatco,
piezas nuevas o restauradas o un Producto nuevo o restaurado
por Hatco o uno de sus centros de servicio autorizados siempre
que la reclamación se haya efectuado dentro de los plazos de
garantía mencionados anteriormente. Hatco se reserva el derecho
a aceptar o rechazar de forma total o parcial cualquier reclamación
efectuada. A efectos de la presente Garantía Limitada, se
entenderá por "restaurado/a” la pieza o el Producto que haya
recuperado sus especificaciones originales tras haber sido
reparado/a por Hatco o por uno de sus centros de servicio
autorizados.Hatco no aceptará la devolución de ningún producto
sin la previa aprobación de Hatco por escrito, y en todas las
devoluciones aprobadas el comprador correrá con los gastos.
HATCO NO SERÁ RESPONSABLE, BAJO NINGUNA
CIRCUNSTANCIA, DE DAÑOS INDIRECTOS O INCIDENTALES,
INCLUYENDO PERO SIN LIMITARSE A COSTOS DE MANO DE
OBRA O PÉRDIDA DE INGRESOS QUE RESULTEN DEL USO
O DE LA INCAPACIDAD DE USAR EL PRODUCTO O DE QUE
EL PRODUCTO SE INCORPORE A OTRO PRODUCTO O
MERCANCÍA O SEA UN COMPONENTE DE DICHO
PRODUCTO.
INFORMACIÓN DEL SERVICIO DE GARANTÍA
El periodo de garantía de los Cajones Térmicos
DRAWERMAX™ de Hatco es de un año a partir de la fecha
de compra o de dieciocho meses a partir de la fecha de envío,
lo que tenga lugar primero.
Si tiene un problema con uno de nuestros Cajones Térmicos
durante la vigencia de la garantía, siga los pasos descritos a
continuación:
Póngase en Contacto con un Distribuidor Local de Hatco
Al comunicarse con un distribuidor de Hatco para recibir
asistencia con el servicio, proporcione al distribuidor la
siguiente información para asegurar un pronto procesamiento:
• Modelo de la Unidad
• Número de Serie (ubicado en la parte inferior de la unidad)
• Problema Específico con la Unidad
• Fecha de Compra
• Nombre de su Negocio
• Dirección de Envío
• Nombre de Contacto y Número de Teléfono
Nº de formulario. HDMCEM-0412
El distribuidor de Hatco hará lo siguiente:
• Proporcionará piezas de repuesto, según sea requerido
• Presentará un reclamo bajo la garantía a Hatco para su
procesamiento
Problemas no relacionados con la garantía
Si tiene un problema no relacionado con la garantía y que
requiere asistencia, póngase en contacto con el Centro de
Servicio Autorizado por Hatco más cercano. Para localizar el
Centro de Servicio más próximo:
• Visite el sitio web de Hatco: www.hatcocorp.com,
seleccione el menú desplegable “Recursos” (Resources)
y haga clic en “Localizar un Centro de Servicio/Distribuidor”
(Find Service Agent/Distributor)
• Llame al número de teléfono del Servicio de Atención al
Cliente de Hatco: 414-671-6350
• Mande un e-mail al Servicio de Atención al Cliente de
Hatco a la siguiente dirección:
partsandservice@hatcocorp.com
31
Page 32

SOMMAIRE
AVIS
ATTENTION
AVERTISSEMENT
Informations Importantes pour le Propriétaire................32
Introduction.........................................................................32
Consignes de Sécurité Importantes .................................33
Description du Modèle .......................................................34
Désignation du Modèle ......................................................34
Caractéristiques Techniques.............................................35
Configuration des Fiches..................................................35
Tableau des Caractéristiques électriques ........................35
Dimensions.......................................................................35
Installation...........................................................................36
Généralités .......................................................................36
Installation des modèles HDM-2 ......................................36
Installation des modèles HDM-2B ....................................37
Mode d'emploi.....................................................................38
Généralités .......................................................................38
Guide de maintien au chaud des aliments.......................38
Maintenance ........................................................................39
Généralités .......................................................................39
Nettoyage .........................................................................39
Options et Accessoires......................................................39
Guide de Dépannage ..........................................................40
Garantie Limitée Internationale .........................................41
Informations de Service .....................................................41
INFORMATIONS IMPORTANTES POUR LE PROPRIÉTAIRE
Noter le numéro de modèle, le numéro de série (à l'arrière des
modèles indépendants et à l'intérieur du panneau gauche dans
les modèles encastrés), le voltage et la date d’achat de votre
appareil ci-dessous. Veuillez avoir cette information à portée
de la main si vous appelez Hatco pour assistance.
Modèle No.____________________________________
Numéro de série________________________________
Voltage ______________________________________
Date d’achat __________________________________
Enregistrez votre appareil!
Remplissez la garantie en ligne pour éviter les retards pour
faire jouer la garantie. Accédez au site Web Hatco
www.hatcocorp.com, sélectionnez le menu déroulant Parts
& Service, puis cliquez sur Warranty Registration.
Horaires ouvrables ;
8h00 à 17h00
Heure du Centre des États-Unis (CST)
(Horaires d’été : juin à septembre –
8h00 à 17h00 CST du lundi au jeudi
8h00 à 14h30 CST le vendredi)
Téléphone : (+1 414) 671-6350
Courriel : partsandservice@hatcocorp.com
Télécopieur : (+1 414) 671-3976 (Pièces et
Service après-vente)
Des renseignements supplémentaires sont disponibles sur
notre site Web à www.hatcocorp.com.
INTRODUCTION
Les tiroirs chauffants DRAWERMAX™ de Hatco permettent de
garder les aliments à la température optimale de service sans
compromettre la qualité. Ils sont conçus pour les cuisines très
actives, en inox robuste, avec de la visserie solide, des
glissières inox et des tiroirs à fermeture positive. Les tiroirs
chauffants DRAWERMAX gardent au chaud tout ce qui va de
la viande aux légumes en passant par les petits pains, sans
perte de goût jusqu'à ce qu'ils soient servis.
Les tiroirs chauffants DRAWERMAX de Hatco sont le fruit de
recherches poussées et d’essais sur site complets. Les
matériaux utilisés ont été sélectionnés pour un maximum de
durabilité, une belle apparence et une performance optimale.
Chaque appareil est minutieusement inspecté et testé avant
expédition.
Ce manuel fournit les instructions d’installation, les consignes
de sécurité et le mode d’emploi des tiroirs chauffants
DRAWERMAX. Hatco vous recommande de lire l’ensemble
des instructions d’installation et d'utilisation et toutes les
consignes de sécurité dans ce manuel avant d’installer et
d’utiliser l'appareil.
Les consignes de sécurité qui apparaissent dans ce manuel sont
identifiées par les mots indicateurs suivants :
AVERTISSEMENT indique une situation dangereuse qui, si
elle n’est pas évitée, peut provoquer la mort ou des
blessures graves.
ATTENTION indique une situation dangereuse qui, si elle
n’est pas évitée, peut provoquer des blessures légères ou
moyennes.
AVIS est utilisé pour des questions sans rapport avec des
blessures corporelles.
32
Formulaire n° HDMCEM-0412
Page 33

CONSIGNES DE SÉCURITÉ IMPORTANTES
AVIS
ATTENTION
AVERTISSEMENT
AVERTISSEMENT
Lisez l'information de securite importante suivante avant d'utiliser cet équipement pour éviter
des dommages ou la mort sérieux et pour éviter d'endommager l'équipement ou la propriété.
DANGER DE DÉCHARGE ÉLECTRIQUE :
• Brancher l’appareil sur une prise de courant avec terre
de tension, de format et de configuration des broches
corrects. Si la fiche et la prise ne se correspondent pas,
s’adresser à un électricien qualifié pour déterminer et
installer une prise de courant de format et de tension
corrects.
• Éteignez l’appareil, débranchez le cordon
d'alimentation/coupez l'alimentation au niveau du
coupe-circuit et laissez refroidir avant une maintenance
ou un nettoyage.
• NE PAS immerger l’appareil ni le saturer d’eau.
L’appareil n’est pas étanche à l’eau. Ne pas le faire
fonctionner s’il a été immergé ou saturé d’eau.
• L’appareil n’est pas à l’épreuve des intempéries. Placer
l’appareil à l’intérieur à une température ambiante de
21°C minimum.
• Ne pas nettoyer à la vapeur ni utiliser trop d’eau sur
l’appareil.
• Cet appareil n’est pas étanche aux jets. Ne pas utiliser
de jet sous pression pour nettoyer l’appareil.
• Ne pas tirer l’appareil par son cordon électrique.
• Ne pas utiliser l’appareil si le cordon est endommagé
ou usé.
• Ne pas tenter de réparer ni de changer un cordon
électrique endommagé. Ce cordon doit être changé par
Hatco, par un réparateur Hatco agréé ou par une
personnes de qualifications comparables.
• Ne pas nettoyer l’appareil lorsqu’il est sous tension ou
chaud.
• Ne pas renverser de liquide dans l’appareil.
• Pour les réparations, utiliser exclusivement des pièces
de rechange Hatco d’origine. Utilisez des pièces
détachées Hatco authentiques sous peine d'annuler
toutes les garanties et d'exposer l’utilisateur à des
tensions électriques dangereuses pouvant entraîner
une électrocution ou des brûlures. Les pièces de
rechange Hatco d’origine sont conçues pour
fonctionner sans danger dans les environnements
dans lesquels elles sont utilisées. Certaines pièces de
rechange génériques ou de second marché ne
présentent pas les caractéristiques leur permettant de
fonctionner sans danger dans la matériel Hatco.
DANGER D’INCENDIE :
• Placer l’appareil à un minimum de 25 mm des parois et
matières combustibles. Si une distance sûre n’est pas
maintenue, la chaleur peut provoquer une combustion
ou une altération de couleur.
• N'utilisez pas de produits chimiques puissants tels que
de l'eau de Javel (ou des nettoyants contenat de l'eau
de Javel), des nettoyants pour four ou des solutions
nettoyantes inflammables pour nettoyer cet appareil.
S'assurer que le produit alimentaire a été chauffé à une
température adaptée au maintien de sa salubrité avant de
le mettre sur l'appareil sous peine de risques graves pour
la santé. Cet appareil est destiné au maintien de produits
alimentaires préchauffés uniquement.
Cet appareil ne doit pas être utilisé par des enfants ou des
personnes avec des capacités physiques, sensorielles ou
mentales diminuées. Assurez-vous que les enfants sont
bien surveillés et tenez-les à l'écart de l'appareil.
Assurez-vous que tous les opérateurs ont été formés à
l'utilisation sûre et correcte de l'appareil.
La réparation de cet appareil doit être confiée
exclusivement à du personnel qualifié. Les réparations par
des personnes non qualifiées peuvent provoquer des
décharges électriques et des brûlures.
Cet appareil ne contient aucune pièce réparable par
l’utilisateur. Si cet appareil doit être réparé, contacter un
réparateur Hatco agréé ou le Service après-vente Hatco au
+1 414-671-6350 ; télécopieur +1 414-671-3976.
DANGER DE BRÛLURE :
• Certaines surfaces extérieures de l’appareil deviennent
chaudes. Toucher ces zones de l’appareil avec
précaution.
• Faites attention en ouvrant le tiroir. De l'air chaud s'en
échappera.
Les huiles de fabrication standard et approuvées pourront
fumer pendant 30 minutes après l'allumage initial. C'est un
problème temporaire. Utilisez l'appareil à vide jusqu'à
dissipation de la fumée.
Placer l’appareil sur un plan de travail de hauteur correcte
à un endroit qui convient pour son utilisation. Le support
doit être de niveau pour éviter toute chute accidentelle du
grille-pain ou de son contenu et suffisamment solide pour
résister au poids de l’appareil et de son contenu.
Ne posez pas l'appareil sur l'avant ou sur l'arrière sous
peine de l'endommager.
Utiliser uniquement des produits nettoyants non abrasifs.
Les produits nettoyants abrasifs peuvent rayer la finition
de l’appareil, ce qui altère son apparence et le rend plus
susceptible d’accumuler la saleté.
Formulaire n° HDMCEM-0412
33
Page 34

DESCRIPTION DU MODÈLE
H D M - X B
Hatco
DRAWERMAX
Encastré
Quantité de tiroirs
Tous les Modèles
Tous les tiroirs chauffants Hatco DRAWERMAX™ sont de
construction solide avec des galets en nylon durables, des
glissières inox calibre 12 et une visserie ultra-robuste. Chaque
tiroir a des glissières à évent réglables pour réguler l'humidité,
un interrupteur de marche/arrê (I/O), un thermostat et une jauge
de température. Des plaques de taille standard de 152 mm de
profondeur sont fournies avec chaque tiroir. Le dessus et les
côtés isolés offrent un rendement énergétique maximum et les
éléments chauffants sont garantis pendant deux ans. Tous les
modèles série HDM comprennent un cordon d'alimentation
attaché de 1 829 mm avec fiche.
Modèle HDM-2
Le modèle HDM-2 est un modèle indépendant à deux tiroirs. Il
est équipé de pieds de 102 mm.
NOTA : Se reporter à la section OPTIONS ET ACCESSOIRES
pour connaître tous les accessoires et options
disponibles.
Modèle HDM-2B
Le modèle HDM-2B est un modèle encastré à deux tiroirs.
Modèle HDM-2B
Modèle HDM-2
DÉSIGNATION DU MODÈLE
34
Formulaire n° HDMCEM-0412
Page 35

CARACTÉRISTIQUES TECHNIQUES
AVERTISSEMENT
CEE 7/7 Schuko BS-1363
AS 3112
NEMA 5-15P
A B
D E
C
Vue de face Vue de côté
A
B
F
C
G
Vue de face Vue de côté
Configuration des fiches
Les appareils sont livrés avec un cordon électrique avec fiche.
Différentes fiches sont fournies selon les applications.
DANGER DE DÉCHARGE ÉLECTRIQUE : Brancher
l’appareil sur une prise de courant avec terre de tension, de
format et de configuration des broches corrects. Si la fiche
et la prise ne se correspondent pas, s’adresser à un
électricien qualifié pour déterminer et installer une prise
de courant de format et de tension corrects.
NOTA: L'étiquette des caractéristiques techniques se trouve à
Tableau des valeurs nominales électriques
l'arrière des modèles indépendants et à l'intérieur du
panneau gauche dans les modèles encastrés.
Reportez-vous à l'étiquette du numéro de série et les
données électriques de l'appareil.
Modéle Tension Intensité Amps Configuration de Fiches
HDM-2
HDM-2B
120 900 7.5
230 (CE) 984 4.3
120 900 7.5
230 (CE) 984 4.3
NOTA: Prise non fournie par Hatco.
NEMA 5-15P
CEE 7/7 Schuko, BS-1363, or AS 3112
NEMA 5-15P
CEE 7/7 Schuko, BS-1363, or AS 3112
Configuration des fiches
Poids
d’embarquement
68 kg (150 lbs.)
68 kg (150 lbs.)
67 kg (147 lbs.)
67 kg (147 lbs.)
Les informations électriques grisées dans le tableau désignent les modèles destinés à internationaux uniquement.
NOTA: Le poids d'embarquement comprend l'emballage.
Dimensions
Largeur
Modéle
HDM-2 749 mm
HDM-2B 743 mm
(A)
(29-1/2″)
(29-1/4″)
Profondeur
(B)
576 mm
(22-3/4″)
568 mm
(22-3/8″)
Hauteur
(C)
614 mm
(24-3/16″)
512 mm
(20-3/16″)
Empattement
Largeur (D)
629 mm
(24-3/4″)
--- ---
Empattement
Profondeur (E)
484 mm
(19-1/16″)
Largeur
Intégrée (F)
--- ---
715 mm
(28-1/8″)
Profondeur
Intégrée (G)
483 mm
(19-1/16″)
Formulaire n° HDMCEM-0412
HDM-2 Dimensions
HDM-2B Dimensions
35
Page 36

INSTALLATION
AVERTISSEMENT
AVIS
Pied de 102 mm
Rallonger
Raccourcir
Extrémité
ajustable
Généralités
Les tiroirs chauffants DRAWERMAX™ sont expédiés avec la
plupart des composants préassemblés. Faites attention lors du
déballage pour éviter d’endommager l’appareil et ses
composants.
DANGER DE DÉCHARGE ÉLECTRIQUE : L’appareil n’est
pas à l’épreuve des intempéries. Placer l’appareil à
l’intérieur à une température ambiante de 21°C minimum.
DANGER D’INCENDIE : Placer l’appareil à un minimum de
25 mm des parois et matières combustibles. Si une
distance sûre n’est pas maintenue, la chaleur peut
provoquer une combustion ou une altération de couleur.
Ne posez pas l'appareil sur l'avant ou sur l'arrière sous
peine de l'endommager.
1. Retirer l'appareil de sa boîte.
2. Retirez le paquet d'information du tiroir.
NOTA: Pour éviter un retard de service sous garantie,
enregistrez la garantie en ligne. Pour des détails, voir la
section INFORMATIONS IMPORTANTES POUR LE
PROPRIÉTAIRE.
3. Retirer le ruban et le film de protection de toutes les
surfaces de l'appareil.
4. Placer l’appareil à l’endroit souhaité.
• Placez l’appareil à un endroit où la température
ambiante est constante et de 21 °C (70 °F) minimum.
Évitez les endroits susceptibles d’activer les
mouvements ou les courants d’air (proximité des
ventilateurs ou hottes d’évacuation et conduites de
climatisation).
• Assurez-vous que l'appareil est placé sur un sol
horizontal solide ou dans une armoire solide.
• Assurez-vous que l'appareil est à la bonne hauteur du
plan de travail dans un espace pratique pour son
utilisation.
5. Installez l'appareil. Consultez la procédures d'installation
appropriée dans cette section.
Installation des modèles HDM-2
Les modèles HDM-2 sont des modèles indépendants exigeant
l'installation de pieds de 102 mm avant utilisation.
1. Enlevez le sac en plastique qui contient les quatre pieds du
tiroir de l'appareil.
2. Posez avec précaution l'appareil sur le côté (il faut s'y
prendre à deux).
3. Installez chaque pied. Serrez les pieds à la main. Ne serrez
pas trop.
4. Remettez l'appareil à la verticale (il faut s'y prendre à
deux). Si l'appareil n'est pas calé ou branle, tourner
l'extrémité réglable du pied approprié pour caler l'appareil.
Installation des pieds
36
Formulaire n° HDMCEM-0412
Page 37

INSTALLATION
721 mm
(28-3/8″)
25 mm
(1″)
489 mm
(19-1/4″)
603 mm
(23-3/4″)
Vue de face
Vue de côté
Bande de blocage
22.2 mm
(0.875″)
3.2 mm
(0.125″)
Bride du tiroir
chauffant
Bande de
blocage
Face de
l'armoire
Goujons de blocage
(dessous)
Installation des modèles HDM-2B
Les modèles HDM-2B sont des modèles encastrés exigeant
une installation dans une armoire avant utilisation.
1. Découpez l'ouverture appropriée dans l'armoire. Pour les
dimensions, consultez l'illustration ci-dessous.
5. Insérez partiellement l'appareil dans l'ouverture, en veillant
à faire également passer le cordon d'alimentation dans
l'ouverture.
6. Avant d'installer l'appareil à fond dans l'ouverture, appliquez
un cordon de colle approuvé par la National Sanitation
Foundation entre la bride du tiroir chauffant et la face de
l'armoire.
7. Glissez l'armoire dans l'ouverture jusqu'à ce que les
goujons de blocage avant descendent derrière la bande de
blocage. Pour vérifier l' installation, tirez avec précaution le
tiroir du bas à fond pour être sûr qu'il est bloqué en position.
Dimensions de découpe et bande de blocage
NOTA: Maintenez un dégagement minimum de 25 mm entre la
découpe et le sol.
2. Fixez une bande de blocage (non fournie) au rebord
intérieur avant, en bas de l'ouverture de l'armoire.
3. Assurez-vous qu'une prise électrique correctement mise à
la terre de tension, taille et configuration corrects est
installée dans la découpe de l'armoire. Pour des détails,
voir la section CARACTÉRISTIQUES TECHNIQUE.
4. Branchez le cordon d'alimentation sur la prise électrique
de l'appareil.
Installation encastrée
Formulaire n° HDMCEM-0412
37
Page 38

MODE D'EMPLOI
Évents du tiroir
Bouton d'évent
ATTENTION
AVERTISSEMENT
Commandes du
tiroir supérieur
Commandes du
tiroir inférieur
Jauge de
température
Tableau
RÉGLAGES
RECOMMANDÉS
Thermostat
TEMPERATURE
Interrupteur de
marche/arrêt
POWER (I/O)
Généralités
Procédez comme suit pour utiliser les tiroirs chauffants
DRAWERMAX™. Chaque tiroir peut être individuellement
commandé et surveillé à l'aide d'évents de tiroir réglables pour
réguler l'humidité, d'un interrupteur de marche/arrê (I/O), d'un
thermostat et d'une jauge de température.
Lire tous les messages de sécurité de la section
Consignes de sécurité importantes avant d’utiliser ce
matériel.
Mise en marche
1. Pour les appareils indépendants, branchez l’appareil sur
une prise électrique correctement mise à la terre de la
configuration, de la taille et de la tension corrects. Pour des
détails, voir la section CARACTÉRISTIQUES TECHNIQUE.
2. Placez l’interrupteur d’alimentation POWER (I/O) sur
position Marche (I).
3. Tournez le thermostat TEMPERATURE au réglage
souhaité. Reportez-vous au tableau des réglages
recommandés sur le panneau de commande ou le Guide
de maintien au chaud des aliments dans cette section.
Les huiles de fabrication standard et approuvées pourront
fumer pendant 30 minutes après l'allumage initial. C'est un
problème temporaire. Utilisez l'appareil à vide jusqu'à
dissipation de la fumée.
DANGER DE BRÛLURE :
• Certaines surfaces extérieures de l’appareil deviennent
chaudes. Toucher ces zones de l’appareil avec
précaution.
• Faites attention en ouvrant le tiroir. De l'air chaud s'en
échappera.
4. Attendez 15–20 minutes que l'appareil atteigne la
température d'utilisation.
5. Ajustez les évents de tiroir pour obtenir l'humidité
souhaitée en glissant le bouton d'évent sur l'avant du tiroir.
L'ouverture complète des évents permet l'évacuation du
maximum d'humidité.
Évents du tiroir
NOTA: Le réglage correct des évents dépend du type et du
Arrêt
volume d'aliments maintenus au chaud, ainsi que de la
fréquence d'ouverture du tiroir
1. Placez l’interrupteur d’alimentation POWER (I/O) sur
position Arrêt (O).
2. Laissez refroidir avant une maintenance ou un nettoyage.
HDM-2 Panneau de commande
Guide de maintien au chaud des aliments
Température de
Stockage Type de Réglage
Produit Recommandée Chaleur d'évent
Petits pains, durs 71°–85° C Sec Fermé
Petits pains, mous 66°–79° C Humide Ouvert de moitié
Légumes 79°–85° C Humide Ouvert de moitié
Viande, volaille 74°–85° C Sec Fermé
Poisson 74°–85° C Humide Ouvert
Gratins 66°–79° C Sec Fermé
Tartes, Desserts 71°–85° C Sec Fermé
Tacos, Tortillas 66°–71° C Humide Ouvert de moitié
Capacité de maintien au chaud des aliments
Un tiroir standard a la capacité suivante :
Petits pains: 6–8 douzaines
Côtes: 25–30 lbs. (11–14 kg)
Pommes de terre: 3–3-1/2 douzaines
38
Formulaire n° HDMCEM-0412
Page 39

MAINTENANCE
AVERTISSEMENT
AVIS
AVIS
Roulettes de 76 mm (3″)
Rondelle
Généralités
Les tiroirs chauffants DRAWERMAX™ sont conçus pour une
durabilité et une performance maximum et un minimum
d'entretien.
DANGER DE DÉCHARGE ÉLECTRIQUE :
• Débrancher le cordon d'alimentation ou mettre hors
tension au coupe-circuit/disjoncteur et laisser refroidir
l'appareil avant d'effectuer une maintenance ou un
entretien.
• NE PAS immerger l’appareil ni le saturer d’eau.
L’appareil n’est pas étanche à l’eau. Ne pas le faire
fonctionner s’il a été immergé ou saturé d’eau.
• Ne pas nettoyer à la vapeur ni utiliser trop d’eau sur
l’appareil.
• Cet appareil n’est pas étanche aux jets. Ne pas utiliser
de jet sous pression pour nettoyer l’appareil.
• Cet appareil n’est pas étanche aux jets. Ne pas utiliser
de jet sous pression pour nettoyer l’appareil.
Cet appareil ne contient aucune pièce réparable par
l’utilisateur. Si cet appareil doit être réparé, contacter un
réparateur Hatco agréé ou le Service après-vente Hatco au
+1 414-671-6350 ; télécopieur +1 414-671-3976.
Nettoyage
Pour préserver la finition de l'appareil et maintenir la
performance, il est recommandé de nettoyer tous les jours
l'appareil.
1. Mettre l'appareil hors tension, débrancher le cordon
d'alimentation et laisser refroidir l'appareil.
2. Enelevz et lavez tous les plaques à aliments.
Utiliser uniquement des produits nettoyants non abrasifs.
Les produits nettoyants abrasifs peuvent rayer la finition
de l’appareil, ce qui altère son apparence et le rend plus
susceptible d’accumuler la saleté.
3. Essuyez les surfaces à l'aide d'un chiffon humide. Un
nettoyant crème non abrasif pourra être utilisé sur les
taches tenaces.
• Assurez-vous de contrôler et d enettoyer l'intérieur de
l'appareil. Des particules d'aliments pourront tomber des
plaques dans le tiroir. ATTENTION ! Risque de brûlure
— Ne nettoyez pas l'intérieur du tiroir quand
l'appareil est en marche ou branché !
4. Essuyez l'appareil entier sèche l'utilisation d'un tissu
propre, sec.
Roulettes
Des roulettes de 76 mm (3″) ou 102 mm (4″) sont disponibles
pour le modèle indépendant à la place des pieds. Procédez
comme suit pour installer les roulettes sous l'appareil.
Ne posez pas l'appareil sur l'avant ou sur l'arrière sous
peine de l'endommager.
1. Enlevez les plaques des tiroirs.
2. Posez avec précaution l'appareil sur le côté droit ou
gauche (il faut s'y prendre à deux).
3. Enlevez les pieds, s'il y a lieu.
4. Installer une roulette.
Pour installer une roulette de 76 mm (3 po.) :
a. Placez une rondelle (fournie) sur le goujon fileté de la
roulette.
b. Vissez la roulette avec la rondelle dans l'orifice qui
accueillait le pied. Serrez bien.
OPTIONS ET ACCESSOIRES
Pour installer une roulette de 102 mm (4 po.) :
a. Alignez les orifices du support de la roue pivotante avec
les orifices à la base de l'unité.
b. Fixez la roulette avec les vis fournies. Serrez-la
fermement.
5. Reprenez le étape 4 pour les trois autres roulettes.
6. Remettez l'appareil à la verticale (il faut s'y prendre à deux).
Bac d'eau/de Déversement
Le bac d'eau/de déversement se place sur le tiroir en dessous
de la plaque d'aliments et il est possible de l'utiliser pour
humidifier la zone de chauffage ou pour éviter les déversements
dans l'intérieur de l'armoire. Une cloison contre les
éclaboussures est recommandée.
Cloison Contre les Éclaboussures
La cloison contre les éclaboussures est utilisée avec le bac
d'eau/de déversement en option. Fabriquée en acier
inoxydable, la cloison se place dans la base du bac d'eau/de
déversement, au-dessus de la cuve d'eau, pour empêcher l'eau
d'éclabousser l'intérieur de l'armoire lors de l'ouverture et de la
fermeture d'un tiroir, tout en permettant à l'humidité de
s'échapper.
Formulaire n° HDMCEM-0412
Installation des roulettes de 76 mm (3″)
39
Page 40

GUIDE DE DÉPANNAGE
AVERTISSEMENT
AVERTISSEMENT
La réparation de cet appareil doit être confiée
exclusivement à du personnel qualifié. Les réparations par
des personnes non qualifiées peuvent provoquer des
décharges électriques et des brûlures.
DANGER DE DÉCHARGE ÉLECTRIQUE: Débrancher le
cordon d'alimentation ou mettre hors tension au coupecircuit/disjoncteur et laisser refroidir l'appareil avant
d'effectuer une maintenance ou un entretien.
Symptôme Cause Probable Solution
Appareil trop chaud. Thermostat réglé trop haut. Baissez le thermostat.
Appareil branché sur une alimentation
inadaptée.
Thermostat interne défectueux. Contactez votre agent de maintenance agréé ou
Appareil pas assez chaud. L'appareil n'a pas eu assez de temps pour
préchauffer.
Thermostat réglé trop bas. Montez le thermostat.
Tiroir(s) pas fermé(s) à fond. Assurez-vous que tous les tiroirs sont fermés à
Thermostat interne défectueux.. Contactez votre agent de maintenance agréé ou
Produit trop sec. Évent du tiroir en position fermée. Ouvrez l'évent à fond.
Assurez-vous auprès d’un personnel qualifié que
l’alimentation correspond aux spécifications de
l’appareil.
Hatco pour assistance.
Attendez 15–20 minutes que l'appareil atteigne
la température d'utilisation.
fond.
Hatco pour assistance.
Bac à eau en option vide ou non installé. Installez et/ou remplissez le bac d'eau propre.
Produit trop humide. Évent du tiroir en position ouverte. Enlevez le bac d'eau du tiroir.
Bac à eau en option installé, mais inutile. Éliminer l'eau pan de tiroir.
L’appareil ne fonctionne
pas du tout.
Appareil non branché Brancher l’appareil sur une alimentation
L’appareil n’a pas été mis sous tension. Placer l’interrupteur de marche/arrêt sur Marche.
Le coupe-circuit a disjoncté. Réarmez le coupe-circuit.
Interrupteur de marche/arrêt défectueux. Contactez votre agent de maintenance agréé ou
Thermostat interne défectueux. Contactez votre agent de maintenance agréé ou
L’élément chauffant a grillé. Contactez votre agent de maintenance agréé ou
Régulez le taux d'humidité intérieure à l'aide des
évents de tiroir.
adéquate.
Hatco pour assistance.
Hatco pour assistance.
Hatco pour assistance.
40
Formulaire n° HDMCEM-0412
Page 41

GARANTIE LIMITÉE INTERNATIONALE
1. GARANTIE DU PRODUIT
Hatco garantit que les produits qu'il fabrique (les " produits ")
seront dépourvus de vices de matériel, dans des conditions
normales d'utilisation et de maintenance, pendant une période
d'un (1) an à partir de la date d'achat à condition qu'ils soient
installés et entretenus conformément aux instructions écrites de
Hatco ou de 18 mois à partir de la date d'expédition de l'usine
Hatco. L'acheteur doit prouver la date d'achat du Produit par
l'enregistrement du produit auprès de Hatco ou par d'autres
moyens satisfaisants pour Hatco, à sa seule discrétion.
Hatco garantit que les composants du produit suivant ne
présentent aucuns défauts dans les matériaux employés pour
leur construction, à partir de la date d’achat (sujet aux conditions
en vigueur), pour la (les) période(s) de temps listées ci-dessous:
a) Deux (2) ans de garantie des pièces :
Les éléments de grille-pain de la rampe (gaine métallique)
Éléments de tiroir chauffant (gaine métallique)
Tiroir chauffant Rouleaux chauffants et Glissières
Éléments de rampe chauffante (gaine métallique)
Vitrine chauffante (gaine métallique, chauffage par air)
Éléments d’armoire de stockage
(gaine métallique, chauffage par air)
Éléments de puits chauffant intégrés — des séries HWB
(gaine métallique)
b) Un (1) an de garantie des pièces PLUS quatre (4) ans de
garantie des pièces aux conditions de prorata que Hatco
expliquera à la demande de l'acheteur :
Réservoirs 3CS et FR
c) Dix (10) ans de garantie des pièces :
Chauffe-eau d'appoint électriques
Chauffe-eau d'appoint au gaz
d) Quatre-vingt dix (90) jours de garantie des pièces :
Pièces détachées de rechange
LES GARANTIES PRÉ-CITÉES SONT EXCLUSIVES ET EN
LIEU DE TOUTES AUTRES GARANTIES, EXPRIMÉES OU
IMPLICITES, INCLUANT MAIS NON LIMITÉ À TOUTE
GARANTIE COMMERCIALE OU DE COMPATIBILITÉ POUR
UN PROPOS PARTICULIER OU TOUTE VIOLATION DE
BREVET OU AUTRE DROIT DE PROPRIÉTÉ
INTELLECTUELLE. Sans limitation quand aux garanties précitées, DE TELLES GARANTIES NE COUVRENT PAS: Les
ampoules à incandescence enduites, les lampes fluorescentes,
les ampoules de lampes chauffantes, les ampoules halogènes
enduites, les ampoules chauffantes halogènes, Ampoules au
xénon, tubes à DEL, les éléments en verre et les fusibles; la
défaillance de produit dans le réservoir d'appoint, l'échangeur de
chaleur à tube fin, ou d'autres équipements de chauffage d'eau
provoquée par le collage, l'accumulation de sédiments , les
attaques chimiques ou le gel, ou une mauvaise utilisation,
manipulation ou application du produit, une mauvaise installation,
ou l'application de tension inadaptée.
2. LIMITATION DES REMÈDES ET DOMMAGES
La responsabilité de Hatco et le recours exclusif de l'acheteur cidessous seront limités seulement au remplacement de tout ou
partie du produit en utilisant, au choix de Hatco, les pièces
neuves ou remises à neuf ou le produit par Hatco ou un
organisme de réparations agréé Hatco à l'égard de toute
réclamation faite dans le délai de la garantie applicable
mentionée ci-dessus. Hatco se réserve le droit d'accepter ou de
rejeter toute réclamation de ce type en tout ou partie. Dans le
contexte de cette garantie limitée, « remis à neuf » signifie qu'une
pièce ou un produit a été ramené à ses caractéristiques
techniques par Hatco ou par un centre de réparation agréé par
Hatco. Hatco n’acceptera pas le renvoi de tel produit que ce soit
sans une autorisation écrite préalable de Hatco, et les coûts
d’expédition des renvois approuvés sont à la charge exclusive
de l’acheteur. HATCO NE PEUT ÊTRE TENU RESPONSABLE,
SOUS AUCUNE CIRCONSTANCE, POUR DES DOMMAGES
CONSÉCUTIFS OU INCIDENTS, INCLUANT MAIS NON
LIMITÉS AU COÛT DE LA MAIN D’ŒUVRE OU A LA PERTE
DE PROFIT RÉSULTANT DE L’UTILISATION OU DE
L’IMPOSSIBILITÉ D’UTILISER LES PRODUITS OU DU FAIT
QUE LE PRODUIT SOIT INCORPORÉ OU DEVIENNE UN
COMPOSANT D’UN AUTRE PRODUIT OU MARCHANDISE.
La garantie des tiroirs chauffants DRAWERMAX™ de Hatco
est d'un an à partir de la date d'achat ou de 18 mois à partir de
la date d'expédition de chez Hatco, selon la première des deux
échéances.
En cas de problème avec un tiroir chauffant durant la période
de garantie, procédez comme suit :
Contacter un Revendeur Hatco
Se tenir prêt à lui fournir les informations suivantes pour
garantir un traitement rapide:
• Modèle
• Numéro de Série (situées en bas de l'appareil)
• Problème Spécifique
• Date d'achat
• Nom de l'entreprise
• Adresse d'expédition
• Nom de la Personne à Contacter et Téléphone
Formulaire n° HDMCEM-0412
INFORMATIONS DE SERVICE
Ensuite, le Revendeur Hatco:
• Fournira les pièces détachées requises
• Enverra la réclamation sous garantie à Hatco pour
traitement
Problèmes non liés à la garantie
En cas de problème hors garantie exigeant une assistance,
contactez le centre de SAV agréé par Hatco le plus proche.
Pour trouver le centre de SAV le plus proche :
• allez sur notre site Web www.hatcocorp.com,
sélectionnez le menu déroulant Resources, puis cliquez
sur « Find Service Agent/Distributor »
• appelez le SAV Hatco au 414-671-6350
• envoyez un courriel au SAV Hatco à
partsandservice@hatcocorp.com
41
Page 42

AVVISO
ATTENZIONE
AVVERTENZA
INDICE
Informazioni Importanti per il Proprietario.......................42
Introduzione ........................................................................42
Importanti Informazioni Sulla Sicurezza ..........................43
Descrizione dei Modelli ......................................................44
Designazione del Modello..................................................44
Dati Tecnici..........................................................................45
Configurazioni delle Spine................................................45
Tabella dei Valori Elettrici Nominali ..................................45
Dimensioni........................................................................45
Installazione ........................................................................46
Informazioni Generali .......................................................46
Installazione dei modelli HDM-2.......................................46
Installazione dei modelli HDM-2B ....................................47
Funzionamento ...................................................................48
Informazioni Generali .......................................................48
Guida al mantenimento dei cibi........................................48
Manutenzione......................................................................49
Informazioni Generali .......................................................49
Pulizia...............................................................................49
Guida alla Soluzione dei Problemi....................................50
Opzioni e Accessori ...........................................................51
Garanzia Limitata Internazionale.......................................52
Informazioni Sugli Interventi in Garanzia.........................52
INFORMAZIONI IMPORTANTI PER IL PROPRIETARIO
Indicare il numero del modello, il numero di serie (posta sul
retro delle unità indipendenti e all'interno del pannello sinistro
delle unità a incasso), la tensione di alimentazione e la data di
acquisto della propria unità negli spazi di seguito. Queste
informazioni dovranno essere fornite nel momento in cui verrà
richiesta l’assistenza Hatco.
N. del modello ________________________________
N. di serie ____________________________________
Tensione di alimentazione ________________________
Data di acquisto ________________________________
Registrare l'unità!
Completando la registrazione della garanzia online si
eviteranno ritardi nell'inizio della copertura. Visitare il sito
Hatco all'indirizzo www.hatcocorp.com, selezionare il menu
"Parts & Service" e fare clic su "Warranty Registration".
Orario d’ufficio:
dalle 8 alle 17
Fuso orario centrale degli USA
(Orario estivo: da giugno a settembre–
dalle 8 alle 17 fuso orario centrale
degli USA da lunedì a giovedì
dalle 8 alle 14.30 fuso orario centrale
degli USA il venerdì)
Telefono: (414) 671-6350
E-mail: partsandservice@hatcocorp.com
Fax: (414) 671-3976 (Parts and Service)
Si possono ottenere informazioni supplementari visitando il
nostro sito Web all’indirizzo www.hatcocorp.com.
INTRODUZIONE
I riscaldatori a cassetto DRAWERMAX™ di Hatco sono
progettati per mantenere le pietanze alle temperature ottimali di
servizio senza comprometterne la qualità. Realizzati per uso
intensivo in cucina con costruzione robusta in acciaio inox e
materiali resistenti, questi riscaldatori prevedono cassetti
montati su guide inox con chiusura dolce a fine corsa. I
riscaldatori a cassetto DRAWERMAX sono ideali per la
conservazione di carni, verdure, panini appena sfornati,
garantendone la freschezza fino al momento di servire.
I riscaldatori a cassetto DRAWERMAX di Hatco sono il frutto di
un'ampia ricerca e di test sul campo. I materiali utilizzati sono
stati scelti in funzione della massima durevolezza, dell'aspetto
estetico e delle prestazioni eccellenti. Ogni unità è ispezionata
e collaudata scrupolosamente prima della spedizione.
Il presente manuale contiene le informazioni di sicurezza e le
procedure di installazione e funzionamento per i riscaldatori a
cassetto DRAWERMAX. Si consiglia di leggere tutte le
istruzioni di installazione, operative e di sicurezza contenute
nel presente manuale prima di installare o utilizzare l'unità.
Le informazioni di sicurezza del presente manuale sono
segnalate con le seguenti scritte:
AVVERTENZA indica una situazione pericolosa che se non
viene evitata può causare lesioni gravi o letali.
ATTENZIONE indica una situazione pericolosa che se non
viene evitata può causare lesioni lievi o moderate.
AVVISO serve a indicare situazioni che non riguardano
lesioni della persona.
42
N. di pubblicazione HDMCEM-0412
Page 43

AVVISO
ATTENZIONE
AVVERTENZA
AVVERTENZA
IMPORTANTI INFORMAZIONI SULLA SICUREZZA
Leggere le seguenti importanti informazioni sulla sicurezza, al fine di evitare
infortuni gravi o anche fatali, ed evitare danni alle apparecchiature o alle cose.
PERICOLO DI SCOSSA ELETTRIC:
• Collegare l’unità a una presa elettrica opportunamente
messa a terra e di corretta tensione e configurazione di
spina. Se la spina e la presa non corrispondono,
mettersi in contatto con un elettricista qualificato per
stabilire la tensione corretta e installare la presa
elettrica della misura giusta.
• Spegnere, scollegare il cavo di
alimentazione/disattivare l'interruttore di circuito e
lasciare raffreddare l'unità prima di eseguire ogni
intervento di manutenzione o pulizia.
• NON immergere in acqua o inzuppare d’acqua. L’unità
non è impermeabile. Non usare l’unità se è stata
immersa in acqua o inzuppata d’acqua.
• L’unità non è a prova di intemperie. Sistemare l’unità al
chiuso in un posto in cui la temperatura ambiente sia
un minimo di 21 °C (70 °F).
• Non pulire a vapore o usare una quantità eccessiva
d’acqua sull’unità.
• La costruzione di questa unità non è a prova di getto.
Non usare spruzzi a getto per pulire l’unità.
• Non tirare l’unità dal cavo di alimentazione.
• Smettere di usare l’unità se il cavo di alimentazione si
consuma o si logora.
• Non cercare di riparare o sostituire un cavo di
alimentazione danneggiato. Il cavo di alimentazione
deve essere sostituito da parte di Hatco, un
rappresentante di servizio autorizzato Hatco o una
persona con simili qualifiche professionali.
• Non pulire l’unità quando è sotto tensione o calda.
• Non lasciare che nessun liquido entri nell’unità.
• Nell’eseguire interventi sull’unità usare solo pezzi di
ricambio originali di Hatco. Ogni inadempienza nell'uso
di pezzi di ricambio originali Hatco renderà nulle le
garanzie e può determinare tensioni elettriche
pericolose per gli operatori generando scosse
elettriche o ustioni. I pezzi di ricambio originali di Hatco
sono necessari per un funzionamento sicuro negli
ambienti d’uso previsti. Alcuni pezzi di ricambio
generici o di altri produttori non possiedono le stesse
caratteristiche e non consentono il funzionamento
degli apparecchi Hatco in condizioni di sicurezza.
PERICOLO DI INCENDIO:
• Sistemare l’unità a un minimo di 25 mm (1 pollice) da
pareti o materiali infiammabili. Se non si mantengono le
distanze di sicurezza, l’unità può scolorirsi o bruciare.
• Non utilizzare sostanze chimiche abrasive, quali
candeggina o detergenti a base di candeggina,
detersivi da forno o soluzioni di pulizia infiammabili per
pulire l'unità.
Verificare che il prodotto alimentare sia stato riscaldato alla
temperatura più adatta prima di introdurlo nell'unità. Ogni
inadempienza nel riscaldamento dei prodotti alimentari può
comportare gravi rischi per la salute. Questa unità è
indicata unicamente per il contenimento di alimenti
preriscaldati.
Questa unità non è destinata all'uso da parte di bambini o
persone con facoltà fisiche, sensoriali o mentali ridotte.
Sorvegliare opportunamente i bambini e tenerli lontani
dall'unità.
Assicurarsi che tutti gli operatori siano stati istruiti sull'uso
sicuro e appropriato dell'unità.
Interventi sull’unità devono essere eseguiti solo da parte
di personale qualificato. Interventi da parte di persone non
qualificate possono risultare in scossa elettrica o ustione.
Questa unità non contiene parti su cui “l’utente” può
intervenire. Se l’unità richiede un intervento di assistenza
mettersi in contatto con un Agente di assistenza
autorizzato di Hatco o con il Reparto di assistenza di Hatco
al numero telefonico 414-671-6350; fax 414-671-3976.
PERICOLO DI USTIONE:
• Alcune superfici esterne dell’unità diventano molto
calde. Fare attenzione quando si toccano queste aree.
• Prestare attenzione quando si apre un cassetto, poiché
all'apertura emana aria molto calda.
Gli oli normali e di produzione approvati possono causare
fumi fino a 30 minuti durante l'avvio iniziale. Questa è una
condizione temporanea. Azionare l'unità senza prodotti
alimentari fino alla dissipazione del fumo.
Sistemare l’unità su di un banco di altezza adatta in un’area
che sia pratica per l’uso. La posizione dovrebbe essere in
piano, per evitare che l’unità e il suo contenuto possano
rovesciarsi, e forte a sufficienza da supportare il peso
dell’unità stessa e del suo contenuto.
Non adagiare l'unità sul davanti o sul retro onde evitare di
arrecarvi danni.
Usare solo agenti di pulizia non abrasivi. I detergenti
abrasivi possono graffiare la finitura dell’unità,
sciupandone l’aspetto e rendendo l’unità soggetta ad
accumulo di sporcizia.
N. di pubblicazione HDMCEM-0412
43
Page 44

H D M - X B
Hatco
DRAWERMAX
Incassato
Quantità di cassetti
DESCRIZIONE DEI MODELLI
Tutti i Modelli
Tutti i riscaldatori a cassetto DRAWERMAX™ di Hatco sono
progettati con materiali robusti su durevoli rotelle di nylon e
muniti di guide inox di spessore 12. Ciascun cassetto dispone
di aperture di ventilazione regolabili per il controllo dell'umidità,
un interruttore ON/OFF (I/O), una manopola di controllo della
temperatura e un termometro. I cassetti sono forniti con teglie
di misura standard, di profondità 152 mm. La parte superiore ed
i lati sono isolati per assicurare la massima efficienza
energetica. Gli elementi riscaldanti hanno una garanzia di due
anni. Tutti i modelli della serie HDM comprendono un cavo di
alimentazione di 1829 mm con spina.
Modello HDM-2
Il modello HDM-2 è un'unità indipendente a due cassetti. È
munita di gambe di 102 mm.
NOTA: Per ulteriori informazioni su tutte le opzioni e gli
accessori disponibili, consultare la sezione OPZIONI E
ACCESSORI.
Modello HDM-2B
Il modello HDM-2B è un'unità incassata a due cassetti.
Modello HDM-2B
Modello HDM-2
INDICAZIONE DEI MODELLI
44
N. di pubblicazione HDMCEM-0412
Page 45

Configurazioni delle spine
AVVERTENZA
CEE 7/7 Schuko BS-1363
AS 3112
NEMA 5-15P
A B
D E
C
Vista frontale Vista laterale
A
B
F
C
G
Vista frontale Vista laterale
Ciascun apparecchio viene fornito dalla fabbrica con cavo di
alimentazione e spina installati. Le spine sono fornite in base
alle applicazioni.
PERICOLO DI SCOSSA ELETTRIC: Collegare l’unità a una
presa elettrica opportunamente messa a terra e di corretta
tensione e configurazione di spina. Se la spina e la presa
non corrispondono, mettersi in contatto con un elettricista
qualificato per stabilire la tensione corretta e installare la
presa elettrica della misura giusta.
NOTA: l'etichetta delle specifiche è posta sul retro delle unità
indipendenti e all'interno del pannello sinistro delle unità
a incasso. Vedere l'etichetta per le informazioni relative
al numero di serie e verificare i dati elettrici dell'unità.
Tabella di corrispondenza electtrica
DATI TECNICI
Configurazioni delle spine
NOTA: Presa non fornita da Hatco.
Configurazione
Modello Tensione Watts Ampere
HDM-2
HDM-2B
I dati elettrici nelle aree ombreggiate pertengono esclusivamente ai modelli per l'internationale.
NOTA: Il peso di spedizione comprende l'imballaggio.
120 900 7.5
230 (CE) 984 4.3
120 900 7.5
230 (CE) 984 4.3
CEE 7/7 Schuko, BS-1363, or AS 3112
CEE 7/7 Schuko, BS-1363, or AS 3112
della Spina
NEMA 5-15P
NEMA 5-15P
Dimensioni
Larghezza
Modello
HDM-2 749 mm
HDM-2B 743 mm
(A)
(29-1/2″)
(29-1/4″)
Profondità
(B)
576 mm
(22-3/4″)
568 mm
(22-3/8″)
Altezza
(C)
614 mm
(24-3/16″)
512 mm
(20-3/16″)
Larghezza
d’igombro
(D)
629 mm
(24-3/4″)
--- ---
Profondità
d’igombro
(E)
484 mm
(19-1/16″)
68 kg (150 lbs.)
68 kg (150 lbs.)
67 kg (147 lbs.)
67 kg (147 lbs.)
Larghezza
Incorporata
(F)
--- ---
715 mm
(28-1/8″)
Peso di
Spedizione
Profondità
Incorporata
(G)
483 mm
(19-1/16″)
N. di pubblicazione HDMCEM-0412
HDM-2 Dimensioni
HDM-2B Dimensioni
45
Page 46

AVVISO
AVVERTENZA
Gamba di 102 mm
Per allungare
Per accorciare
Punta
regolabile
INSTALLAZIONE
Informazioni Generali
I riscaldatori a cassetto DRAWERMAX™ sono forniti con la
maggior parte dei componenti preassemblati. Aver cura di non
danneggiare l'unità e i suoi componenti nell'estrarla
dall'imballaggio.
PERICOLO DI SCOSSA ELETTRIC: L’unità non è a prova
di intemperie. Sistemare l’unità al chiuso in un posto in cui
la temperatura ambiente sia un minimo di 21 °C (70 °F).
PERICOLO DI INCENDIO: Sistemare l’unità a un minimo di
25 mm (1 pollice) da pareti o materiali infiammabili. Se non
si mantengono le distanze di sicurezza, l’unità può
scolorirsi o bruciare.
Non adagiare l'unità sul davanti o sul retro onde evitare di
arrecarvi danni.
1. Rimuovere l'unità dalla scatola.
2. Rimuovere il pacchetto informativo dal cassetto dell'unità.
NOTA: Completare la registrazione della garanzia online per
evitare ritardi nell'inizio della copertura. Vedere la
sezione INFORMAZIONI IMPORTANTI PER
L'ACQUIRENTE per ulteriori dettagli.
3. Rimuovere il nastro e la pellicola protettiva da tutte le
superfici dell'unità.
4. Sistemare l’unità nella posizione desiderata.
• Sistemare l'unità in un'area in cui la temperatura
ambiente sia costante e con un valore minimo di 21°C
(70°F). Evitare i luoghi soggetti a flussi e correnti d'aria
attivi (ossia, in prossimità di condotti dell'aria
condizionata o condotte aspiranti).
• Verificare che l'unità sia collocata su una superficie
stabile e a livello o in un mobiletto robusto.
• Accertarsi che l'unità sia su di un banco di altezza
adatta in un'area pratica per l'uso.
5. Installare l'unità. Consultare la procedura di installazione
appropriata in questa sezione.
Installazione dei Modelli HDM-2
I modelli HDM-2 sono unità indipendenti e richiedono
l'installazione delle gambe di 102 mm prima dell'uso.
1. Rimuovere la busta di plastica delle quattro gambe dal
cassetto dell'unità.
2. Adagiare attentamente l'unità su di un fianco (richiede due
persone).
3. Installare le gambe. Avvitarle a mano con fermezza. Non
serrare eccessivamente.
4. Riportare l'unità in verticale (richiede due persone). Se
l'unità non è a livello o barcolla, ruotare la punta regolabile
della gamba più corta per portarla a livello.
Installazione delle gambe
46
N. di pubblicazione HDMCEM-0412
Page 47

721 mm
(28-3/8″)
25 mm
(1″)
489 mm
(19-1/4″)
603 mm
(23-3/4″)
Vista frontale
Vista laterale
Striscia di blocco
22.2 mm
(0.875″)
3.2 mm
(0.125″)
Flangia del
riscaldatore a
cassetti
Striscia di blocco
Struttura
del mobiletto
Perni di blocco (sotto)
INSTALLAZIONE
Installazione dei Modelli HDM-2B
I modelli HDM-2B sono unità a incasso da installare in un
mobiletto prima dell'uso.
1. Praticare un'apertura di dimensione appropriata nel
mobiletto. Consultare la figura seguente per le dimensioni.
5. Inserire l'unità solo parzialmente nell'apertura e verificare
che il cavo di alimentazione venga inserito per primo.
6. Prima di installare l'unità a fondo nell'apertura, applicare un
cordone di sigillante approvato dalla National Sanitation
Foundation tra la flangia del riscaldatore a cassetti e il
mobiletto.
7. Inserire l'unità nell'apertura finché i perni di blocco anteriori
non si innestino nella striscia di blocco. Per verificare
l'installazione, estrarre completamente il cassetto inferiore
e tirare delicatamente per assicurare che l'unità sia bloccata
in posizione.
Dimensioni apertura e striscia di blocco
NOTA: Assicurare uno spazio minimo di 25 mm tra l'apertura e
il pavimento.
2. Fissare una striscia di blocco (non fornita) all'interno del
bordo inferiore sul davanti dell'apertura del mobiletto.
3. Verificare che all'interno dell'apertura del mobiletto sia
disponibile una presa elettrica munita di messa a terra, di
tensione, misura e configurazione corrette. Vedere la
sezione SPECIFICHE per ulteriori dettagli.
4. Inserire il cavo di alimentazione dell'unità nella presa di
corrente.
Installazione a incasso
N. di pubblicazione HDMCEM-0412
47
Page 48

FUNZIONAMENTO
Aperture
del cassetto
Manopola di ventilazione
ATTENZIONE
AVVERTENZA
Controlli del
cassetto
superiore
Controlli del
cassetto
inferiore
Termometro
Tabella delle
impostazioni
consigliate
Manopola di
controllo della
temperatura
Interruttore
ON/OFF (I/O)
Informazioni Generali
Attenersi alla seguente procedura per utilizzare un riscaldatore
a cassetti DRAWERMAX™. Ciascun cassetto può essere
controllato e monitorato individualmente mediante le aperture
di ventilazione regolabili per il controllo dell'umidità, un
interruttore ON/OFF (I/O), una manopola di controllo della
temperatura e un termometro.
Prima di usare l’unità, leggere tutti i messaggi di sicurezza
contenuti nella sezione IMPORTANTI INFORMAZIONI
SULLA SICUREZZA.
Avvio
1. Per le unità indipendenti, collegare l'unità a una presa
elettrica opportunamente munita di messa a terra e di
tensione, misura e configurazione di spina corrette. Vedere
la sezione SPECIFICHE per ulteriori dettagli.
2. Portare ogni interruttore ON/OFF (I/O) in posizione ON (I).
3. Ruotare ogni manopola di controllo della temperatura
all'impostazione desiderata. Consultare la tabella delle
impostazioni consigliate sul pannello di controllo o la Guida
al mantenimento dei cibi in questa sezione.
Gli oli normali e di produzione approvati possono causare
fumi fino a 30 minuti durante l'avvio iniziale. Questa è una
condizione temporanea. Azionare l'unità senza prodotti
alimentari fino alla dissipazione del fumo.
PERICOLO DI USTIONE:
• Alcune superfici esterne dell’unità diventano molto
calde. Fare attenzione quando si toccano queste aree.
• Prestare attenzione quando si apre un cassetto, poiché
all'apertura emana aria molto calda.
4. Attendere 15-20 minuti che l'unità raggiunga la
temperatura di esercizio.
5. Regolare le aperture di ventilazione dei cassetti all'umidità
desiderata agendo sulla manopola sul fronte del cassetto.
L'apertura completa consente la fuga della massima
quantità di umidità.
Aperture del cassetto
NOTA: La regolazione corretta della ventilazione dipende dal
Arresto
tipo e dalla quantità di cibo, così come dalla frequenza
con cui si apre il cassetto.
1. Portare l'interruttore ON/OFF (I/O) in posizione OFF (O).
2. Lasciar raffreddare l'unità prima di procedere alla pulizia o
alla manutenzione.
HDM-2 Pannello di controllo
Guida al mantenimento dei cibi
Temperatura di
Conservazione Tipo di Impostazione
Prodotto Consigliata Calore Ventilazione
Panini, croccante 71°–85° C Asciutto Chiuso
Panini, morbida 66°–79° C Umido Aperto a metà
Verdure 79°–85° C Umido Aperto a metà
Carne, pollame 74°–85° C Asciutto Chiuso
Pesce 74°–85° C Umido Aperto
Casseruole 66°–79° C Asciutto Chiuso
Torte, dolci 71°–85° C Asciutto Chiuso
Tacos, Tortillas 66°–71° C Umido Aperto a metà
Capienza di mantenimento dei cibi
Un cassetto standard ha la capienza seguente:
Panini: 6–8 dozzine
Costine: 11–14 kg (25–30 lbs.)
Patate: 3–3-1/2 dozzine
48
N. di pubblicazione HDMCEM-0412
Page 49

MANUTENZIONE
AVVERTENZA
AVVISO
Informazioni Generali
I riscaldatori a cassetto DRAWERMAX sono stati progettati per
la massima durevolezza e prestazioni ottimali con un minimo di
manutenzione.
PERICOLO DI SCOSSA ELETTRIC:
• Scollegare il cavo di alimentazione o spegnere
l'interruttore generale a livello
dell'interruttore/sezionatore di circuito e lasciare
raffreddare l'unità prima di eseguire ogni intervento di
manutenzione o pulizia.
• NON immergere in acqua o inzuppare d’acqua. L’unità
non è impermeabile. Non usare l’unità se è stata
immersa in acqua o inzuppata d’acqua.
• Non pulire a vapore o usare una quantità eccessiva
d’acqua sull’unità.
• La costruzione di questa unità non è a prova di getto.
Non usare spruzzi a getto per pulire l’unità.
• Non pulire l’unità quando è sotto tensione o calda.
Questa unità non contiene parti su cui “l’utente” può
intervenire. Se l’unità richiede un intervento di assistenza
mettersi in contatto con un Agente di assistenza
autorizzato di Hatco o con il Reparto di assistenza di Hatco
al numero telefonico 414-671-6350; fax 414-671-3976.
Pulizia
Per conservare intatta la finitura e mantenere la performance
dell'unità, si consiglia di pulirla quotidianamente.
1. Spegnere l'unità, scollegare il cavo di alimentazione e
lasciarla raffreddare.
2. Estrarre e lavare tutte le teglie.
Usare solo agenti di pulizia non abrasivi. I detergenti
abrasivi possono graffiare la finitura dell’unità,
sciupandone l’aspetto e rendendo l’unità soggetta ad
accumulo di sporcizia.
3. Detergere le superfici con un panno umido. Per eliminare
le macchie ostinate si può usare una crema detergente non
abrasiva.
• Controllare e pulire anche l'interno dell'unità. Pezzi di
cibo possono cadere dalle teglie nella cavità del
cassetto. ATTENZIONE! Pericolo di ustioni — Non
pulire la cavità del cassetto se l'unità è accesa o
alimentata.
4. Pulire l'intera unità asciugare con un panno pulito e
asciutto.
N. di pubblicazione HDMCEM-0412
49
Page 50

AVVERTENZA
AVVERTENZA
GUIDA ALLA SOLUZIONE DEI PROBLEMI
Interventi sull’unità devono essere eseguiti solo da parte di
personale qualificato. Interventi da parte di persone non
qualificate possono risultare in scossa elettrica o ustione.
Pericolo di scossa elettrica: Scollegare il cavo di
alimentazione e lasciare che l’unità si raffreddi prima di
eseguire interventi di manutenzione e pulizia o prima di
cercare di sbloccare un inceppamento.
Sintomo Causa Probabile Intervento
L'unità è surriscaldata. Manopola di controllo della temperatura troppo
alta.
L'unità è inserita in una presa di corrente
inadatta.
Termostato interno difettoso. Rivolgersi per assistenza al rappresentante
L'unità è troppo fredda. L'unità non ha avuto tempo sufficiente per
riscaldarsi.
Manopola di controllo della temperatura troppo
bassa.
Cassetto non chiuso completamente. Assicurarsi che tutti i cassetti siano
Termostato interno difettoso. Rivolgersi per assistenza al rappresentante
Prodotto troppo asciutto. Apertura di ventilazione non chiusa. Aprire le aperture di ventilazione del cassetto.
Portare la manopola di controllo della
temperatura su un valore più basso.
Verificare con personale qualificato che
l'alimentazione corrisponda a quella indicata
nelle specifiche dell'unità.
autorizzato o direttamente ad Hatco.
Attendere 15-20 minuti che l'unità raggiunga la
temperatura di esercizio.
Portare la manopola di controllo della
temperatura su un valore più alto.
completamente chiusi.
autorizzato o direttamente ad Hatco.
Bacinella bagnomaria opzionale vuota o non
installata.
Prodotto troppo umido. Apertura di ventilazione aperta. Chiudere le aperture di ventilazione del cassetto.
Bacinella bagnomaria opzionale installata, ma
non necessaria.
L'unità non funziona. Il cavo di alimentazione dell'unità non è inserito
nella presa elettrica.
L'unità non è accesa. Portare l'interruttore generale ON/OFF sulla
Gli interruttori di circuito sono saltati. Reimpostare gli interruttori di circuito.
L'interruttore ON/OFF è difettoso. Rivolgersi per assistenza al rappresentante
Termostato interno difettoso. Rivolgersi per assistenza al rappresentante
L'elemento riscaldante è fulminato. Rivolgersi per assistenza al rappresentante
Installare e/o rabboccare la bacinella con acqua
pulita. Controllare il livello di umidità regolando le
aperture di ventilazione.
Estrarre la bacinella bagnomaria dal cassetto.
Inserire il cavo di alimentazione nella presa di
corrente appropriata.
posizione ON.
autorizzato o direttamente ad Hatco.
autorizzato o direttamente ad Hatco.
autorizzato o direttamente ad Hatco.
50
N. di pubblicazione HDMCEM-0412
Page 51

AVVISO
Rotelle di 76 mm (3″)
Rondella
OPZIONI E ACCESSORI
Rotelle
Le rotelle di 76mm (3″) o 102 mm (4″) sono disponibili per le
unità indipendenti al posto delle gambe. Attenersi alla seguente
procedura per installare le rotelle sulla base dell'unità.
Non adagiare l'unità sul davanti o sul retro onde evitare di
arrecarvi danni.
1. Rimuovere qualsiasi bacinella dai cassetti dell'unità.
2. Adagiare attentamente l'unità sul fianco destro o sinistro
(richiede due persone).
3. Rimuovere le gambe, se installate.
4. Installazione di una rotella.
Per installare una rotella da 76 mm (3″):
a. Inserire una rondella (fornita) sul perno filettato della
rotella.
b. Introdurre la rotella con la guarnizione in un foro da cui
è stato rimosso un piede. Serrare a fondo.
Vasca Acqua/Fuoriuscita
La vasca dell’acqua/ fuoriuscita va inserita nel cassetto sotto la
vasca del cibo e può essere utilizzata per umidificare l’area
riscaldante o mantenere la fuoriuscita dall'interno del mobiletto.
Si consiglia un paraschizzi.
Paraschizzi
Paraschizzi è utilizzato con la vasca dell’acqua / fuoriuscita
opzionale. Fabbricato in acciaio inossidabile, il paraschizzi si
inserisce sul fondo della vasca dell’acqua/fuoriuscita, sopra il
bagno d’acqua, per prevenire di schizzare la parte interna del
mobiletto quando si apre e si chiude un cassetto, permettendo
però all’umidità di uscire.
Installazione delle rotelle di 76 mm (3″)
Per installare una rotella da 102 mm (4″):
a. Allineare i fori della piastra di montaggio della rotella con
i fori della base dell’unità.
b. Fissare la rotella utilizzando le viti fornite. Avvitare
saldamente.
5. Ripetere i passo 4 per le altre tre rotelle.
6. Riportare l'unità in verticale (richiede due persone).
N. di pubblicazione HDMCEM-0412
51
Page 52

GARANZIA LIMITATA INTERNAZIONALE
1. GARANZIA SUL PRODOTTO
La Hatco garantisce che i prodotti di sua fabbricazione (i
"Prodotti"), in normali condizioni di uso e manutenzione, sono
esenti da difetti di materiale per un (1) anno dalla data di
acquisto, se installati e mantenuti in osservanza delle istruzioni
scritte della Hatco, oppure per 18 mesi dalla data di spedizione
dalla Hatco. L’acquirente deve confermare la data di acquisto
del prodotto registrando il prodotto con Hatco o per mezzo di
altri sistemi accettati da Hatco a sua totale discrezione.
La Hatco garantisce che i seguenti componenti del Prodotto
non presenteranno difetti materiali dalla data dell’acquisto (in
conformità alle condizioni di cui sopra) per la(e) durata(e) e le
condizioni di seguito elencate:
a) Due (2) giorni di garanzia per le parti:
Elementi del tostapane a convezione (guaina metallica)
Componenti scorrevoli del riscaldatore (rivestiti in metallo)
Riscaldatore , rulli del riscaldatore e scivoli del Riscaldatore
Elementi termostrisce (rivestiti in metallo)
Componenti del visualizzatore del riscaldatore
(riscaldamento ad aria rivestito in metallo )
Componenti di sostegno dell’armatura (impianto di
riscaldamento ad aria rivestito in metallo )
Elementi del pozzo riscaldato incorporato —
serie HWB (con protezione di metallo)
b) Un (1) anno parti e manodopera PIÙ quattro (4) anni
garanzia solo parti, a termini distribuiti
proporzionalmente che Hatco spiegherà
all'acquirente se così richiesto:
Serbatoi 3CS e FR
c) Dieci (10) giorni di garanzia per le parti:
Serbatoi di acqua calda ausiliari elettrici
Serbatoi di acqua calda ausiliari a gas
d) Novanta (90) giorni di garanzia per le parti:
Parti di ricambio
LE GARANZIE DI CUI SOPRA SONO ESCLUSIVE E
SOSTITUISCONO QUALSIASI ALTRA GARANZIA,
ESPRESSA O IMPLICITA, COMPRESA TRA L'ALTRO, LA
GARANZIA DI COMMERCIABILITÀ O ADEGUATEZZA PER
UNO SCOPO PARTICOLARE O DI PROTEZIONE DALLA
VIOLAZIONE DEI DIRITTI DI BREVETTO O DI ALTRO
GENERE DI PROPRIETÀ INTELLETTUALE. Senza limitare il
concetto generico di quanto sopra, DETTE GARANZIE NON
COPRONO: lampadine per lampade incandescenti rivestite,
lampade fluorescenti, lampadine per lampade di riscaldamento,
lampadine per lampade alogene rivestite, lampadine per
lampade di riscaldamento alogene, lampadine xenon, tubi LED,
componenti in vetro e fusibili, guasti del prodotto nella vasca
booster, nel tubo ad alette dello scambiatore di calore o in altra
attrezzatura per il riscaldamento dell'acqua causati da
calcinazione, accumulo di sedimentazione, agenti chimici o
congelamento, uso scorretto del prodotto, manomissione o
applicazione errata, installazione non corretta o applicazione di
tensione errata.
2.LIMITI DEGLI OBBLIGHI DI RIPARAZIONE E DI
RISARCIMENTO DANNI
La responsabilità di Hatco e l'esclusivo rimedio spettante
all'acquirente per quanto riportato di seguito, saranno limitati
esclusivamente alla sostituzione della parte di ricambio con parti
nuove o rigenerate, a scelta di Hatco, da parte di Hatco stessa
o di un centro di servizio autorizzato in relazione alla richiesta
effettuata entro il succitato periodo di garanzia pertinente. Hatco
si riserva il diritto di accettare o rifiutare eventuali reclami in tutto
o in parte. Nel contesto della presente Garanzia limitata,
"rigenerato" significa che una parte o un Prodotto è stato
riportato alle specifiche tecniche originali da Hatco o da
un'agenzia di servizio autorizzata da Hatco. La Hatco non
accetterà la restituzione dei propri Prodotti senza previa
approvazione scritta da parte della stessa e le spese di
spedizione saranno esclusivamente a carico dell’Acquirente.
LA HATCO DECLINA QUALSIASI RESPONSABILITÀ PER
EVENTUALI DANNI INDIRETTI O ACCIDENTALI, COMPRESI
TRA L'ALTRO I COSTI DI MANODOPERA O IL MANCATO
GUADAGNO CAUSATI DALL’UTILIZZO O
DALL’IMPOSSIBILITÀ DI UTILIZZARE I PRODOTTI O
DOVUTI AL MONTAGGIO DEI PROPRI PRODOTTI IN ALTRI
IMPIANTI O APPARECCHI.
INFORMAZIONI SUGLI INTERVENTI IN GARANZIA
La garanzia di tutti i riscaldatori a cassetto DRAWERMAX™ di
Hatco è di un anno dalla data d'acquisto o di diciotto mesi dalla
data di spedizione dallo stabilimento Hatco, quale che sia la
prima.
Se sorge un problema con un riscaldatore a cassetto durante
il decorso della garanzia:
Contattare il Rivenditore Locale Hatco
Quando si contatta il rivenditore Hatco per richiedere
assistenza, fornire le seguenti informazioni per assicurare la
celerità del servizio:
• Modello dell'apparecchio
• Numero di Serie (situate sul fondo dell'unità)
• Una Descrizione Accurata del Problema
• Data di Acquisto
• Nome dell'azienda
• Indirizzo di spedizione
• Nome e Numero Telefonico della Persona da Contattare
Il rivenditore Hatco:
• Fornirà i Ricambi Necessari
• Inoltrerà alla Hatco il Reclamo
Problemi non coperti dalla garanzia
Se sorge un problema non coperto dalla garanzia per il quale
è necessaria assistenza, rivolgersi al centro di servizio
autorizzato Hatco di zona. Per gli indirizzi dei centri di servizio:
• visitare il sito www.hatcocorp.com, selezionare il menu
"Resources" e fare clic su "Find Service Agent/Distributor".
• Chiamare l'assistenza Hatco al numero +1 414 671 6350.
• Scrivere all'assistenza Hatco all'indirizzo
partsandservice@hatcocorp.com.
52
N. di pubblicazione HDMCEM-0412
Page 53

ATTENTIE
VOORZICHTIG
WAARSCHUWING
INHOUD
Belangrijke Informatie Voor De Eigenaar .........................53
Inleiding ...............................................................................53
Belangrijke Veiligheidsinformatie .....................................54
Modelbeschrijving ..............................................................55
Modelaanduiding ................................................................55
Specificaties........................................................................56
Stekkerconfiguraties.........................................................56
Tabel met elektrische gegevens .......................................56
Afmetingen .......................................................................56
Installatie .............................................................................57
Algemeen .........................................................................57
De HDM-2-modellen installeren .......................................57
De HDM-2B-modellen installeren.....................................58
BELANGRIJKE INFORMATIE VOOR DE EIGENAAR
Noteer het modelnummer, serienummer (Aan de achterkant
van alleenstaande toestellen en binnenin aan het linker paneel
bij ingebouwde toestellen), de spanning en de aankoopdatum
van uw unit in de ruimte onderaan. Zorg ervoor dat u deze
informatie ter beschikking hebt als u Hatco voor service belt.
Modelnr. ______________________________________
Serienr. ______________________________________
Spanning ____________________________________
Aankoopdatum ________________________________
Registreer uw apparaat!
Als u online de garantieregistratie invult kunt u vertargingen bij
het bekomen van uw garantievoordelen vermijden. Ga naar
de Hatco-website op www.hatcocorp.com, selecteer the
Onderdelen&Onderhoud menu en klik op “Garantieregistratie”.
Werking................................................................................59
Algemeen .........................................................................59
Voedselbewaargids ..........................................................59
Onderhoud ..........................................................................60
Algemeen .........................................................................60
Reinigen ...........................................................................60
Oplossen van Problemen ..................................................61
Opties en Accessoires .......................................................62
Internationale Beperkte Garantie ......................................63
Informatie over Garantieservice........................................63
Kantooruren:
8:00 uur tot 17:00 uur
Central Standard Time (CET – 7 uur)
(Zomeruren: juni tot september –
8:00 uur tot 17:00 uur CST
maandag tot donderdag
8:00 uur tot 14:30 uur CST op vrijdag)
Telefoon: +1-414-671-6350
E-mail: partsandservice@hatcocorp.com
Fax: +1-414-671-3976
(Onderdelen en service)
Bijkomende informatie vindt u op onze website:
www.hatcocorp.com.
Hatco DRAWERMAX™ schuifverwarmers zijn ontworpen om
voedingswaren op de optimale serveertemperatuur te houden
zonder de kwaliteit ervan te verminderen. Ze zijn gebouwd voor
groot keukenwerk, met een constructie uit roestvrij staal,
resistent gereedschap, roestvrij stalen schalen en poitief
sluitende schuiven. DRAWERMAX Schuifverwarmers houden
alles, van vlees tot groenten en wraps, warm en smaakvers
totdat het geserveerd wordt.
De Hatco DRAWERMAX Schuifverwarmers zijn producten
waar extensief onderzoek en research naar gevoerd wordt. De
gebruikte materialen worden gekozen voor een maximale
duurzaamheid, hun aantrekkelijke uitzicht en optimale
prestaties. Voor het de fabriek verlaat, wordt elk toestel grondig
geïnspecteerd en getest.
In deze handleiding vindt u instructies voor de installatie, het
veilige gebruik en de bediening van de Hatco DRAWERMAX
Toaster. Hatco raadt aan om alle installatie-, bedienings- en
veiligheidsinstructies in deze handleiding te lezen voordat het
apparaat wordt geïnstalleerd of bediend.
Formulier nr. HDMCEM-0412
INLEIDING
De veiligheidsinformatie in deze handleiding wordt voorafgegaan
door een tekstkader met een van de volgende termen:
WAARSCHUWING wijst op een gevaarlijke situatie die, als
ze niet wordt vermeden, tot ernstige of dodelijke letsels kan
leiden.
VOORZICHTIG wijst op een gevaarlijke situatie die, als ze
niet wordt vermeden, tot lichte of vrij ernstige letsels kan
leiden.
ATTENTIE wordt gebruikt om uw aandacht te vestigen op
praktijken die niet tot lichamelijke letsels leiden.
53
Page 54

WAARSCHUWING
ATTENTIE
VOORZICHTIG
WAARSCHUWING
BELANGRIJKE VEILIGHEIDSINFORMATIE
Lees de volgende belangrijke veiligheidsinformatie om mogelijk dodelijk letsel te voorkomen
en om schade aan het apparaat of materiaal te voorkomen.
GEVAAR VOOR ELEKTRISCHE SCHOKKEN:
• Steek de stekker van het apparaat alleen in een naar
behoren geaard stopcontact met de correcte spanning,
grootte en stekkerconfiguratie. Als de stekker en het
stopcontact niet passen, neemt u contact op met een
gekwalificeerd elektricien om een stopcontact met de
correcte spanning en grootte te installeren.
• Zet de stroomschakelaar UIT, trekt de stekker uit het
stopcontact/zet zekering uit en laat het toestel afkoelen
voordat u het reinigt of een onderhoud uitvoert.
• Dompel het apparaat NIET onder en maak het ook NIET
kletsnat. Het apparaat is niet waterbestendig. Gebruik
het apparaat niet als het onder werd gedompeld of erg
nat werd gemaakt.
• Het apparaat is niet weerbestendig. Gebruik het
apparaat alleen binnenshuis op een plaats waar de
omgevingstemperatuur minimaal 21°C bedraagt.
• Maak het apparaat niet schoon met stoom en gebruik
ook niet al te veel water.
• De constructie van dit apparaat is niet bestand tegen
hogedrukspuiten. Gebruik geen sprays met een
spuitstraal om dit apparaat schoon te maken.
• Trek niet aan het elektrische snoer van het apparaat.
• Gebruik het apparaat niet langer wanneer het
elektrische snoer gerafeld of versleten is.
• Probeer een beschadigd elektrisch snoer niet te
herstellen of vervangen. Het snoer moet door Hatco,
een erkende Hatco servicevertegenwoordiger of een
persoon met vergelijkbare kwalificaties worden
vervangen
• Maak het apparaat niet schoon als het onder stroom
staat of nog warm is.
• Laat geen vloeistoffen in het apparaat lopen.
• Gebruik alleen authentieke Hatco
vervangingsonderdelen als het apparaat moet worden
hersteld. Als er geen authentieke Hatcovervangingsonderdelen worden gebruikt, komen alle
garanties te vervallen en kunnen de gebruikers van de
apparatuur aan gevaarlijke elektrische spanning
worden blootgesteld, wat kan resulteren in elektrische
schokken of brandwonden. Authentieke Hatco
vervangingsonderdelen zijn specifiek ontworpen om
veilig te werken in de omgevingen waarin ze worden
gebruikt. Sommige niet-authentieke of generieke
vervangingsonderdelen hebben niet de vereiste
eigenschappen om veilig te kunnen werken in
apparaten van Hatco.
BRANDGEVAAR:
• Plaats het apparaat op ten minste 25 mm afstand van
brandbare wanden en materialen. Als de
veiligheidsafstand niet wordt gerespecteerd kan
ontbranding of verkleuring optreden.
• Gebruik geen chemicaliën als bleekwater (of
reinigingsproducten die bleekwater bevatten),
ovenreinigers of brandbare reinigingsoplossingen om
dit apparaat te kuisen.
Zorg dat het voedsel tot op de veilge
warmhoudtemperatuur is verwarmd alvorens het op het
apparaat te plaatsen. Als het voedsel niet tot op de juiste
temperstuur is verwarmd, kan dit ernstige risico's voor de
gezondheid tot gevolg hebben. Dit apparaat is uitsluitend
bestemd voor het warmhouden van voorverwarmd
voedsel.
Dit apparaat is niet bestemd voor gebruik door kinderen of
personen met beperkte lichamelijke, gevoels- of mentale
capaciteiten. Zorg voor een goede toezicht en houd
kinderen uit de buurt van het apparaat.
Zorg dat alle bedieners van het apparaat goede instructies
hebben ontvangen betreffende het veilige en juiste gebruik
van het apparaat.
Onderhoud aan en herstellingen van dit apparaat mogen
alleen worden uitgevoerd door bevoegd personeel. Als
onbevoegd personeel het onderhoud of de herstelling
uitvoert kan dat tot elektrische schokken of brandwonden
leiden.
Dit apparaat bevat geen onderdelen die door de gebruiker
kunnen worden vervangen. Als het apparaat moet worden
hersteld neemt u contact op met een erkend Hatco
servicevertegenwoordiger of de Hatco serviceafdeling op
het nummer +1-414-671-6350; fax +1-414-671-3976.
GEVAAR VOOR BRANDWONDEN:
• Sommige oppervlakken aan de buitenkant van het
apparaat worden heet. Wees voorzichtig wanneer u
deze oppervlakken aanraakt.
• Open de schuif voorzichtig. Er komt hete lucht vrij
wanneer de schuif geopend wordt.
Tijdens de eerste ingebruikneming kunnen standaard en
erkende industriële oliën tot 30 minuten rookvorming
veroorzaken. Dit is een toestand van voorbijgaande aard.
Om een veilig gebruik te garanderen laat u het toestel
zonder voedingswaren werken tot de rook is verdwenen.
Plaats het apparaat op een hoogte en een plaats waar er
gemakkelijk mee kan worden gewerkt. Het oppervlak moet
waterpas zijn om te voorkomen dat het apparaat of de
inhoud ervan per ongeluk zou vallen en moet sterk genoeg
zijn om het gewicht van het toestel en de inhoud te kunnen
dragen.
Leg het toestel niet op de voor- of achterkant. Anders kan
het toestel beschadigd geraken.
Gebruik uitsluitend niet-schurende schoonmaakmiddelen.
Schurende schoonmaakmiddelen kunnen krassen op de
finish van het apparaat veroorzaken die ontsierend zijn en
tot vuilophoping leiden.
54
Formulier nr. HDMCEM-0412
Page 55

H D M - X B
Hatco
DRAWERMAX
Ingebouwd
Hoeveelheid schuiven
MODELBESCHRIJVING
Alle Modellen
Alle Hatco DRAWERMAX™ Schuifverwarmers zijn gebouwd
uit een ruige constructie met duurzame nylon wielen, 12
schalen uit roestvrij staal en resistente materialen. Elke schuif
bevat luchtgaten om de vochtigheid te regelen, een AAN/UITstroomschakelaar, een TEMPERATUURregelknop en een
temperatuurmeter. Standaard pannen van 152 mm diep worden
meegeleverd bij elke schuif. De geïsoleerde bovenkant en
zijkanten zorgen voor een maximale energiezuinigheid en voor
de verwarmingselementen is er een garantie van twee jaar. Alle
moodellen van de HDM-serie bevatten een stroomsnoer van
1.829 mm met stekker.
Model HDM-2
Model HDM-2 is een alleenstaand model met twee schuiven.
Het is uitgerust met poten van 102 mm.
OPMERKING :Raadpleeg het hoofdstuk OPTIES EN
TOEBEHOREN voor alle beschikbare opties
en toebehoren.
Model HDM-2B
Model HDM-2B is ingebouwd toestel met twee schuiven.
Model HDM-2B
Model HDM-2
MODELAANDUIDING
Formulier nr. HDMCEM-0412
55
Page 56

WAARSCHUWING
CEE 7/7 Schuko BS-1363
AS 3112
NEMA 5-15P
A B
D E
C
Vooraanzicht Zijaanzicht
A
B
F
C
G
Vooraanzicht Zijaanzicht
SPECIFICATIES
Stekkerconfiguraties
De apparaten worden met een op de fabriek geïnstalleerd
elektriciteitssnoer met stekker geleverd. Stekkers worden
geleverd volgens de toepassingen.
GEVAAR VOOR ELEKTRISCHE SCHOKKEN: Steek de
stekker van het apparaat alleen in een naar behoren geaard
stopcontact met de correcte spanning, grootte en
stekkerconfiguratie. Als de stekker en het stopcontact niet
passen, neemt u contact op met een gekwalificeerd
elektricien om een stopcontact met de correcte spanning
en grootte te installeren.
OPMERKING :Het specificatielabel zit bij aleenstaande
modellen aan de achterkant van het toestel en
bij ingebouwde modellen binnenin aan het
linker paneel. Raadpleeg het etiket voor het
serienummer en informatie over de elektriciteit
van het apparaat.
OPMERKING: Stopcontact niet door Hatco geleverd.
Tabel met elektrische gegevens
Model Spanning Watts Ampère Stekkerconfiguratie Verzendgewicht
Stekkerconfiguraties
HDM-2
HDM-2B
De elektrische informatie in de gearceerde gebieden heeft uitsluitend betrekking op Internationale modellen.
OPMERKING: Verzendgewicht is inclusief verpakking.
120 900 7.5
230 (CE) 984 4.3
120 900 7.5
230 (CE) 984 4.3
NEMA 5-15P
CEE 7/7 Schuko, BS-1363, or AS 3112
NEMA 5-15P
CEE 7/7 Schuko, BS-1363, or AS 3112
Afmetingen
Breedte
Model
HDM-2 749 mm
HDM-2B 743 mm
(A)
(29-1/2″)
(29-1/4″)
Diepte
(B)
576 mm
(22-3/4″)
568 mm
(22-3/8″)
Hoogte
(C)
614 mm
(24-3/16″)
512 mm
(20-3/16″)
Breedte
Tussen
Buitenkant
Pootjes (D)
629 mm
(24-3/4″)
--- ---
Diepte
Tussen
Buitenkant
Pootjes (E)
484 mm
(19-1/16″)
Ingebouwde
Breedte
715 mm
(28-1/8″)
68 kg (150 lbs.)
68 kg (150 lbs.)
67 kg (147 lbs.)
67 kg (147 lbs.)
Ingebouwde
Diepte
(F)
--- ---
(G)
483 mm
(19-1/16″)
HDM-2 Afmetingen
HDM-2B Afmetingen
56
Formulier nr. HDMCEM-0412
Page 57

ATTENTIE
WAARSCHUWING
Poot van 102 mm
Verlengen
Verkorten
Aanpasbare
Tip
INSTALLATIE
Algemeen
DRAWERMAX™ Schuifverwarmers worden verzonden met de
meeste onderdelen al ingebouwd. Wees voorzichtig bij het
uitpakken van de verzenddoos om schade aan het apparaat
en de onderdelen te vermijden.
GEVAAR VOOR ELEKTRISCHE SCHOKKEN: Het apparaat
is niet weerbestendig. Gebruik het apparaat alleen
binnenshuis op een plaats waar de omgevingstemperatuur
minimaal 21°C bedraagt.
BRANDGEVAAR: Plaats het apparaat op ten minste 25 mm
afstand van brandbare wanden en materialen. Als de
veiligheidsafstand niet wordt gerespecteerd kan
ontbranding of verkleuring optreden.
Leg het toestel niet op de voor- of achterkant. Anders kan
het toestel beschadigd geraken.
1. Haal het apparaat uit de doos.
2. Verwijder het informatiepakket uit de schuif van het toestel.
NOTE: Om vertraging bij een garantiedekking te vermijden,
vult u het best de online garantieregistratie in. Zie het
hoofdstuk BELANGRIJKE GEBRUIKERSINFORMATIE
voor meer informatie.
3. Haal de tape en beschermlaag van alle oppervlakken van
het apparaat.
4. Plaats het apzparaat op de gewenste plaats.
• Plaats het apparaat in een ruimte waar de omgevende
luchttemperatuur constant is en minstens 21°C (70°F)
bedraagt. Vermijd ruimten waar er veel luchtbeweging
of toch is (i.e. naast afzuigventilatoren/afzuigkappen en
airconditioningleidingen).
• Zorg ervoor dat het toestel geplaatst wordt op een vaste
rechte vloer, of in een resitstente kast.
• Zorg ervoor dat het apparaat op een hoogte en een
plaats staat waar er gemakkelijk mee kan worden
gewerkt.
5. Het toestel installeren. Raadpleeg de geschikte
installatieprocedure in dit hoofdstuk.
De HDM-2-modellen installeren
De HDM-2 modellen zijn alleenstaande toestellen waarvoor de
poten van 102 mm moeten worden geïnstalleerd voordat u het
toestel gebruikt.
1. Verwijder de plastic zak met de vier poten uit de schuif.
2. Leg het toestel voorzichtig op een kant (hiervoor zijn twee
personen nodig).
3. Installeer elke poot. Schroef de poten vast met de hand.
Schroef ze niet te hard vast.
4. Plaats het toestel terug in zijn normale rechte positie
(hiervoor zijn twee personen nodig). Als de kast niet recht
staat, draait u aan de aanpasbare tip van het juiste pootje
om de kast recht te krijgen.
Installatie van de poten
Formulier nr. HDMCEM-0412
57
Page 58

721 mm
(28-3/8″)
25 mm
(1″)
489 mm
(19-1/4″)
603 mm
(23-3/4″)
Vooraanzicht
Zijaanzicht
Vergrendelstrip
22.2 mm
(0.875″)
3.2 mm
(0.125″)
Schuifverwarmingsmof
Vergrendelstrip
Zicht van
de kast
Vergrendelingen (onderaan)
INSTALLATIE
De HDM-2B-modellen installeren
De HDM-2B modellen zijn ingebouwde toestellen die moeten
worden geïnstalleerd in een kast voordat u ze gebruikt.
1. Snijd de geschikte opening uit in de kast. Raadpleeg de
illustratie hieronder voor de correcte afmetingen.
5. Plaats het toestel gedeeltelijk in de opening en zorg ervoor
dat het snoer goed in de opening zit.
6. Voordat u het toestel volledig in de opening plaatst plaatst
u een door de National Sanitation Foundation
goedgekeurde verzegeling tussen de schuifverwarmerfmof
en de kast.
7. Schuif het toestel in de opnening totdat de voorste
vergrendilingen achter de vergrendelinsstrips vastklikken.
Om de installatie te controleren trekt u de onderste schuif
voorzichtig volledig open en kijkt u of het toestel op zijn
plaats blijft.
OPMERKING : Behoud een minimale afstand van 25 mm
2. Bevestig een ergrendelingsstrip (niet meegeleverd) aan de
3. Zorg ervoor dat een goed geaard stopcontact met een
4. Steek het stroomsnoer van het toestel in het stopcontact.
Afmetingen uitsnij- en vergrendelingsstrips
tussen de uitgesneden opening en de vloer.
onderste lip, binnenin de kastopening.
correcte spanning (volt), grootte en stekkerconfiguratie
voorzien is in de kast. Zie de rubriek SPECIFICATIES voor
meer informatie.
Ingebouwde installatie
58
Formulier nr. HDMCEM-0412
Page 59

Schuifopeningen
Openingsknop
VOORZICHTIG
WAARSCHUWING
Bediening van
de Bovenste
Schuif
Bediening van
de Onderste
Schuif
Temperatuurmeter
Grafiek met
AANBEVOLEN
INSTELLINGEN
TemperatuurBediening
Kleurkeuzetimerknop
POWER ON/OFF
(I/O) schakelaar
WERKING
Algemeen
Volg de volgende procedure om de DRAWERMAX™
Schuifverwarmers te bedienen. Elke schuif kan afhankelijk
worden bediend of gecontroleerd met behulp van de
aanpasbare schuiverwarmingsopeningen voor
vochtigheidsregeling en met de AAN/UIT-stroomschakelaar
(I/O) en temperatuurmeter.
Lees alle veiligheidsvoorschriften onder Belangrijke
veiligheidsinformatie voor u dit apparaat bedient.
Opstarten
1. Voor alleenstaande toestellen steekt u de stekker van het
apparaat alleen in een naar behoren geaard stopcontact
met de correcte spanning, grootte en stekkerconfiguratie.
Zie het hoofdstuk SPECIFICATIES voor meer informatie.
2. Zet de aan/uit (I/O)-schakelaar in de stand ON (I) (aan).
3. Draai de TEMPERATUUR-bedieningsknop(pen) in de
gewenste stand(en). Zie de grafiek met aanbevolen
instellingen of de Voedselbewaargids in dit hoofdstuk.
Tijdens de eerste ingebruikneming kunnen standaard en
erkende industriële oliën tot 30 minuten rookvorming
veroorzaken. Dit is een toestand van voorbijgaande aard.
Om een veilig gebruik te garanderen laat u het toestel
zonder voedingswaren werken tot de rook is verdwenen.
GEVAAR VOOR BRANDWONDEN:
• Sommige oppervlakken aan de buitenkant van het
apparaat worden heet. Wees voorzichtig wanneer u
deze oppervlakken aanraakt.
• Open de schuif voorzichtig. Er komt hete lucht vrij
wanneer de schuif geopend wordt.
4. Laat het toestel 15-20 minuten opwarmen.
5. Pas de vochtigheidsopeningen aan door aan de
openingsknop aan de voorkant van de schuif te draaien.
Als u de openingen helemaal openzet kan de vochtigheid
volledig ontsnappen.
OPMERKING :De geschikte openingsinstelling hangt af van
de hoeveelheid voedsel en de frequentie
waarmee de schuif wordt geopend.
Uitschakelen
1. Zet de aan/uit (I/O)-schakelaar in de stand OFF (0) (uit).
Schuifopeningen
2. Laat het toestel afkoelen voordat u het reinigt of een
onderhoud uitvoert.
HDM-2 Bedieningspaneel
Voedselbewaargids
Aanbevolen Type Openings
Product Bewaartemperatuur Warmte Instelling
Wraps, hard 71°–85°C (160°–185°F) Droog Gesloten
Wraps, zacht 66°–79°C (150°–175°F) Vochtig Halfopen
Groenten 79°–85°C (175°–185°F) Vochtig Halfopen
Vlees, gevogelte 74°–85°C (165°–185°F) Droog Gesloten
Vis 74°–85°C (165°–185°F) Vochtig Open
Stoofpotjes 66°–79°C (150°–175°F) Droog Gesloten
Taarten, desserts 71°–85°C (160°–185°F) Droog Gesloten
Tacos, Tortillas 66°–71°C (150°–160°F) Vochtig Halfopen
Voedselbewaarcapaciteit
Een standaard schuif bezit de volgende capaciteit:
Dinner Rolls: 6–8 dozijn
Ribben: 11–14 kg (25–30 lbs.)
Aardappelen: 3–3-1/2 dozijn
Formulier nr. HDMCEM-0412
59
Page 60

ONDERHOUD
WAARSCHUWING
ATTENTIE
Algemeen
De DRAWERMAX™ Verwarmingsschuiven zijn ontwikkeld
voor een maximale duurzaamheid en maximale prestaties met
een minimaal onderhoud.
GEVAAR VOOR ELEKTRISCHE SCHOKKEN:
• Trek de stekker uit het stopcontact en schakel de
stroom UIT bij de van een zekering voorziene
contactverbreker/stroomonderbreker en laat de
eenheid afkoelen alvorens tot onderhoud of
schoonmaak over te gaan.
• Dompel het apparaat NIET onder en maak het ook NIET
kletsnat. Het apparaat is niet waterbestendig. Gebruik
het apparaat niet als het onder werd gedompeld of erg
nat werd gemaakt.
• Maak het apparaat niet schoon met stoom en gebruik
ook niet al te veel water.
• De constructie van dit apparaat is niet bestand tegen
hogedrukspuiten. Gebruik geen sprays met een
spuitstraal om dit apparaat schoon te maken.
• Maak het apparaat niet schoon als het onder stroom
staat of nog warm is.
Dit apparaat bevat geen onderdelen die door de gebruiker
kunnen worden vervangen. Als het apparaat moet worden
hersteld neemt u contact op met een erkend Hatco
servicevertegenwoordiger of de Hatco serviceafdeling op
het nummer +1-414-671-6350; fax +1-414-671-3976.
Reinigen
Om de afwerking en de prestaties van het apparaat te
beschermen, wordt aanbevolen het apparaat dagelijks te
reinigen.
1. Schakel het apparaat uit, off the unit, trek de stekker uit het
ctopcontact en laat het apparaat afkoelen.
2. Verwijder alle voedselpannen en reinig ze.
Gebruik uitsluitend niet-schurende schoonmaakmiddelen.
Schurende schoonmaakmiddelen kunnen krassen op de
finish van het apparaat veroorzaken die ontsierend zijn en
tot vuilophoping leiden.
3. Reinig de oppervlaktes met een vochtige doek. Op
moeilijke vlekken mag een niet-schurend crèmeschoonmaakmiddel worden gebruikt.
• Controleer en reinig ook de binnenkant van het toestel.
Er kunnen voedselstukjes uit de voedselpannen in de
schuifholtes vallen. VOORZICHTIG!
Verbrandingsgevaar — Reinig het toestel niet
wanneer het snoer verbonden is met een
stopcontact!
4. Veeg het geheel droog met een schone, droge doek.
60
Formulier nr. HDMCEM-0412
Page 61

OPLOSSEN VAN PROBLEMEN
WAARSCHUWING
WAARSCHUWING
Onderhoud aan en herstellingen van dit apparaat mogen
alleen worden uitgevoerd door bevoegd personeel. Als
onbevoegd personeel het onderhoud of de herstelling
uitvoert kan dat tot elektrische schokken of brandwonden
leiden.
GEVAAR VOOR ELEKTRISCHE SCHOKKEN: Trek de stekker
uit het stopcontact en schakel de stroom UIT bij de van een
zekering voorziene contactverbreker/stroomonderbreker en
laat de eenheid afkoelen alvorens tot onderhoud of
schoonmaak over te gaan.
Symptoom Mogelijke Oorzaak Corrigerende-Maatregel
Apparaat te warm. Temperatuurknop te hoog ingesteld. Zet de temperatuurknop naar een lagere stand.
Apparaat niet warm
genoeg.
Apparaat op onjuiste voedingsbron aangesloten. Controleer met bevoegd personeel of de
Interne thermostaat defect. Neem contact op met een erkend
Het toestel kreeg niet voldoende tijd om op te
warmen.
Temperatuurknop te laag ingesteld. Zet de temperatuurknop naar een hogere stand.
Schuif/schuiven niet volledig gesloten. Zorg ervoor dat alle schuiven volledig gesloten
Interne thermostaat defect. Neem contact op met een erkend
voedingsbron overeenstemt met de specificaties
van het apparaat.
servicevertegenwoordiger of met Hatco voor
assistentie.
Laat het toestel 15-20 minuten opwarmen.
zijn.
servicevertegenwoordiger of met Hatco voor
assistentie.
Product te droog. Schuifopening in gesloten stand. Plaats schuifopening in open stand.
Optionele waterpan leeg of niet geïnstalleerd. installer en/of vul waterpan met water. Regel het
Product te vochtig. Schuifopening in open stand. Plaats schuifopening in gesloten stand.
Optionele waterpan geïnstalleerd, maar niet
nodig.
Apparaat werkt helemaal
niet.
Stekker van apparaat zit niet in stopcontact. Sluit het apparaat op de juiste voedingsbron aan.
Apparaat niet ingeschakeld. Zet de ON/OFF-schakelaar in de stand ON (aan).
Zekering gesprongen. Zet de zekering terug aan.
AAN/OFF-schakelaar defect. Neem contact op met een erkend
Interne thermostaat defect. Neem contact op met een erkend
Verwarmingselement is doorgebrand. Neem contact op met een erkend
vochtniveau met de schuifopeningen.
Verwijder de waterpan uit de schuif.
servicevertegenwoordiger of met Hatco voor
assistentie.
servicevertegenwoordiger of met Hatco voor
assistentie.
servicevertegenwoordiger of met Hatco voor
assistentie.
Formulier nr. HDMCEM-0412
61
Page 62

ATTENTIE
76 mm (3″) Wielen
Sluitring
OPTIES EN ACCESSOIRES
Wielen
76 mm (3″) of 102 mm (4″) wielen in plaats van poten zijn
beschikbaar voor aleenstaande modellen. Volg deze procedure
om de wielen te installeren onderaan het toestel.
Leg het toestel niet op de voor- of achterkant. Anders kan
het toestel beschadigd geraken.
1. Verwijder de pannen uit de schuiven van het toestel.
2. Leg het toestel voorzichtig op zijn rechter kant (hiervoor
zijn twee personen nodig).
3. Verwijder de poten, indien die geïnstalleerd zijn.
4. Het installeren van een zwenkwieltje.
Het installeren van een zwenkwieltje van 76 mm (3"):
a. Plaats een sluitring (meegeleverd) over het bedrade
gedeelte van de wielen.
b. Schroef het zwenkwieltje met sluitring in het gaatje waar
de poot verwijderd is. Maak stevig vast.
Water/Morspan
De water/morspan past in de schuif onder de voedselpan en
kan zorden gebruikt om de verwarmingsruimte te bevochtigen
of om gemorst eten op te vangen. Een splashbodem is
aanbevolen.
Splashbodem
De splashbodem wordt gebruikt met de optionele
water/morspan. De bodem is vervaardigd uit roestvrij staal en
past in de bodem van de water/mprspan, over het waterbad,
om te voorkomen dat er water binnenin de kast wordt gemorst
wanneer u een schuif opent of sluit, terwijl de vochtigheid toch
kan ontsnappen.
De 76 mm (3″) wielen installeren
Het installeren van een zwenkwieltje van 102 mm (4"):
a. Breng de gaten op de plaat met zwenkwieltje op één lijn
met de gaten aan de onderkant van het toestel.
b. Bevestig het zwenkwieltje met de bijgeleverde
schroeven. Draai stevig vast.
5. Herhaal stap 4 voor de overblijvende wielen.
6. Plaats het toestel terug in zijn normale rechte positie
(hiervoor zijn twee personen nodig).
62
Formulier nr. HDMCEM-0412
Page 63

INTERNATIONALE BEPERKTE GARANTIE
1. PRODUCTGARANTIE
Hatco garandeert dat de producten die zij vervaardigt (de
"Producten") vrij zijn van materiaalfouten bij normaal gebruik
en onderhoud, gedurende de periode van één (1) jaar vanaf de
aankoopdatum als ze geïnstalleerd en onderhouden worden in
overeenstemming met de schriftelijke instructies van Hatco of
gedurende 18 maanden na datum van verzending door Hatco.
De koper van het product moet de aankoopdatum valideren
door het product te registreren bij Hatco of door andere
bevredigende middelen naar Hatco's eigen goeddunken.
Hatco garandeert dat de volgende productonderdelen vrij zijn
van defecten in materialen vanaf de aankoopdatum
(onderhevig aan de voorafgaande voorwaarden) voor de
periode(n) in overeenstemming met de voorwaarden die
hieronder worden gespecificeerd:
a) Twee (2) jaar garantie op onderdelen:
Elementen bandtoaster (bekleed met metaalplaten)
Schuifverwarmingselementen (metalen bekleding)
Schuifverwarmer schuifrollers en glijdingen
Elementen van verwarmingsstrip (metalen bekleding)
Uitstalverwarmingselementen
(luchtverwarming met metalen bekleding)
Elementen van het wachtcabinet (luchtverwarming met
metalen bekleding)
Ingebouwde elementen van warmhoudketel —
HWB-serie (met metalen bekleding)
b) Eén jaar (1) garantie op onderdelen en uurloon PLUS
vier (4) jaar garantie uitsluitend op onderdelen met
inachtneming van pro-ratabepalingen die Hatco aan
de Koper toelicht indien de Koper daarom verzoekt:
3CS- en FR-tanks
c) Tien (10) jaar garantie op onderdelen:
Extra elektrische boilers
Extra gasboilers
d) Negentig (90) dagen garantie op onderdelen:
Vervangingsonderdelen
DE VOORAFGAANDE GARANTIES ZIJN EXCLUSIEF EN
VERVANGEN ALLE ANDERE GARANTIES, OFWEL
UITDRUKKELIJK OF GEÏMPLICEERD, MET INBEGRIP VAN,
MAAR NIET BEPERKT TOT, ENIGE GEÏMPLICEERDE
GARANTIE VAN VERKOOPBAARHEID, OF GESCHIKTHEID
VOOR EEN BEPAALD DOEL, OF OCTROOI, OF ANDERE
INBREUK OP INTELLECTUELE EIGENDOMSRECHTEN.
Zonder de algemeenheid van het voorafgaande te beperken
DEKKEN ZULKE GARANTIES NIET HET VOLGENDE:
Gloeilampen met coating, fluorescentielampen,
verwarmingspeertjes van lampverwarmer, glazen onderdelen,
defecten in aanjagertank, xenongloeilampen, LED-buizen,
warmtewisselaar met koelribben of andere waterverwarmingsvoorzieningen veroorzaakt door verkalking, de afzetting van
sediment, chemische aantasting of bevriezing, misbruik van,
het knoeien aan of het verkeerd gebruiken van het Product,
verkeerde installatie of het gebruik van een verkeerd voltage.
2. BEPERKING VAN REMEDIES EN SCHADE
De aansprakelijkheid van Hatco en de exclusieve
rechtsmiddelen van kopers hieronder zullen enkel en alleen
beperkt zijn tot vervanging van onderdelen of productgebruik,
naar keuzen van Hatco, nieuwe of opgeknapte onderdelen of
producten of een door Hatco geautoriseerd servicebedrijf met
betrekking tot enige claims die ingediend worden binnen de
toepasselijke garantieperiode waarnaar hierboven verwezen
wordt. Hatco behoudt zich het recht voor om elke dergelijke
vordering geheel of gedeeltelijk te aanvaarden of te verwerpen.
In de context van deze beperkte garantie betekent “opgewerkt”
een onderdeel of Product dat door Hatco of een door Hatco
erkend serviceagentschap terug volgens de originele
specificaties is ingesteld.Hatco aanvaardt geen geretourneerde
Producten zonder voorafgaandelijk verkregen schriftelijke
toestemming van Hatco, en alle onkosten voor goedgekeurde
geretourneerde producten zijn ten laste van de Koper. ONDER
GEEN ENKELE OMSTANDIGHEDEN ZAL HATCO
AANSPRAKELIJK GESTELD WORDEN VOOR
GEVOLGSCHADE OF BIJKOMENDE SCHADE, MET
INBEGRIP VAN, MAAR NIET BEPERKT TOT,
ARBEIDSONKOSTEN OF WINSTDERVING
RESULTERENDE VAN HET GEBRUIK VAN OF HET
ONVERMOGEN DE PRODUCTEN TE GEBRUIKEN, OF VAN
DE PRODUCTEN DIE GEÏNCORPOREERD WORDEN IN OF
EEN ONDERDEEL WORDEN VAN ENIG ANDER PRODUCT
OF ENIGE ANDERE GOEDEREN.
INFORMATIE OVER GARANTIESERVICE
De garantie voor de Hatco DRAWERMAX™ Draagbare
voedselverwarmers is voor één jaar, beginnende vanaf de dag
van de aankoop, of voor een periode van achttien maanden na
de verzending door Hatco. de periode die het eerst verstrijkt is
van toepassing.
Gelieve het volgende te doen wanneer u binnen de
garantieperiode een probleem ondervindt met de
kuipverwarmer.
Contact opnemen met een Plaatselijke Hatco-dealer
Wanneer u contact opneemt met een Hatco-dealer voor hulp
en service, geef de dealer dan de volgende informatie om
verzekerd te zijn van onmiddellijke behandeling:
• Model van de unit
• Serienummer (op de onderkant van het apparaat)
• Het Specifieke Probleem met de unit
• Aankoopdatum
Formulier nr. HDMCEM-0412
• Naam van uw Bedrijf
• Verzendadres
• Naam en Telefoonnummer van Contactpersoon
De Hatco-dealer doet het Volgende:
• Vereiste Vervangende Onderdelen Verschaffen
• Garantieclaim aan Hatco zenden voor Verwerking
Problemen buiten de garantie
Als u een probleem hebt buiten de garantie dat ondersteuning
vereist, gelieve het dichstbijzijnde door Hatco geauthoriseerd
onderhoudsbedrijf te contacteren. Om het dichstbijzijnde
onderhoudsbedrijf te vinden:
• gan naar onze website www.hatcocorp.com, selecteer de
Resources menu, en klik op “Find Service
Agent/Distributor”
• bel Hatco Service op 414-671-6350
• e-mail Hatco Service naar partsandservice@hatcocorp.com
63
Page 64

HATCO CORPORATION
P.O. Box 340500
Milwaukee, WI 53234-0500 U.S.A.
Telephone (414) 671-6350
International Fax (414) 671-3976
partsandservice@hatcocorp.com
www.hatcocorp.com
Register online!
See IMPORTANT OWNER INFORMATION
for more information.
Registrieren Sie Ihr Gerät online!
Einzelheiten finden Sie im Abschnitt WICHTIGE
BESITZERINFORMATIONEN.
¡Regístrese en línea!
Consulte la sección INFORMACIÓN IMPORTANTE
PARA EL PROPIETARIO para obtener informatción.
S'inscrire en ligne!
Lisez la section INFORMATIONS IMPORTANTES
POUR LE PROPRIETAIRE pour plus de informations.
Registrare l’unità online!
Per i dettagli, consultare la sezione INFORMAZIONI
IMPORTANTI PER IL PROPRIETARIO.
Registreer uw eenheid online!
Printed in U.S.A. April 2012 P/N 07.04.490.00 Form No. HDMCEM-0412
Zie het hoofdstuk BELANGRIJKE INFORMATIE VOOR
DE EIGENAAR voor de bijzonderheden.
 Loading...