


BUD
Bluetooth USB Dongle
User Manual
Confidential and Proprietary Information
Document Number : BUD_English.pdf (20020628)
Software Version : 1.2.1.20
Oct. 18, 2002
135-757 3fl. Missy2000 Bldg. 725, Sooseo - Dong, Kangnam - Ku, Seoul, Korea Office: +82-2-3413-1980 FAX: +82-2-3413-1985
Technical Support: support@hassnet.com Infomation: info@hassnet.com
1

Table of contents
[1] Welcome
[2] Brief specification of BUD
[3] What’s the powerful functions of BUD?
[4] Getting started
[5] What’s in the Box?
[6] Various features of BUD
[7] How to Setup the BUD software
Step 1. Installation of Hassnet Bluetooth Software
Step 2. Setup USB controller
[8] How to use BUD software
1. Begin touring a Hassnet Bluetooth Software
1.1 The main page of Hassnet Bluetooth Software
----- 4
----- 5
----- 6
----- 9
----- 10
----- 11
----- 12
----- 12
------ 17
------ 21
------ 21
------ 21
1.1.1 Bluetooth Device Configuration in menu bar
1.1.2 My Device on the main panel
1.1.3 ‘Add Bluetooth Connection’ on the main panel
1.2 Bluetooth TRAY
1.3 Icons used for Bluetooth devices and services
2. Basic Operations
2.1 Find Bluetooth Devices
2.2 Find a Service
2.3 Determine a Connection’s Status
2
------ 22
------ 24
------ 26
------ 29
------ 30
------ 31
------ 31
------ 32
------ 33

3. Client Applications
----- 34
Table of Contents
3.1 Network Access
3.1.1 Internet connection sharing with a Bluetooth-enabled
computers that have a hardwired Ethernet connection.
3.1.1.1 Network Access Server-side Setup for Windows 2000
3.1.1.2 Network Access Server-side Setup for Windows 98SE &
Windows Me
3.1.1.3 Network Access Client-side Setup for Windows 2000
3.1.2 Internet connection via Access Point
3.2 File Transfer
3.2.1 Setup for the Public Folder(shared folder)
3.2.2 Types of File Transfer operations
3.3 Information Synchronization
3.4 Dial-up Networking
----- 34
----- 34
----- 34
--
--- 35
----- 40
------ 42
------ 44
------ 46
------ 47
------ 48
------ 54
3.5 FAX
3.6 Information Exchange
3.7 Bluetooth Serial Port
4. Security
5. Troubleshooting
[9] Technical support and contact information
[10] FCC Information
------ 54
------ 55
------ 57
------ 59
------ 64
------ 66
------ 67

Chapter 1
Welcome
BUD(Bluetooth USB Dongle) is a Bluetooth USB Adaptor. Only with simple
connection to the existent non-Bluetooth devices, you can access Internet and
exchange data without cable attachment. The old-fashioned computers or PDAs
will be changed to the Bluetooth-enabled devices and will have more mobility
and productivity with BUD.
BUD’s design is simple and comfortable, so it’s very easy to use and portable.
To use it, external power is not needed and just the software installation leads
you to the fantastic Bluetooth world.
Plug BUD into your computer or PDA to allow you to enjoy a wireless freedom!!
• You can go to a meeting anywhere in your building and send/receive e-mails
and access the Internet via Bluetooth Access Point.
• You can exchange files or business cards with anyone that comes into your
office.
• If you are in a meeting, it is possible to transfer copies of presentations direct
to attendees’ computers wirelessly.
• With BUD in your PDA or handheld computer, you can wirelessly synchronize
all your data with your computer that BUD’s plugged in.
• In your home, you can access internet with your family together using only
one ADSL line, if you have BUDs.
4

Chapter 2
Brief specification of BUD
Bluetooth Specification
• Frequency Range : 2.402 GHz ~ 2.480 GHz
• Data rate : 723.2 Kbps
• Rx Sensitivity : -83dBm
• Tx Power : 13dBm (Power Class 1)
• BUD includes all software drivers necessary to support ad-hoc networking, peer-to-
OVERVIEW on Bluetooth service;
BUD’s software supports the following Bluetooth services to make a free world
peer file transfers, data synchronization. The Bluetooth software drivers support
Microsoft Windows ® 98SE(Second Edition), ME(Millennium Edition),
2000, XP Professional and XP Home Edition.
with BUD.
• LAN Access Client and Server
• Dial-up Networking Client and Server
•FAX Client
• Serial Port Profile Client and Server
• Generic Object Exchange Profile
• Object Push Profile Client and Server
• File Transfer Profile Client and Server
•SYNC Profile
• Generic Access Profile
• Service Discovery Application Profile
Will support the following profiles in the near future.
: Headset Profile / Intercom/ Cordless Telephony/ Personal Area Network/ Hardcopy
Cable Replacement/ Enhanced Service Discovery
Chapter 3
What’s the powerful functions of
BUD?
• LAN Access
• Internet connection sharing
• File Transfer
• Active Sync.
6
What’s the powerful functions of BUD?
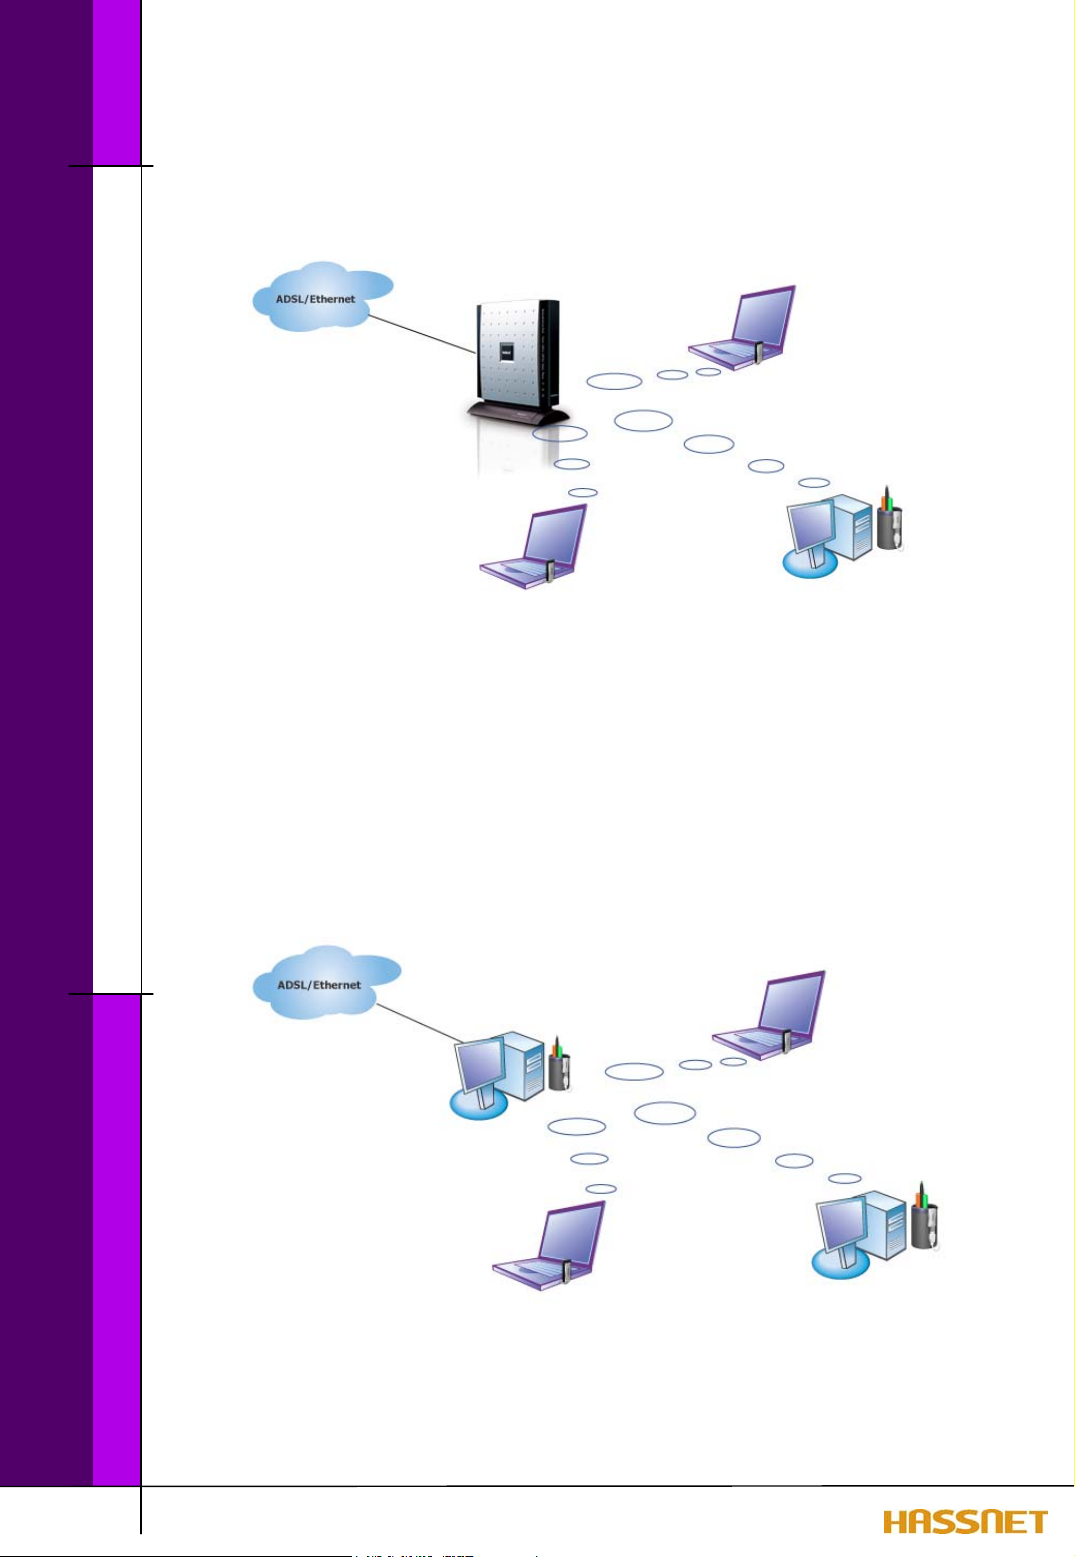
Access to your wired network (LAN or ADSL) via Bluetooth Access Point
without wired connections. With this function, you can go surfing into
internet and check & send e-mail in great mobility.
LAN Access
Internet connection sharing
The most powerful function of BUD is an internet connection sharing with
7 terminals simultaneously with just one wired network such as LAN or
ADSL. Now, you’re reading CNN news in CNN site sitting in your desk and
your cute child is playing game in Disney site in his room with a big smile.
7

What’s the powerful functions of BUD?
File transfer
Create Wireless communication network between devices embedded
Bluetooth technology and BUD plugged into. Therefore, by just using BUD,
you can transfer your file saved in your computer to other computers at any
time and at any place.
Active Sync
When you go back to the office or home to synchronize your data saved in
your PDA with your computer, you don’t need to find a cradle and stoop for
connecting the cable any more. If you have BUD !!!!
8

Chapter 4
Getting started
To use your BUD, do the following proper steps:
1. Remove and identify the contents of this box.
2. Install the software.
: To check the contains of your package, see What’s in the Box on page 9.
: For instruction on how to install BUD Software on your computer, see
Installing the BUD software on page 12.
<caution>
insert the BUD into the USB port of your computer.
3. Insert your BUD to the USB port of your computer.
: For instruction on how to insert BUD to your computer, see Inserting the
BUD on page 17.
4. Enjoy the wireless freedom.
: For instruction on how to use the BUD software on your computer, see
how to use BUD software on page 20.
Before installation the BUD software in your computer, don’t
9
Chapter 5
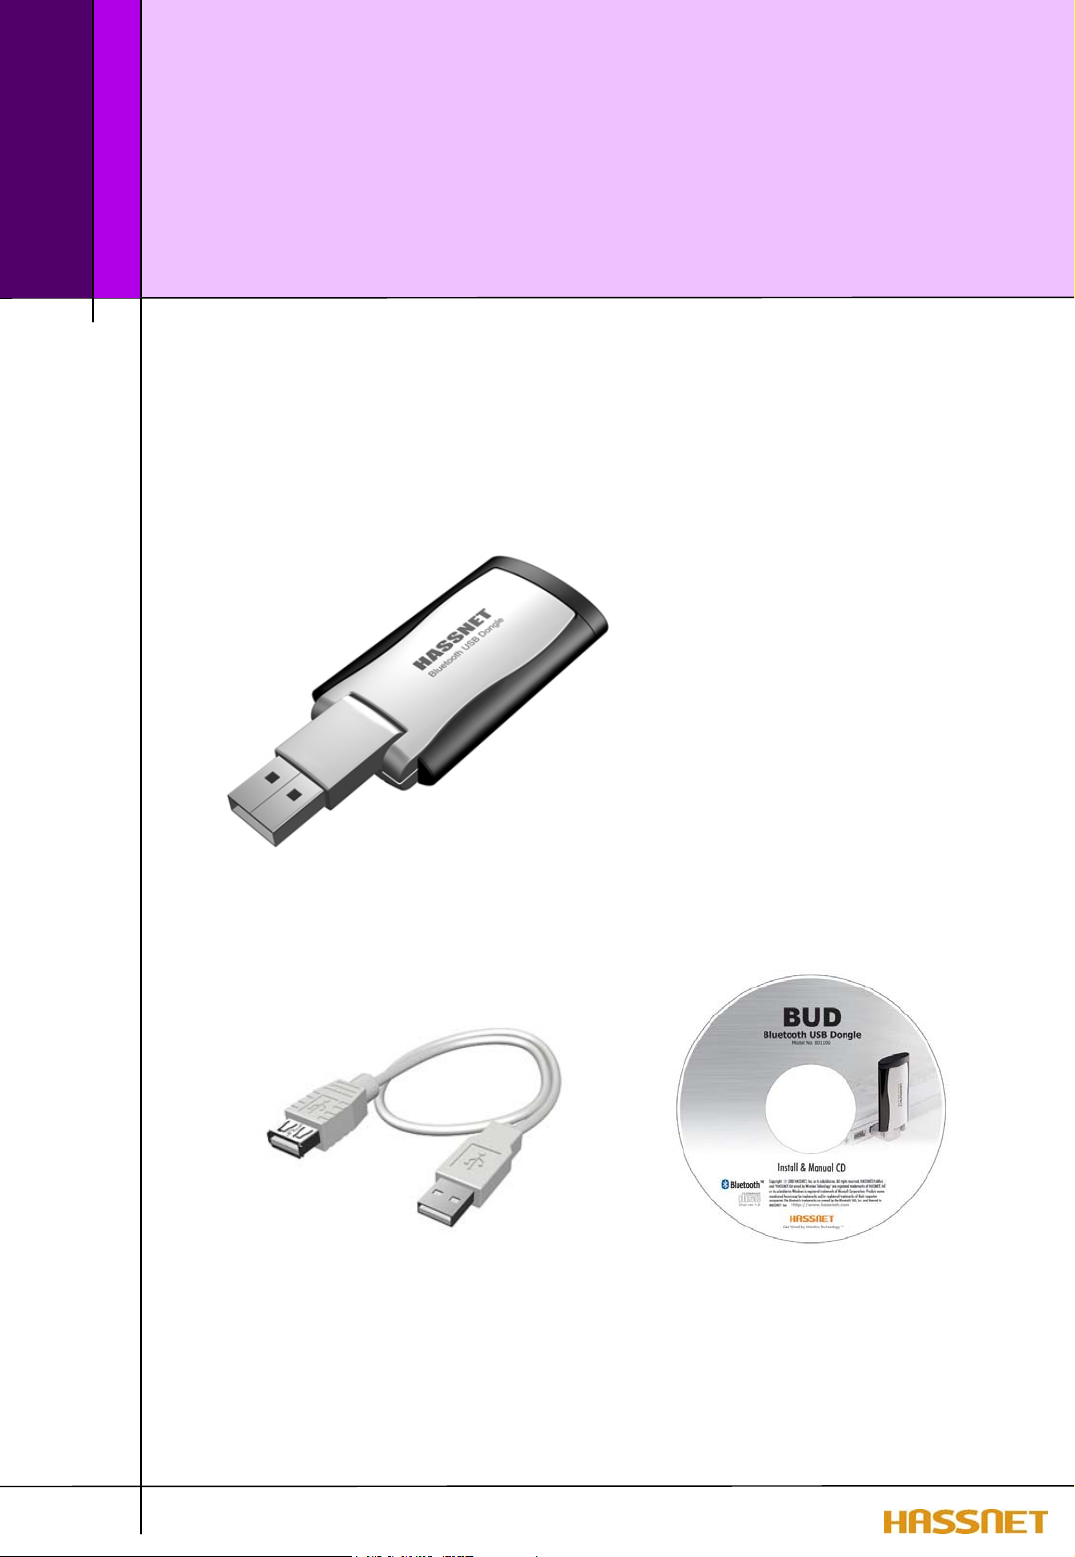
What’s in the Box?
Before you start, check that your package contains the following
items :
BUD
USB Cable
CD-ROM with installation software & Manual
10
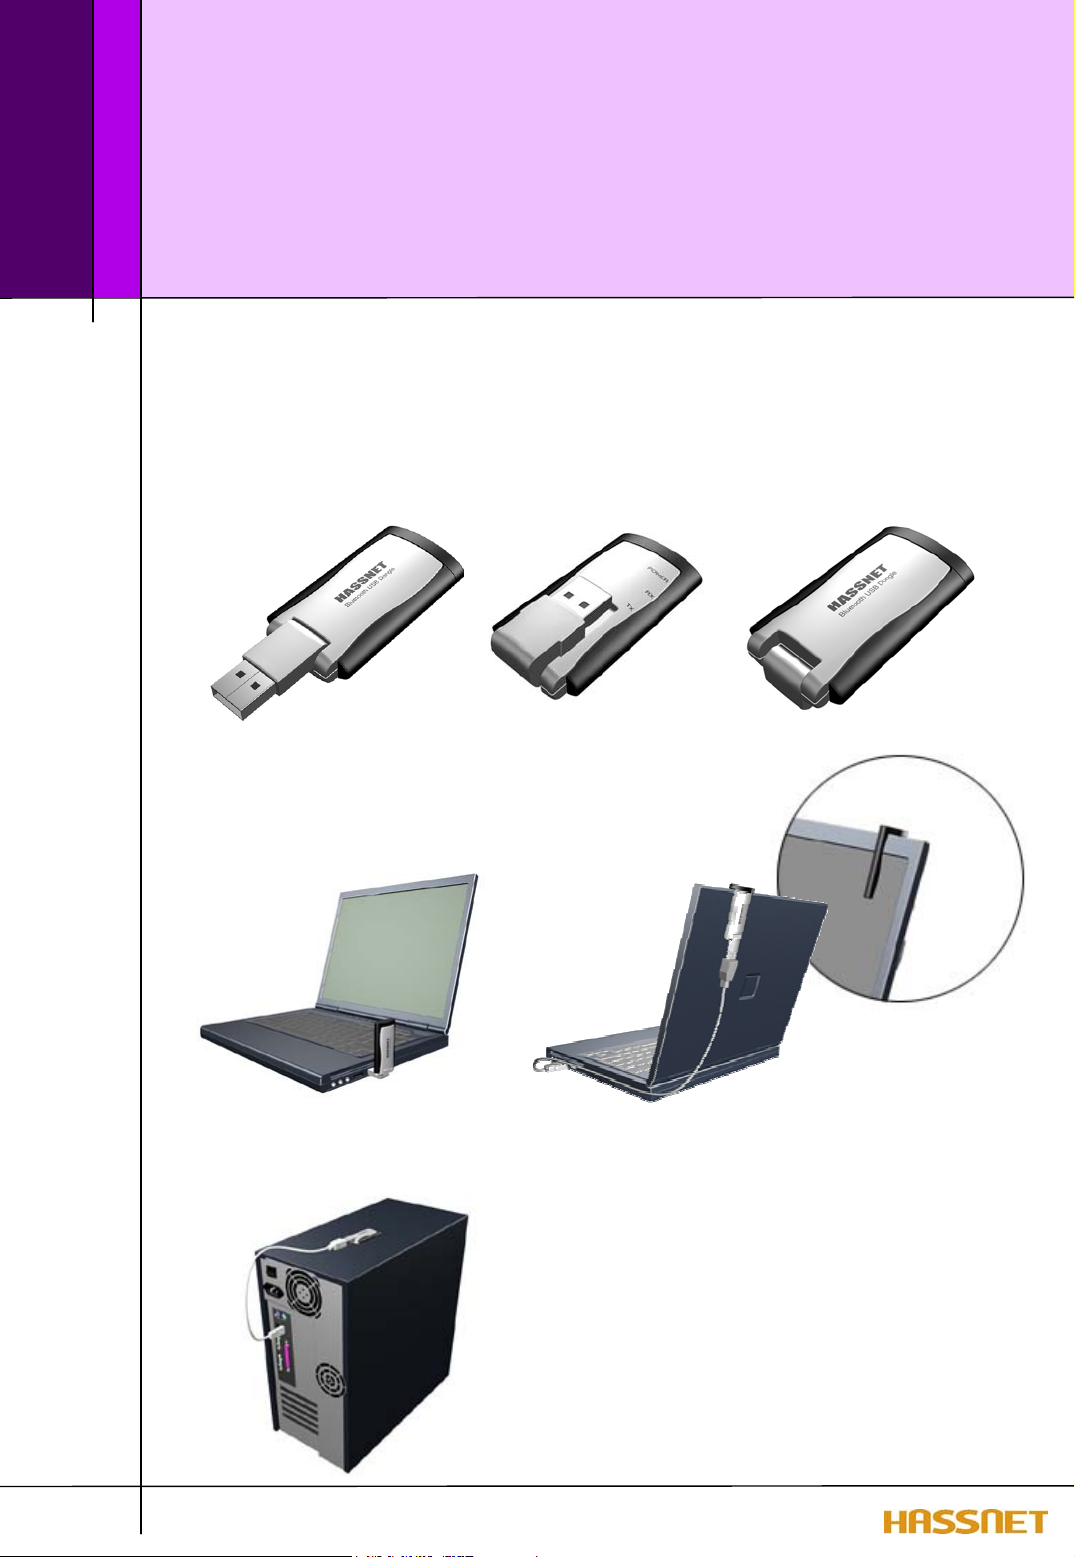
Chapter 6
Various features of BUD
When you insert BUD to the USB port of your computer, you
can use in the following shapes :
Open BUD Folded BUD
for Laptop computer
11
for Desktop computer
Chapter 7
How to Setup the BUD Software
Step 1. Installation of Hassnet Bluetooth Software
<caution>
the BUD into the USB port of your computer.
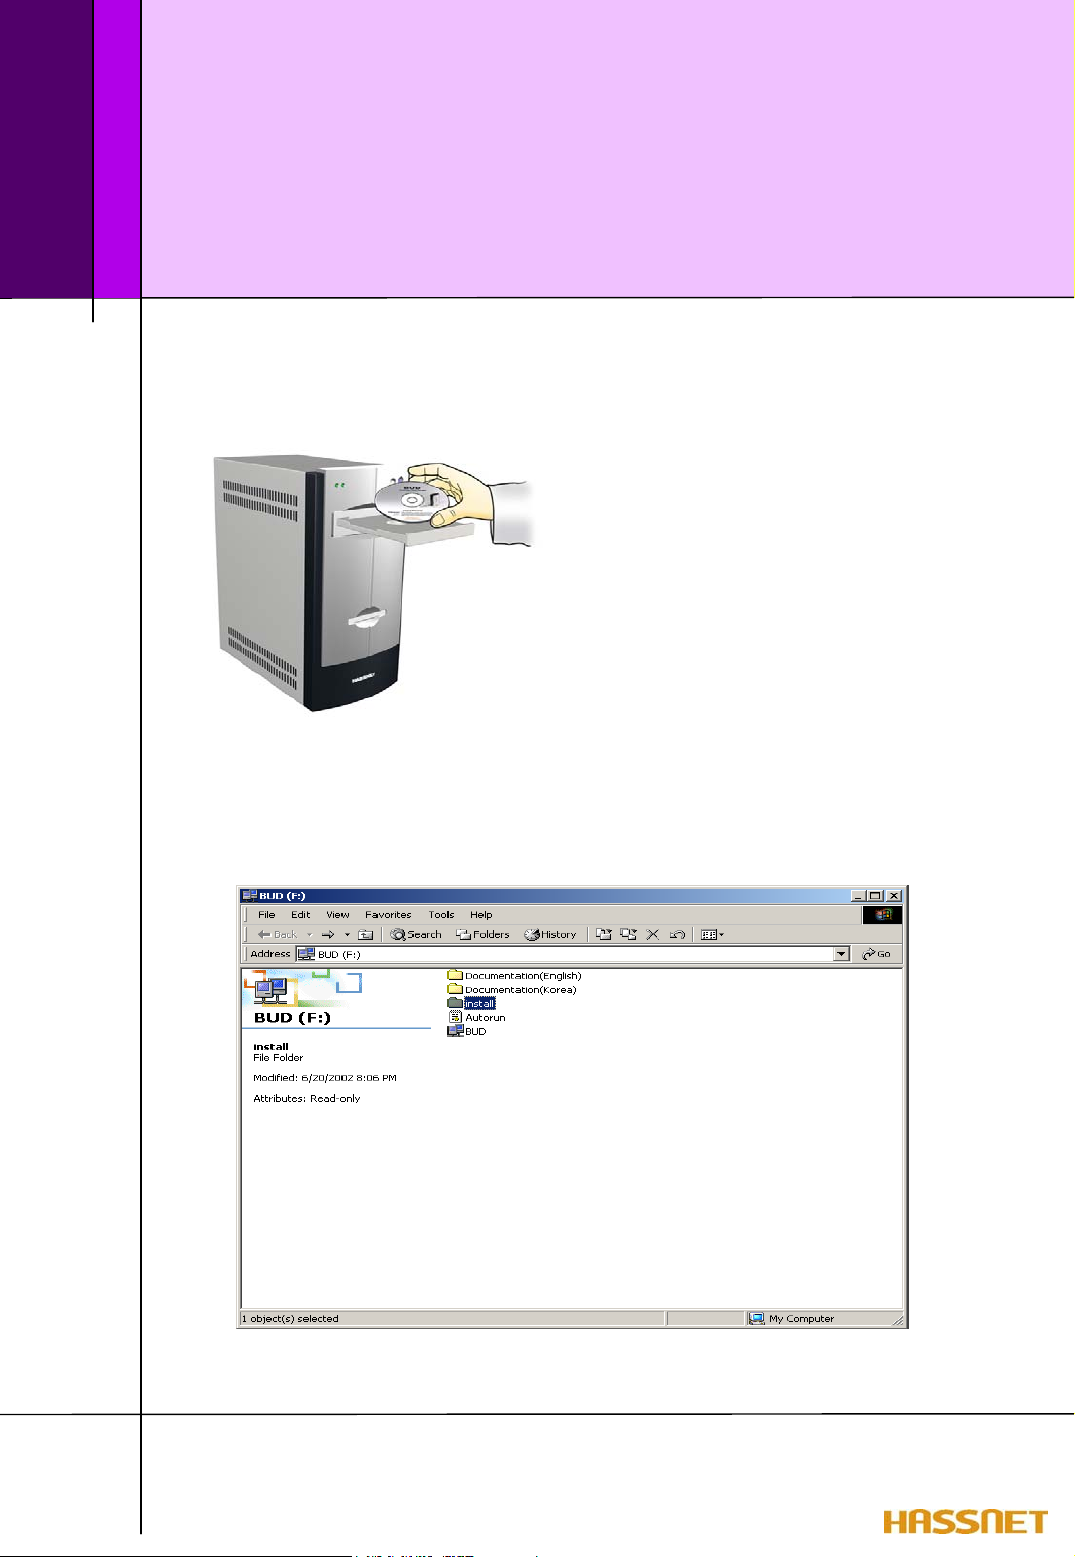
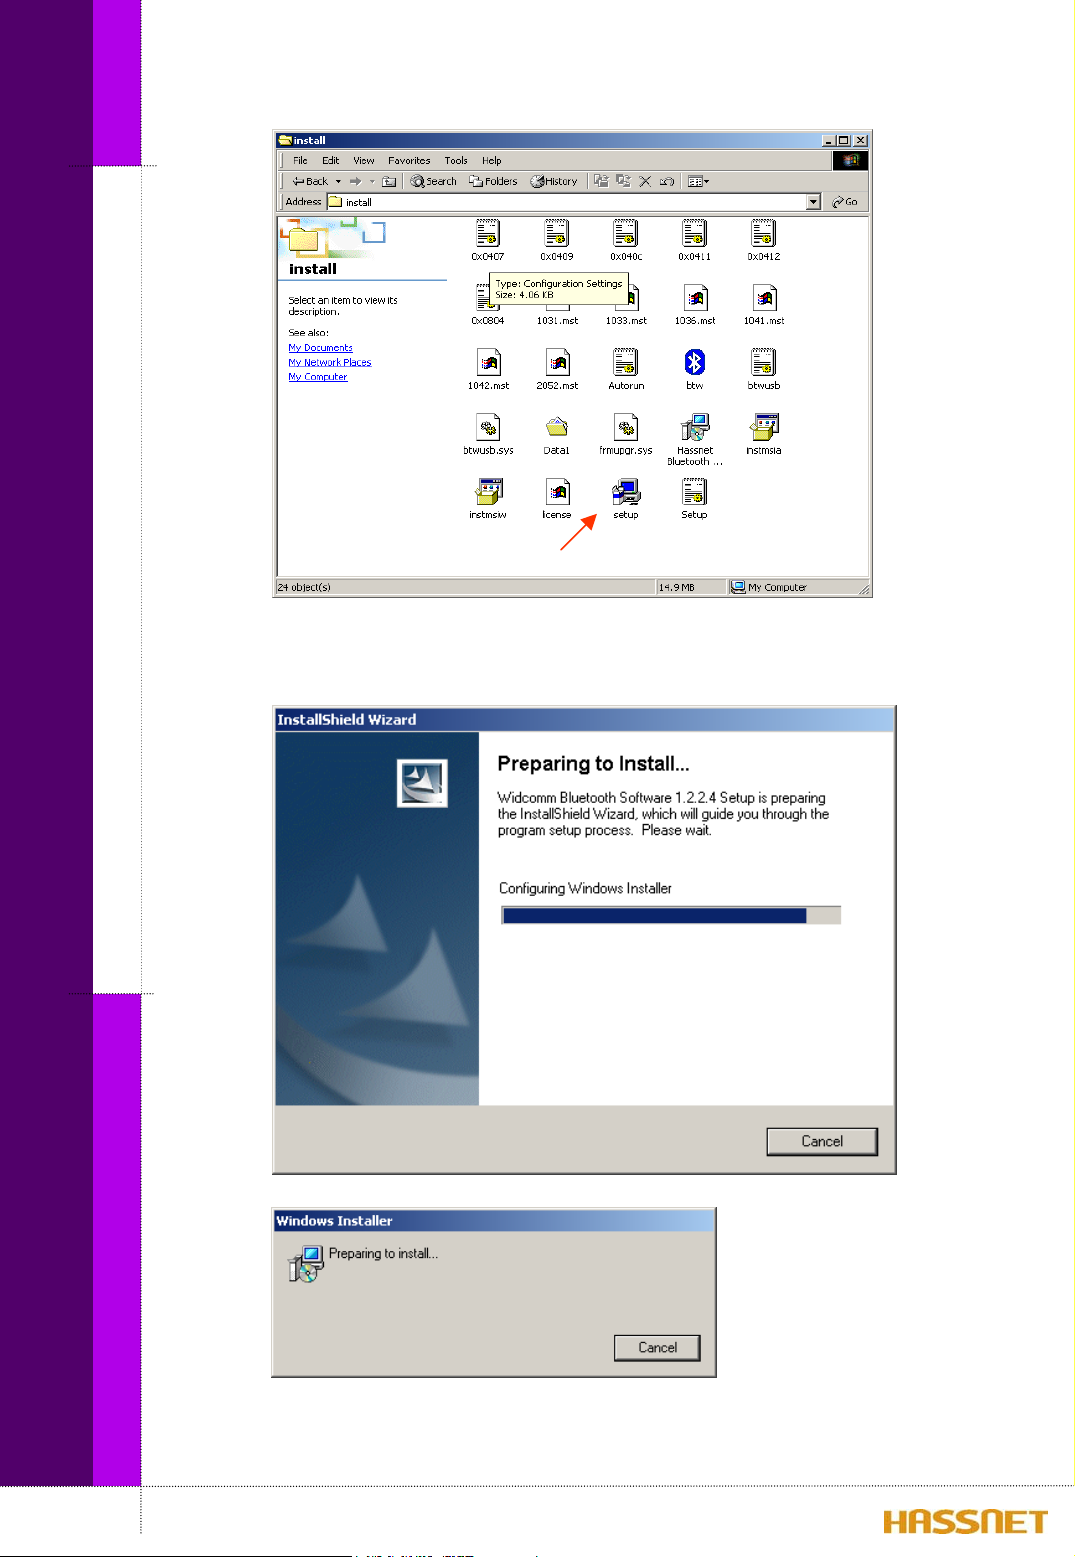
1. In supplied CD-ROM, find the ‘setup.exe’ in directory ‘install’. Double click on
the ‘setup.exe’, you can start the installation.
Before installation the BUD software in your computer, don’t insert
12
How to setup the BUD software
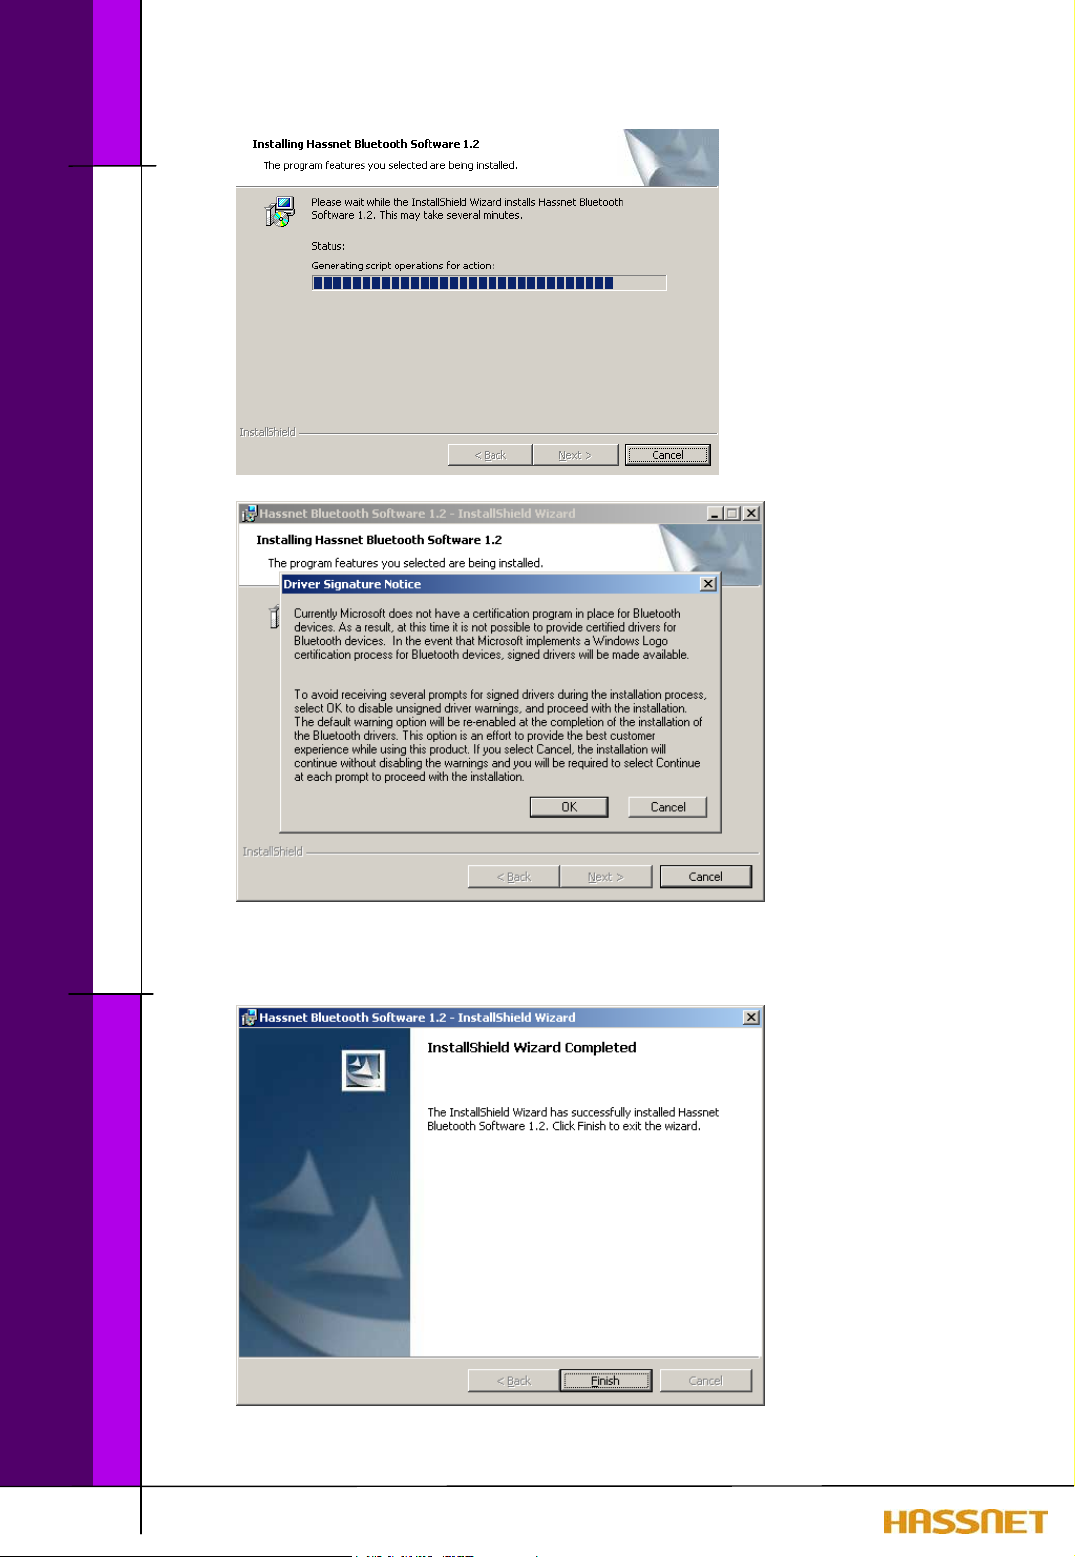
2. Follow the following steps to complete the installation.
13
How to setup the BUD software
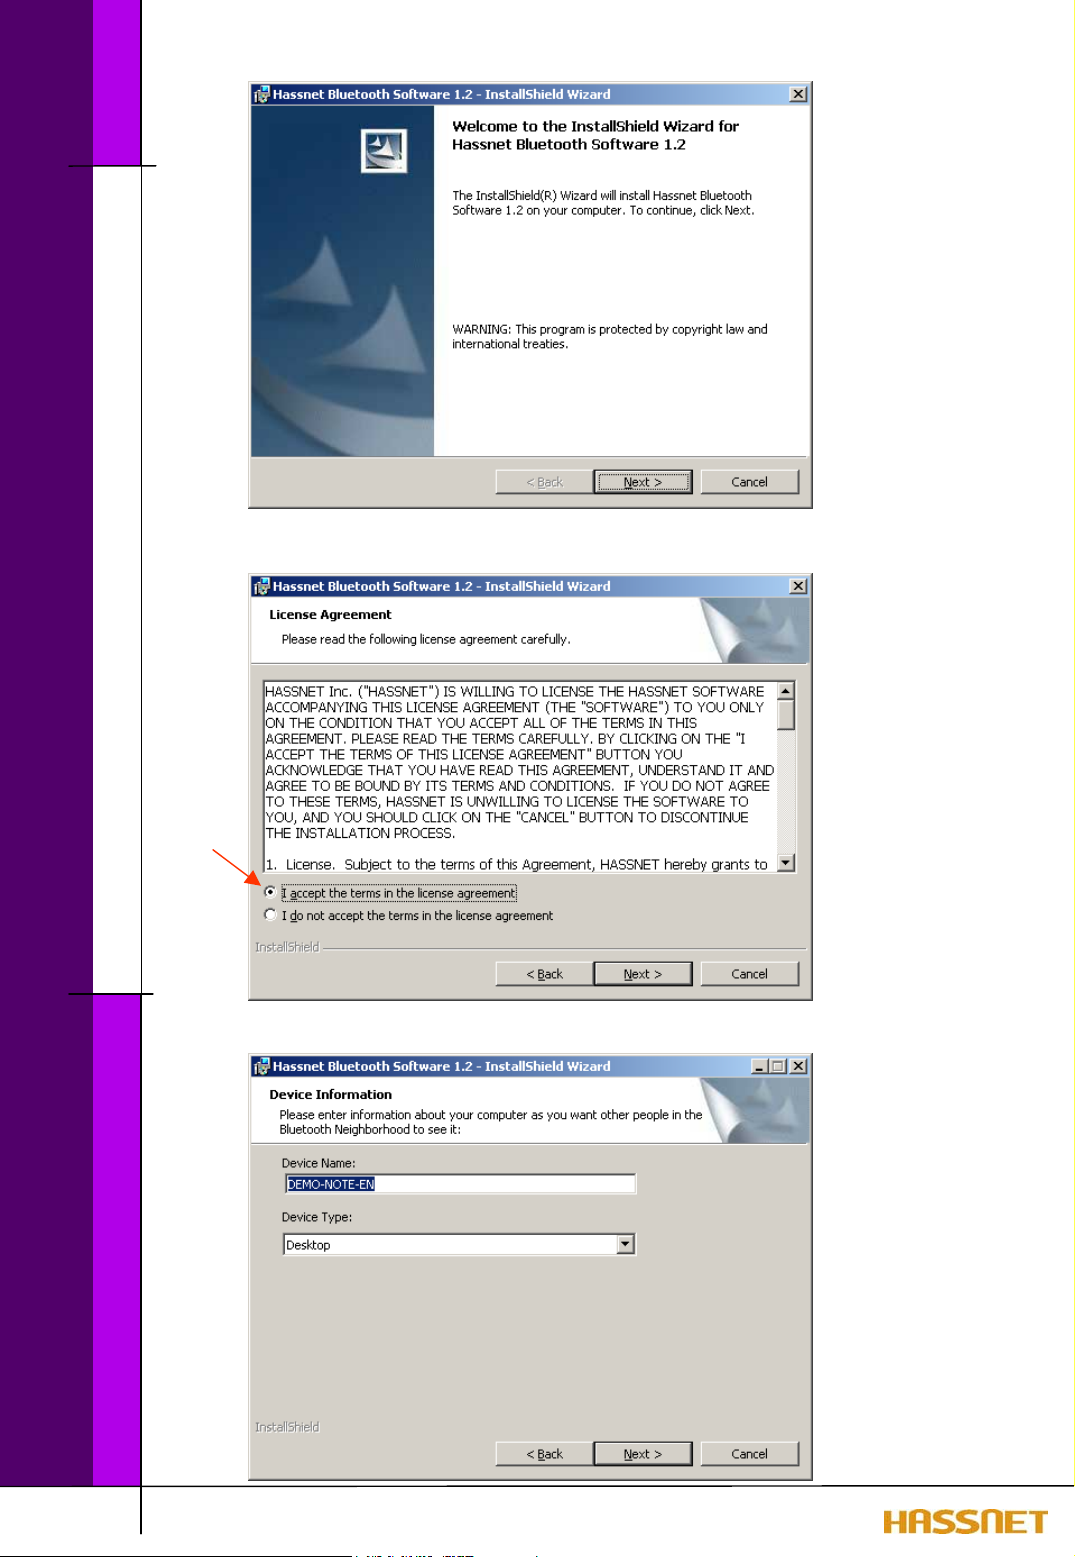
Click ‘Next >’ button.
14
Check to agree the License Agreement and Click ‘Next >’ button.
How to setup the BUD software
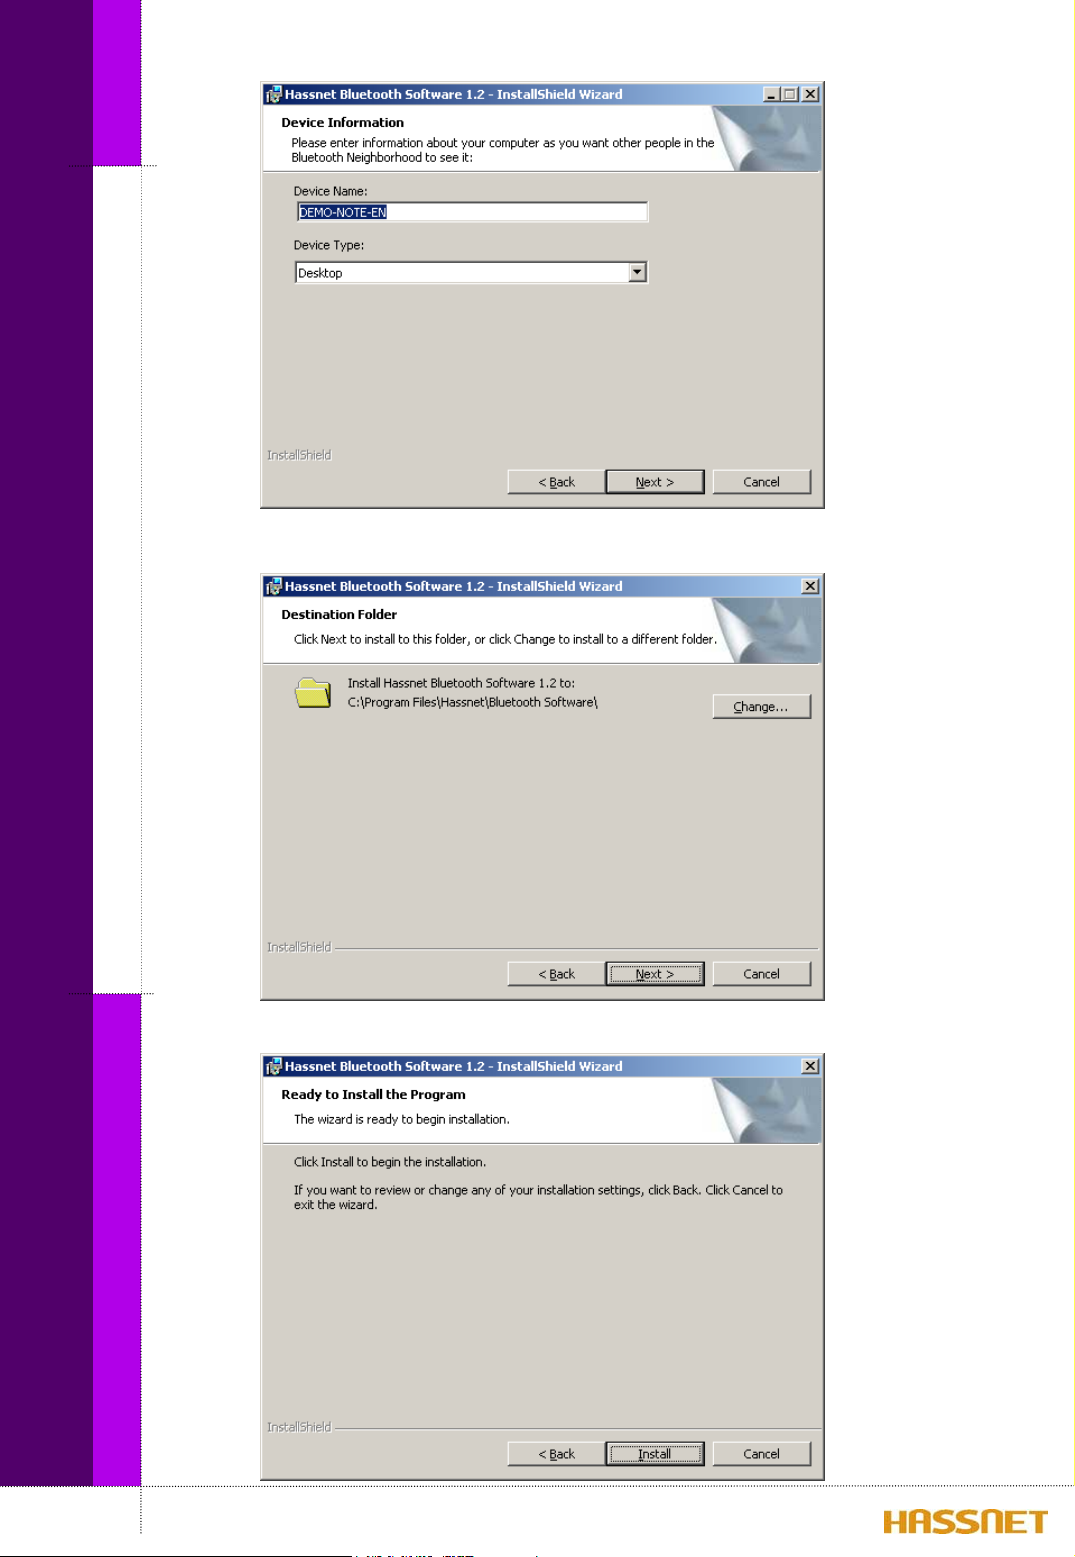
Give a Device Name as you want and select the device type. Click ‘Next>’ button.
15
Click ‘Next>’ to install to this folder, or click ‘Change’ to install to a different folder.
How to setup the BUD software
16
During installation of the software, you’ll see the above box message several times. You
can check the message and click ‘OK’ button.
Click ‘Finish’ to exit the installation wizard.
How to setup the BUD software
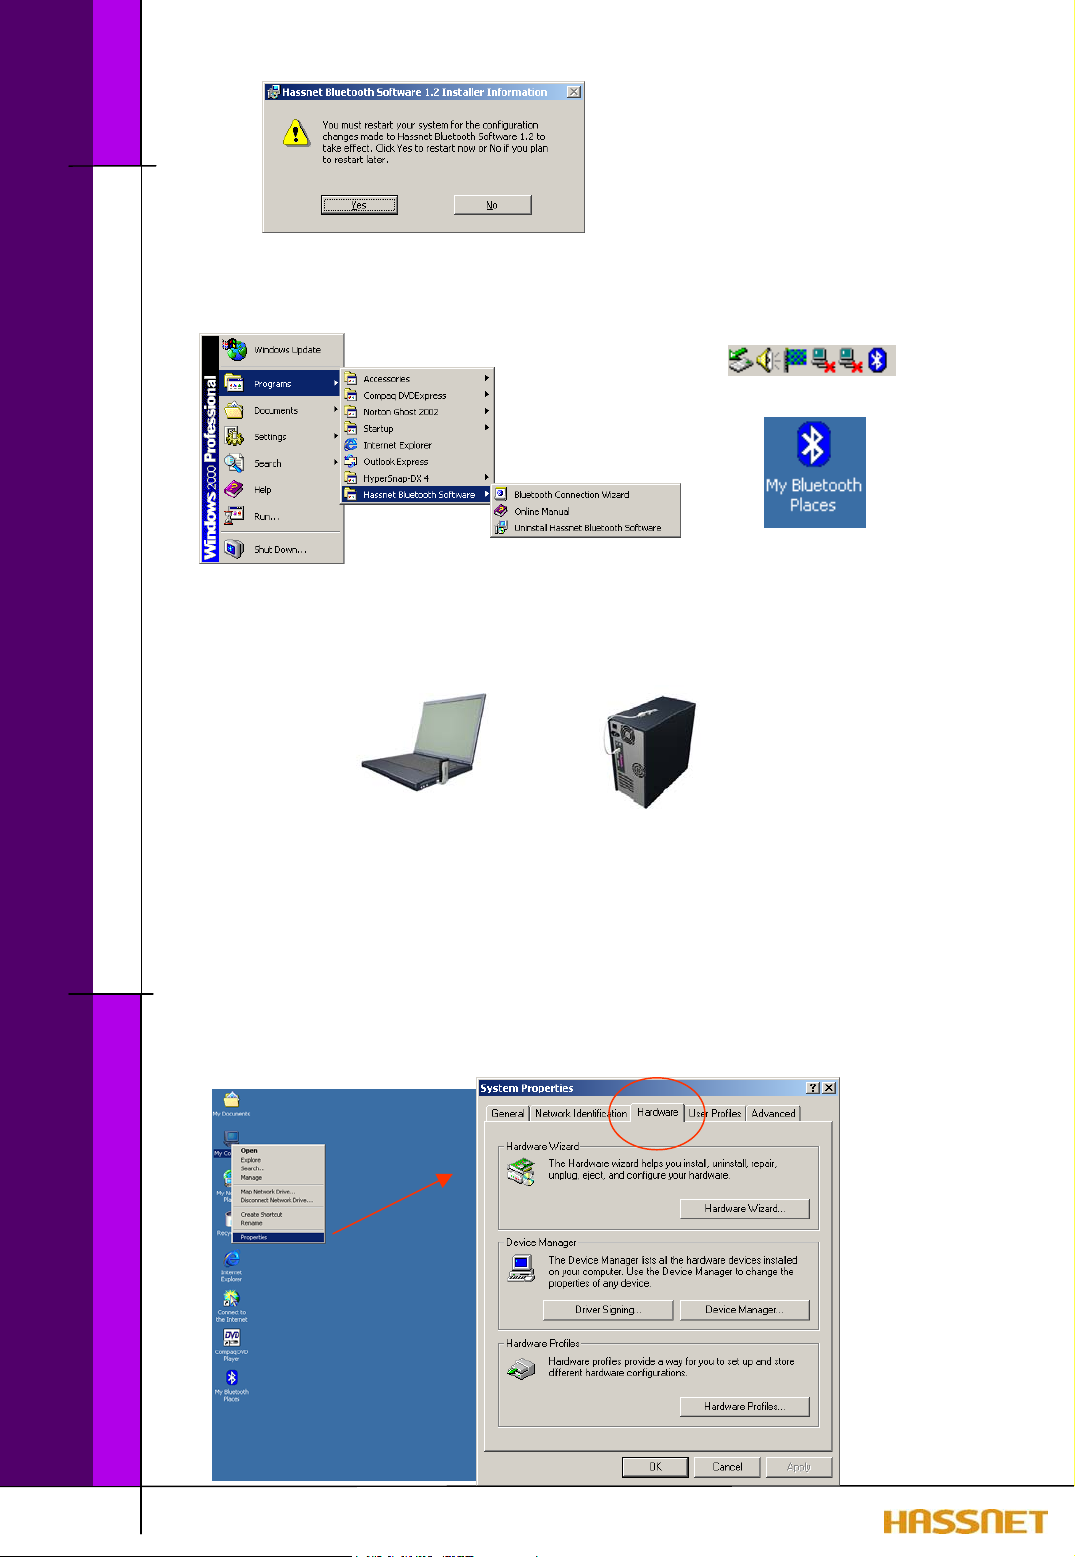
Click ‘Yes’ button to complete the installation. After re-starting, you can see the icon for
Hassnet Bluetooth software on your computer screen and tray.
Step 2. Setup USB controller
After installation, insert your BUD to the USB port of your computer.
When you insert BUD to the computer, your BUD is regarded as a new hardware and the
driver for the BUD will be installed automatically.
If there is any problem to finish the automatic installation, please set the driver by hand.
The procedure is as follows:
1. Check the installation of the driver
: Using right button of your mice on ‘My Computer’ on your computer screen,
open ‘Properties’ and check as follows:
17

How to setup the BUD software
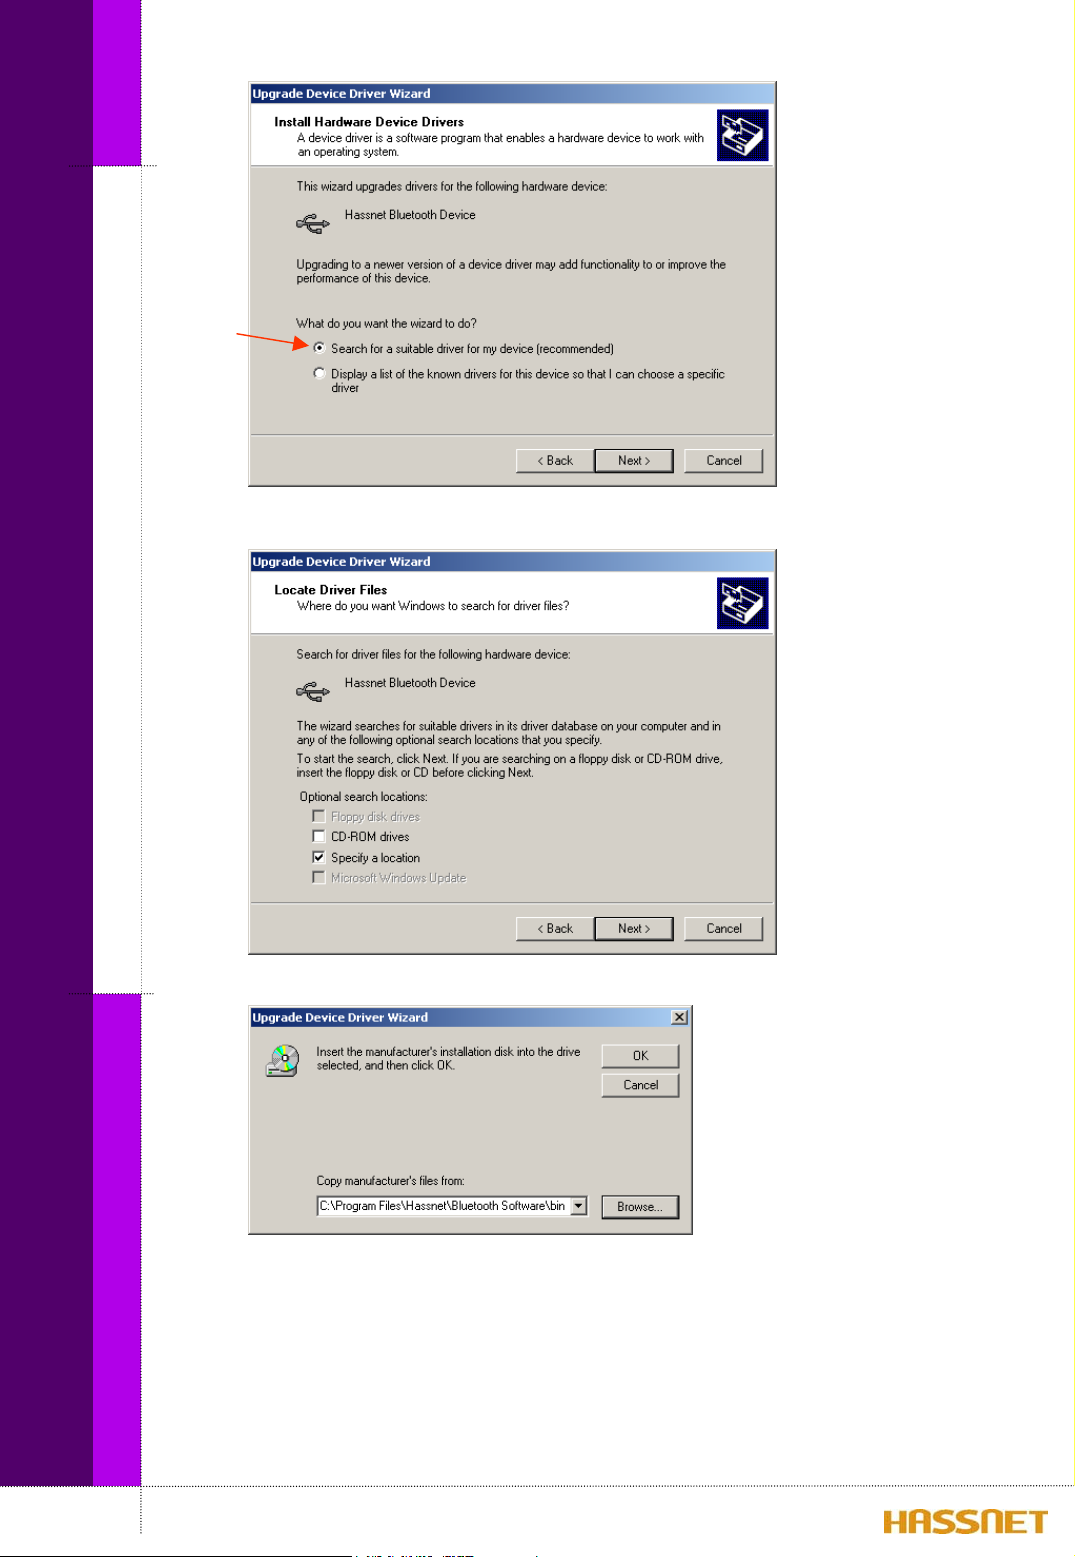
Check the ‘Hassnet Bluetooth Device’ in the Universal Serial Bus controllers’ tree.
If the automatic installation is failed, select the Properties of Hassnet Bluetooth Device
as above.
18
Click ‘Update Driver..’.
How to setup the BUD software
Check ‘Search for a suitable driver for my device’ and click ‘Next>’ button.
19
Check ‘Specify a location’ and click ‘Next>’ button.
Click ‘Browse’ button and specify a location as a c:/Program Files/Hassnet/Bluetooth
Software/Bin/btwusb.inf.

How to setup the BUD software
Click ‘Next>’ button.
20
Click ‘Finish’ button to complete the setting.
Chapter 8
How to use BUD Software
1. Begin touring a Hassnet Bluetooth Software
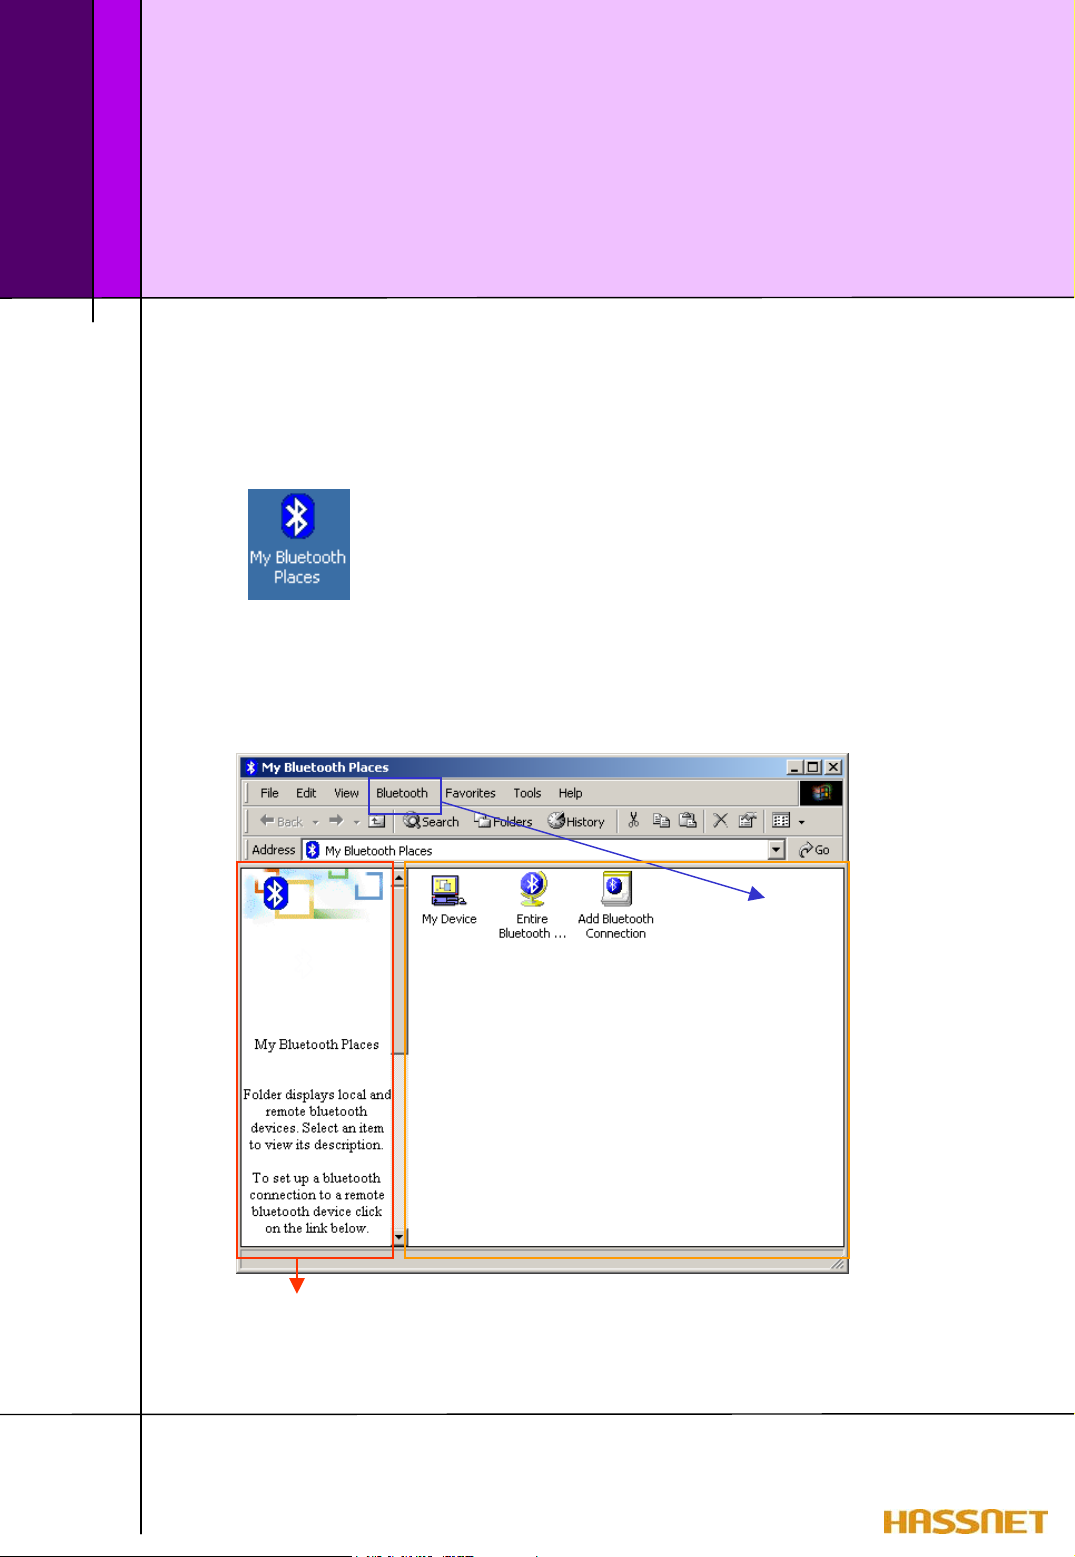
By making a double-click the Icon, ‘My Bluetooth Places’, you can start the software.
1.1 The main page of Hassnet Bluetooth Software is as follows:
You can search devices and
check your device’s configuration.
Using the icons on this frame, you
can get services as you want.
In this frame, you can see the explanation on the present screen and on the method to
use this program.
21

How to use BUD software
1.1.1 Bluetooth Device Configuration in menu bar :
In the screen ‘General’, you can
give a name of your computer and
select a computer type.
22
In the screen ‘Hardware’, you can
Check your device’s properties.
* Device Address: Every Bluetooth
device has a unique 48-bit binary
Bluetooth Device Address (BDA)
burned into its Read-Only Memory
(ROM). This address cannot be changed
by the end-user. A device’s BDA is
usually displayed in hexadecimal format;
00:08:D6:80:00:5C is a valid BDA.
Each Bluetooth device also has an
operator-configurable, user-friendly
name to help distinguish it from other
Bluetooth devices.

How to use BUD software
In the screen ‘Local Services’, you
can check the possible service of
your device with Hassnet’s Bluetooth
Software.
In the screen ‘Accessibility’, you
can specify which devices have access
to your computer.
23
In the screen ‘Information Exchange’,
you can specify the shared directory
and your business card to send to
someone and inbox directory to save
other’s Business Cards, Calendars,
Email, Notes.which devices have
access

How to use BUD software
1.1.2 My Device on the main panel :
24
You can check the possible service using your BUD and Hassnet Bluetooth Software in
this panel. The brief function of each service is as follows:
. Bluetooth Serial Port—establishes a Bluetooth wireless connection between
two devices. The connection may be used by applications as though a physical
serial cable connected the devices.
. Dial-up Networking—allows a Bluetooth client to use a modem that is
physically attached to the Bluetooth server.

. Fax—allows a Bluetooth client to wirelessly send a fax using a device that is
physically attached to the Bluetooth server.
How to use BUD software
. File Transfer—establishes a Bluetooth wireless connection that allows your
computer to perform file system operations on another Bluetooth-enabled
device—browse, drag/drop, open, print, cut/copy, paste, delete, rename, etc.
. Information Exchange—establishes a Bluetooth wireless connection between
two devices so that they can exchange personal information manager data such as
business cards, calendar items, email messages, and notes.
. Information Synchronization—establishes a Bluetooth wireless connection
between two devices and uses the connection to synchronize Personal
Information Manager data between the two devices.
. Network Access—establishes a Bluetooth wireless connection between the client
and a server that is physically connected to the Local Area Network. If the client
has permission (user name and password for the LAN), the wireless connection
can be used as if the client were hardwired to the LAN.
All Bluetooth servers do not necessarily provide all of these services. For example,
network gateways such as those in Hassnet’s ViaBlue only provide access to
the Local Area Network (the Network Access service) among the above services.
To determine the services provided by a Bluetooth device:
1. On the client, in the Folders pane of My Bluetooth Places, select Entire Bluetooth
Neighborhood.
2. In the right pane of Entire Bluetooth Neighborhood, right-click anywhere
on a device name
In the Folders pane of My Bluetooth Places, right-click a device and select Discover
Available Services from the pop-up menu to update the available services list. The
available services will be displayed in the right pane of My Bluetooth Places.
and select Refresh from the pop-up menu.
except
25

1.1.3 ‘Add Bluetooth Connection’ on the main panel :
How to use BUD software
You can make a shortcut to use a service more quickly and easily by double click the
‘Add Bluetooth Connection’ Icon or in the Windows system tray right-click the Bluetooth
icon and select Services from the pop-up menu, and then select Connection Wizard from
the submenu.
Open a Connection Wizard Screen:
26

How to use BUD software
a) In the Select a Service drop-down menu, select the
will be established. (The specific service will be selected later, if necessary.)
b) In the “Select a device that provides the service” drop-down menu, select the
device that will provide the service. (To update the list of devices displayed,
click the Search Devices… button.)
c) Optional: select the “Require secure encrypted connection” option to enable
Authentication and Encryption for this connection.
Click Next> button.
type
of connection that
27
If “Require secure encrypted connection” was selected above, a security screen may
appear:
. To establish a paired relationship with the remote device while using this wizard,
enter your Personal Identification Number in the PIN Code field of the security
screen, and then click the Next button.
. To establish the paired relationship with the remote device the first time this connection
is used, leave the PIN Code field blank in the security screen, and click the Next button.
The Security screen WILL NOT appear if the devices have been paired.

How to use BUD software
You can give a name of the connection and click Finish button.
28
Now, the New Shortcut is created on the main screen.

1.2 Bluetooth TRAY
How to use BUD software
The Bluetooth Tray resides in the Windows System Tray, which is normally located in
the lower-right corner of the screen. Bluetooth Tray provides fast access to many routine
Bluetooth operations.
From the Bluetooth Tray you can:
a) Access My Bluetooth Places—double-click the Bluetooth icon.
b) Access the Bluetooth Configuration Panel—right-click the Bluetooth icon,
c) Access the Bluetooth Security dialog box—right-click the Bluetooth icon,
d) Access the Bluetooth Connection Wizard—right-click the Bluetooth icon,
select Setup, and then select Configuration from the submenu.
select Setup, and then select Security from the submenu.
select Services, and then select Connection Wizard from the submenu.
29
e) Exchange Business Cards with another Bluetooth Computer—right-click the
Bluetooth icon, select Services, and then select Business Card Exchange from the
submenu.
f) Search for, and connect to, a specific service—right-click the Bluetooth icon,
select Services, and then select the desired service from the submenu. An
additional submenu will appear that contains one or more options, including:
* Find Devices…
or
* Other Devices… and one or more device names. The device name(s) will be
present if this computer has used this service, and connected via this
technique, at least once before. If a device name is present in the submenu,
selecting that device will re-initialize the connection.

1.3 Icons used for Bluetooth devices and services
Bluetooth icons provide at-a-glance feedback about a device or service's status by
How to use BUD software
changing color.
Device icons are blue in color with yellow accents in their ‘normal’ state and green
with yellow accents in their ‘connected’ state. Devices that are paired with this
computer display a ‘check mark’ in the upper-left portion of their icon.
Service icons are gray or yellow in color (or gray with yellow accents) in their ‘normal’
state. In the "connected" state the primary color of the icon (gray or yellow) changes
to green.
Icons for services that are not available have a red ‘X’ in their lower-right corner.
Services may be unavailable because they are in use or because the necessary hardware
30
(such as a modem for Dial-up Networking) is not installed.

2. Basic Operations
2.1 Find Bluetooth Devices
How to use BUD software
Double click ‘Entire Bluetooth Neighborhood’ Icon.
31
You can get all Bluetooth
neighborhood by Right-click
of your mice or select the
‘Search for devices’ on the
Menu bar.

How to use BUD software
One of the advantages of Bluetooth is the mobility the wireless connections allow.
However, mobility means that devices may move in or out of connection range during
the time between the automatic updates performed by Hassnet Bluetooth Software. To
be certain that the displayed list of devices in the neighborhood is current, or if
automatic periodic inquiry is not enabled, force an update of the device list using the
technique on the previous page.
Some devices within connection range may not show up in the list of devices found
because
. Your device is configured to report only specific types or classes of devices
(Bluetooth Configuration Panel >Discovery tab, on your device).
. The unlisted device is configured to be non-discoverable
(Bluetooth Configuration Panel > Accessibility tab, on the unlisted device).
2.2 Find a Service
32
The process of determining the services that a device provides is called Service
Discovery. To initiate a Service Discovery, in the Folders pane of My Bluetooth Places,
right-click the device and select Discover Available Services from the pop-up menu or
you can double click the device that you want to access to.

How to use BUD software
2.3 Determine a Connection’s Status
The Bluetooth Connection Status dialog box displays information about the state
of a connection and provides a means to disconnect an active connection.
To display the Connection Status dialog box
. In My Bluetooth Places, from the Folders pane, select (highlight) a device.
. In the right pane of My Bluetooth Places, right-click a service name and select
Status from the pop-up menu.
. Status: Connected or Disconnected
. Device Name: the name of the
device to which this computer is
connected.
. Duration: the length of time this
connection has been established,
displayed in hours, minutes and
seconds. Depending on the service,
the connection may time out
(automatically disconnect) after a
specific period of inactivity.
. Activity: the number of bytes sent
33
and received over the connection
. Signal Strength: a variable scale
that ranges from Too Weak through
Good to Too Strong.

3. Client Applications
3.1 Network Access
How to use BUD software
The Network Access service permits a Bluetooth client to use a Local Area Network
connection that is physically attached to another Bluetooth device (the server).
Possible Network Access servers include:
a) Bluetooth-enabled computers that have a hardwired Ethernet connection.
b) Stand-alone Bluetooth Network Access Points such as those in Hassnet’s ViaBlue.
3.1.1 Internet connection sharing with a Bluetooth-enabled computers that
The Bluetooth server must be specifically configured to provide the Network Access
service.
Caution) After a Bluetooth device is configured as a Network Access server it
3.1.1.1 Network Access Server-side Setup for Windows 2000
have a hardwired Ethernet connection.
cannot act as a Network Access client without being re-configured.
34
a) From the Windows Control Panel Right-click My Network to select Network and
Dial-up Connections.

How to use BUD software
b) Right-click the Local Area Connection icon and select Properties.
Caution) Once a computer is
configured with ‘A’ BUD as a
server, if you change the BUD to
‘B’ BUD for the server computer,
you should clear the check mark
in this screen and click OK. After
this step, you should open this
screen again and check the
‘Enable Internet Connection
Sharing for this connection’ as left
and click OK. For successful
configuration with changed BUD,
you should follow this method.
c) On the Sharing tab, select Enable Internet Connection Sharing for this
connection and click OK.
d) Click the Yes button in the confirmation dialog box to enable Internet
connection sharing.
3.1.1.2 Network Access Server-side Setup for Windows 98 Second Edition.
a) Click Start Æ Settings Æ
Control Panel:
35

How to use BUD software
b) Open Add/Remove Programs:
c) Click the Windows Setup tab:
36
d) Scroll down the list and find
Internet Tools, click to
highlight it, then click the
Details button. Make sure
you don’t uncheck it by
accident by clicking near
the checkbox:

How to use BUD software
e) Scroll down the list, and check the box Internet Connection Sharing:
f) Click OK to close the
Add/Remove Programs.
g) After closing the Add/Remove programs window, your computer may ask
you to insert Windows 98 Second Edition CD. Please insert the CD into the
computer’s CDROM drive and click OK.
Internet Tools
window, and click OK again to close
37

How to use BUD software
h) The
Internet Sharing Wizard
will begin, click Next to continue:
i) Choose High-speed connection and click Next.
●
j) Select the device your current outgoing connection, for example ‘PCMCIA
Ethernet 10 Base T card’ or ‘3 Com EtherLink XL 10/100 PCI TX NIC’.
Click Next to continue
k) Select the device you’ll share the connection through. It is the
Access Server Driver.
.
Bluetooth LAN
Click Next to continue.
l) Click Next to continue.
m) Click Cancel on creating a Setup Disk, and click Next.
n) Now, You’ve completed the Internet Sharing setup. You’ll be asked to restart
your computer:
38

Caution) To connect to the 98 SE/ME Server with a Client, you should set a DNS Address
in a Client computer. Please refer to the page 41.
How to use BUD software
3.1.1.3 Network Access Server-side Setup for Windows 98 Millennium Edition.
a) Click Start Æ Settings Æ Control Panel:
b) Open Add/Remove Programs:
c) Click the Windows Setup tab:
39
d) Scroll down the list and find
Communications, click to
highlight it, then click the Details
button.

How to use BUD software
e) Scroll down the list, and check the box Internet Connection Sharing:
f) Click OK to close the
Add/Remove Programs. The
continue:
Communications
Internet Sharing Wizard
windows, and click OK again to close
will begin, click Next to
40
g) Select the device your current outgoing connection, for example ‘PCMCIA
Ethernet 10 Base T card’ or ‘3 Com EtherLink XL 10/100 PCI TX NIC’.
Click Next to continue
h) Select the device you’ll share the connection through. It is the
Access Server Driver.
.
Bluetooth LAN
Click Next to continue.

i) Click NO on this screen, and click Next:
j) Click NO on creating a Setup Disk, and click Next:
How to use BUD software
3.1.1.4 Network Access Client-side Setup
Caution) In case Windows 98 SE/ME is set as a Server, you should do give a DNS Address with
k) Now, You’ve completed the Internet Sharing setup. You’ll be asked to restart
your computer:
the same one with the server computer or any one that you already know with the
following steps before executing the My Bluetooth Places .
: Right Click of My Network Places
41
: Right Click of BluetoothConnection

How to use BUD software
: Select Internet Protocol(TCP/IP)
and Click Properties.
42
: Select ‘Use the following DNS server addresses:’ and give the address with the server’s
one or the one that you already know.

By Executing ‘My Bluetooth Places’,
Without wire connection, you can access internet just using any Bluetooth enabled
computer via Bluetooth enabled computer set as a Network Access Server that have a
How to use BUD software
hardwired Ethernet connection as following steps:
a) The computer named ‘CHRIS’ is set as a server. Double-click CHRIS icon.
43
b) Double click the ‘Network Access’ icon.

How to use BUD software
c) If you set the ID & Password to access the server computer, you can use them.
If not, you can click ‘Connect’ button to connect the server.
44
d) Now, it’s connected and you can use internet.

3.1.2 Internet connection via Access Point
How to use BUD software
a) You can find your Access Point. Double click the Icon of Access Point or select the
service in the menu opening by Right-click of the Icon.
45
b) Select the Icon for LAN Access Point.

How to use BUD software
c) If you set the ID & Password to access the Access Point, you can use them.
If not, you can click ‘Connect’ button to connect the Access Point.
46
d) Now, it’s connected and you can use internet.

3.2 File Transfer
The File Transfer service allows one Bluetooth device to perform file operations on the
How to use BUD software
default File Transfer directory (and the folders and files it contains) of another Bluetooth
device.
a) Double click the device you want to transfer files with.
b) Double click the Public Folder then the folders contents are displayed in the right pane
47
of My Bluetooth Places.

How to use BUD software
c) Now drag the file you want to transfer to your adaptable folder or you can copy &
paste it.
48

3.2.1 Setup for the Public Folder (Shared folder)
The File Transfer service allows one Bluetooth device to perform file operations on the
default File Transfer directory (and the folders and files it contains) of another Bluetooth
How to use BUD software
device.
a) Right-click My device in the My Bluetooth Places and select the Properties.
49
b) Using ‘Browse’ button, you can specify the Shared Directory.

3.2.2 Types of File Transfer operations
In the right pane of My Bluetooth Places, right-click a folder item and select an option
from the pop-up menu. A dialog box (the title varies, depending on the operation being
How to use BUD software
carried out) appears and the status line (bottom of the dialog box) indicates the
operational step that is being carried out.
The types of operations that can be accomplished are:
a) Open:
b) Print—sends the selected server file to the client’s default printer.
c) Send to:
d) Cut—copies a folder and its contents, or individually selected files in a folder, to
• Files—are opened in the application associated with them.
• Folders—are expanded to show their contents.
• 3.5” Floppy Drive—copies the selected item(s) from the server to the client’s
3.5” floppy drive.
• My Shared Folder—copies the selected item(s) from the server to the default
File Transfer folder on the client.
the Windows clipboard. When the clipboard contents are pasted to a new
location, the originally selected file(s) on the server are deleted.
e) Copy—copies a folder and its contents, or individually selected files in a folder,
to the Windows clipboard.
f) Delete—deletes selected file(s) and/or folder(s) on the server.
g) Rename—allows you to change an empty folder’s name.
h) Properties—displays the file or folder’s properties dialog box.
Other options may appear (depending on the context the menu appears in):
a) Update—updates the contents of a folder
b) New Folder—creates a new folder on the server
c) Abort FTP Operation—aborts an in-process File Transfer operation.
50

3.3. Information Synchronization
The Information Synchronization service is used to synchronize information (e.g., a
Personal Information Manager database) between a Bluetooth client and a Bluetooth
How to use BUD software
server.
Hassnet Bluetooth Software supports synchronization with devices that support IrMC v1.1
and exchange the v2.1 vCard format.
The first time Information Synchronization is used with a new application it may take a
few minutes to synchronize the database; the data from both devices must be merged,
duplicate entries deleted, and then the updated database copied back to both devices.
Subsequent uses of Information Synchronization, for the same application, are much
faster—only the changes that have been made since the databases were last
synchronized must be exchanged.
Microsoft Outlook is the only Personal Information Manager supported in this release of
Hassnet Bluetooth Software. Outlook permits duplicate entries, so all duplicates may not
be exchanged in the synchronization process.
Only Outlook’s default contacts folder is synchronized. Items in sub-folders are not
synchronized. Items that are moved from the default folder to a sub-folder will appear to
have been deleted the next synchronization takes place.
3.3.1 To use Information Synchronization
a) Set ‘Microsoft Outlook’ as a basic application in both of Server and Client computer.
51

How to use BUD software
b) Activate the function of Information Synchronization in both of Server and Client
computer.
b-1) Select Device Configuration & Information Exchange and check ‘save objects in Personal
Information Manager’.
52

How to use BUD software
b-2) Select My Device and check the possible service of my Bluetooth device.
If the ‘X’ is marked on Information Synchronization, Right-click on the ‘Information
synchronization and select ‘Start’.
53

How to use BUD software
c) On the client, in the folders pane of My Bluetooth Places, select Entire Bluetooth
Neighborhood.
d) In the right pane of Entire Bluetooth Neighborhood, right-click anywhere
on a device name
e) In the Folders pane of My Bluetooth Places, right-click the server you want to
synchronize with and select Discover Available Services from the pop-up menu
to update the available services list. The available services will be displayed in
the right pane of My Bluetooth Places.
and select Refresh from the pop-up menu.
except
54

How to use BUD software
f) In the right pane of My Bluetooth Places, double-click Information Synchronization.
A dialog box displays synchronization progress and, when the process is complete,
indicates that synchronization has successfully completed.
55
g) The connection closes automatically when synchronization is complete.

h) The ‘Receive Items’ from the opposite site can be selected.
How to use BUD software
56

3.4 Dial-up Networking
The Dial-up Networking service permits a Bluetooth client to use a modem that is
How to use BUD software
physically connected to a different Bluetooth device (the server).
After the Bluetooth wireless connection is established the client can use the server’s
modem as if it were a local device on the client.
To establish a Dial-up Networking session
Connections are initiated from the client:
a) On the client, in the Folders pane of My Bluetooth Places, select Entire Bluetooth
b) In the right pane of Entire Bluetooth Neighborhood, right-click anywhere
c) In the Folders pane of My Bluetooth Places, right-click the server that will
d) In the right pane of My Bluetooth Places, double-click Dial-up Networking.
e) In the Connect To dialog box, fill in your user name, password, and the phone
Neighborhood.
except
on a device name
provide the Dial-up Networking Service and select Discover Available Services
from the pop-up menu to update the available services list. The available services
will be displayed in the right pane of My Bluetooth Places.
number to be dialed, and then click the Dial button. Select the Save password
check box and the dialog box will not appear for subsequent connections to the
and select Refresh from the pop-up menu.
same phone number.
You can now open a web browser and connect to the Internet.
To close a Dial-up Networking connection
. On the client, in the Folders pane of My Bluetooth Places, select (highlight) the
device that is providing the Dial-up Networking service.
. In the right pane of My Bluetooth Places, right-click Dial-up Networking and
then select Disconnect Dial-up Networking from the pop-up menu.
3.5 FAX
The Fax service allows a Bluetooth client to wirelessly send a fax using a device that is
physically attached to a Bluetooth server.
To send a Fax
Connections are initiated from the client:
a) On the client, in the Folders pane of My Bluetooth Places, select Entire Bluetooth
Neighborhood.
b) In the right pane of Entire Bluetooth Neighborhood, right-click anywhere
on a device name
and select Refresh from the pop-up menu.
except
57
c) In the Folders pane of My Bluetooth Places, right-click the server that will
provide the Fax service and select Discover Available Services from the pop-up

menu to update the available services list. The available services will be
d) In the right pane of My Bluetooth Places, double-click Fax.
How to use BUD software
3.6 Information Exchange
The Information Exchange service provides a way to send and receive Microsoft Outlook
items to and from another Bluetooth device, such as a Personal Digital Assistant or
notebook computer.
The supported Outlook items are
There are three types of operations:
displayed in the right pane of My Bluetooth Places.
After the Fax connection is established, open or create the document to be faxed and
use the “Print” or “Send to Fax Recipient” option available in most applications.
The Fax connection closes automatically when the transmission is complete.
• Business cards (*.vcf and *.vcd)
• Calendar entries (*.vcs)
•Notes (*.vnt)
• Messages (*.vmg)
• Send—sends an object to another device.
• Receive—requests an object from another device.
• Exchange—sends a client object and receives a server object.
The default location of your business card and the location where received items are
placed can be configured in the Bluetooth Configuration Panel.
To send, receive or exchange an object: on the client, in the Folders pane of My
Bluetooth Places, right-click the Inbox icon of the remote device and select an option
from the pop-up menu.
Business cards are sent, received or exchanged without further intervention.
To send Calendar Items, Notes, and Messages, navigate to the folder that contains the
item you want to send, select the item, and then click Open.
3.6.1 INFORMATION EXCHANGE CONFIGURATION SETTINGS
The settings on the Information Exchange tab of the Bluetooth Configuration Panel
configure:
• The highest-level directory on this computer that a remote device has
permission to access (My Shared Directory)
58
• The path to your electronic business card (My Business Card)
• The path to the directory that will be used to save incoming (My Inbox
Directory):

How to use BUD software
9 Business cards
9 Notes
9 Messages
9 Calendar items.
3.6.1.1 File Transfer
My Shared Directory: the directory configured in this section is the highest-level
directory to which a remote Bluetooth computer has access. This directory and its sub
directories are displayed in the remote device's My Bluetooth Places.
Click the Browse button and navigate to the directory that will be used as My Shared
Directory.
3.6.1.2 Send Business Card
My Business Card: the path to the directory on this computer that contains your
electronic business card.
Select the "Send Business Card on Request" option to allow remote devices to obtain
your business card.
Click the Browse button and navigate to the directory that contains your business card.
3.6.1.3 Receive Business Card
My Inbox Directory: the path to the directory on this computer where inbound
Personal Information Manager items such as Business cards, Notes, Calendar entries and
Messages will be saved.
Select the types of items you wish to accept by placing a checkmark in the appropriate
boxes, and then click the Browse button to navigate to the directory where they should
Be saved.
Select the "Save Object in Personal Information Manager" option to save incoming
objects directly in the PIM.
When this option is selected, the path specified in “My Inbox
Directory” is not used.
59

3.7 Bluetooth Serial Port
The Bluetooth Serial Port service allows two Bluetooth devices to establish a wireless
How to use BUD software
connection through virtual communications ports and then use that connection as if it
were a hardwired serial cable between the devices.
To establish a Bluetooth serial port connection:
Connections are initiated from the client:
a) On the client, in the Folders pane of My Bluetooth Places, select Entire Bluetooth
Neighborhood.
b) In the right pane of Entire Bluetooth Neighborhood, right-click anywhere
on a device name
c) In the Folders pane of My Bluetooth Places, right-click the server you want to
establish a connection with and select Discover Available Services from the popup
menu to update the available services list. The available services will be
displayed in the right pane of My Bluetooth Places.
d) In the right pane of My Bluetooth Places, double-click Bluetooth Serial Port. A
dialog box appears that contains the communications port number assigned to
this connection by the client. The application that will use this connection must
be configured to send data to this port.
and select Refresh from the pop-up menu.
except
Depending on the security configuration, the dialog box that provides communications
port information may not appear until after Authentication and Authorization have been
accomplished.
The application on the server must be configured to use the correct communications port.
To determine the communications port being used by the service:
• On the server, in the Folders pane of My Bluetooth Places, right-click My Device
and select Properties from the pop-up menu
• In the Bluetooth Configuration Panel, select the Local Services tab.
• Double-click the Bluetooth Serial Port service to display its Service Properties
dialog box. The Service Properties dialog box shows the communications port
the connection is using.
To close a Bluetooth serial port connection
Connections are normally closed from the client:
• On the client, in the Folders pane of My Bluetooth Places, select (highlight) the
device that is providing the Bluetooth Serial Port service.
60
• In the right pane of My Bluetooth Places, right-click Bluetooth Serial Port and
then select Disconnect Bluetooth Serial Port from the pop-up menu.

Though not recommended, connections can also be closed from the server:
• On the server, in the Folders pane of My Bluetooth Places, select (highlight) My
How to use BUD software
Device
• In the right pane of My Bluetooth Places, right-click Bluetooth Serial Port and
then select Stop to close the service. The service must be re-started before it will
be available to remote devices (right-click Bluetooth Serial Port and select Start
from the pop-up menu).
61

4. Security
4.1 INTRODUCTION
Each service that the server provides can be configured to require:
How to use BUD software
The default security setting for Authorization, Authentication and Encryption is disabled.
Devices can also be paired, a process that eliminates the need to enter a PIN code
every time access is attempted.
4.2 AUTHENTICATION
Authentication is used to verify identity; it requires a passkey or Link Key from the
• Authorization—the server operator must acknowledge all connection attempts
before a connection is established.
• Authentication—the server requires a Personal Identification Number (PIN,
also referred to as a “passkey”) code or a Link Key before a connection is
established.
• Encryption—all data sent between the Bluetooth client and Bluetooth server is
encrypted. The encryption key is based on the Authentication Link Key;
Encryption requires that Authentication be enabled.
remote device. When a remote device attempts access, a visual and/or audio warning
notifies the local operator.
The local operator can open a dialog box that provides:
• The user-friendly name of the device attempting access
• A place for the local operator to enter a Bluetooth passkey.
The operator of the remote system must enter the identical passkey or access is denied.
If the notification is ignored, access is denied after a preset timeout.
When devices are “paired,” those devices automatically exchange a Link Key and
Authentication is carried out without operator intervention.
4.3 AUTHORIZATION
Authorization is yes-or-no security.
A visual and/or audio warning alerts the server operator that a remote device is
attempting to connect.
The server operator responds by clicking the Bluetooth icon in the Windows system tray
to open a dialog box that displays:
• The user-friendly name of the device attempting to connect
62
• The local service to which the remote device is attempting to connect.
The server operator may grant or deny access to the service by clicking an on-screen
button.
If the server operator ignores the Authorization notification access will be denied after a
preset timeout.

4.4 ENCRYPTION
Encrypting translates data into an unreadable format using a secret key or password.
Decrypting the data requires the same key or password that was used to encrypt it.
How to use BUD software
Encryption in Hassnet Bluetooth Software is based on the same passkey or Link Key that
is used for Authentication. If Authentication is not enabled the key is not available and
Encryption will not take place.
To use Encryption, Authentication must be enabled.
To enable Encryption for a service:
a) Right-click a service name and select Properties from the pop-up menu to display
the Bluetooth Properties dialog box.
b) Select the Encryption option. If Authentication is not enabled it will be
automatically turned on when Encryption is selected.
c) Click the OK button to close the dialog box and apply the change.
4.5 LEVELS OF SECURITY
Security for local services may be configured on an individual basis.
The configuration options are:
• Startup-Automatic or Manual
• Authorization
• Authentication
•Encryption
To access the security settings for a local service, in the Bluetooth Configuration Panel,
from the Local Services tab, double-click the service name.
Bluetooth-enabled devices from different vendors may handle security in a slightly
different manner. Refer to the user's guide for your Bluetooth device for additional
information.
4.6 LINK KEY
A Link Key is a unique, internally generated, access code. Link Keys are generated
automatically when devices are Paired or when Authentication is enabled.
Link Keys are created by combining
• The Passkey
• The Bluetooth Device Address
• An internally generated random number.
63

How to use BUD software
4.7 PAIRING DEVICES
Pairing allows you to avoid entering access information each time a connection is
attempted. Paired devices share a unique Link Key, which they exchange when
connecting.
The mate of a pair will always appear in My Bluetooth Places, even if the mate is not
turned on or is out of connection range.
Paired devices remain paired even when:
• One of the devices is not powered up
• A service connection is interrupted or the service stopped
• One or both devices are rebooted.
When Authentication is enabled, devices are paired the first time they attempt to
connect,
after a successful passkey exchange.
To pair devices
a) In the Windows System Tray, right-click the Bluetooth icon, then Setup and
select Security from the submenu.
b) The Bluetooth Security dialog box appears and Hassnet Bluetooth Software
performs a device inquiry
to update the list of devices in the area. After the inquiry is complete:
c) In the Found Devices pane of the dialog box, click the name of the device to be
paired
d) Click the Execute Pairing button.
e) In the Bluetooth Passkey Request dialog box:
f) Enter the Bluetooth passkey
g) Click the OK button.
The check box on the main screen, when selected, permits all services to connect
without Authorization.
When devices are paired, the configuration information is saved on both devices.
Devices remain paired until the relationship is broken on both devices.
To break a paired device relationship
before
attempting a connection:
64
• In the Windows System Tray, right-click the Bluetooth icon, then Setup and
select Security from the submenu.
• From the Bluetooth Security dialog box, in the Paired Devices list, select a
device, click the Delete button and then click the Done button.
Pairing must be broken on both devices.

4.8 PASSKEY
A Passkey is an alphanumeric string up to 16 characters in length. Passkeys are also
How to use BUD software
called PIN codes, or Personal Identification Numbers.
In Hassnet Bluetooth Software, passkeys are used in the Authentication and Encryption
process.
4.9 SECURITY REQUEST DIALOG BOX
A Bluetooth Authorization or Bluetooth Passkey Request dialog box may appear
(depending on security settings) when a connection is attempted if either Authorization
or Authentication is enabled. The method of notification depends on the version of
Windows:
Regardless of the version of Windows, click the Bluetooth icon in the Windows System
Tray and then follow the on-screen instructions. The instructions vary, depending on the
security configuration of the system.
If the security notification is ignored the connection request will fail after a preset
• Windows 2000, Windows Me, and Windows XP—a bubble message is displayed
over the Bluetooth icon in the Windows System Tray
• Windows 98SE—The Hassnet Bluetooth Software icon in the Windows System
Tray blinks.
timeout.
The dialog box provides
• Device Name: the user-friendly name of the device attempting to connect.
• Request to access: the service the remote device is attempting to access.
• Buttons for responding.
9 OK-allow the connection
9 Cancel-deny the connection
9 Advanced button (see below)
• A check box that, when enabled, grants (authorizes) the connecting device
access to all of the services on this computer (click the See Also button, below,
for more information).
4.10 SECURITY REQUEST DIALOG BOX, ADVANCED BUTTON
The check box on the main page of the Bluetooth Authorization and Bluetooth Passkey
Request dialog boxes ("Check this box to ALWAYS allow this device to access ALL the
services of your computer"), when enabled, grants permission (authorizes) the device
attempting to connect to access all services on this computer when attempting to
65
connect in the future.
To limit the services the connecting device may use:

How to use BUD software
• Click the Advanced button
• In the expanded dialog box, select the services that the connecting device is
authorized to use. When a service is selected, that service will NOT require
authorization in the future (no prompt will appear when a connection is
attempted).
Regardless of whether the main dialog box is for Authorization or Authentication,
these options pertain to Authorization; they do not affect Authentication.
• Click the Authorize or Authenticate button.
66

5. Troubleshooting
5.1 CANNOT CONNECT TO A PAIRED DEVICE:
How to use BUD software
Paired devices are always displayed in My Bluetooth Places, even if the remote device
is out of range or not powered up.
Verify that the remote member of the pair is within radio range and powered up and then
attempt the connection again.
5.2 CANNOT DISCOVER SERVICES ON AN UN-PAIRED REMOTE DEVICE:
The remote device may not be powered up or may be out of range.
5.3 DIAL-UP NETWORKING SERVICE DOES NOT START:
The Dial-up Networking service will not start unless a properly configured modem is
attached to the server.
• Verify that the remote device is powered up.
• Verify that the remote device is in Connectable mode (Bluetooth Configuration
Panel > Accessibility tab).
• Perform a Search for Devices to verify that the device is within range.
• Verify that the modem is usable as a local device from the server.
• In the Bluetooth Configuration Panel, Local Services tab, double-click the Dialup
Networking service:
9 Click the down arrow in the Modem field and select the modem that
will be used to dial out
9 Click the OK button
9 Click the OK button to close the Bluetooth Configuration Panel.
5.4 HOW DO I DETERMINE THE BLUETOOTH DEVICE ADDRESS (BDA) OF MY
HARDWARE DEVICE?
In the Bluetooth Configuration Panel, on the Hardware tab, in the Devices section, select
the device you want to determine the address of. In the Device Properties section of the
dialog box, the fourth entry, Device Address, is the BDA of the selected Bluetooth
device.
5.5 HOW DO I DETERMINE THE VERSION NUMBER OF THE BLUETOOTH
SPECIFICATION THAT THE HOST CONTROLLER INTERFACE (HCI) COMPLIES
WITH?
In the Bluetooth Configuration Panel, on the Hardware tab, in the Device Properties
67
section, the fifth entry provides Bluetooth Specification compliance information for the
Host Controller Interface.

The sixth entry contains the Specification Revision information for the Host Controller
Interface, if appropriate.
How to use BUD software
5.6 HOW DO I DETERMINE THE VERSION NUMBER OF THE LINK MANAGER
PROTOCOL (LMP)?
In the Bluetooth Configuration Panel, on the Hardware tab, in the Device Properties
section, the seventh entry provides Link Manager Protocol version number information.
The eighth entry contains the Link Manager Protocol sub-version number information, if
appropriate.
5.7 HOW do I FIND INFORMATION ABOUT THE BLUETOOTH HARDWARE
ATTACHED TO MY COMPUTER?
In the Bluetooth Configuration Panel, select the Hardware tab.
5.8 HOW DO I TEST A NETWORK ACCESS CONNECTION?
If the client is hardwired to the LAN, unplug the hardwired connection to ensure that the
test checks the wireless connection rather than the hardwired connection.
If the server has access to the Internet, open a browser on the client and connect to the
World Wide Web.
You may also Ping the server from the DOS prompt.
5.9 WHY DO I GET AN UNKNOWN PORT MESSAGE WHEN I ATTEMPT TO USE A
BLUETOOTH SERIAL PORT?
The “Unknown Port” error message usually means an attempt was made to connect a
port that was in use.
Additional Bluetooth Serial Ports can be added if they are required.
68

Chapter 9
Thank you
Technical support and contact information
For Hassnet BUD (Bluetooth USB Dongle) support information, visit the Hassnet
website at http://www.hassnet.com.
E-mail : info@hassnet.com
Address: 136-701, 6fl. Techno Complex Bldg., Korea Univ., 126-16, Anam-dong 5Ka,
support@hassnet.com
Seongbuk-Ku, Seoul, Korea
Office : 82-2-927-6521
FAX : 82-2-927-6523
• Notice : The changes or modifications not expressly approved by the party responsible
for compliance could void the user’s authority to operate the equipment.
• IMPORTANT NOTE: To comply with the FCC RF exposure compliance requirements, no change to the
antenna or the device is permitted. Any change to the antenna or the device could result in the device
exceeding the RF exposure requirements and void user’s authority to operate the device. This device and
its antenna must not be co-located or operating in conjunction with any other antenna or transmitter.

Chapter 10
FCC INFORMATION
The Federal Communication Commission Radio Frequency Interference Statement includes
the following paragraph:
The equipment has been tested and found to comply with the limits for a Class B Digital
Device, pursuant to part 15 of the FCC Rules. These limits are designed to provide
reasonable protection against harmful interference in a residential installation. This
equipment generates, uses and can radiate radio frequency energy and, if not installed and
used in accordance with the instruction, may cause harmful interference to radio
Communication. However, there is no grantee that interference will not occur in a
particular installation. If this equipment dose cause harmful interference to radio or
television reception, which can be determined by turning the equipment off and on , the
user is encouraged to try to correct the interference by one or more of the following
measures:
• Reorient or relocate the receiving antenna.
• Increase the separation between the equipment and receiver.
• Connect the equipment into an outlet on a circuit different from that to which the receiver
is connected.
•Consult the dealer or an experienced radio/TV technician for help.
The user should not modify or change this equipment without written approval from HASSN
ET Inc. Modification could void authority to use this equipment.
* THIS DEVICE COMPLIES WITH PART 15 OF THE FCC RULES. OPERATIONS IS SUBJECT
TO THE FOLLOWING TWO CONDITIONS: ( 1 ) THIS DEVICE MAY NOT CAUSE HARMFUL
INTERFERENCE AND ( 2 ) THIS DEVICE MUST ACCEPT ANY INTERFERENCE RECEIVED,
INCLUDING INTERFERENCE THAT MAY CAUSE UNDESIRED OPERATION.
 Loading...