

Page 1
1
ORIG0122-1
412881 1U/B
12/08/2006
This guide includes Instructions for Adding Postage and
Connecting to the Online Services Server
UNBOX AND SET-UP EQUIPMENT
This machine requires connection to a grounded power
outlet and an analog telephone outlet.
Choose your set-up location with this in mind.
If you are unsure what type of phone line you have, most
fax machines use an anlog line.
STEP 1
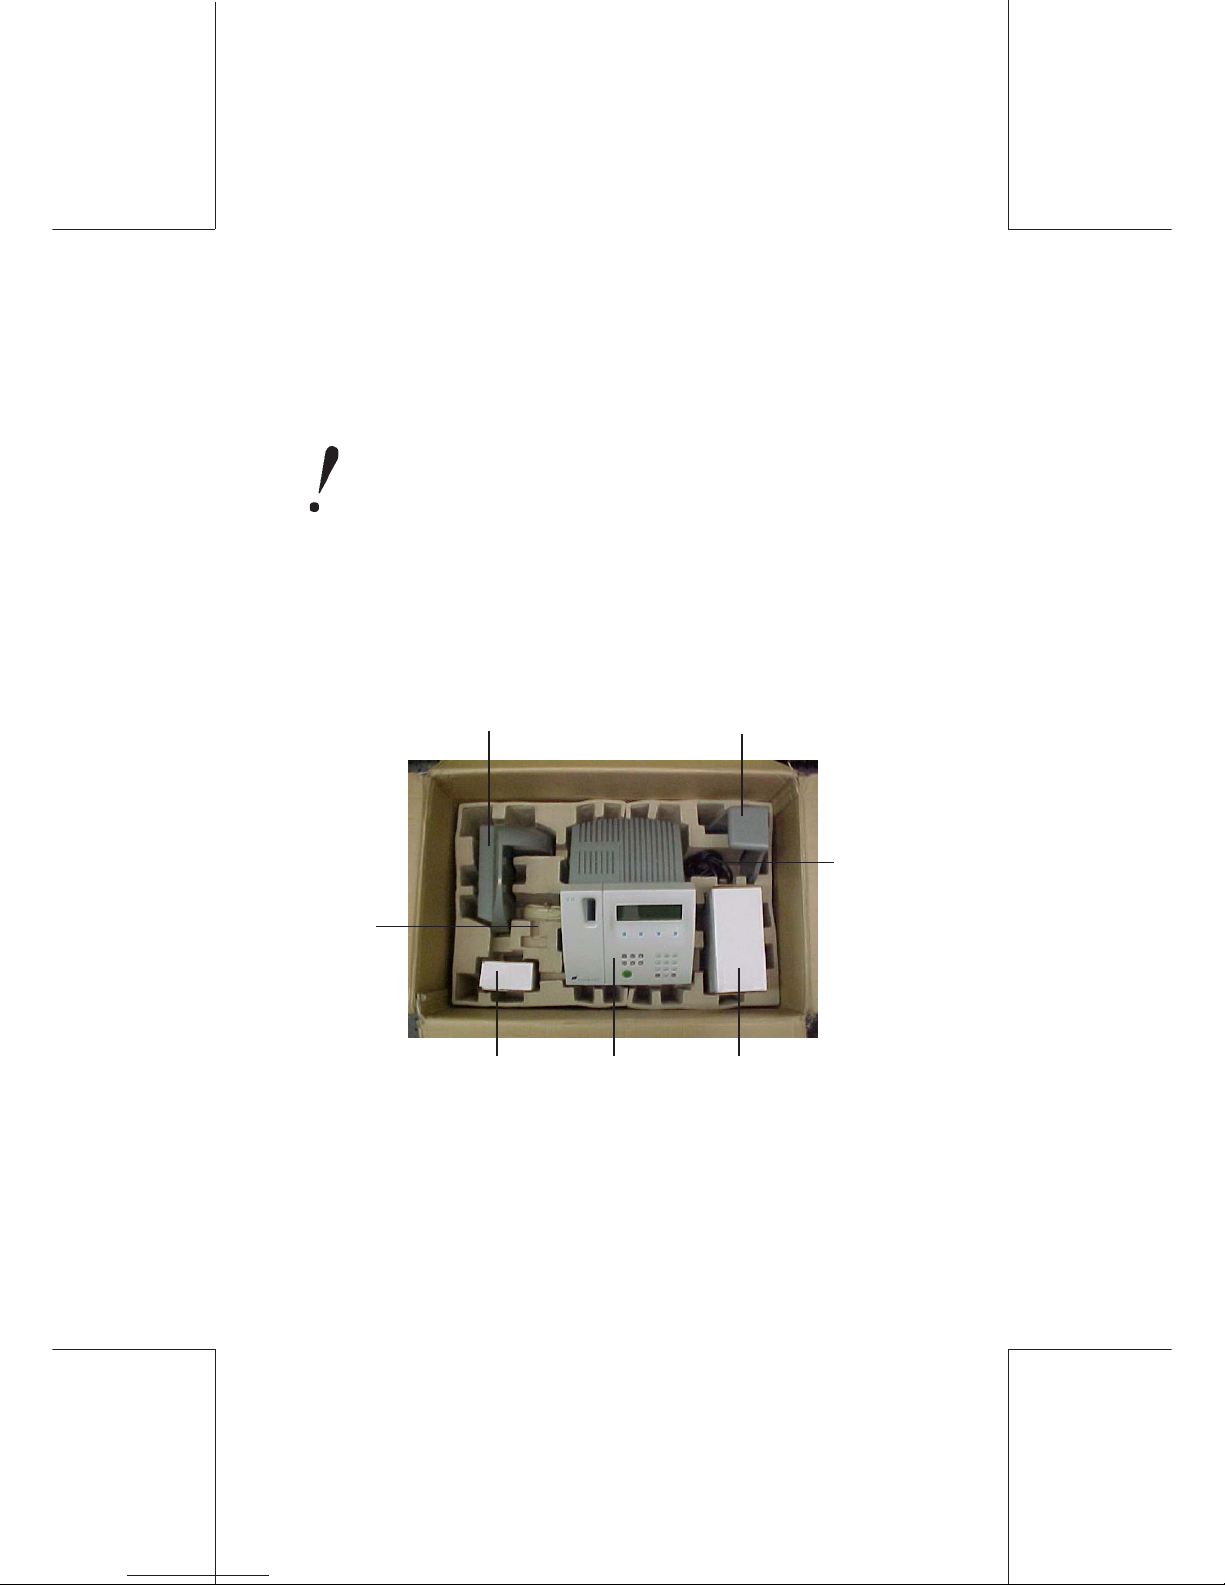
Open the WJ 65, WJ 95 or WJ 110 carton and remove the contents.
Remove the cardboard packing insert from the mailing machine
by pulling in the direction of the arrow.
Set aside the Handfeed Platform, Catch Tray, Ink Cartridge,
Labels, Power Cord, Phone Cable, User Guide and optional
WP5 Weigh Platform.
Handfeet
Platform
WJ 65/95/1 10
Mail Machine
Catch Tray
Power Cord
&
Telephone
Cable
Optional IWP5
Weigh Platform
Ink Cartridge
Labels
Page 2

2
ORIG0122-2
4128811U/B
12/08/2006
STEP 2
Open the optional WJ 65/95/110AF Feeder, WJ Moistener or WP
weigh platform cartons and remove the contents.
Feeder
Moistener
WJWP10,
IWP30,
or WJWP70
Platform
Page 3
3
ORIG0122-3
412881 1U/B
12/08/2006
-If you ordered an WJ Moistener to use with the Hand Feed
Platform, go to step 3
- If you ordered an WJ 65/95/110AF Autofeed and Moistener,
go to step 4
- If you did not order an Autofeed or Moistener, go to step 5
STEP 3
Attach Moistener Unit to the Hand
Feed Platform
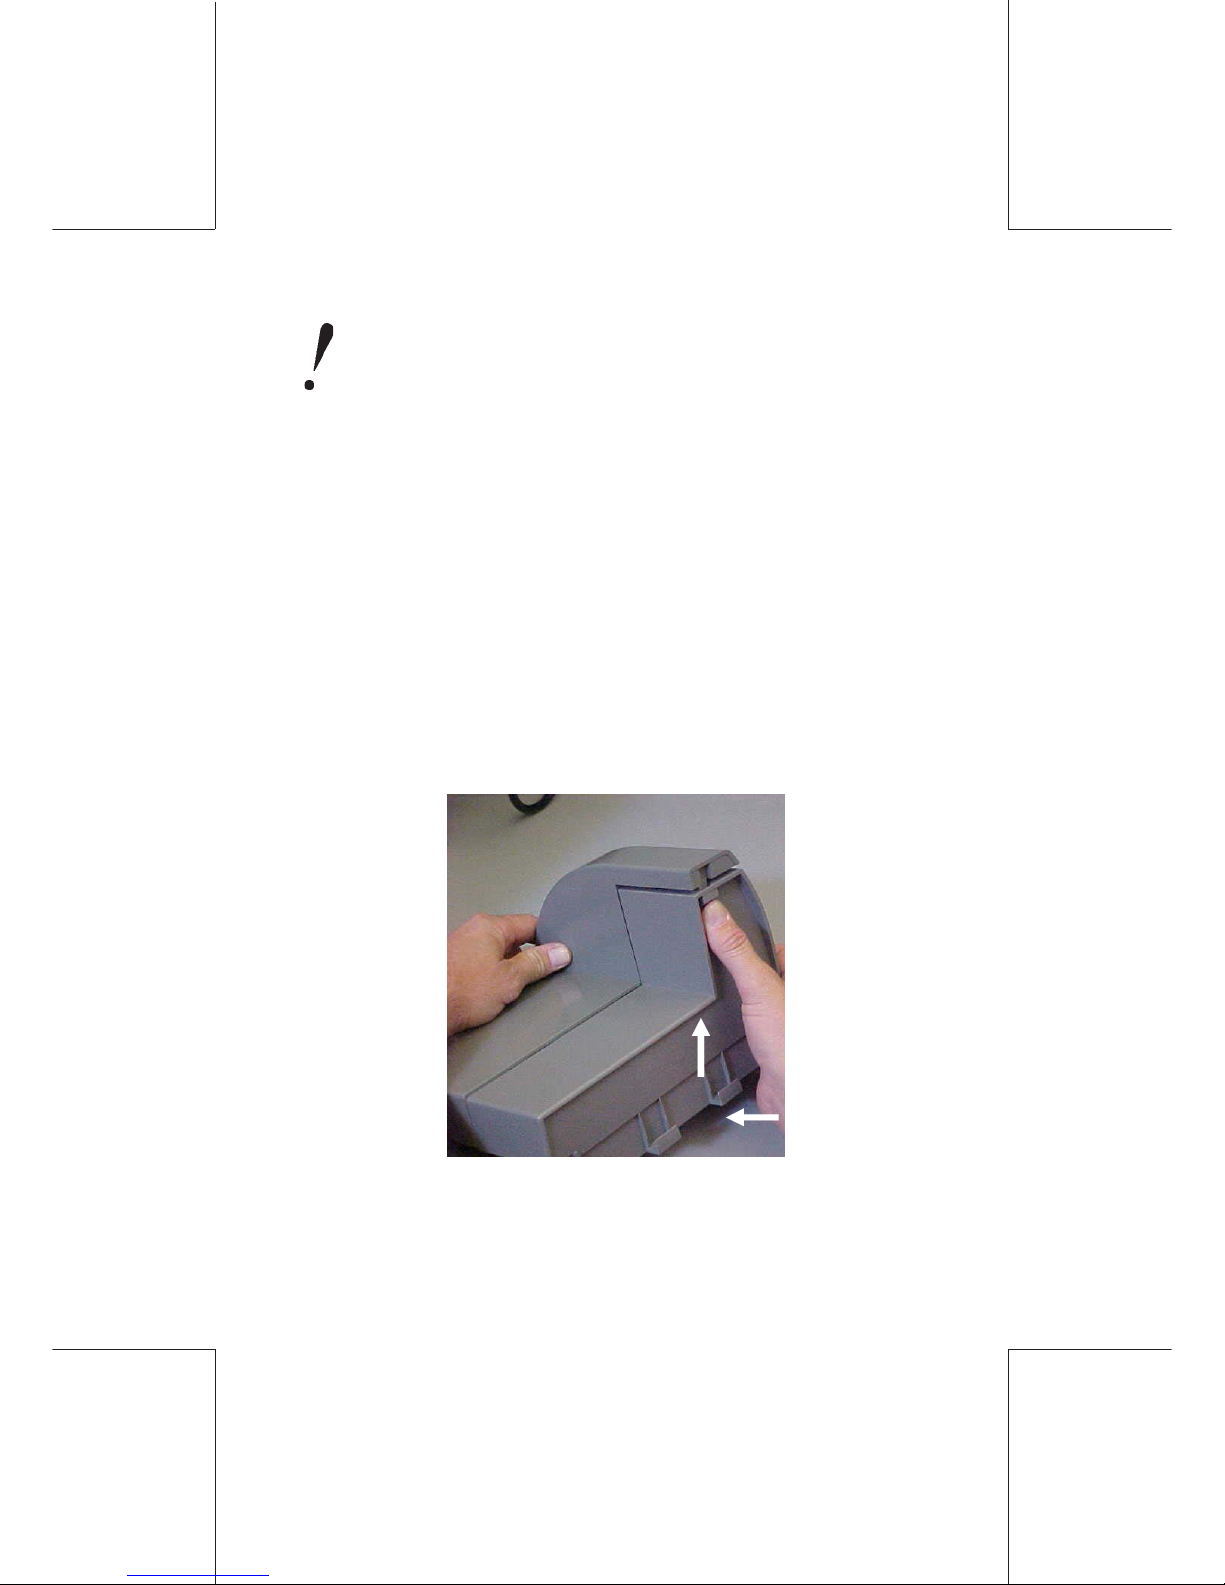
If you oredered an WJ Moistener to use with the Handfeed Platform,
you must first remove the Platform Infill from the Handfeed Platform.
1) Press on tab with thumb then push up.
Page 4
4
ORIG0122-4
4128811U/B
12/08/2006
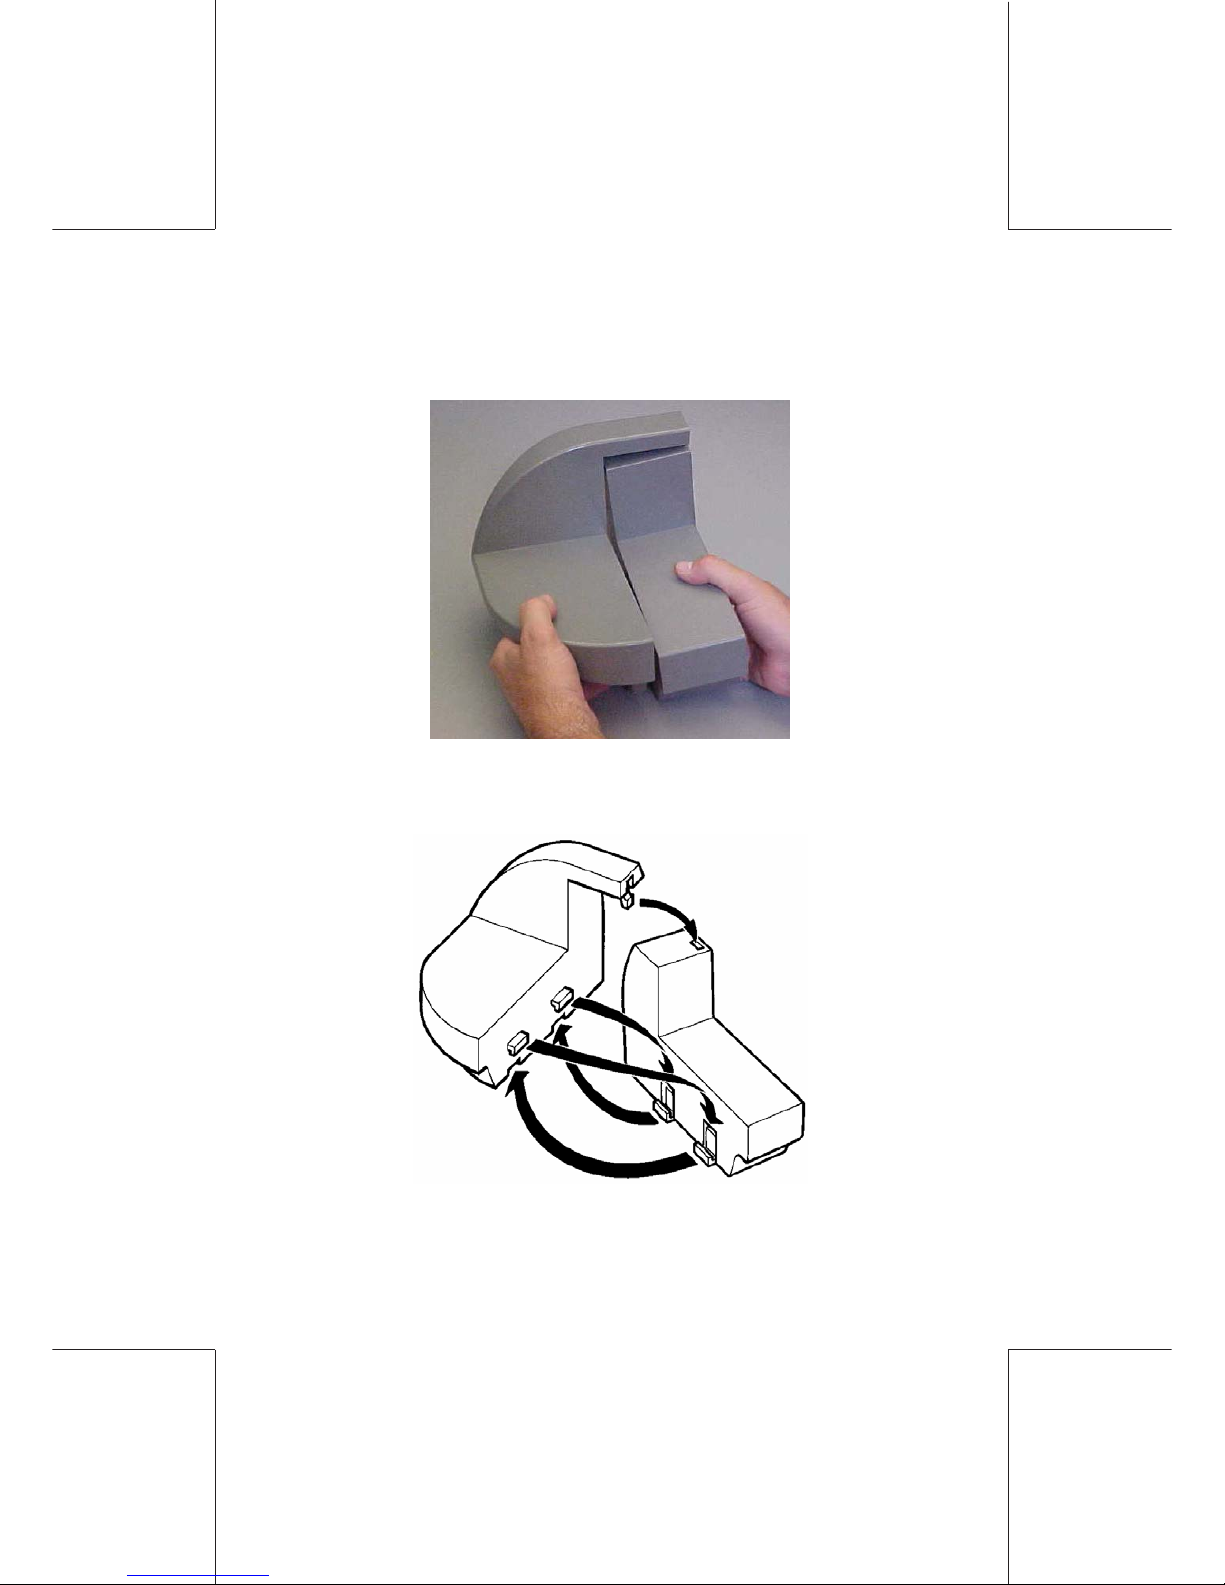
2) Pull down slightly then separate infill from handfeed platform.
- Attach the WJ Moistener Unit to the Handfeed Platform.
Page 5
5
ORIG0122-5
412881 1U/B
12/08/2006
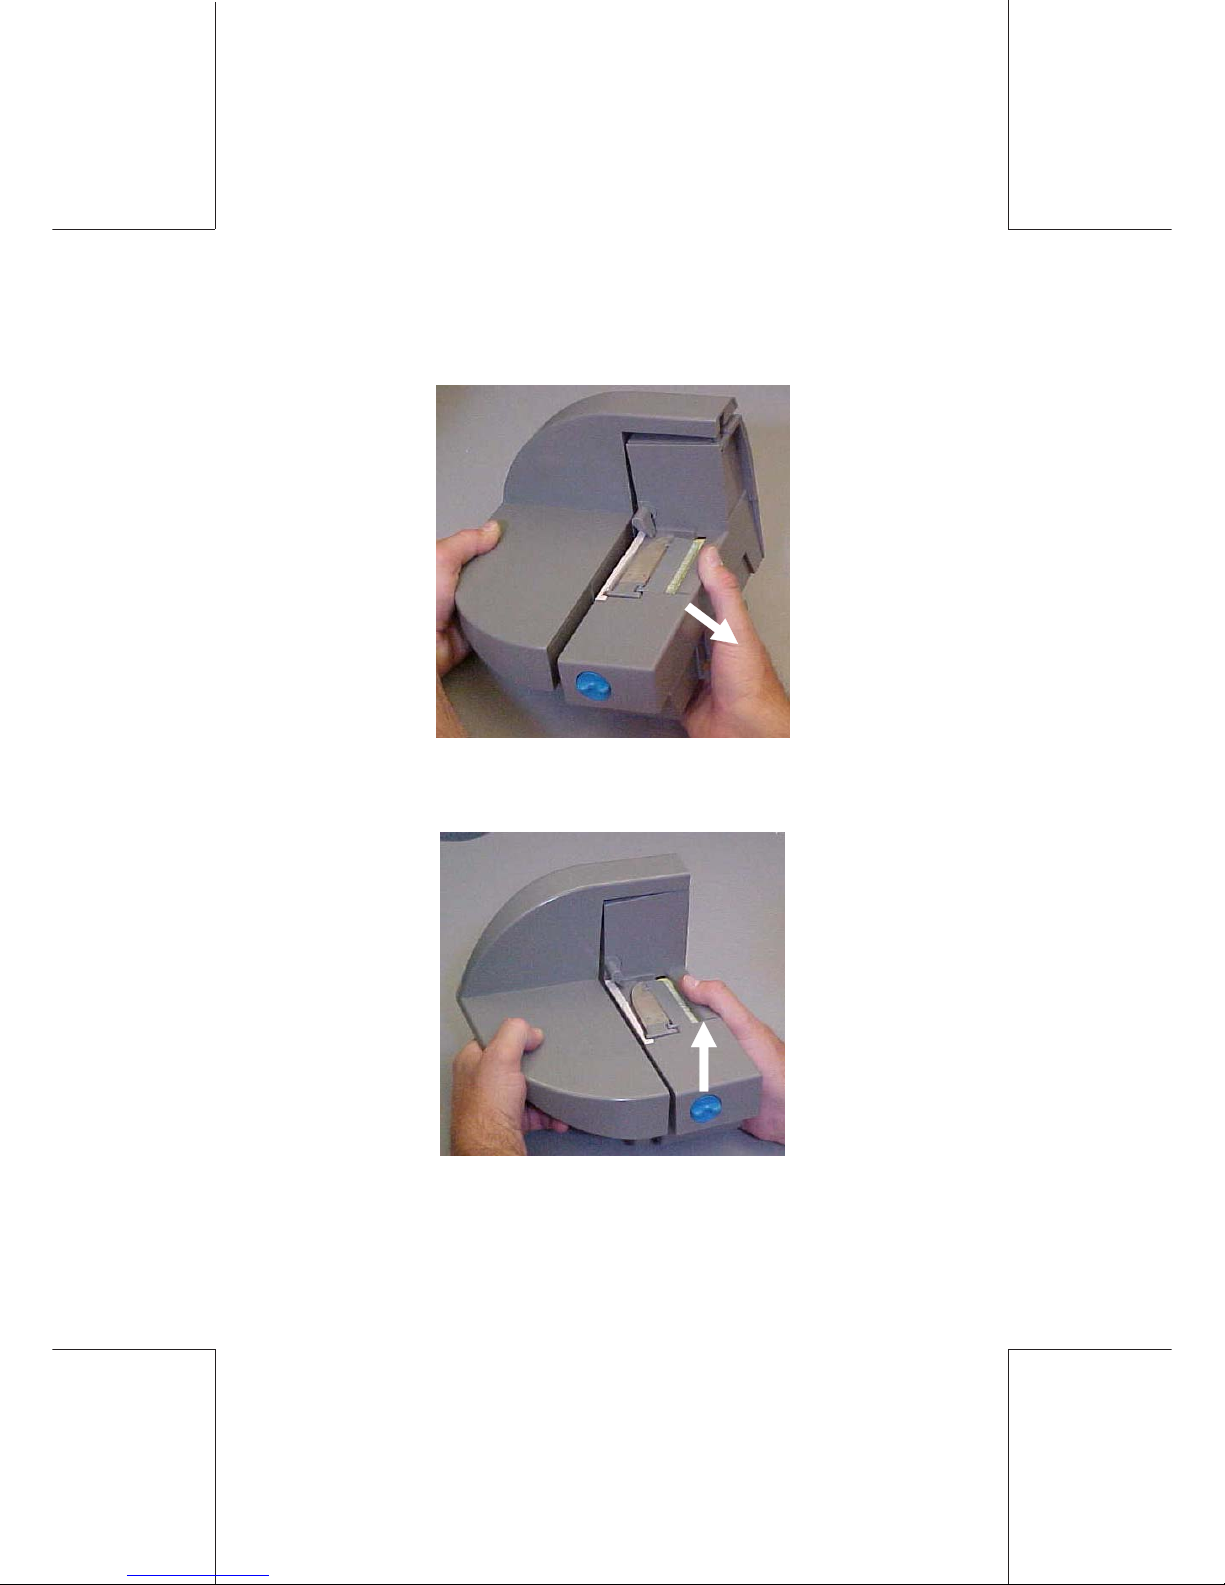
- Ensure that the Tabs and Slots interlock as illustrated.
- Press sealer and platform together then push sealer up to lock.
Page 6
6
ORIG0122-6
4128811U/B
12/08/2006
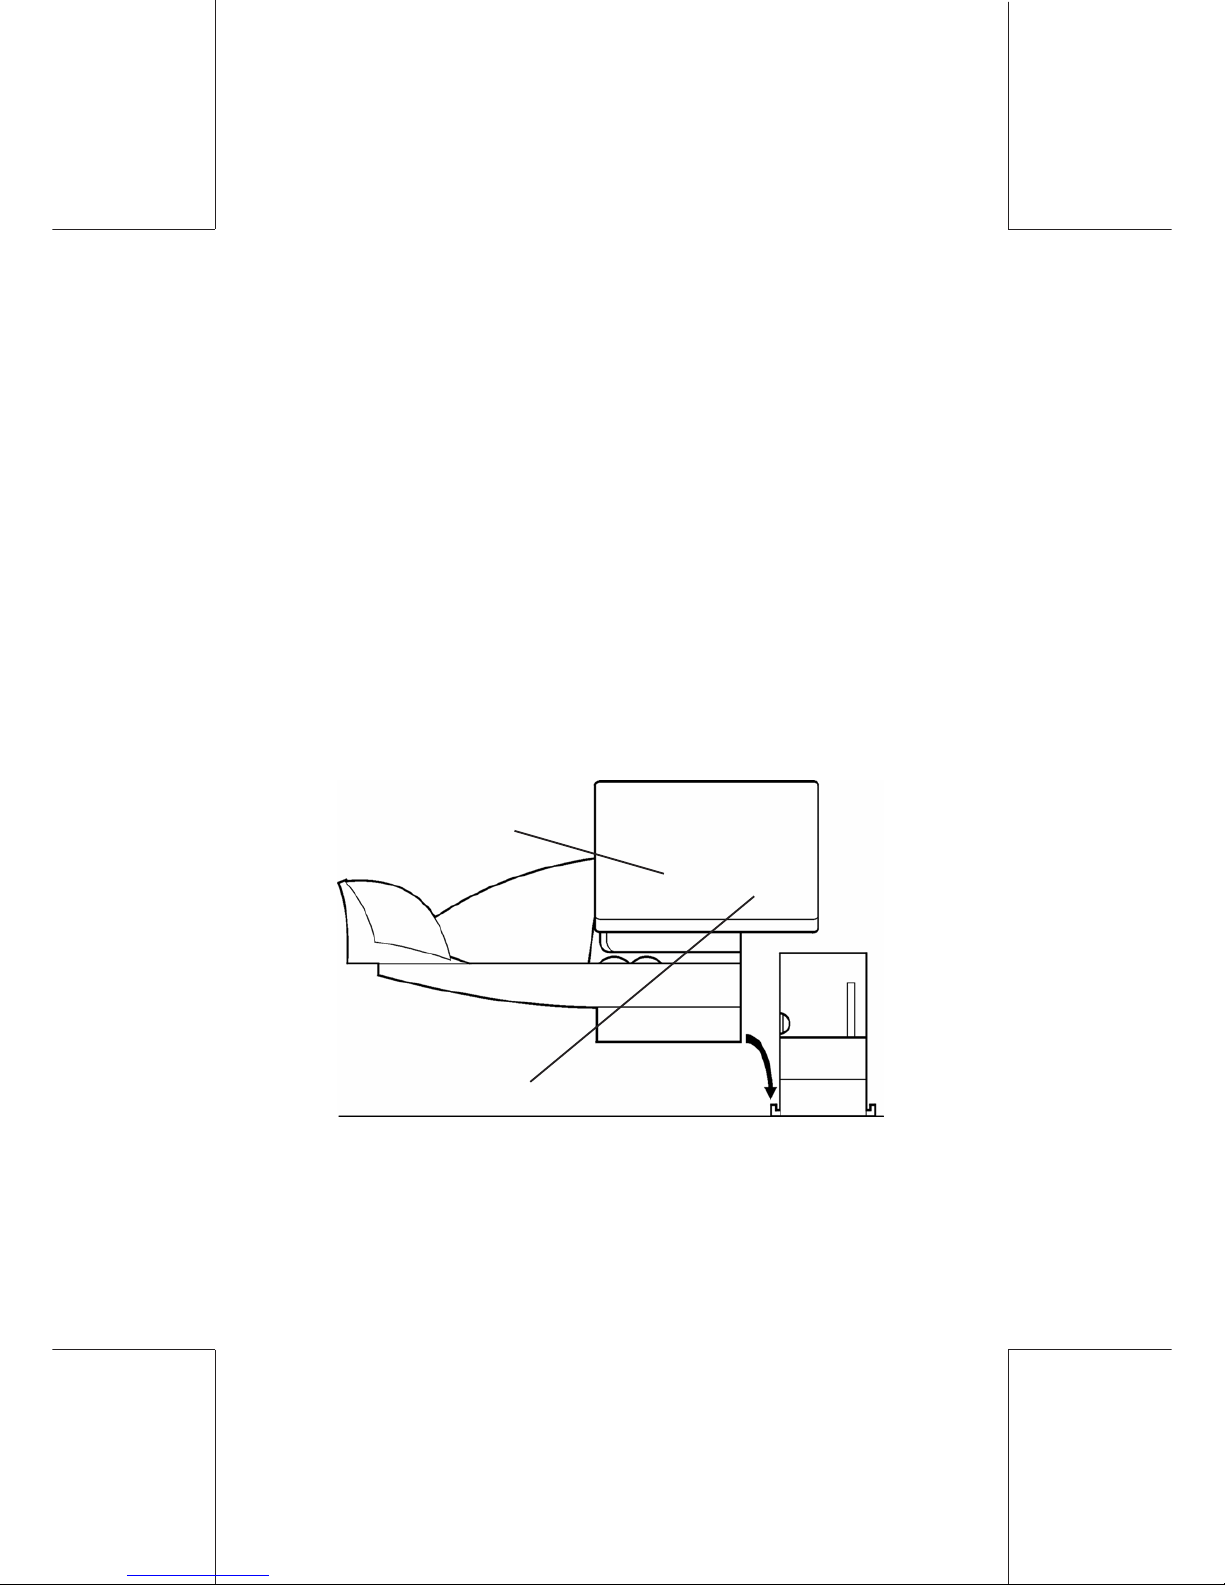
STEP 4
Attach Optional Moistener Unit to the
Autofeed Unit
If you received an optional WJ 65/95/110 AF Autofeed, you must
first attach the WJ Moistener.
Place the Moistener Unit on the table, then lower the Autofeed Unit
onto the Sealer ensuring that the slots on the Autofeed fit tightly
over the tabs on the Moistener Unit as illustrated.
Feeder
Moistener
Page 7
7
ORIG0122-7
412881 1U/B
12/08/2006
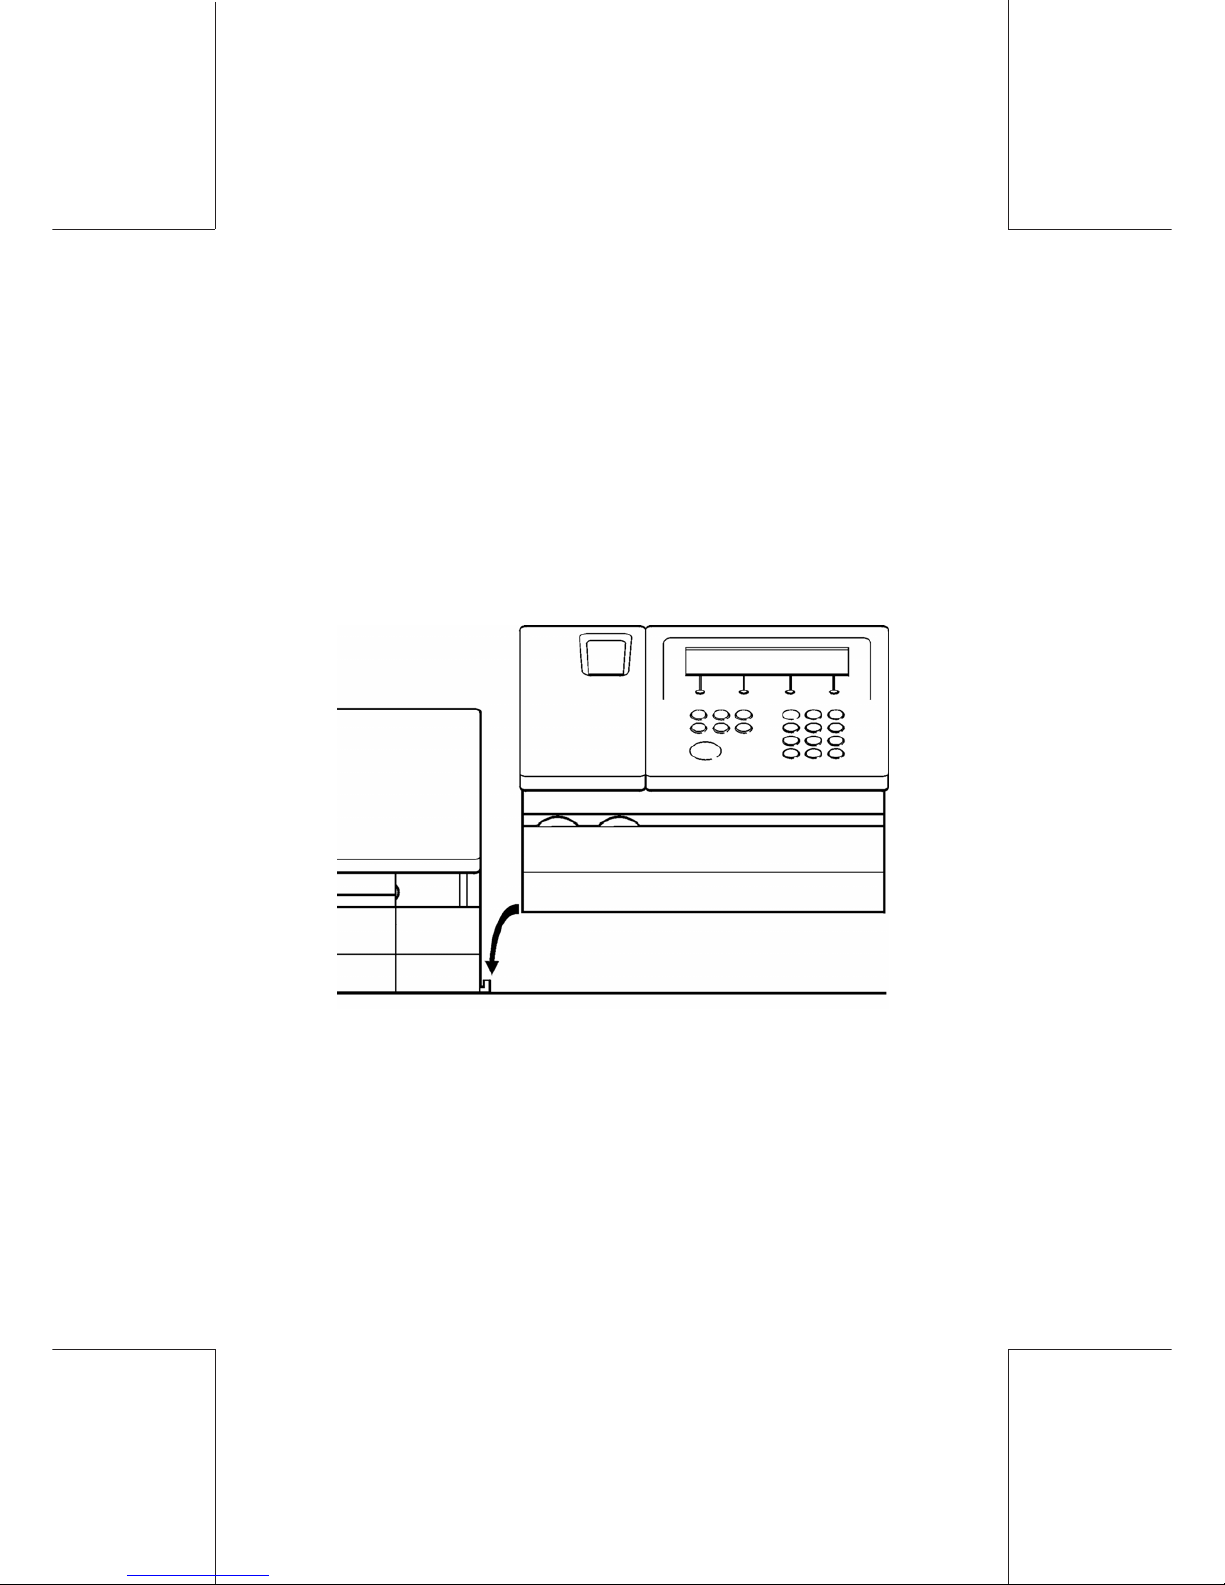
STEP 5
Attach WJ 65, WJ 95 or WJ 110 Base
Mailing Unit to the Autofeed or Hand Feed
Platform
With the Autofeed or Handfeed Platform in the desired position on
the table, lower the WJ 65/95/110 into place so that the slots fit
over the tabs as illustrated.
The position of the slots in the WJ 65/95/110 are easily identifiable by the metal tabs easily seen from the top when lowering the
unit.
Page 8
8
ORIG0122-8
4128811U/B
12/08/2006
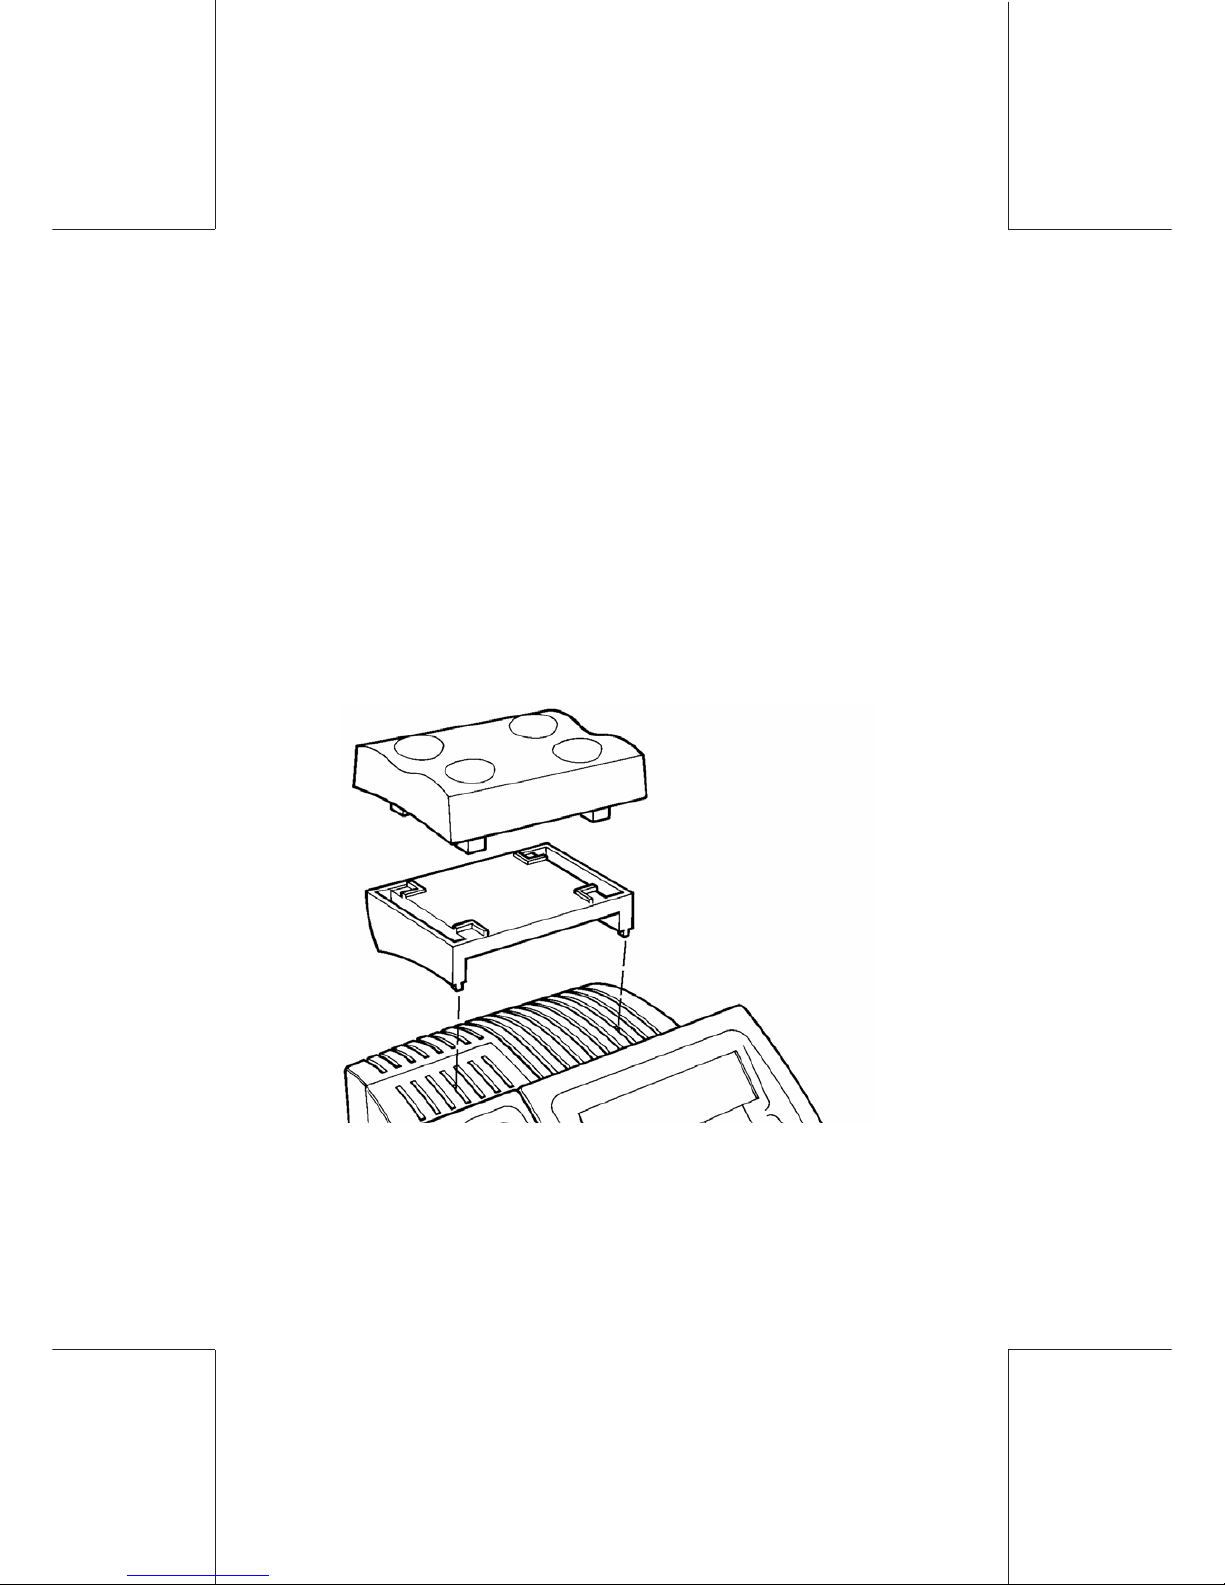
STEP 6
Attach the optional WP5 Weigh Plat form
and Support
Sufficient cable has been provide to enable the unit to be placed
on the table adjacent to the mailing machine if this is preferred.
1) Position the weigh platform on its support. Excess cable can be
loosely in the clips under the support.
2) Position the support platform on top of the WJ 65/95/110 unit
so that the pins on the underside of the support fit into the locating
points on the rear cover of the WJ 65/95/110.
The position of the slots in the WJ 65/95/110 are easily identifiable by the metal tabs easily seen from the top when lowering the
unit.
Page 9
9
ORIG0122-9
412881 1U/B
12/08/2006
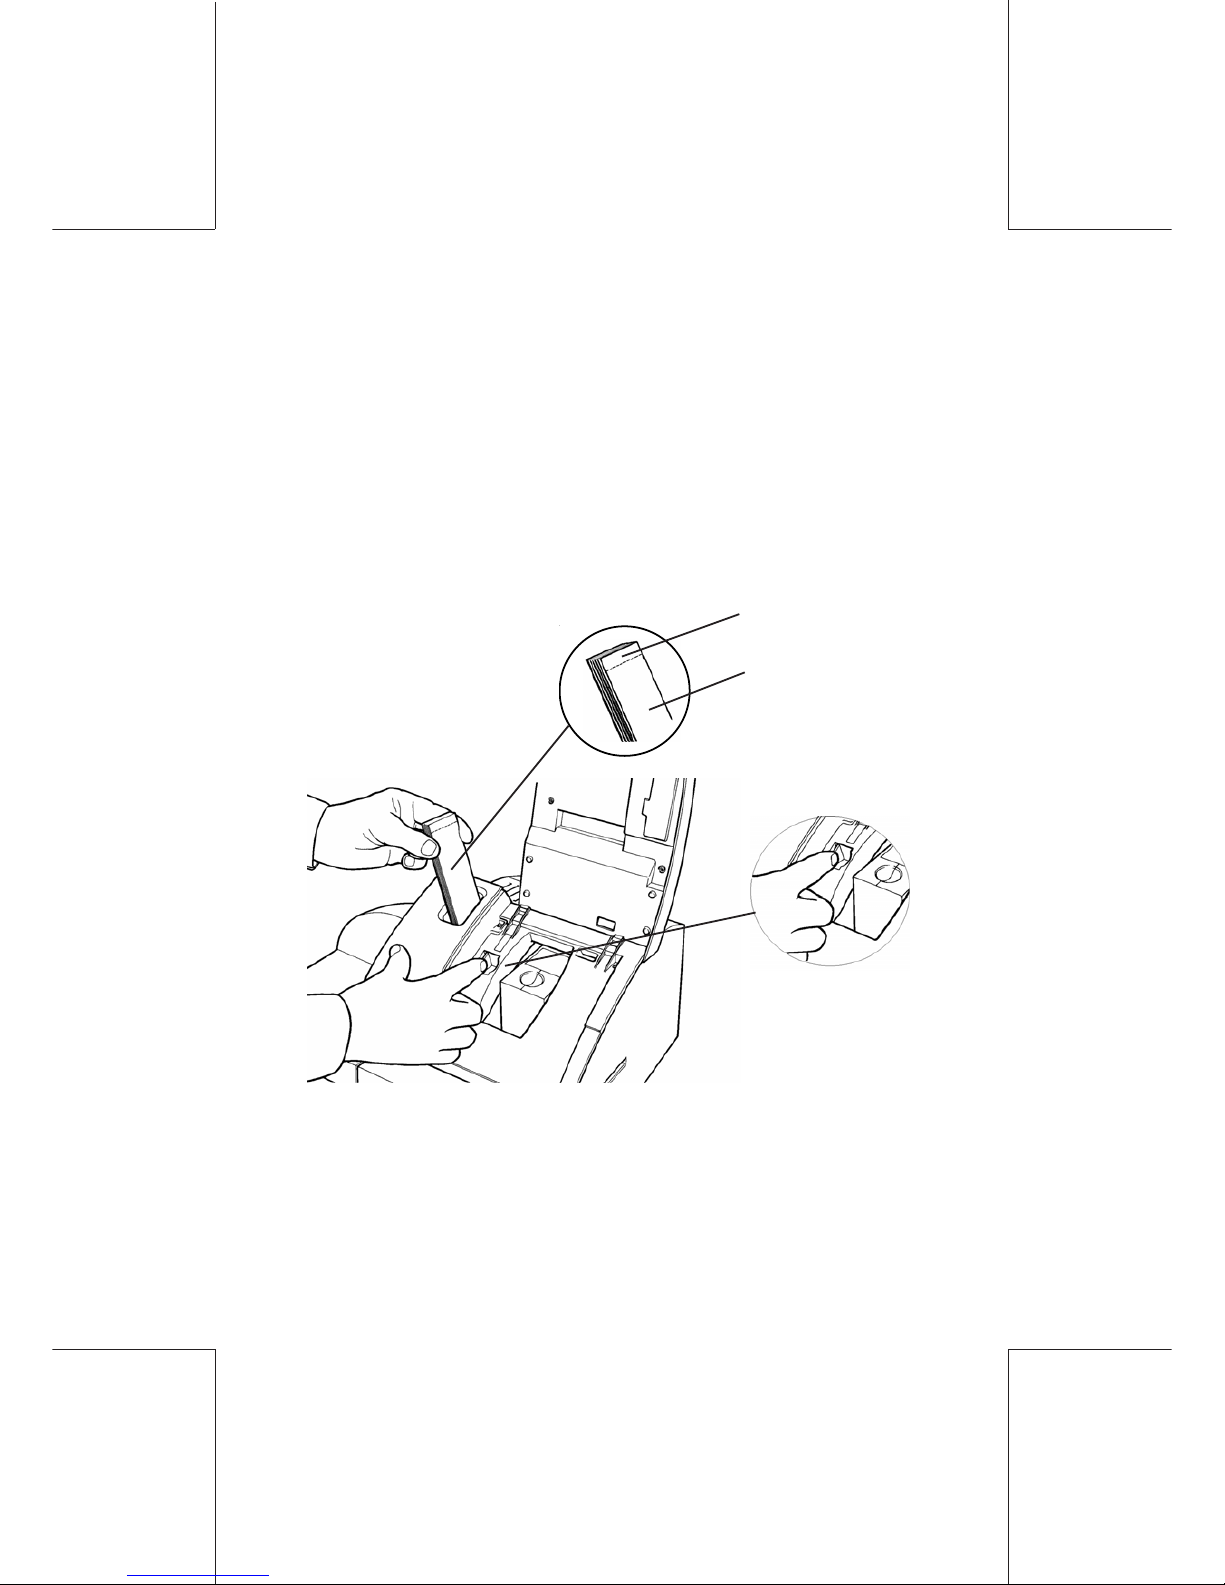
STEP 7
Fill the Label Dispenser
A package of postage labels is included with your WJ 65/95/110
mail machine. The label dispenser will hold up to 50 labels.
1) Open the top cover to access the label release lever.
2) Insert labels into the dispenser with the tab uppermost and the
label side to be printed facing the direction of travel.
3) Using one finger, apply pressure to the label release lever thus
allowing the labels to drop into contact with the feed mechanism,
then, release the lever.
4) Close the top cover.
Tab
Printing
surface
Page 10
10
ORIG0122-10
4128811U/B
12/08/2006
STEP 8
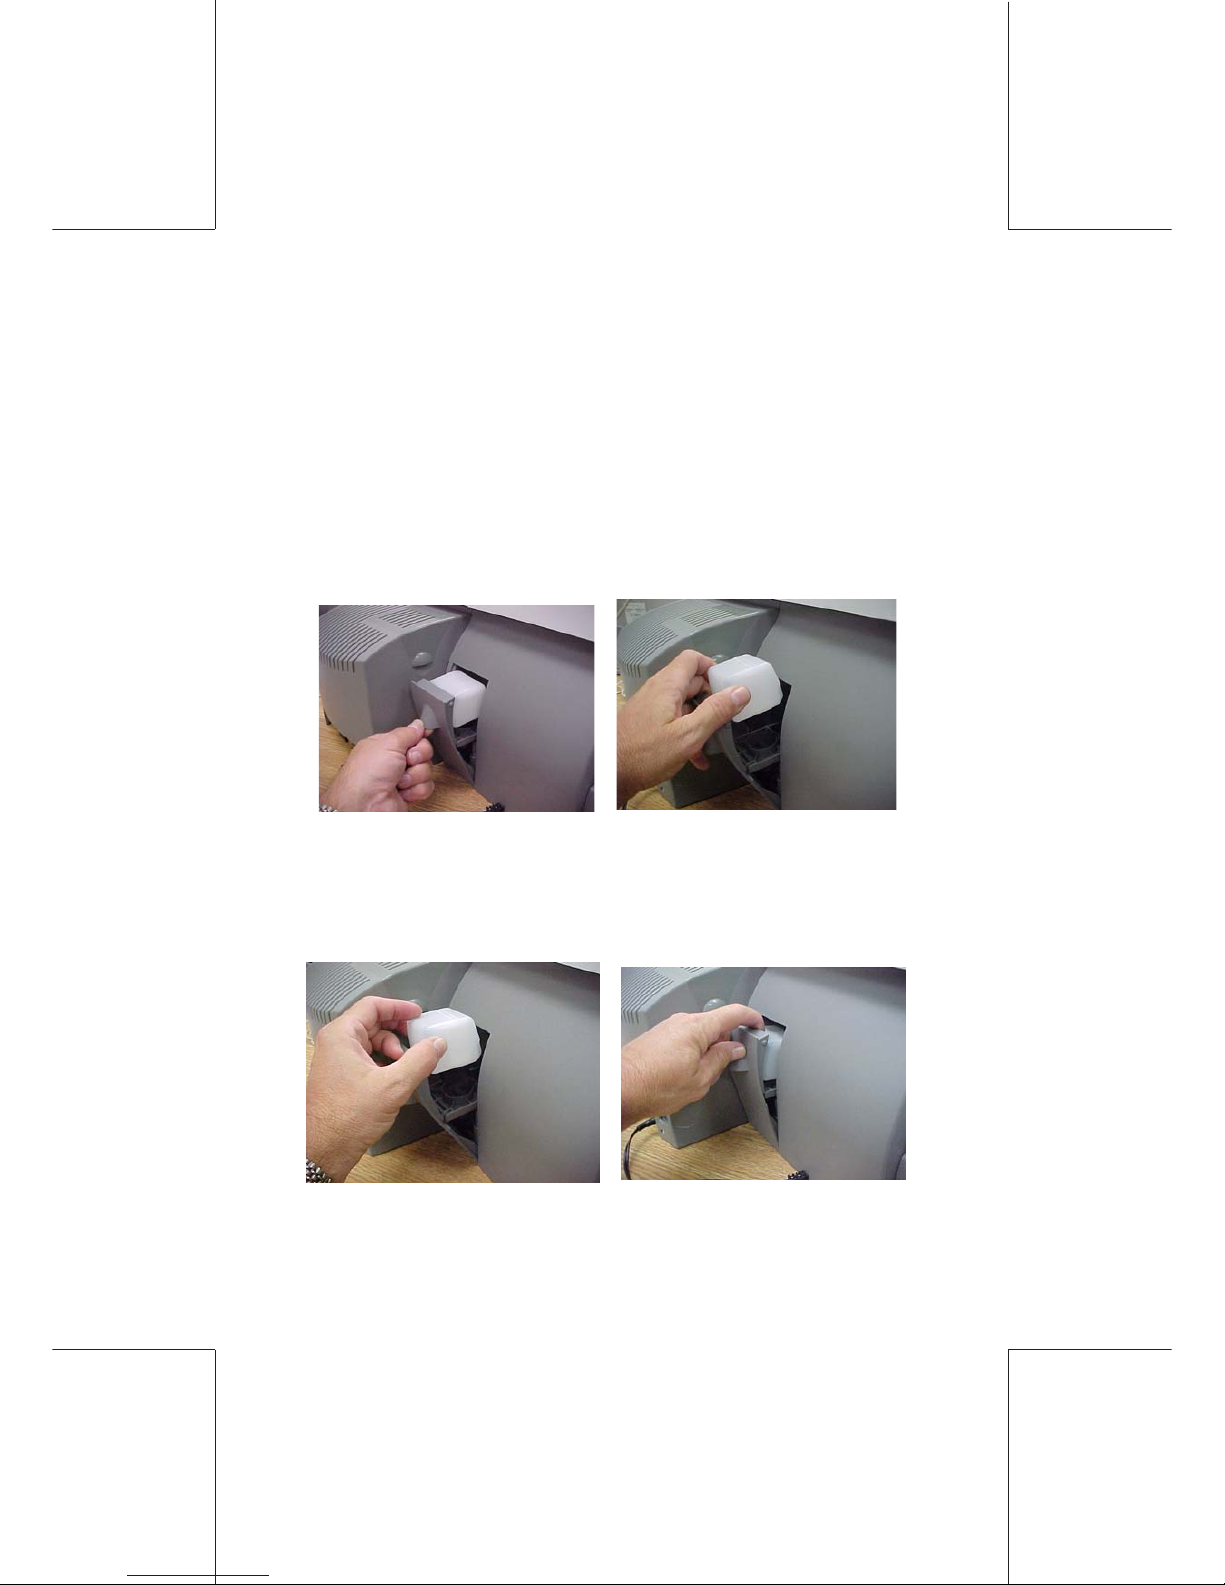
Fill the optionnal Moistener Reservoir
For safety always, disconnect mailing machine from the power
outlet and keep top cover closed when filling the moistener.
- Pull open the moistener bottle compartment door.
- Grasp the plastic water bottle and lift to remove.
- Unscrew the cap and fill the bottle to 1/2 inch from top with water.
- Screw the cap back on the bottle.
- Invert the water bottle and install so the cap fits in reservoir cup.
- Squeeze the bottle slightly to start the water flow to the moistening
sponge then close the compartment door.
Page 11
11
ORIG0122-11
412881 1U/B
12/08/2006
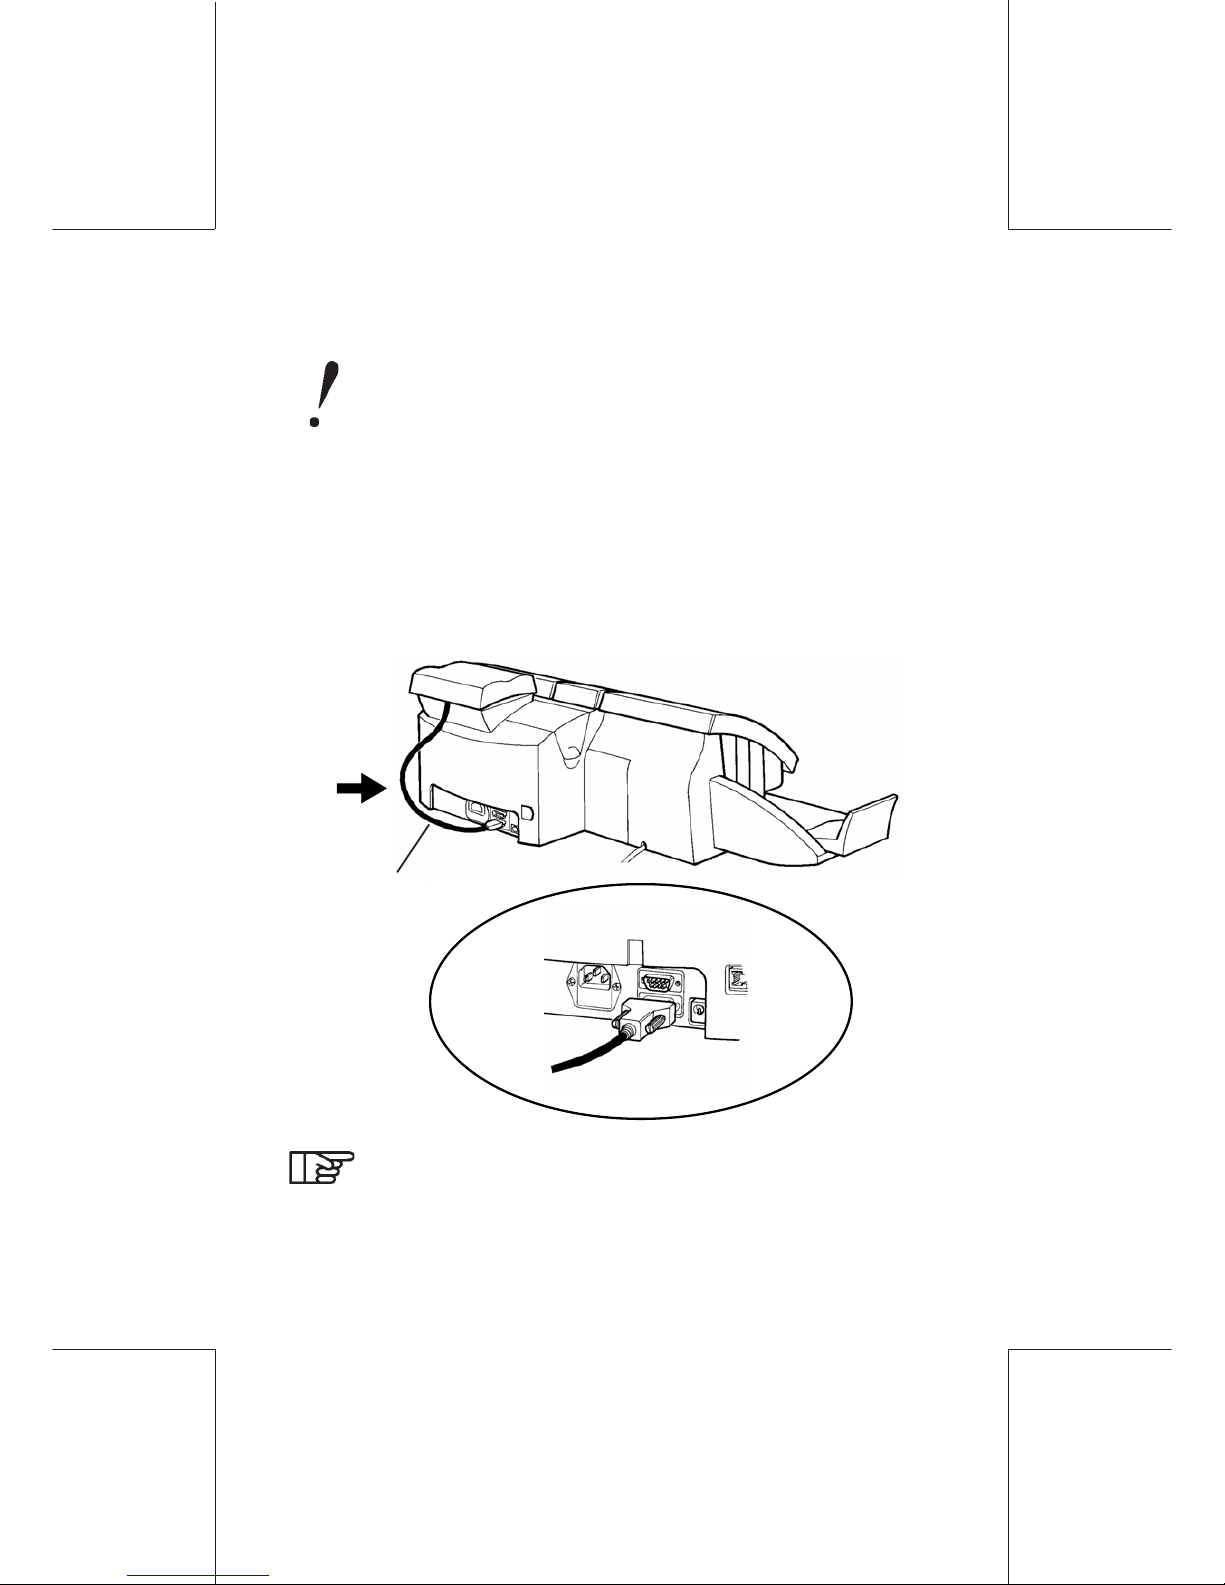
MACHINE CONNECTIONS TO WEIGH PLATFORM
Do not plug the power cord into the machine until all the
other connections have been made
STEP 9
Connect optionnal IWP5 Five Pound Weigh
Platform to WJ 65/95/110 Base mailing ma-
chine
Cable
The weigh platform must be plugged into the lower
connector
Page 12
12
ORIG0122-12
4128811U/B
12/08/2006
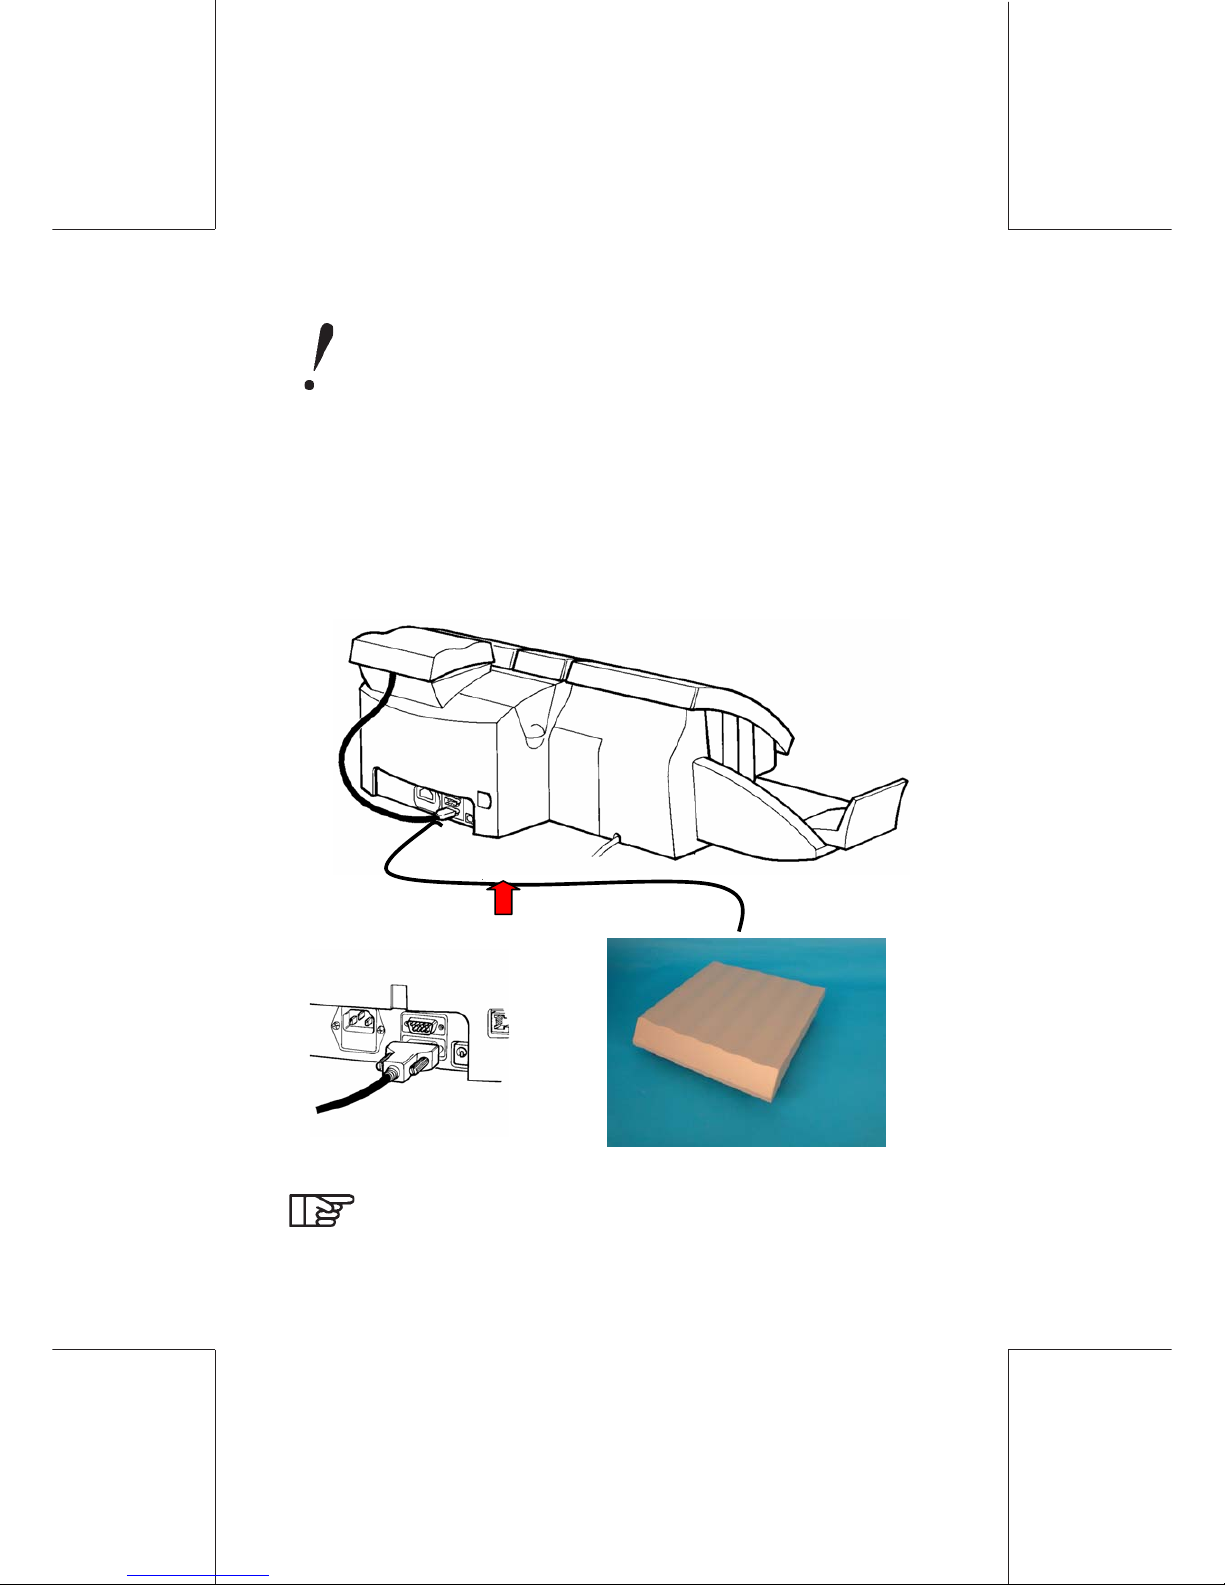
Do not plug the power cord into the machine until all the
other connections have been made
STEP 10
Connect optional WJWP10, IWP30 or
WJWP70 Weigh Platform to WJ 65/95/110
Base Mailing Machine
The weigh platform must be plugged into the lower
connector
Page 13
13
ORIG0122-13
412881 1U/B
12/08/2006
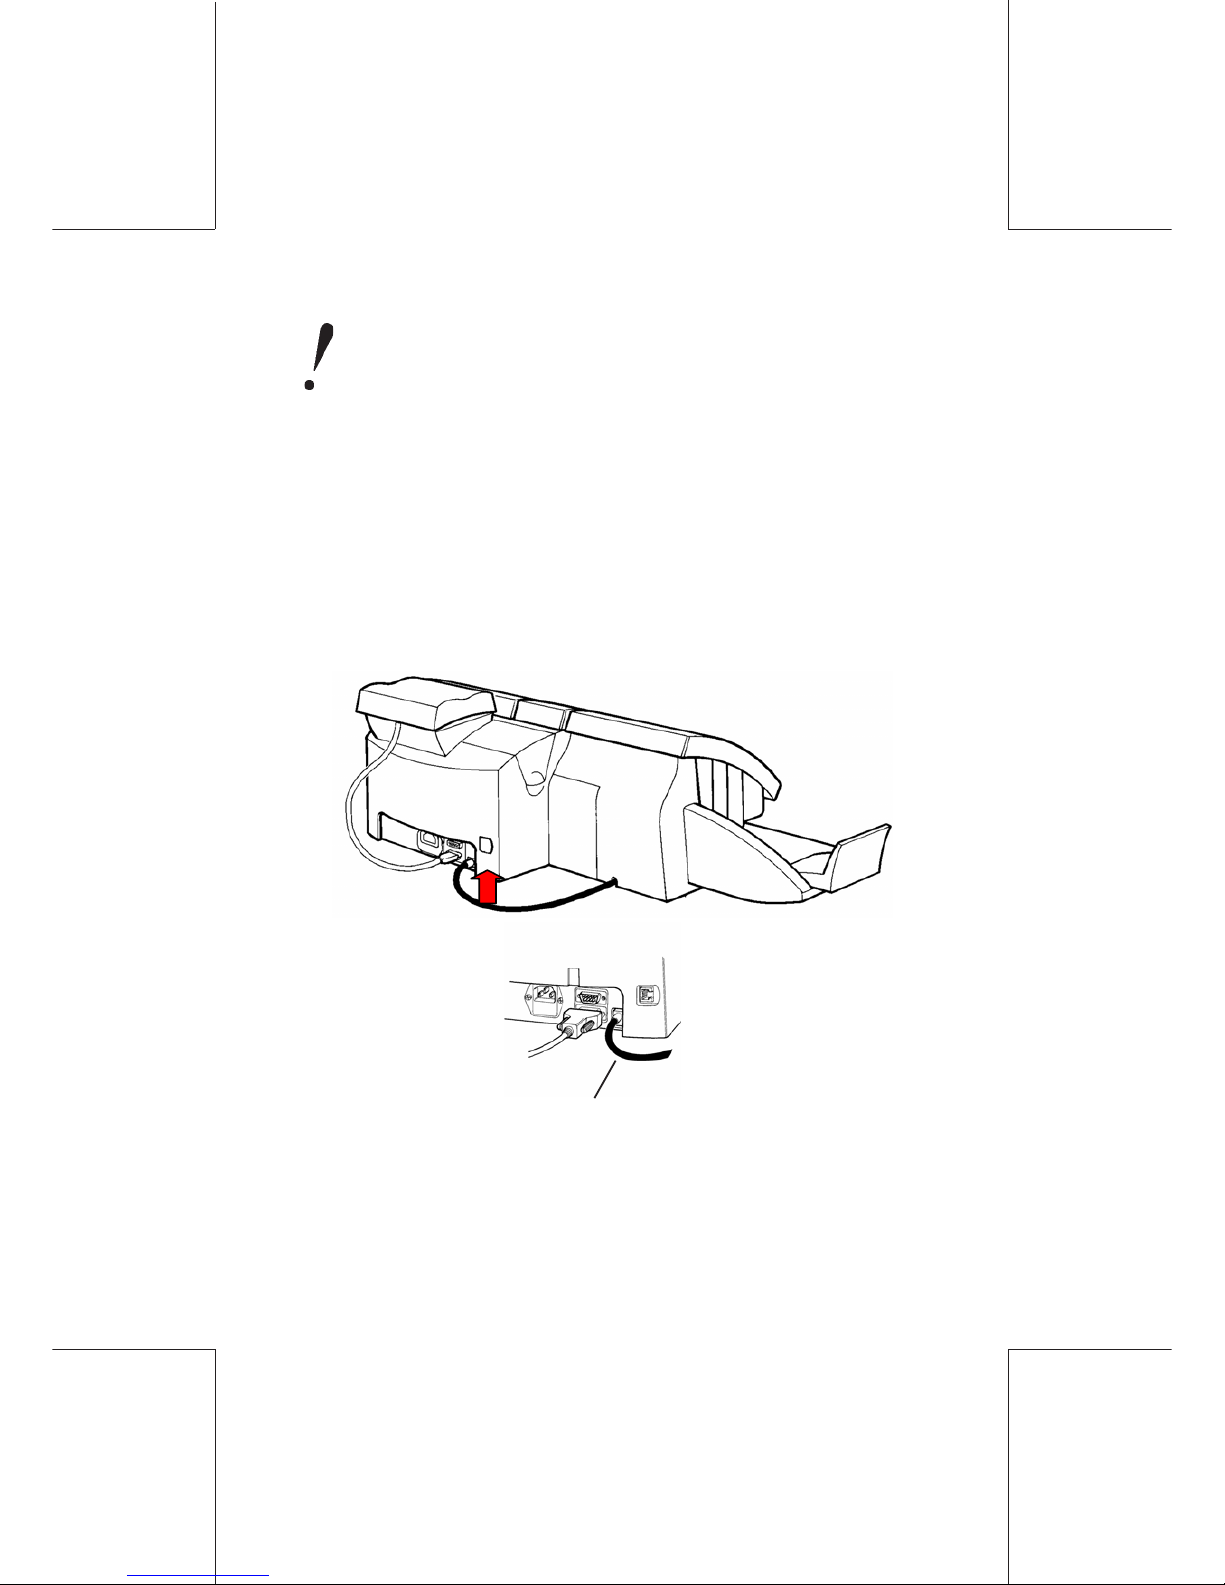
Do not plug the power cord into the machine until all the
other connections have been made
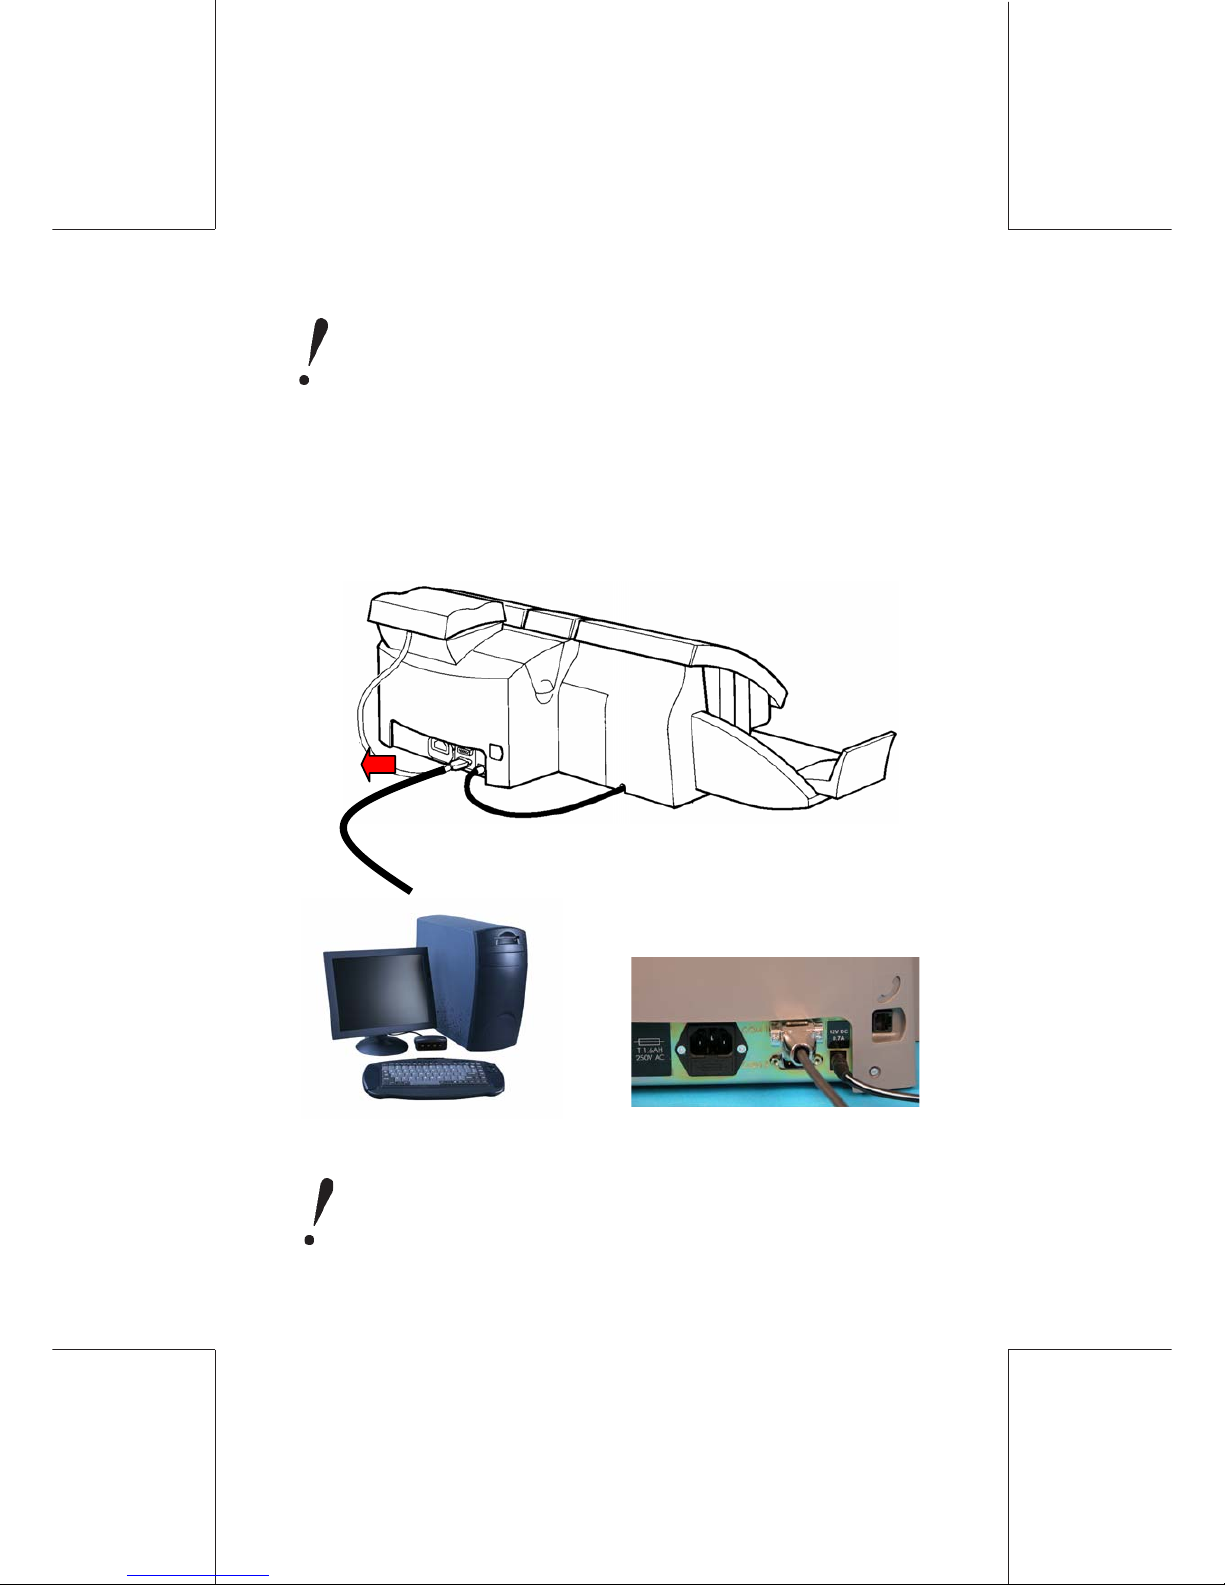
STEP 11
Connect optional Autofeed to WJ 65/95/110
Base Mailing Machine
Cable
Page 14
14
ORIG0122-14
4128811U/B
12/08/2006
Do not plug the power cord into the machine until all the
other connections have been made
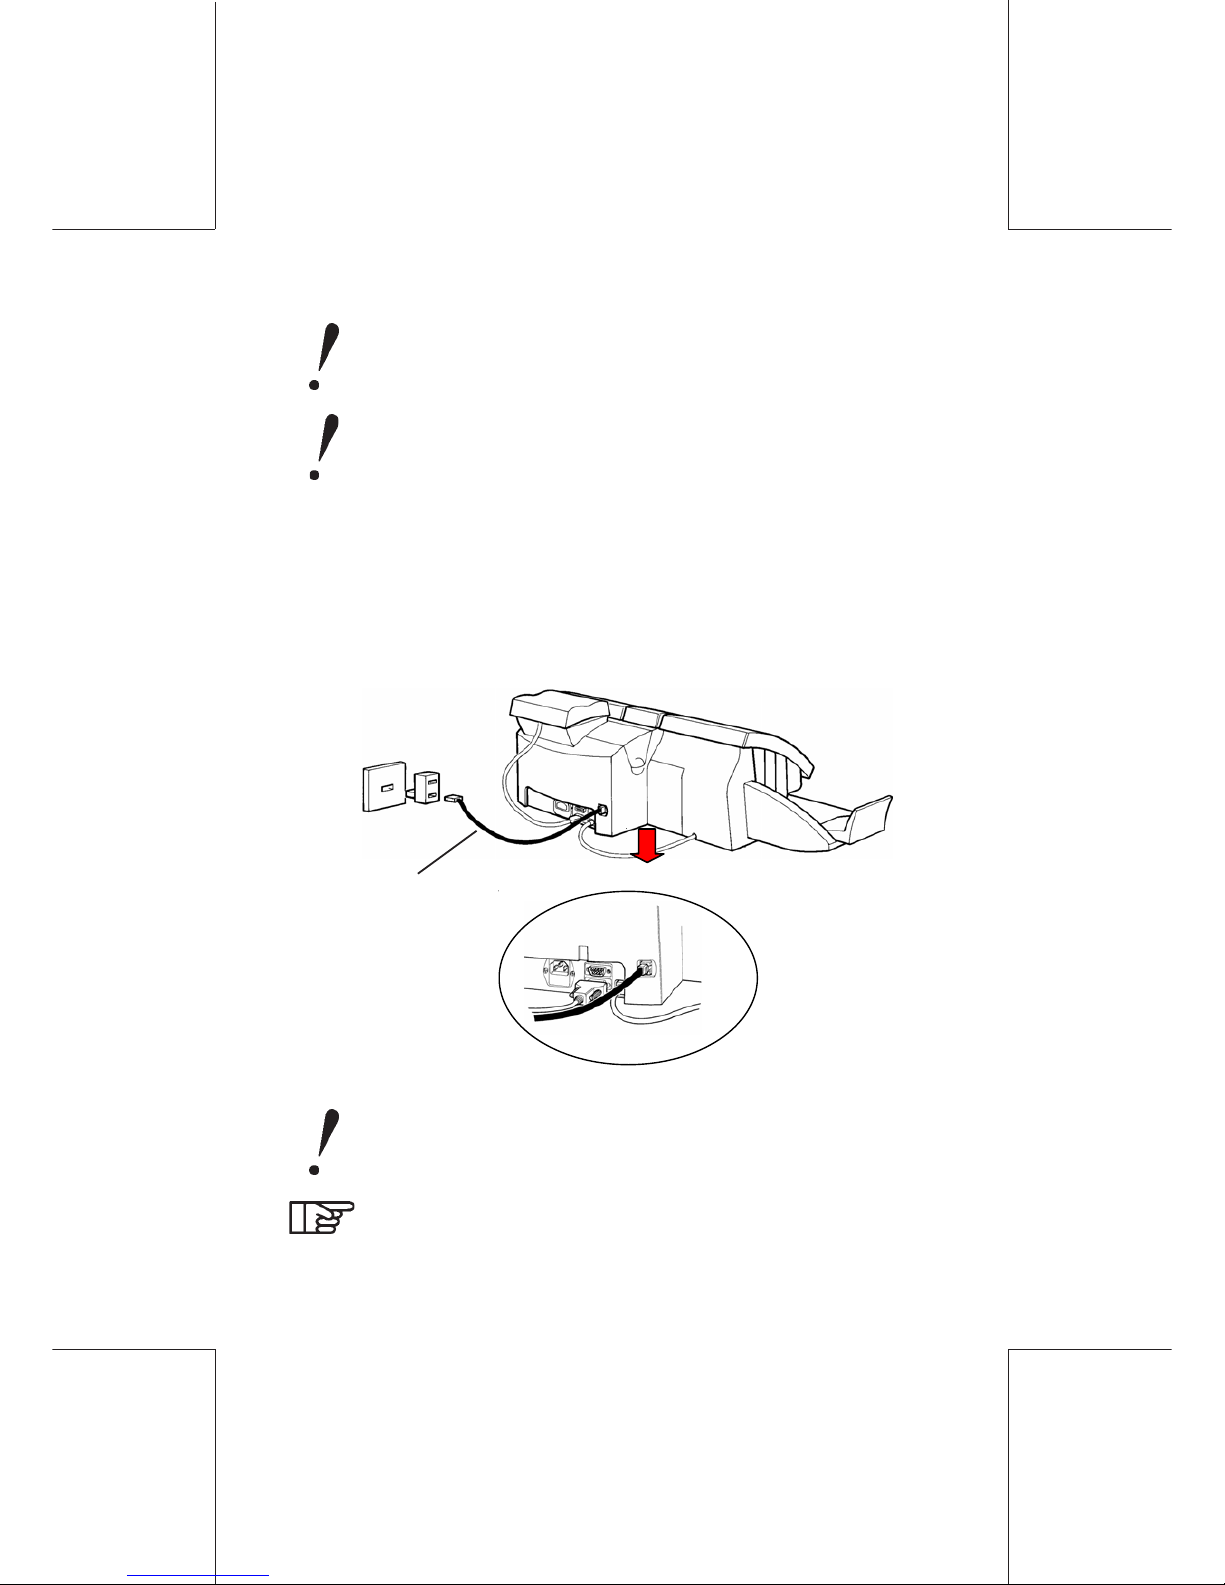
STEP 12
Connect optional Hasler Mail Accounting PC to
WJ 65/95/1 10 Base Mailing Machine
This is only applicable for connection to a Hasler supplied
PC Mail Accounting system
Page 15
15
ORIG0122-15
412881 1U/B
12/08/2006
Do not plug the power cord into the machine until all the
other connections have been made
If you have a Hasler PC Mail Accounting system :
1) Power on PC
2) Open the Mail Manager 2 PC software
3) Power on the machine
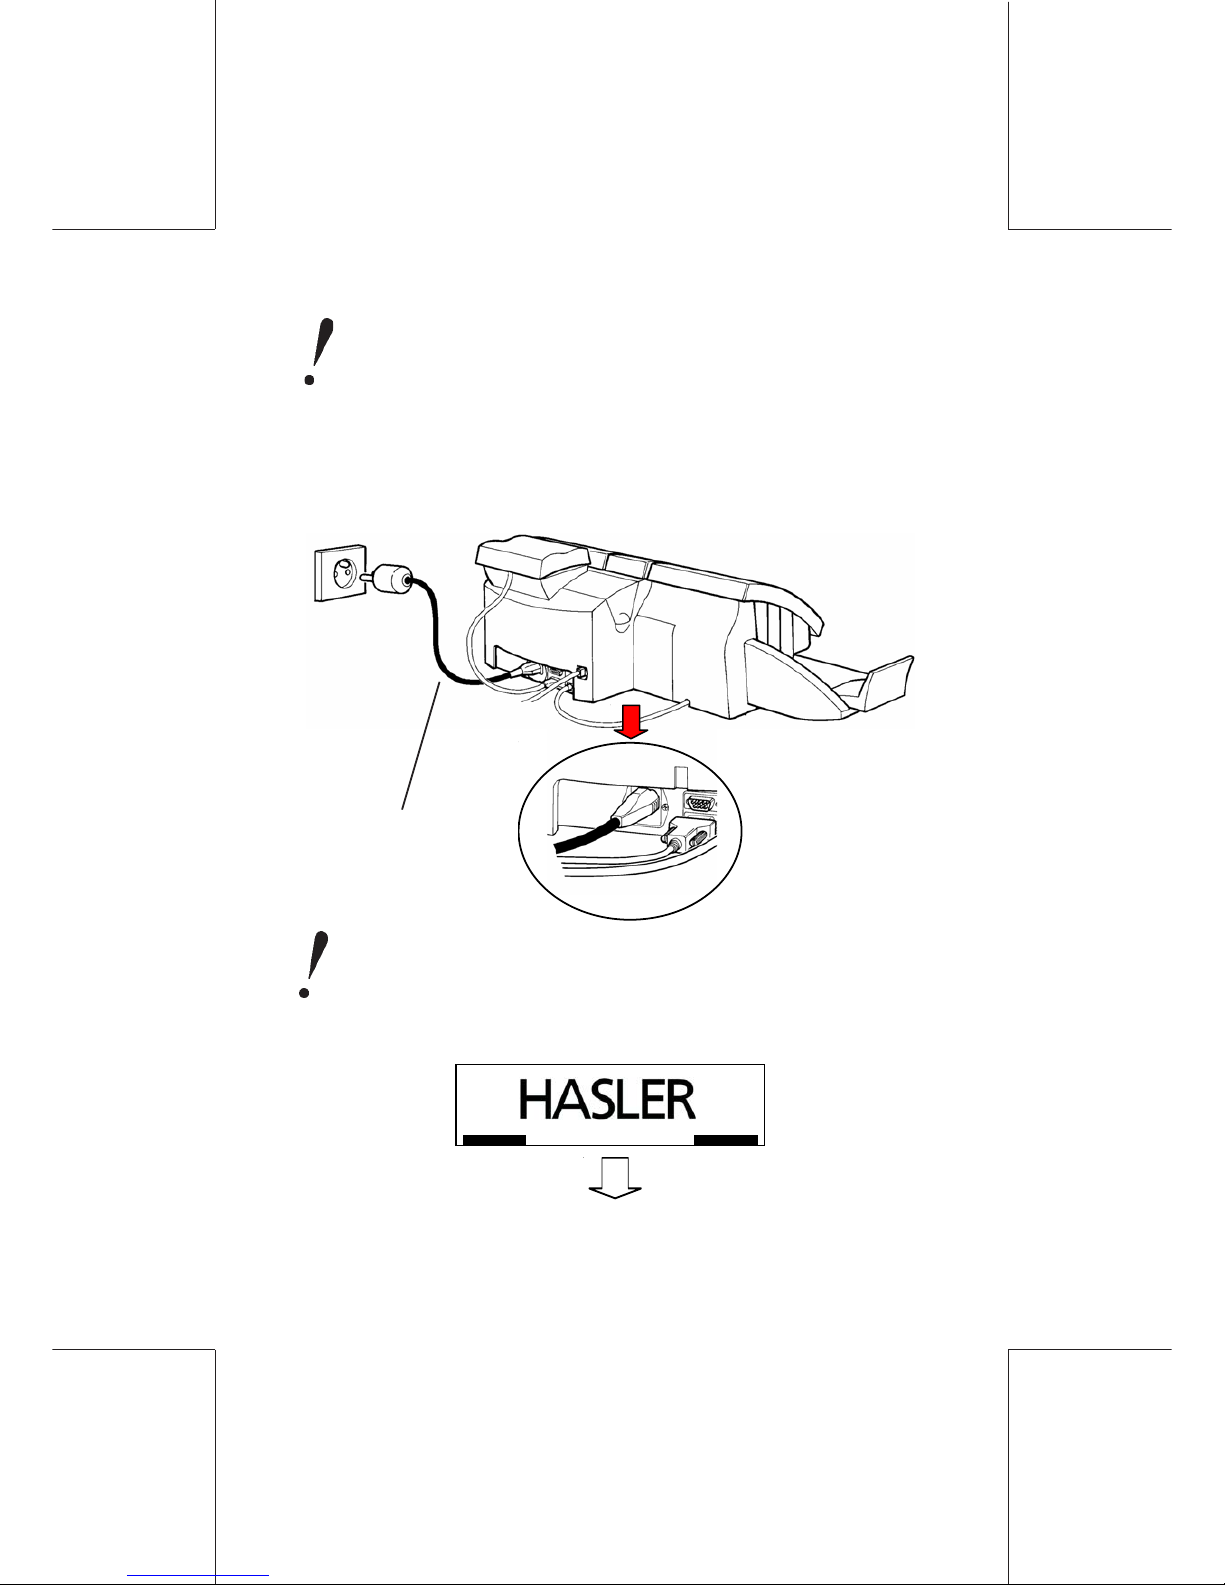
STEP 13
Telephone connection to WJ 65/95/110
Base Mailing Machine
Telephone
Cable
Caution, to reduce the risk of fire, use only No. 26 AWG or
larger telecommunication line cord.
The telephone connection is only required when adding
postage to the mailing machine or connecting to the
Online Services server.
Page 16
16
ORIG0122-16
4128811U/B
12/08/2006
Do not plug the power cord into the machine until all the
other connections have been made
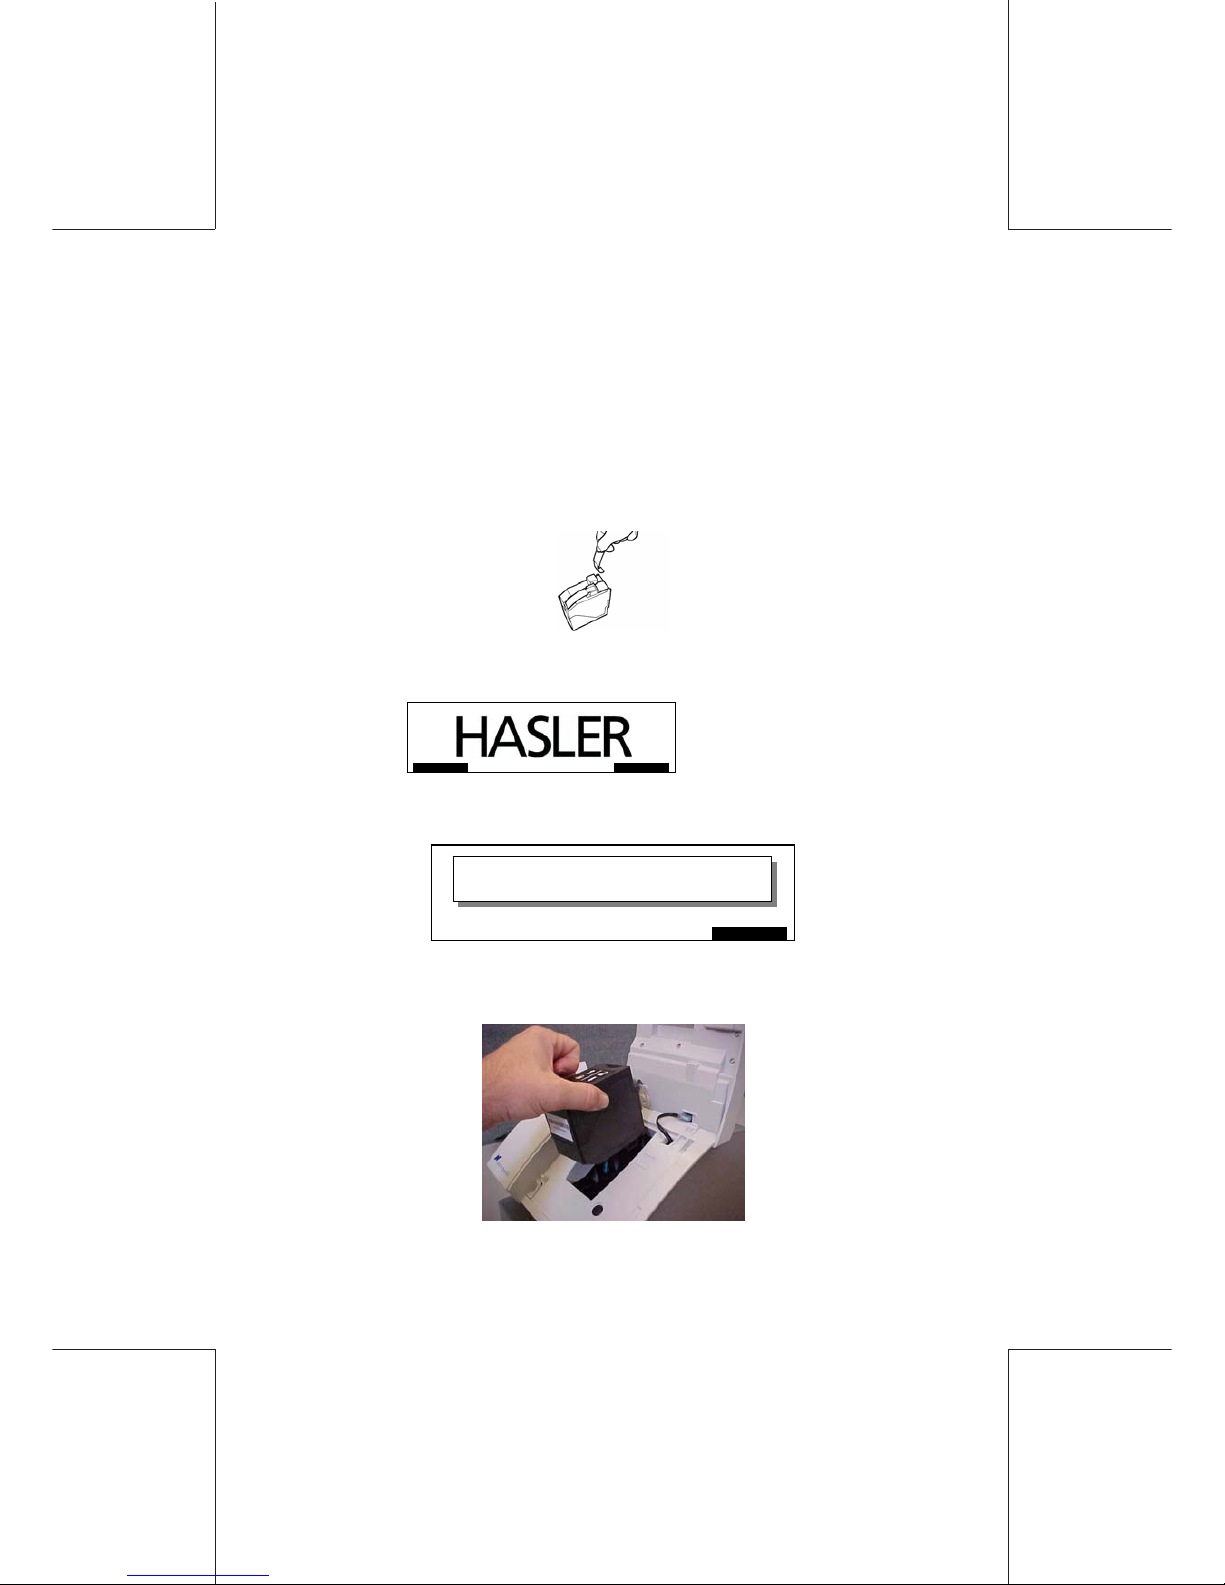
STEP 14
Power Cord Connection to WJ 65/95/1 10
Base Mailing Machine
Power
cord
After you plug the power cord into the WJ 65/95/110, it will
beep and display «PLEASE WAIT» while it goes through a
power-up sequence.
When it displays:
SUPERVIS USER
Go to Step 15 to install the Ink Cartridge
Page 17
17
ORIG0122-17
412881 1U/B
12/08/2006
STEP 15
Install Ink Cartridge in WJ 65/95/1 1 0
Mailing Machine
1. Remove the Ink Cartridge from its packaging and carefully
remove the tape seals.
2. The WJ 65/95/110 mailing machine must be plugged in and
displaying
SUPERVIS USER
to install the Ink Cartridge.
3. Press the blue button under USER
4. The display is:
OK
CARTRIDGE
INSERT CARTRIDGE & PRESS OK
5. Open the machine top cover
6. Place the new cartridge in its holder.
Page 18
18
ORIG0122-18
4128811U/B
12/08/2006
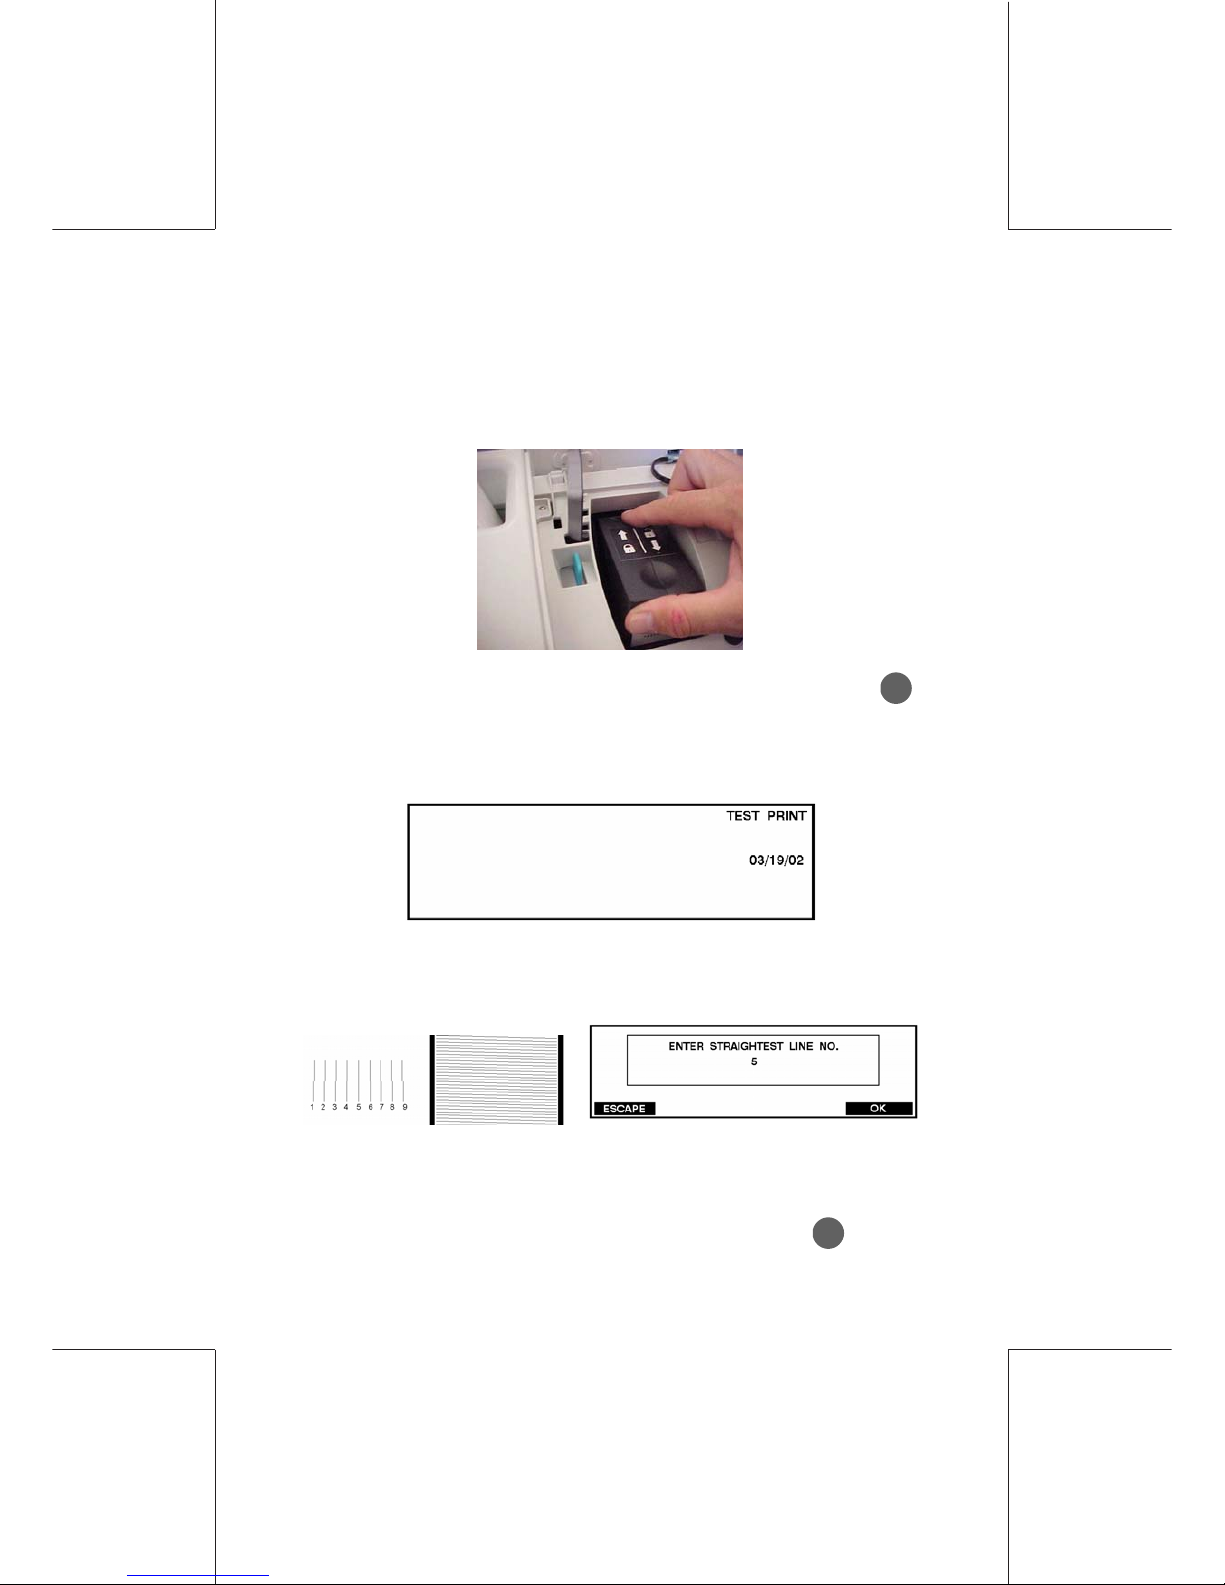
7) Lock the cartridge in position by carefully pushing down on the
depressed semi-circle on the top of the cartridge with your index
finger, then use your thumb to push the cartridge to the rear until you
hear it ‘click’ into place.
8) Close the machine cover and press the blue button under OK.
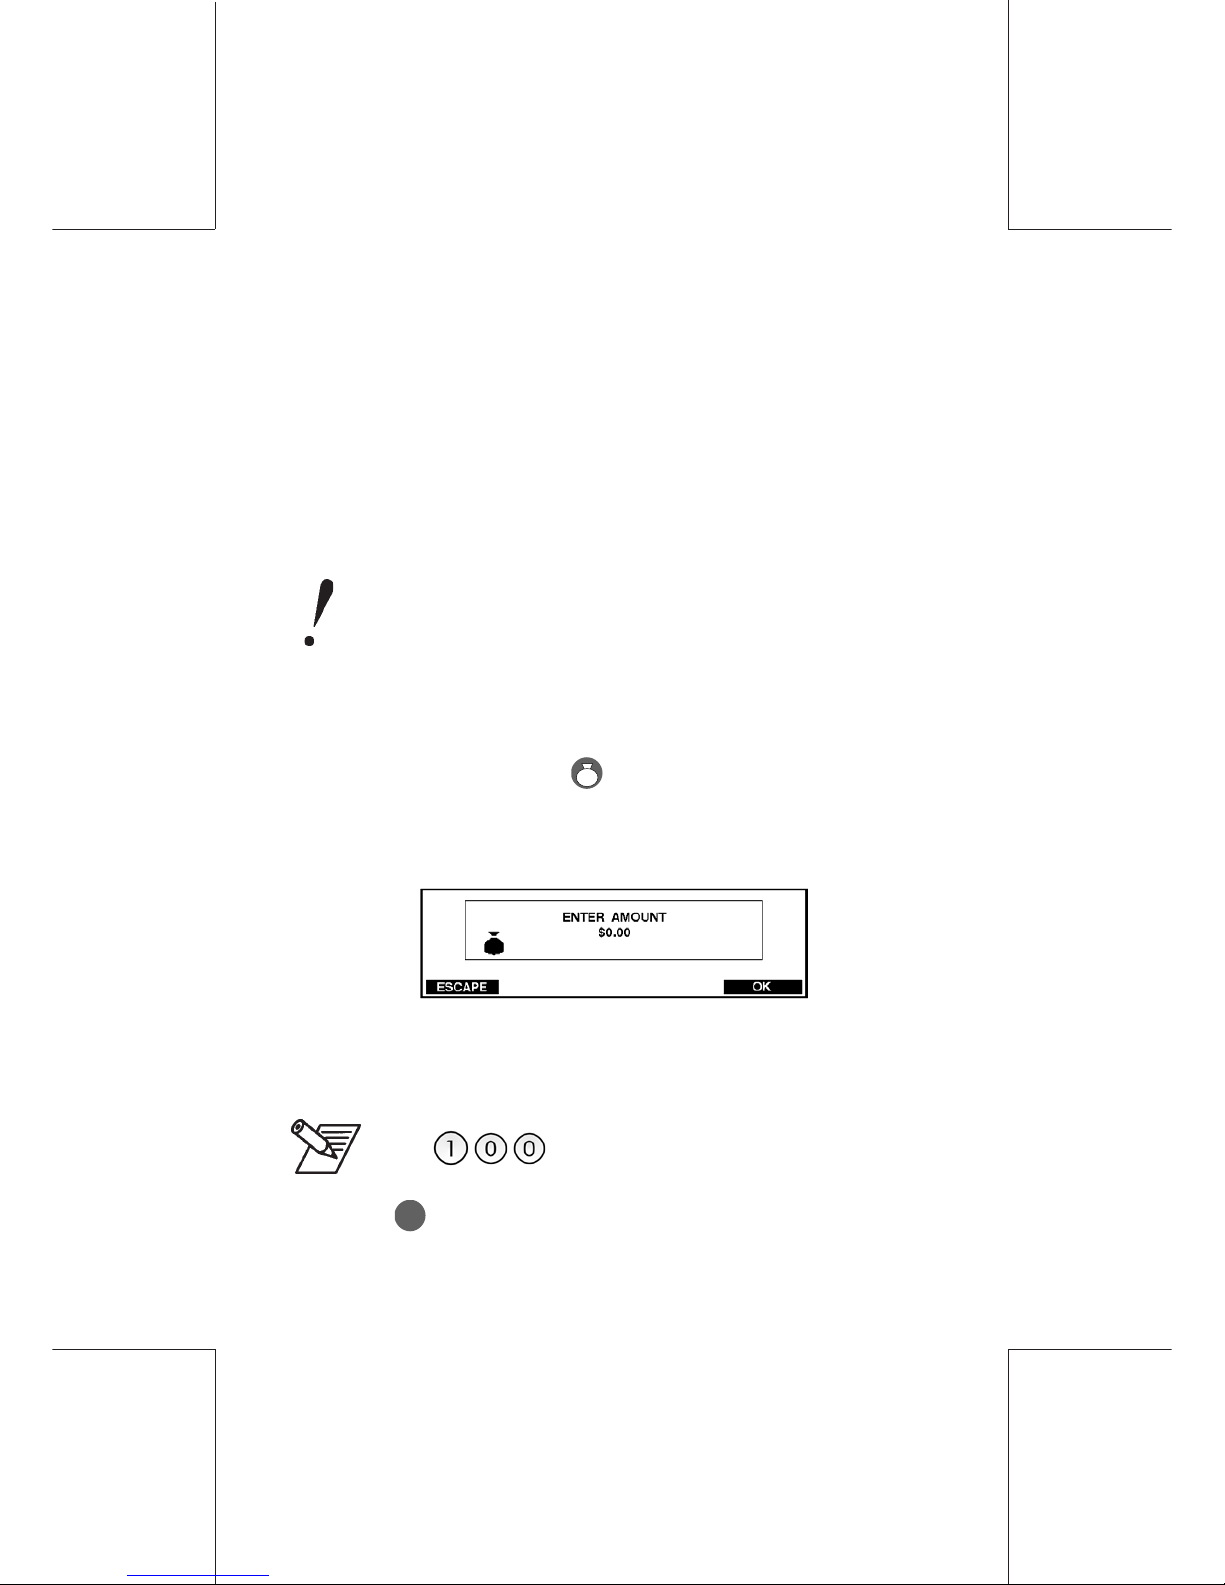
9) After a short delay the prompt to make a Test Print will be
displayed:
10) To make a Test print, insert a blank envelope into the machine
and press the green START/STOP button.
11) Inspect the Test Print and enter the straightest line (for the
example above it is line 5) by pressing the appropriate numeric
key on the keypad then press the blue button under OK.
Page 19
19
ORIG0122-19
412881 1U/B
12/08/2006
STEP 16
Adding postage to the meter
Postage is purchased from the Post Office using the Hasler Tele
Meter Setting® (TMS) system. You must have funds in your TMS
account to add postage to your meter.
Ensure that the telephone cable from the modem socket
located in the rear of the machine is connected to an
analog telephone outlet (as detailed STEP 13 of this
guide). If your analog telephone system requires dialing
a prefix, please refer to page 94 of the User Guide for setup instructions.
1) From Ready mode, press on the keyboard (this is the Funds
key).
2) The ENTER AMOUNT screen is displayed:
3) Use the numeric key pad to enter the amount of postage you
wish to purchase (whole dollars only) e.g $100.
Press .
4) Press OK.
Page 20
20
ORIG0122-20
4128811U/B
12/08/2006
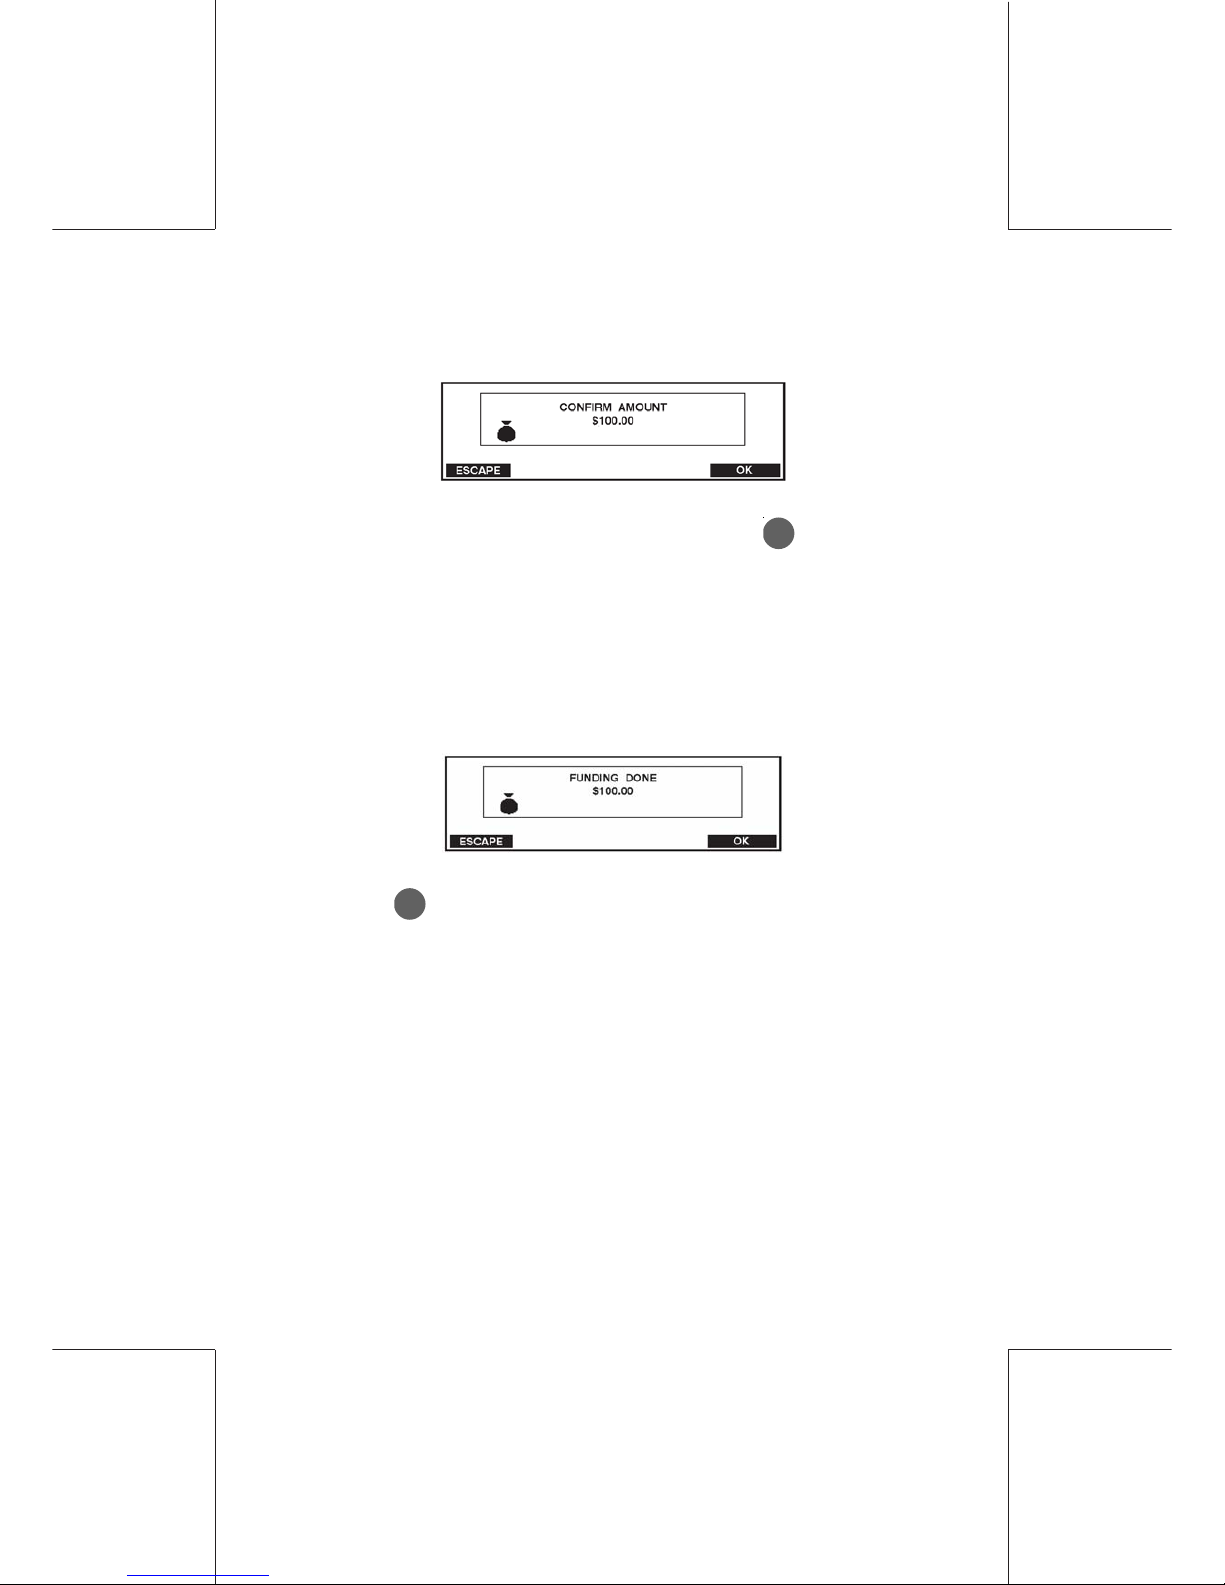
5) You will now be asked to verify the amount before proceeding.
- If the amount displayed is correct, press OK to confirm
- If the amount is incorrect, press ESCAPE and start again
from the Enter Amount screen.
6) The postage meter will connect to the Hasler Tele Meter
Setting® system and system and upon completion of the Add
Postage transaction, the following screen will be displayed.
7) Press OK or ESCAPE to return to Ready Mode.
Page 21
21
ORIG0122-21
412881 1U/B
12/08/2006
STEP 17
Activating ONLINE SERVICES
To get all the features on your mailing machine, you have to
connect twice to the ONLINE SERVER.
Please make sure the telephone cable is plugged into the
rear of the mailing machine as well as the telephone wall
outlet. If your analog telephone system requires dialing a
prefix, please refer to page 92 of the Mailing Machine User
Guide for set-up instructions.
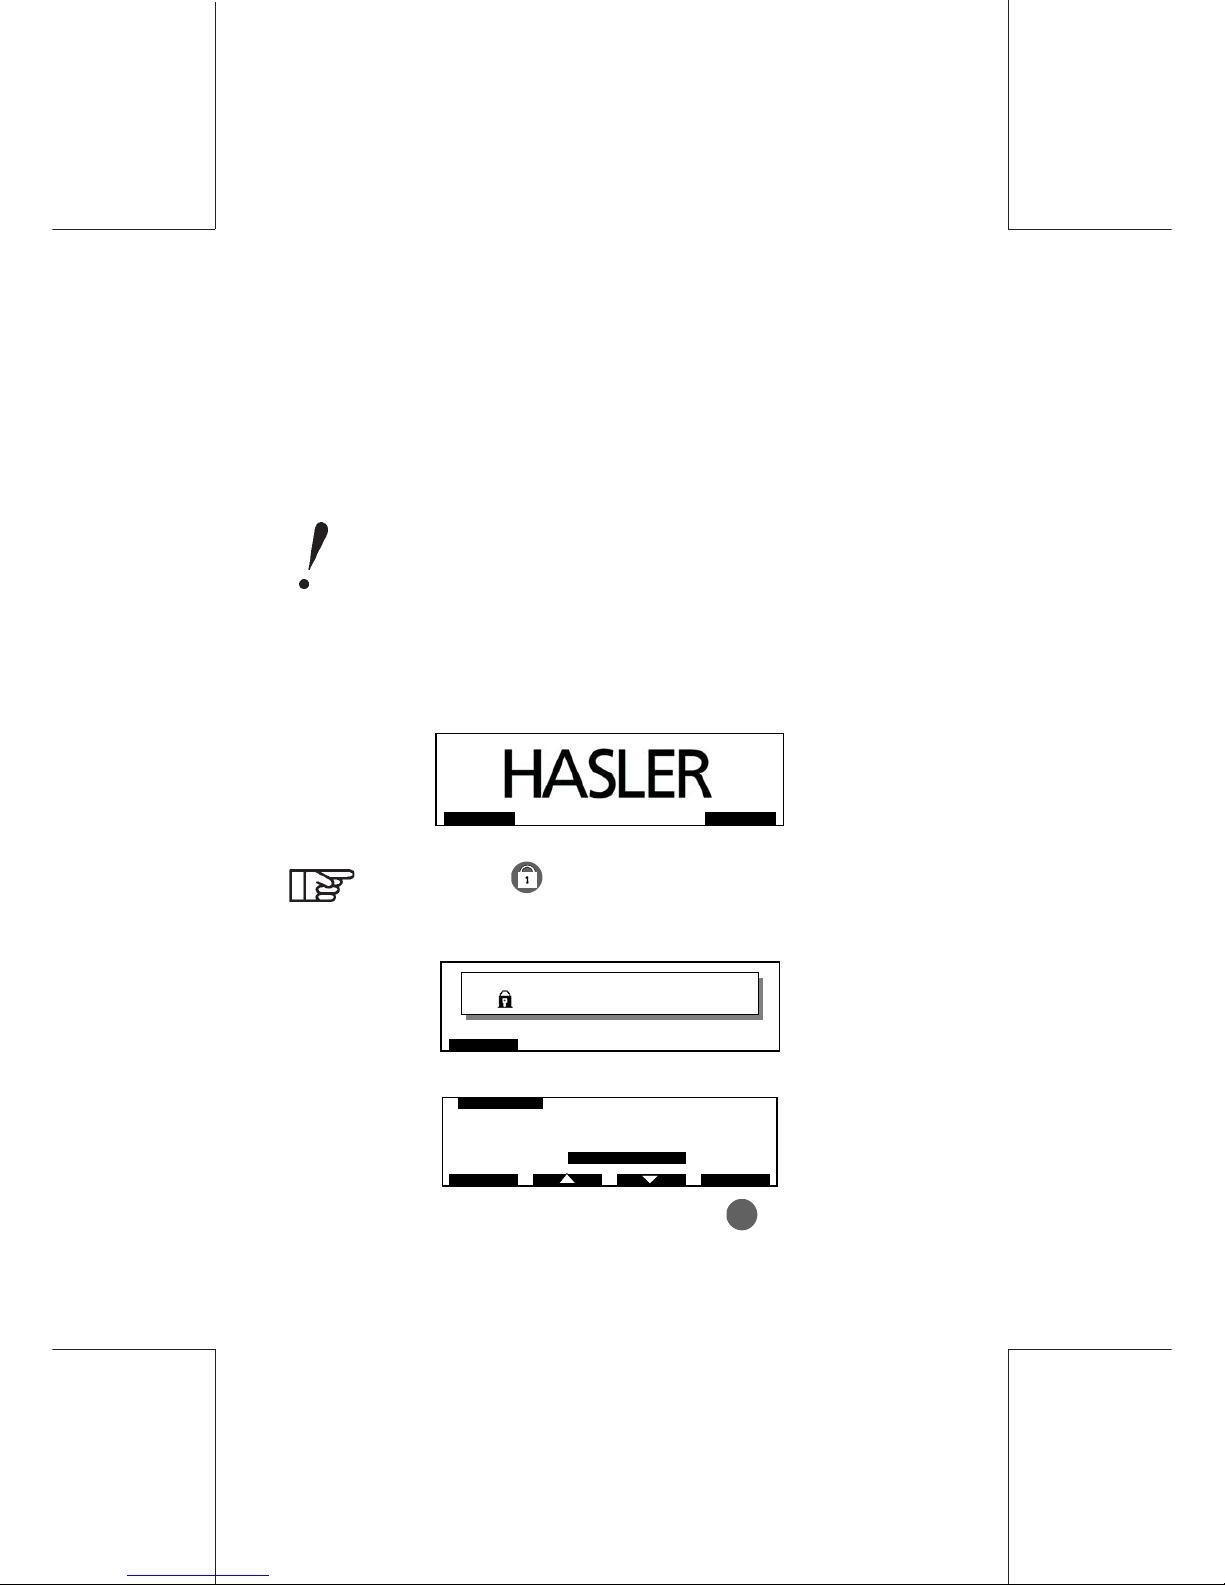
1) The WJ 65/95/110 mailing machine must be plugged in and
displaying.
SUPERVIS USER
You can press to go directly to this screen.
2) Press the blue button under SUPERVIS.
ESCAPE
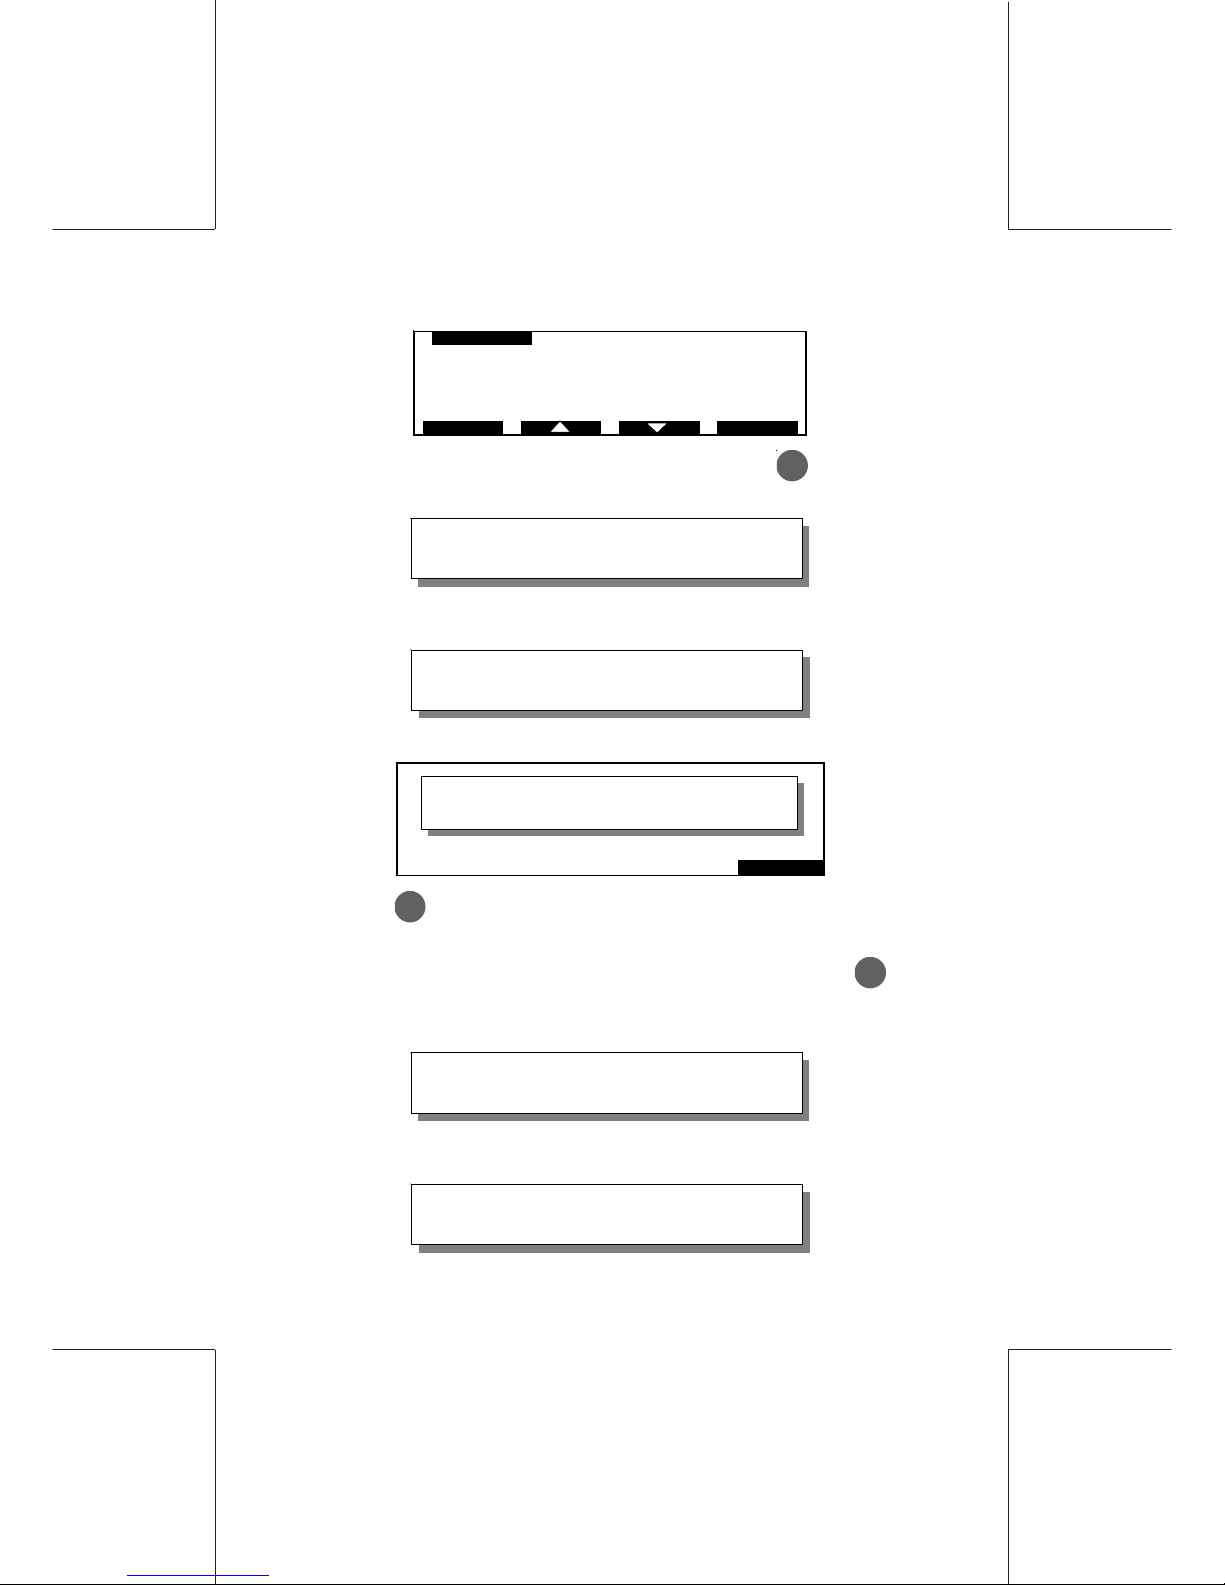
ENTER SUPERVISOR PIN
- - - -
3) Supervisor settings require the entry of Supervisor Pin 9430.
1 SECURITY & DEPT
2REGISTERS
3 LOAD FROM M EM ORY CARD
4 ONLINE SERVICES
5SETUP
OKESCAPE
SUPERVISOR
4) Choose ONLINE SERVICES and press OK.
Page 22
22
ORIG0122-22
4128811U/B
12/08/2006
1 ONLINE SERVER CALL
ON-LINE SERVICES
OKESCAPE
5) Choose ONLINE SERVER CALL and press OK.
DIALING
PLEASE WAIT . . .
TRAN SA C TION I N P RO GRE S S
PLEASE WAIT . . .
At the end of the connection you will get following display.
OK
START DECLARATION COMPLETE
6) Press OK.
7) Choose ONLINE SERVER CALL again and press OK to
make your second call to the ONLINE SERVER to finish the
operation
DIALING
PLEASE WAIT . . .
TRAN SA C TION I N P ROG RE S S
PLEASE WAIT . . .
Page 23
23
ORIG0122-23
412881 1U/B
12/08/2006
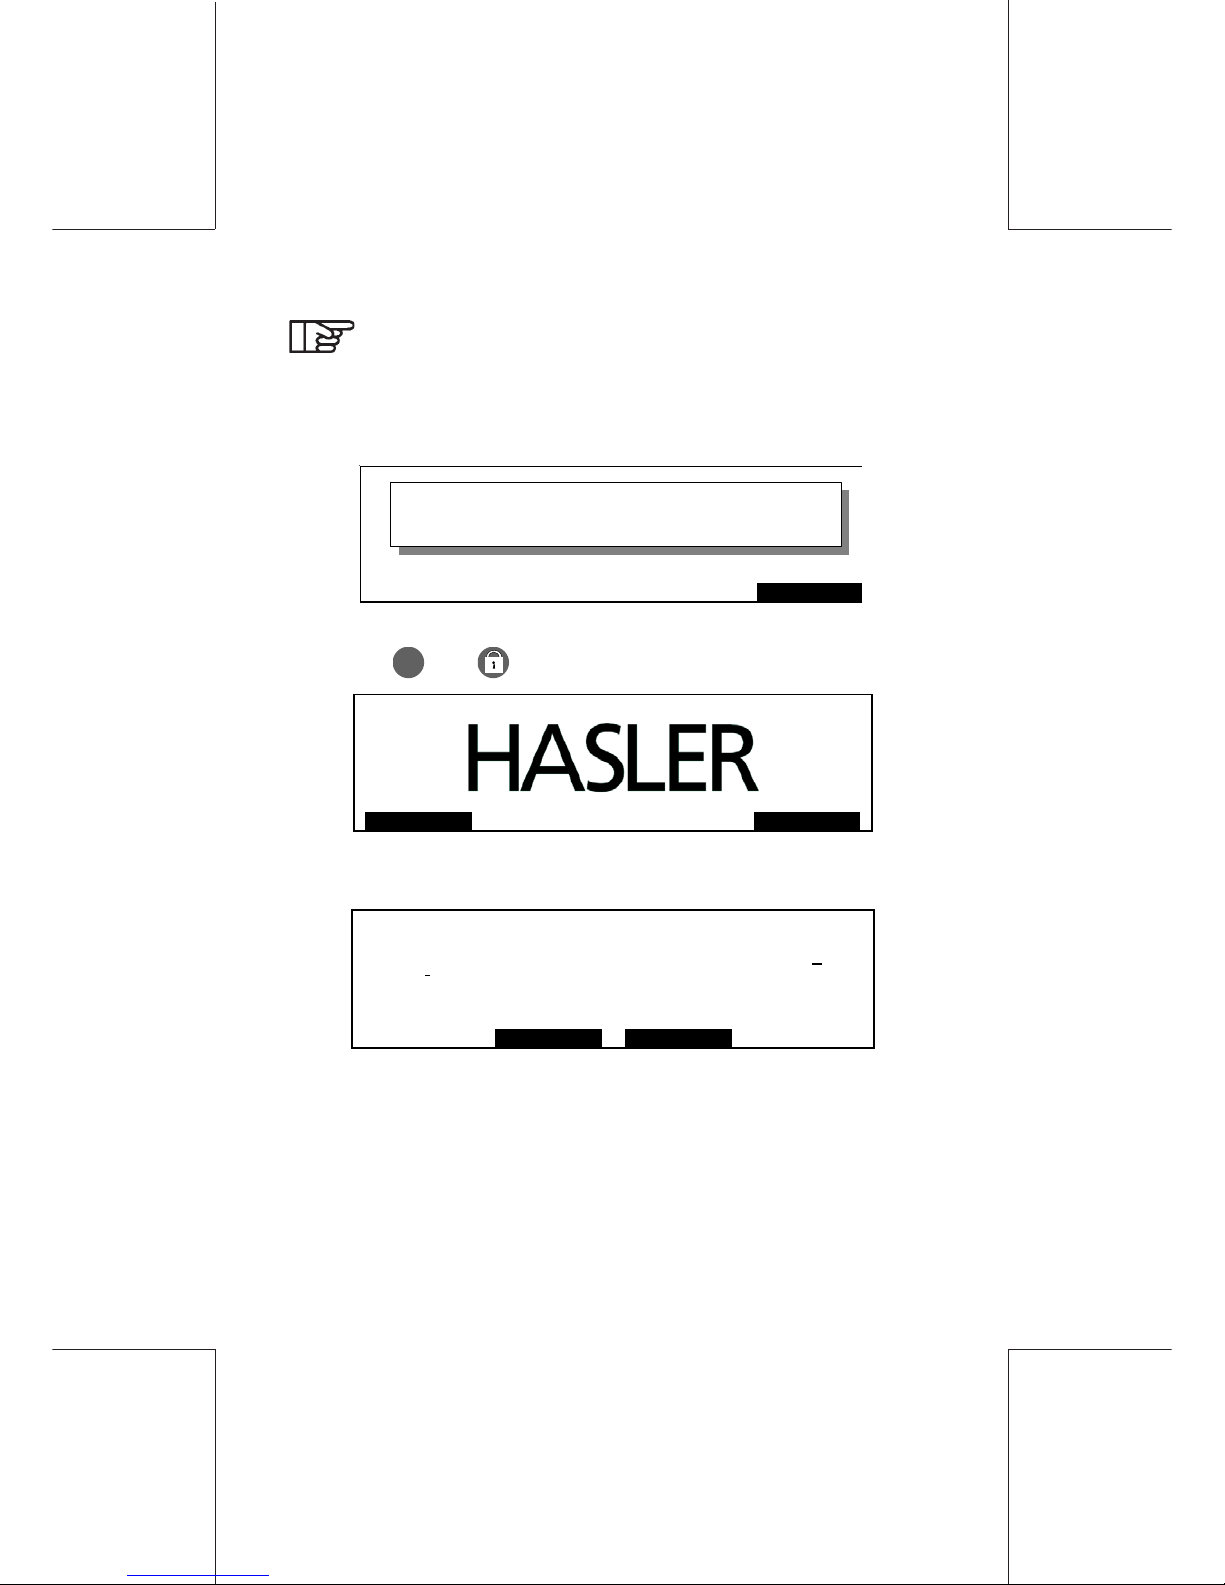
Depending upon the services you ordered, you may see
screens indicating rates being downloaded to your machine during the connection.
At the end of the connection you will get following display.
OK
FINISH DECLARATION COMPLETE
8) Press OK then to return to the main screen.
SUPERVIS USER
9) Press the blue button under USER to go to Ready mode.
$ 150,20 7
50.00
USER
IMPRINT
03/19/02
MODE
$ 0.00
0
Page 24

24
ORIG0122-24
4128811U/B
12/08/2006
STEP 18
YOU ARE READY NOW T O USE YOUR
MAILING MACHINE
- For more details on using the WJ 65/95/110 mailing machine,
please refer to your WJ 65/95/110 Mailing Machine User Guide.
- For more details about the ONLINE SERVICES, please refer to
WJ 65/95/110 Mailing Systems Online Services User Guide.
- Supervisor settings require the entry of Supervisor Pin 9430.
If you require assistance, call the Customer Service
Customer Care at 1-800-446-6027.
Page 25
412881 1U/B
12/08/2006 ORIG0121-V
UNPACKING AND
SET-UP GUIDE
WJ 65/95/110
MAILING MACHINE
II
II
I
MPMP
MPMP
MP
OO
OO
O
RR
RR
R
TT
TT
T
ANTANT
ANTANT
ANT
PlPl
PlPl
Pl
ee
ee
e
aa
aa
a
ss
ss
s
e Ue U
e Ue U
e U
ss
ss
s
e te t
e te t
e t
his Ghis G
his Ghis G
his G
uiui
uiui
ui
dd
dd
d
e te t
e te t
e t
o Seto Set
o Seto Set
o Set
-U-U
-U-U
-U
pp
pp
p
YY
YY
Y
oo
oo
o
ur Mur M
ur Mur M
ur M
ailinailin
ailinailin
ailin
g Syg Sy
g Syg Sy
g Sy
stst
stst
st
ee
ee
e
mm
mm
m
Page 26
412881 1U/B
12/08/2006
Edition 12/08/2006 - 4128811U/B
ORIG0121--R
 Loading...