

Page 1

INSTALLATION GUIDE
IM-280
BROADBAND CONNECTION
Page 2

4155855Q/B - 04/08/2011
Page 3

LAN Installation Overview
The IS series mailing systems have the ability to connect to both the Postage
Funding Server TMS and the Online Services Server via a LAN co nn ec tio n using a
standard RJ45 Ethernet patch cable.
When the machine connects to the Postage Funding Server or the Online
Services Server it opens a secure communication over your Internet access
based on SSL protocol via HTTPS on TCP port 443.
Depending on the network installed t here are certain things tha t must be known
prior to installing the system. It is likely that you will want to ask your IT
department to get involved here.
IP addressing:
1. Do you want to let DHCP allocate an IP address to your Mailing Machine?
Does the network have a DHCP server that will provide a n IP address,
default gateway, and DNS, which will allo w access to the Internet?
2. Or do you want to manually assign an IP address from your organi zation to
the Mailing Machine?
You will need to know the settings for IP address, Subnet Mask, Defaul t
Gateway, and DNS server.
Getting Internet access:
The Mailing Machine needs to get access via the Internet to:
na-meterservices.neopost.com using TCP port 443.
1. Will the Mailing Machine be able to get direct access to this from your LAN
once it has an IP address? If yes go to page 3.
2. Or, will someone from your IT/Sec urity teams need to make firewall changes
to permit this? If yes go to page 4.
3. Or, will some Proxy settings need to be applied to the Mailing Machine to allow
Internet Access? If yes go to page 5.
1
Page 4

Terms used:
DHCP: (Dynamic Host Configuration Protocol). For Automatic IP addresses
assignment.
DHCP server provides the machine with an IP address. Generally requires no user
intervention to obtain IP address. The DHCP server automatically assigns an IP
address to the mailing system. It provides also the Default Gateway IP address,
and DNS server IP address.
DNS: (Domain Name System). Th e DNS server allows (resolves ) Domain Name to
IP addresses.
Proxy: If a Proxy is used to access the Internet, you can set-up the machine to use
it when the machine tries to access the Hasler Servers through your In ternet connection.
Firewall: A network security system that allows businesses to closely control
access between networks and network attached devices, such as your Mai ling Machine and Hasler.
Default settings: In its factory-default state, DHCP is enabled, DNS is in
automatic mode and Proxy support is disabled. By default the port used to
communicate over the Internet is port 443. If the proxy support is activated, the
port used to communicate with the proxy is port 8080.
2
Page 5
Systems
Hasler Re-Crediting
TCP port 443
na-meterservices.neopost.com
Sample Installation Scenarios
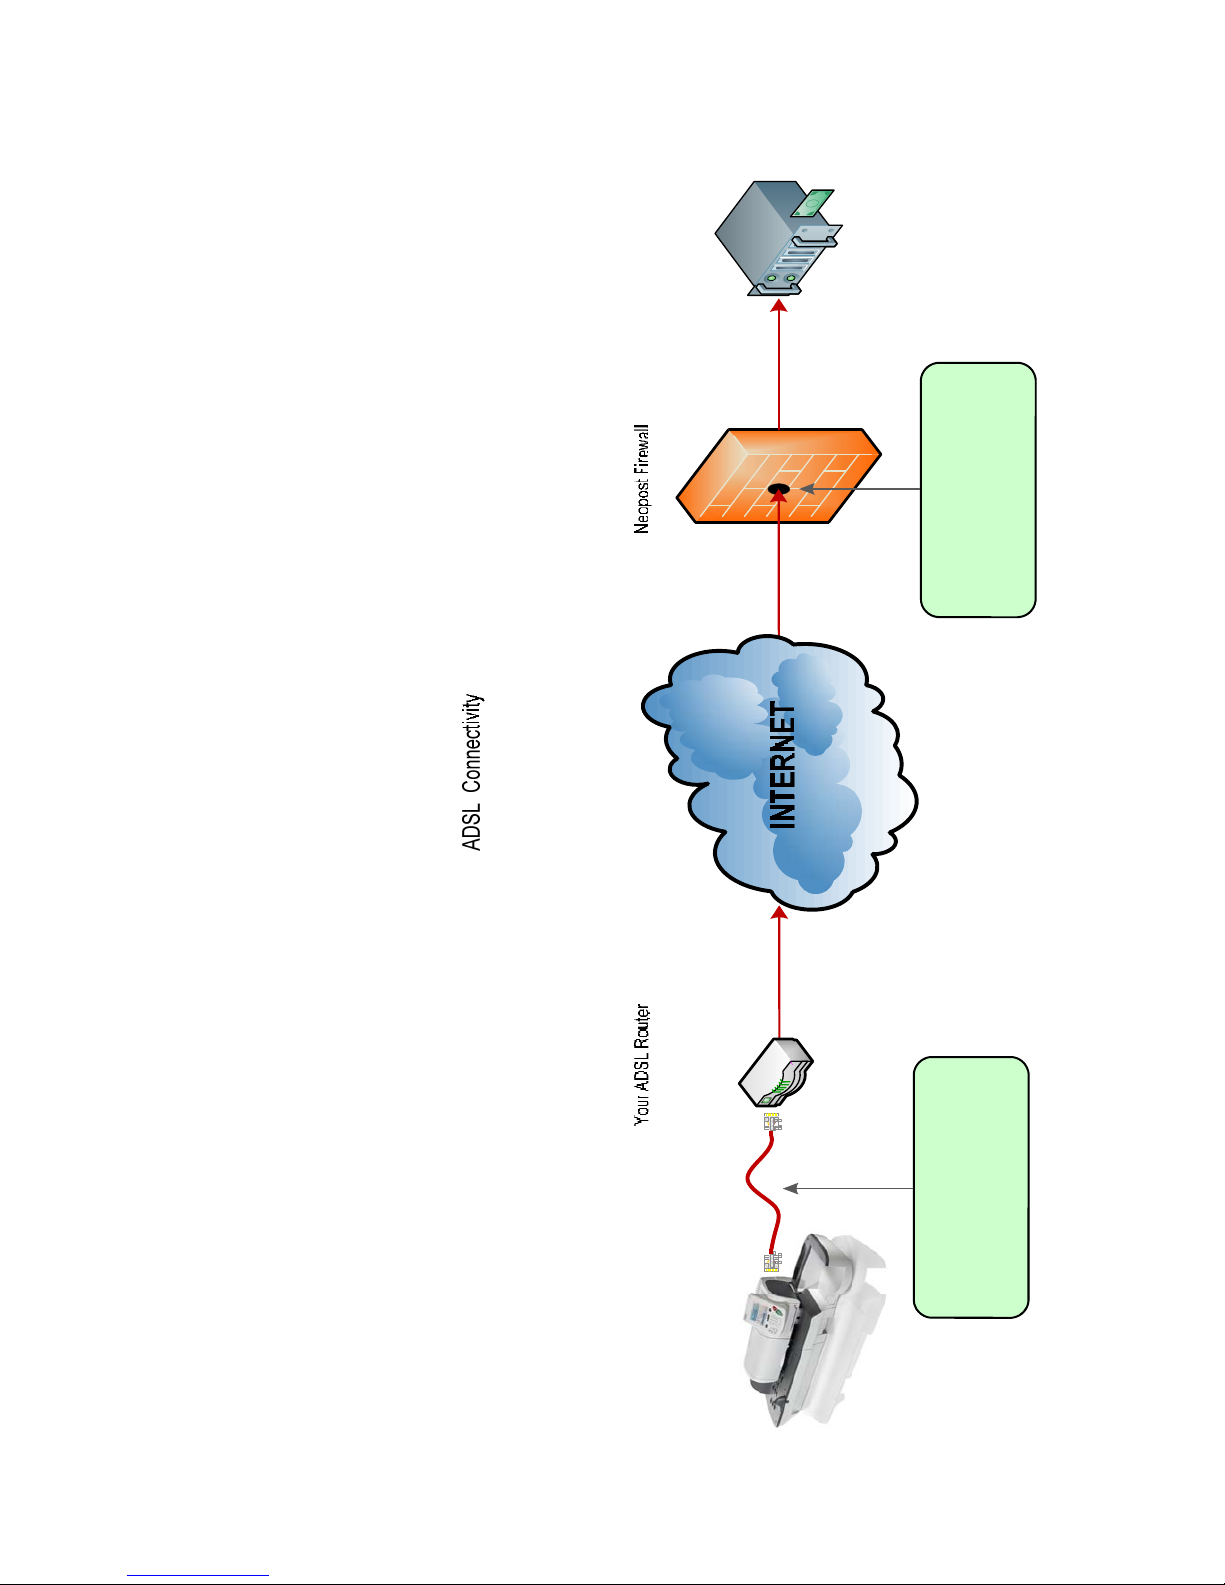
Simple Internet access via a standard ADSL Internet connection:
In this scenario, you simply plug the Mailing Machine into your ADSL router or LAN connected to the ADSL
ing you ADSL line.
router using a standard Ethernet (CAT5, RJ45) cable. The Router then assigns all IP address settings for you
using DHCP. In the majority of cases the Mailing Machine will then be able to connect directly to Hasler us-
Your Hasler Mailing
into your network
cable into your Mailing
Plug one end of your CAT5
machine, and the other end
Machine
3
Page 6
Systems
Hasler Re-Crediting
machine must be allowed to reach:
Allocated IP adress of your Mailing
TCP port 443
na-meterservices.neopost.com
TCP port 443
na-meterservices.neopost.com
Hasler Firewall
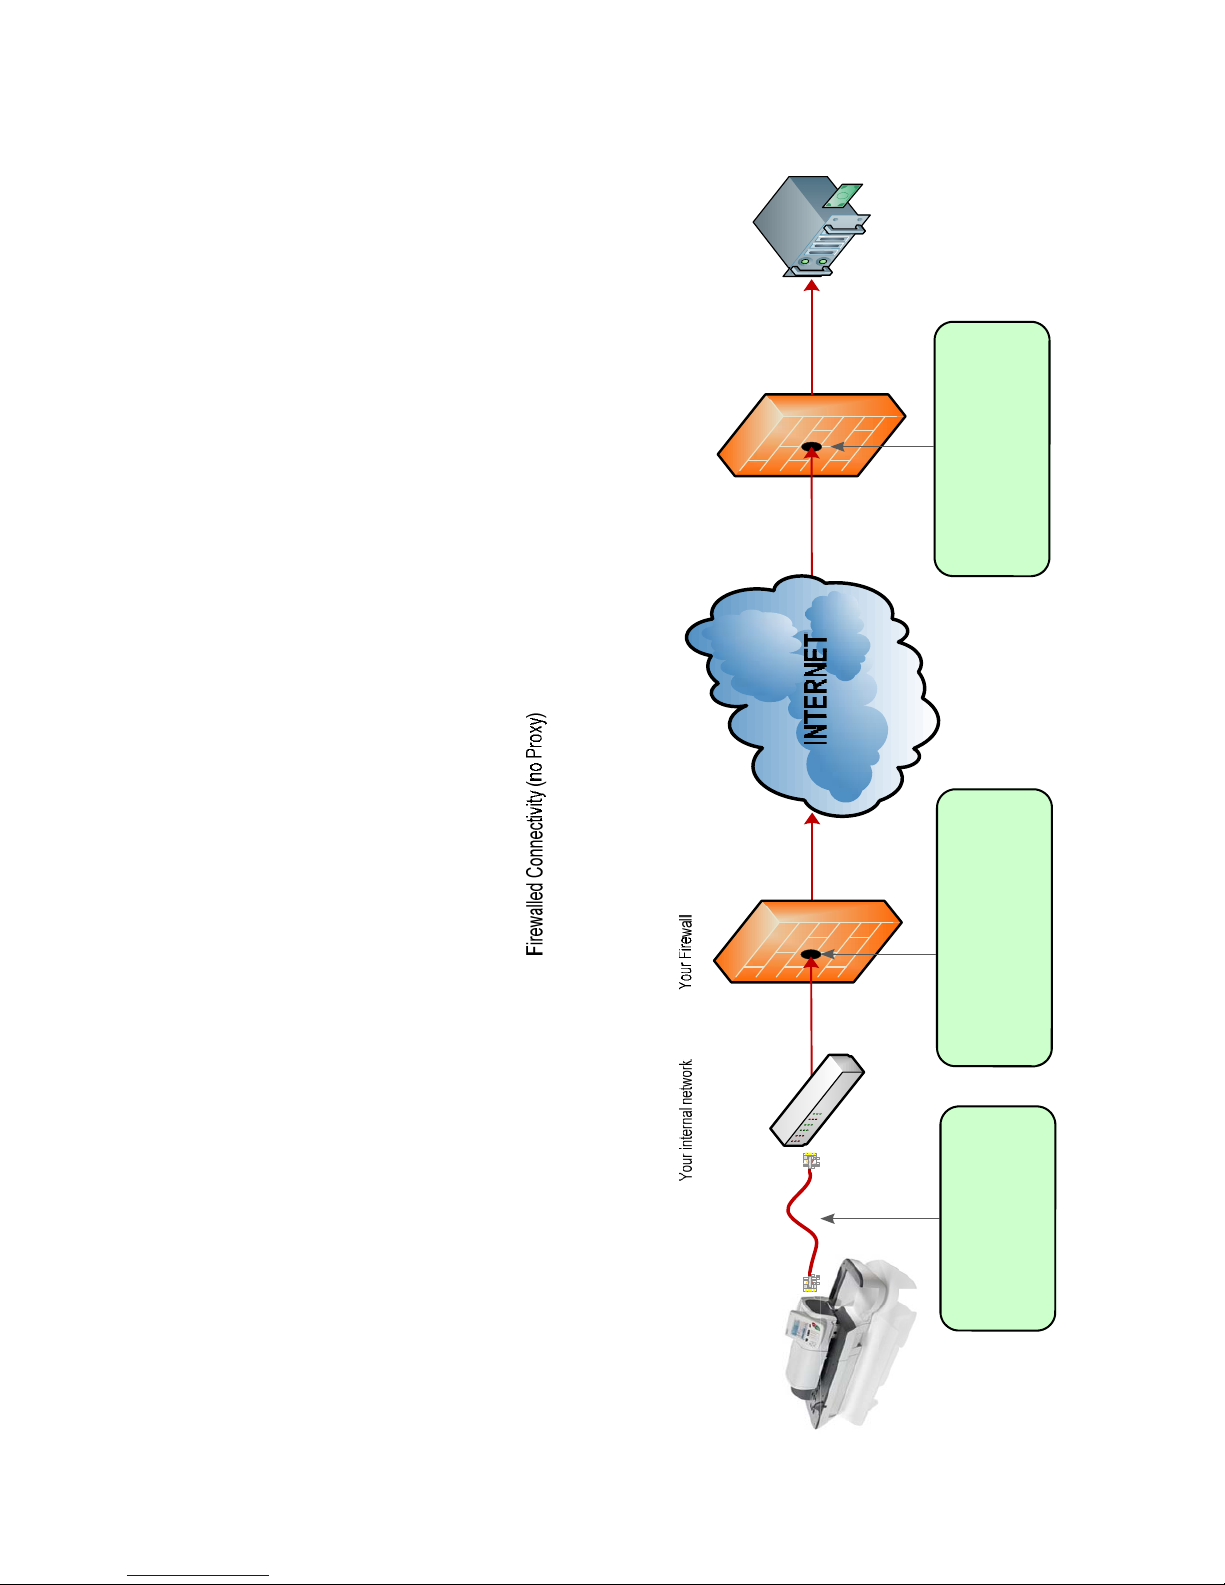
Corporate Internet access via a Firewall: Here your Mailing Machine is connected to your internal corporate network using a standard Ethernet (CAT5,
RJ45) cable, with either DHCP allocating the IP address or your IT/Security departments giving you details
for manual configuration. Additionally, a security device called a firewall controls access to the Internet,
and may block the Mailing Machine.
To enable the Mailing Machine to reach Hasler, you may need to involve your IT/Security teams, and ask
them to permit the Mailing Machine to reach:
4
na-meterservices.neopost.com using TCP port 443.
into your network
cable into your Mailing
Plug one end of your CAT5
machine, and the other end
Machine
Your Hasler Mailing
Page 7
Systems
Hasler Re-Crediting
TCP port 443
Hasler Firewall
na-meterservices.neopost.com
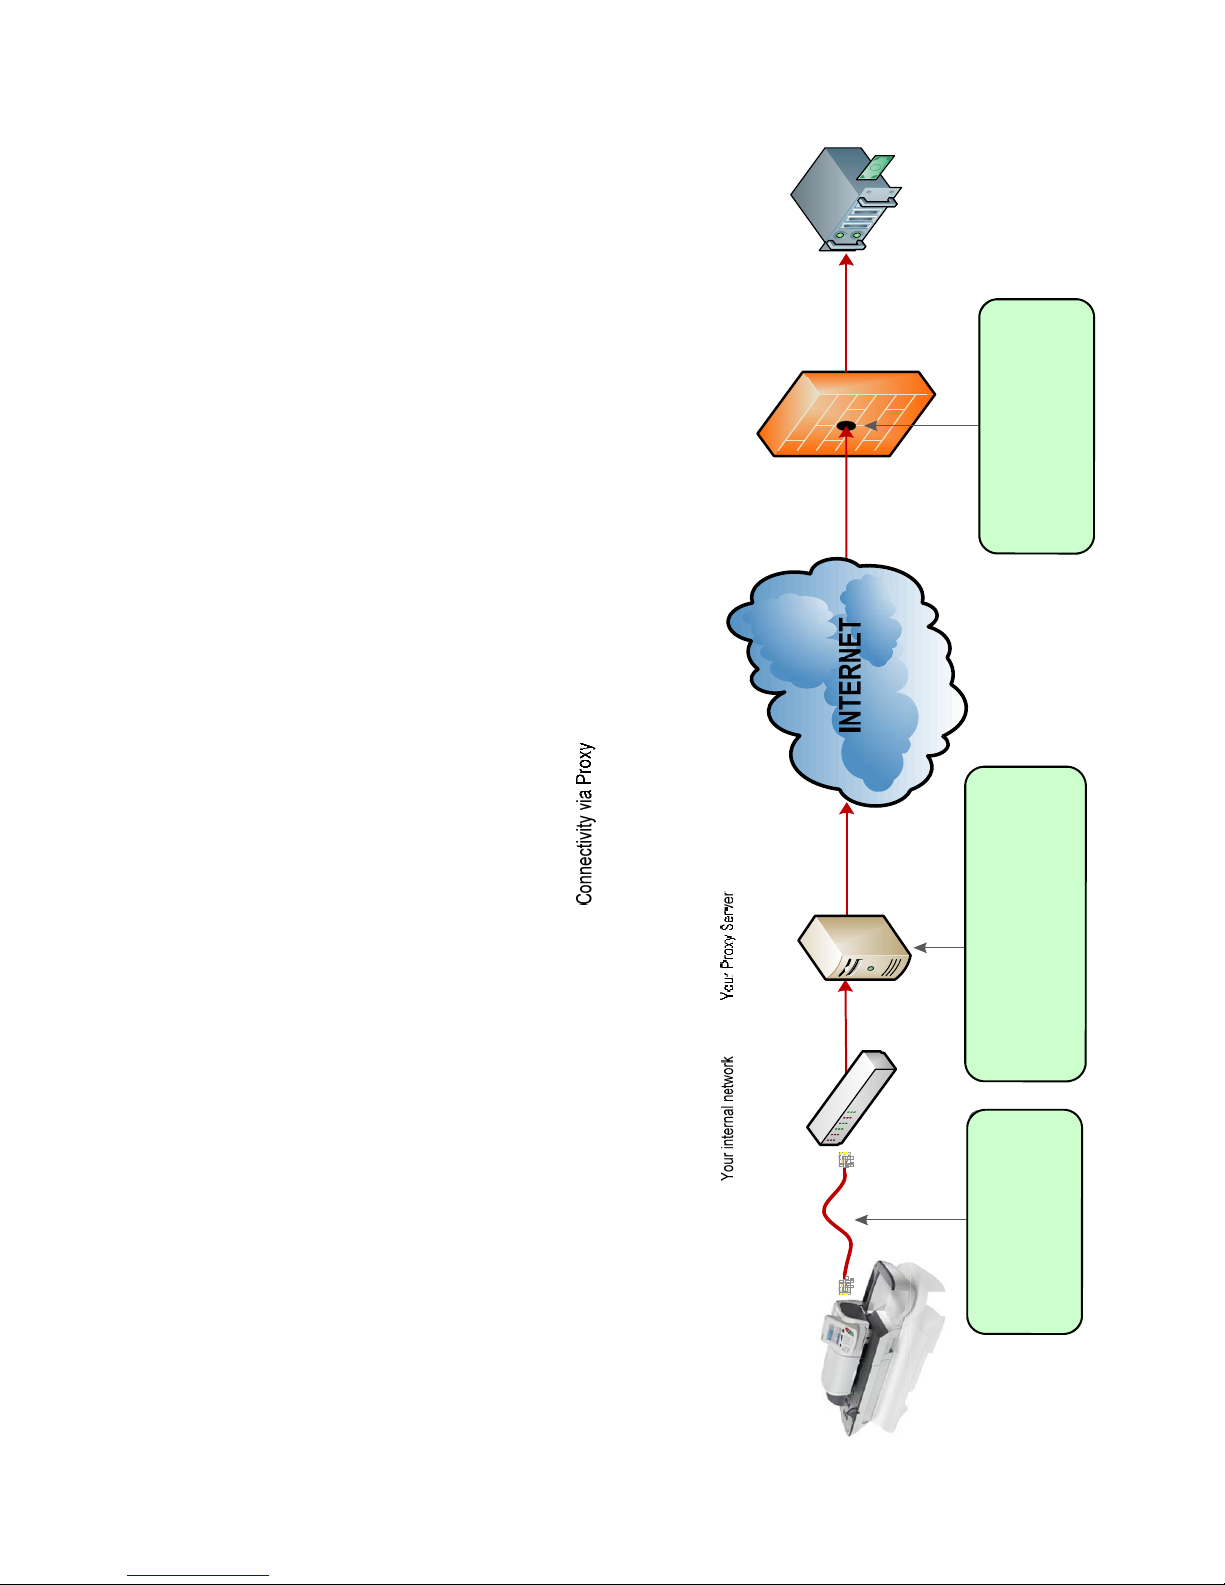
Corporate Internet access via a Proxy Server:
Here your Mailing Machine is connected to your internal corporate network using a standard Ethernet (CAT5,
RJ45) cable, with either DHC P allocating the IP address or your IT/Security departments giving you details
for manual configuration. Additio nally, a security device called a Pro xy Server is used to permit access to
Hasler.
TCP port 443
na-meterservices.neopost.com
server via TCP port 8080 by default.
Your proxy server will pass this on to:
Your mailing machine talks to your Proxy
Plug one end of your
CAT5 cable into your
other end into your net-
Mailing machine, and the
It is likely you will need to ask your IT/Security teams to create settings for the Mailing Machine in the
Proxy Server Configuration. They will need to know the following information:
The Mailing Machine needs to reach: na-meterservices.neopost.com using TCP port 443 (which is also
known as SSL or HTTPS).
It will talk to your Proxy Server via TCP port 8080 by default, and is capable of sending username and
password.
They may respond by providing you with a Username and Password, as well as an IP address or DNS name
for the Proxy Server. These details will allow the Mailing Machine to get access to Hasler.
Your Hasler Mailing
Machine
5
Page 8

The Mailing Machine will need the follow ing fields completed during setup. (It
may be advisable to have a member of yo ur IT/Security teams present during
installation to assist here).
Proxy URL: This is the name or IP address of your Proxy Server. This will need
to be provided by your IT department.
Proxy Port: This is the port number allocated on the network that
communicates with your Proxy Server. By default this is set to 8080. This will
need to be provided by your IT department.
Proxy Login: This is a user account created on your Proxy Server that allows
Internet access. This will need to be provided by your IT department.
Proxy Password: This is the password that would be associated to your Proxy
Login. This will need to be provided by your IT department.
6
Page 9
Manually configuring LAN communication settings
In some unique instances, the LAN settings may have to be programmed into the
IS series mailing machine in order to establish a valid connection via LAN. To
manually configure LAN settings on an IS series mailing machine for a new install,
the actions below are required.
|Note : If this process is not followed the System will not be able to co nnect using
the default settings.
Remove the power from the system; remove the PSD (meter); plug the system
back in and wait until the sys tem boots up.
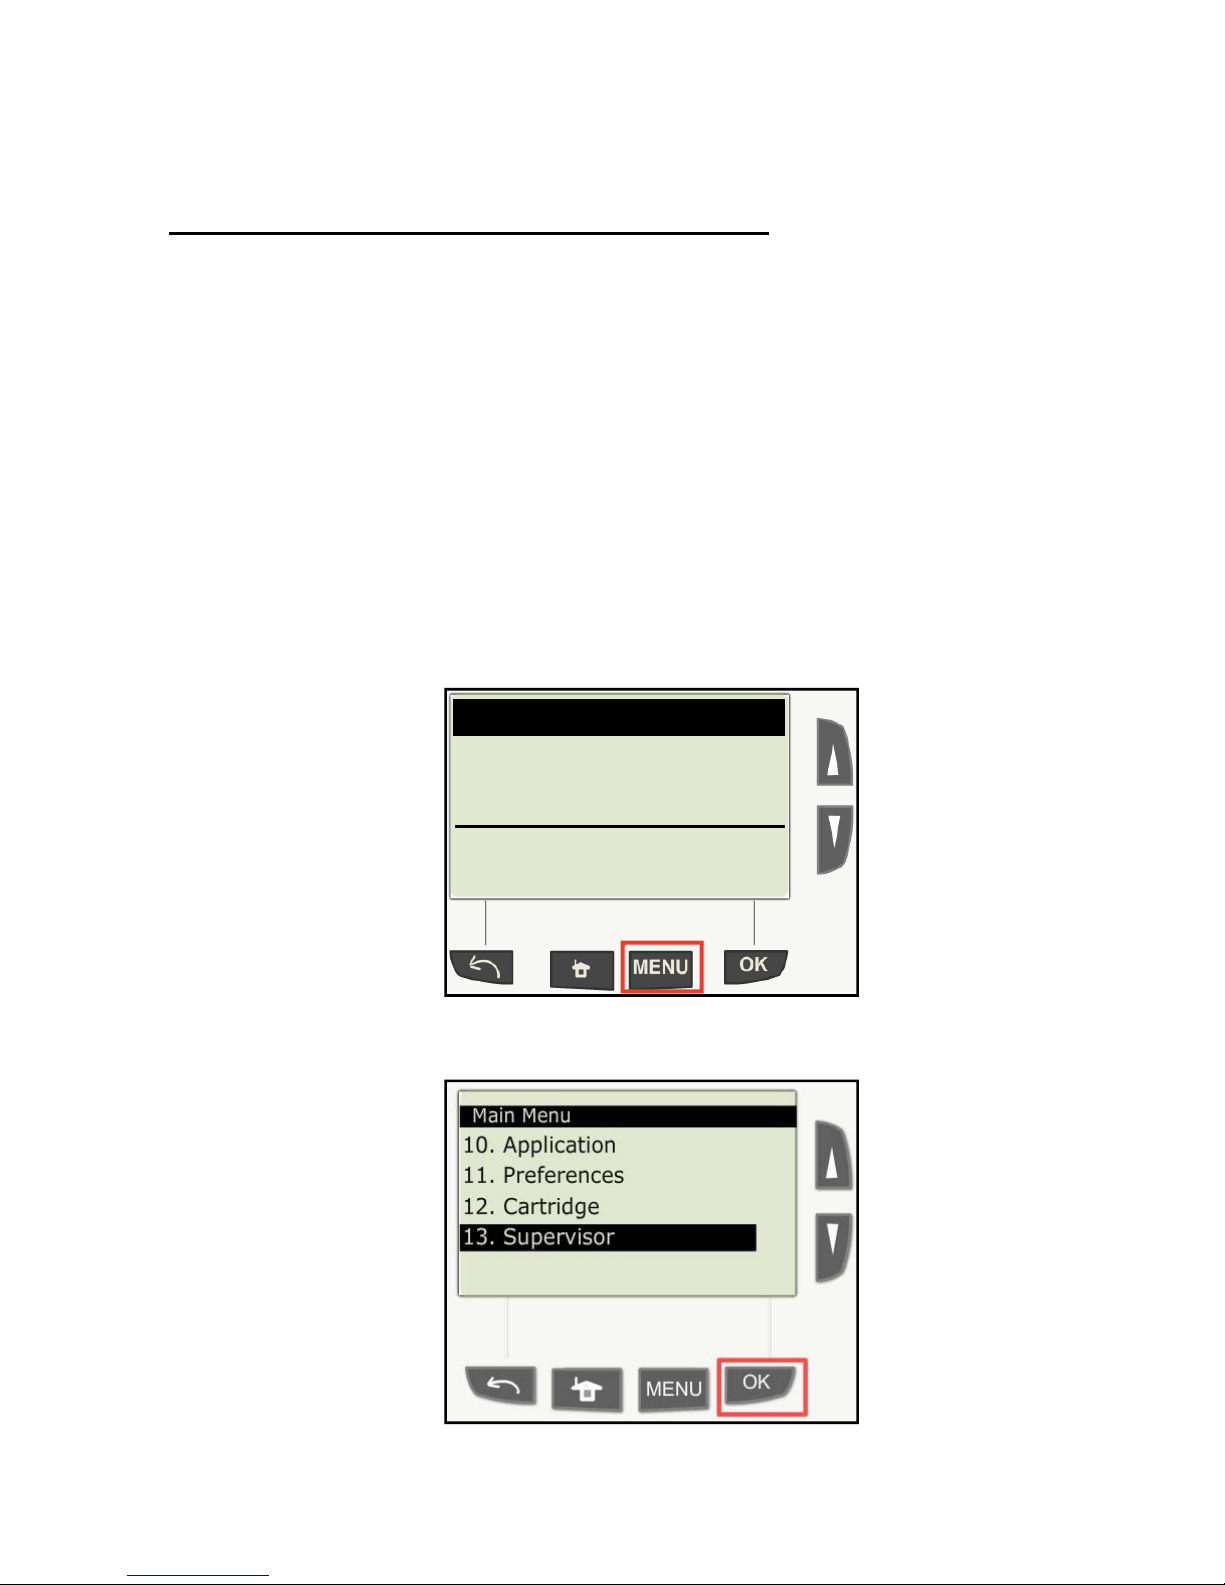
1. When the system powers on with no PSD (meter), you will be required to
clear a “boot with no PSD” messege. Press “ OK” to display the screen
below. Press the “Menu” button.
|Note: if there is no cartridge in the system, other messages may have to
be cleared by pressing OK.
2. Scroll down and select ”13 Supervisor”.
No Stamp
No printing
7
Page 10
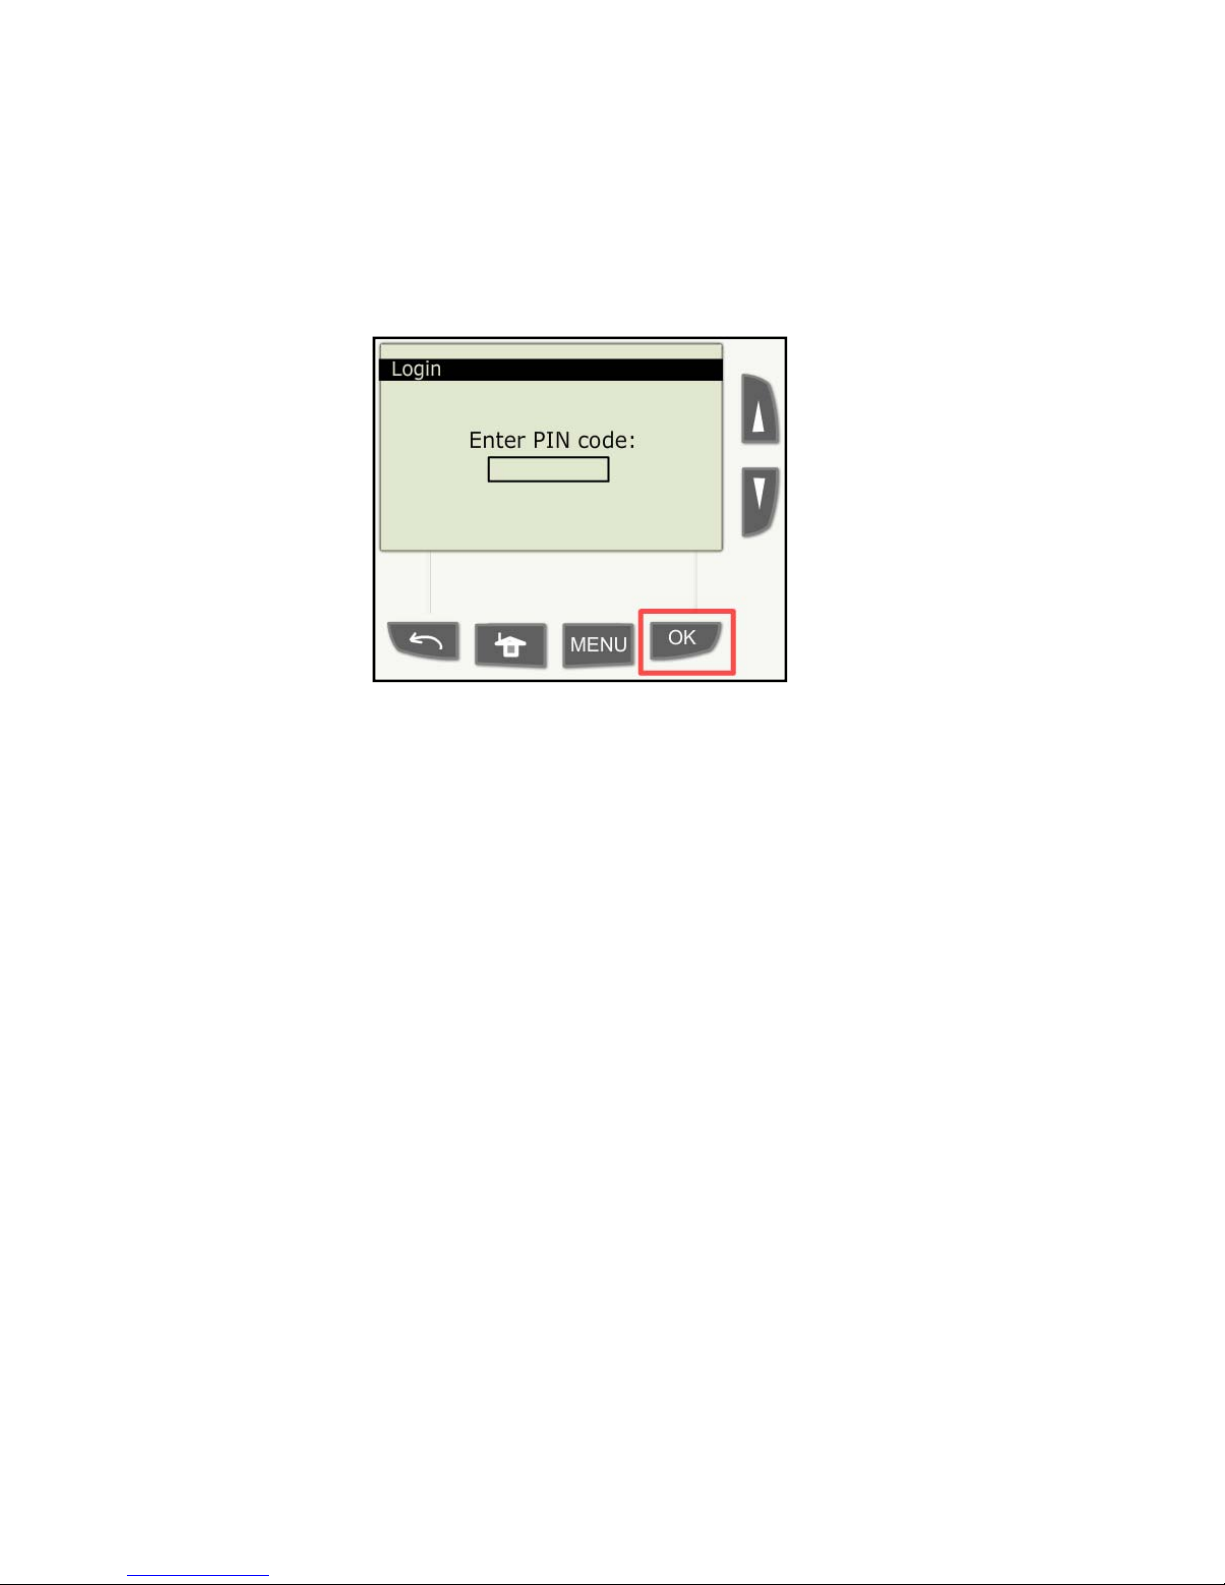
3. Enter the supervisor pin code “09430”. Select “OK” to continue.
You will now be able to access the “LAN settings” via the “communication
settings” option number “9”
|Note: This pin code only applies when the PSD (meter) is not present.
|Note: Please ask a member of your IT administration staff to be
present before adjusting these settings.
If you are using a proxy server, the proxy settings can also be accessed from this
menu. However the mailing system will automatically detect the proxy server
during the installation wizard and r equest the following information.
»
8
Page 11
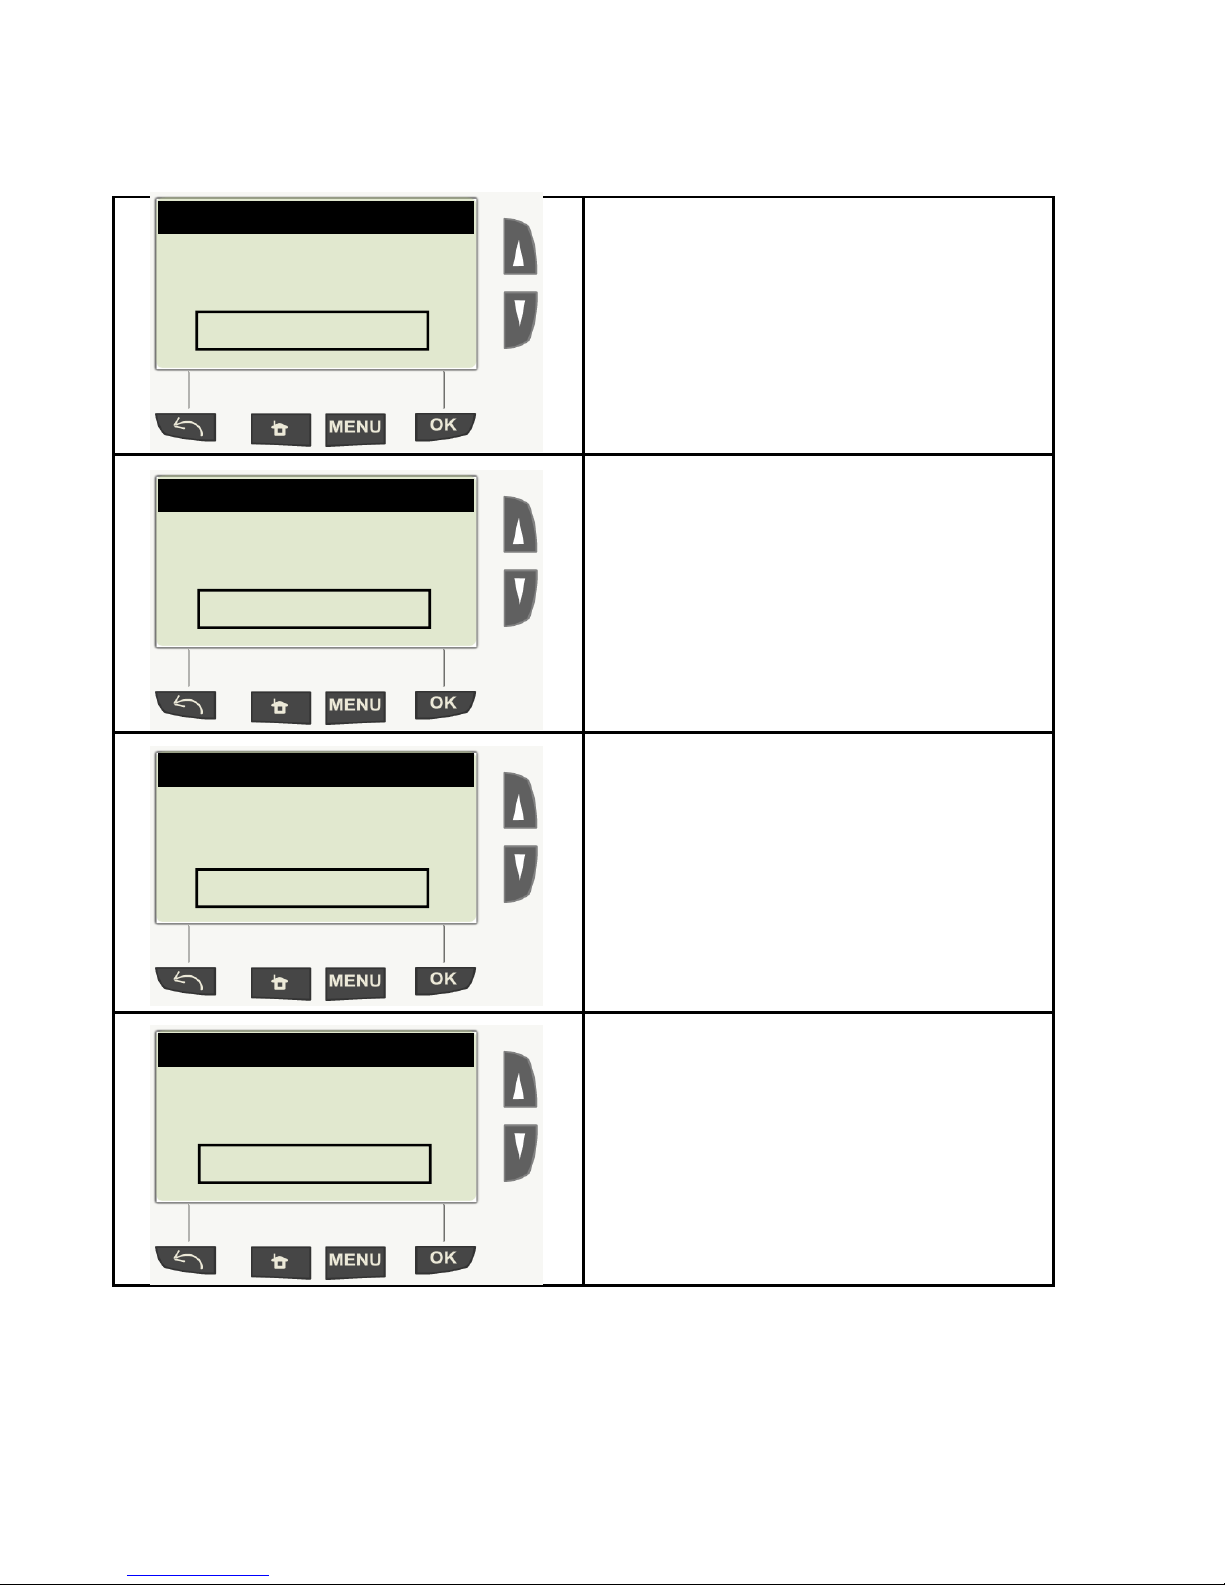
Installation process
Proxy URL
MY PROXY
Installation process
Proxy URL: This is the name of the
proxy server. This will need to be provided by your IT department.
Proxy Port
Installation process
Proxy Login
Installation process
Proxy Password
8080
USER
TEST
Proxy Port: This is the port number allocated on the network that commun icated
to the proxy server. This will need to be
provided by your IT department.
Proxy Login: This is a user account created on the proxy server that allows
internet access. This will need to be provided by your IT department.
Proxy Password: This is the password
that would be associated to the proxy
login. This will need to be provided by
your IT department.
Once the proxy information has been entered please continue from “step C3”
Activate the postal server connection. This can be found in the “Installation guide”.
9
Page 12
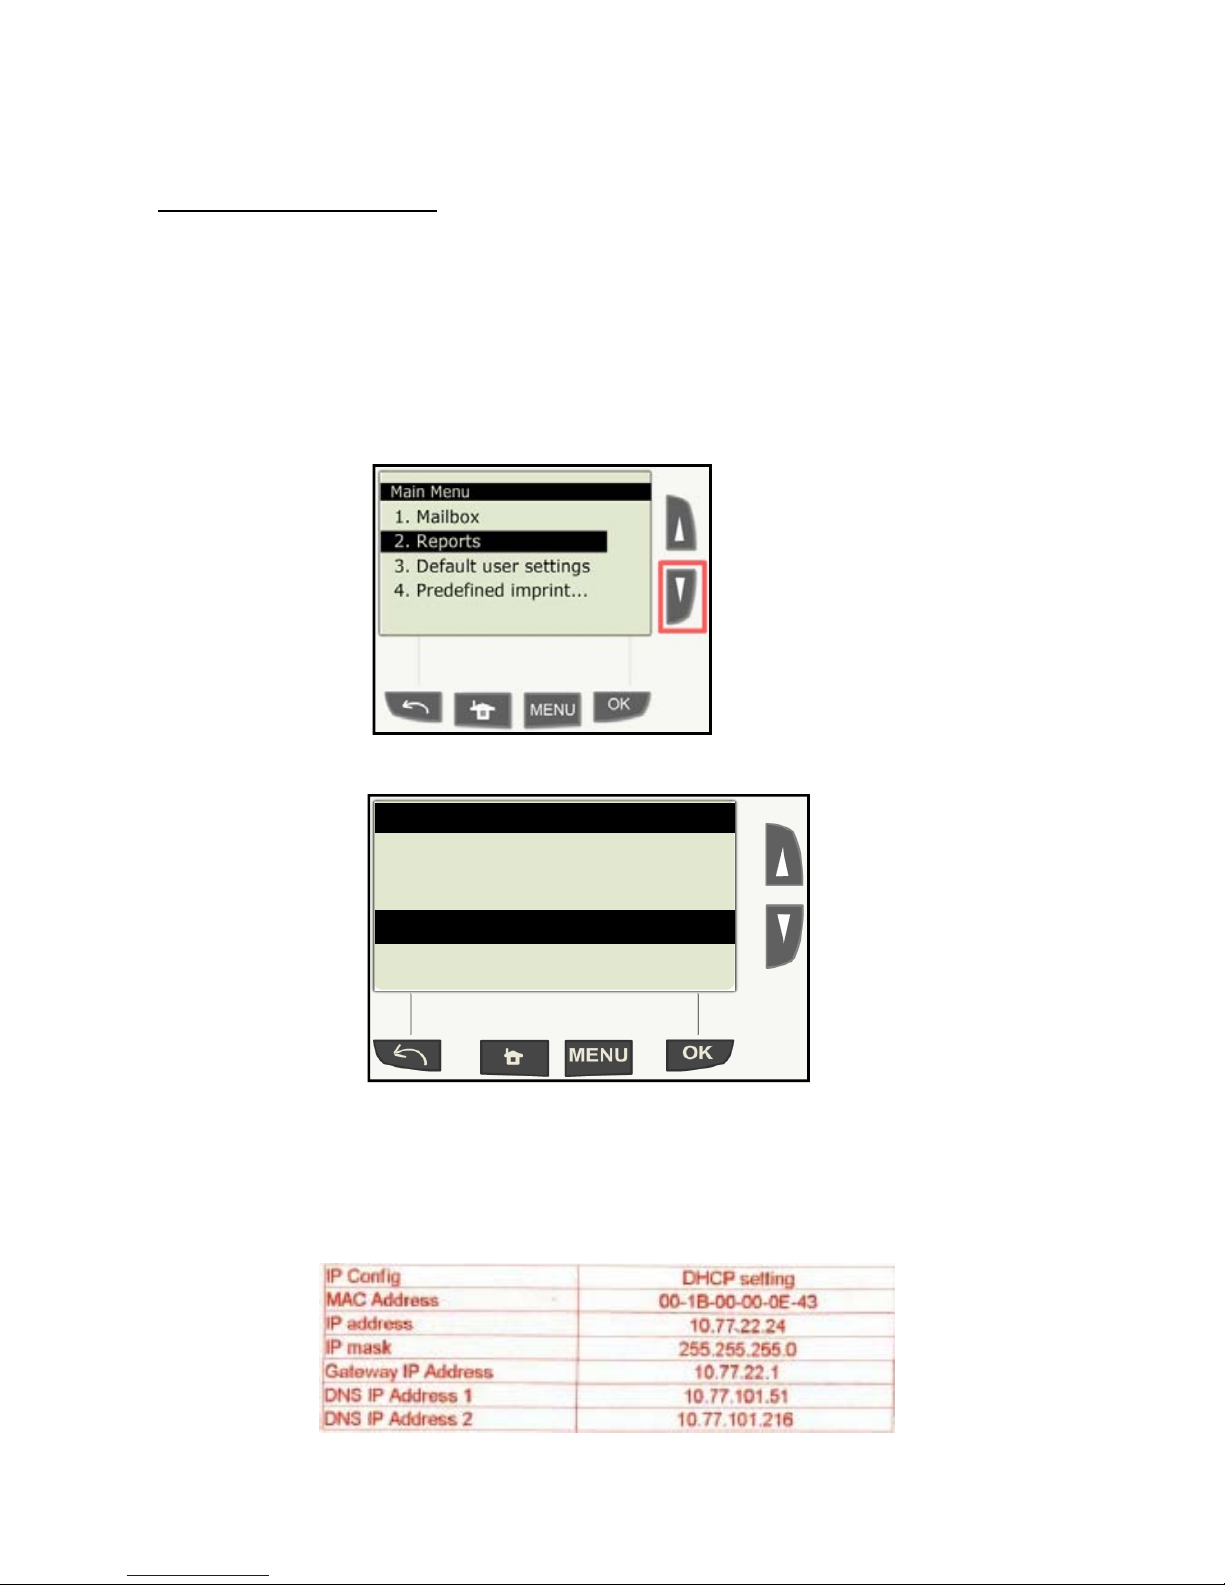
IP Configuration report
A report can be obtained to assist your IT department when configuring your
network firewall to allow traffic from the mailing system.
To access the report please follow steps 1-3 in page 7 and 8 of this booklet
“Manually configuring LAN communication settings” this will allow you
access to the “supervisor menu”.
4. Select “Reports” from the menu.
5. Select “IP Configuration report”
Select report
7 Multi account
8 Base errors
9 Meter errors
10 IP Configuration report
11 Proxy configuration report
6. Make sure that labels are present in the label feeder. Select “Get report”
|Note: IS350 uses double labels which can be fed the same way as an
envelope.
The label will be printed showing the cur rent network settings assigned to
the mailing system.
E
L
P
M
10
EXA
 Loading...