

Hasler HJ700, HJ710 Operating Manual
Operating Guide
1
HJ700 and HJ710 Inkjet Printers
Mailing Systems
And Solutions
HASLER
America’s better choice®
An ISO 9001 Quality System
Certified company

2
Products presented in this guide are conform to
requirements of directives nbr 73/23/CEE and
89/336/CEE.
Neopost has implemented a program for the
recycling of worn machines and machines at the
end of their lifetime. Contribute in a responsible
way to the environmental protection by consulting
your retailer internet site, or by contacting him.
He will inform you of the collection and treatment
processes of these machines.

© Copyright 2007
All rights reserved. This manual may not be reproduced in whole or in part, trans-
ferred, stored in a telemetry system or translated into any langua ge, in whatsoever
form, without prior written permission.
The manufacturer assumes no liability for damages occurring as a result of misuse,
repairs and modifications, which are carried out by unauthorized third parties. This
manual has been prepared with great care. However, liability is excluded for any
errors occurring in spite of such care.. In his commitment to continuous improvement, the manufacturer reserves the right to implement further technical and optical changes. The values herein provided are nominal values . Therefore, no legal
claims may be raised in connection with this manual.
The manufacturer cannot be held liable for damages or malfunctions caused by options or accessories, when these are not original products or when they have not
been expressly approved by the manufacturer.
Brand:
HP is a registered brand name of Hewlett-Packard Corporation.
Microsoft and Windows are registered brand names of Microsoft Corporation.
3

Table of Contents
Table of Contents
Illustration Directory
1 Introduction
1.1 Pictograms
1.2
Notes for the Use of this Manual
1.3 Important Terms and Abbreviations
1.4
System requirements
2 Safety Notes
2.1 General Safety Notes
2.2 Handling Ink Cartridges
2.3
Location of the Printer
2.4
Disposal
3 Transport and Packaging
3.1 Shipping
3.2 Unpacking the Printer
3.3
Assembly
4 Printer Description
4.1 Machine Overview
4.2
Range of Application
4.3 Operation
4.4 The Control Panel
4.4.1
Keyboard Layout
4.4.2 Key Combinations
4.5 The Display
4.5.1 Offline Mode
4.5.2 Online Mode
4.6
Brief Instructions
5 Start-Up and Operation
5.1 Setting Up and Connecting the Printer
5.2 Installing the Driver
4

5.3
Inserting the Ink Cartridge
5.3.1 Correctly Inserting the Ink Cartridge
5.3.2
Resetting the Ink Counter
5.3.3 Display for the Change of Ink Cartridge
5.3.4 Cleaning the Ink Jets
5.4 Print job Setup
5.4.1
Setting Media Widths for the Machine
5.4.2 Setting the Print Format
5.4.3 Checking the Paper Transport
5.5 Test Print
5.6 Machine Counters
5.6.1
Day Counter
5.6.2
Service Counter
5.6.3
Counting of Job Pages
6 The Programming – Offline Mode
6.1 Purpose of the Programming Mode
6.2
The Control Panel in the Programming – Offline Mode
6.3
Keyboard Layoutin the Programming Mode
6.4 Menu Overview
6.5 Explanation of the Individual Menus
6.5.1 Example of an Application in the Programming Mode
6.5.2 Initialization of the Machine
7 Troubleshooting
7.1 Error Messages
7.2 Warning Messages
8 Appendix
8.1 Maintenance Notes
8.1.1 Cleaning the Ink Cartridge
8.1.2
Press Rolls and Rollers
8.2 Interfaces
8.2.1 Centronics Parallel Interface
8.2.2
RS-232-C Serial Interface
8.3 Fonts
8.3.1
Terminology
8.3.2
Character Set
8.3.3 Selection of the Fonts for Printing
5

8.4
Character Sets
8.4.1
7-Bit Character Sets
8.4.2 8-Bit Character Sets
8.5 Technical Data of PRINTER 700/710
9 Glossary
6

1 Introduction
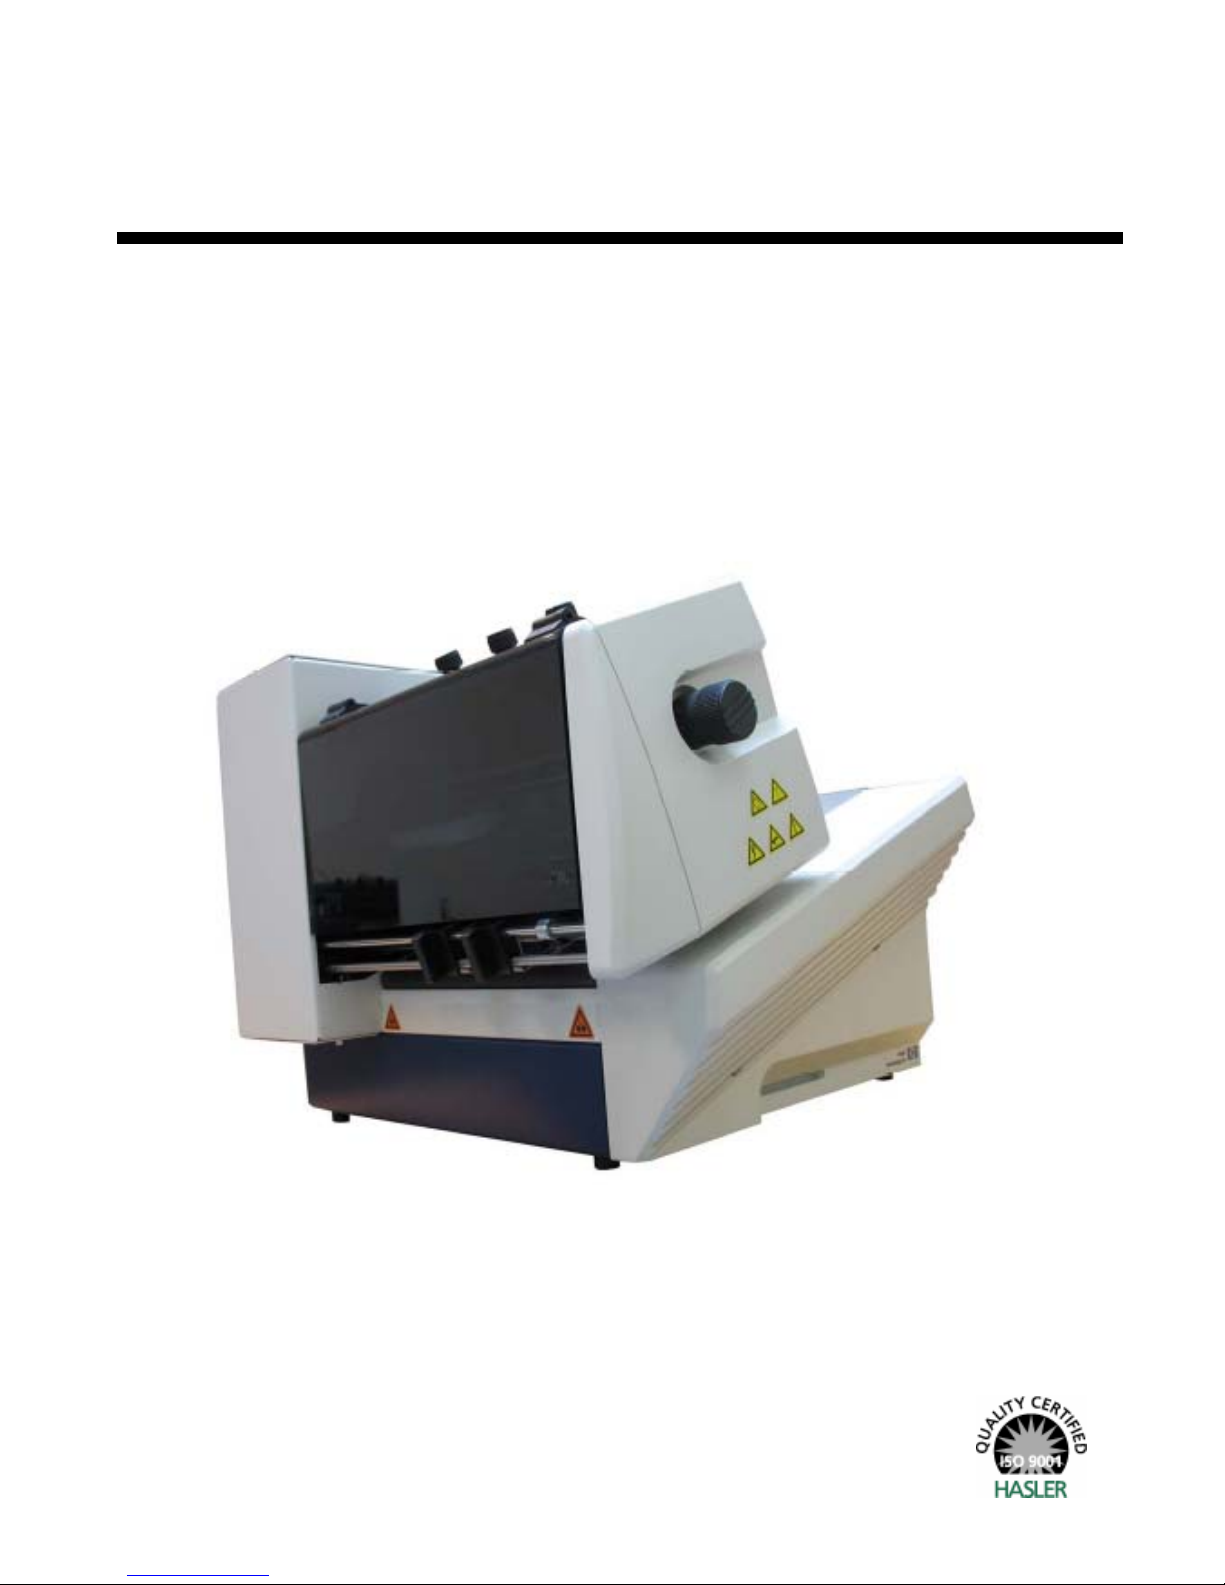
With the PRINTER 700/710 you have an innovative digital printer with HP ink jet
technology for printing variable data - for printing mass mailings, for example,
with addresses, serial numbers or other variable information and graphic elements.
The machine has been designed for professional use with high performance.
In order to ensure both long service life of PRINTER 700/710 and its
components, as well as safe conditions of use, we recommend that
you read carefully and comply with the operating instructions and
safety notes. Always be aware of all warnings and notes that are affixed to or printed on the machine itself.
All persons who are to handle this machine must also be familiar with the operating
manual.
Store this manual in a safe place where it is easily accessible for future reference at
any time.
1.1 Pictograms
General Warnings
Warning of danger from electricity or electrical shock
Information / Note indicating important information regardin g the
handling of the machine.
7

1.2 Notes for the Use of this Manual
The following sections provide all the general informat ion and explanations required, in order to be able to carry out the subsequent tasks and procedures.
When some action is expected from the assembler or operator, the text is always
preceded by a dot, for example:
• First step.
• Next step.
Please, always read through to the action texts, so that you w ill obtain all of the
necessary information. Do not anticipate what you believe will follow in the manual:
It will prevent you from making mistakes!
Chronology and Reference
This manual is structured chronologically, and therefore ordered sequentially from
the receipt of the machine packed up to its ready-for-use state. This is followed by
information for operation, programming, and then fin a lly technical data.
When you are unfamiliar with the machine, it is best to read through the manual
from beginning to end. You will be guided step by step, and in this way you can
easily and quickly have the machine in operation.
If you are already familiar with the PRINTER 700/710, it will make things easy if
you to use this manual as a reference work.
1.3 Important Terms and Abbreviations
There are a few terms and abbreviations you need to know, in connection with the
PRINTER 700/710:
• Cartridge = Crt + C.
• Print object width = Extension of the print object in the transport direction.
• Print object height = Extension of the print object crosswise to the transport
direction.
1.4 System requirements
The PRINTER 700/710 is designed for use on a PC (at least Pentium 200 MHz) with
parallel interface. It can be run with the Windows 2000 or Windows NT4 or Windows XP operating systems.
The interface cable must be a shielded twisted-pair parallel interface cable (not included in the delivery).
As an alternative, the printer can be connected with a USB cable, when using Windows 2000 and Windows XP.
8

2 Safety Notes
For your own safety and the proper functioning of the machine, please, read carefully the following instructions, before start in g your machine. Always be aware of all
warnings and notes that are affixed to or printed on the machine itself. Store this
manual in a safe place where it is easily accessible for future reference at any time.
The digital PRINTER 700/710 is a state-of-the-art construction and reliable in operation. Nevertheless, the device may present hazards when operated by untrained
personnel. The same applies to use that is inappropriate and not in keeping with its
intended purpose.
Failure to comply with this manual’s instructions might result in:
• an electrical shock,
• injuries due to the rotating rollers,
• damage to the machine.
9

2.1 General Safety Notes
Caution!
Please, read these notes with care.
Save this manual for future reference.
All notes and warnings found on the machine are to be followed.
Installing the
Machine
A safe, level position is necessary, when installing the machine.
Injuries may be caused by tipping, rolling away or falling.
The machine is to be protected from moisture.
WARNING!
This is a Class A device. This device may cause radio frequency
disturbances in residential areas; in this case, the operator may
be required to implement the necessary corrective measures.
Electrical
Hazards
Depending upon the country-specific version, the digital
PRINTER 700/710 may only be connected to either a voltage
of 230 V/50 Hz or 115 V/60 Hz.
The mains plug may only be connected with a socket having an
installed protective contact! The protective effect may not be
compromised by the use of an extension line without a protective
grounding conductor. All interruptions of the protective grounding conductor, within or outside of the machine, are prohibited.
The device is double pole fused! When fuse failure occurs, electrical machine parts can still carry voltage.
When making the connection to the mains power, be aware of
the connection values on the rating plate.
Inspect the voltage setting on the device’s power supply unit.
Run the power cords in such a way, that no-one may trip over
them. Do not place any objects upon a power cord.
When the machine is not in use over a long period of time, it
should be disconnected from the power supply in order to avoid
any damage in the event of a voltage surge.
Protect the device from moisture. When moisture enters the machine, there is a danger of electrical shock.
Never open the machine. For reasons of electrical safety, the
machine should only be opened by authorized service personnel.
Operating
Safety
Never put your hands inside the machine when it is running!
The danger of injuries exists, through pulling in and crushing on
the rotating rollers. In addition, keep long hair and parts of loose
clothing far from the machine in operation.
In order to prevent damage to the machine, only factory authorized accessory parts should be used.
Cleaning the
Machine
Prior to cleaning the machine, it should be disconnected from the
mains outlet.
When cleaning the machine, do not use liquid or spray cleaners,
but only a cloth dampened with water.
10

Allow the
Machine to
be Inspected
by the Service Partner!
In the following cases, you should unplug the machine from the
mains and contact an authorized service technician:
• When the power cord or its plug is worn or damaged.
• When water or other liquid has entered the device.
• When the device does not function properly, in spite of
following the instructions provided.
• When the device has fallen down or the housing is damaged.
• When there is a significant change in the performance of
the machine.
Spare Parts When repair work is carried out, only original spare parts or
spare parts approved by the manufacturer may be used.
Repairs Do not disassemble the machine any further than is described in
this manual. The opening of the machine by unauthorized personnel is not permitted. Repairs may only be carried out by authorized service personnel.
Modification is not permitted:
For safety reasons, your own reworking and modifications are
not permitted.
Please contact your authorized dealer, for all questions relating to
service and repair. In this way, you ensure the operational safety of
your machine.
2.2 Handling Ink Cartridges
Store ink cartridges out of the reach of children. Normally, no ink
leakage can occur. Immediately wash off sprays of ink from the skin
under running water. Should ink get into the eyes, rinse it out immediately with sufficient water.
The ink cartridge should not be shaken, allowed to fall, or hit with the hand or a
hard surface.
Install the ink cartridge immediately after removing the protective strip. The expiration date may not be exceeded!
Do not attempt to open or refill an ink cartridge. This can damage the mach ine.
Clean the ink cartridge as described in chapter
8.1.1 “Cleaning the Ink Cartridge“
on page 73.
11

2.3 Location of the Printer
Be aware when installing the machine that it must stand on a smooth and level surface that is larger than the printer.
The floor space for the printer must be sufficiently stable. The tipping over or falling
of the machine can lead to injuries, as well as damage to the machine.
When selecting the installation or storage location for the printer, keep in mind that
it must be protected from strong temperature and humidity changes, direct sunlight
and excessive heat.
The printer must not be subject to vibrations or shocks.
Install the printer near a mains outlet, so that the power cord can be disconnected
trouble-free at all times.
2.4 Disposal
The printer may not be disposed of in the conventional manner of household waste.
Please, dispose of the printer in accordance with the regulations in force.
12

3 Transport and Packaging
3.1 Shipping
The PRINTER 700/710 is shipped in packaging designed for the purpose of delivery
at its intended destination, via regular transportation, in undamaged condition.
The forwarding agent is liable for damages occurring in transit. Transport and storage should take place under normal conditions, i.e. at temperatures between +5°C
and +70°C, and maximum relative humidity of 80%. During unauth orized conditions, damage may occur that is not outwardly visible.
3.2 Unpacking the Printer
In order to remove the printer from its packaging, lifting may only be carried out at
the points indicated in the illustration below. Never lift the device on the control
panel!
Remove all packaging and take out the device with accessories. Be aware when lifting it out, that the device may only be lifted at the blue varnished areas.
Check to see, if all parts of the printer according to the following list are present in
total and in undamaged condition:
• 1 Printer 700/710
• 1 Side guide
• 1 Paper support plate
• 1 Printer driver & the User Guide (CD)
• 1 Power cord
• 1 USB / Parallel cable
• 1 Ink Cartridge
Should you not have any need for the packaging – e.g. sending it back for maintenance purposes – dispose of it in an environmentally friendly manner.
13

3.3 Assembly
Assembly of the Paper Support Plate
Unscrew the knurled screw with about 10 turns. Stick the front tab of the paper
support plate into the slot of the feeder. Press the slotted laminated spring together
with the base element and stick both between clamp and feeder on the threaded
part of the knurled screw.
Illustration 3-1: Assembly of the paper support plate
14
4 Printer Description
4.1 Machine Overview
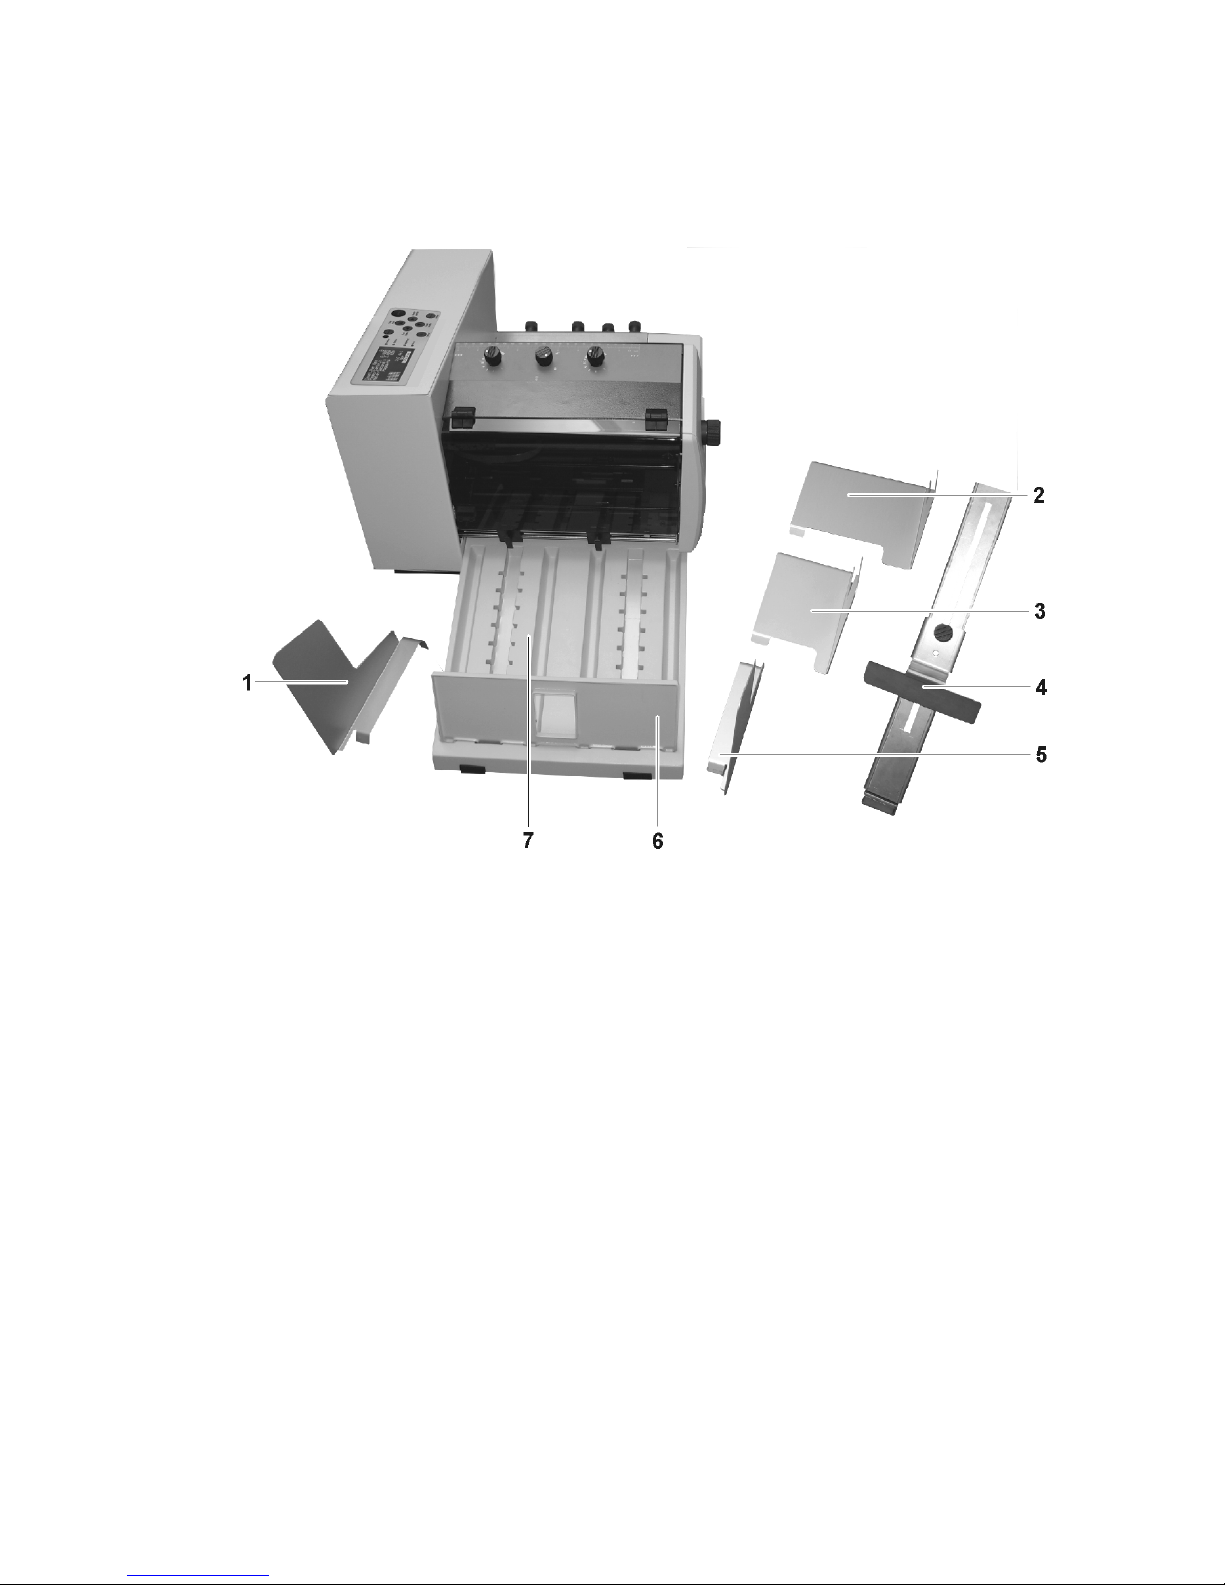
Illustration 4-1: PRINTER 700/710 Overview
1. Inner side guide
2. Outer side guide, wide
3. Outer side guide, middle
4. Paper support plate
5. Outer side guide narrow
6. Paper stop, not included in the
delivery
7. Paper output tray, not included in the delivery
15
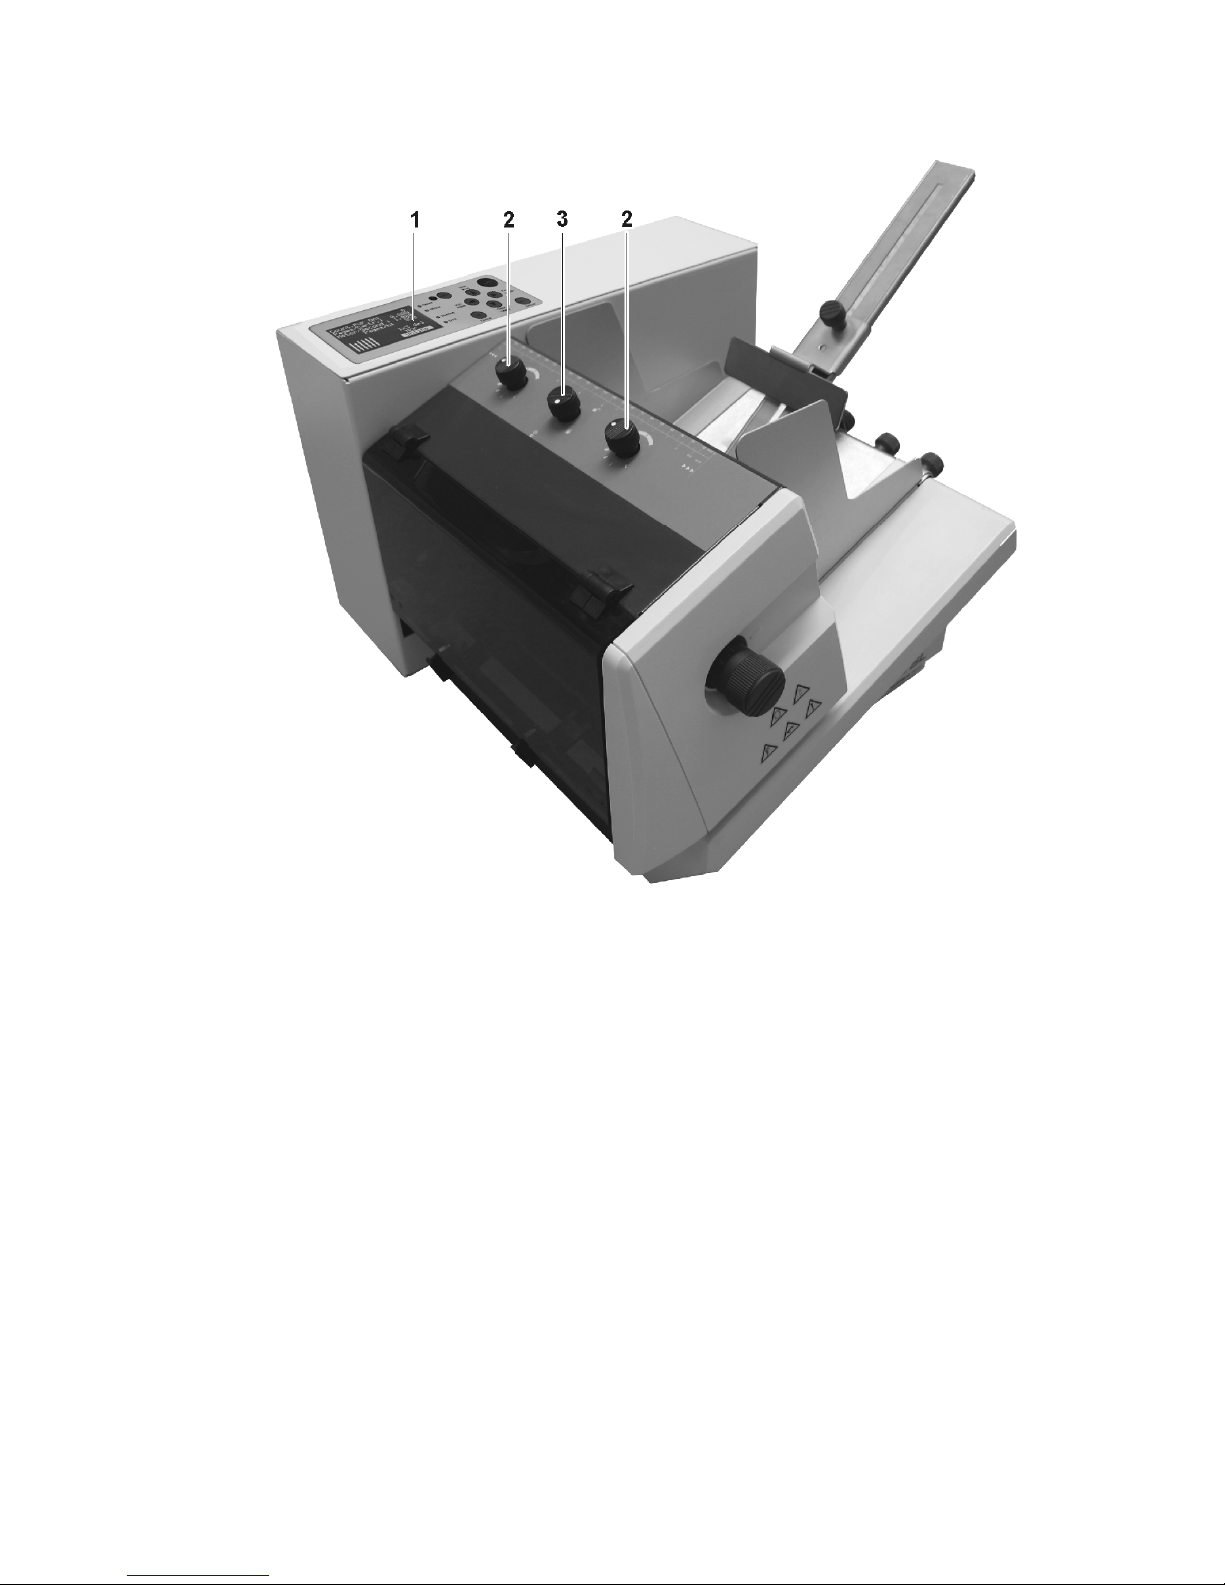
Illustration 4-2: PRINTER 700/710 front side
1. Control panel
2. Paper thickness button
3. Locking mechanism of paper
thickness button, for removal of
dust
16
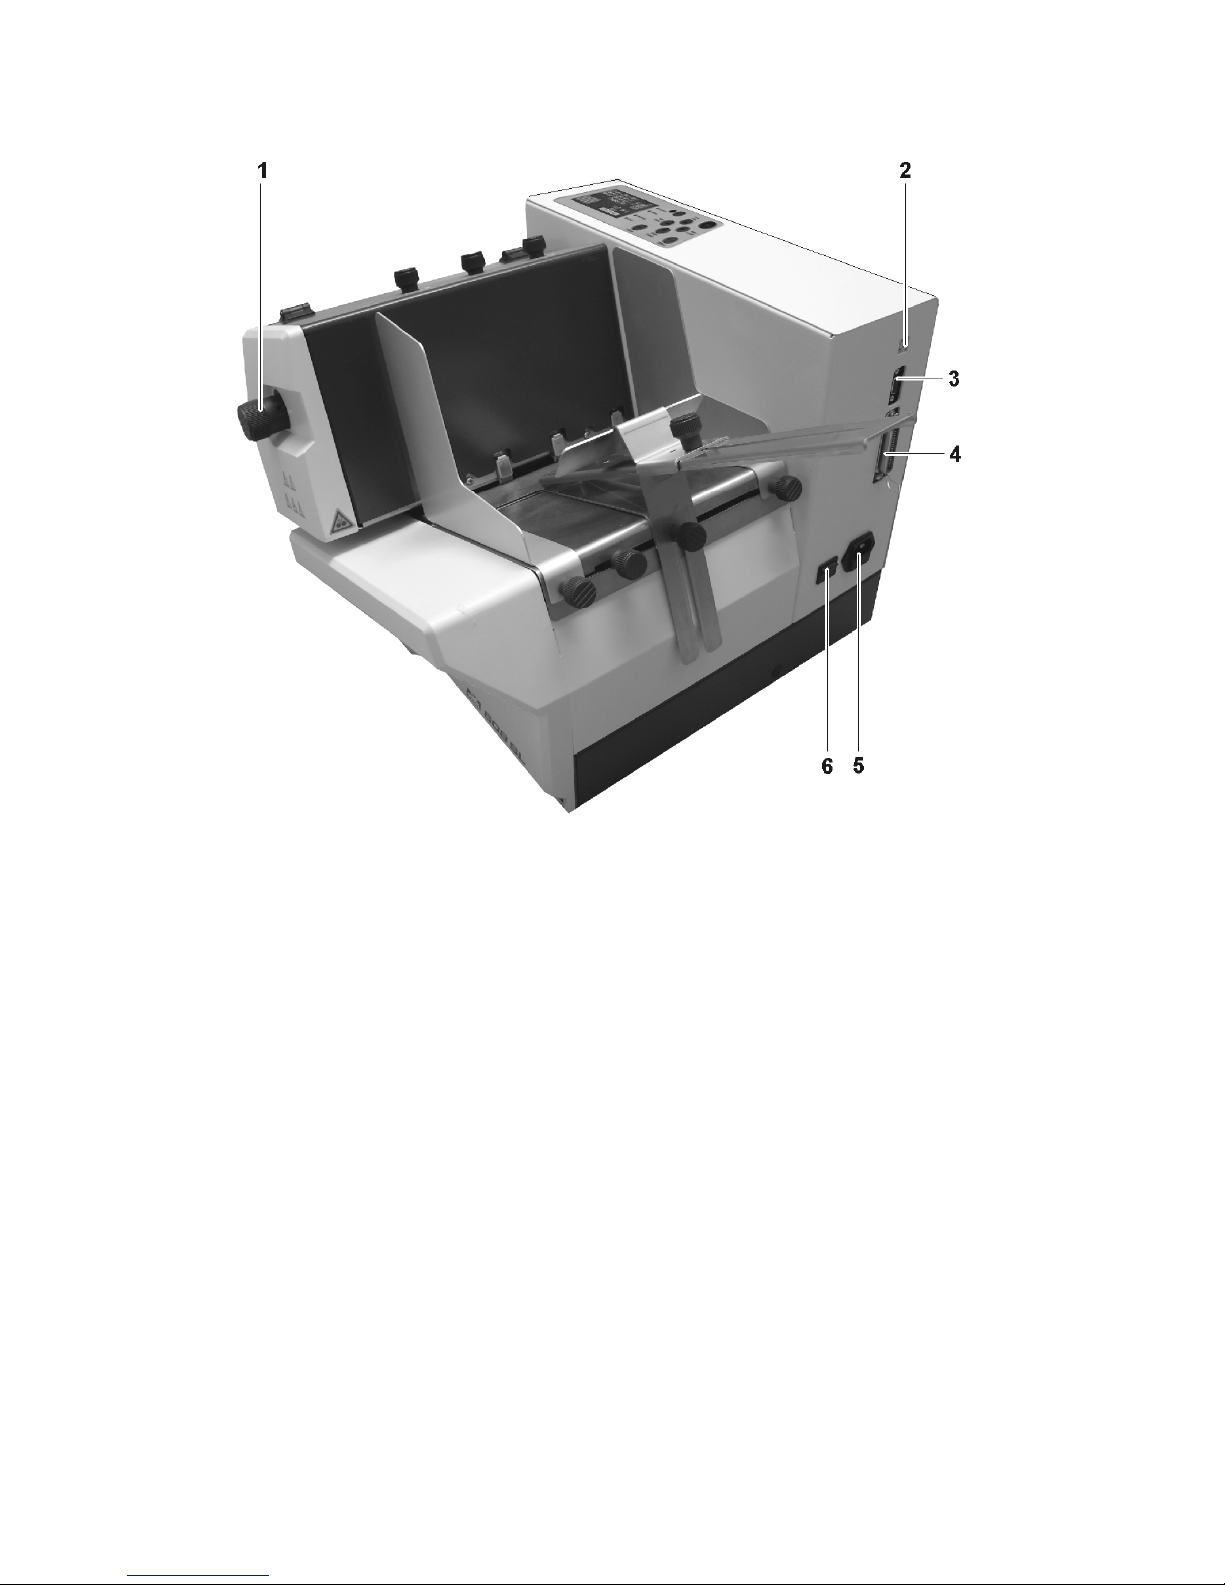
Illustration 4-3: PRINTER 700/710 back side
1. Height setting for printing unit
2. USB connection
3. Serial connection
4. Parallel connection
5. Mains plug and fuse
6. On/off switch
17
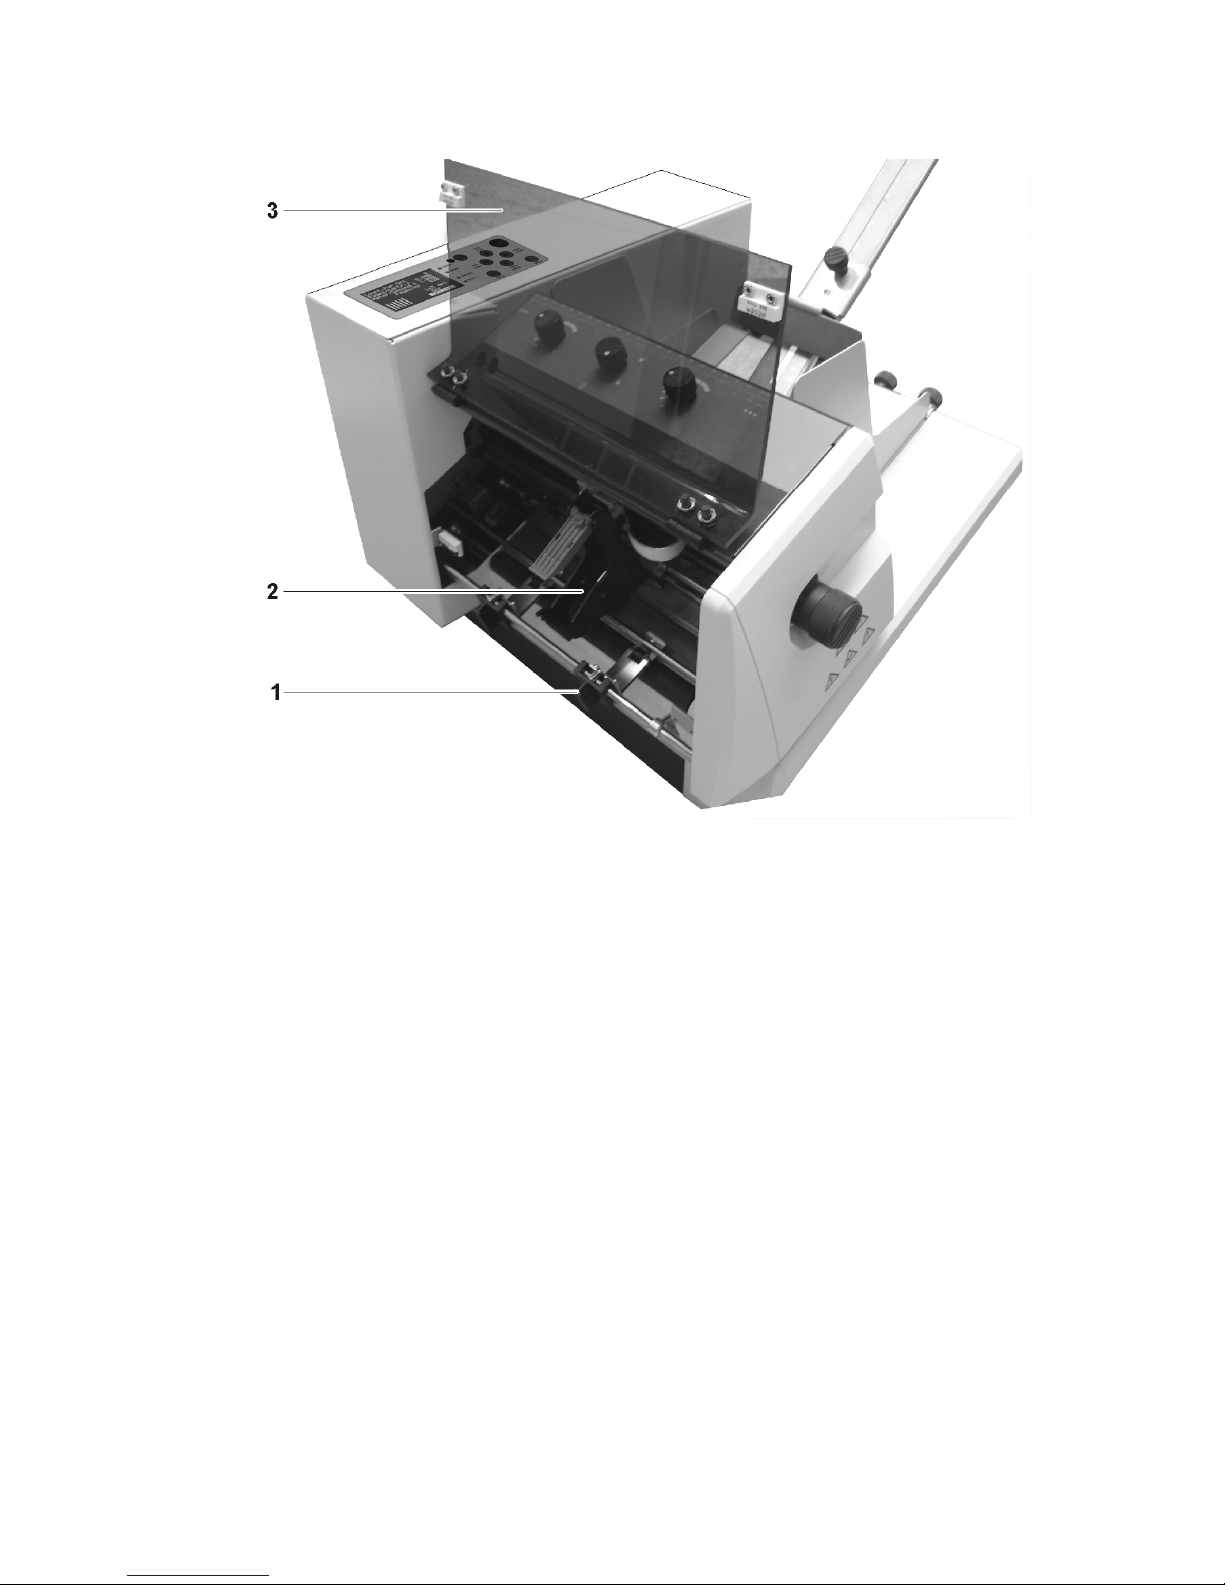
Illustration 4-4: PRINTER 700/710 with open safety cover
1. Movable press rollers (outfeed rollers)
2. Carriage in middle position
3. Safety cover
18
4.2 Range of Application
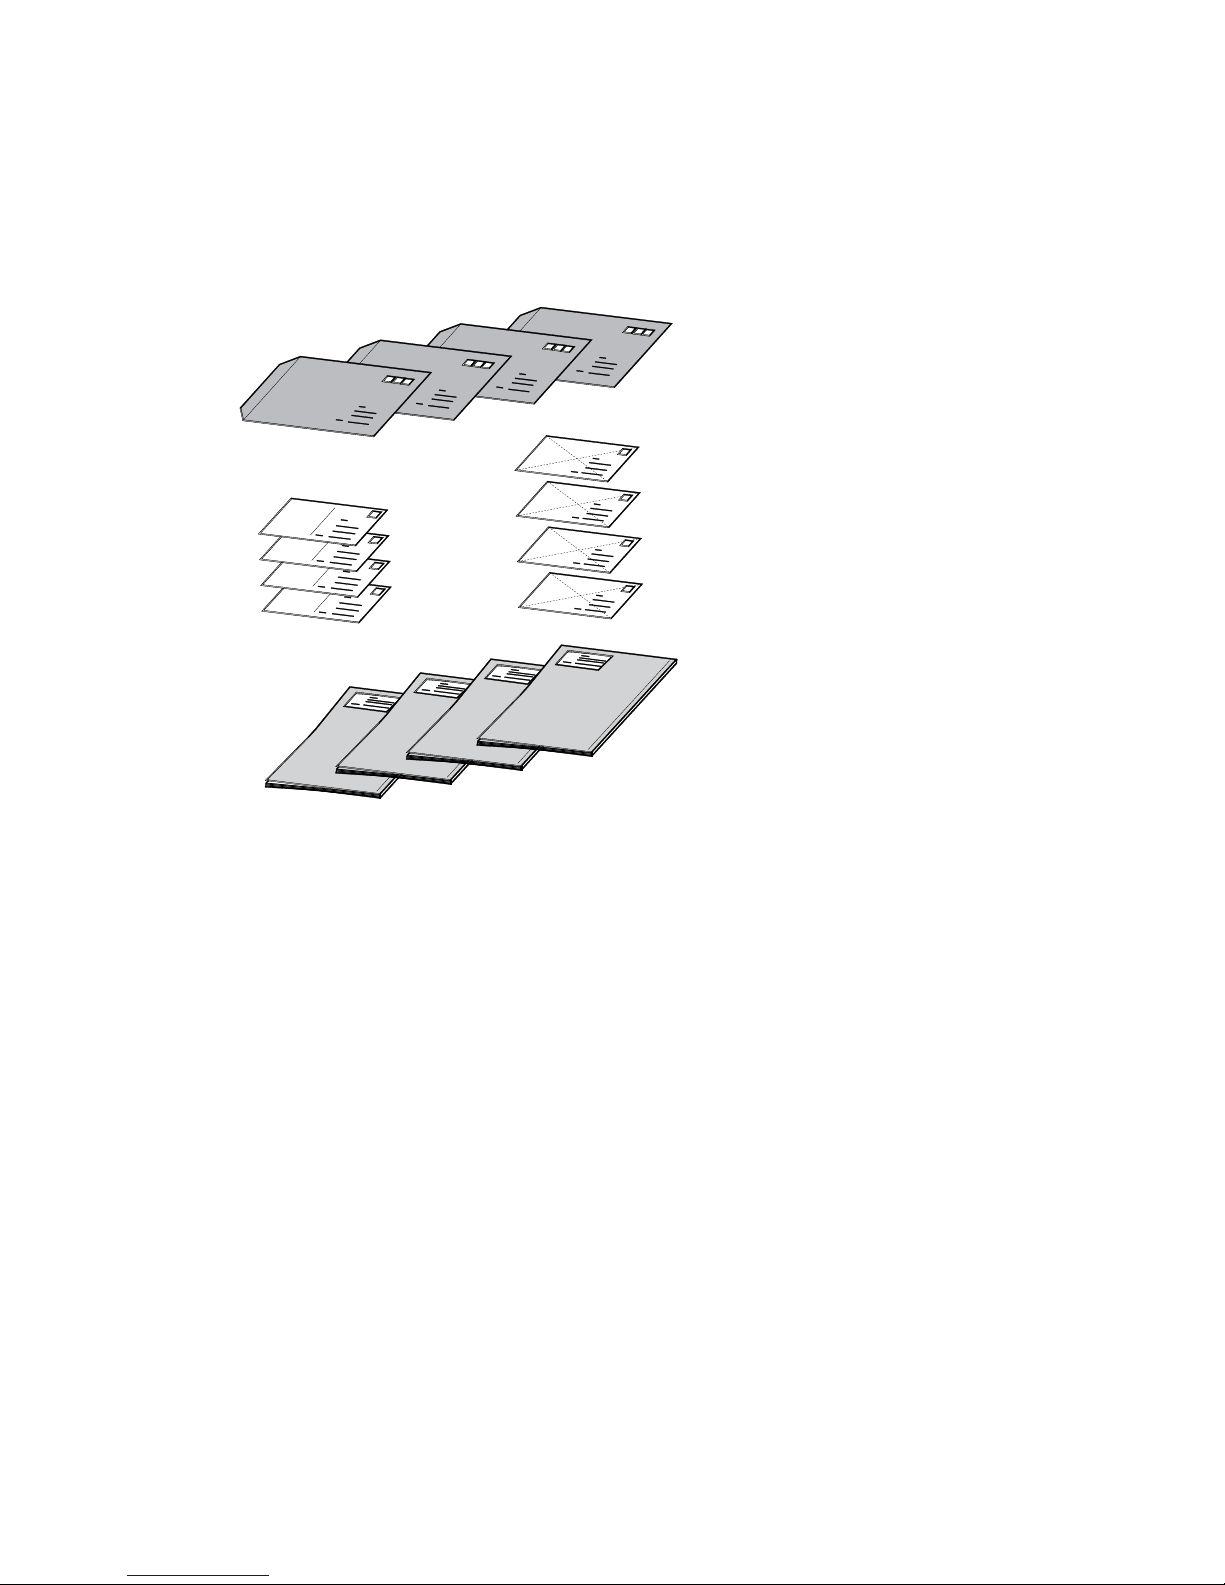
The digital PRINTER 700/710 is a high quality ink jet printer . It prints correctly positioned addresses on various print objects, such as letter envelopes, cards, prospectuses and newspapers, with thicknesses of up to 6 mm.
Illustration 4-5: Print object PRINTER 700/710
With 13 resident fonts, a selection of various font-families is available.
The printing width measures 180 mm for the PRINTER 700 & 235 mm for the
PRINTER 710.
Printing is carried out with a commercially available, replaceable ink cartridge.
19

4.3 Operation
The PRINTER 700/710 is designed for operation on an IBM-compatible PC. Printing
can be carried out from most word processing, database and address processing
programs.
For the printing of variable data and layout design, we recommend the Mailing Studio. This program provides a comfortable working environment.
The printing unit of the PRINTER 700/710 is fitted with the HP ink cartridge. The
print is carried out during the carriage movement of the print head.
The direction of the font is parallel to the head movemen t. Printing can be done so
as to be readable from the user side or can be rotated by 180°.
The position of the print fields on the print object depends upon the position of the
printing units and on that of the stack in the feeder.
The print object is - exactly positioned by the stacking tray - inserted above the
printing unit. Printing is carried out when the print object passes under the printing
unit.
The printer control procedure is very simple. For the first start-up, you will require
about 30 minutes.
20
4.4 The Control Panel
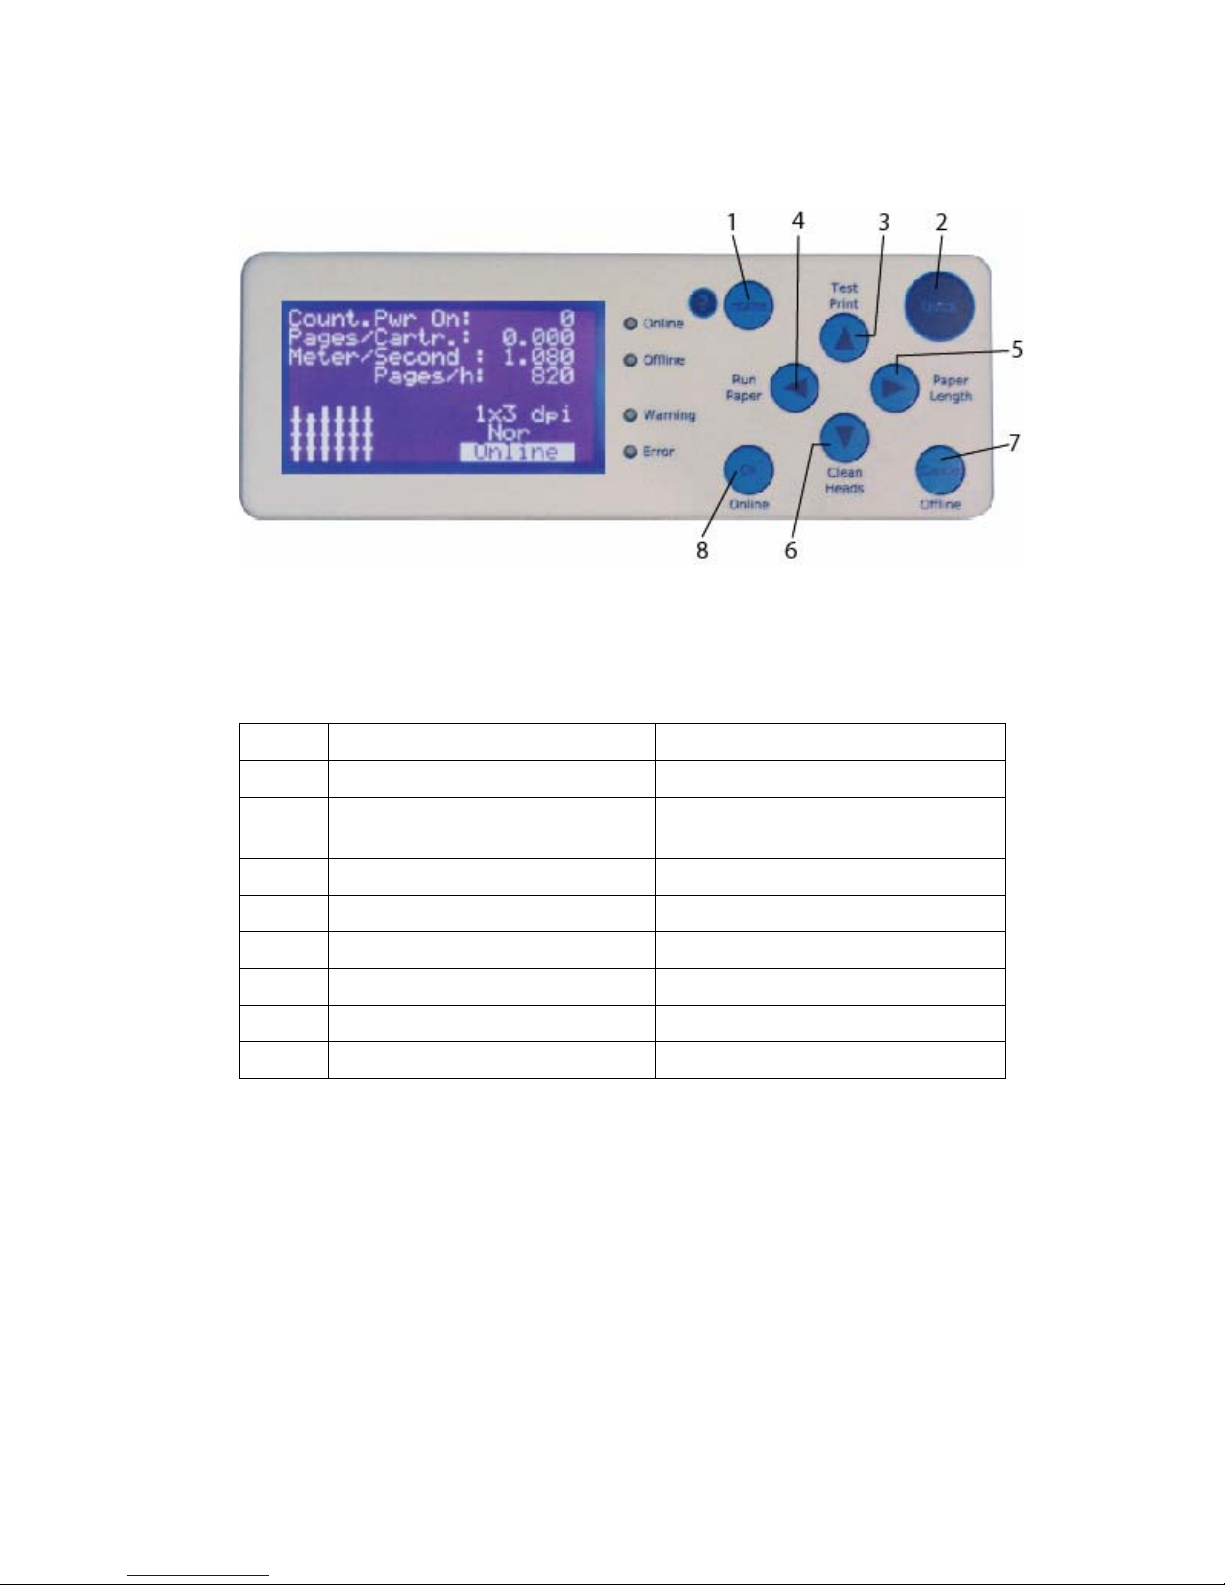
Illustration 4-6: Control Panel PRINTE R 700/710
4.4.1 Keyboard Layout
Only in the offline mode
Keys Key (X) alone Together with “Quick” Key
1 Home = Main Menu
2 Quick Menu =To find important
functions very fast
3 Arrow up Start Test Print
4 Arrow left Run Paper
5 Arrow right Measure Paper Length
6 Arrow down Purge Cartridges
7 Cancel / Offline Mode
8 OK (Confirm) / Online Mode
LED Functions
Green LED = Online Blue LED = Offline
Orange LED = Warning Red LED = Error
In online mode the printer only can only be switched to offline by pressing the “Off-
line” (7) button.
21
4.4.2 Key Combinations
The key combinations have, in connection with th e switching on of the machine, the
following functions:
Power
on
Home Quick OK Cancel Down Up Left Right Description
X X Reset settings ex-
cepting mechanical
Reset
X X Default Reset
X X X X Firmware Download
without starting ap-
plication
X X X X X Firmware Download
Note:
x means
- key is pressed at power-up.
When are the keys active?
If you are in the ONLINE mode you can only use the “Offline” key to change in the
OFFLINE mode. All the other keys are without function during the ONLINE mode.
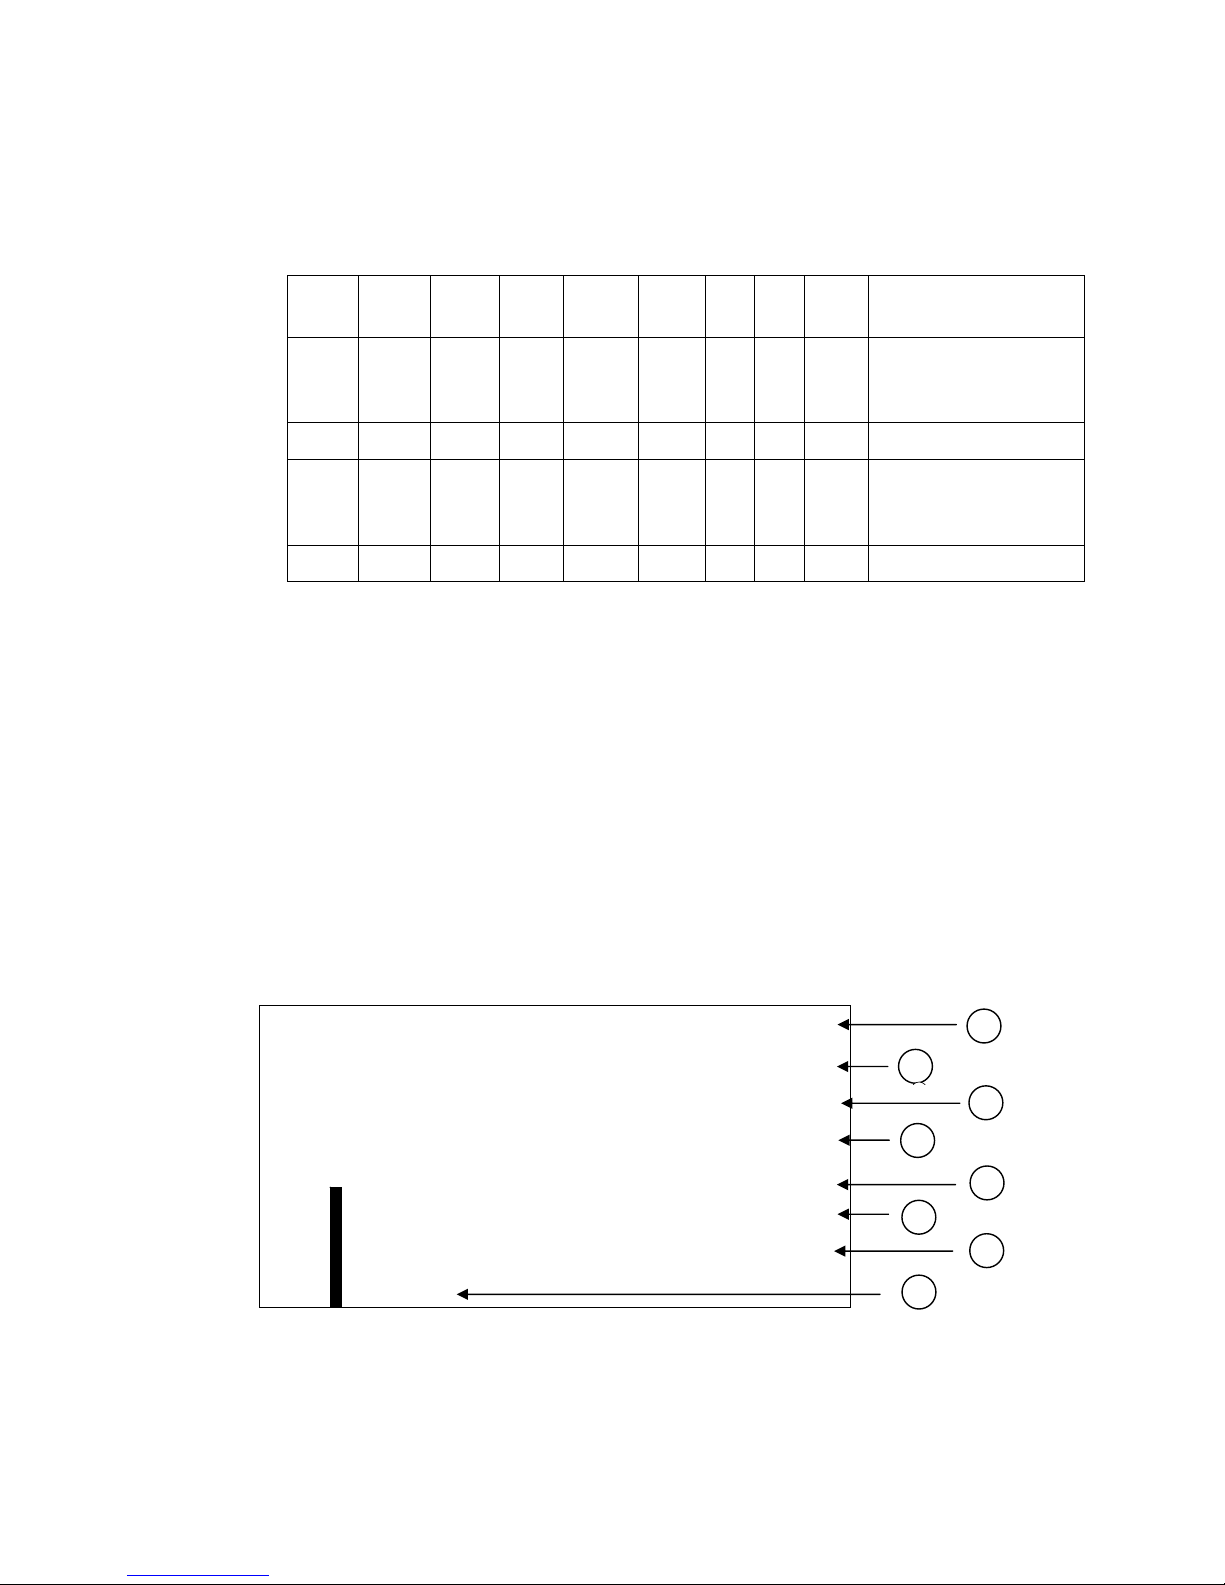
4.5 The Display
This is just an example and could look different, depending on the printer setup.
C o u n t. P o w r.
ON: 1
I n k C o s t s / J o b :
0.000
M e t e r / S e c o n d : 0 . 0 0 0
X J o b P a g e s / h : 0
6X6 dp i
No r
onl ine
Illustration 4-7: Display indications
2
1
3
4
5
6
7
8
1
22
Meaning of the display
1 Job Counter, after powering up of the printer
2 Averaged ink costs of job
3 Current transport speed
4 Throughput per hour
5 Print resolution measured in dots per inch
6 Rotate print by 180° Nor = Normal, Rev = Reverse
7 Indicates the printer mode “On” or “Offline”
8 Ink level of the cartridge.
4.5.1 Offline Mode
In this type of operation, you can configure the machine via the keyboard.
By using the "Online" key, you access the online condition.
4.5.2 Online Mode
In this type of operation, you can start the machine via command sequences from
your computer. Printing is carried out in this type of operation.
4.6 Brief Instructions
In order to be able to quickly carry out a test print with no previous experience, the
necessary operational steps are listed in the following table in the correct order. In
the pages listed in the right hand column, you will find the detailed description of
operational steps.
Operational Step Chapter Page
Connect device
5.1
25
Switch on device
0
26
Operate device via USB
5.2
27
Set device for media thickness
5.4.1
39
Set the format of the device
5.4.2
41
Paper run without printing
5.4.3
45
Test print
5.5
46
23

5 Start-Up and Operation
5.1 Setting Up and Connecting the Printer
Install the printer as described in chapter 2.3 - “Location of the Printer“.
Power Cord
See
HIllustration 4-3: PRINTER 700/710 on page 18
Caution!
The PRINTER 700/710 is a device of class 1!
The machine may only be operated on electrical circuits with protec-
tive grounding conductors (ground)!
Connect the power cord to the printer. Stick the mains plug into a socket with protective contact.
Change the fuses (also necessary when changing the mains voltage)
Caution!
When changing the fuse, you must in every case remove the power
cord beforehand!
Open the holding compartment with a fingernail or small pen. Change the fuse as
shown in the following illustration.
See chapter
8.5 - “Technical Data of PRINTER 700/710“ – starting on page 95.
Illustration 5-1: Changing the fuses
Interface Cable
If you wish to operate the printer via USB, then read through the
chapter
5.2 “Installing the Driver“ starting on page 27 now.
See HIllustration 4-3: PRINTER 700/710 on page 18
Stick the interface cable into the connector at the back side of the machine (lock
the parallel cable). Connect the cable with your computer.
24

5.2 Installing the Driver for Your Printer
25
Note:
hen several user accounts are used on the syste m, you must make certain that you have
• W
Administrator Privileges. According to th e Wi ndow s s ec urity model, only the Administrator
can install the driver.
sert the CD labelled Hasler Address Printer Installation. The
1. In
installation program should start automatically, if it doesn’t,
browse the CD and open the file named Install_Menu.
2. Hold down the Ctrl key and click >>Driver I
model printer.
nstallation for your
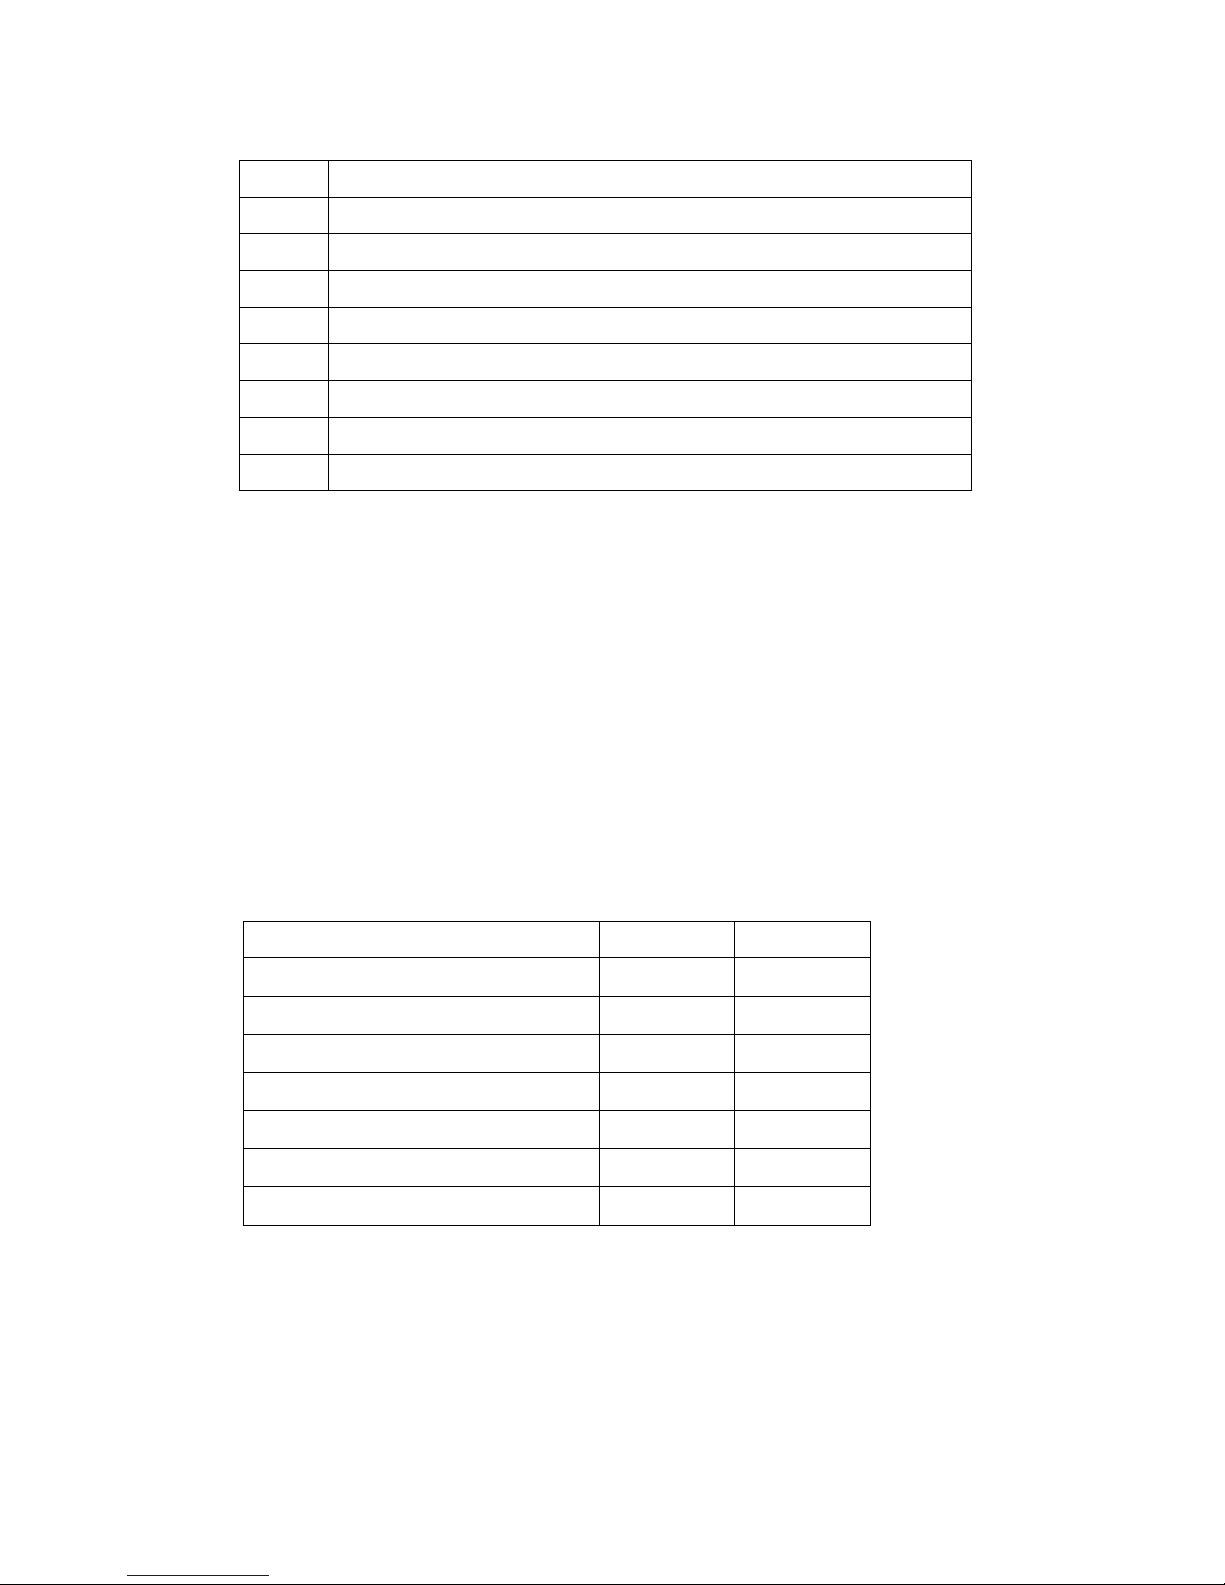
3. You will be brought to the w elcome screen of the Printer
26
Installation Wizard. The wizard will walk you through the process
of installing the driver. Click Next.
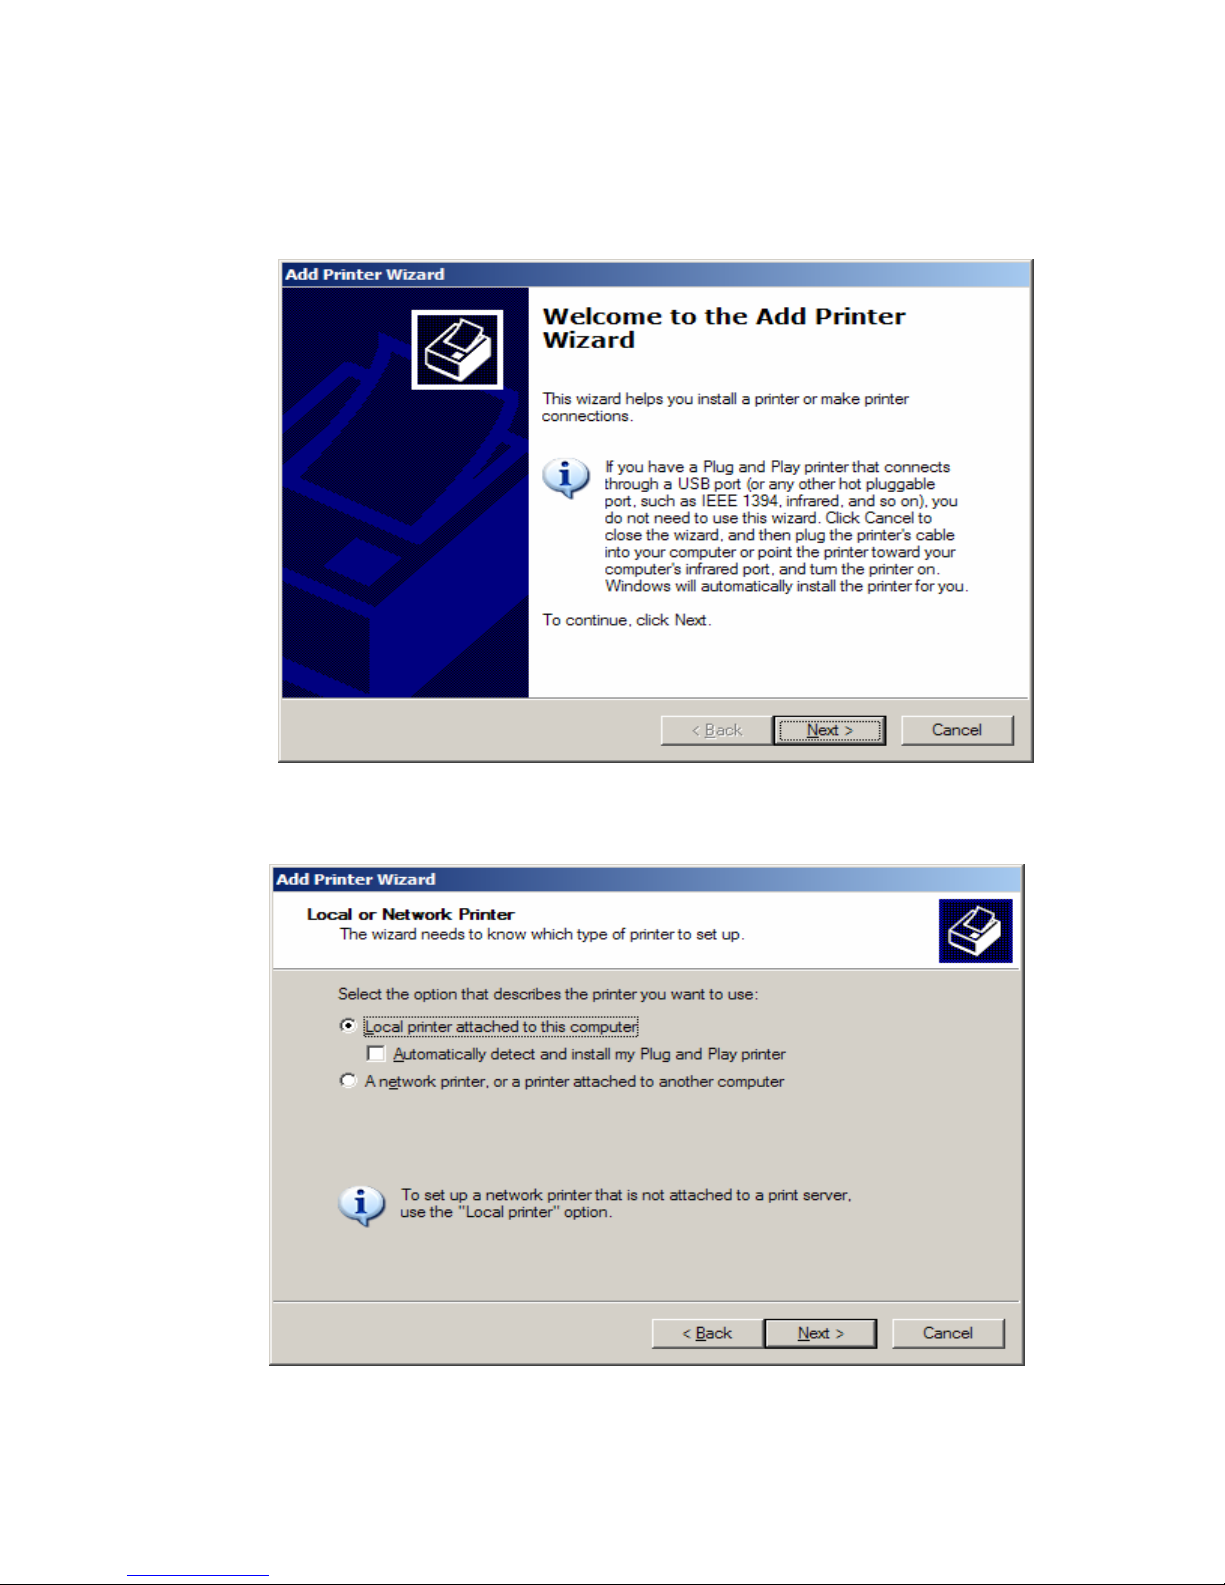
4. Select Local printer at
tached to this computer. Click Next.
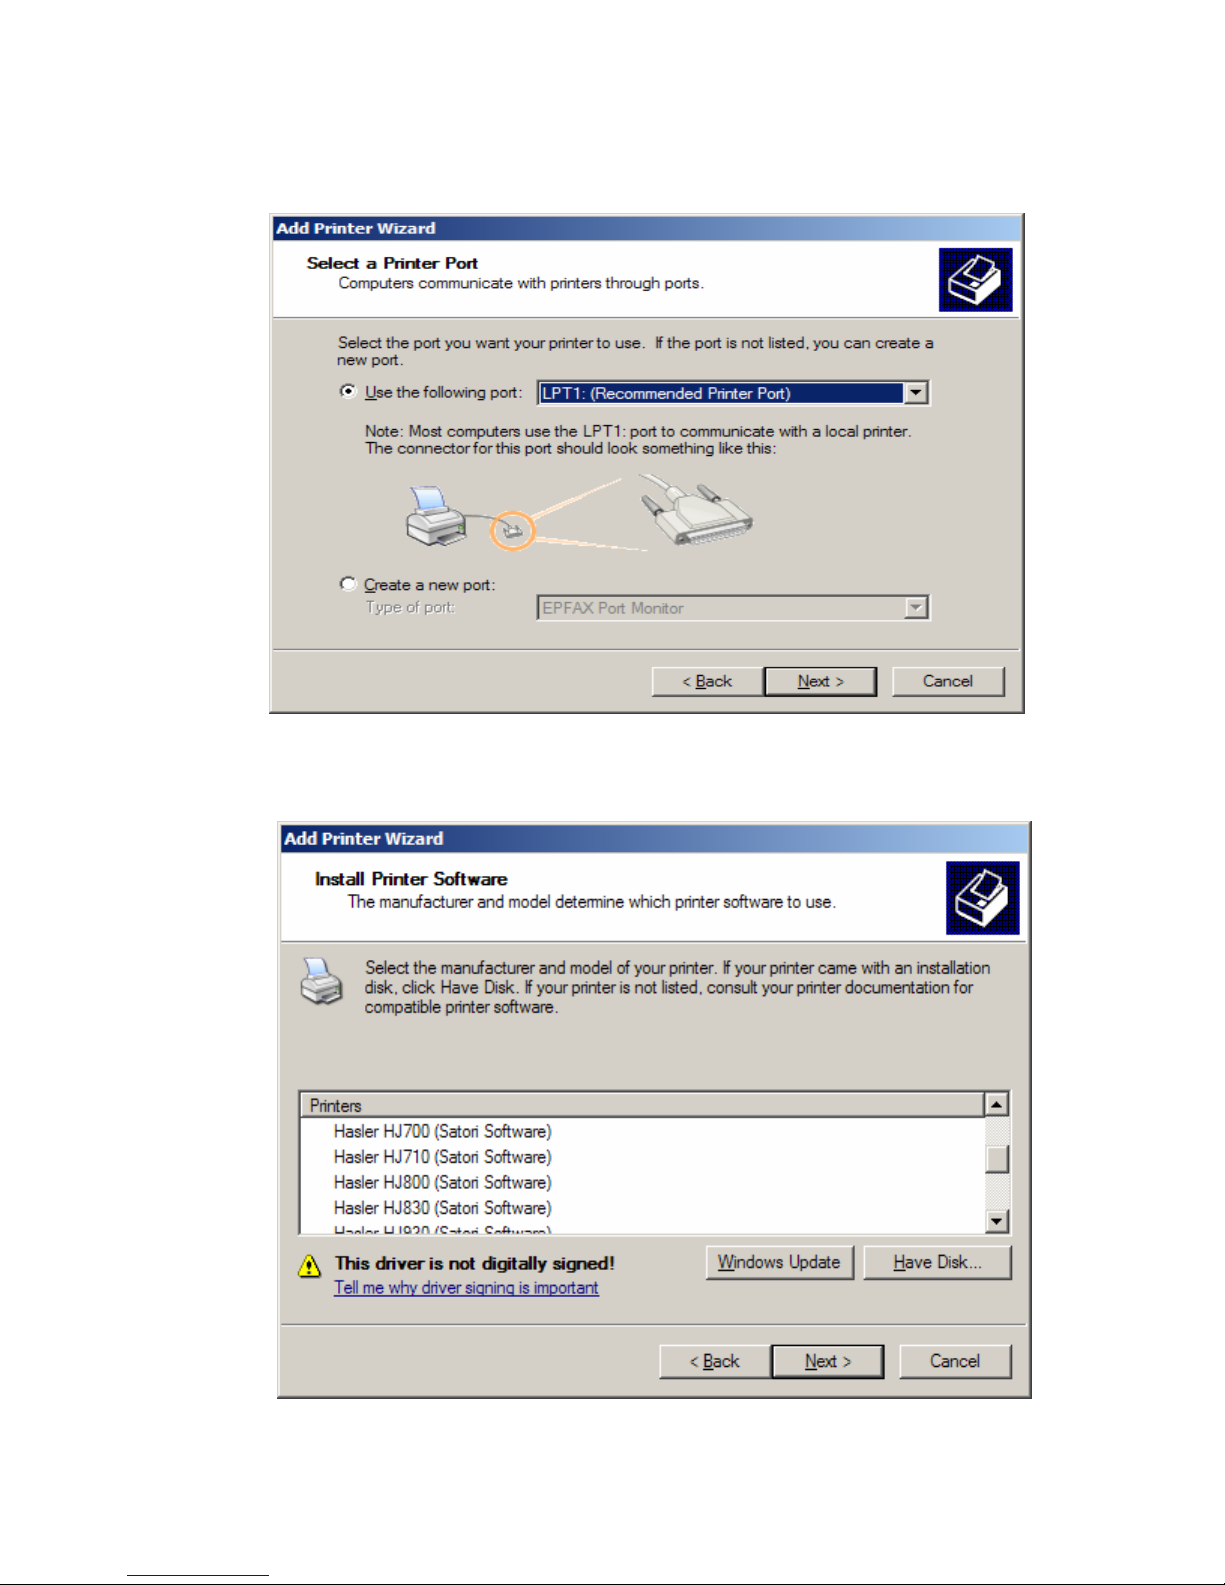
5. Select the appropriate printer port. Click Next.
27
hoose your printer model from the menu. Click Next.
6. C
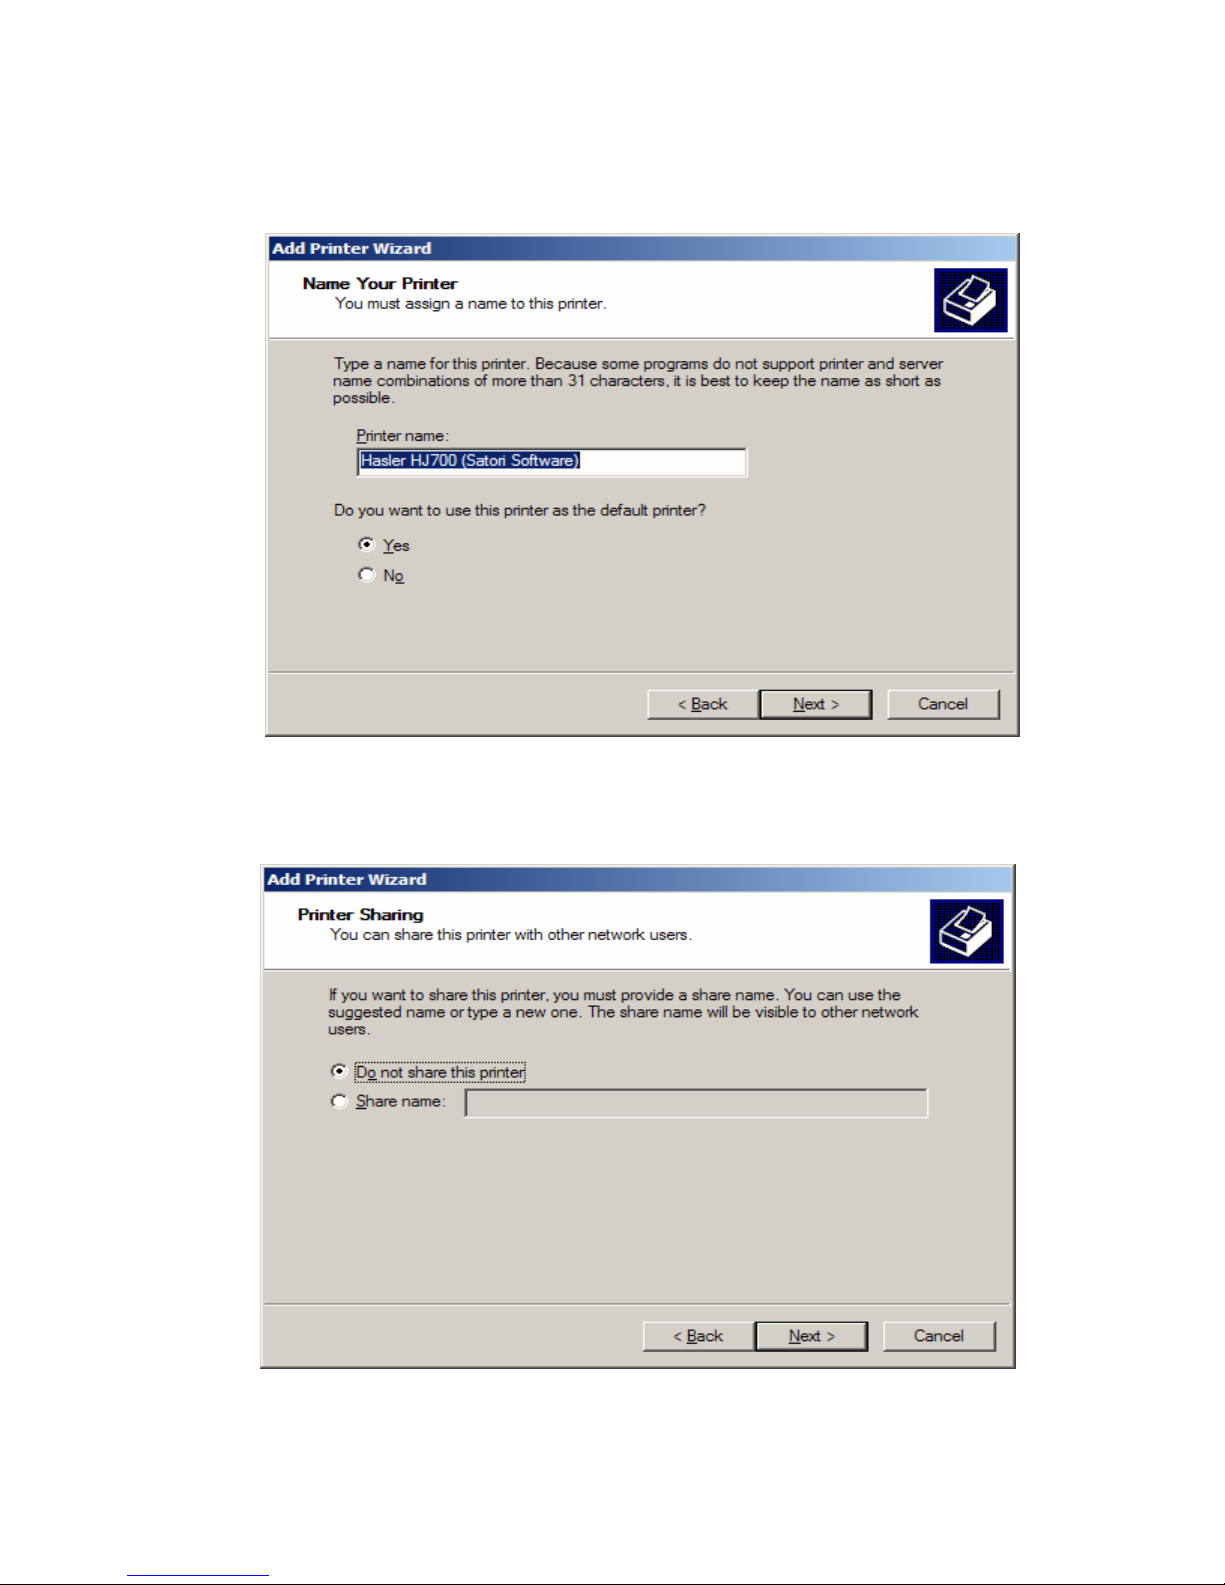
7. Select wether or not you wish to set this as your default printer. Click
28
Next.
8. Yo
u are now given the choice of sharing this printer on your network.
Click Next.
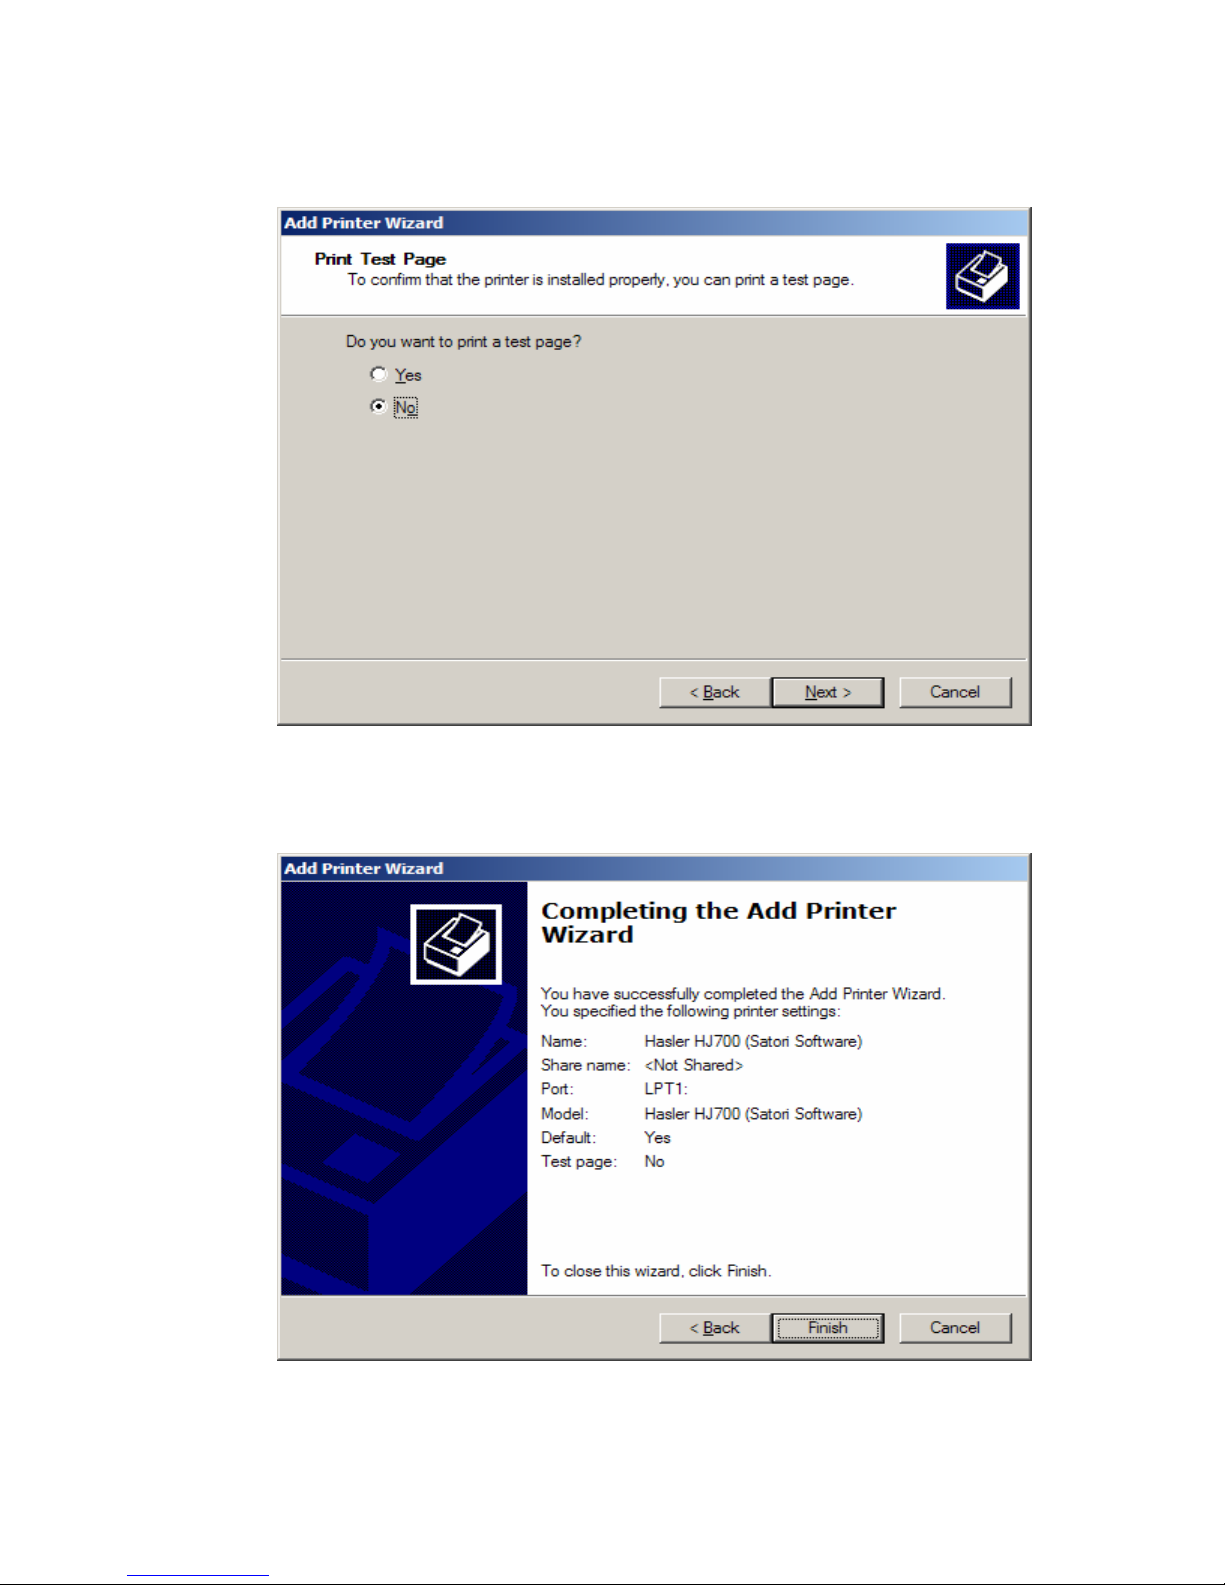
9. Choose wether or not you’d like to print a test page. Click Next.
29
10. Verif
y all of your information and click Finish to complete the
installation.
 Loading...