

Page 1
®
Operating Guide
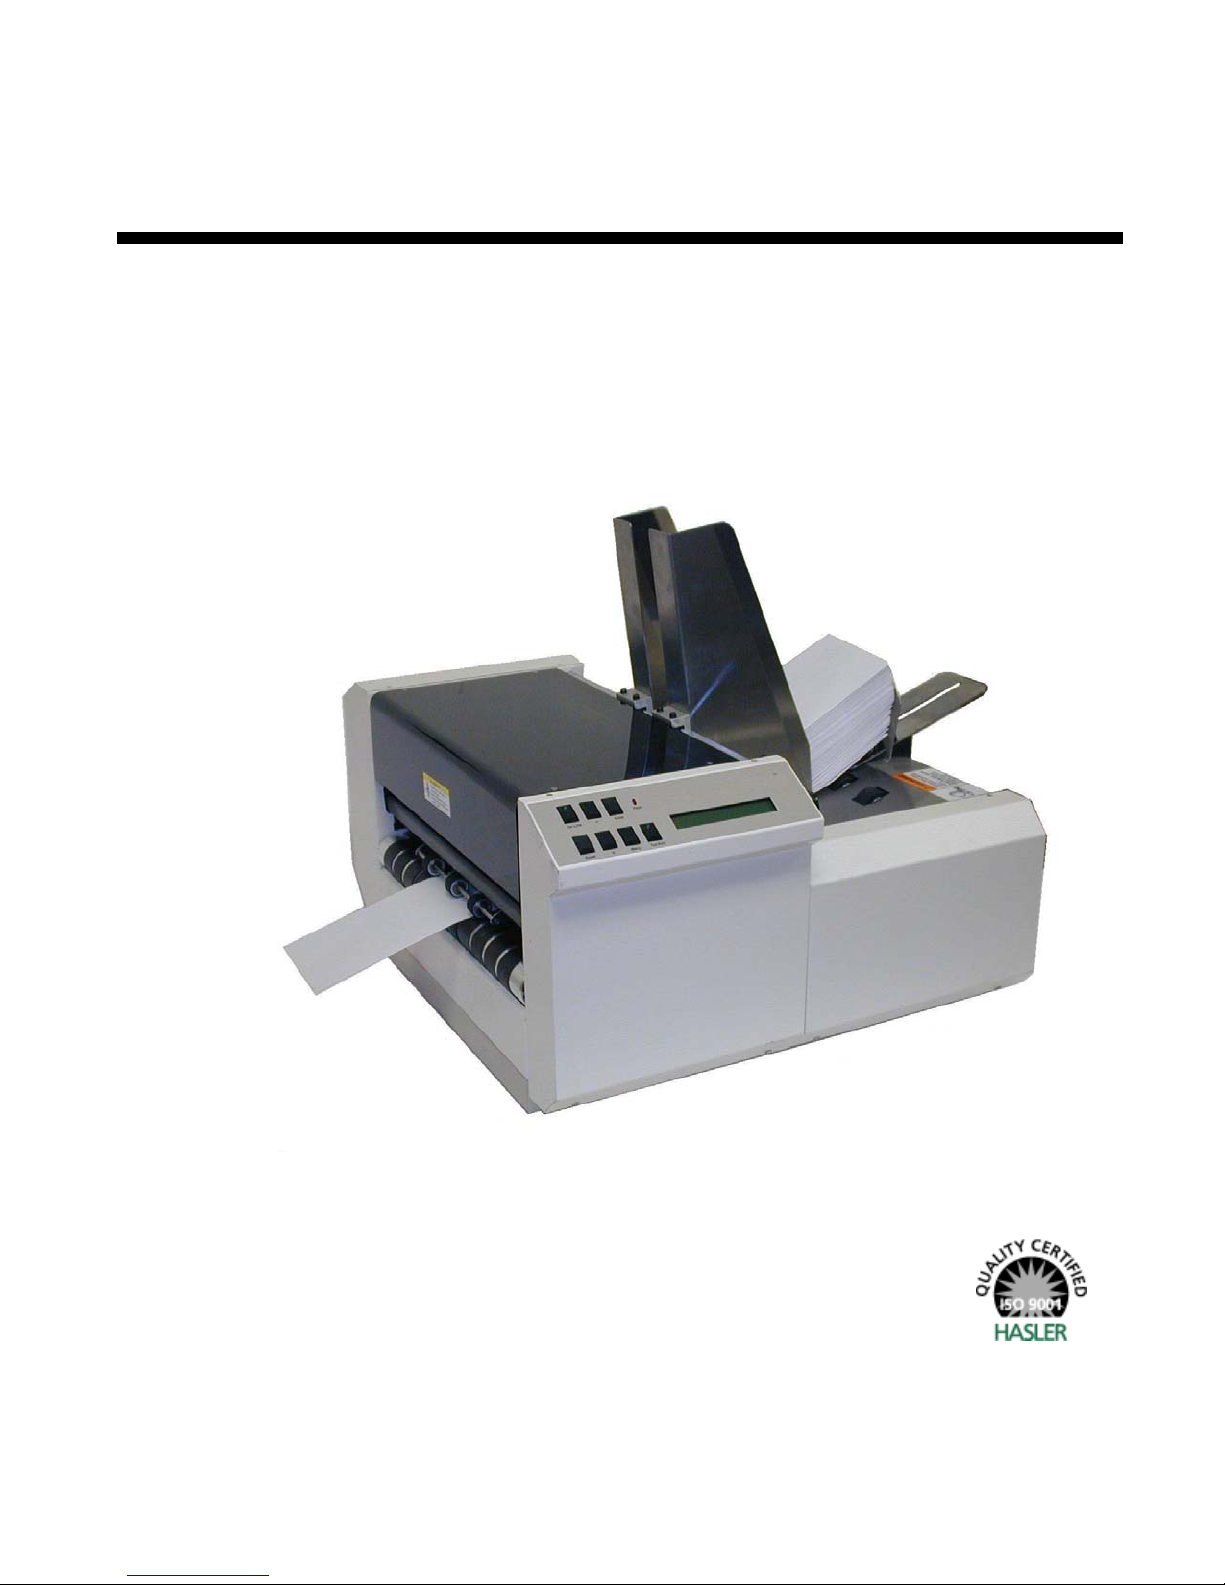
HJ500 Inkjet Printer
Mailing Systems
And Solutions
HASLER
America’s better choice
An ISO 9001 Quality System
Certified company
Page 2

Model Number ____________________
Serial Number ____________________
Dealer Phone ____________________
Hasler®, Inc.
19 Forest Parkway
Shelton, CT 06484-6140
TEL 800/793-0180
203/926-1087
FAX 203/929-6084
E-Mail [email protected]
Web: http://www.haslerinc.com
Page 3

CUSTOMER SURVEY FORM HJ500 Operating Guide
Good
Poor
Revision: 06/2004 Form 51016
If you liked this manual ....... tell us! If you did not like this manual ....... tell us!
We at Hasler®, Inc. would like to hear your comments about this manual.
Fill out the following form and mail to: Jim Koonz or FAX to: Jim Koonz
P.O. Box 858 (203)-925-2441
19 Forest Parkway
Shelton, CT 06484-0904
Rate The Manual
Check A Box
What did you like:
What didn’t you like:
Are there any improvements or features that you would like to see added to the product?
Optional Information: Name THANKS
This way we can We
can send you a new Phone Number appreciate
manual when we your
update it Company response
Very
Good Fair Poor Very
Page 4

Page 5

SAFETY PRECAUTIONS
THIS EQUIPMENT PRESENTS NO PROBLEM WHEN USED PROPERLY. HOWEVER,
CERTAIN SAFETY RULES SHOULD BE OBSERVED WHEN OPERATING THE HASLERJET 500
SYSTEM.
BEFORE USING THE PRINTER, YOU SHOULD READ THIS MANUAL CAREFULLY AND
FOLLOW THE RECOMMENDED PROCEDURES, SAFETY WARNINGS, AND INSTRUCTIONS:
??Keep hands, hair, and clothing clear of rollers and other moving parts.
??Avoid touching moving parts or materials while the machine is in use. Before clearing a jam, be sure machine
mechanisms come to a stop.
??Always turn off the machine before making adjustments, cleaning the machine, or performing any maintenance covered
in this manual.
??Use the power cord supplied with the machine and plug it into a properly grounded wall outlet located near the machine
and easily accessible. Failure to properly ground the machine can result in sever personal injury and/or fire.
??The power cord and wall plug is the primary means of disconnecting the machine for the power supply.
??DO NOT use an adapter plug on the line cord or wall outlet.
??DO NOT remove the ground pin from the line cord.
??DO NOT route the power cord over sharp edges or trapped between furniture.
??Avoid using wall outlets that are controlled by wall switches, or shared with other equipment.
??Make sure there is no strain on the power cord caused by jamming between the equipment, walls or furniture.
??DO NOT remove covers. Covers enclose hazardous parts that should only be accessed by a qualified service
representative. Report any damage of covers to your service representative.
??This machine requires periodic maintenance. Contact your authorized service representative for required service
schedules.
??To prevent overheating, do not cover the vent openings.
??Use this equipment only for its intended purpose.
In addition, follow any specific occupational safety and health standards for your workplace or area.
This manual is intended solely for the use and information of Hasler Inc., its designated agents, customers, and their
employees. The information in this guide was obtained from several different sources that are deemed reliable by all industry
standards. To the best of our knowledge, that information is accurate in all respects. However, neither Hasler Inc. nor any of
its agents or employees shall be responsible for any inaccuracies contained herein.
HASLERJET is a registered trademark of Hasler Inc..
Hewlett -Packard is a registered trademark of Hewlett -Packard Corporation.
Windows 95 and Windows 98 are registered trademarks of Microsoft Corporation.
IBM is a regist ered trademark of International Business Machines.
All other trademarks are the property of their respective holders.
All rights reserved. No part of this book may be reproduced or transmitted in any form or by any means, electronic or mechanical, including photocopying,
recording, or any information storage and retrieval system, without permission in writing from the Publisher.
Page 6

Page 7

Table of Contents
Section 1 – Getting Acquainted 1
The HaslerJet 500 1
The Control Panel 3
Section 2 – Installing the HaslerJet 500 5
Choose a Location 5
Connecting the HaslerJet 500 5
Installing the Inkjet Cartridges 6
Setting up the Feed 6
Installing the Software on the Computer 7
Section 3 – Quick Start 9
Create a Layout 9
Print the Job 10
Section 4 – Printer Operation 11
Running a Job 11
Printer Control Panel 12
Printer Control Panel Messages 14
Types of Media 14
Databases 15
Section 5 – Maintenance 17
The Inkjet Cartridge 17
Jams in the HaslerJet 500 Printer 19
Replacing the Sheet Separators 19
Replacing the Feed Rollers 20
Cleaning 21
Section 6 – Trouble Shooting Guide 23
Inkjet Cartridges 23
HaslerJet 500 Printer 24
Appendices 25
Specifications 25
Supplies and Optional Hardware 27
Index 29
i
Page 8

Notes
ii
Page 9
Section 1 – Getting Acquainted
HASLERJET 500
The HaslerJet 500 is a high-speed printing and addressing systems that can print addresses,
bar codes, return addresses, bitmapped graphics, and special messages using TrueType
scaleable fonts simultaneously on up to 20,000 postcard (3.5 X 5.5 inch) mail pieces per hour.
1
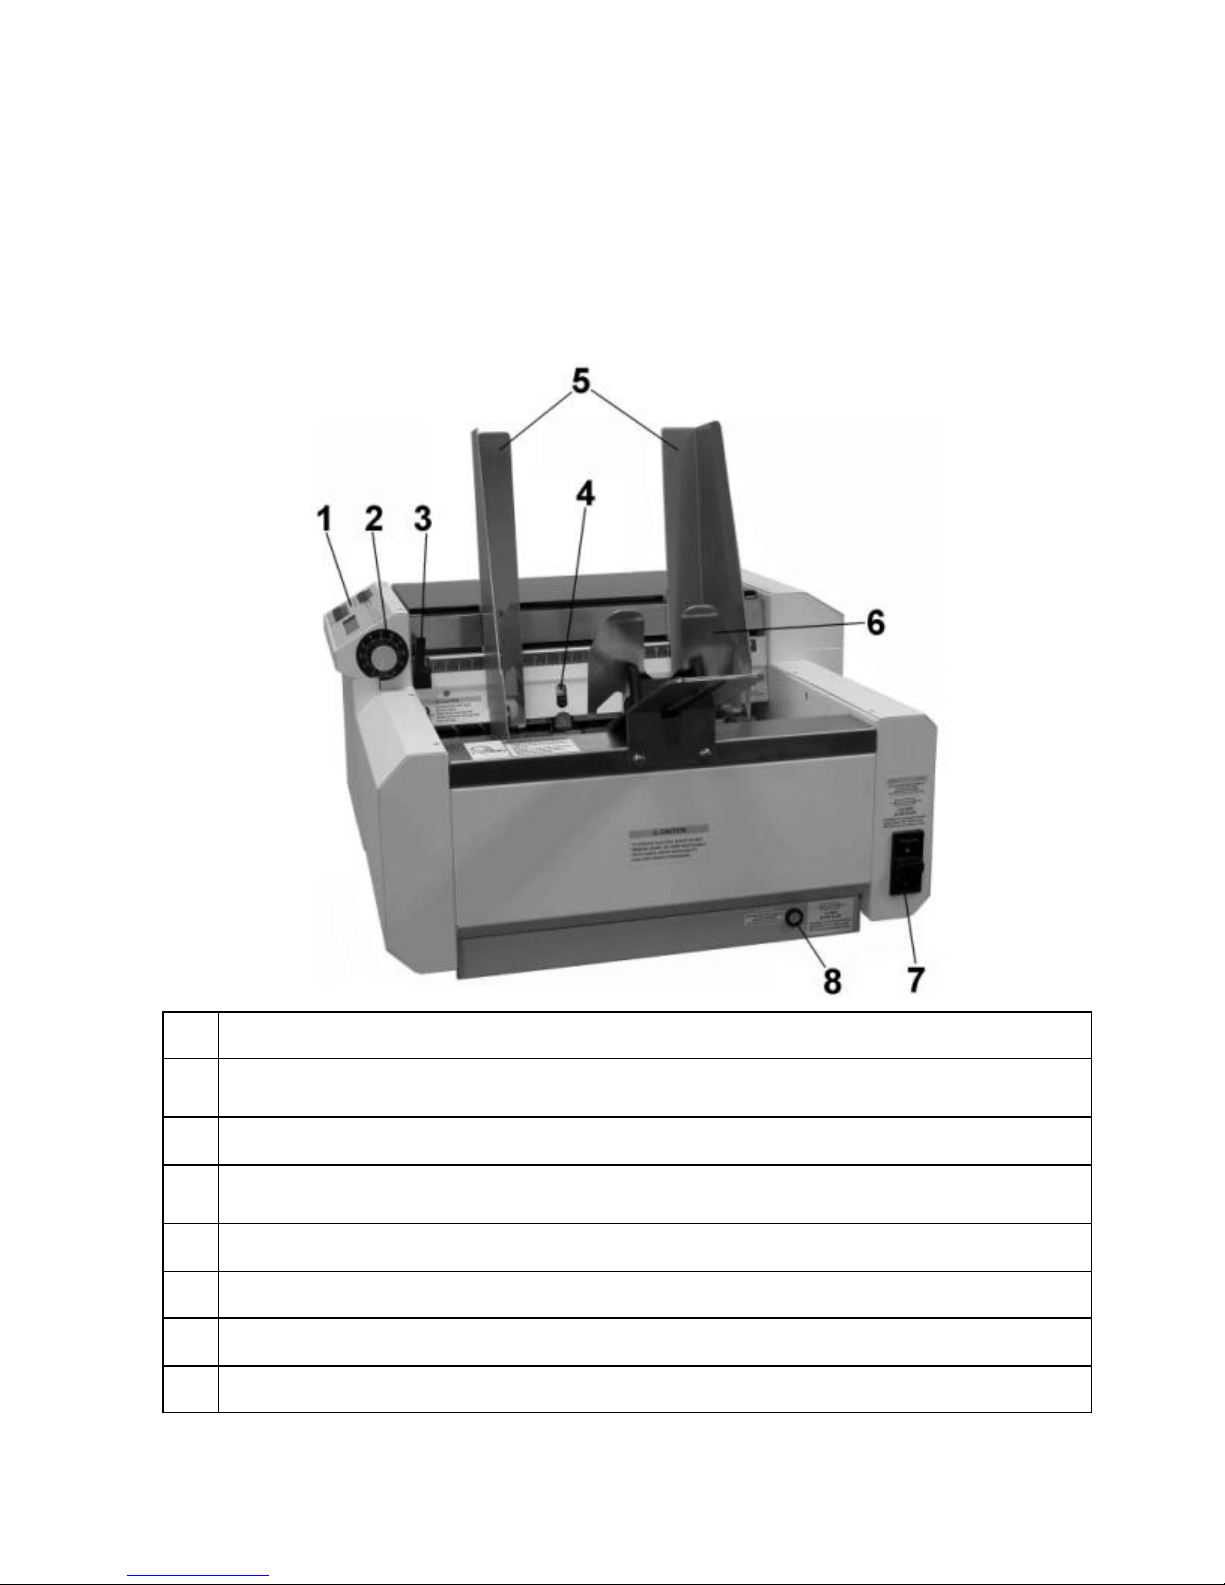
CONTROL PANEL – See page 3
2
MEDIA THICKNESS KNOB – Controls the height of the printheads to obtain proper distance from the
media.
3
SHEET SEPARATOR LOCKING LEVER – This lever locks and releases the sheet separators Item 3.
4
SHEET SEPARATORS – There are four sheet separators that help separate the media as it is being fed.
(See Setting Up the Job page 6)
5
SIDE GUIDES – The side guides are used to maintain side to side registration.
6
REAR-GUIDE - The rear-guide is used to hold the media against the sheet-separators for proper feeding.
7
POWER RECEPTACLE – The power receptacle contains the main power switch and the fuses.
8
MOTOR CIRCUIT BREAKER – This circuit breaker protects the motor from overloads.
1
Page 10
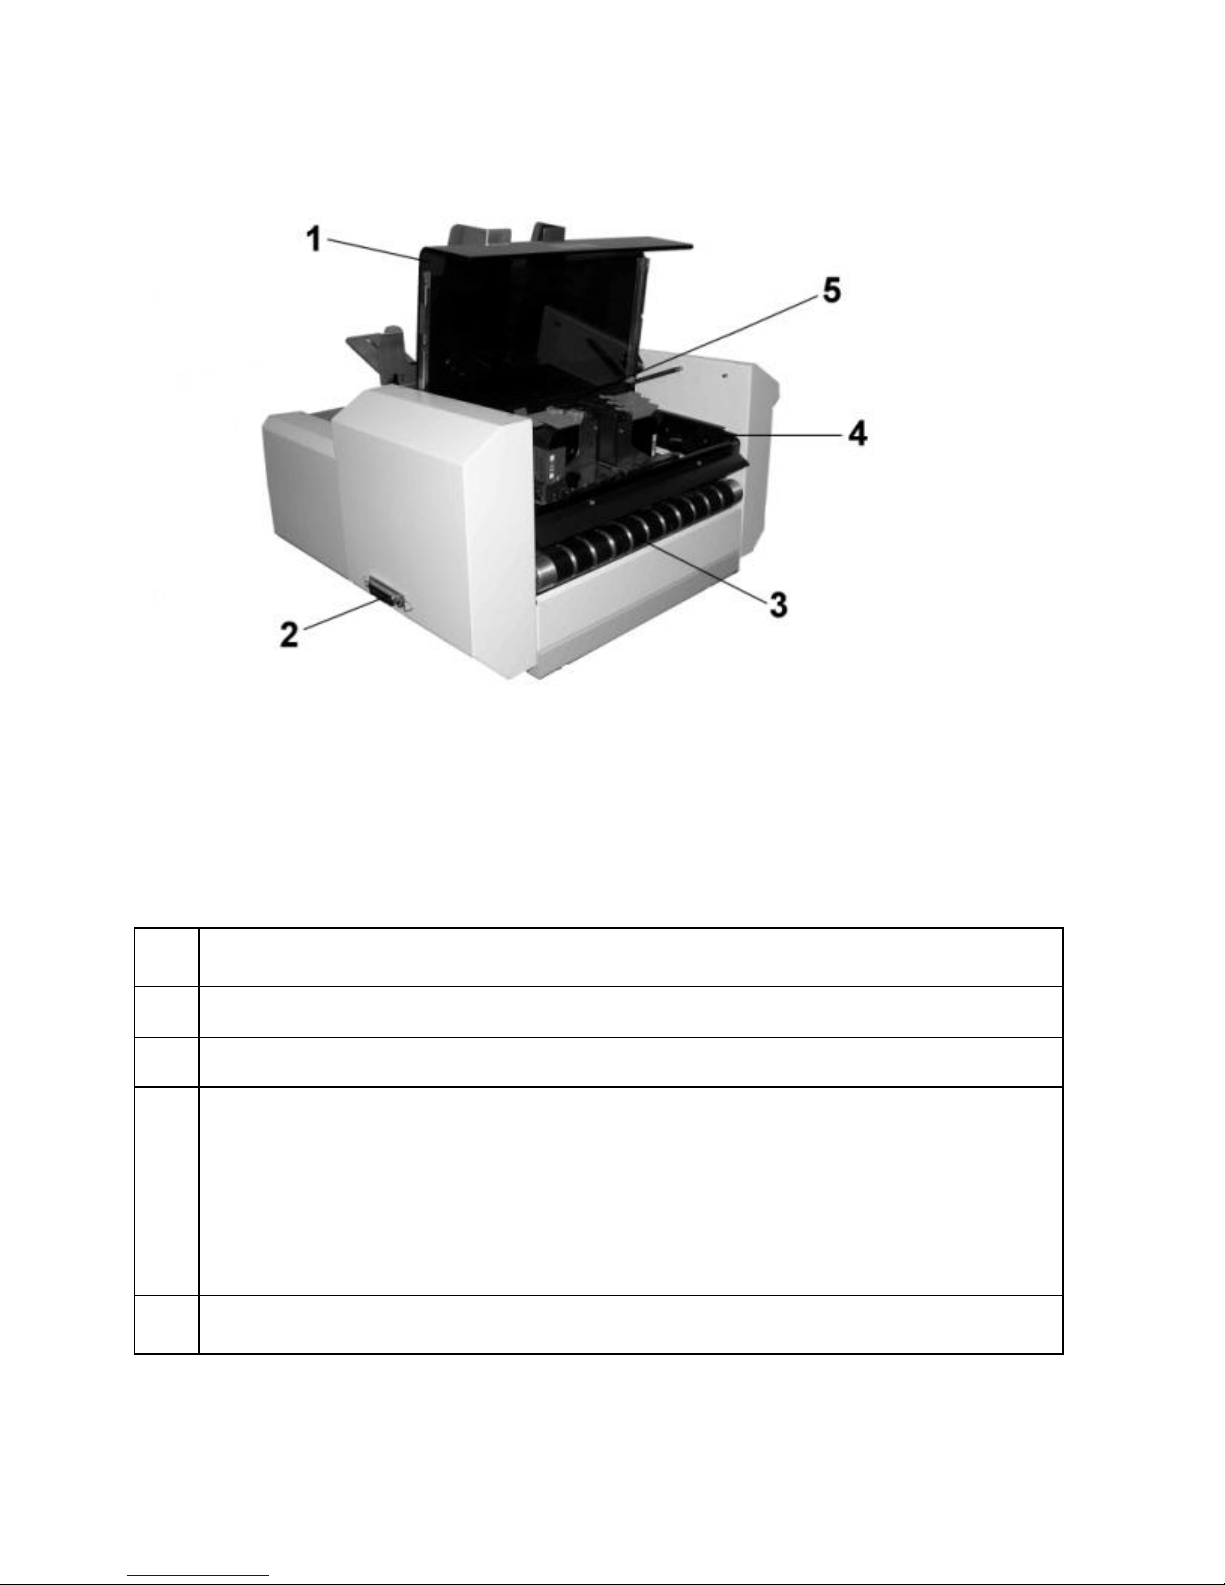
PRINT HEAD COVER – Shown open for illustration purposes, but should be in the closed position for
1
running.
PARALLEL PORT – The printer cable from your computer should be connected here.
2
MEDIA TRANSPORT BELTS – The media is transported under the printheads on these belts.
3
PRINTHEAD CARRIAGE – The HaslerJet 500 has fiver printheads. Head 1, 2, and 3 are banked
4
together on the rail. Head 4 and 5 are banked together and share the same rail and are positioned
opposite and independent of the other heads.
You can move the two printing banks from side to side to position the information properly on the media
with the following restrictions. Heads 1, 2, and 3, print a band 1-1/2 inch wide and may be positioned
anywhere within a range of 2-1/2 inches from the Control Panel side of the printer to 4 inches from the
opposite side of the printer. Head 4 and 5 can be positioned to within 1-5/16- inches of head 3 and to
within 2 -1/2 inch of the non-operator side of the printer.
MEDIA SENSOR – The media sensor is located just before the printheads and senses the media to start
5
the printing action.
2
Page 11
CONTROL PANEL
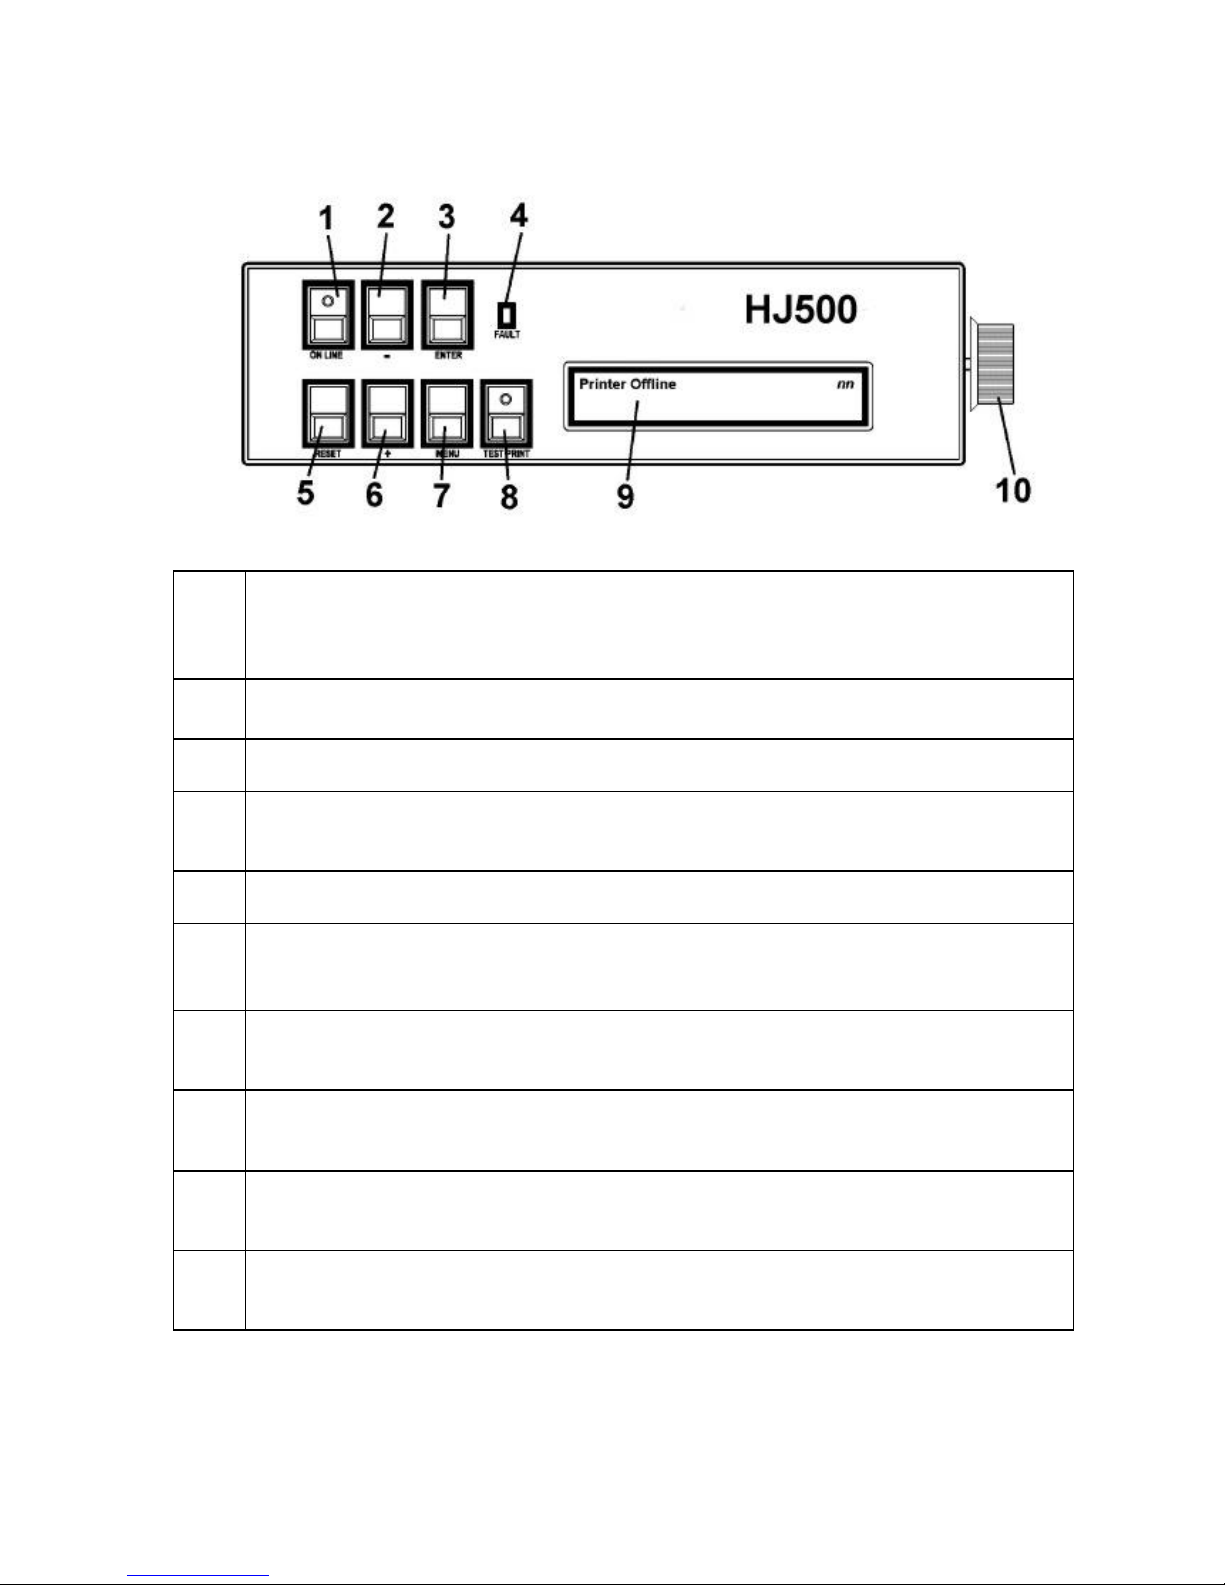
1.
2.
3.
4.
5.
6.
7.
8.
ON LINE key – The indicator on this key lights when data is sent to the
HASLERJET 500 and they are ready to begin printing. This key also turns the
printer off line so that the menu mode can be accessed..
- key – In the menu m ode this key will scroll to the previous selection.
ENTER key – This key starts and stops the printing.
FAULT Indicator – This indicator lights when there is a problem with the printing
process.
RESET key – This key will reset the printer to its wait state.
+ key – When the printer is in the menu mode this key will scroll to the next
selection.
MENU key – This key causes the printer to enter the menu mode where several
operator functions can be accessed.
TEST PRINT key – Pressing this key will put the printer in the test mode and send
a sample copy to check the printer’s output.
9.
10.
NOTE: A complete description of the functions and operation of the printer keys can be
found in Section 4 – Printer Operation.
OPERATOR DISPLAY – Indicates the printer’s status including menus and error
messages.
MEDIA THICKNESS – The knob on the right side of the control panel is used to
adjust the height of the print heads to compensate for different media thickness.
3
Page 12

Notes
4
Page 13
Section 2 – Installing the HaslerJet 500
To install the HaslerJet 500 printer the following must be done:
?? Choose a location for the HaslerJet 500 Printer
?? Plug in the printer and connect it to the computer
?? Install the Inkjet Cartridges
?? Set up the feed on the printer
?? Install the HaslerJet 500 software on the computer
?? Create a job to be printed (refer to Section 3 – Quick Start)
Choose a Location
The HaslerJet 500 should be placed on a sturdy worktable or cabinet at least 12 inches from any walls.
Protect the HaslerJet 500 from excessive heat, dust, and moisture – avoid placing it in direct sunlight.
Connecting the HaslerJet 500
Plugging in the Printer
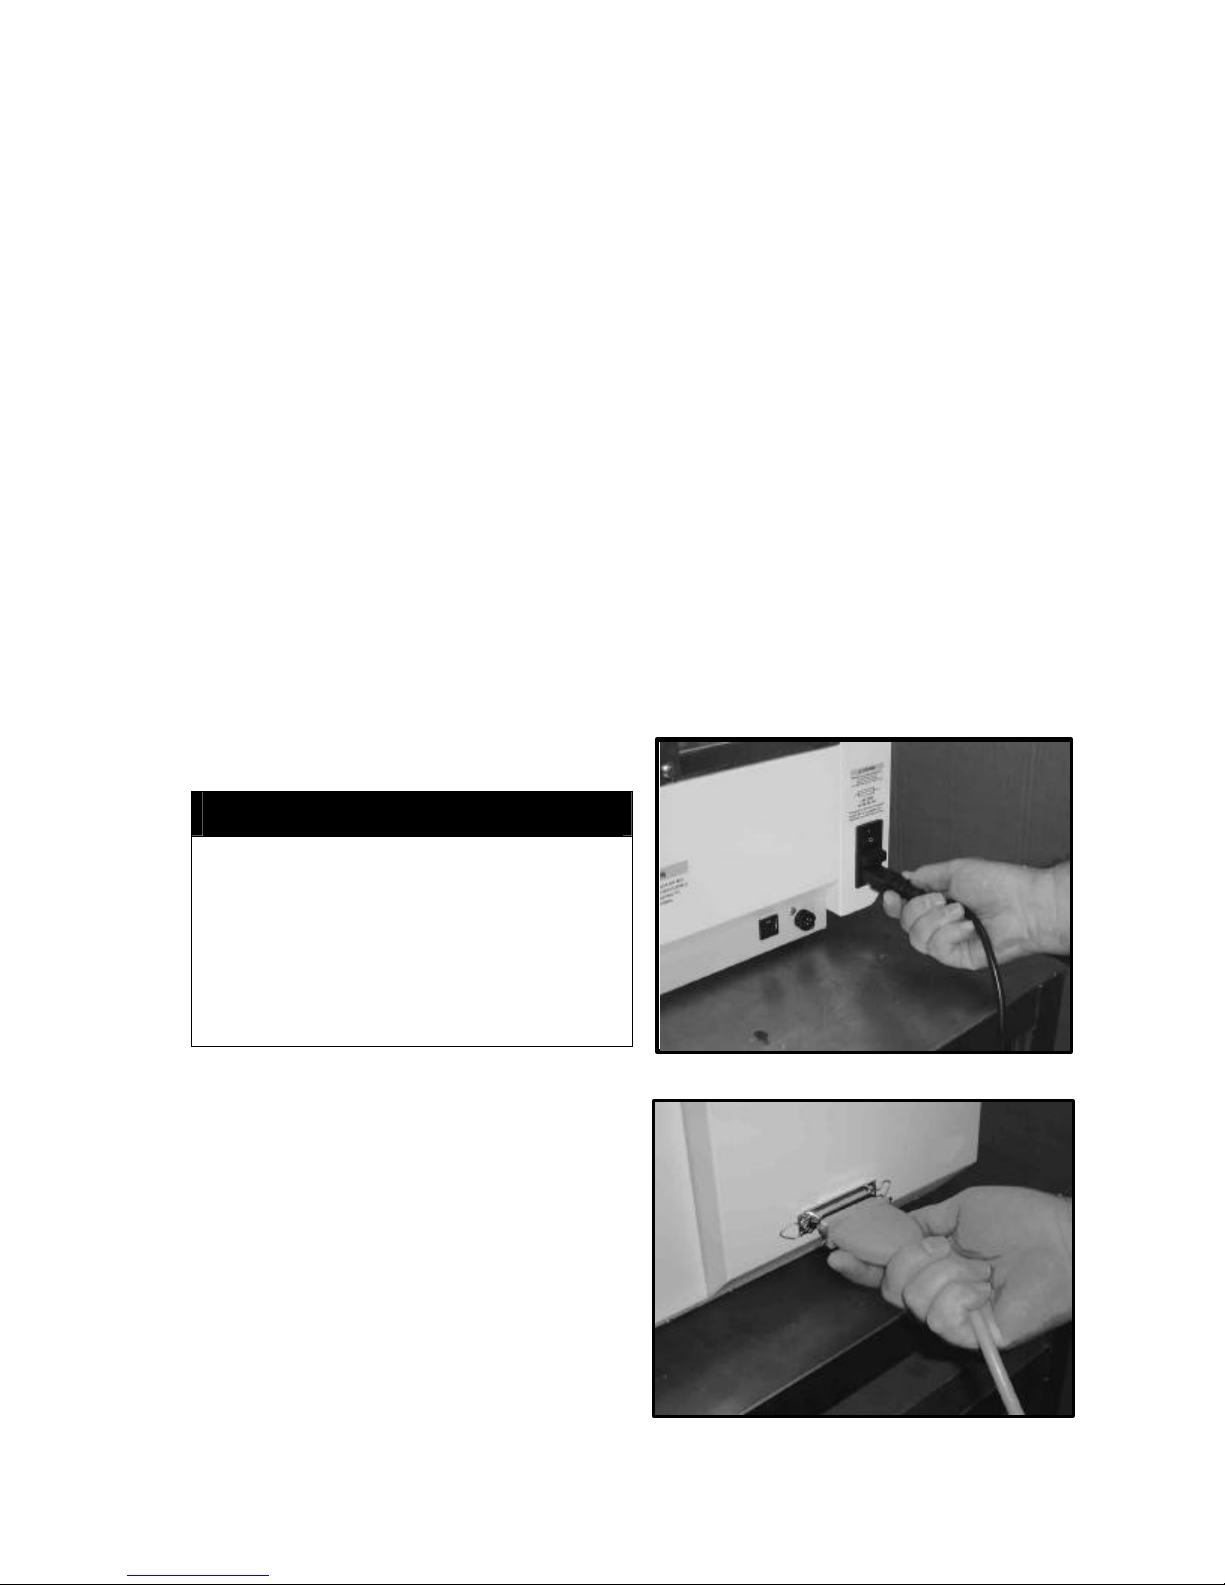
Make sure that the main power switch of the HaslerJet 500 Printer is in the OFF position.
1. Connect one end of the power cord to the rear of the HaslerJet 500 in the corresponding receptacle.
2. Plug the other end into a 115-220 Volt AC, 50/60
Hz. Grounded outlet.
CAUTION
Do not use an adapter plug or extension cord
to connect the printer to the wall recept acle.
Do not use outlets controlled by wall switches.
Do not use an outlet that shares the same
circuit with large electrical machines or
appliances.
Connecting to the Computer
Plug the parallel printer cable from your computer into
the rear of the printer and latch the two locking clips.
The cable used to connect the HaslerJet 500 to the
computer must not exceed 6 feet long.
5
Page 14
Install the Inkjet Cartridges
The HaslerJet 500 can be configured with up to 5 inkjet cartridges. The cartridges are installed as follows:
??Remove the inkjet cartridge from its packaging, taking care not to touch
the copper contacts, the metal plate, or the gold printhead. Remove
the protective tape from the printhead.
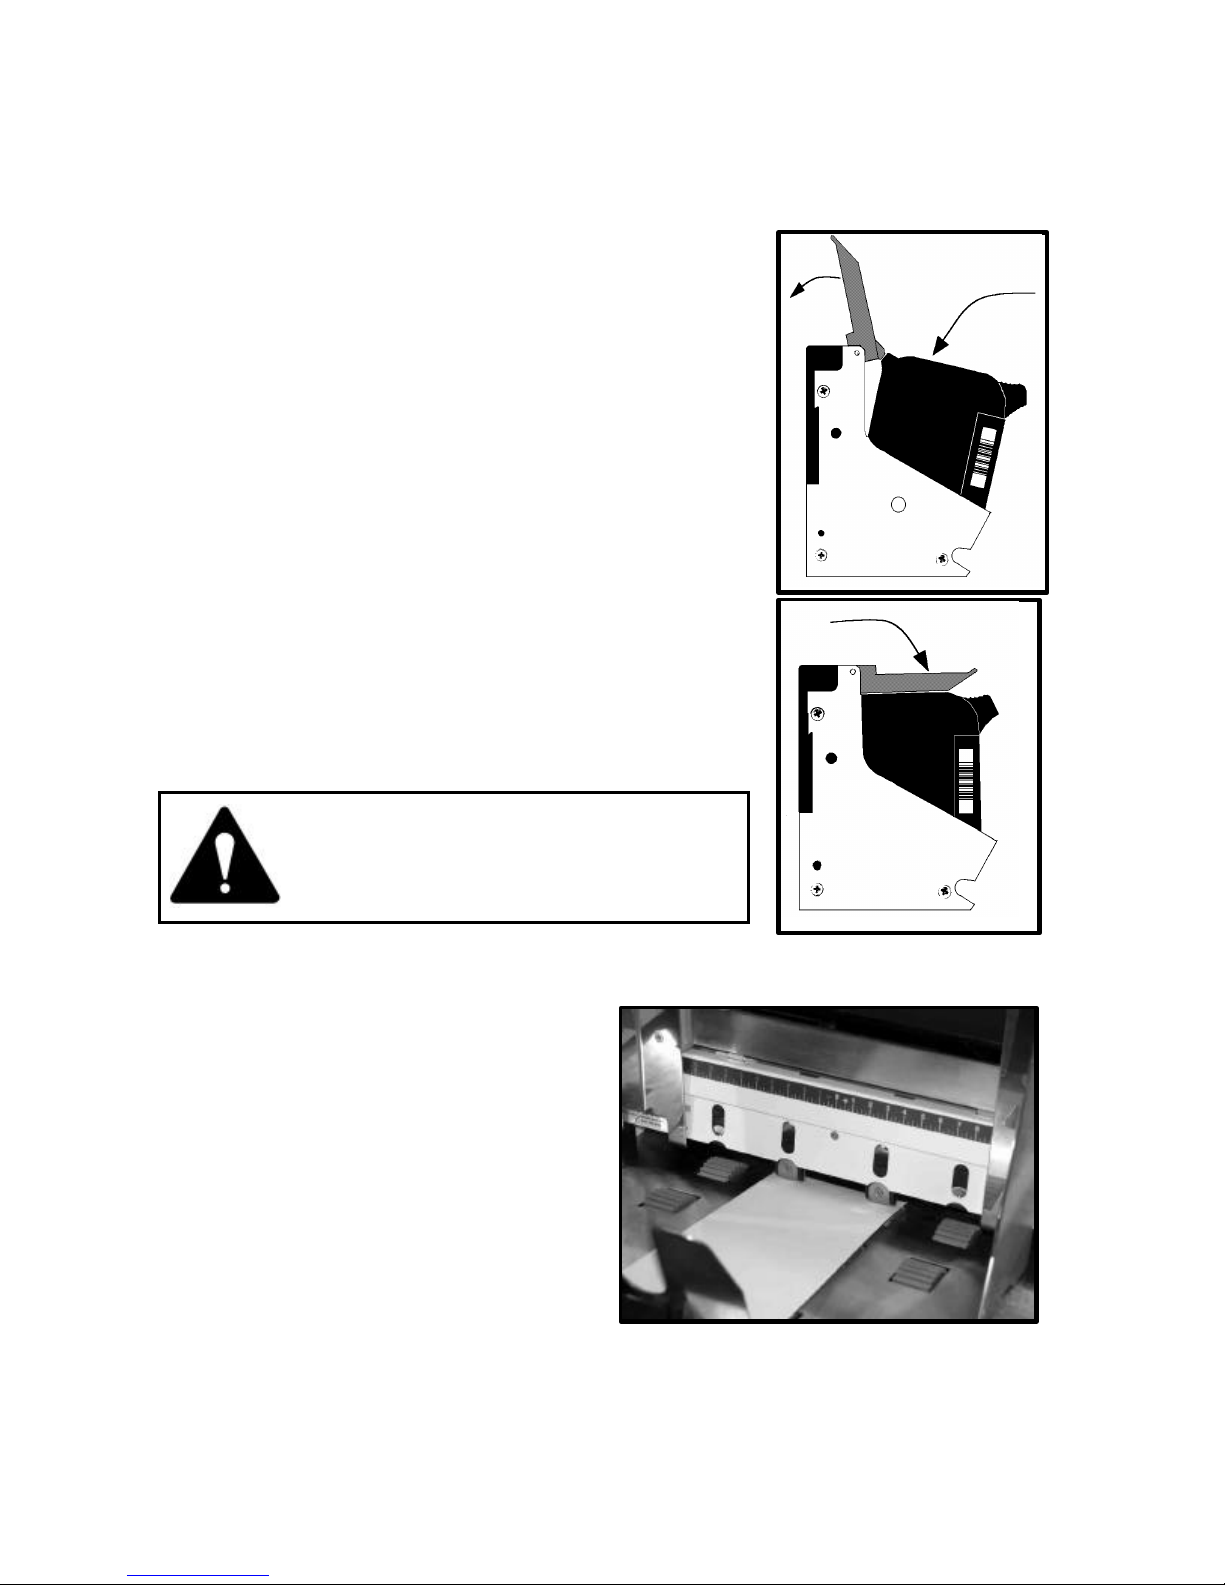
??The cartridges are held in place by a latch lever mounted on the inkjet
cartridge holder. Release the lever by raising it vertical.
??With the cartridge’s printhead pointing down, slide the cartridge into
the holder and push down and toward the contacts in the holder.
??Make sure the cartridge is seated in the holder then close the latch lever
to secure the cartridge in the holder. Do not force the lever into
place. (See the diagram.)
??Repeat the above for the remaining cartridges.
NOTE: For optimum image quality during the run, refer to
"Cleaning the Printhead" .
The ink in the cartridge may be harmful if
swallowed. Keep new and used cartridges
out of reach of children. Discard empty
cartridges immediately.
Setting up the Feed
1. Release the separator-locking lever located on
the operator’s side of the feeder and raise the
separators to the up and locked position. Move
the side guides out to their extreme open
position. Place one piece of media in the center
of the feed table.
2. There are four separators on the feeder. Use the
two center separators for narrow media and all
four separators for wide media. Place the media
under the separators and lower the separators so
that they rest on the media.
3. Rotate the locking lever up to lock the separators
in place.
6
Page 15
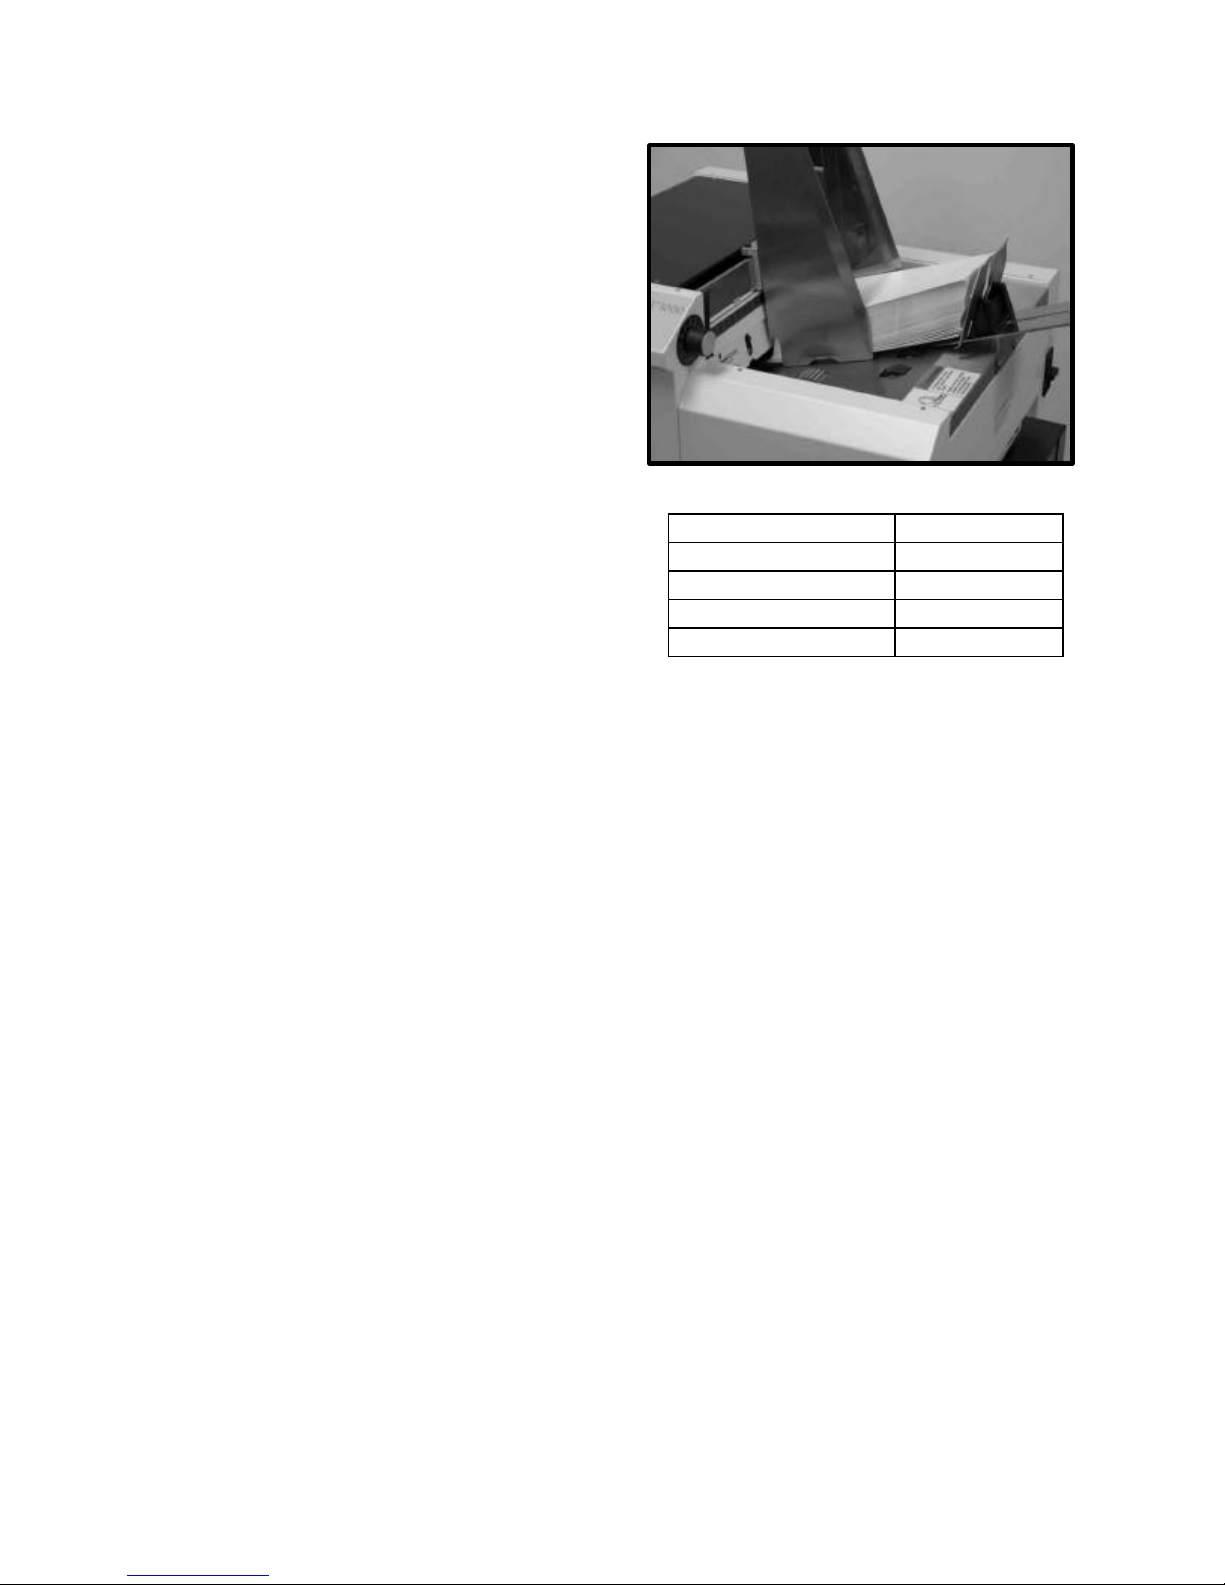
4. Adjust the side guides to within 1/32-inch of the
media and set the back guide so that the media is
raised approximately 1/2-inch and rests on the
curve of the back guide. When running 10 inch
or longer or heavy media you may have to set
the back guide so that it just touches the back of
the media.
5. Turn the HaslerJet 500 on and then turn the
media thickness knob to set the initial print head
height as follows:
Media Thickness Dial Setting
.004” to 1/32” 0 to 2
1/32” to 1/16” 2 to 3
1/16” to 1/8” 3 to 7
1/8” to 1/4” 7 to 10
NOTE: These are initial settings. It may be necessary to adjust the MEDIA THICKNESS control to
optimize the print quality
6. Press the STAND BY key, and then press the SELECT key, to test feed media.
NOTE: The HaslerJet 500 is supplied with two types of sheet separators. The hard tip, which is
installed on the unit when you receive it, is for media such as envelopes, books, and stuffed
envelopes. A soft tip separator is packed with the machine for use with single sheets of paper
and plain envelopes. Refer to Section 5 – Maintenance for instructions on how to change
them.
Installing the Software on the Computer
The HaslerJet 500 is not supplied with a computer. The computer that you use with your HaslerJet 500 System
should meet the following minimum requirements:
An IBM or Compatible Pentium 100 Megahertz PC or better.
Windows 95, 98, 2000 or NT installed.
A minimum of 20 Megabytes of free hard disk space.
The computer should be equipped with at least 16 Megabytes of RAM for Windows 95 and 98 (32
Megabytes of RAM required for Windows 2000 and NT).
A 2X CD ROM or better.
An 800 X 600 SVGA Monitor or better.
Parallel (Centronics) printer cable, no longer than 6 feet.
The Parallel Port must be set to the EPP (Enhanced Parallel Port) setting in the CMOS of the computer.
Addressing Software Installation
1. Before installing the CD check that there is at least 20 megabytes of disk space available on the
computer.
2. Close all programs currently running and reboot the computer. Do not open any programs prior to
installing the addressing software.
7
Page 16

3. Install the CD in the computer. The CD should start automatically. If it does not click on the Start
button, then select Run. Type “D:\Setup.exe” (where D is the CD drive) and then click OK.
4. The software Setup Menu will appear on your screen. It contains five options:
Install Printer Software
Read the Manuals
Browse this CD
Install Adobe Acrobat – This is ver sion 4.0 of Adobe Acrobat for reading and printing the Operator
Manuals.
5. Click on “Install Printer Software” and then choose the operating system that is installed on your
computer. If you are using Windows 95 refer to the instructions under “Windows 95” and if you are
using Windows 98, Windows NT4, 2000, ME, or XP refer to the instructions under “W98 / NT4 /
W2000”.
6. If this is a new printer installation (not a software update) go to the installation instructions for your
operating system to complete the installation. If this is a software and firmware update, you must also
download a new “BIOS” to the printer.
Windows 95
1. Insert the program CD into your CD-ROM drive. Click on “Install Printer Software”.
2. Select “Windows 95”.
3. Select “ODBC95” and follow the instructions in the windows to install “DCOM95 for Windows 95”.
When this is installed Restart your computer.
4. Open the program CD again and select “Install Printer Software”, then “Windows 95”.
5. Follow the directions in the windows. At the end of the installation you will be asked to identify the
model of your printer. Select the appropriate printer and then restart your computer.
Windows 98, NT4, or 2000
1. Insert the program CD into your CD-ROM drive. Click on “Install Printer Software”.
2. Select “W98 / NT4 / W2000” “ A setup menu will appear with the “Welcome: window. Follow the
instructions.
3. At the end of the installation you will be asked to identify the model of your printer. Select the
appropriate printer and then restart your computer.
8
Page 17
Section 3 – Quick Start
Create a Layout
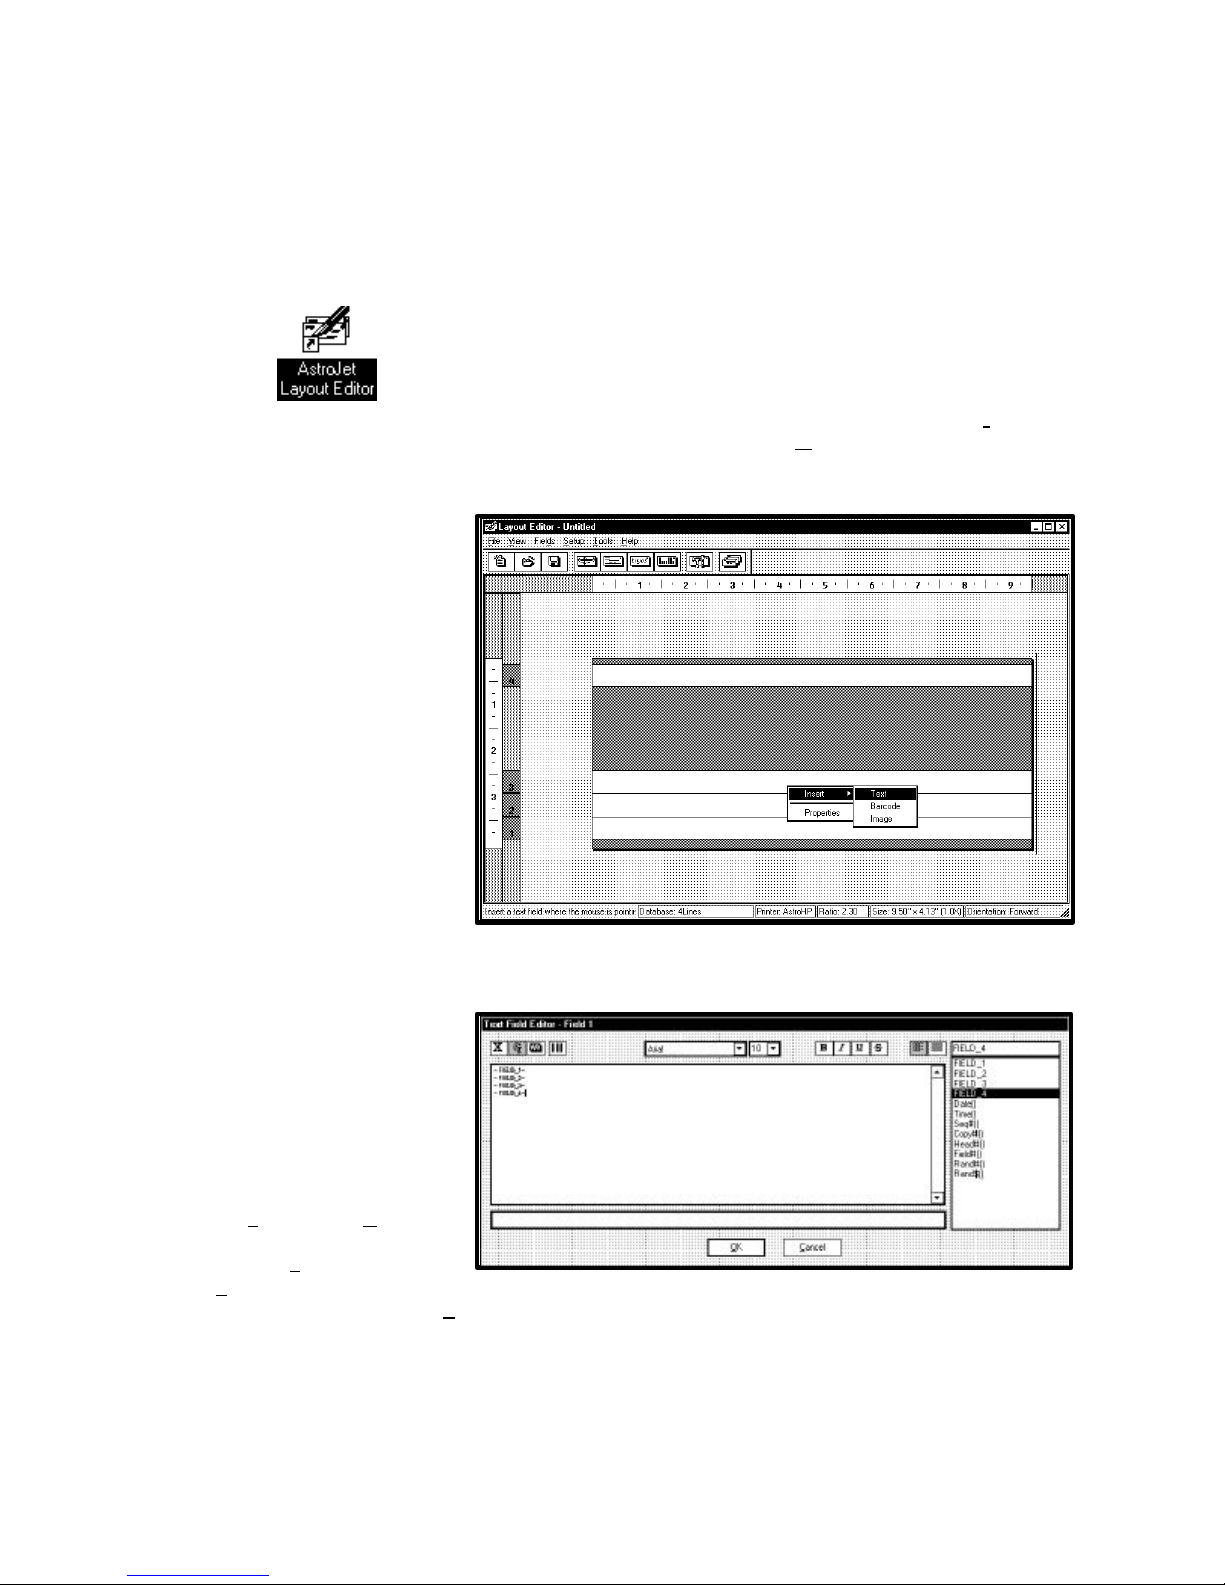
Click on the . The “Layout Editor – Select Database” window will open. Click OK. The “Select
Database” window will open, select the location of your database on your hard drive. In the Files of type box
select the type of database, then select the database you wish to use and click Open. If this is the first time you
are using that particular database, follow the instructions in the “Layout Editor – Database Attributes” window.
The “Database View – “ window will then open, click OK.
The “Layout Editor – Stock
Properties” window will open.
Select the envelope from the drop
down box and click OK. The
“Layout Editor – Untitled” window
will now open. Place your mouse
pointer at the place on the layout
that you wish to add the address
information and right click on the
mouse. Then select Insert and
Text as shown below.
The “Text Field Properties” window will open.
Click on each field that you wish to
print. Use the SPACE BAR to
separate fields on the same line and
the ENTER key to start a new line.
When you have built your address,
select the type style and font size
from the drop down menu and
click OK.
Click on File, the Save As and
give your project template a name.
Then click on File, and click on
New Job. Click OK on the “Layout Wizard – Select Template” window. Then click OK on the “Database
View – “ window. Next click on Save in the “Save Job As…” window. The job is now ready to print.
NOTE: Using the above method you can also add logos or graphics and a postal barcode. For more
information and a detailed explanation of the layout software refer to “Printer Software Manual”.
9
Page 18
Print the Job
IMPORTANT: Make sure it is connected to the computer and that the printer is turned ON before
beginning.
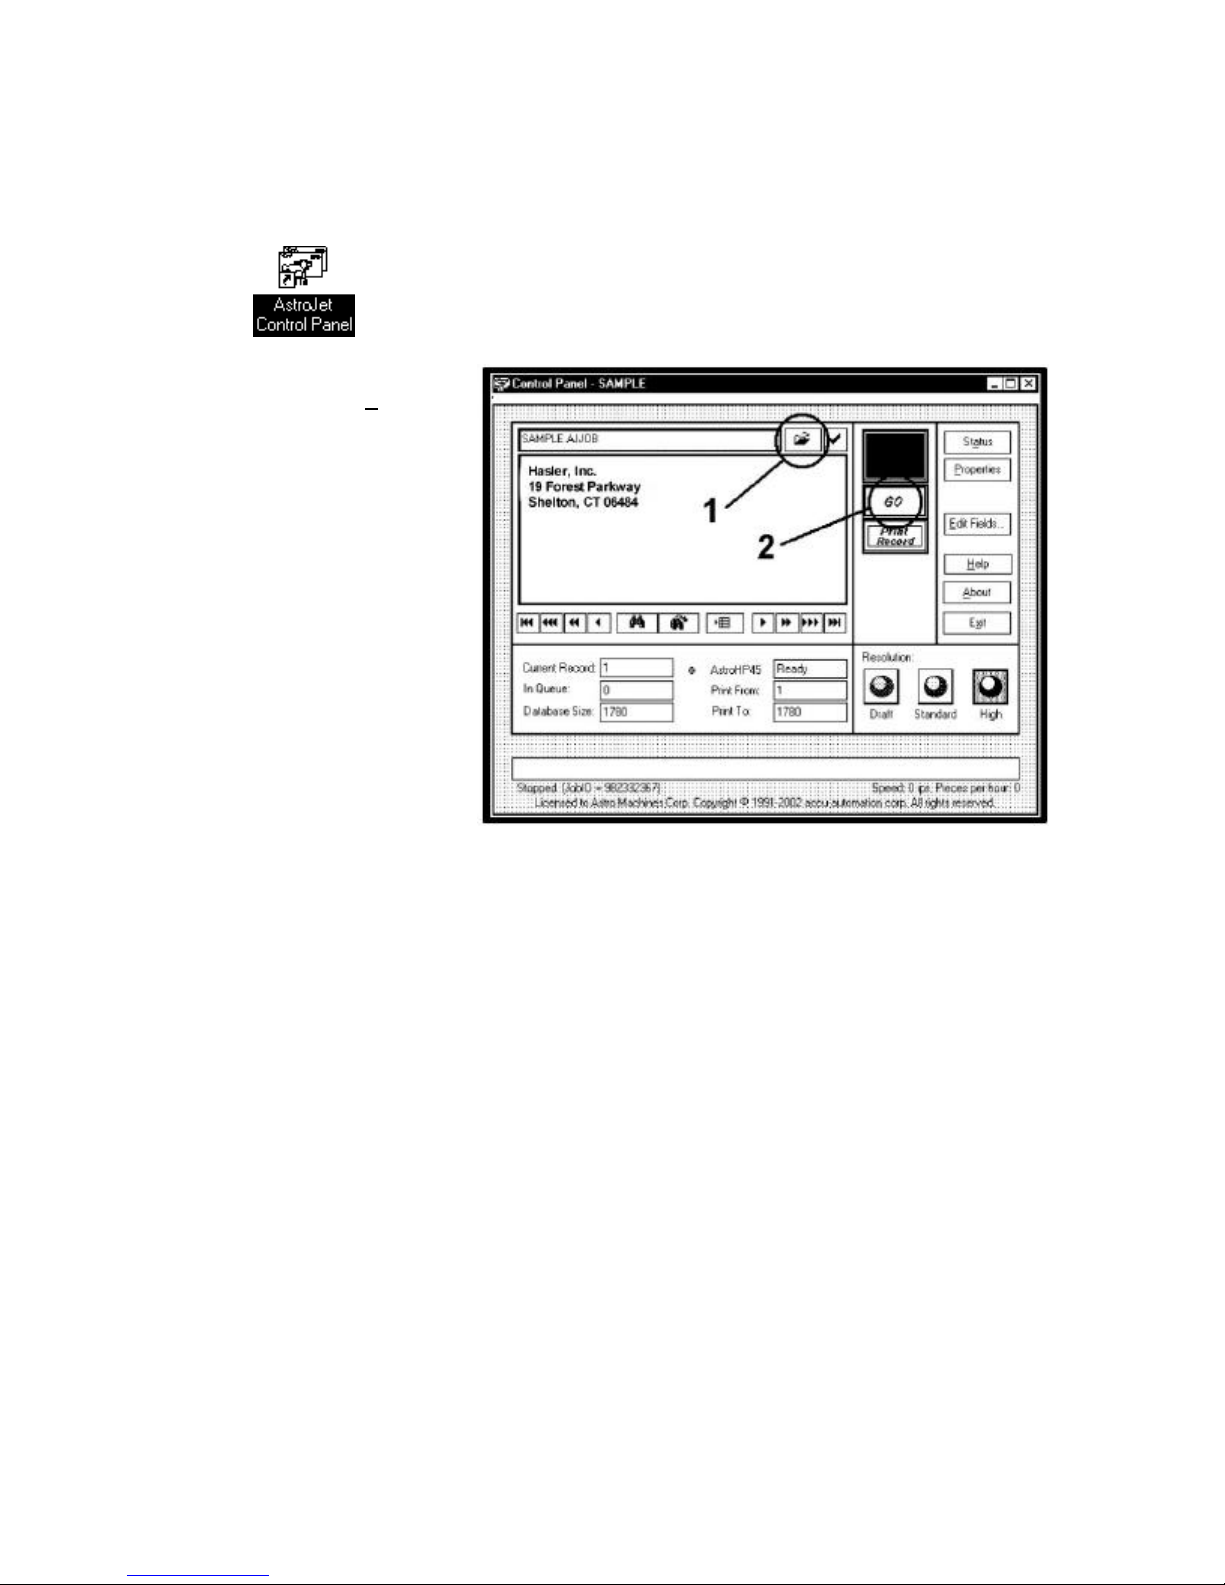
Click on the . The “Control Panel” window will open. Click on the Load a new job button [1] and
the “Control Panel – Load Job”
window will open. Select the job that
you wish to print and click Load Job.
The first record of your database will
appear in the box under the name of
the job.
To start printing click on the GO
button [2]. After the job loads the
printer will start running. To begin the
printing process press the SELECT
key on the printer’s control panel.
NOTE: For more information
about the Control Panel
refer to the “Printer
Software Manual”
10
Page 19
Section 4 – Printer Operation
Running a Job
Setting up the Feeder
The following steps will assist you in setting the feeder portion of the HaslerJet 500:
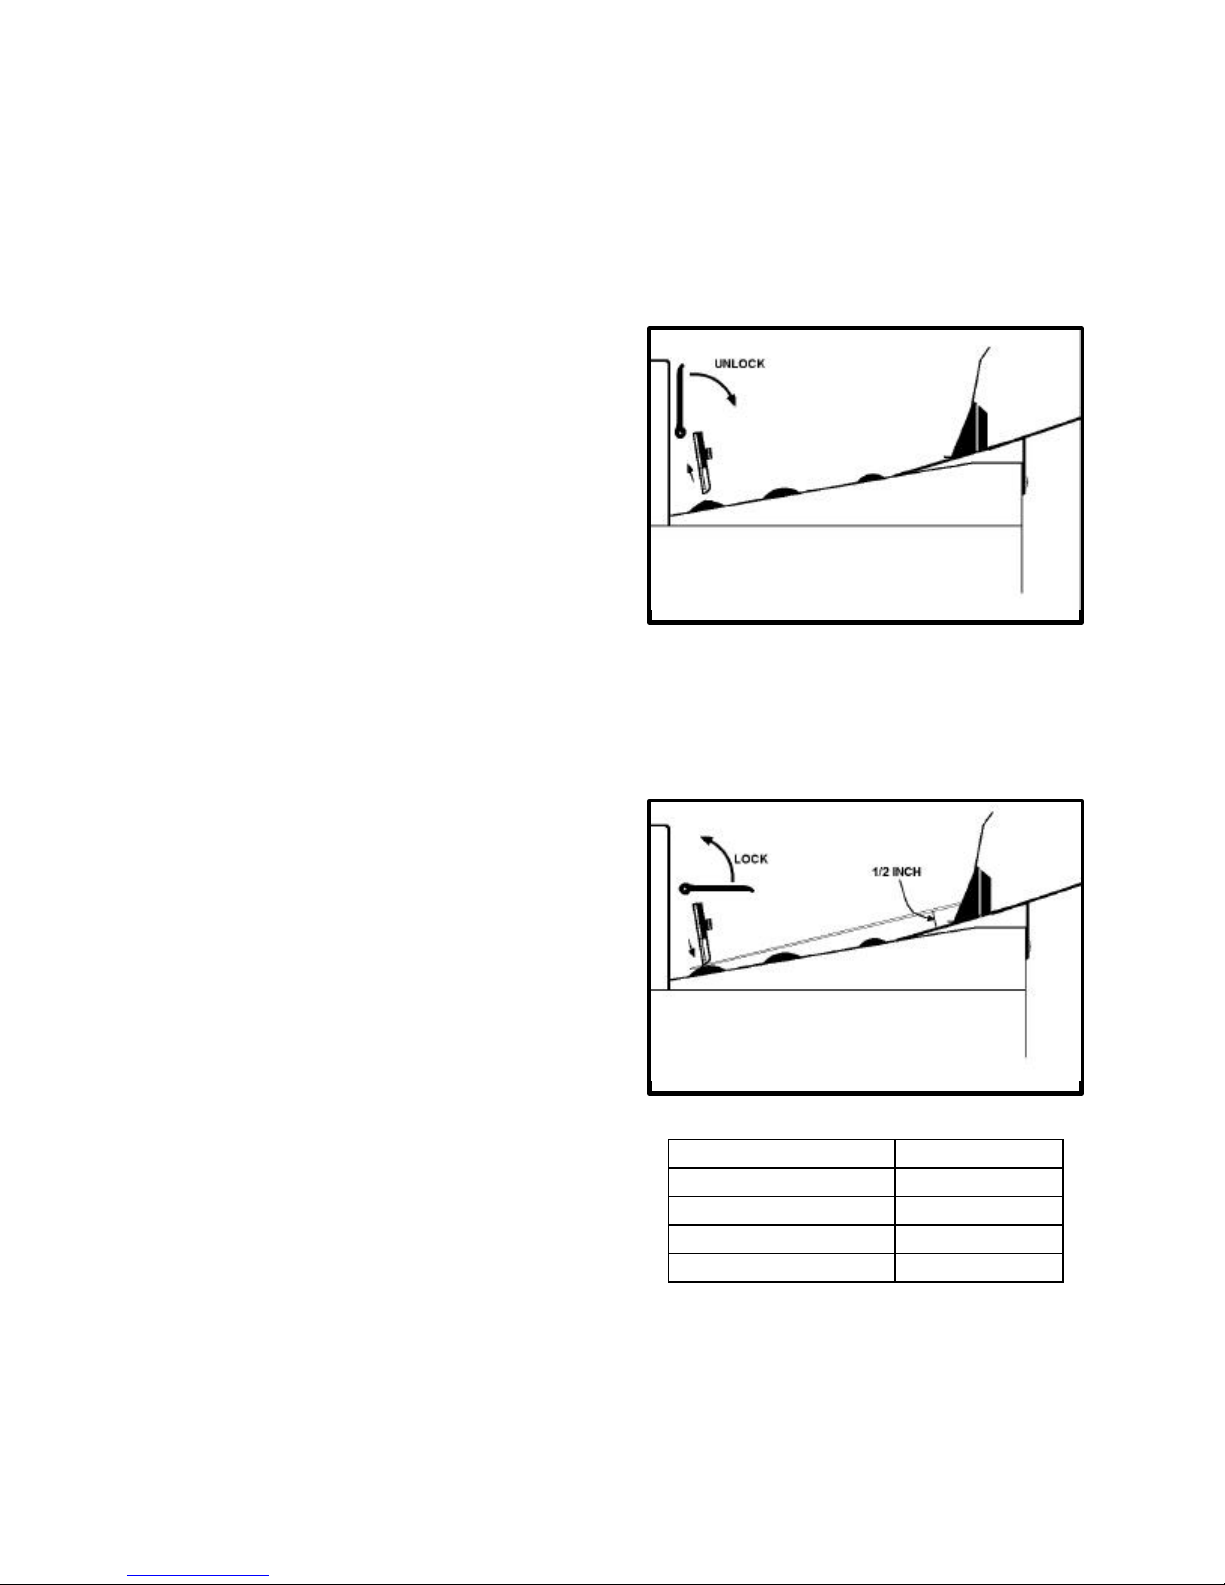
1. Release the separator-locking lever located on
the operator’s side of the feeder and raise the
separators to the up and locked position. Place
one piece of media on the feeder table. Move
the side guides out to their extreme open
position.
2. There are four separators on the feeder. Use the
two center separators for narrow media and all
four separators for wide media. Place the media
under the separators and lower the separators so
that they rest on the media.
NOTE: Two types of separator tips are included
with the HaslerJet 500. The set that is
installed on the unit was designed for all types of media except single sheets of paper. These
hard tips last the longest and carry a part number of 90-103-09. The set packed with the
machine is softer and is intended to be used when running single sheets of paper or cards.
They carry the part number 90-103-09S.
3. Move the separator-locking lever up to lock the separators in place.
4. Adjust the side guides to the width of the media
and adjust the back guide so that the media is
raised approximately 1/2-inch and rests on the
curve of the back guide. When running 10 inch
or longer or heavy media you may have to set
the back guide so that it just touches the back of
the media.
5. Turn the HaslerJet 500 on and then turn the
medial thickness knob to set the initial print
head height according to the chart on the right:
Media Thickness Dial Setting
.004” to 1/32” 0 to 2
1/32” to 1/16” 2 to 3
1/16” to 1/8” 3 to 7
1/8” to 1/4” 7 to 10
11
Page 20
Starting Up the HaslerJet 500
If the HaslerJet 500 has been sitting idle for a period of time, It is a good idea to Purge the printheads before
beginning to run a job. This can be done from the HaslerJet 500 LCD Display Panel. Press MENU, then ON
LINE to put the HaslerJet 500 in the menu mode. Then using the + or - buttons scroll to PURGE: Then
press the ENTER button. Allow the HaslerJet 500 to run a few pieces then press ENTER again to stop the
purge. Check that the pattern run on the media is even, without any blank areas or white streaks. If the
pattern is OK, then return the HaslerJet to the standby mode by pressing the MENU button. Anytime the
HaslerJet 500 sits idle for a while the purge routine should be run before running the job.
Printing a Test Print
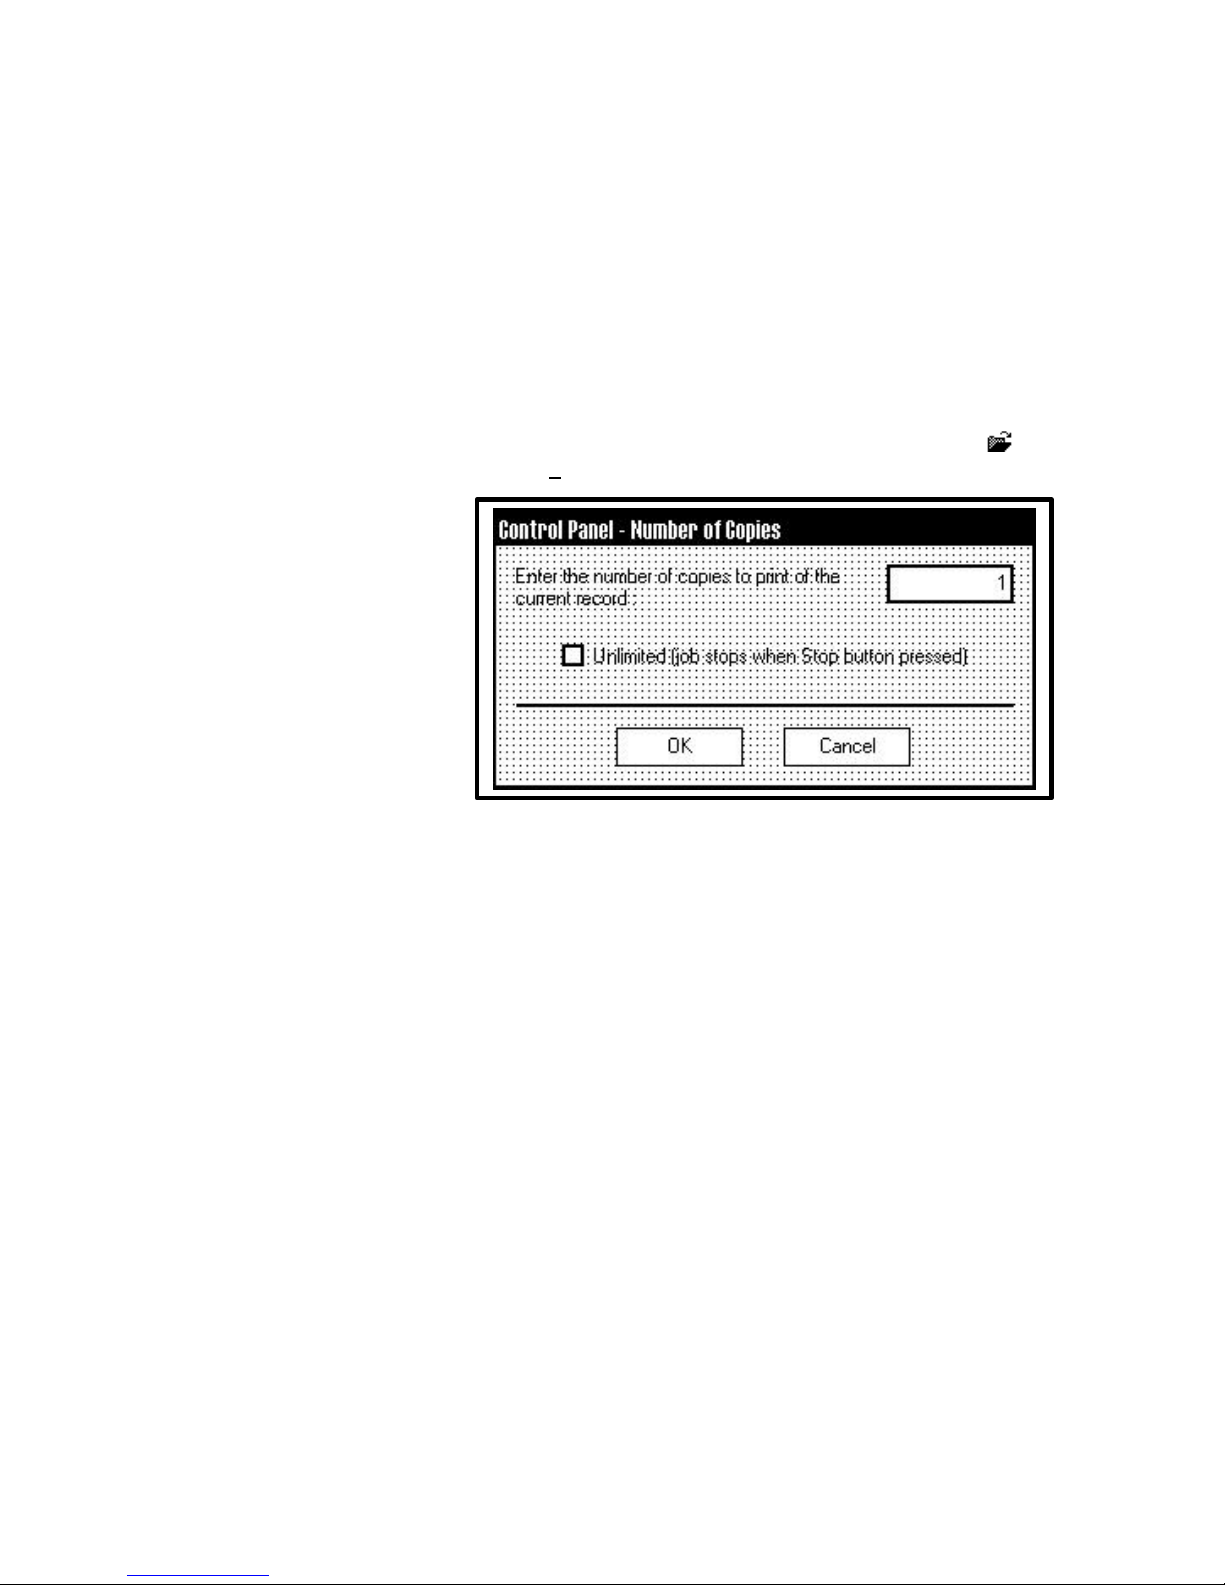
Make sure that the HaslerJet 500 printer is properly connected to the computer and turned ON. Open the
“Control Panel” either from the desktop or from the icon in the layout editor. Click on the Load Job icon
and select the job you wish to run. Then click Load Job.
Once the job is loaded the first
record to be run will appear. Click
on the Print Record button and
the window on the right will
appear. You have the choice of
either selecting the number of
prints that you wish to print (the
default is 1) or selecting
Unlimited, which will allow the
printer to run the same record until
you press the Select key to stop the
feed.
When you have completed the
running the copies for setup, simply click on GO to start printing the job.
NOTE: This feature may be used at anytime during the printing of your job to check setup or to rerun
lost records.
Printing the Job
Click on the GO button to begin printing the job. The HaslerJet 500 will begin by rendering the fonts and
logos then download them to the printer. Depending on the complexity of the page this process may take up
to a few minutes. Once a font or logo is rendered, the HaslerJet 500 can call it up from this folder for reuse
the next time a job that uses that particular font style or logo is run.
Monitoring the Job
The HaslerJet 500 can be stopped by pressing the SELECT key or by clicking on STOP in the Control Panel
software without affecting the job. The printer will resume printing at exactly the same point in the database
when it is restarted.
Printer Control Panel
When you first turn the printer ON, the light in the TEST PRINT key lights and the display becomes active. At
this point, the printer is ready to print if it is connected to your computer.
The printer control panel keys can be used to access various functions that help the operator control the printer.
These functions and their operation are as follows:
ENTER key
The ENTER key is used to start the printer printing under production situations. When the printer is placed in
any of the menu modes, the ENTER key is used to choose the options available.
TEST PRINT key
12
Page 21

Pressing the TEST PRINT key momentarily places the printer in the test print mode. The word “Working
“appears in the lower half of the display and after a short period of time the display changes to “Enter to feed”.
Pressing the ENTER key will start the printing process and print the test print. To stop the feeding press,
ENTER again.
To restore the printer to the normal ready mode press the ON LINE key to take the printer off line and then
press and hold the RESET key until the light on the TEST PRINT key blinks. The printer is then restored to its
normal ready state.
Pressing and holding the TEST PRINT key will cause the printer to enter the “Service Menu” where the various
functions of the printer can be tested. To exit the “Service Menu” turn the printer OFF, the ON again. The
service menu is primarily used by service to diagnose problems should they occur. You can use the “+” or “-“
key to scroll through the menu. Pressing the ENTER key will test the function. To restore the printer to its
normal print mode, turn it OFF then ON.
To check the level of the ink cartridges when you enter the Service Menu press the “-“ key and the amount of ink
remaining will appear as a percentage in the lower half of the display window.
MENU key
The MENU key is used to access the special features built into the printer. The basic features are accessed by
momentarily pressing the MENU key. Use the “+” or “-“ keys to access the features. The features available
under this mode of operation are as follows:
Clear Batch Counter – Pressing the ENTER key will clear the number in the upper right hand corner of
the display. Resetting the counter is usually performed at the start of each job. Turning OFF the printer
will not reset this counter.
Print Speed – Pressing the ENTER key and then selecting the desired speed the press the ENTER key
again.
NOTE: The speed of the HaslerJet 500 may be changed to run at a slower speed than the maximum one
for the print resolution. The Standard quality mode speed may be set to low speed to allow
more drying time and the Draft quality mode speed may be set to low or medium speed. In
High quality, the speed cannot be changed, however.
Purge – The purging function is useful to clear the printhead nozzles when the machine has been sitting
idle for a period. To activate the purge, press the ENTER key and feed media. To stop the purge press,
ENTER again.
Print Enhancement – Pressing the “+” or “-“ key will bring this message up in the display. The print
enhancement feature is used when printing to ensure that the nozzles on the printhead stay open and
prevent the loss of the descender on letters such as “y” or “q” and accent marks that do not appear in every
address. Pressing the ENTER key will turn this function ON or OFF. The function will remain as changed
until the operator changes it again. Turning the printer ON and OFF will not affect the setting.
Installing New Printheads – The printer is capable of telling you when a printhead is running low of ink.
To use this feature press the MENU key momentarily, then use the “+” or “-“ key to highlight “Enter when
head (n) is filled”. Press the ENTER key and install a new cartridge. Repeat for each cartridge you install.
When the ENTER key is pressed the display will change to “Head (n) has a new cartridge”. To check the
level of ink in the cartridges, Press and hold the TEST PRINT key until the “Service Menu” appears. Use
the “+” or “-“ key to scroll to the “Service Menu: Ink Levels. This will show how much ink remains in the
cartridge.
NOTE: This feature only works if the cartridges remain in the original head where they were installed. If
you swap the cartridges from one head to another, the levels will not be accurate.
13
Page 22

SETUP MENU
Pressing and holding the MENU key for a few seconds until the “Setup Menu” appears will allow you to
enter a second set of menus available in the display. You can step through these items with the “+” or “-“
key.
Total Count – The total count displayed is the total number of prints that have passed through the printer.
It is non-resettable.
BIOS Version – The version of the BIOS is displayed in this menu when the “+” key is pressed once.
From time to time, it may be necessary to upgrade the BIOS in the printer. When this is done, the new
BIOS version can be checked in this manner.
Bulk Ink – This feature is not used on the HaslerJet 500. No provisions are made to install the larger
cartridges.
Printer Control Panel Messages
PRINTER OFFLINE – Printer is waiting for data and the main driver motor is off.
PRINTER ONLINE – The mail driver motor is on and waiting for the ENTER key to be activated to
start the feed.
PRINTING – Both the main driver and feeder are on. The Printer is feeding paper and printing. If no
paper is in the feeder the Printer will shutdown in 1/2-second and display OUT OF PAPER.
SETUP MENU – When you press and hold the MENU key for a few seconds the Printer enters the
Setup Menu.
SERVICE MENU – The Printer has been placed in the Service Test Mode by pressing the TEST
PRINT key and holding it until the Printer enters this menu. To exit the SERVICE MENU turn the
Printer OFF and then ON.
TEST PRINTING – If a test print has been loaded into the printer memory it will now print when the
TEST PRINT key is pressed. A message “No test print loaded” means none is available.
ENTER TO FEED – Press the ENTER key to start the feeder.
ENTER TO STOP F EED – Press the ENTER key to stop the feeder.
OUT OF PAPER – The paper sensor did not detect paper within 1/2-second of the starting of the
feeder.
OPERATOR STOP – The operator caused the Printer to stop printing such as when the ENTER key is
activated during the printing process.
REMOTE STOP – The STOP on the Software Control Panel was activated to stop the printing
process.
PAPER JAM – A paper jam was detected by the printer.
Types of Media
The HaslerJet 500 will print on many types of mailing media, but some restrictions apply. As with any other
printing process, the texture of the media has a direct effect on both the print quality and the ink drying time.
It is best to test each new type of media to determine performance levels before beginning the Job.
Coated and plastic types of paper do not easily absorb ink and smearing may occur. Print may appear fuzzy
on very porous paper. Another cause of fuzzy printouts is excessive buildup of dust within the machine, or if
the printhead is too far away from the media. Be aware, that when printing in the High Quality mode, drying
time for the ink is longer than in the other modes. In addition, when humidity is high, drying time is
increased.
14
Page 23

Media Thickness
The HaslerJet 500 will handle pieces up to 1/4” thick (0.250”). All folds must be crisp and even.
CAUTION
DO NOT use stapled pieces in the HaslerJet 500.
DO NOT use paper- clipped pieces in the HaslerJet 500.
These methods of binding the mail piece will damage the printheads, affect print quality, and may
seriously damage your printer. The Hasler Warranty Policy will not cover components damaged
through improper use.
The USPS does not accept this type of mail for its automated equipment.
Databases
The HaslerJet 500 System is capable of handling many types of databases including .TXT, .CSV, Microsoft
Access. MDB, and dBase III, IV, V, FoxPro (*.DBF). TXT and CSV files are handled as they are. The rest
of the database files are converted automatically by the Printer Software to CSV files. In addition whenever
you update a file, the Software will reconvert and re-index it if you place the updated files in the Database
folder in the software.
15
Page 24

Notes
16
Page 25

Section 5 – Maintenance
This section discussed how to care for the inkjet cartridges, clear paper jams, replace sheet
separators, and perform routine operator maintenance to the HaslerJet 500 Printer.
The Inkjet Cartridge
The HaslerJet 500 inkjet cartridges must be replaced when out of ink, when print quality is poor, or when
purging and cleaning have not helped the image quality.
The Approximate life of the HP 51645A Inkjet cartridges based on three lines of 20 characters at 10-point size
per address is:
High Quality 50,000 addresses
Standard Quality 100,000 addresses
Draft Quality 200,000 addresses
NOTE: These figures can vary depending on the font selected.
To Replace the Inkjet Cartridge:
?? Remove the used cartridge from the cartridge holder by raising the latch lever to release the cartridge,
then pull the cartridge up and out of the holder.
?? Remove the new inkjet cartridge from its packaging, taking care not to touch the copper contacts, the
metal plate, or the gold printhead. Remove the protective tape from the printhead.
?? The cartridges are held in place by a lever mounted on the inkjet cartridge holder. Release the lever by
raising it vertical.
?? With the cartridge’s printhead pointing down, slide the cartridge into the holder and push down and
toward the contacts in the holder.
?? Make sure the cartridge is seated in the holder then close the lever to secure the cartridge in the holder.
Do not force the lever into place.
?? Repeat the above for the remaining cartridges.
CAUTION
Never shake, drop, or hit the cartridge against the palm of your hand or any other hard surface.
Shaking the print cartridge does not “mix” the ink and hitting the cartridge against a hard surface does
not clear the nozzles Both of these actions actually hurt the print quality because they allow bubbles to
form near the ink firing chambers. These bubb les prevent the nozzles from firing causing white streaks
in the print image.
Storage
Short-term storage is defined as less than 2 days or less than 1 day in a hot and dry environment. Long-term
storage is defined as more than 2 days or more than 1 day in a hot and dry environment.
17
Page 26
Short-term Storage
Leave the cartridge in the HaslerJet 500 for short periods of time, 1 day or less.
The next time that the HaslerJet 500 is used, the printhead may have to be cleaned and purged
Long-term Storage
Keep the printhead in an area that is relatively free of dust and paper particles that is not too dry
Place the cartridges in a Tupperware container with a damp sponge or towel to maintain humidity and
prevent the printhead from drying out.
When the cartridges are ready to be used again, the printhead will need to be cleaned.
Disposal
The cartridge may be
disposed of in a normal
manner.
If there should be an ink spill,
use soap and water to clean
up any problem areas. Abrasive soap works well to get the ink off of hands.
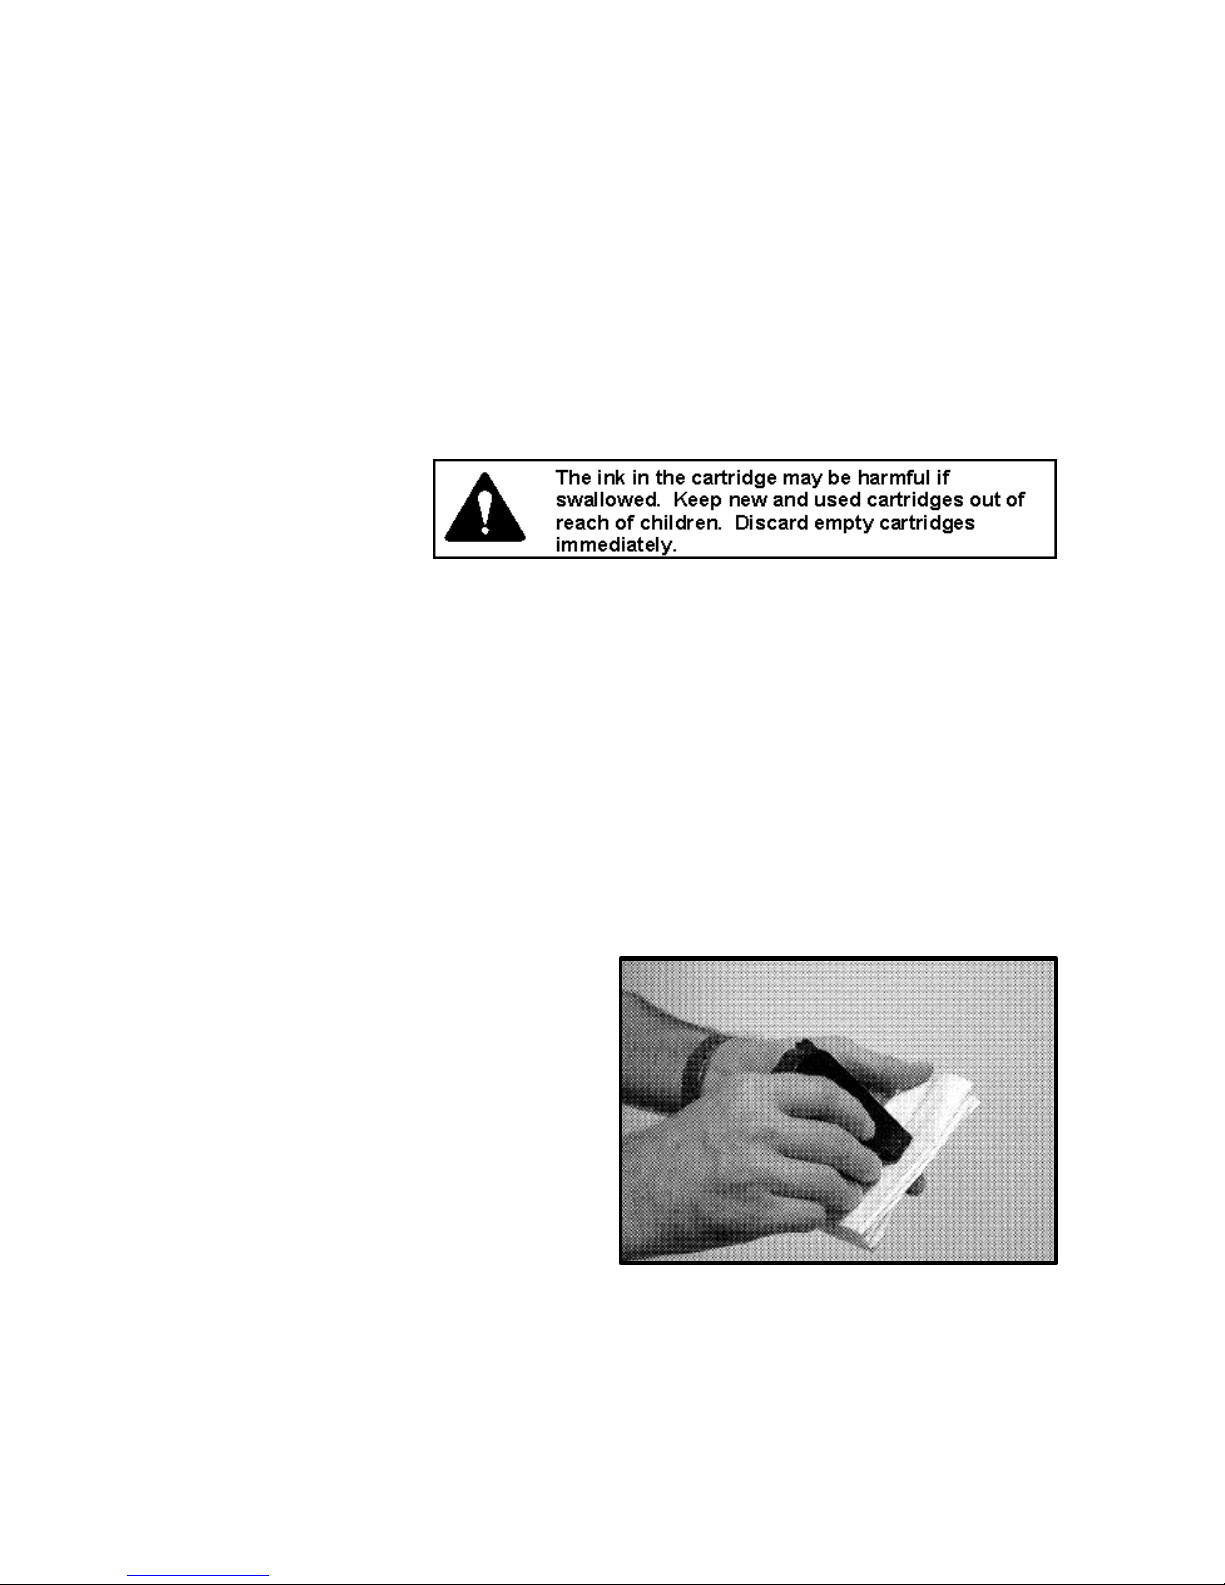
Cleaning the Printhead
To maintain good print quality it is important that the printheads are kept clean. During the printing process ink
spray, paper fibers, and dust can cause a build-up on the printheads. This build-up will eventually degrade the
print quality. If you begin to notice problems with the quality of the print, or to just prevent a build-up from
occurring with the printhead with a wet fiberless cloth.
Cloth should be: Cloth should not be:
? Soft
? Fiberless
? Moist with Water (Distilled is best but tap
works)
? Abrasive
? Made of small fibers
? Dry or containing chemical additives
Wipe slowly across the long-axis with the printhead
facing down (as shown). Do not apply excessive force,
as this could scratch the nozzle area.
Purging the Nozzles
If the printhead sits inactive for a period of time, ink may dry in the nozzles. Printing may not remove these “ink
plugs” from the nozzles. White streaks will then show up in the printed text or graphic. In order to obtain better
print quality, these ink plugs need to be forced out or purged. A Purge routine is built into the HaslerJet 500
Printer. It can be accessed from the LCD panel on the HaslerJet 500 Printer. Refer to Section 4 – Printer
18
Page 27
Operation, under "Running a Job; Purge the Printheads". If this does not solve the problem then proceed as
follows:
1. Wipe the printhead with a wet cloth as described in "Cleaning the Printhead" above.
2. Perform the Purge routine from the HaslerJet 500 Printer LCD Display panel.
3. Wipe the printhead again with a moist cloth.
NOTE: For more information refer to the Troubleshooting Print Heads in Section 6 – Trouble
Shooting Guide.
Jams in the HaslerJet 500 Printer
If a jam occurs, STOP the HaslerJet Printer. The missed addresses can be recovered at the computer from the
control panel by stepping back to the place in the job where the jam occurred. No data will be lost.
Some possible reasons for jamming are:
1. Feeding more than one piece of media.
2. Damaged media, such a dog-eared (turn down corners).
3. Media that is not stiff enough may not be usable. Media that meets Postal stiffness requirements for
automated feeding is acceptable in the HaslerJet 500.
4. Envelopes that are caught under the flap of another envelope or stuck to one another may cause
jamming.
Removing Jammed Media
1. It may be necessary to move one or more of the printheads to gain access to the jammed media. Take
care in removing jammed media to prevent damage to the print heads. All pieces of the jammed media
must be removed from the feed path.
2. Use the control panel in the HaslerJet 500 Software to recover any lost addresses.
3. Restart the job by putting the HaslerJet 500 back to STAND BY and then resume printing by using the
GO button on the HaslerJet 500 Software Control Panel.
Replacing the Sheet Separators
The sheet separators insure separation of the pieces as they are being fed. The do wear and must be replaced
from time to time. If you experience double sheet feeding and can not adjust the separators to prevent it, they
should be replaced. Replacement of the sheet separators is not difficult. Just follow the steps below:
1. Turn off the HaslerJet 500 and unplug it from the power
source.
2. Release the separator-locking lever and move the paper
side guides to their maximum open position.
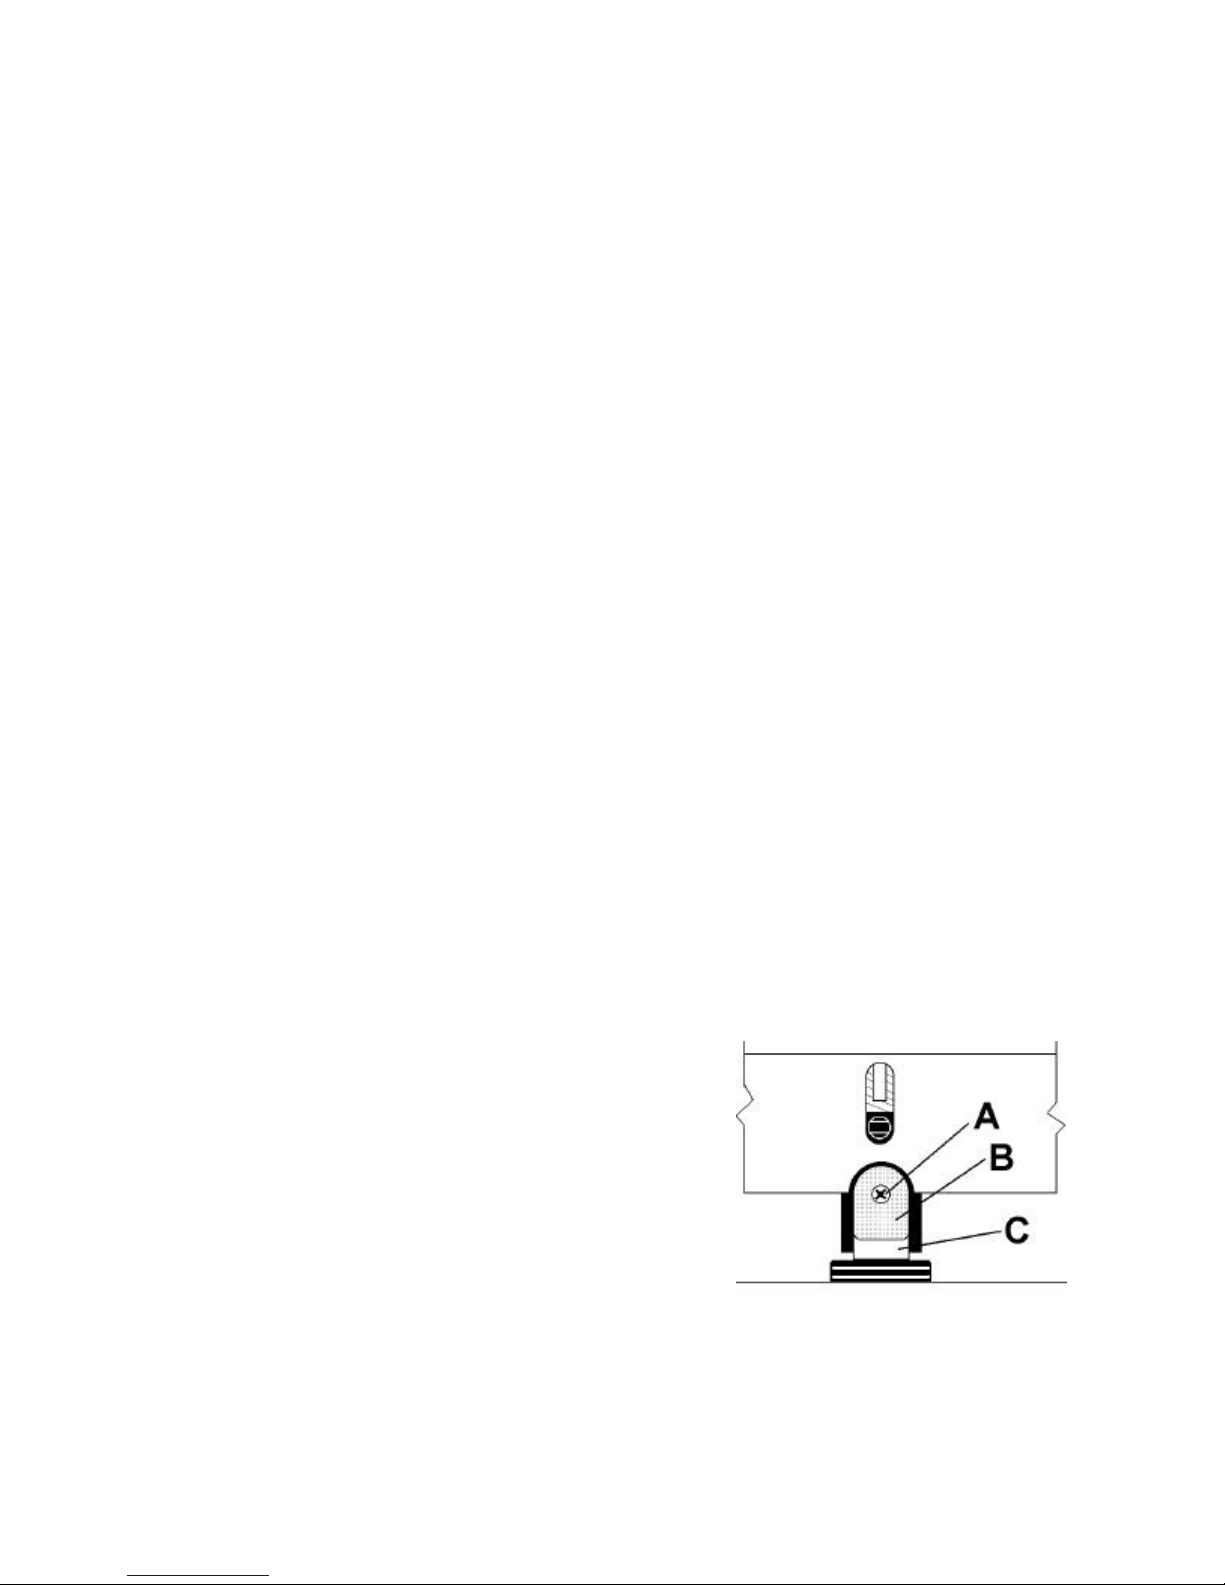
3. Lower the separators so that they touch the feed roller.
4. Remove the screw [A] and the separator support [B.] Then
remove the separator [C] by prying it out of the holder.
5. Install a new separator in place and replace the separator
support and screw.
19
Page 28
Replacing the Feed Rollers
To replace the feed rollers on the HaslerJet printer follow the steps below:
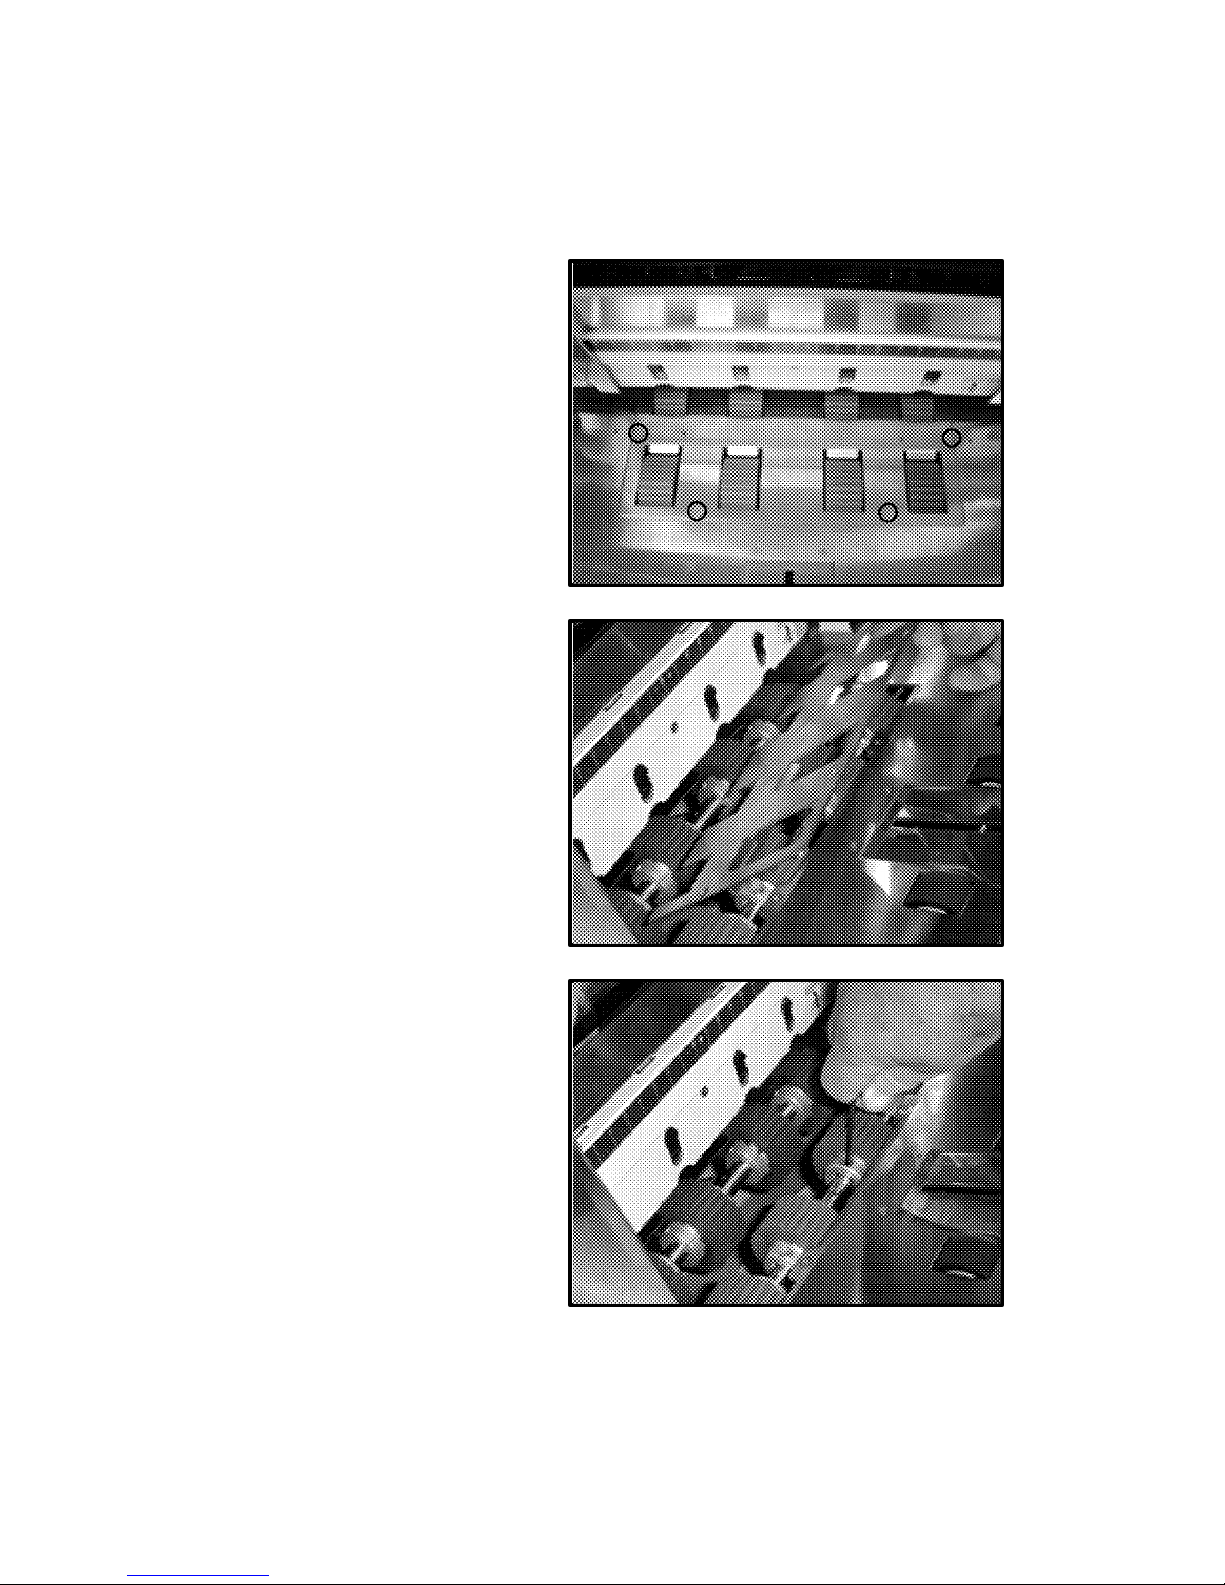
1. Before removing the feed roller access plate, unplug the power to the printer.
2. Using a Phillips screwdriver, remove the
four screws from the feed roller access
plate.
3. Remove the feed roller access plate.
4. Rotate the feed roller shaft so that the
screws are face up and use a 3/32-inch
Allen wrench to remove the two button
head cap screws. This will permit you to
remove one half of the feed roller. Rotate
the shaft until the two screws holding the
second half of the feed roller in place are
accessible. Remove those screws also.
Install the feed roller half and replace the
screws. Rotate the shaft and replace the
second feed roller half and fasten with the
remaining screws.
5. Replace the feed roller access plate and
fasten with the four Phillips screws.
20
Page 29
Cleaning
The HaslerJet 500
WARNING
THE HASLERJET 500 PRINTER IS A PRECISION MACHINE THAT SHOULD BE
CLEANED REGULARLY TO INSURE MANY YEARS OF S ERVICE. BEFORE
PERFORMING ANY MAINTENANCE DISCONNECT THE MACHINE FROM ITS POWER
SOURCE!
The HaslerJet 500 must be cleaned regularly of accumulated paper dust and ink. Depending on the types of
media that are run, paper dust may accumulate within the printer and on the transport. To properly clean the
HaslerJet 500, unplug it from the power receptacle and remove the covers.
The internal areas are best cleaned with a vacuum that has a soft brush attachment to help loosen the dust
particles. Take care not to damage the PC Boards or electrical wiring.
The exterior of the machine may be cleaned with any standard household cleaner which is non-abrasive and does
not contain plastic harming solvents.
CAUTION
NEVER SPRAY OR POUR CLEANERS DIRECTLY ON OR INTO TH E HASLERJET
500 PRINTER. EXCESS LIQUID COULD HARM ELECTRONIC PARTS. ALWAYS
DAMPEN A RAG WITH THE CLEANER AND APPLY IT TO THE PARTS TO BE
CLEANED.
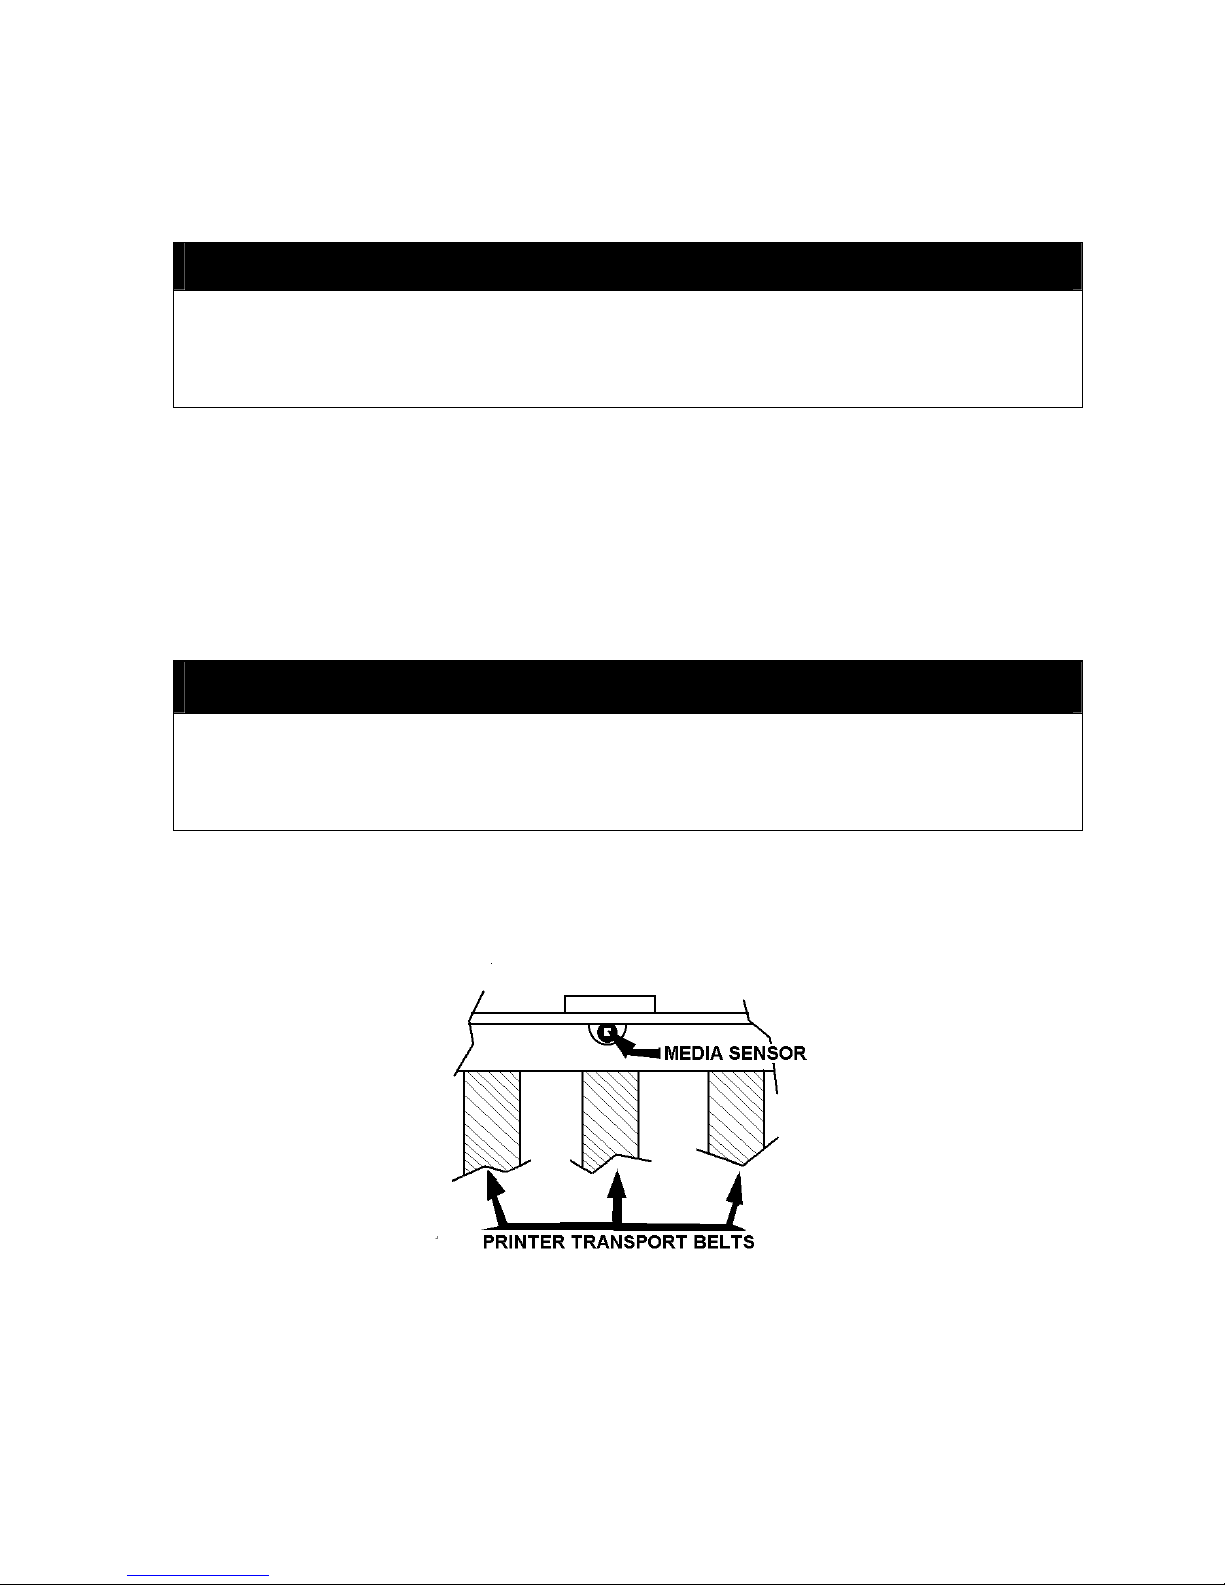
Cleaning the Media Sensor
Periodically check the media sensor located in the print carriage area of the printer section. The sensor should be
clean and free of accumulated paper dust. Use a vacuum with a soft brush attachment or dry compressed air to
remove the dust.
21
Page 30

Notes
22
Page 31
Section 6 – Trouble Shooting Guide
The following trouble shooting g uides are provided to assist you in solving any problems that
might occur with the HaslerJet 500 Printer or its software. We have tried to make them as
complete as possible. The best advice we can offer is to make sure that the system is setup
properly, plugged in, that it has an adequate supply of ink before attempting to trouble shoot
any problem.
Print Cartridges
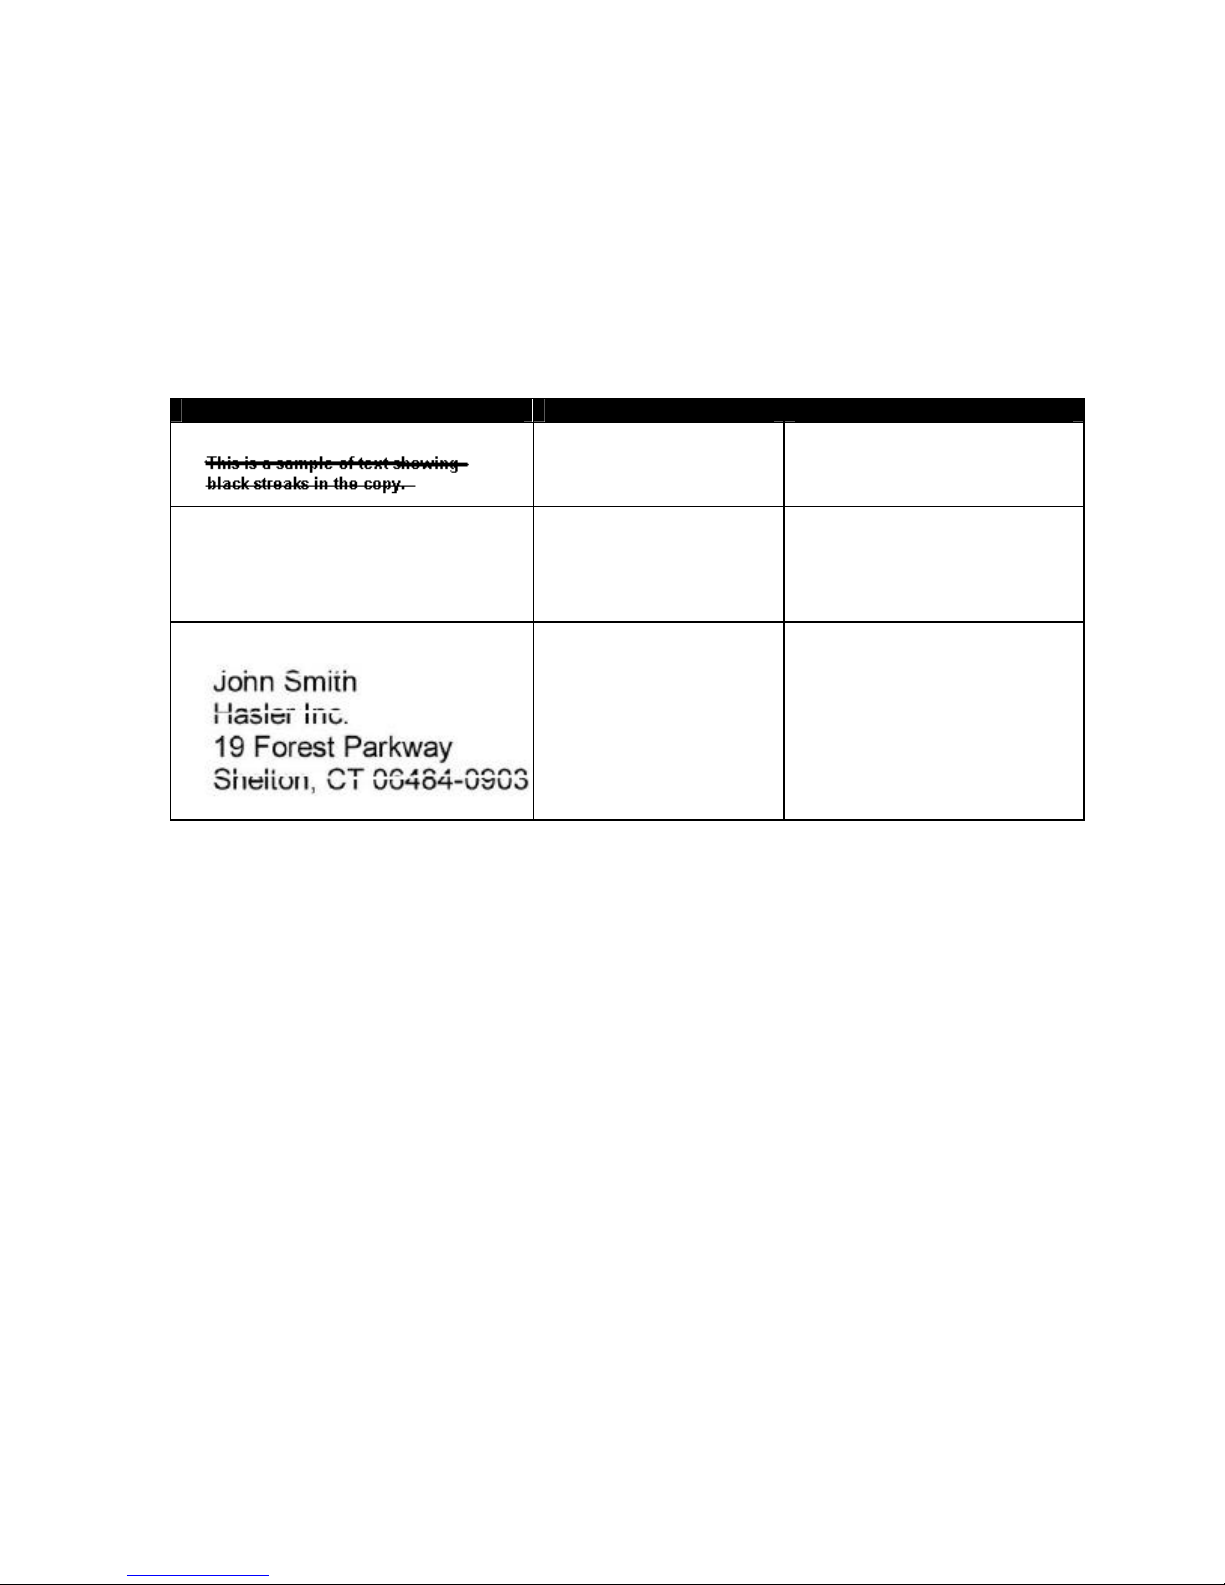
CONDITION PROBLEM SOLUTION
Black streaks in text
Cartridge will not print Sheet is blank even after it
White streaks in text or graphics Lint or dust blocking
Lint or paper dust on
printhead.
has gone underneath
cartridge(s).
printhead holes.
Poor contact between
printhead and printhead
holder.
Clean the cartridge nozzles with a
clean lint-free cloth moistened
with distilled water.
Check to make sure the tape is off
the printhead.
Remove and reinsert the cartridge
into the carriage holder.
Install a new print cartridge.
Clean the cartridge nozzles with a
clean lint-free cloth moistened
with distilled water.
Clean interconnects.
Remove and reinsert the cartridge
into the holder.
Insert a new Print Cartridge.
23
Page 32
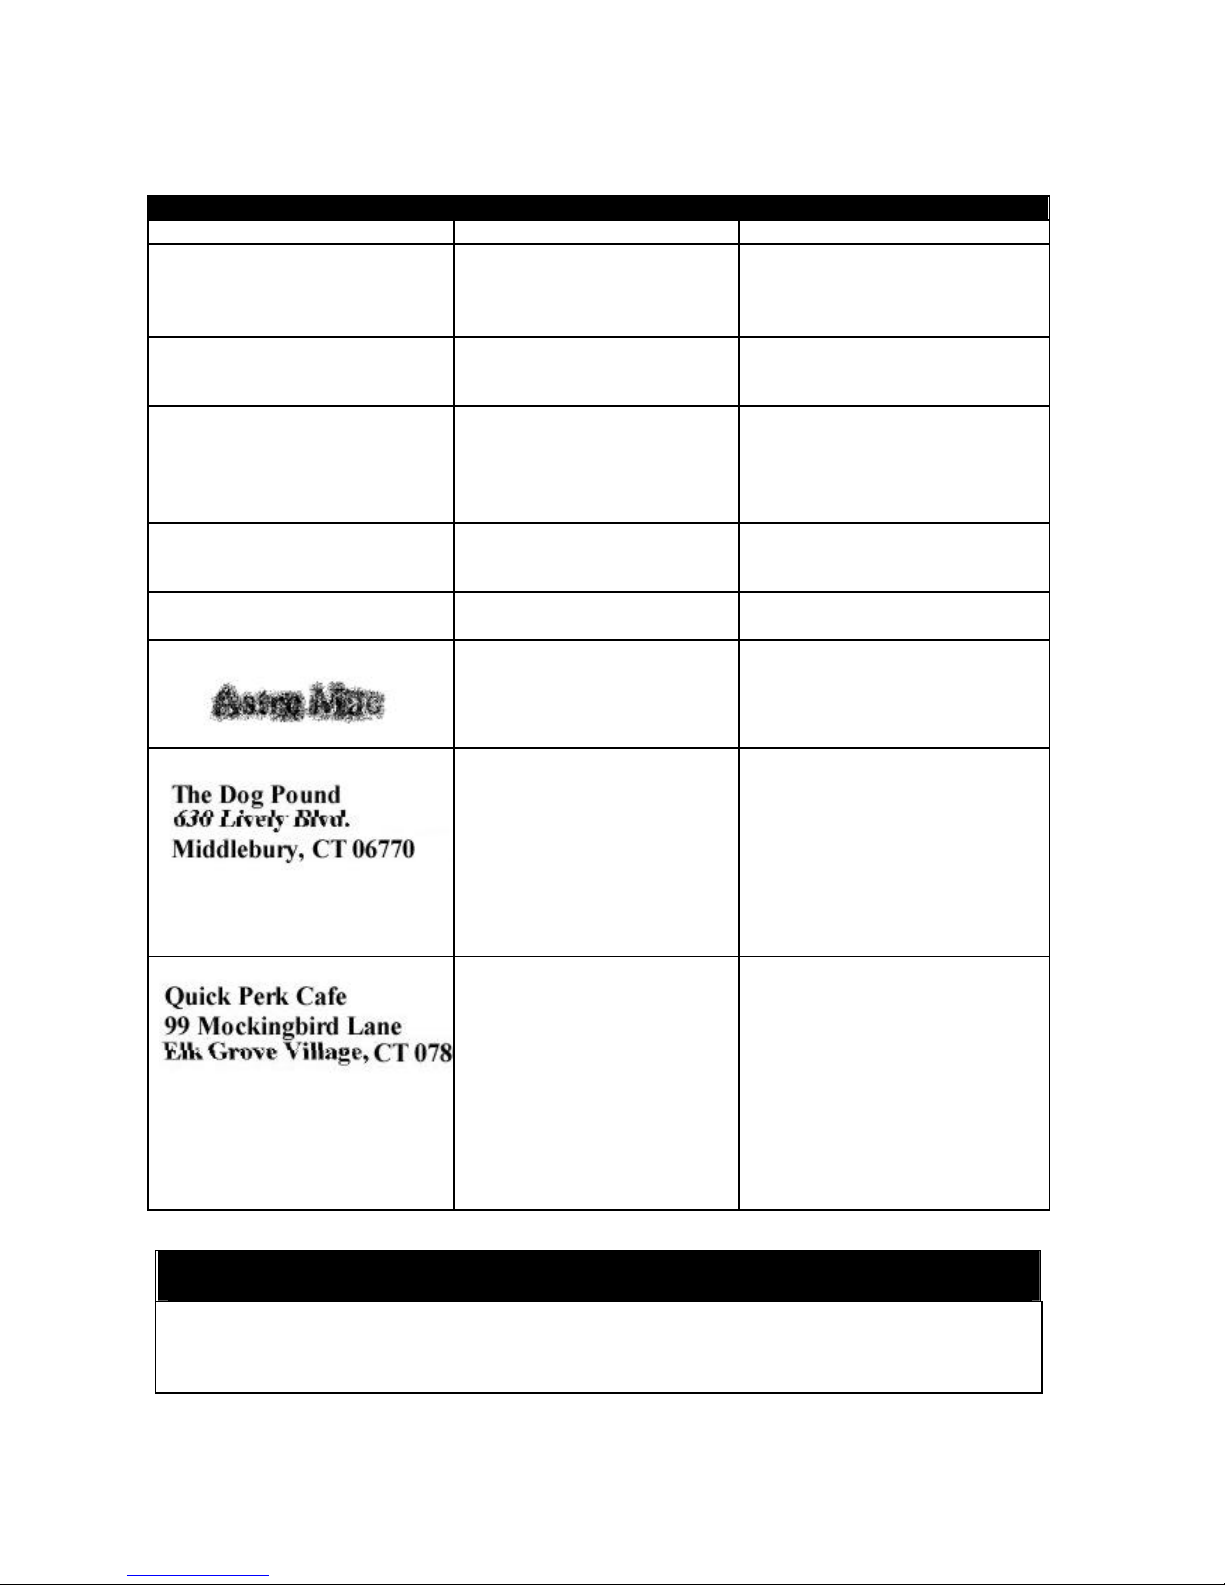
HaslerJet 500 Printer
CONDITION PROBLEM SOLUTION
Extra lines; losing data Database problem Check data in database program
Improper output (address
information out of order, misfeeding, etc.)
Media jams Double feeding
No communication Improper cabling / connector
Not printing on media Media not positioned properly Adjust printhead vertically.
Print too light or missing
character dots
Blurry address
Wrong interface settings
Static electricity
Dirty media sensor
Media is curled or bent
Media is too thin
Unit not receiving power
Clogged or dirty printheads
Running out of ink
Image is not sharp Printhead gap too high. Adjust
Check software or data base on PC.
Close control panel software, the
turn Printer of and on.
Clean media sensor.
Adjust Sheet Separators on feeder.
Uncurl media.
Media must be at least 0.008”.
Use Proper cable (see Operator
Manual).
Check plug connections, on/off
switch and fuse on back panel (see
Operator Manual).
Adjust margin setting in layout
software.
Purge or clean cartridges.
Replace inkjet cartridges.
printhead closer to the media.
Split line of type Line of type is placed across two
printheads
Uneven split line of type Some but not all of a line of type
across two printheads matches
up.
WARNING
Reposition the text in the layout so
that it does not print across two
printheads.
Adjust the positioning of the two
printheads in relationship to each
other using the Head Alignment
tool in the software control panel or
in the Properties window of the
PCL version driver.
Reposition the text in the layout so
that it does not print across two
printheads.
Check the sheet separator
adjustment. Separators should just
touch the media.
Check that the printhead is set at
the proper height. A printhead that
is too high will cause slippage in
the media as it is passing under the
heads.
DO NOT REMOVE THE SIDE COVERS OF THE HASLERJET 500 PRINTER
THERE ARE HIGH VOLTAGES PRESENT BEHIND THE COVERS!
24
Page 33
Appendices HJ500
APPENDIX A – HJ500 Specifications
The information (electrical and physical dimensions, etc.) on the HJ500 is presented here for your
reference. Specifications are subject to change without notice.
Print Quality
(Dots Per Inch)
Print Speed
(Inches Per Second)
Image Area Total of 2.5 inches using five printheads
Media Sizes Maximum 14” long x 13.5” wide up to 1/4“ (.25”) thick
Print Mechanism HP 51645A Inkjet Cartridge
Number Of Cartridges
InkJet Cartridge Life
(approximate)
Graphics And Logos Allows printing of Bitmapped graphics, logos, and pictures
High Quality 600 x 600 dpi
Standard Quality 600 x 300 dpi
Draft Quality 600 x 150 dpi
High Quality 15 ips
Standard Quality 30 ips
Draft Quality 50 ips
Minimum 5” long x 3” wide up to 1/4” (.25”) thick
5 cartridges
Addressing: High Quality 1,050,000 characters
Standard Quality 2,100,000 characters
Draft Quality 4,200,000 characters
(three line address labels only, logos and other printing not included in the
above)
Software And Fonts Windows 95, 98, NT, 2000, ME, and XP
All Windows True-Type fonts
Print Colors Standard Black, Fast Drying Black, and Spot Colors
Ink Water based may require drying assistance for coated stock
Operator Display Options
(LCD)
PC Interface Centronics Parallel Cable
Dimensions 11.5” H x 19.56” L x 20” W
Electrical 115VAC, 60 Hz
Weight 69 lbs. (31.4 kg.)
Duty Cycle 51 million addresses total or 850,000 per month over a 5-year life cycle.
Counter, Stop on Break, Print enhancement, Print Resolution, Purge, Left
Margin, BIOS Version
Hasler®, Inc. 03/2004 Page-25
Page 34

Computer Requirements
1. An IBM or Compatible Pentium 100 Megahertz PC or better.
2. Windows 95, 98, 2000 , NT, ME, or XP installed.
3. A minimum of 10 Megabytes of free hard disk space.
4. At least 16 Megabytes of RAM. (32 Megabytes for Windows 2000 and NT)
5. A 2X CD ROM or better.
6. An 800 X 600 SVGA Monitor or better.
7. Parallel (Centronics) printer cable, no longer than 6 feet.
8. The Parallel Port must be set to the EPP (Enhanced Parallel Port) setting in the CMOS of the
computer.
26
Page 35

APPENDIX B - Supplies and Optional Hardware
The following supply items and optional hardware are available from your Hasler Distributor:
Supplies
Black Inkjet Cartridge HP 51645A
Fast Drying Black Inkjet Cartridge HP 6195A
Yellow Inkjet Cartridge HPC6173A
Red Inkjet Cartridge HPC6168A
Green Inkjet Cartridge HPC6169A
Blue Inkjet Cartridge HPC6170A
Versatile Black HPC8842A
Optional Hardware
Various Conveyors Available
Drop Tray
27
Page 36

Notes
28
Page 37

Index
- key 3
+ key 3
A
adjust, separators 6
B
barcode inserting 9
batch counter 13
BIOS installation 8
C
cartridge, installation 6
circuit breaker, motor 1
cleaning inkjet cartridges 18
cleaning media sensor 20
cleaning printer 20
clear batch counter 13
color cartridges 25
computer, connecting 5
computer, requirements 24
connecting computer 5
connecting printer 5
control panel 1, 3, 10
D
databases 15
display, operator 3
disposal, inkjet cartridges 18
E
enter key 3, 12
Enter To Feed 14
Enter To Stop Feed 14
F
fault indicator 3
feed 6
feeder 11
G
GO 10
graphics inserting 9
I
indicator, fault 3
inkjet cartridge cleaning 18
inkjet cartridge disposal 18
inkjet cartridge replacement 17
inkjet cartridge storage 17
inkjet cartridges 6, 17, 25
installing inkjet cartridges 6
installing, BIOS 8
installing, software 7
J
jams 19, 22
job save 9
job, monitoring 12
job, printing 12
L
Layout Editor 9
Layouts 9
load job 10
long media 11
M
maintenance, cartridges 17
media 14
media jams 19
media sensor 2, 20
media thickness 7, 11, 15
media thickness knob 3
media transport belts 2
media types 14
menu key 3
menu key 13
motor circuit breaker 1
N
no print 21, 22
O
online key 3
Operator Stop 14
options 25
Out of Paper 14
P
Paper Jam 14
parallel port 2
plugging in 5
power receptacle 1
print enhancement 13
print enhancement 14
print head carriage 2
print head cover 2
print speed 13
print speed 14
Printer Offline 14
29
Page 38

Printer Online 14
printer settings 12
printer trouble shooting 22
printer, cleaning 20
printer, connecting 5
printer, startup 12
printhead cleaning 18
printhead trouble shooting 21
Printing 14
printing 10, 12
printing job 12
printing test print 12
purge 13, 18
purging print heads 13
R
rear guide 1, 7
Remote Stop 14
replacing inkjet cartridge 17
replacing sheet separator 19
reset key 3
S
save 9
select job 10
sensor, media 2
separator adjustment 6, 11
separators 11
Service Menu 14
set print speed 14
setup feed 6
Setup Menu 14
sheet separator 1, 7, 19
side guides 1, 7
software installation 7
specifications 23
startup printer 12
storing inkjet cartridges 17
supplies 25
T
test print 12, 13
test print key 3
Test Printing 14
text inserting 9
thickness, media 3
transport belts, media 2
trouble shooting printer 22
trouble shooting printhead 21
V
voltage requirements 5
W
Windows 2000 8
Windows 95 8
Windows 98 8
Windows ME 8
Windows NT 8
Windows XP 8
30
Page 39

Page 40

Form #51016 06/2004
 Loading...