

Page 1
=
Ha see
=
E486
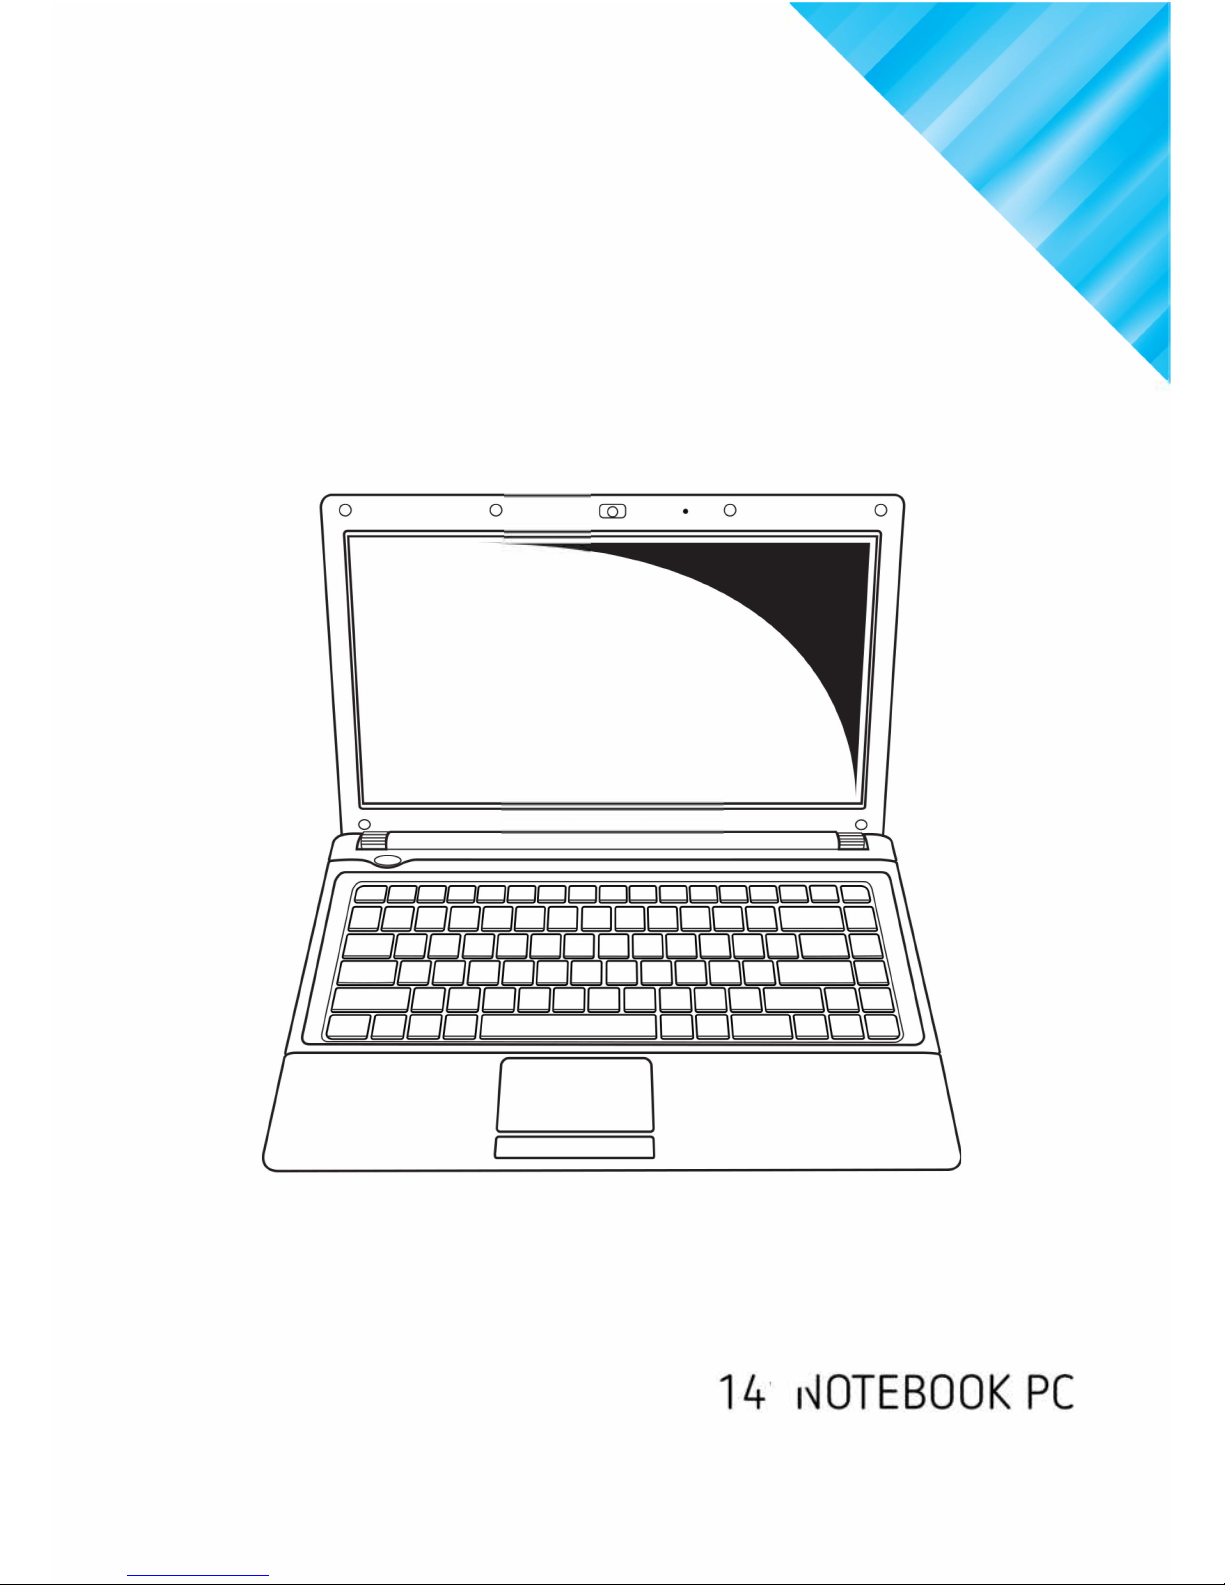
Laptop Computer
Page 2

1
Contents
Taking Care of your Notebook PC ..........................................................................................3
Chapter 1 .................................................................................................................................5
Introducing the Notebook PC ............................................................................................5
Components
......................................................................................................................5
Top Components
...............................................................................................................6
Chapter 2 ............................................................................................................................... 12
Preparing y our Notebook PC ........................................................................................... 12
Installing Battery Pack
..................................................................................................... 12
Connecting the Power Adapter
......................................................................................... 13
Opening the Display Panel
................................................................................................ 14
Turning on the Co mputer
................................................................................................. 15
Chapter 3 ............................................................................................................................... 16
Using the Notebook PC .................................................................................................... 16
Touchpad
........................................................................................................................ 16
Keyboard
........................................................................................................................ 17
Power Sources
................................................................................................................. 19
Standby and hibernation
.................................................................................................. 21
Drives
............................................................................................................................. 24
External Devices
.............................................................................................................. 27
Wireless LAN
................................................................................................................... 28
Connecting to a WL A N
..................................................................................................... 29
Local area networks
......................................................................................................... 29
Chapter 4 ............................................................................................................................... 31
Routine Care ..................................................................................................................... 31
Hardware Maintenance
.................................................................................................... 31
Chapter 5 ............................................................................................................................... 36
Troubleshooting ................................................................................................................ 36
The computer w i ll no t s tart up
. ......................................................................................... 36
The computer screen is bla nk
. .......................................................................................... 37
The software is functioning abnormally
. ............................................................................ 37
The computer is turned on, but is no t re sp o ndi ng
. ............................................................. 38
Page 3

2
The computer is extremely warm
. ..................................................................................... 38
An external device is not working
. .................................................................................... 39
The computer cannot conne ct to a w irel es s lo ca l a rea netw o rk (WL A N )
. ............................. 39
Page 4
3
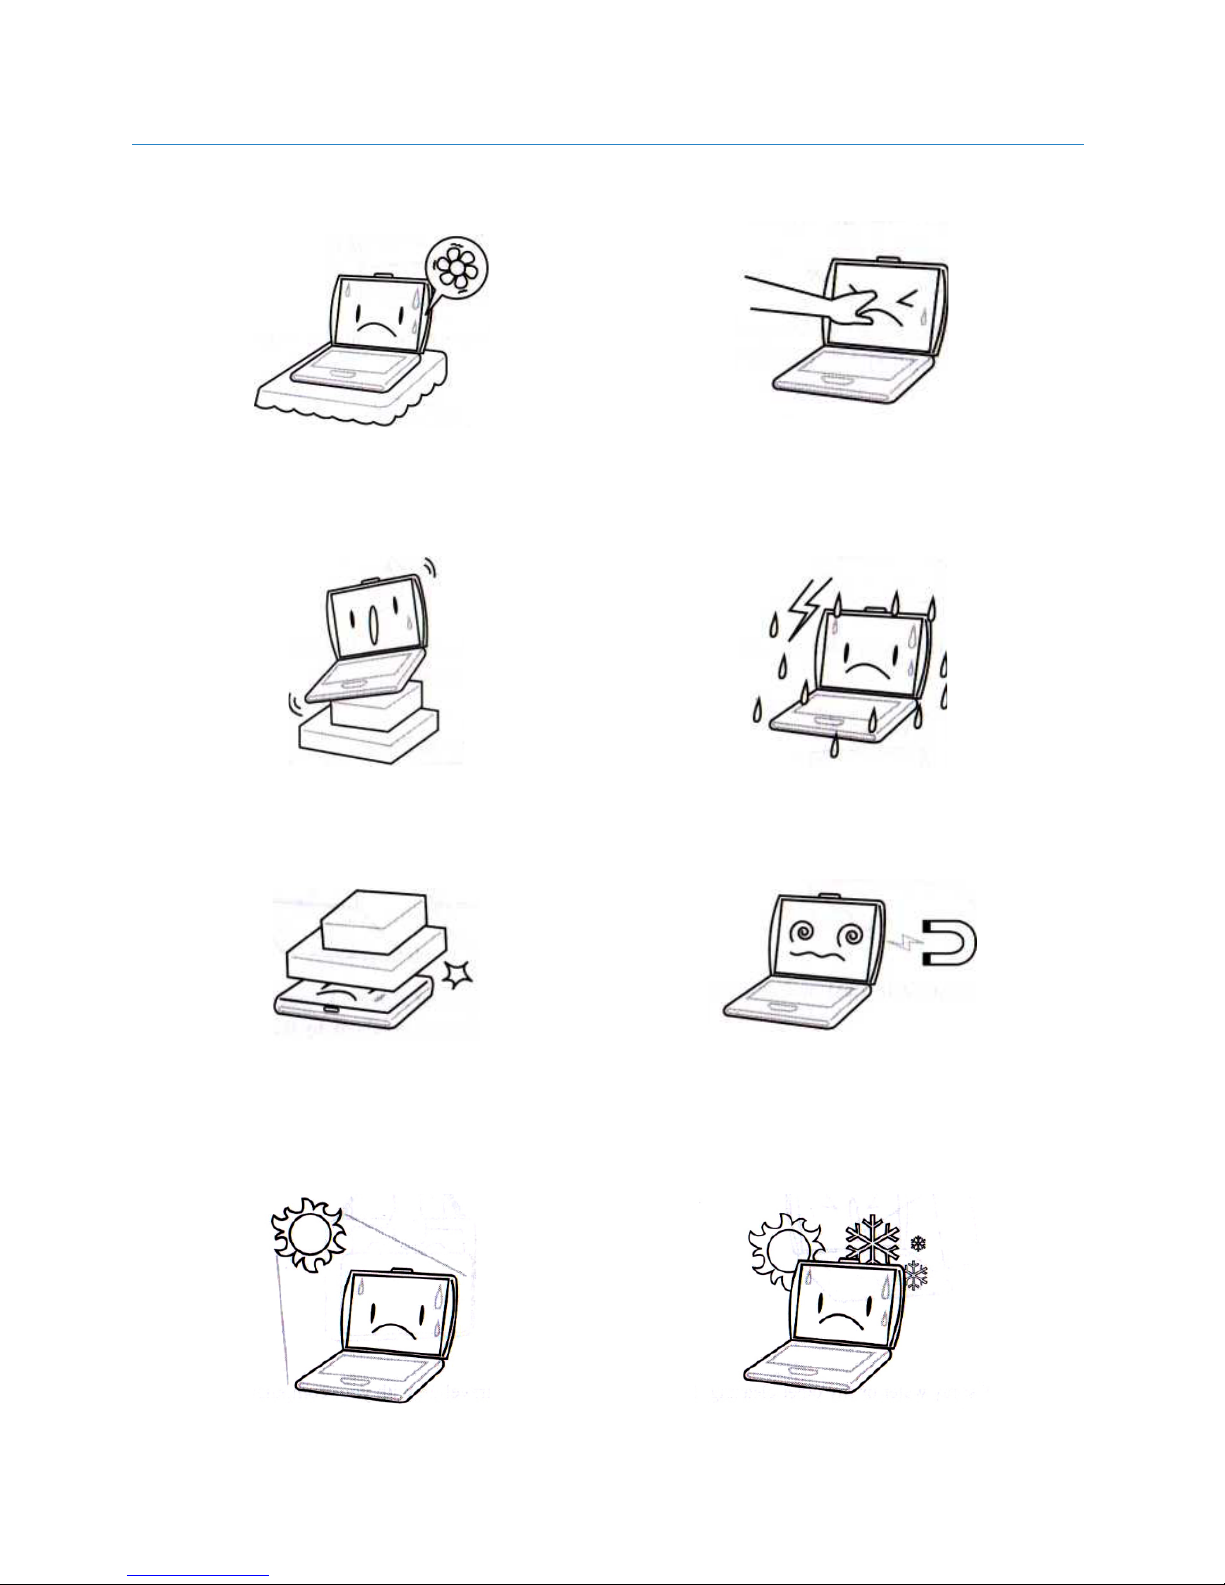
Taking Ca re of your Notebook PC
To prevent possible overheating of the
computer's processo r, make sure y o u don't
block the openings provided for ventilation.
DO NOT press or touch the display panel.
DO NOT place on unev e n o r unsta bl e w o rk
surfaces.
DO NOT use your no te bo o k und er hars h
conditions.
DO NOT place or drop objects on the
computer and DO NOT apply heavy pressure
on it.
DO NOT subject the co mputer to m a g neti c
fields.
DO NOT expose to direct sunlight.
DO NOT use in extreme temperatures.
Page 5
4
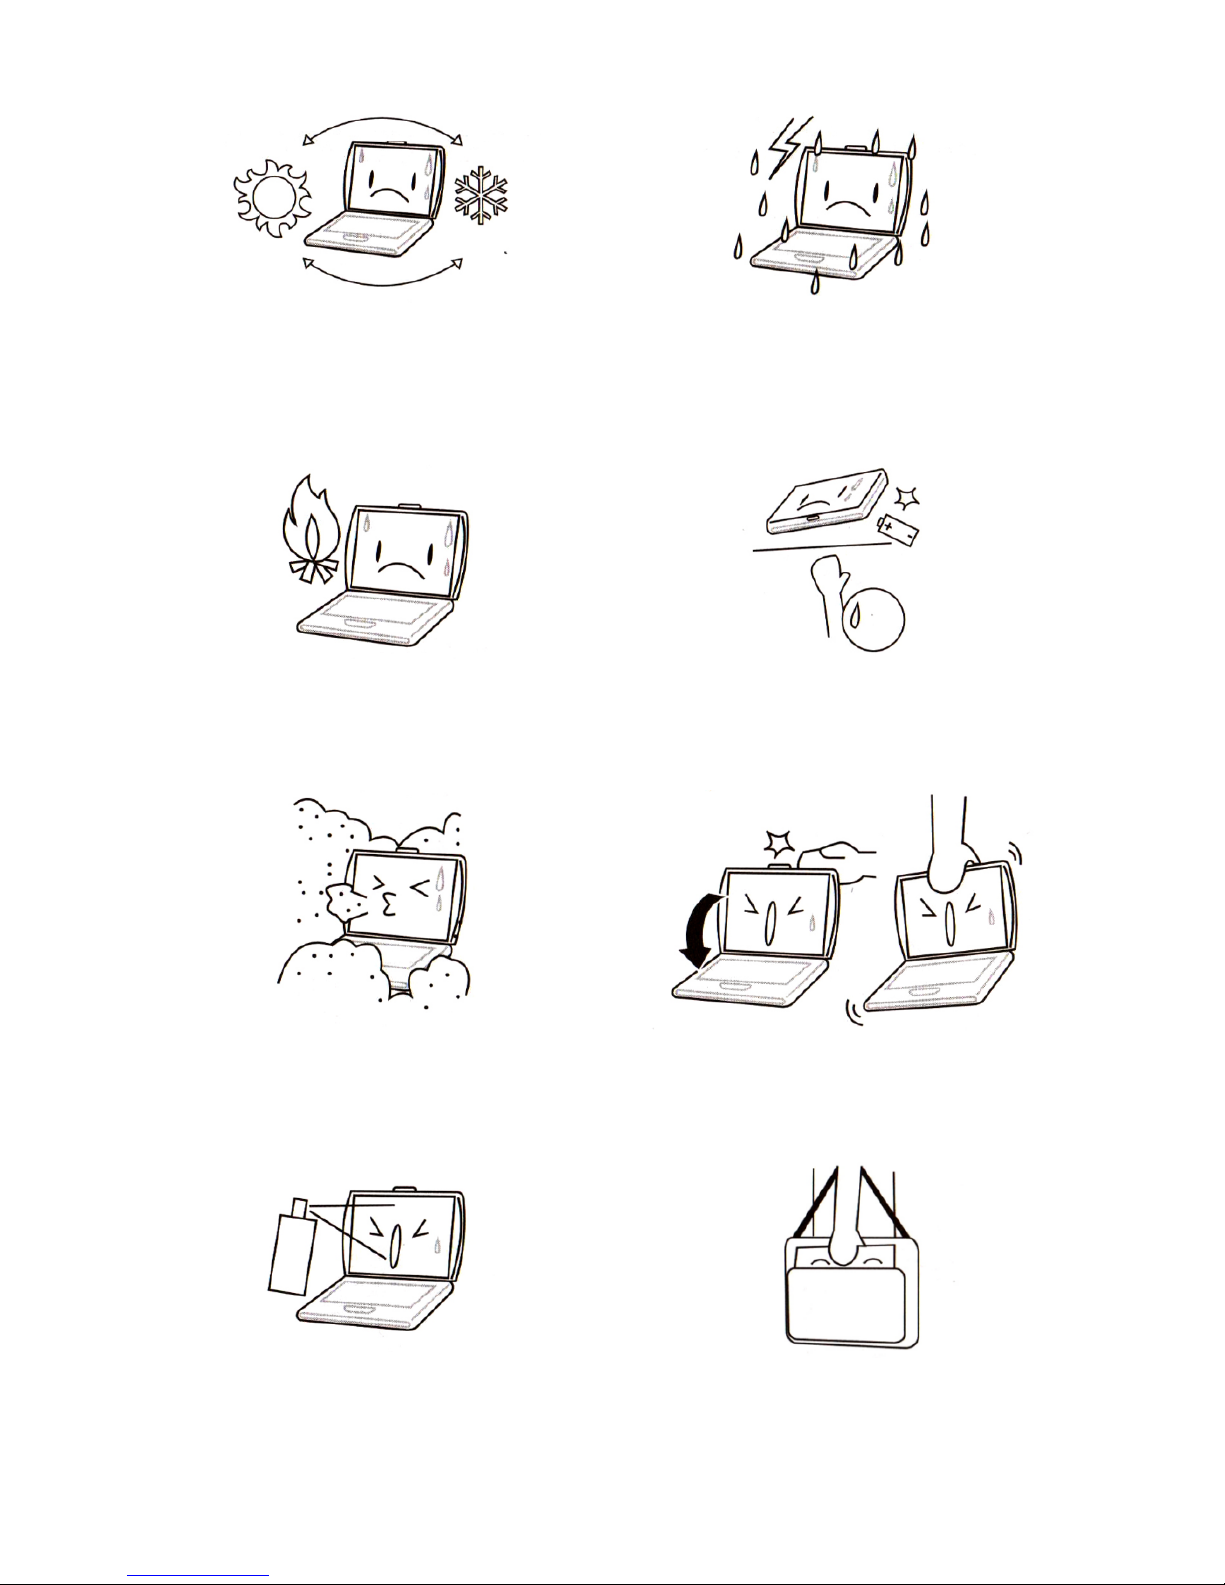
Avoid sudden changes in temperature or
humidity by keeping it away from A/C and
heating vents.
DO NOT expose the co m p ute r to ra in or
moisture.
DO NOT place near fire or other sources of
heat.
DO NOT tampe r with the batteries. K eep them
away from children.
DO NOT expose to dust and/or corrosive
chemicals.
DO NOT slam y o ur no te bo o k shut and never
pick up or hold your notebook by the display
DO NOT spray water or any other cleaning
fluids directly on the display.
If you are traveling with your computer,
remember to carry it as hand luggage. Do not
check it in as baggage.
Page 6

5
Chapter 1
Introduc ing the Not ebook PC
Components
This chapter explains the hardware features of the computer. To see a
list of installed hardware in the computer:
1. Select Start > Settings > System > About.
2. In the right pane of the window, select Device Manager.
You can also add hardware or modify device configurations using Device
Manager.
Page 7
6
T o p Components
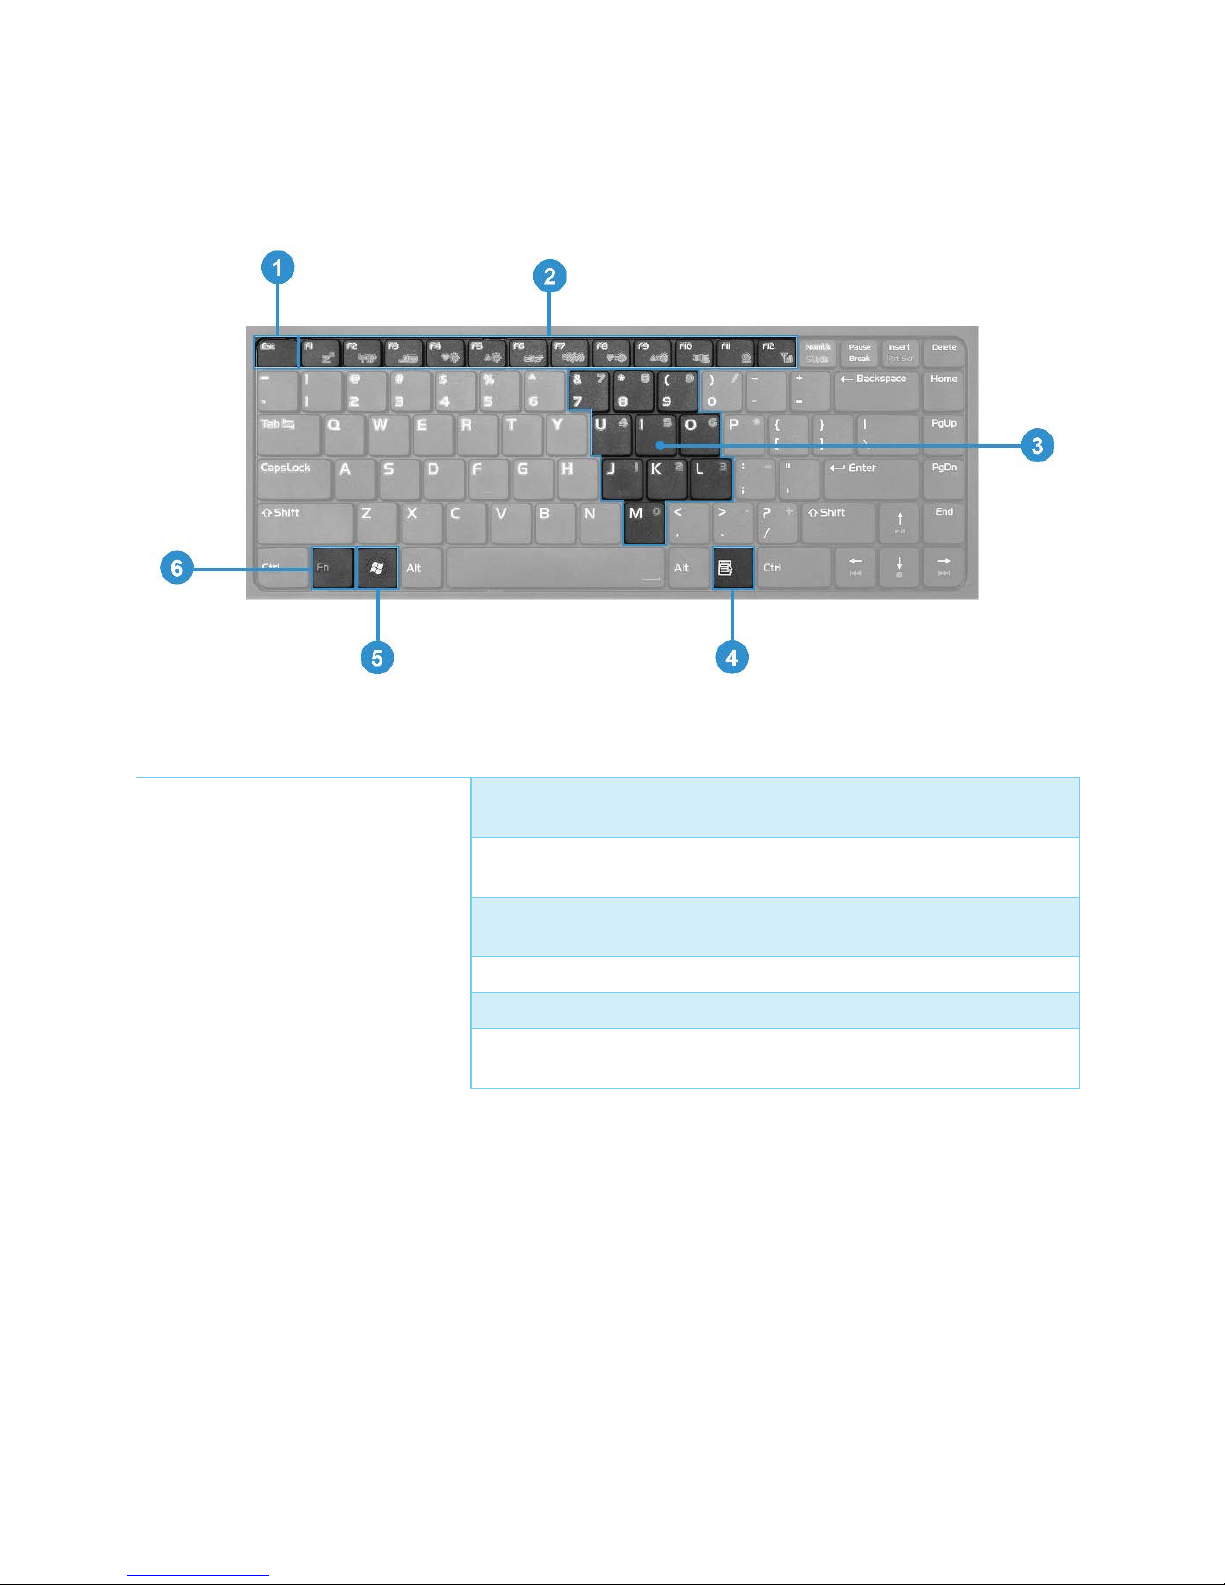
Keys
Components
Description
1. esc key
Displays system inform ation when pressed in combination
with the fn key
2. Function key
Execute freq ue ntly use d s y s tem functions w he n pres s e d in
combinatio n w ith the fn key.
3. Embedded numeric keypad
keys
Can be used like the keys on an external numeric keypad.
4. Windows applications key
Displays a s ho rtcut m enu f o r ite m s b ene ath the po inte r
5. Windows logo key
Displays the Microsoft Windows Start menu.
6. fn key
Executes frequently used s y s tem functions w he n pres s e d in
combinatio n w ith a f unctio n k ey o r the e s c ke y.
Page 8
7
TouchPad
Components
Description
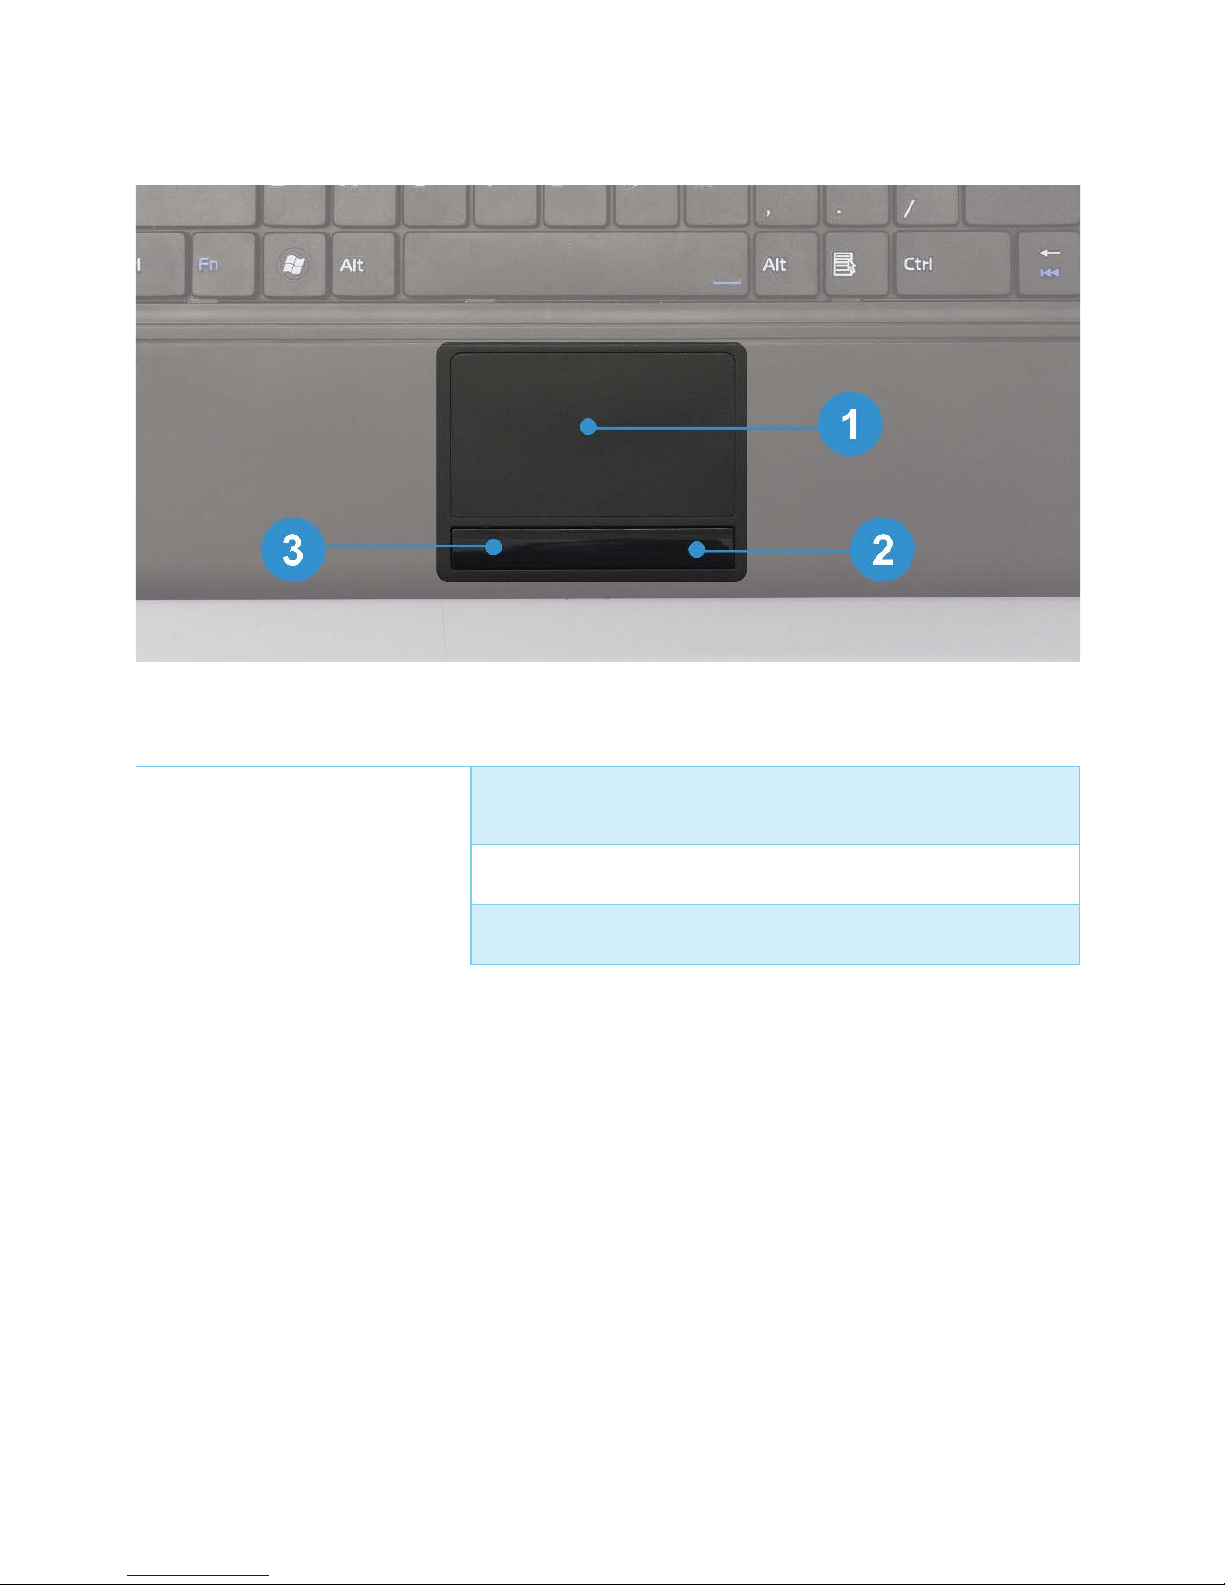
1. TouchPad
Moves the p o inte r and s e le cts o r acti v ate s ite m s o n the
screen. Can be se t to pe rf o rm o the r m o us e functio ns , s uch
as scrolling, selecting, and double clicking.
2. Right TouchPad button
Functions like the right butto n o n an e x terna l m o us e .
3. Left TouchPa d button
Functions like the le f t button on an ex te rnal mouse.
*This table describes default settings. To view and change TouchPad
preferences, select
Start > Settings > Devices > Mouse and
Touchpad > Additional Mouse Optio ns.
Page 9
8
Front compone n ts
Components
Description
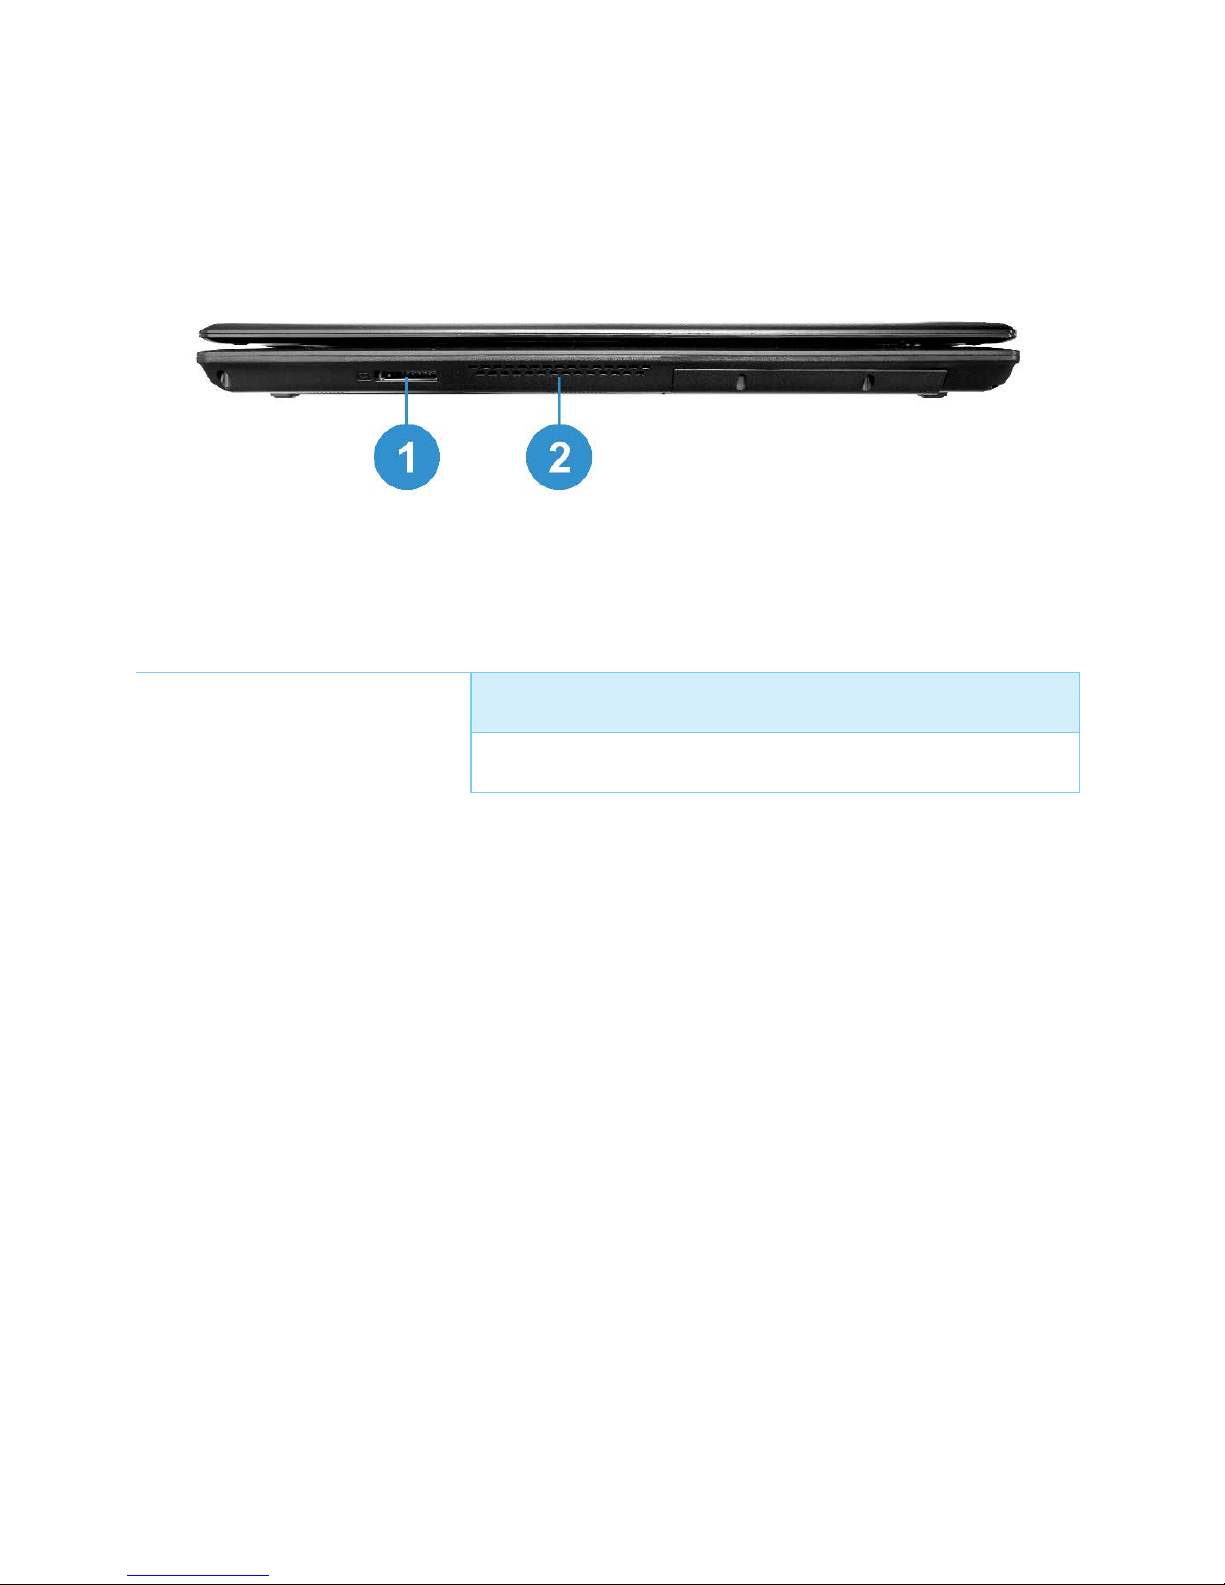
1. Memory Card Slot
Supports 7 optional digital card formats
2. Vent
Provides airflow to cool internal components.
CAUTION: To prevent ov erheating, do no t obstr uct v ents . Use the
computer only on a hard, flat surface. Do not allow another hard surface,
such as an adjoining optional printer, or a soft surface, such as pillows or
thick rugs or clothing, to block airflow.
NOTE: The computer fan sta rts up automaticall y to coo l internal
comp onents and prevent ove rheating. It is no rmal fo r the inte rnal fan to
cycle on and off during routine operation.
Page 10
9
Right Components
Components
Description
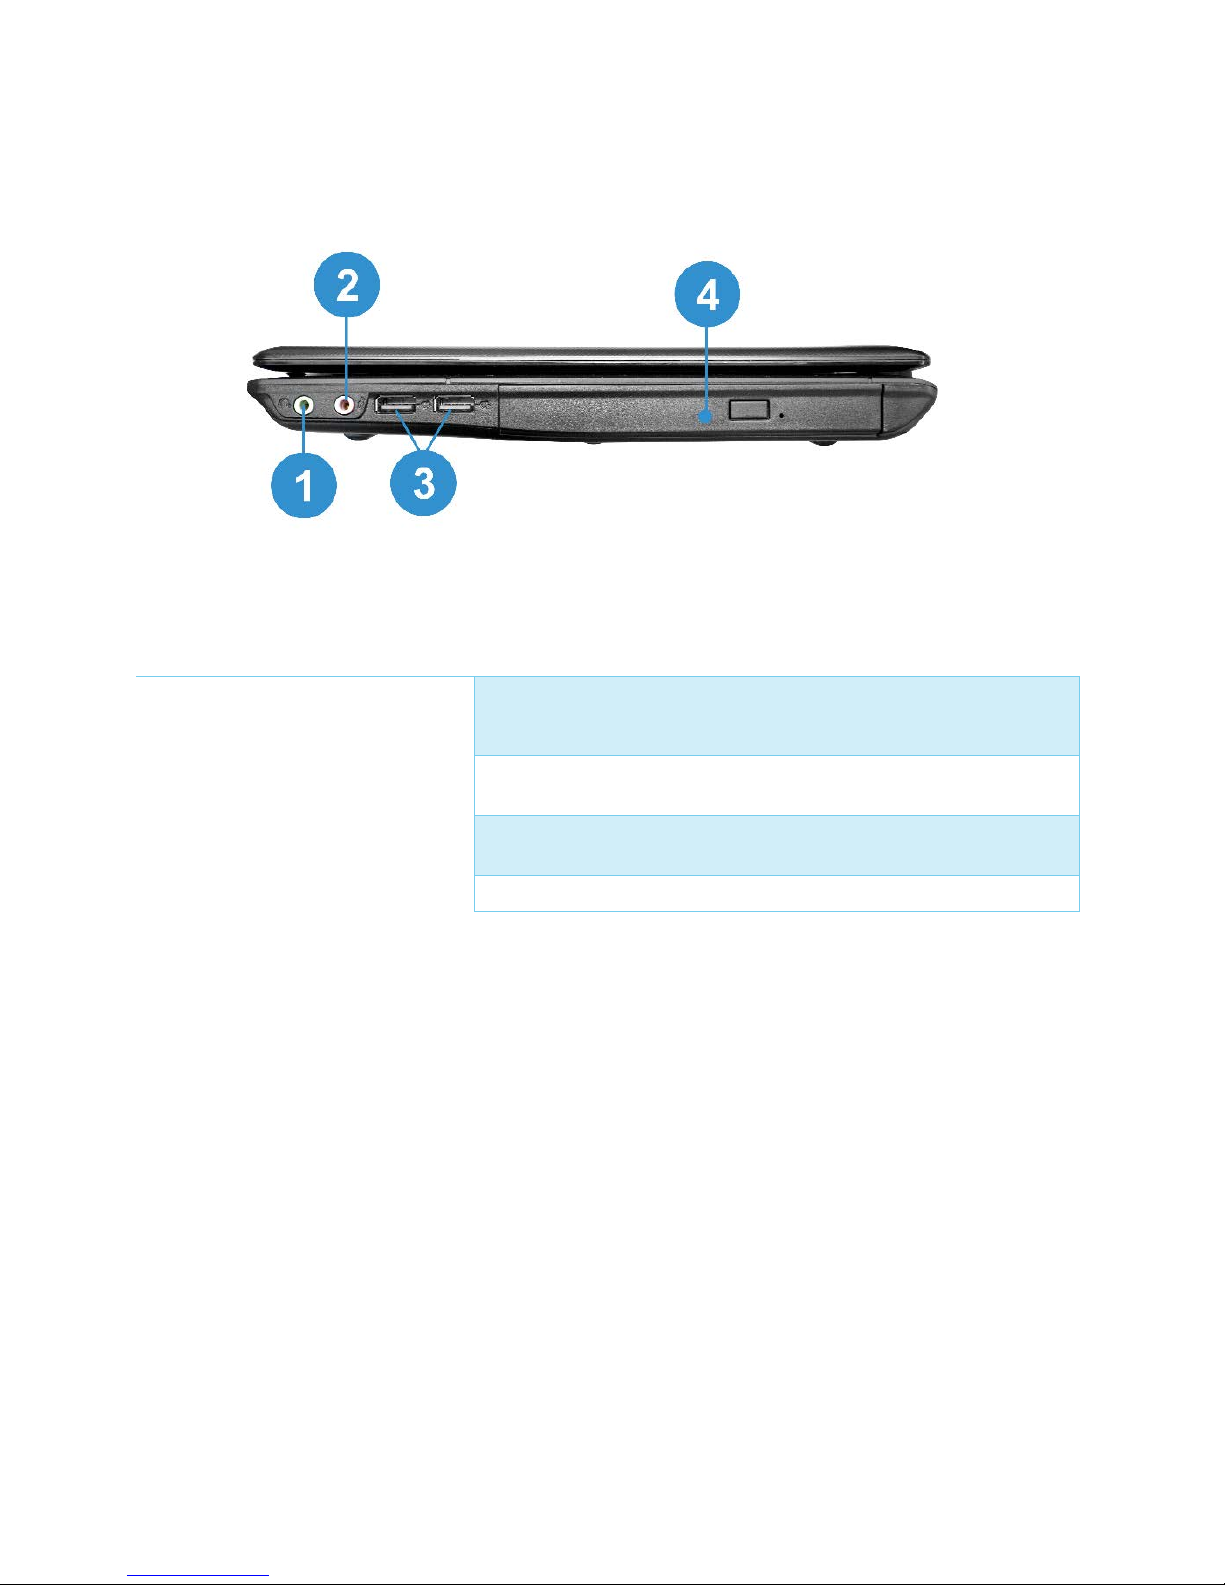
1. Audio-out (headpho ne ) ja ck
Produces sys te m s o und w hen co nne cted to o p tio na l powered
stereo speakers, headphones, ear buds, a headset, or
television audio.
2. Audio-in (microphone) jack
Connects an op tio na l co m pute r hea ds et microphone or a
microphone.
3. USB 2.0 ports
Connects an op tio na l USB device.
4. Optical drive
Reads an optical disc.
Page 11
10
Left Components
Components
Description
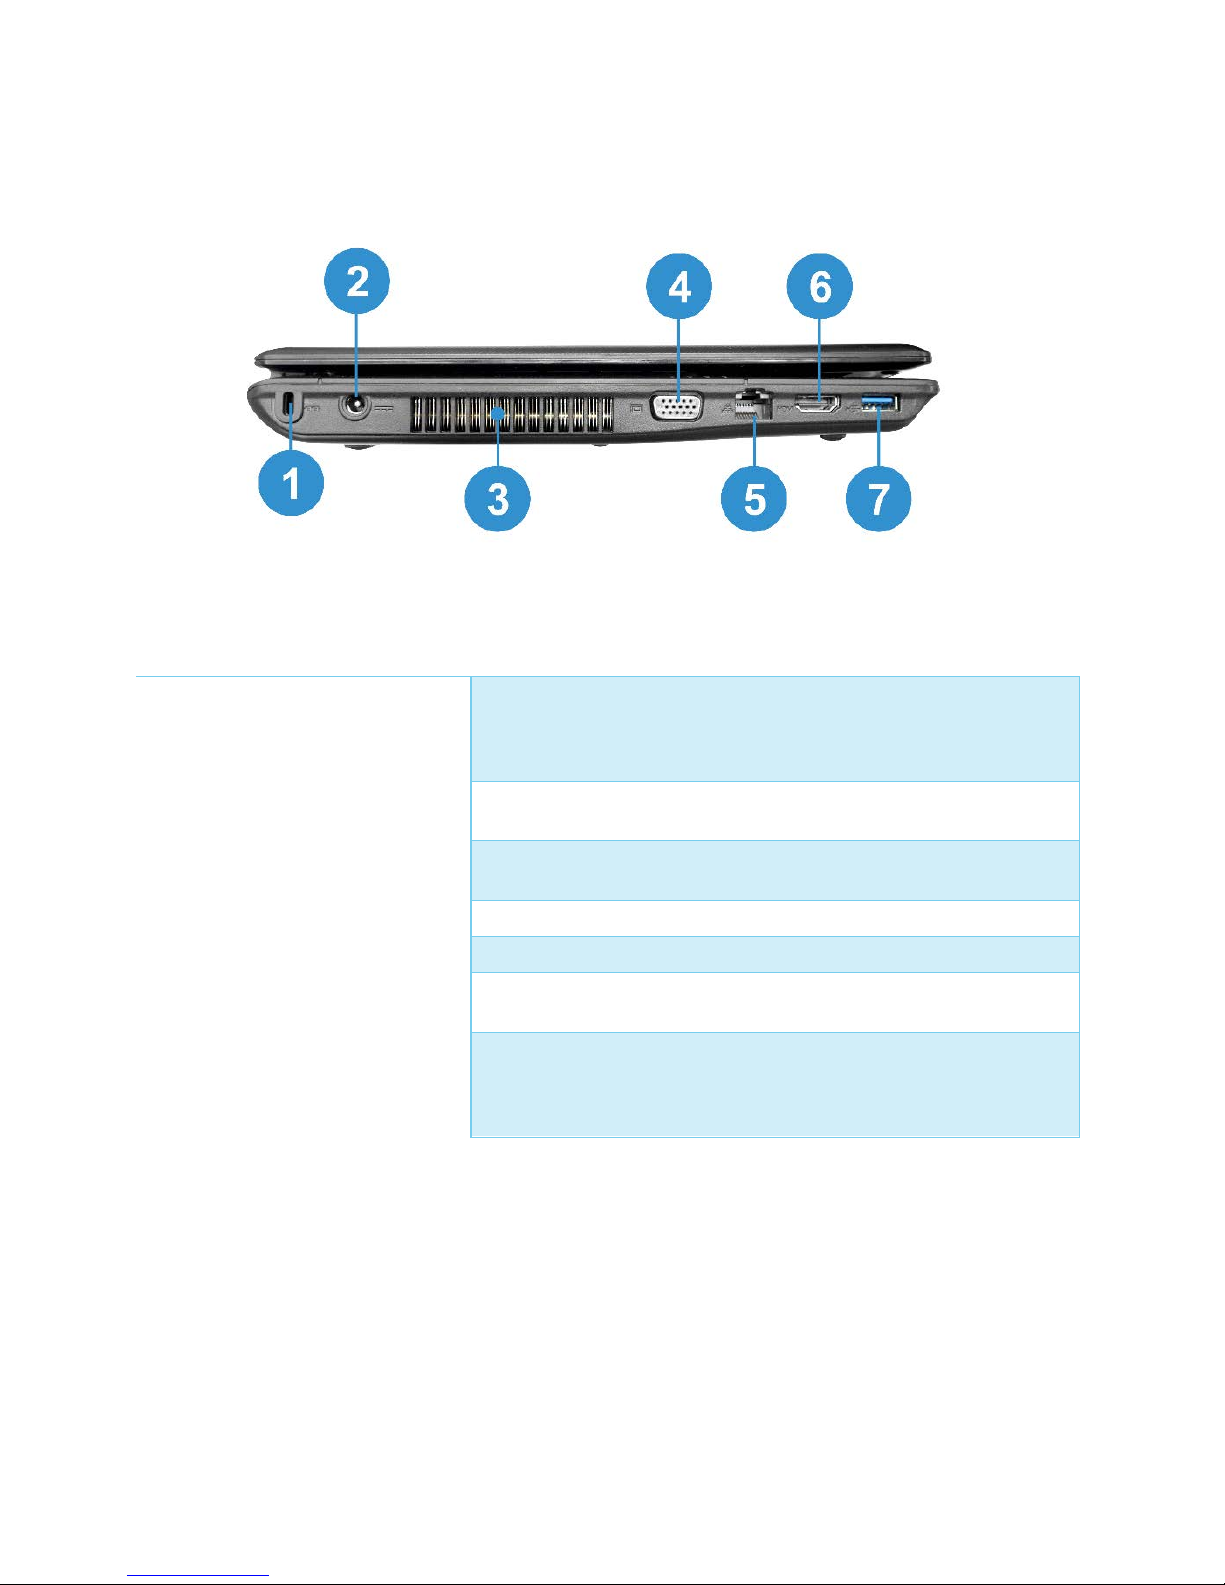
1. Security cable slot
Attaches an o p tio n al s ecurity ca bl e to the co m p uter.
NOTE: The security cable is designed to act as a deterrent,
but may no t prevent the computer from being mis handled or
stolen.
2. Power connector
Connects an AC adapter or an optional power adapter.
3. Vent
Provides airflow to cool internal components.
4. Externa l V G A p o rt
Connects an ex ternal moni to r.
5. RJ-45 (network) ja ck
Connects a netwo rk cable.
6. HDMI Po rt
Connects an ex ternal moni to r.
7. USB 3.0 Port
USB 3.0 adds the new transfer rate referred to as
SuperSpee d USB (SS) that ca n trans fer data at up to 5 Gbit/s
(625 MB/s), which is about ten times as fast as the USB 2.0
standard
Page 12
11
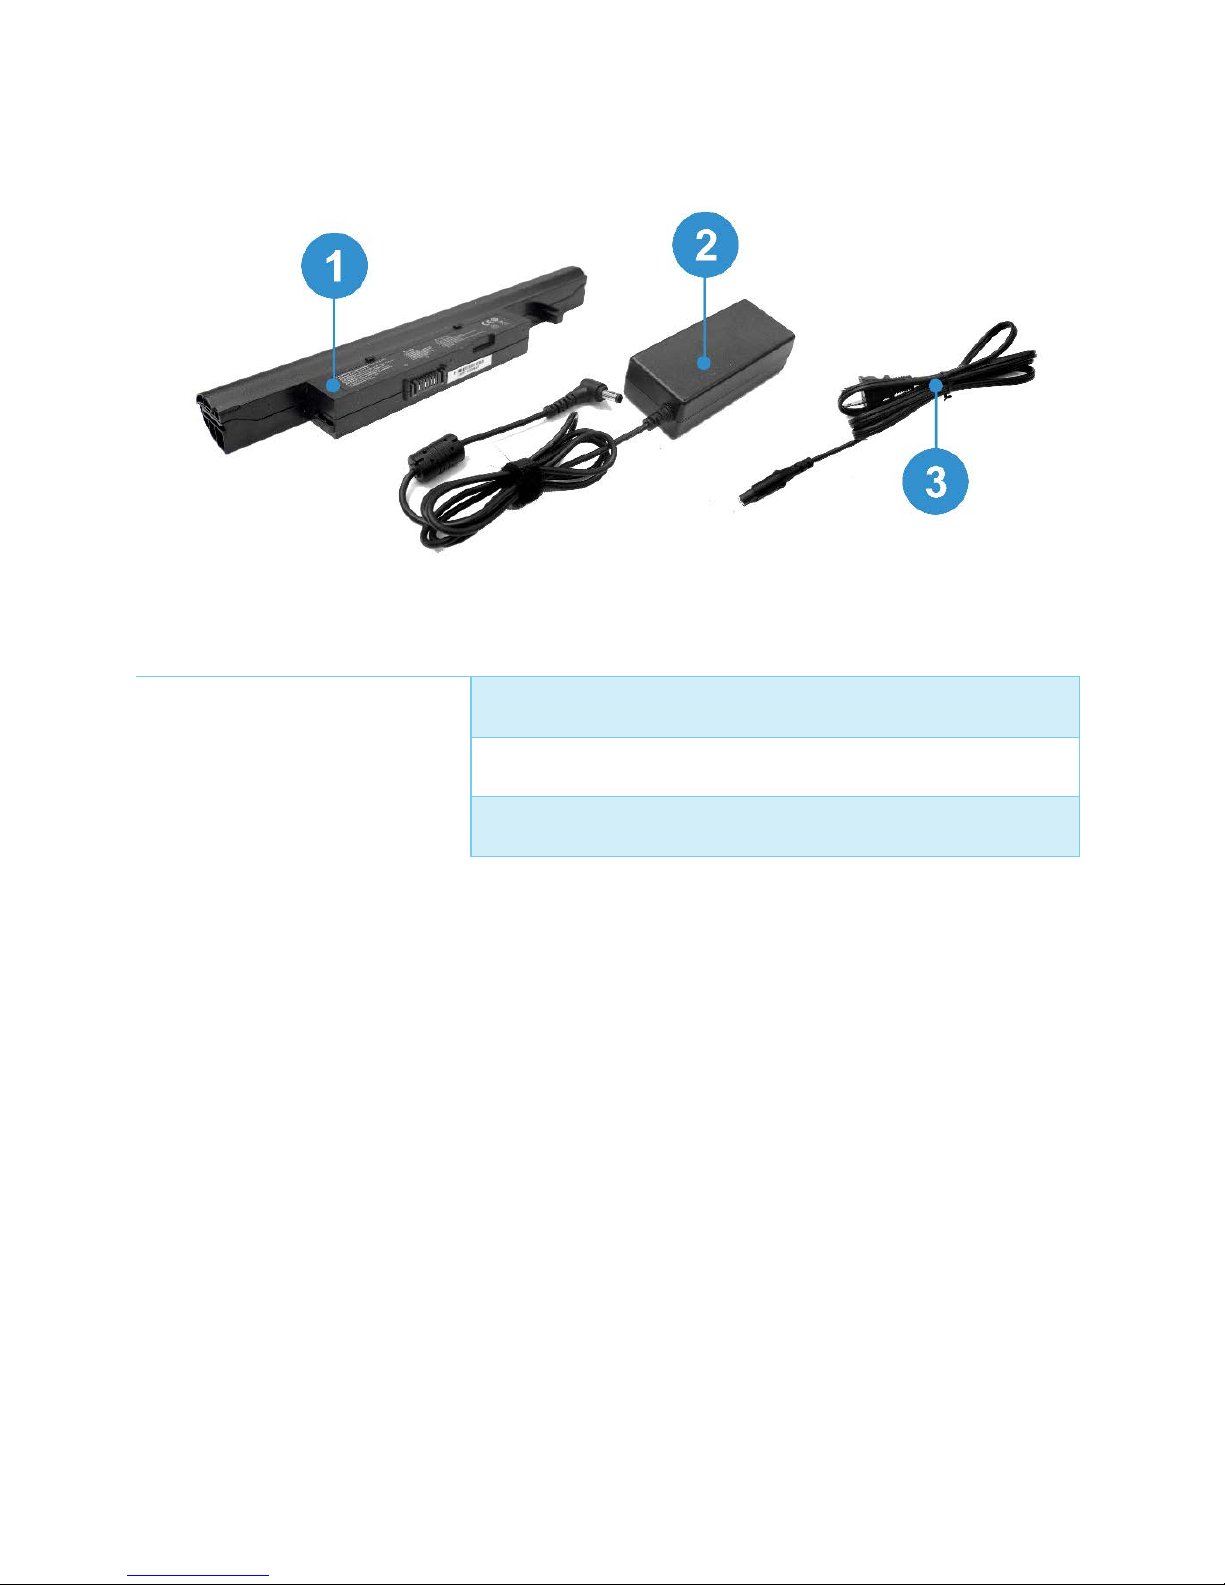
Additional Hardware Components
Components
Description
1. Battery Pa ck
Powers the co mputer when the computer is not conne cted to
external power.
2. AC adapter
Converts AC power to DC power.
3. Power co rd
Connects an AC adapter to an AC outlet.
Page 13
12
Chapter 2
Preparing your Notebook PC
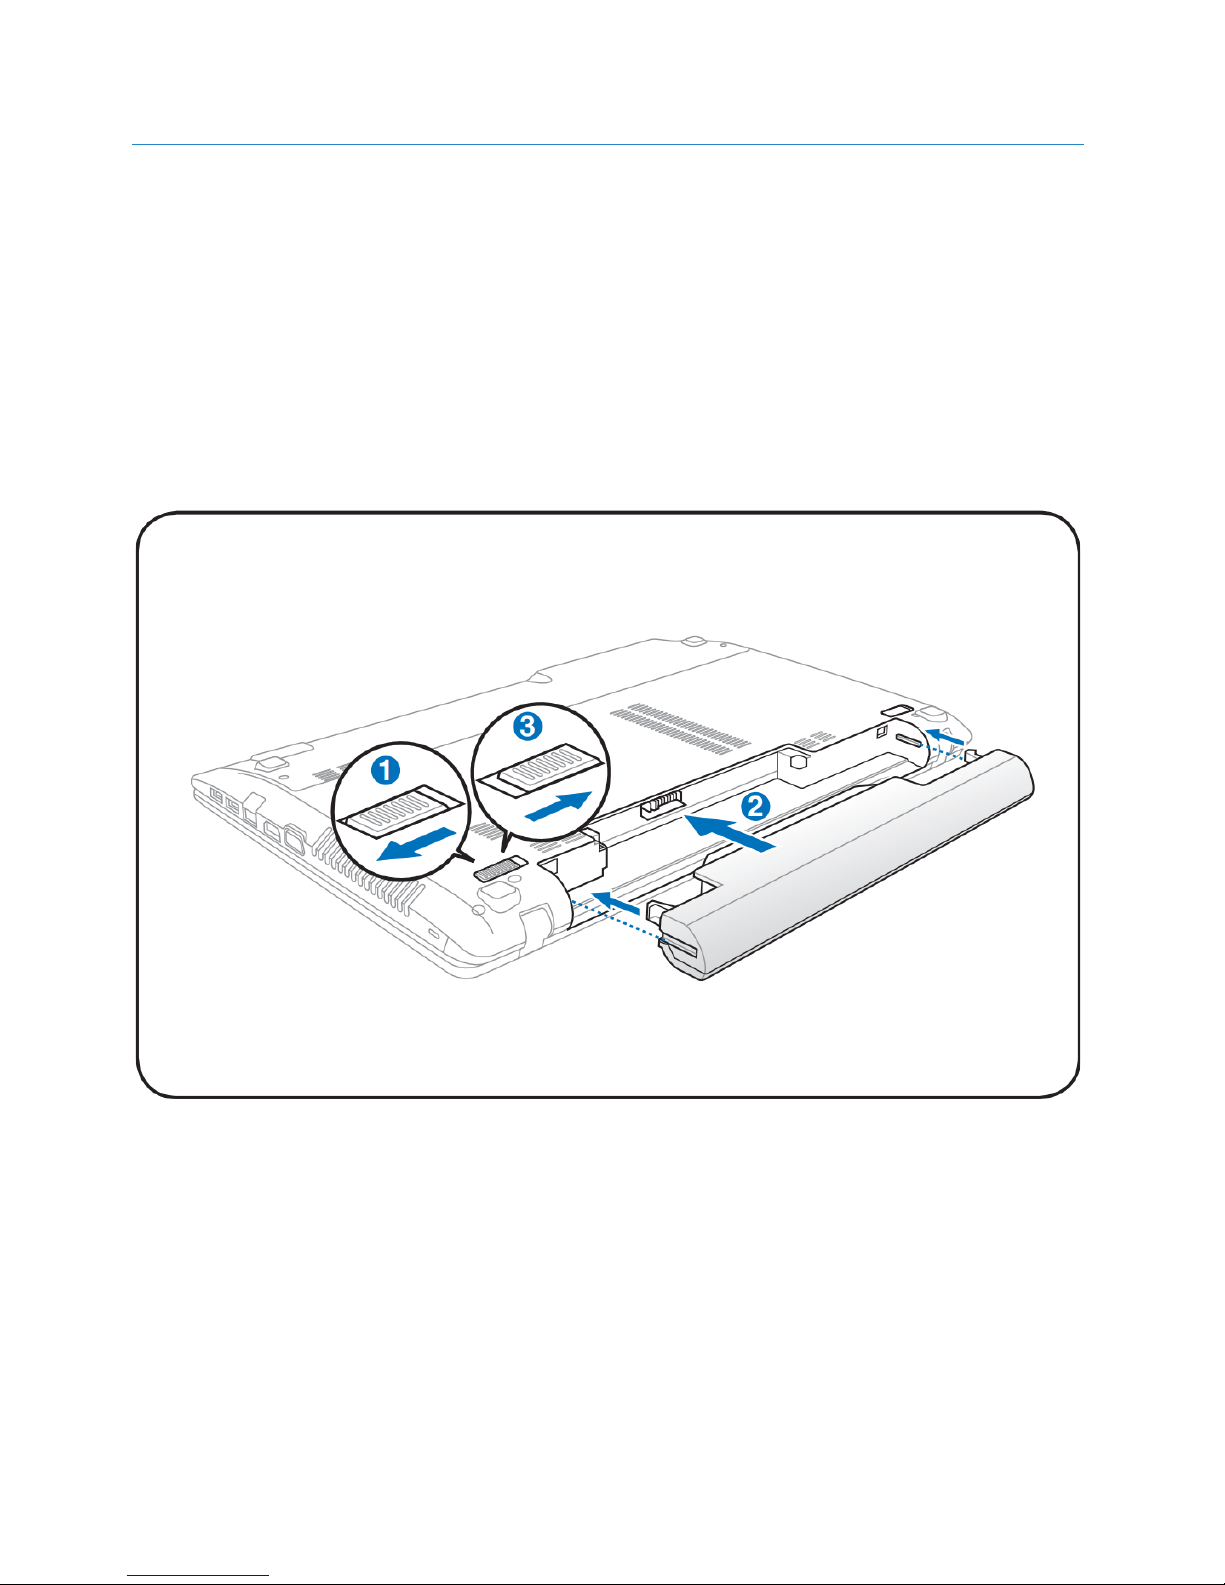
These are only quick instructions for using your notebook PC.
Installing Battery Pack
Page 14
13
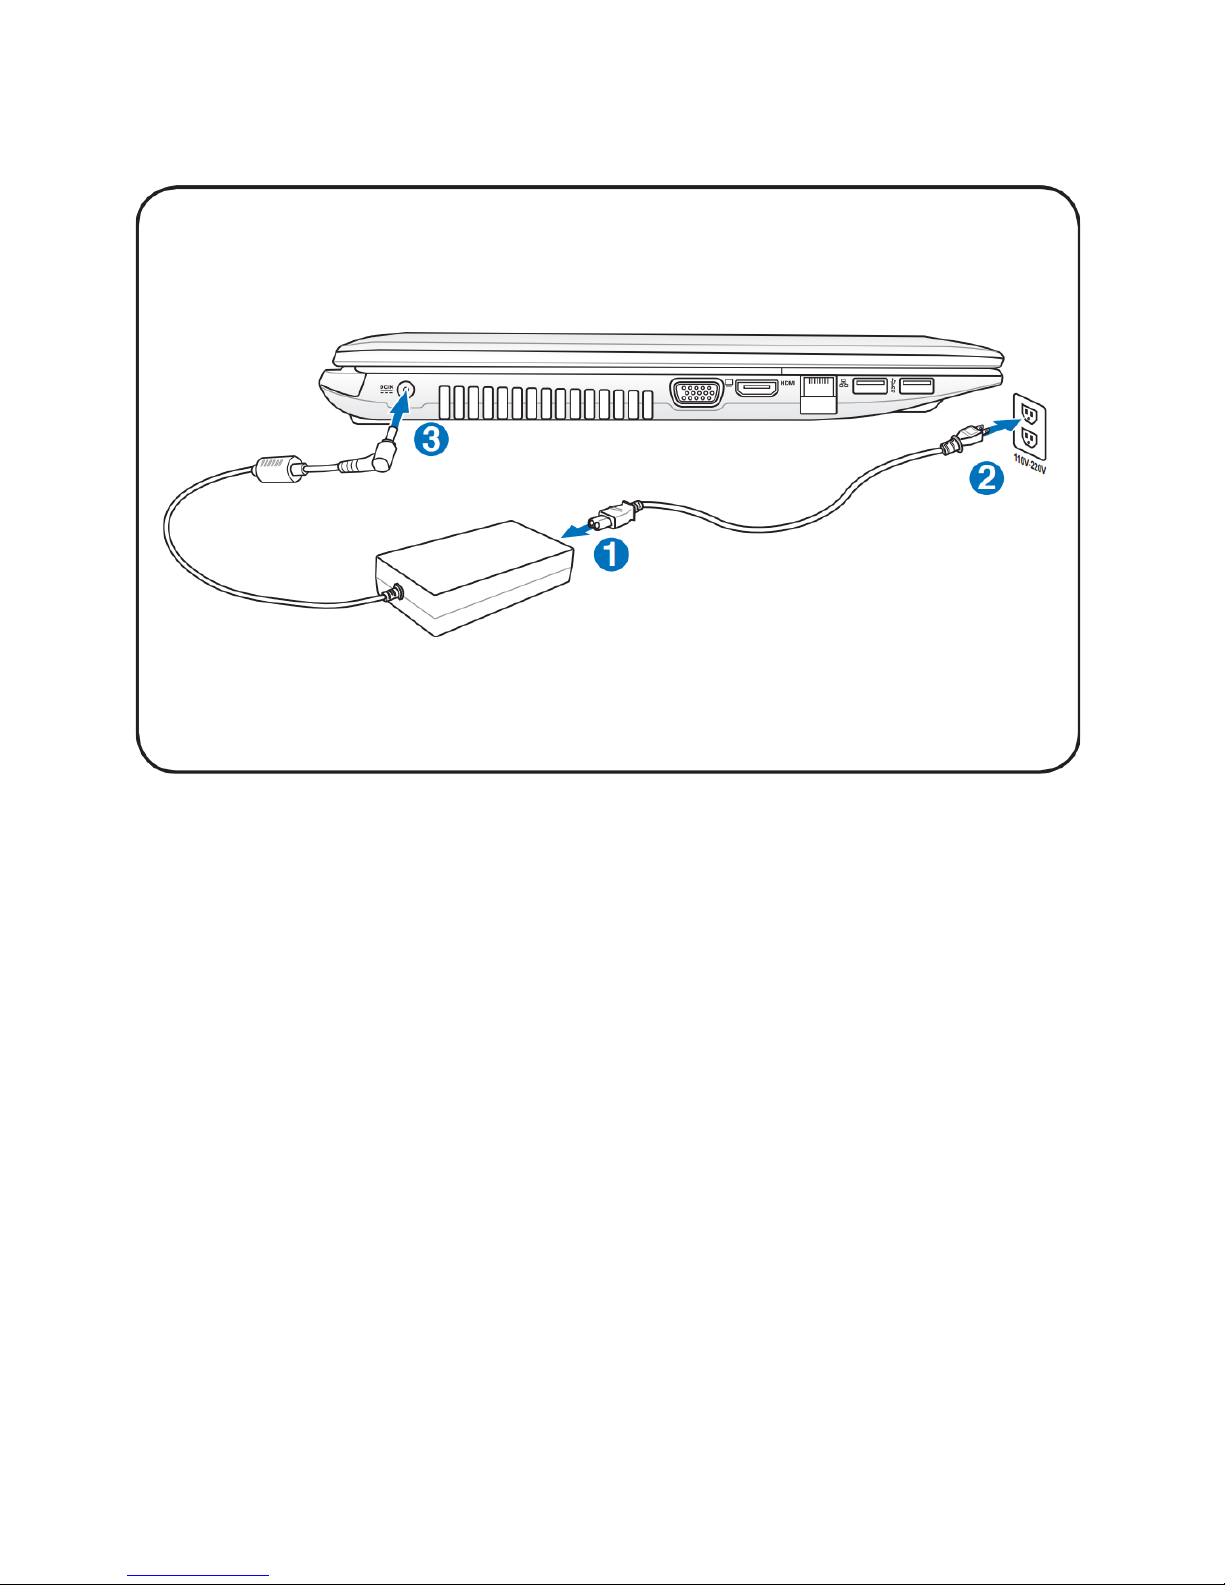
Connecting the Power Adapter
Page 15
14
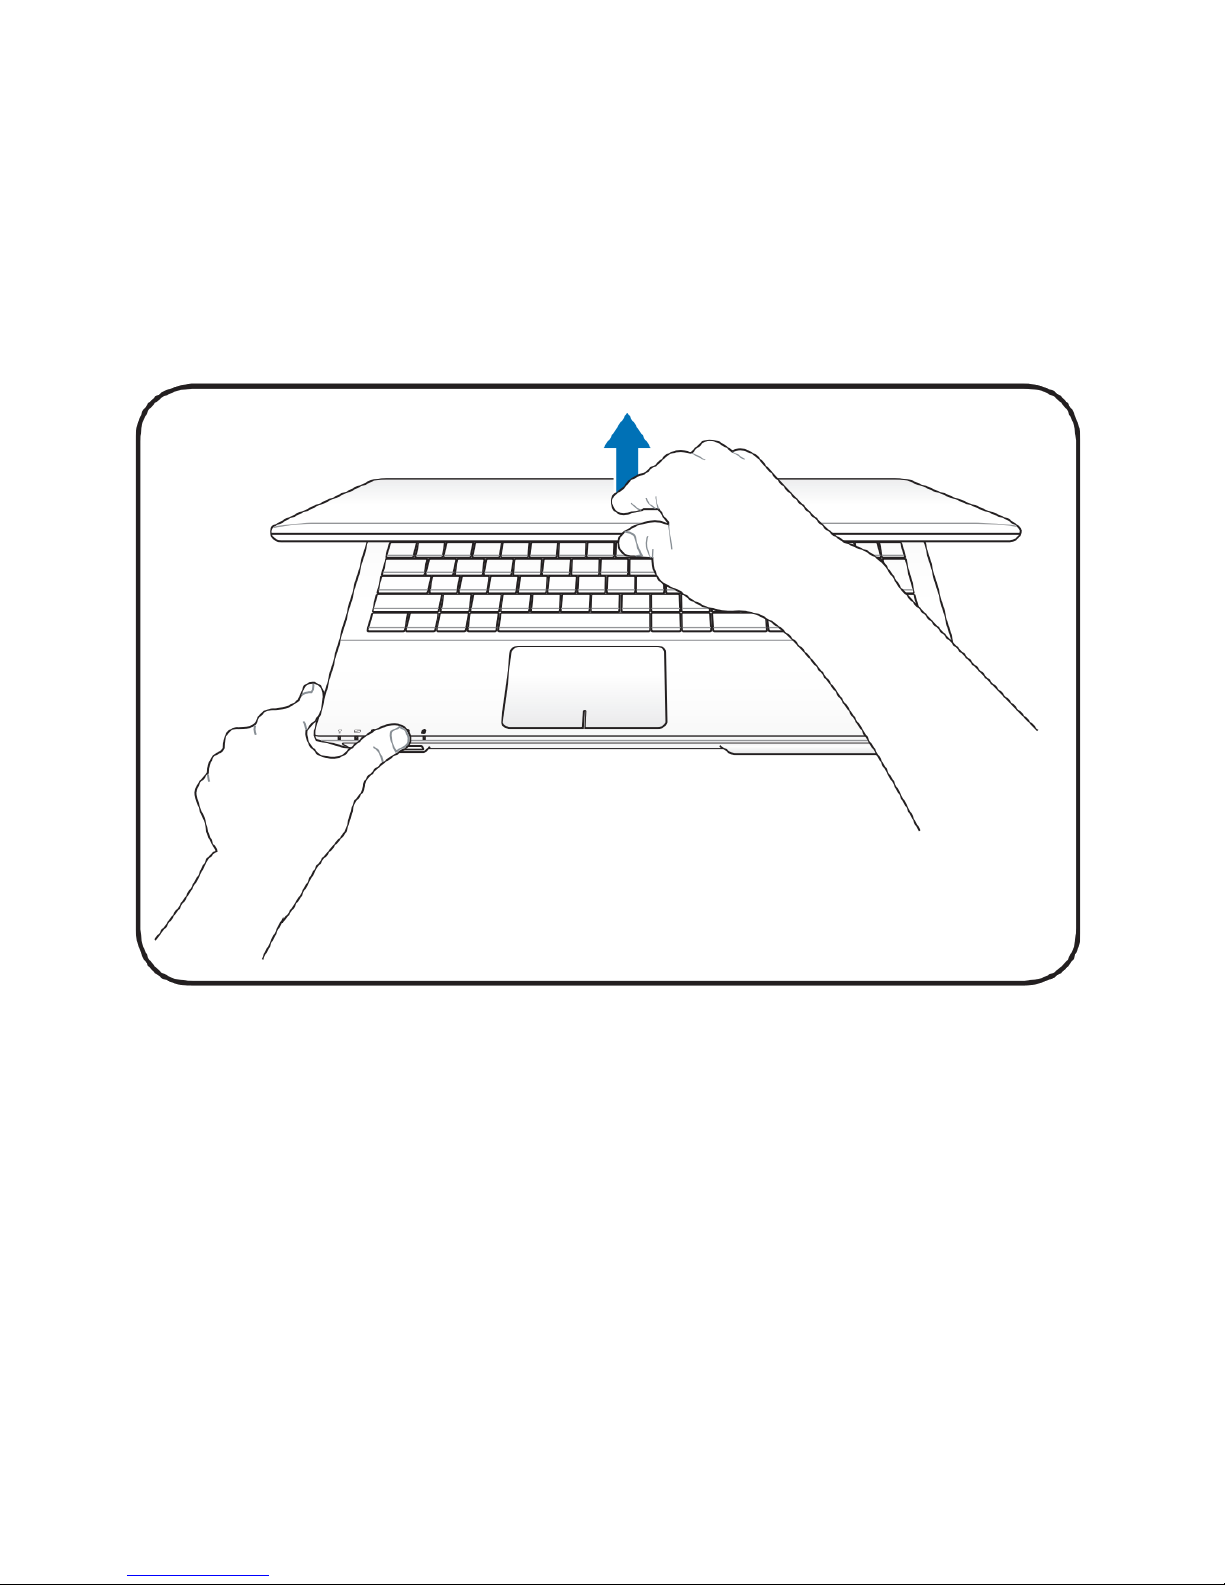
Opening the Display Panel
1. Carefully lift up the display panel with your thumb.
2. Slowly tilt the display panel forward or backward to a comfortable
viewing angle.
Page 16
15
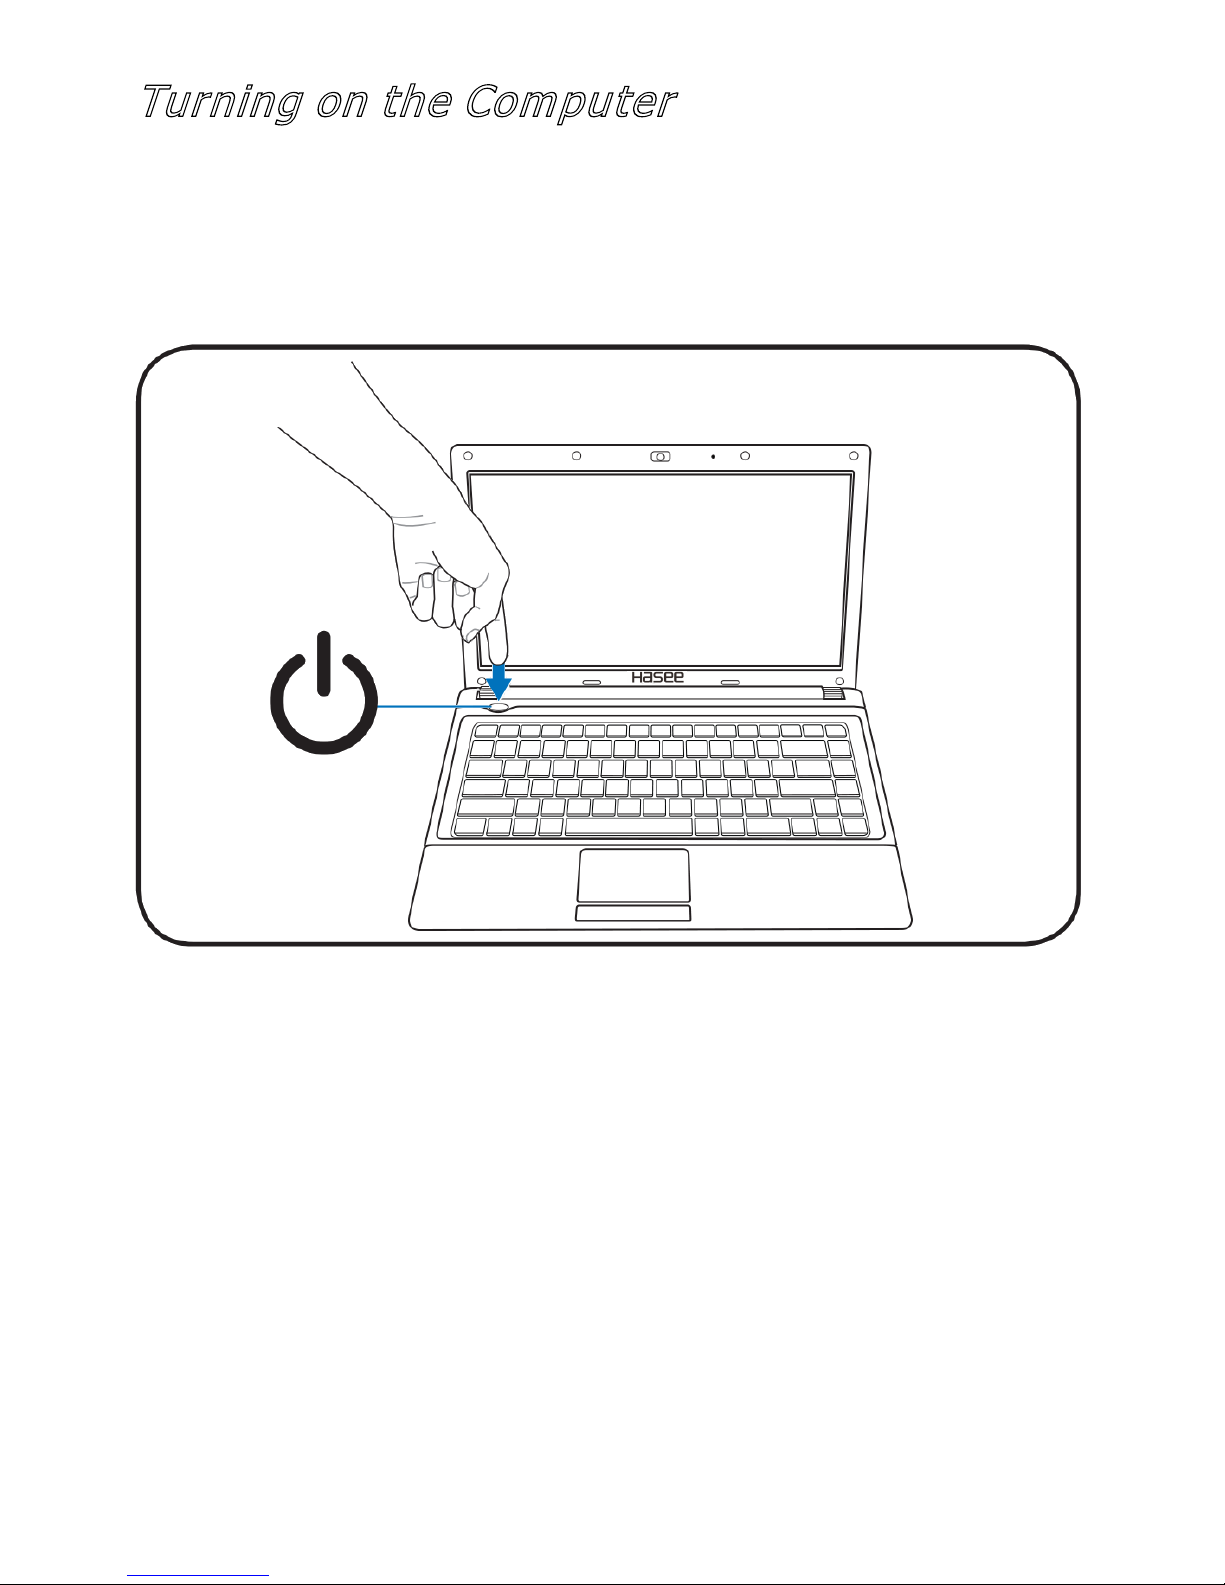
Turning on the Com puter
1. Push and release the power button located beneath the display
panel.
Page 17

16
Chapter 3
Using the Notebook PC
Touchpad
Using the Touchpad
To move the poin t er, sli de your finger ac ross the Touchpad surface
in the direction you want the pointer to go. Use the left and right Touchpad
buttons as you would the left and right buttons on an external mouse. To
scroll up and down usin g the Touchpad scroll zone, slide your finger up or
down over the grooved lines on the Touchpad.
Using an external mouse
An extern a l US B mouse can be conn e c te d to the computer using
one o f the US B p orts on t he comput er. A USB mouse can also be connected
to the syst em u sing the c onnectors on an optional ex p an sion product.
Setting Touchpad preferences
Mouse Properties in Microsoft® Windows® allows you to customize settings
for pointing devices, including
• Touchpad tapping, which enables you to tap the Touchpad once to
select an object or twice to double-click an object (enabled by
default).
Page 18

17
• Edge motion , whi ch ena bl es you to continue to scroll even though
your finger has reached the edge of the Touchpad (disabled by
default).
• Button preference, which all ows you t o switch bet w een lef t-hand
and ri ght-hand use (right-hand preference is enabled by default).
Other featur es, such as mouse sp eed preferences and mouse trai ls, are
also found in Mouse Properties.
To access Mou se Properties, selec t Start > Settings > Devices >
Mouse and Touchpad.
Keyboard
The following sections provide information on the keyboard features
of the not eb ook .
Hotkeys
Hotkeys are combinations of the fn key (1) and either the esc key
(2) or one of the function keys (3). The icons on the f1 through f12 keys
represent the hotkey functions. Hotkey functions and procedures are
discussed in the following sections.
Components
Description
1. fn + F1
Places the noteb o o k in Sus pe nd m o de. Pressing the Power
button re turns it to activ e mode.
2. fn + F2
Enables or disables the wireless network connection and
Bluetooth.
3. fn + F3
Allows you to change your selection of where to send your
display video. Each time you press the combination of keys
you will step to the next choice. The choices, in order, are:
built-in display panel only, both built-in display panel and
external monitor, or external monitor only.
4. fn + F4
Decreases the screen Brightness.
Page 19

18
5. fn + F5
Increases the s creen Bright ne s s .
6. fn + F6
Enables or disables the touchpad.
7. fn + F7
Mutes the com puter's volume.
8. fn + F8
Decreases the computer's volume.
9. fn + F9
Increases the co m p uter's volum e .
10. fn + F10
Enables or disables display panel.
11. fn + F11
Enables or disables the built-in camera.
12. fn + F2
Enables or disables the 3G network connection.
Hotkey procedures
To use a hotkey c omm and on the compu ter keyb oard, ei ther
• Briefly press the fn key, and then briefly press the second key of the
hotkey command or,
• Press and hold down the fn key, briefly press the second key of the
hotk ey command, and then release b oth keys at the sam e time .
Keypad
The computer has an embedded numeric keypad and also supports
an optional external numeric keypad or an option al external keyb oard that
includes a numeric keypad.
Using the embedded numeric keypad
The 15 keys of the embedded numeric keypad can be used like the
keys on an external keypad. When the embedded numeric keypad is turned
on, each key on the keypad performs the function indicated by the ico n in
the upper-right corner of the key. Enabling and disabling the embedded
numeric keypad Press num lk to enable the embedded numeric keypad.
The num lock light is turned on. Press num lk aga i n to return the keys to
their standard keyboard functions.
Page 20

19
Power Sources
Your computer h as tw o type s of po w er sources: a L ith ium -Ion
battery or an AC adapter .
CONNECTING THE POWER ADAPTERS
The AC adapter provides power for operating your notebook PC and
charging the battery.
Connecting the AC Adapter
1. Plug t he DC output cab l e into the DC power jack of y our notebook
PC.
2. Plug the AC adapter into an AC electrical outlet.
Switching from AC Adapter Power to Battery
Power
1. Be sure that you have at least one charged battery installed.
2. Remove the AC adapter. Your notebook will automatically switch
from DC power to battery power.
Note: The Lithium-Ion battery is not charged upon purchase. Initially, you
will nee d to conn ect the AC adapter to us e you r notebook PC.
Page 21

20
RECHARGING THE BATTERY
The Lithium-Ion bat tery is recharged intern ally using t he AC adapter. To
recharge the battery, make sure the battery is installed and the computer is
connected to the AC adapter. There is no "memory effect" in Lithium-Ion
batteries; the re fore, you do not need to disch arge th e ba ttery completely
before recharging. The charge times will be significantly longer if your
notebook PC is in use while the battery is charging. If you want to charge
the battery more quickly, put your computer into Suspend mode or turn it
off while the adapter is charging the battery.
Low Battery State
When the battery charge is low, a notification message appears. If you do
not respo nd to the low batter y m essag e, the batte ry continues to discharge
until it is too low to operate. When this happens, your notebook PC goes
into Suspend mode. There is no g uar an tee y our data will be saved onc e th e
notebook reaches this point.
Caution: To protect your notebook from damage, use only the power
adapter that came with it because each power adapter has its own power
output rating.
Once your notebook PC goes into Suspend mode as a result of a
dead battery, you will be unable to resume operation until you provide a
source of power either from an adapter or a charged battery. Once you
have provided power, you can press the S uspend / R e s ume button to
resu me operation. In Suspend mode, your data is ma intained for some
time, but if a power source is not provided promptly, the Power indicator
stops flashing and then goes out, in which case you have lost the data that
was no t saved. Once you provide power, you can continue to use your
computer while an adapter charges the battery.
Page 22

21
Battery Replacement
There is danger of explosion if an incorrect battery type is used for
replacement. For computers equipped with a replaceable lithium-ion ba tte ry
pack, the following applies:
• If the battery is placed in an OPERATOR ACCESS AREA, there shall
be a ma r k ing close to the b attery , or a sta tement in both the
opera t ing and the servicing i nstruct i ons;
• If the battery is placed elsewhere in the computer, t h ere shall b e a
marking close to the battery or a statement in the servicing
instructions. The marking or statement shall include the following or
similar t ext:
Caution: Risk of explosion if battery is replaced with an incorrect type.
Dispose of used batteries according to the instructions.
Standby and hiberna tio n
Standby and hibernation are energy-saving features that conserve
power and reduce startup time. They can be initiated by you or by the
system. For more information, refer to "Initiating standby, hibernatio n o r
shutdown."
Standby
CAUTION: To avoid a complete battery discharge, do not leave the
computer in standby for ext ended periods. Connect the computer to an
external power source.
Standby reduces power to system components that are not in use.
When standby is initiated, your work is stored in random access memory
(RAM), and then the screen is cleared. When the computer is in standby,
Page 23

22
the power lights blink. When you resume from standby, your work returns
to th e screen where you left off.
CAUTION: To reduce the risk of information loss, save your work before
initiating standby.
Hibernation
CAUTION: If the configuration of the computer is changed during
hibernation, resuming from hibernation may not be possible. When the
computer is in hibernation: Do not connect the computer to or disconnect
the c ompute r from an e xpansion product . Do not add or r emove mem ory
modules. Do not insert or remove any hard driv es or optical drives. Do not
connect or disconnect external devices. Do not insert o r rem ove an ex t ern al
media card , s uch as a MultiMed iaCard.
Hibernation saves your work to a hibernation file on the hard drive,
and then shuts down the computer. The power lights are turned off. When
you restore from hibernation, your work returns to the screen wher e you
left off. If a power-on password has been set, the password must be
entered to res tor e fr o m hib ernation.
CAUTION: To reduce the risk of information loss, save your work before
initiating hibernation.
You can disa b le hibe rnation. However, if hibernation is disabled and
the system reaches a lowba tt er y co nd ition, the sy s tem will not a u tomaticall y
save your work while power is on or when standby has been initiated.
Initiating standby, hibernation or shutdown
The following sections explain when to initiate stan dby or
hibernation and when to shut down the computer.
Page 24

23
NOTE: Y ou c annot initiate an y type of n etworking communi c ations or
perfo rm an y computer functi ons wh i l e th e com pute r is i n sta ndby or
hibernation.
When you leave your work
When standby is initiated, your work is stored in random access
memory (RAM), and then the screen is cleared. When the computer is in
standby, it uses less power than when it is on. Your work returns instantly
to th e screen when you re s ume from sta ndby. Hibernation saves your work
to a hibernation file on the hard drive, and then shuts down the computer.
When the com pute r is in hi b e rn at i on, it uses much les s power than
when it is in standby. When the computer will be unused and disconnected
from external power for an extended period, shut down the computer and
remove the battery pack to extend the life of the battery pack. For details
on battery pack storage, refer to "Storing a battery pack."
When a reliable power supply is unavailable
Be sure that hibernation remains enabled, especially if you are
operating the computer on battery power and do not have access to an
external power supply. If the battery pack fails, hibernation saves your work
to a hibernation file and shuts down the computer. It is recommended that
if you pause your work when the power supply is uncertain, you take one of
the followin g actions :
• Save your work, and then initiate standby.
• Initiate hibernation.
• Shut down the computer.
Page 25

24
Drives
Optical drives
An optical drive, such as a DVD-ROM drive, supports optical discs
(CDs and DVDs). These discs are used to store or transport data and to play
music and movies. DVDs have a higher capacity than CDs. The computer
can read or write to optical drives as described in the following table.
If your d riv e has this
logo…
This is your
drive type…
Use you r drive for…
CD drive
Installing programs, playing audio CDs,
and accessing data.
CD-RW drive
Installing programs, playing audio CDs,
accessing data, and creating CDs.
DVD/CD-RW
drive
Installing programs, playing audio CDs,
accessing data, creating CDs, and
playing DVDs.
DVD drive
Installing programs, playing audio CDs,
playing DVDs, and accessing data.
DVD+RW
Installing programs, playing audio CDs,
playing DVDs, accessing data, and
recording video and data to DVD+R or
DVD+RW discs.
DVD R/RW
drive
Installing programs, playing audio CDs,
playing DVDs, accessing data, and
recording video and data to DVD+R,
DVD+RW, DV D-R, an d DVD-RW discs.
Page 26
25
Dual layer
DVD+RW
Installing programs, playing audio CDs,
playing DVDs, accessing data, and
recording video and data to double layer
DVD+R discs. Note: To use the double
layer capability of the double layer
recordable DVD drive, the blank DVDs
you purchase must state Double Layer,
Dual Layer, or DL. Using other types of
blank media will result in less capacity.
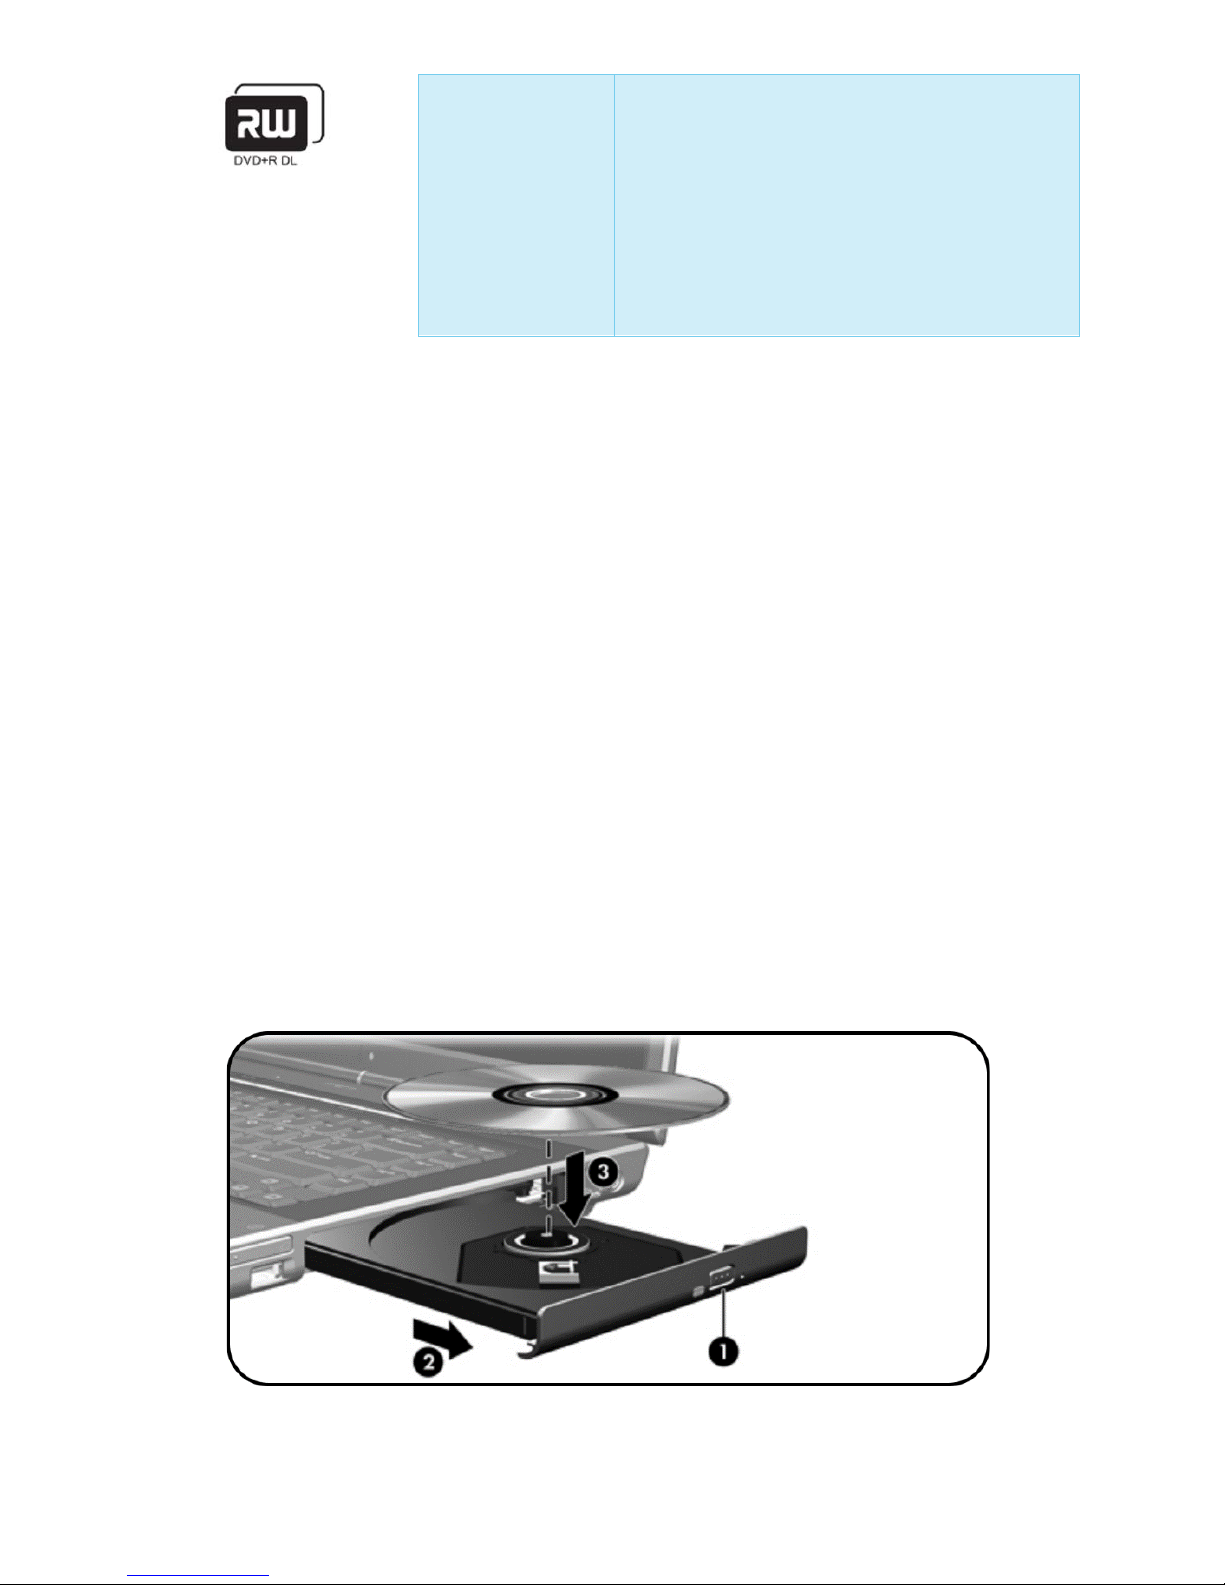
Inserting a CD or DVD
Inserting an optical disc
1. Turn o n t h e c omputer .
2. Press the release button (1) on the drive bezel to release the media
tray.
3. Pull out the tray (2).
4. Hol d th e CD or DVD by the edges to av oid tou ch ing the flat
surfaces, and position the disc over the tray spindle, with the labelside up. NOTE If the tray is not fully accessible, tilt the disc carefully
to position it over the spindle.
5. Gently press the disc (3) down onto the tray spindle until the disc
snaps into plac e.
Page 27

26
6. Close the media tray.
NOTE: A fter you inse r t a d isc, a short pause is no rmal. If y ou have not
selected a default media player, an AutoPlay dialog box opens. It
prom pts you to select how you want to use the me d ia cont ent.
Playing a CD
Use the music program or Windows Media Player o n your comp uter to:
• Play music CDs
• Create M P3 music files from you r mus ic CDs
• Edit music track information
• Use your music files to build a music library
• Listen to Internet Ra d io
Playing a DVD
A Digital Versatile Disc (DVD) is similar to a standard CD but has
greater data capacity. Because of this increased capacity, full-length movies,
several albums of music, or several gigabytes of data can fit on a single
disc. You can play DVDs with the DVD program or Windows M edia Pla yer on
your computer.
Creating CDs or DVDs
You can use the CD or DVD burning program on your computer to copy
tracks from a music CD to your hard drive, copy or create data CDs and
DVDs, create music CDs, create video DVDs, and more.
Page 28

27
External Devices
Using a USB device
Universal Serial Bus (USB) is a hardware interface that can be used
to connect a n optional extern al d ev ic e, s uc h as a U SB keyboard, mou se,
drive, printer, scanner, or hub, to the computer or to an optional expansion
product. A hub p rovides ad d itional USB ports for the system and can be
connected to the computer or to another hub.
Connecting a USB device
CAUTION: To prev ent damag e to the USB connectors, use minim al force to
connect a USB dev ice.
To connect a U SB d ev ic e to the co mp ut er , c on nect the USB cable of
the device to the USB port. The operating system will issue a sound to
indicate that a device has been connected.
NOTE: The first time you connect a USB device, the "Found New Hardware"
message is displayed in the notification area, at the far right of the taskbar.
Stopping a USB device
CAUTION: To prevent loss of information or an unr e sponsive sy st em, stop
the USB dev ice b efo re rem oving it.
To sto p a USB devic e:
1. Double-click the Safely Remove Hardware icon in the notification
area, at the far right of the taskbar.
2. Click the USB device listing.
Page 29

28
NOTE: To display the Safely Remove Hardware icon, click Show
Hidden Icons in the notification area.
3. Click Stop.
Required USB softwa re
Some USB devices may require additional support software, which is
usually included with the device. For more information about device-specific
software, refer to the user guide for the device.
Wireless LAN
Wireless LAN features
A wirel e ss co mpu ter includes Wi-Fi or Blueto oth® wireless capability
or both.
Th e se devices differ in the follow ing ways :
• Wireless computer can connect to wireless local area
networks (WLANs) in corporate offices, your home, and
public places such as airports, restaurants, coffee shops,
hotels, and uni versities. Hotspots are public places where
you can acces s a wir el e ss network. Contact your Internet
service provider (ISP) or search the Web for a list of
hotspots nea r you.
• A Bluetooth wireless compute r can conn ect to oth er
Bluetooth wireless-enabled devices such as computers,
phones, printers, headsets, speakers, and cameras.
NOTE: The computer may look different from the illustrations in this guide.
The location and number of butto ns, lights, and jacks vary by mode l .
Page 30

29
Wireless controls
The wire l ess butto n (fn + F 2) enables and disables Wi-Fi and
Bluetooth wireless devices, and the wireless light indicates the state of the
wireless devices.
You can enable and disable the wireless devices with the wireless
button. You can also enable and disable the wireless devices in the Setup
Utility.
Connecting to a WLAN
To connect to your WLAN:
1. Be sure that the Wi-F i device is on. If it is on, the wireless light is
on.
2. Be sure that your router is correctly installed and configured. For
instructions, refer to yo ur ro ut er user guide.
3. Use the Wirel es s Network Connection feature to con n ec t t he
comput er to the WLAN.
NOTE: Functional range for subsequent WLAN connections will vary,
depending on the computer WLAN implementation, router manufacturer,
and interference from walls and other electronic devices.
Local area networks
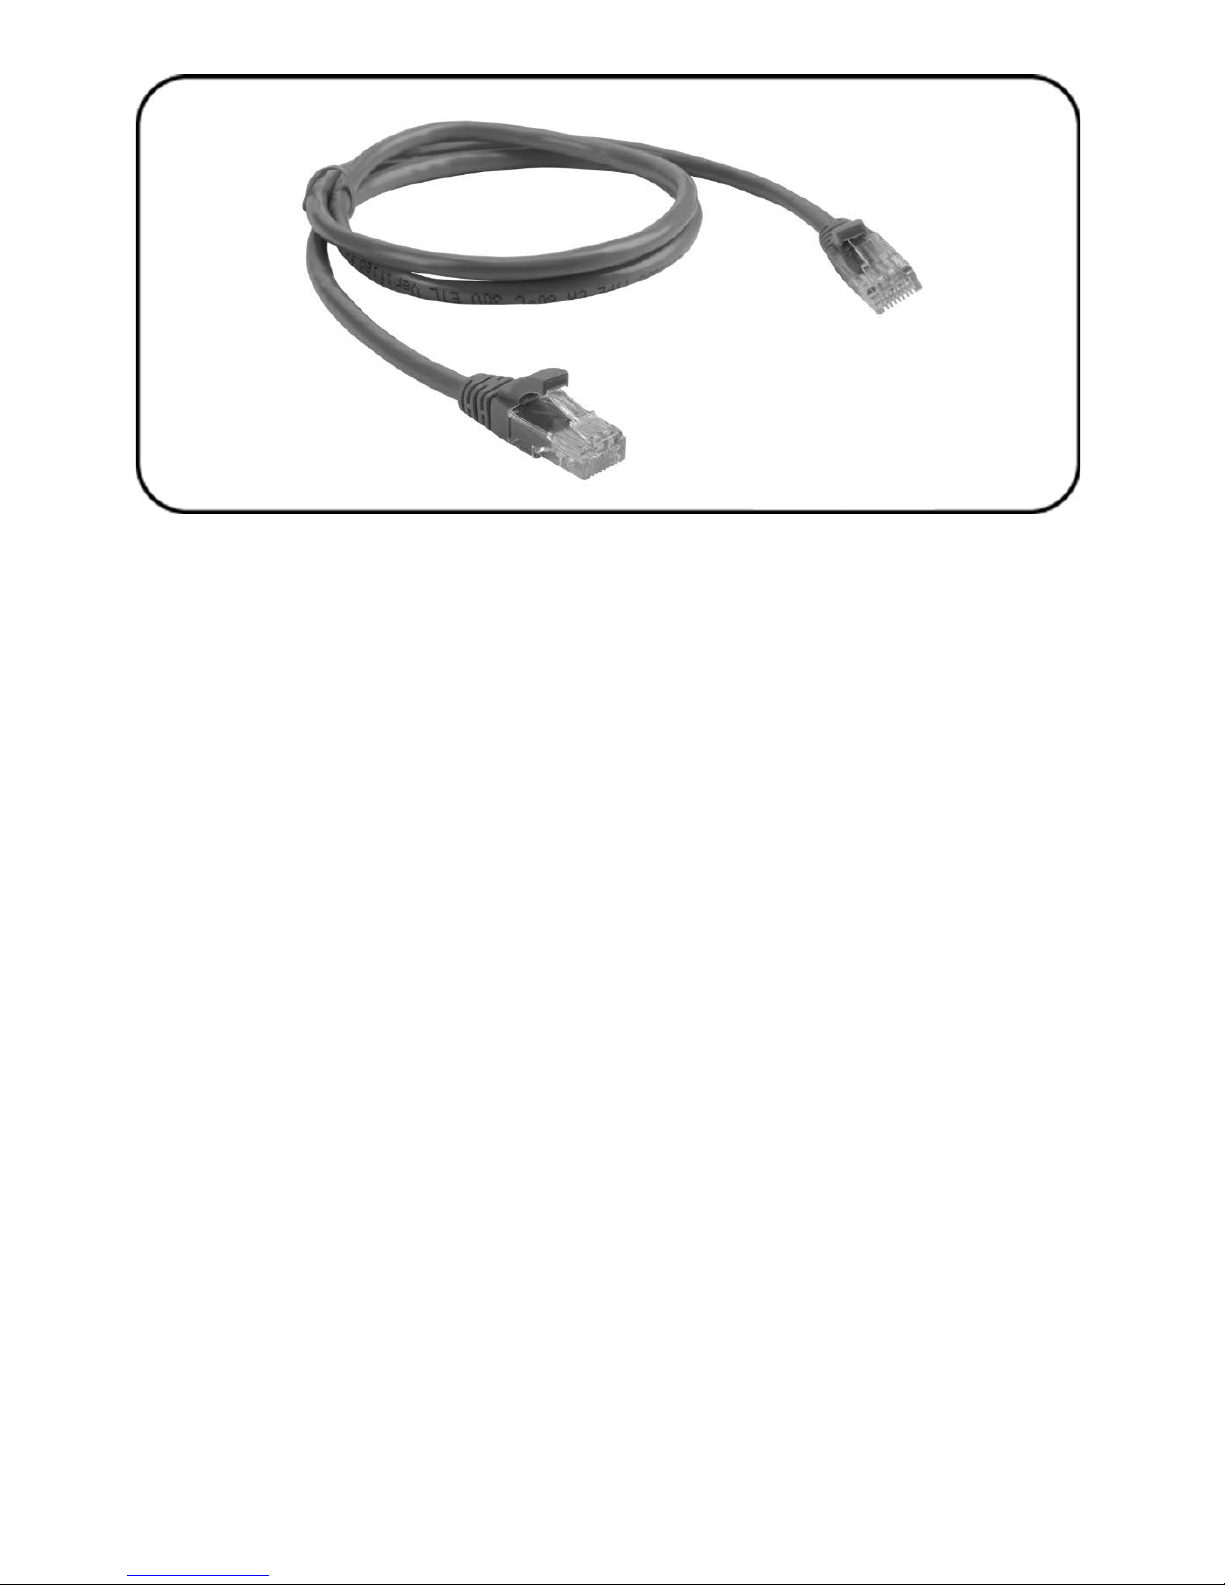
Connecting to a local area network (LAN) require s an 8-pin, R J-45
network cable (not included). Orient the circuitry end of the cable toward
the computer.
Page 31
30
To connect the network cable:
1. Plug the network cable into the network jack on the computer.
2. Plug the oth er end of the cable into a network router.
Page 32

31
Chapter 4
Routine Care
Hardware Maintenance
The computer is designed for durability and long operating life.
Fo llow the ro ut ine care guid elines described in this chapter to extend the
life of the computer and maintain its peak performance.
• Carry and store the computer in a portable carrying case.
CAUTION: To redu c e the risk of damage to th e display, do not
place anything on top of the computer, even when it is in the
carrying case.
• Avoid exposing the computer to direct sunlight, extreme
temperatures, or ultraviolet light for extended periods.
CAUTION: Do not e x pose the comput er or driv es to temperature or
humidity extremes.
• Keep the computer clean. Dust buildup can raise the temperature of
internal components.
WARNING! To avoid potentia l discomfor t or burns, do not b lock
the air vents or use the computer on your lap for extended periods.
The computer is designed to run demanding applications at full
power . As a resu lt of i ncreas ed powe r consu mption, i t is norma l for
the computer to feel warm or hot when used continuously.
CAUTION: To reduce the risk of electric shock or damage to the
computer:
Always disconnec t the compu ter from the AC outle t and disconnect
peripherals from the computer before attempting to clean the
computer or any of its components.
Page 33

32
Do not spray liquids on the computer keyboard, display, or drives,
or allow liquids to drip onto them.
CAUTION: To prevent over heating, d o n ot ob struct vents. Use the
computer only on a hard, flat surface. Do not allow another hard
surface, such as a printer, or a soft surface, such as pillows, thick
rugs, or clothing, to block the airflow.
Battery pack
If a computer will be unused and disconnected from external power
for more than 2 weeks, remove the battery pack and store it separately.
To prolong the charge of a stored battery pack, place it in a cool,
dry place.
Disposing of a used battery pack
WARNING! When a battery pack has reached the end of its useful life, do
not dispose of the battery pack in general household waste. Follow the local
laws and re gulat ions in your a rea for co mputer battery pa ck disposa l.
Touchpad and keyboard
Dirt and gre ase on the Touchpad can cause the pointe r to jump
around on the screen. To avoid this, clean the Touchpad with a damp cloth,
and wash your hands frequently when using the computer.
WARNING! To reduce the risk of electric shock or damage to internal
compone nt s, do not us e a va cuum cl e aner attachme nt to cl e an th e
keyboa r d . A vacuum cl e ane r could deposit hous ehold debr is on the
keyboard surface.
Page 34
33
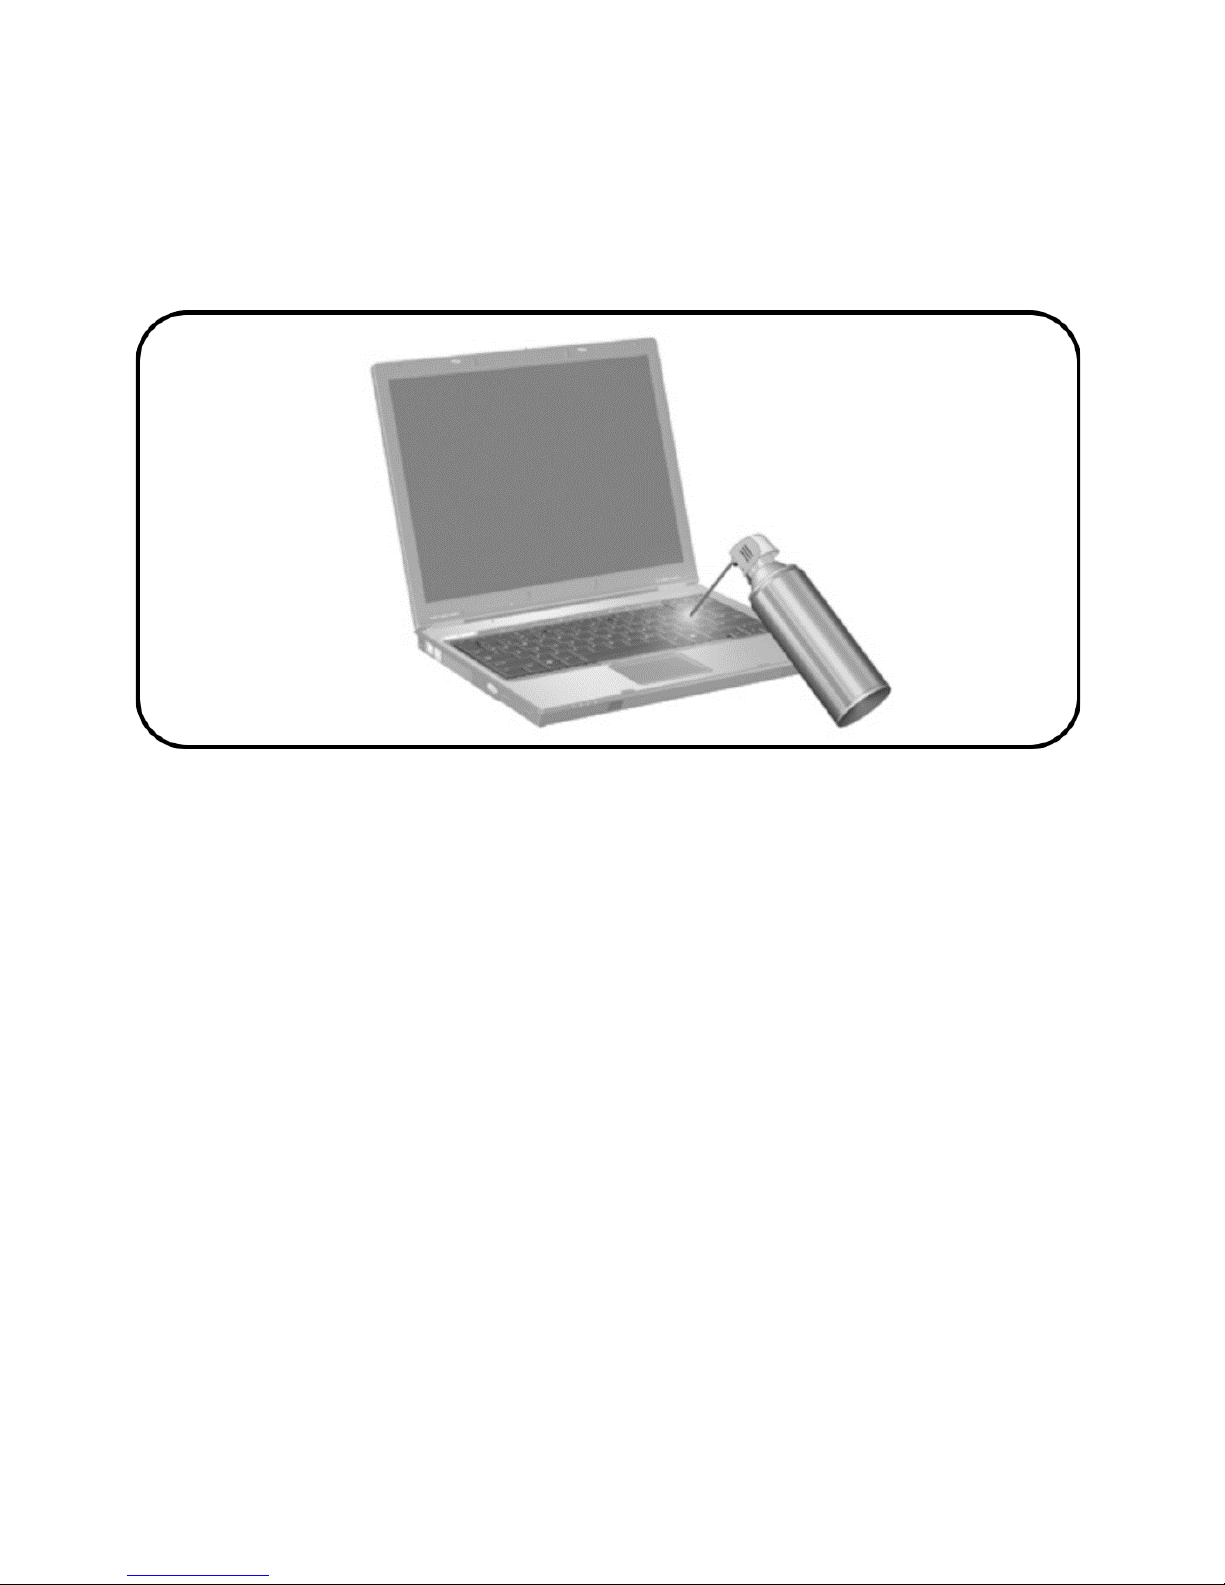
Clean the keyboard regularly to prevent keys from sticking and to
remove dust, lint, and particles that can become trapped beneath the keys .
A can o f compressed air with a straw extension can be used to blow air
around and under the keys to loosen and remove debris.
Display
To remove smudges and lint, frequently clean the display with a
soft, damp, lint-free cloth. If the screen requires additional cleaning, use
premoistened antistatic wipes or an antistatic screen cleaner.
CAUTION: To prevent pe rman ent damage to the comput er, never sp ray
water, cleaning fluids, or chemicals on the display.
Drives
Drives are fragile components that must be handled carefully . Follow the
guidelines in this section to protect the drives.
Page 35

34
CAUTION: To redu c e the risk of damage to th e computer, d amage to a
drive, or loss of information, observe these precaution s:
• Before handling a drive, discharge static elec tricity by touching the
unpainte d metal surfa c e of the driv e.
• Do not touch the connector pins on a removable drive or on the
computer.
• Handle a drive carefully; do not drop or compress the drive.
• Do not use excessive force when inserting a drive into a drive bay.
• Do not type on the keyboard or move the computer while the drive
is writing to a medium. The write process is sensitive to vibration.
• When the battery pack is the only source of power, ensure that the
battery pack is sufficiently charged before writing to a medium.
Using Disk Defragmenter
As you use the computer, the hard disk files become fragmented.
Disk Defragmenter consolidates the fragmented files and folders on the
hard disk so that it can run more efficiently.
To r u n Disk Defrag menter:
1. Select Start > Settings > System > About > Additional
Administrative Tools > Defragment and Optimize Drives.
2. Click a volume, and then click Optimize.
For additional information, access the Disk Defragmenter Online Help.
Using Disk Cleanup
Disk Cleanup searches the hard disk for unnecessary fi l es tha t you
can safely delete to free up disk space and help the computer to run more
efficiently.
Page 36

35
To run Disk Cleanup:
1. Select Start > Settings > System > About > Additional
Administrative Tools > Disk Cleanup.
2. Follow the instructions on the screen.
Regular tune-ups
To keep the computer hardware and software running like new,
perform these simple tasks periodically.
• Install and/or update the antivirus software. Prote c t agains t
current security threats to the computer by installing antivir us
software. Keep the antivirus sof tware u p to date to pro tect against
the ongoi ng thr eat of new viruses .
• Install and update software that detects and removes
spyware. Spyware tools allow you to detect and prevent electronic
encroa chme nt into the computer system by ou tsid e p arti es.
• Enable service reminders. Subscriber’s Choice is a free service
that allo ws you to receive insta nt e-mail notification about product
updates, software drivers, and creative ideas to help you get more
out of t he com puter .
• Create a backup strategy. A virus or an electrical outage could
dam age or destroy yo ur information. Back up y o ur f iles onto a CDRW, DVD+RW, or USB drive to protect the security of your files.
• Create a restore point. In the eve nt of a computer proble m,
the se ben chmarks allow you to go back in time to a point before the
computer encountered a problem.
• Create a PC tune-up schedule. Create weekly and monthly
reminders to back up files, update virus software, and perform
hardware and software maintenance.
Page 37

36
Chapter 5
Troubleshooting
T he computer will not start up.
To turn on the computer, press the power button. When the computer is
turned on, the power light is turned on.
If the computer and the power light are not turned on when you press the
power button, adequate power may not be available to the computer.
The sugges ted actions below may help you deter mi ne the reason the
computer will not start up:
• If the computer is plugged into an AC outlet, verify that the AC
outlet is providing adequate power by plugging another electrical
device into th e outlet.
• If t h e com puter is running on bat te ry po w er o r is plugged into an
external power source other than an AC outlet, plug the computer
into an AC outl et usi ng the AC adapter. Make sure the power cord
and AC adapter connection s are secure.
• If the computer is running on battery power:
o Remove the primary battery pack and travel batter y pack (if
appli cable) and plug the co mputer into an AC outlet using
the AC ada pter. If the computer starts up, one of the battery
packs may need to be replaced.
o If the battery light on the front of the computer is blinking,
the battery pack has reached a low-battery cond i tion, which
may not allow the computer to start up. Plug the computer
into an AC outlet u sing the AC adapte r to start the compu ter
and allow the battery to charge.
Page 38

37
T he co mputer screen is blank.
If you have not turned off the computer but the screen is blank, the
computer may be in standby or hibernation, may not be set to display the
image on the c omputer screen , or t he di splay switch may not be functioning
properly.
The suggested actions below may help you determine the reason
the computer screen is blank.
• To resume from standby or restore from hibernation, briefly press
the power but to n.
Standby and hibernation are energy-saving features that can turn
off the display. Standby and hibernation can be initiated by the
system while the computer is in Microsoft® Windows® but is not in
use or has reached a critical low-battery cond ition. To change thes e
and other power settings, select Start > Settings > System >
Power and sleep > Additional power settings.
• To transfer the image to the computer screen, press fn+f3. On most
models, when an optional external display devic e, such as a
monitor, is connected to the computer, the image can be displayed
on the computer screen or the external display, or on both devices
simultaneously. Wh en you press fn+f3 repeatedly, the image
alt ernat es among the compu ter dis p lay, one or more external
display devices, and simultaneous displays on all devices.
• Press the dis p lay switch fn+10.
T he so ftware is f unctio ning abnormally.
If the software becomes unr esponsive or responds abnormally:
• Restart the c o mpu ter:
o Select Sta rt > Power > Restart. If you can no t r es ta rt the
computer using these procedures, refer to the next secti on,
"The comput e r i s t ur ned on, b ut is not r esponding."
Page 39

38
• Run a virus scan.
• If the comput er feels unusua l ly warm , al l ow it to cool to room
temperature. For more information about computer overheating,
refer to "The computer is extremely warm." later in this chapter.
• If you are using an optional wir e le ss mou se, ma k e su re tha t the
mouse battery has an adequate charge.
T he co mputer is turned on, but is not
responding.
If the computer is turned on, but is not responding to software
applications or keyboard commands, try first to shut down the computer
through the operating system by selecting Star t > Power > Shutdown.
If the comput er remains unres p ons i ve, try the emer gency shutdown
procedures i n t he foll ow ing sequence:
1. If the computer is in Windo ws , p re ss ctrl+alt+delete. T he n, click
Power button located at lower right of the window pane then click
Shutdown.
2. If you cannot shut dow n the c om pu te r by using ctrl+alt+del,
press and hold the power button for at least 5 seconds.
3. If you are unable to shut down the computer by using the power
button, unplug the computer from external power and remove the
battery pack.
T he co mputer is extremely warm.
It is n orm al fo r the computer to f eel warm t o the touch while it is in
use. But if the computer feels extremely warm, it may be overheating
because a vent is blocked. If you suspect that the computer is overheating,
allow the computer to cool to room temperature. Then be sure to keep all
vents free from obstructions while you are using the computer.
Page 40

39
CAUTION: To prevent ov erheating, do no t obstr uct v ents. Use th e
computer only on a hard, flat surface. Do not allow another hard surface,
such as a printer, or a soft surface, such as a pill o w or a thick r ug or
clothing, to block airflow.
An external device is not working.
If an external device does not function as expected:
• Turn on the device as instructed in the device user guide. Some
devices, such as monitors and printers, may not be powered by the
computer, and must be turn ed on before the comp ut er is t urn ed on.
• Verify that:
o All device connections are secure.
o The device is receiving electrical power.
o The device, especially if it is an older one, is compatible with
the operating system. For compatibility information, refer to
the Web site of the d ev ic e ma n uf ac turer.
o The correct drivers are installed and updated. Drivers may
be available on a CD included with the device or on the Web
site of the devic e m an uf ac t urer.
T he co mputer cannot connect to a wireless
local area network (WLAN).
If the comput er cannot connect to a WLAN:
• Ve rify that the com puter is within o ptimal ra nge of a wireless router
(access point).
• Verify that the wireless light on the computer is turned on.
• Verify that the computer wireless antennae are free from
obstructions.
Page 41

40
• Verify that the wireless router and broadband modem are working
correctly.
Page 42

FCCCaution
Thisdevicecomplieswithpart15oftheFCCRules.Operationissubjecttothe
followingtwoconditions:(1)Thisdevicemaynotcauseharmfulinterference,and(2)
thisdevicemustacceptanyinterferencereceived,includinginterferencethatmay
causeundesiredoperation.
AnyChangesormodificationsnotexpresslyapprovedbythepartyresponsiblefor
compliancecouldvoidtheuser'sauthoritytooperatetheequipment.
Note: ThisequipmenthasbeentestedandfoundtocomplywiththelimitsforaClass
Bdigitaldevice,pursuanttopart15oftheFCCRules.Theselimitsaredesignedto
providereasonableprotectionagainstharmfulinterferenceinaresidentialinstallation.
Thisequipmentgeneratesusesandcanradiateradiofrequencyenergyand,ifnot
installedandusedinaccordancewiththeinstructions,maycauseharmfulinterference
toradiocommunications.However,thereisnoguaranteethatinterferencewillnot
occurinaparticularinstallation.Ifthisequipmentdoescauseharmfulinterferenceto
radioortelevisionreception,whichcanbedeterminedbyturningtheequipmentoff
andon,theuserisencouragedtotrytocorrecttheinterferencebyoneormoreofthe
followingmeasures:
-Reorientorrelocatethereceivingantenna.
-Increasetheseparationbetweentheequipmentandreceiver.
-Connecttheequipmentintoanoutletonacircuitdifferentfromthattowhichthe
receiverisconnected.
-Consultthedealeroranexperiencedradio/TVtechnicianforhelp.
The device has been evaluated to meet general RF exposure requirement. The device ca
n be used in portable exposure condition without restriction.
Page 43

Hasee Industrial Park, Ban Xuegang Industrial Area, Longgang District,Shenzhen, P.R.C. Zip: 518112
 Loading...