

Page 1
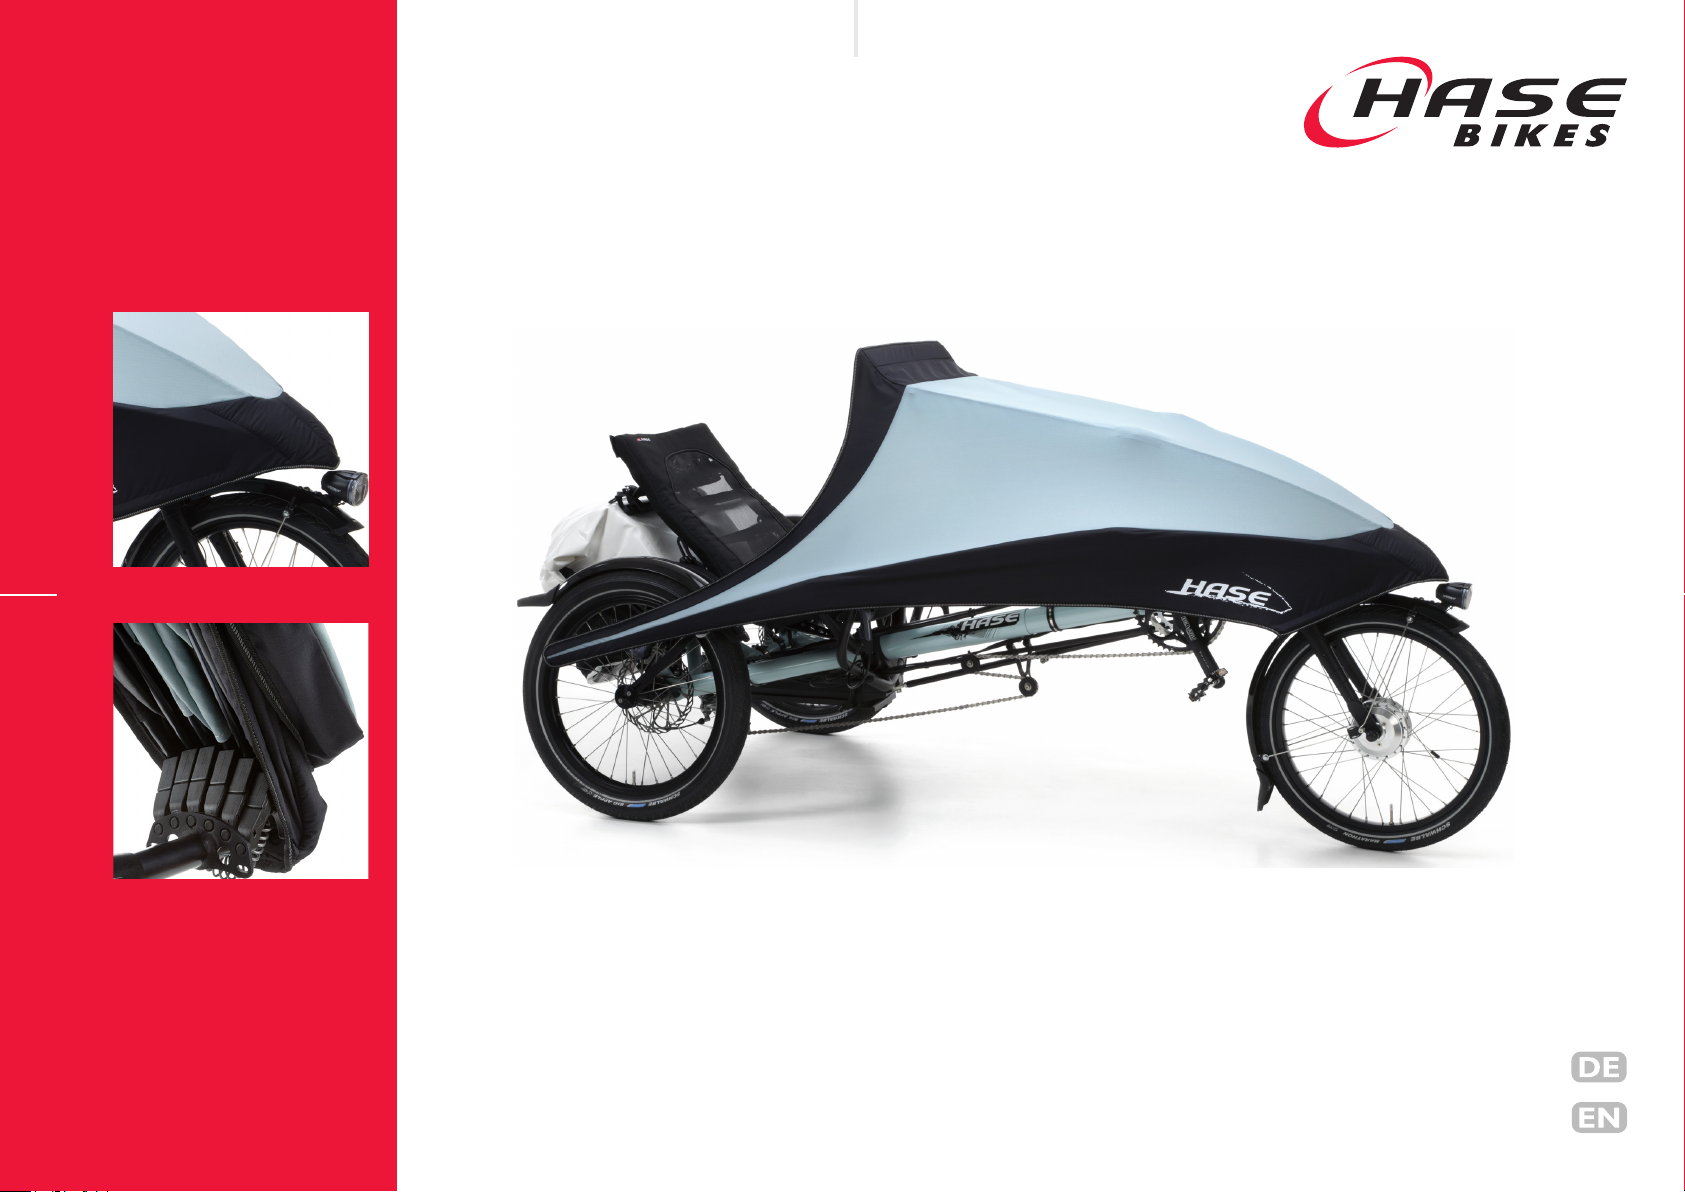
FALTVERDECK / FOLDABLE FAIRING
Gebrauchsanleitung
FV 02/16 DE-EN
User´s Manual
Page 2
FALTVERDECK
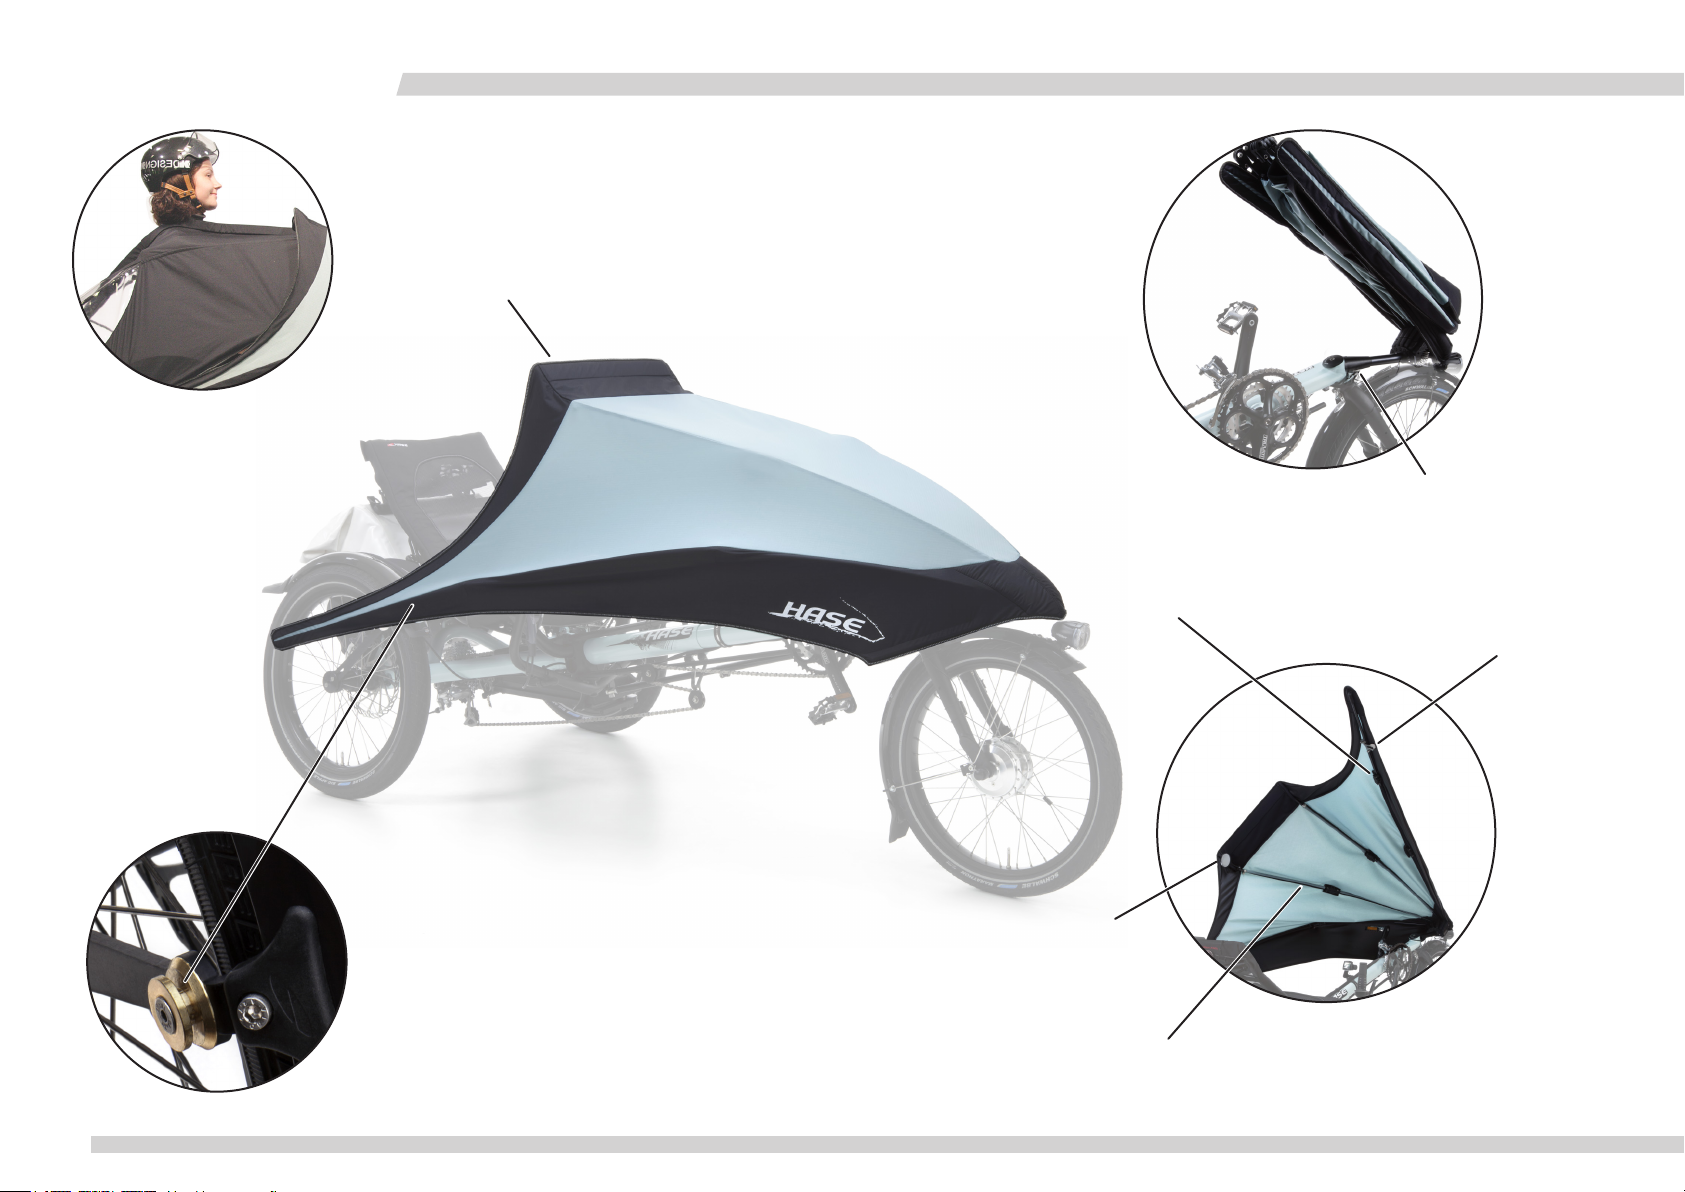
Regenponcho (Zubehör)
Rain Poncho (optional)
Gefaltetes Verdeck
Folded fairing
Windabrisskante
Wind deflector
Aufgespanntes Verdeck
Mounted fairing
Vordere Befestigung
Front mount
Stangengelenke
Frame joints
Seitliche Befestigung
Side mount
FV 02/16
Seitliche Befestigung
Side mount
Rückspiegel
Rearview mirror
Gestänge
Frame
www.hasebikes.com
Page 3

Inhalt Contents
Lieferumfang und Zubehör ........................... 2
Sicherheitshinweise........................................3
Gebrauchsanweisung beachten ................................... 3
Verwendungszweck ....................................................... 3
Montage und Einstellung ...............................................3
Benutzung des Regenponchos ....................................3
Fahren bei Wind.............................................................3
Parken bei Wind ............................................................3
Sichtbar sein für andere ................................................4
Öffnen des Faltverdecks ............................................... 4
Bevor Sie losfahren... ..................................................... 4
Technischer Zustand ..................................................... 4
Montage ..........................................................5
Montage am ungefederten Kettwiesel, Lepus
und Trix ............................................................................5
Seitliche Befestigung montieren ..................................5
Vordere Befestigung montieren ................................. 6
Langes Schutzblech für 20“ Rad montieren ............. 7
Zweites Schutzblech für 16“ Rad montieren (Trix und
Lepus Comfort) .............................................................. 8
Spritzschutz montieren .................................................9
Tasche anbringen .........................................................10
Montage am gefederten Kettwiesel, Lepus, Trix ..11
Seitliche Befestigung montieren ................................11
Vordere Befestigung montieren ...............................11
Langes Schutzblech für 20“ Rad montieren ...........11
Langes Schutzblech für 16“ Rad montieren ...........11
Montage am Stahl-Lepus.............................................12
Seitliche Befestigung montieren ................................12
Vordere Befestigung montieren ...............................12
Rund ums Fahren .........................................13
Faltverdeck anbringen .................................................13
Ausrichten des Faltverdecks ......................................15
Höhe der Windabrisskante einstellen .....................16
Ein- und Ausstiegen. ....................................................18
Regenponcho anbringen .............................................19
Regenponcho an kurze Rahmenlängen anpassen ..21
Faltverdeck abnehmen ................................................22
Reinigung und Lagerung des Faltverdecks ..............22
Ersatzteile ..................................................... 23
Vordere Befestigung ....................................................23
Seitliche Befestigung für ungefederte Trikes .........24
Seitliche Befestigung für gefederte Trikes und
Lepus Stahl .....................................................................25
Stangengelenk, Rastblech, Rückspiegel ....................26
Anhang für Händler ..................................... 27
Bohrung im Steuerrohr anbringen ..........................27
Bohrschablone ..............................................................28
Gewährleistung und Garantiebedingungen .. 29
Scope of delivery and optional Accessories .2
Safety information .........................................3
Read User’s Manual ....................................................... 3
Intended use .................................................................... 3
Mounting and adjustment ............................................. 3
Use of the Rain Poncho ................................................ 3
Riding in windy conditions ........................................... 3
Parking in windy conditions ......................................... 3
Being visible for others ................................................. 4
Caution when opening the Foldable Fairing ............4
Before each ride ............................................................. 4
Technical condition .......................................................4
Mounting ......................................................... 5
Mounting the fairing mounts: non-suspended
Kettwiesel, Lepus, and Trix ......................................... 5
Mounting the side mounts ........................................... 5
Mounting the front mount ........................................... 6
Mounting the long fender to a 20” wheel ................ 7
Mounting a second fender for the 16” wheel (Trix
and Lepus Comfort) ...................................................... 8
Mounting the splash guard ........................................... 9
Mounting the Fairing Bag ............................................10
Mounting the fairing mount: full-suspended
Kettwiesel, Lepus and Trix ........................................11
Mounting the side mounts .........................................11
Mounting the front mount .........................................11
Mounting the long fender for a 20” wheel .............11
Mounting a second fender for a 16” wheel ..........11
Mounting the fairing mount: Lepus steel ................12
Mounting the side mounts .........................................12
Mounting the front mount .........................................12
Riding with the Foldable Fairing .................13
Mounting the Foldable Fairing ...................................13
Adjusting the Foldable Fairing ...................................15
Adjusting wind deflector height ................................16
Mounting and dismounting .......................................18
Attaching the Rain Poncho ........................................19
Adjusting the Rain Poncho for short frame
lengths .............................................................................21
Removing the Foldable Fairing ..................................22
Cleaning and storing the Foldable Fairing ..............22
Replacement parts ....................................... 23
Front mount ..................................................................23
Side-mount parts for non-suspended Trikes .........24
Side-mount parts for suspended Trikes and
Lepus steel .....................................................................25
Frame joint, locking plate, rearview mirror ...........26
Appendix for dealers ....................................27
Drilling hole in head tube ..........................................27
Drilling template ...........................................................28
Conditions of warranty and liability .............29
FOLDABLE FAIRING
www.hasebikes.com
FV 02/16
1
Page 4
FALTVERDECK
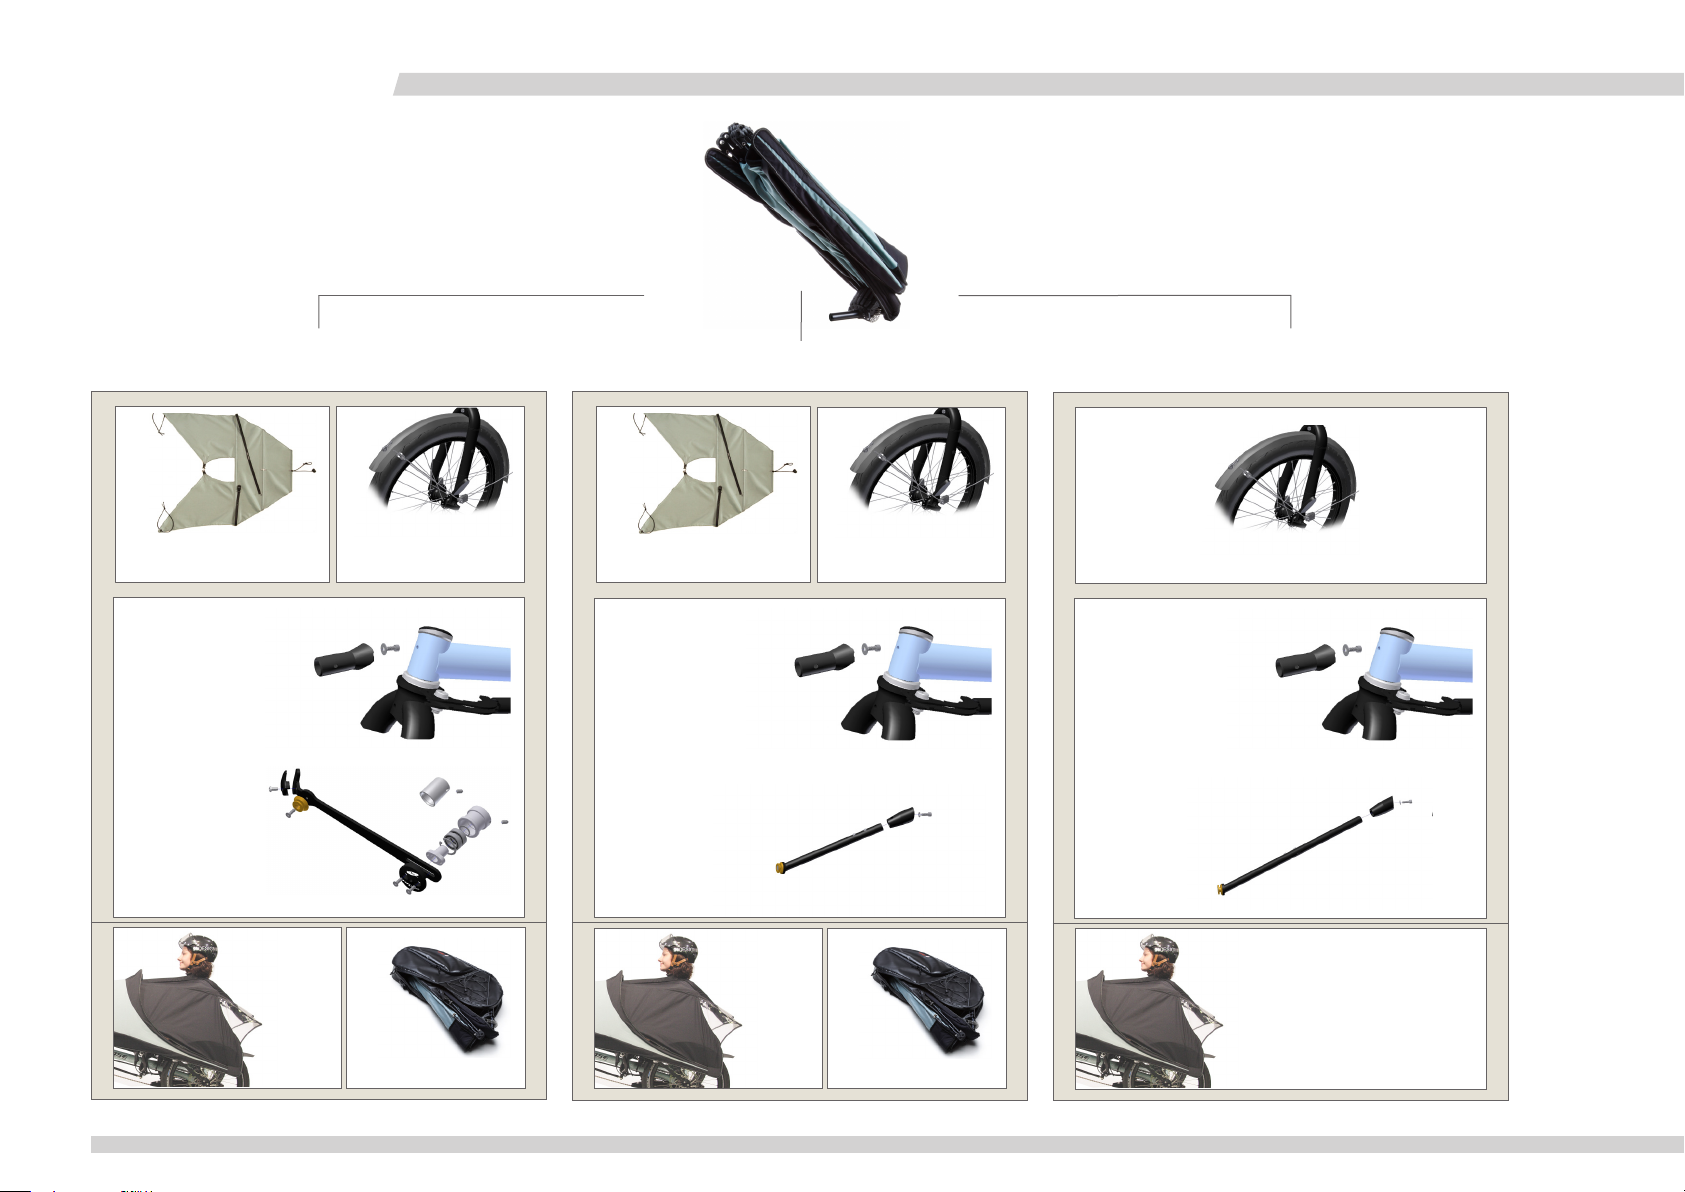
Lieferumfang und Zubehör
Kettwiesel, Trix, Lepus
ungefedert / unsuspended
Spritzschutz
Splash guard
Vordere Befestigung
Front mount
Langes Schutzblech
16 oder 20“
Long fender, 16 or 20“
Faltverdeck
Foldable Fairing
Kettwiesel, Trix, Lepus
gefedert / full suspended
Spritzschutz
Splash guard
Vordere Befestigung
Front mount
Langes Schutzblech
16 oder 20“
Long fender, 16 or 20“
Scope of delivery and optional Accessories
Stahl Lepus
Lepus steel
Langes Schutzblech 16 oder 20“
Long fender, 16 or 20“
Vordere Befestigung
Front mount
2 x
Seitliche Befestigung
Side mounts
Regenponcho
(Zubehör)
Rain Poncho
(optional)
Tasche
(Zubehör)
Fairing Bag (opional)
FV 02/16
2
Seitliche Befestigung
Side mounts
2x
Regenponcho
(Zubehör)
Rain Poncho
(optional)
Tasche
(Zubehör)
Fairing Bag (opional)
Seitliche Befestigung
Side mounts
2x
Regenponcho
(Zubehör)
Rain Poncho
(optional)
www.hasebikes.com
Page 5

FOLDABLE FAIRING
Sicherheitshinweise
Gebrauchsanweisung beachten
Lesen Sie diese Gebrauchsanleitung sorgfältig und machen Sie sich mit dem Faltverdeck praktisch vertraut. Beachten Sie ebenfalls die Gebrauchsanleitung des jeweiligen Fahrzeugs.
Verwendungszweck
Das Faltverdeck darf nur an den Hase-Trikes verwendet werden. Die Benutzung in Verbindung mit
anderen Fahrzeugen ist nicht erlaubt. Für eventuelle Schäden übernehmen wir keine Haftung.
Montage und Einstellung
Ihr Fachhändler hat das Faltverdeck montiert und auf Ihre Körpergröße eingestellt. Wie das Faltverdeck für einen anderen Fahrer angepasst werden soll, lesen Sie im Kapitel: „Höhe der Windabrisskante einstellen“, Seite 16.
Sollten Sie das Faltverdeck selbst montieren, beachten Sie die Montageanleitung. Beim Fahren mit
dem Faltverdeck, darf die Sicht und die Bewegungsfreiheit der Lenkung nicht eingeschränkt werden.
Lenkung und Bremsen müssen frei zugänglich sein.
Benutzung des Regenponchos
Bei Benutzung des als Zubehör erhältlichen Regenponchos müssen die Bewegungsfreiheit des Oberkörpers und der Arme, vor allem bei Handzeichen für Richtungswechsel und für den „Schulterblick“
gewährleistet sein. Achten Sie darauf, dass das Rücklicht durch den Regenponcho nicht verdeckt wird.
Bei einem sehr kurz eingestellten Trike ist es wahrscheinlich, dass der Regenponcho das Rücklicht
verdeckt. So dürfen Sie auf keinen Fall fahren. Suchen Sie Ihre Fachwerkstatt auf, um den Regenponcho anzupassen.
Fahren bei Wind
Ein Fahrrad mit einem Faltverdeck bietet dem Wind eine größere Angriffsfläche an. Deshalb kann sich
das Fahrverhalten bei Wind verändern. Fahren Sie daher nicht bei Sturm.
Parken bei Wind
Bei starkem Wind empfehlen wir das Faltverdeck zum Parken abzunehmen, damit das Fahrrad nicht
umkippt oder wegrollt. Wenn Sie das Faltverdeck nicht abnehmen, müssen Sie sicherstellen, dass das
Fahrrad nicht umkippen oder wegrollen kann.
Bei einem sehr kurz eingestellten Kettwiesel, Trix oder Lepus lässt sich das Trike mit Faltverdeck
nicht mehr aufrecht parken. Das Faltverdeck könnte sonst beschädigt werden.
Safety information
Read User’s Manual
Read this User’s Manual carefully, and familiarize yourself with the construction and function of the
Foldable Fairing. It’s also important to read and observe all safety, installation, and operating instructions in the User’s Manual for the trike with which the fairing is being used.
Intended use
The Foldable Fairing can only be used with the Hase trikes. The use of the Foldable Fairing with other
vehicles is prohibited. Hase assumes no liability for any consequential damage.
Mounting and adjustment
Your authorized Hase retailer has mounted the Foldable Fairing and adjusted it to your height. See
section “Adjusting wind deflector height” on page 16 for instructions on adjusting the fairing to another rider.
If you are mounting the Foldable Fairing yourself, be sure to follow the mounting instructions in this
manual. When mounted, the Foldable Fairing should in no way restrict the rider’s vision or the movement of the steering controls. The handlebar grips and brake levers must remain freely accessible.
Use of the Rain Poncho
When using the optional Rain Poncho, be sure that it does not in any way restrict movement of the
torso and arms and, above all, that it is still possible to make the necessary hand signals and turn your
head for looking over your shoulder. Check that the Rain Poncho is not covering the taillight.
If a trike is adjusted for very short riders, the Rain Poncho will probably hang in front of the taillight.
In this case, do not, under any circumstances, ride the trike with the Rain Poncho. Ask a qualified bicycle mechanic to adjust the Rain Poncho accordingly.
Riding in windy conditions
A trike with a Foldable Fairing has a greater surface area, making it more susceptible to wind gusts.
This can affect vehicle handling. A strong gust of wind could lift up the vehicle, push it into another
lane, or even tip it over. For this reason, Hase strongly advises never to ride with the Foldable Fairing in windy conditions.
Parking in windy conditions
In windy conditions, we recommend removing the Foldable Fairing when parking your trike outdoors. Otherwise, a gust of wind could tip over the vehicle or cause it to roll away. If you do not
remove the Foldable Fairing, then be sure to secure the parked vehicle from tipping or rolling.
A Kettwiesel, Trix, or Lepus that has been adjusted for a very short rider cannot be parked upright
(on end) with a mounted Foldable Fairing, as this would damage the fairing.
www.hasebikes.com
FV 02/16
3
Page 6

FALTVERDECK
Sichtbar sein für andere
Bei Regen sind die Sichtverhältnisse in der Regel geringer. Deshalb können Sie möglicherweise von
anderen Verkehrsteilnehmern schlechter gesehen werden. Fahren Sie auch am Tage mit Licht, dieses erhöht die Aufmerksamkeit der anderen Verkehrsteilnehmer.
Der Frontscheinwerfer darf andere Verkehrsteilnehmer nicht blenden. Unfallgefahr! Beachten Sie,
dass vor allem hochwertige LED-Scheinwerfer sehr helle und weitreichende Lichtkegel erzeugen.
Öffnen des Faltverdecks
Lösen Sie die seitliche Befestigung des Faltverdecks nur vorsichtig. Das Faltverdeck könnte sich
durch die Spannung des Gestänges plötzlich entfalten und möglicherweise Personen in der Nähe
verletzen. Achten Sie darauf, dass sich keine Personen in unmittelbarer Nähe befinden.
Bevor Sie losfahren...
Kontrollieren Sie das Faltverdeck auf eine korrekte Befestigung. Ein nicht korrekt befestigtes Faltverdeck könnte sich während der Fahrt öffnen und Sie oder andere Verkehrsteilnehmer verletzen
oder Unfälle verursachen.
Technischer Zustand
Fahren Sie stets nur mit einem technisch einwandfreien und korrekt befestigtem Faltverdeck. Führen Sie vor jeder Fahrt eine Sichtprüfung auf eventuelle Schäden durch.
Being visible for others
Visibility is generally poor in wet weather. Therefore, it may be more difficult for other road users
to see you. Hase recommends riding with your lights on in wet weather to make it easier for other
road users to see you.
Be sure to adjust the headlight properly so that it does not blind other road users. Risk of accident!
Keep in mind that high-quality LED headlights are especially bright and produce long beams of light.
Caution when opening the Foldable Fairing
Use caution when releasing the catch on the side mount of the Foldable Fairing. The frame tension
could cause the fairing to spring open, possibly injuring bystanders. Be sure that no one is standing
near the fairing before you release the catch.
Before each ride
Check the Foldable Fairing to make sure it is mounted correctly. A fairing that has been improperly
mounted could open during the ride and injure you or other road users or cause accidents.
Technical condition
The Foldable Fairing should only be used if it is in perfect technical condition and mounted properly.
Before each trip, be sure to check the condition of the fairing and vehicle for possible faults or damage.
FV 02/16
4
www.hasebikes.com
Page 7
FOLDABLE FAIRING
Mounting
The Foldable Fairing is intended for use with the trike models Kett-
wiesel, Lepus and Trix. The fairing itself is identical for all models. The
mounts with which the fairing is attached, however, differ for the vari-
ous models. (See page 2, “Scope of delivery and optional accessories”.)
Mounting the fairing mounts:
non-suspended Kettwiesel, Lepus and Trix
Caution!
Special tools may be required, depending on the type of ve-
hicle. Therefore, Hase recommends having a qualified bicycle
mechanic mount the Foldable Fairing and adjust it to your
height. An improperly mounted or adjusted fairing can cause
accidents.
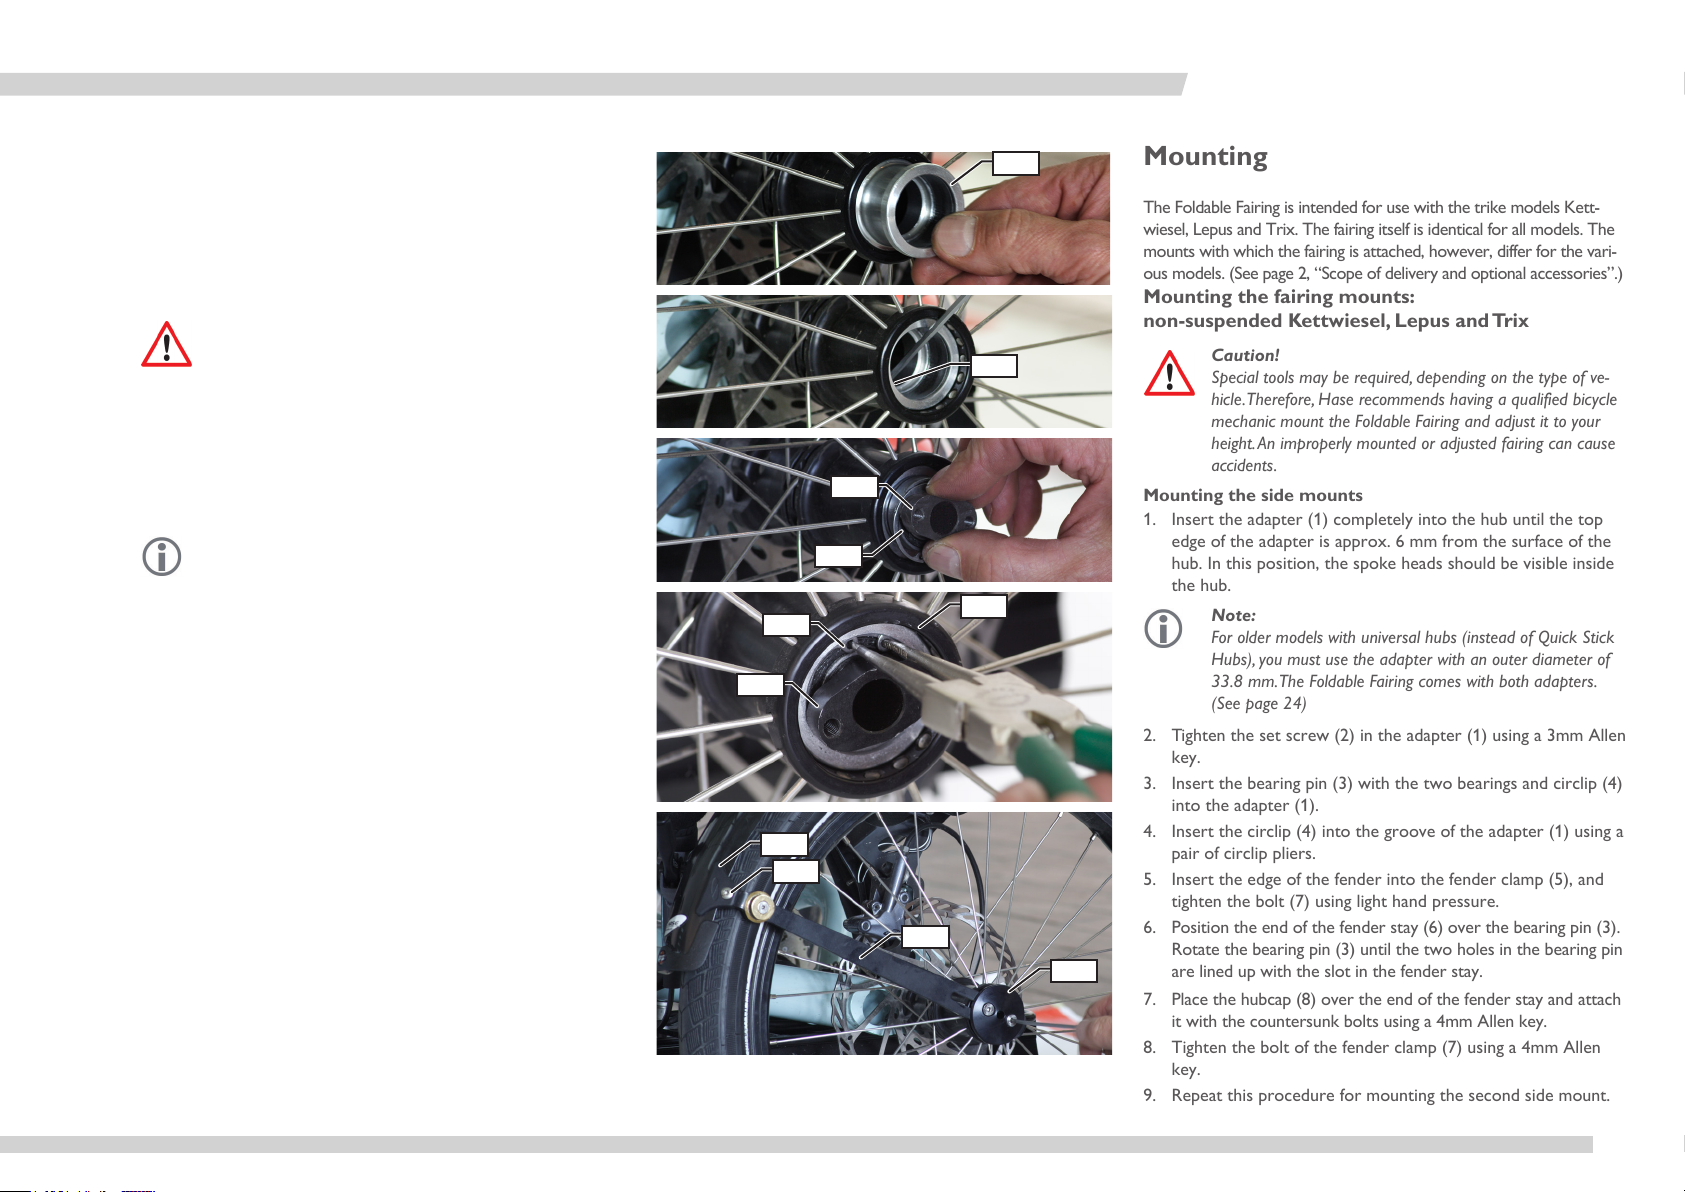
Mounting the side mounts
1. Insert the adapter (1) completely into the hub until the top
edge of the adapter is approx. 6 mm from the surface of the
hub. In this position, the spoke heads should be visible inside
the hub.
Note:
For older models with universal hubs (instead of Quick Stick
Hubs), you must use the adapter with an outer diameter of
33.8 mm. The Foldable Fairing comes with both adapters.
(See page 24)
2. Tighten the set screw (2) in the adapter (1) using a 3mm Allen
key.
3. Insert the bearing pin (3) with the two bearings and circlip (4)
into the adapter (1).
4. Insert the circlip (4) into the groove of the adapter (1) using a
pair of circlip pliers.
5. Insert the edge of the fender into the fender clamp (5), and
tighten the bolt (7) using light hand pressure.
6. Position the end of the fender stay (6) over the bearing pin (3).
Rotate the bearing pin (3) until the two holes in the bearing pin
are lined up with the slot in the fender stay.
7. Place the hubcap (8) over the end of the fender stay and attach
it with the countersunk bolts using a 4mm Allen key.
8. Tighten the bolt of the fender clamp (7) using a 4mm Allen
key.
9. Repeat this procedure for mounting the second side mount.
Montage
Das Faltverdeck ist für die Trike-Modelle Kettwiesel, Lepus und
Trix geeignet. Das Verdeck ist für alle Modelle gleich. Unterschiedlich ist die Befestigung am Fahrzeug. (Vergleiche Seite 2,
Lieferumfang und Zubehör).
Montage am ungefederten Kettwiesel, Lepus und Trix
Achtung!
Seitliche Befestigung montieren
1. Stecken Sie die Klemme (1) ca. 6 mm tief in die Nabe, so dass
2. Ziehen Sie die Madenschraube (2) in der Klemme (1) mit
3. Stecken Sie den Lagerstab (3) mit den beiden Lagern und dem
4. Setzen Sie den Sicherungsring (4) mit Hilfe einer Sicherungs-
5. Stecken Sie die Kante des Schutzbleches in die Schutzblechk-
6. Setzen Sie die Strebe (6) auf den Lagerstab (3). Drehen Sie
7. Setzen Sie die Kappe (8) auf und schrauben Sie sie mit
8. Schrauben Sie die Schraube der Schutzblechklemme (7) mit
9. Gehen Sie bei der Montage der zweiten Befestigung genauso
Die Montage erfordert je nach Fahrradmodell eventuell
Spezialwerkzeug. Lassen Sie deshalb das Faltverdeck von
einer Fachwerkstatt montieren und auf Ihre Körpergröße
einstellen. Fehlerhafte Montage oder Einstellung können
Unfälle verursachen.
die Speichenköpfe im Inneren der Nabe sichtbar sind.
Hinweis:
Bei älteren Modellen mit Universalnaben benötigen Sie die
Klemme mit dem Außendurchmesser 33,8 mm. Im Lieferumfang sind beide Klemmen enthalten (Seite 24).
einem Innensechskantschlüssel 3 mm fest.
Sicherungsring (4) in die Klemme (1).
ringzange in die Nut der Klemme (1).
lemme (5) und ziehen Sie die Schraube (7) leicht an.
den Lagerstab (3) so, dass die Bohrungen mit dem Langloch in
der Strebe übereinstimmen.
den mitgelieferten Senkschrauben mit einem Innensechskantschlüssel 4 mm fest.
einem Innensechskantschlüssel 4 mm fest.
vor.
1
2
3
4
1
4
3
5
7
6
8
www.hasebikes.com
FV 02/16
5
Page 8

FALTVERDECK
Montage / Mounting
Vordere Befestigung montieren
Die vordere Befestigung für des Faltverdeck wird am Steuerrohr
montiert. Dafür ist im Steuerrohr eine Bohrung (1) angebracht,
die mit einem Aufkleber verdeckt ist. Sollten Sie eine Version des
Rahmens ohne eine solche Bohrung besitzen, so lassen Sie das
Faltverdeck von ihrer Fachwerkstatt fachgerecht anbringen.
Achtung!
Zum Anbringen der vorderen Befestigung (2) ist eine Bohrung
(1) im Steuerrohr notwendig. Diese Bohrung darf nur von
einer Fachwerkstatt durchgeführt werden. Nicht fachgerecht
durchgeführte Bohrung kann zur Beschädigung des Rahmens
und damit zu schwerwiegenden Unfällen führen.
1. Entfernen Sie die Schraube (3) aus der Ahead-Kappe (4) mit
einem TX30 Torxschlüssel.
2. Entfernen Sie die Ahead-Kappe (4), das Lager (5) und ziehen
Sie die Gabel (6) aus dem Steuerrohr nach unten. Gehen
Sie dabei vorsichtig um, damit die Lenkanbindung (7) nicht
beschädigt wird.
3. Entfernen Sie den Aufkleber und setzen Sie die mitgelieferte
Schraube (8) mit Unterlegscheibe (9) von Innen durch die
Bohrung im Steuerrohr.
4. Setzen Sie die vordere Befestigung (2) auf die Schraube und
ziehen Sie die Schraube zunächst mit einem Innensechskantschlüssel mit Kugelkopf 4 mm handfest an.
5. Richten Sie die vordere Befestigung (2) aus und ziehen Sie die
Schraube (8) mit einem L-förmigen Innensechskantschlüssel 4
mm fest.
6. Bauen Sie die Gabel und den Steuersatz in umgekehrten
Reihenfolge wieder ein. Ziehen Sie die Schraube (3) in der
Ahead-Kappe so fest, dass die Lenkung frei beweglich, der
Steuersatz jedoch spielfrei ist.
2
1
3
4
5
8
9
2
6
7
Mounting the front mount
The front mount (2) for the Foldable Fairing is mounted to the
head tube. For this purpose, the head tube has a special hole (1),
which is covered with a decal. If your head tube does not have
this hole (e.g. earlier models), then the Foldable Fairing must be
professionally mounted by a qualified bicycle mechanic.
Caution!
A hole (1) in the head tube is required for mounting the front
mount (2). This hole can only be drilled by a qualified bicycle
mechanic. An improperly drilled hole can damage the frame,
which can in turn lead to serious accidents.
1. Remove the bolt (3) from the Aheadset cap (4) using a TX30
Torx key.
2. Remove the Aheadset cap (4), compression ring, and cartridge bearing (5), and pull the fork (6) out of the head tube
from below. Take care not to damage the fork-steering rod
connection (7).
3. Remove the decal and insert the bolt (8) with washer (9)
(included with the mounting hardware) through the hole from
the inside of the head tube.
4. Place the front mount (2) over the bolt, and tighten the bolt
lightly using a 4mm ball-end Allen key.
5. Adjust the front mount (2) to the correct position, and tighten the bolt (8) firmly using a 4mm L-shaped Allen key.
6. Remount the fork and headset, following the instructions
from steps 1 and 2 in the reverse order. Tighten the bolt (3)
in the Aheadset cap until there is no play in the headset but
the bearing can still move freely.
FV 02/16
6
www.hasebikes.com
Page 9

Montage / Mounting
FOLDABLE FAIRING
Langes Schutzblech für 20“ Rad montieren
Damit Sie bei Regen trocken bleiben, sollte das vordere Schutzblech besonders lang und mit einem Spritzschutz ausgestattet
sein. Außerdem kollidiert die Befestigung der vorderen Beleuchtung mit dem Regenverdeck. Deshalb sollte das vordere Schutzblech ersetzt werden. Auf dem langen Schutzblech ist die Lampenbefestigung weiter vorne angebracht, so dass genügend Platz
zum Anbringen des Regenverdecks vorhanden ist.
1. Lösen Sie die Schraube (1) in der Ahead-Kappe mit einem
TX30 Torxschlüssel.
2. Schrauben Sie die Schrauben (2) des vorhandenen Schutzbleches mit einem Innensechskantschlüssel 4 mm vom
unteren Teil der Gabel ab.
3. Schrauben Sie die Schraube (3) von der Mutter (4) mit einem
Innensechskantschlüssel 5 mm und einem Gabelschlüssel 10
mm am oberen Teil der Gabel ab.
4. Nehmen Sie das Schutzblech (5) und auch die eventuell vorhandene Lampenbefestigung ab.
5. Schrauben Sie das lange Schutzblech (6) mit der Schraube (3)
und der Mutter (4) mit einem Innensechskantschlüssel 5 mm
und einem Gabelschlüssel 10 mm an das obere Teil der Gabel.
6. Schrauben Sie die Schutzblechstreben (7) des langen Schutzbleches mit einem Innensechskantschlüssel 4 mm an das
untere Teil der Gabel fest.
7. Stecken Sie die mitgelieferten Schutzkappen (10) auf die
Enden der Schutzbstreben (7).
8. Stecken Sie die Schutzblechstreben (7) durch die Schrauben
(8) und ziehen Sie die Muttern (9) mit einem Gabelschlüssel 8
mm fest.
9. Ziehen Sie die Schraube (1) in der Ahead-Kappe mit einem
TX30 Torxschlüssel wieder fest.
10
1
3
4
5
Mounting the long fender to a 20” wheel
The headlight mount on the standard fender is too high for use
with the front mount of the Foldable Fairing. Therefore, it must
be replaced with the long fender that comes with the Foldable
Fairing. This fender has a lower headlight mount and, when used
in combination with the splash guard, ensures that the rider will
stay dry in wet conditions.
1. To remove the existing fender, unscrew the bolt (1) in the
Ahead cap using a TX30 Torx key.
2. Unscrew the bolts (2) of the fender stays from the fork ends
using a 4mm Allen key.
2
3. Unscrew the bolt (3) from the nut (4) on the upper fork using
a 5mm Allen key and 10mm open-end wrench.
4. Remove the fender (5) and any headlight mounting hardware.
9
3
8
7
4
6
7
5. Attach the long fender (6) to the top of the fork with the bolt
(3) and nut (4) using a 5mm Allen key and a 10mm open-end
wrench.
6. Screw the fender stays (7) of the long fender onto to the fork
ends using a 4mm Allen key.
7. Place the protective caps (10) over the top ends of the fender
stays (7).
8. Insert the ends of the fender stays (7) through the bolts (8),
and tighten the nuts (9) using an 8mm open-end wrench.
9. Tighten the bolt (1) in the Ahead cap using a TX30 Torx key.
2
www.hasebikes.com
FV 02/16
7
Page 10
FALTVERDECK
Montage / Mounting
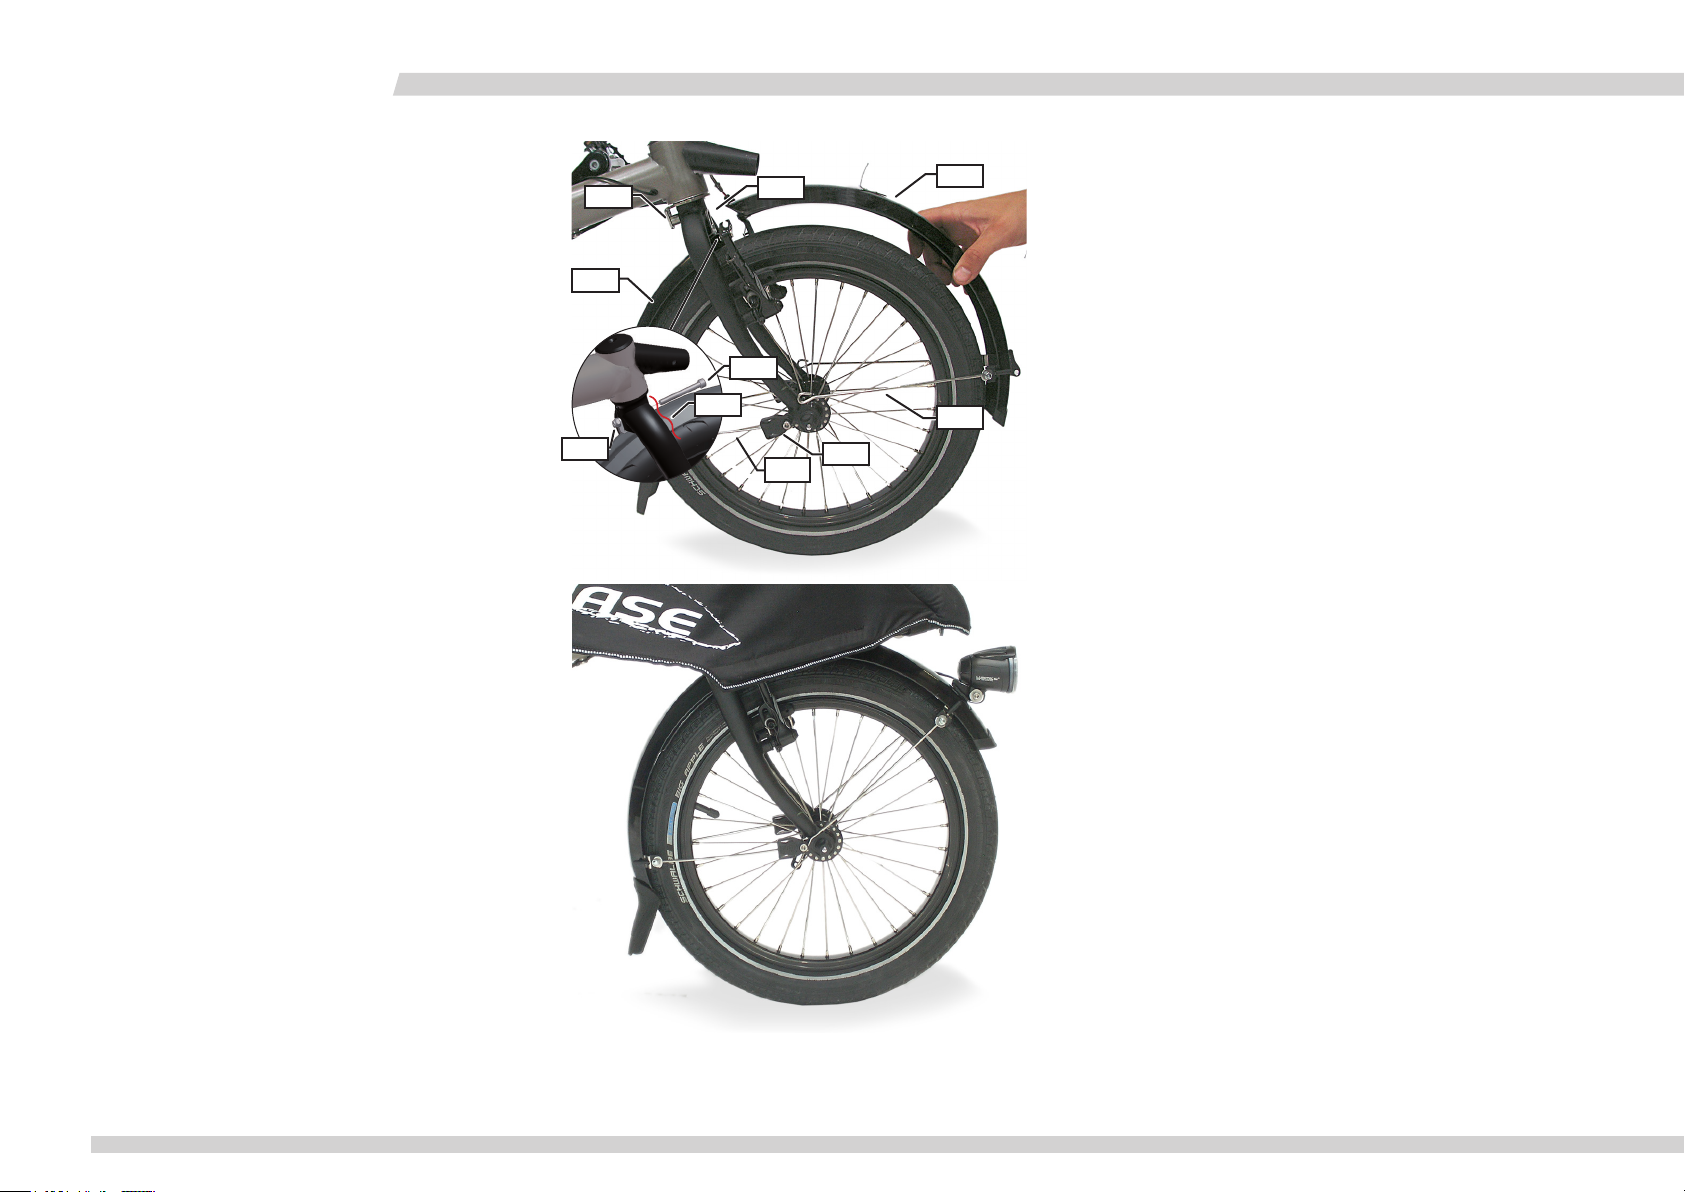
Zweites Schutzblech für 16“ Rad montieren (Trix und
Lepus Comfort)
Damit Sie bei Regen trocken bleiben, sollte das vordere Schutzblech besonders lang und mit einem Spritzschutz ausgestattet
sein. Außerdem kollidiert die Befestigung der vorderen Beleuchtung mit dem Regenverdeck. Deshalb sollte das vordere Schutzblech mit einem zweiten ergänzt werden. Auf dem zweiten
Schutzblech ist die Lampenbefestigung weiter vorne angebracht,
so dass genügend Platz zum Anbringen des Regenverdecks vorhanden ist.
1. Schrauben Sie die Schrauben (2) des vorhandenen Schutzbleches mit einem Innensechskantschlüssel 4 mm vom
unteren Teil der Gabel ab.
2. Schrauben Sie die Schraube (3) von der Mutter (4) mit einem
Innensechskantschlüssel 5 mm und einem Gabelschlüssel 10
mm am oberen Teil der Gabel ab.
3. Nehmen Sie das Schutzblech (5) und auch die eventuell vorhandene Lampenbefestigung ab.
4. Sägen Sie das vordere Teil des abgenommenen Schutzbleches
(5) an der vorderen Gabelkante (8) ab.
5. Schrauben Sie das zuvor abgesägte Schutzblech (5) zusammen
mit dem zweiten Schutzblech (6) mit der Schraube (3) und
der Mutter (4) mit einem Innensechskantschlüssel 5 mm und
einem Gabelschlüssel 10 mm an das obere Teil der Gabel.
6. Schrauben Sie die Schutzblechstreben (7) beider Schutzbleche
mit einem Innensechskantschlüssel 4 mm an das untere Teil
der Gabel fest.
4
3
6
5
Mounting a second fender for the 16” wheel (Trix and
Lepus Comfort)
In order to keep the rider dry in rainy conditions, the front fender should be especially long and include a splashguard. Furthermore, the headlight mount collides with the fairing. Therefore,
a second front fender should be mounted. The headlight mount
is positioned further forward on the second fender, leaving sufficient space for the fairing mount.
3
8
4
2
7
7
1. Using a 4mm Allen key, remove the bolts (2) that fasten the
existing fender to the lower part of the fork.
2. Using a 5mm Allen key and a 10mm open-end wrench,
remove the bolt (3) from the nut (4) on the top part of the
fork.
3. Remove the fender (5) and the headlight mount, if applicable.
4. Saw off the front section of the removed fender (5) at the
front edge of the mount (8).
5. Using a 5mm Allen key and a 10mm open-end wrench, fasten
the rear section of the shortened fender (5), together with
the second fender (6), to the top part of the fork with the
bolt (3) and nut (4).
6. Fasten the fender stays (7) of both fenders to the lower part
of the fork, using a 4mm Allen key.
FV 02/16
8
www.hasebikes.com
Page 11
Montage / Mounting
FOLDABLE FAIRING
Spritzschutz montieren
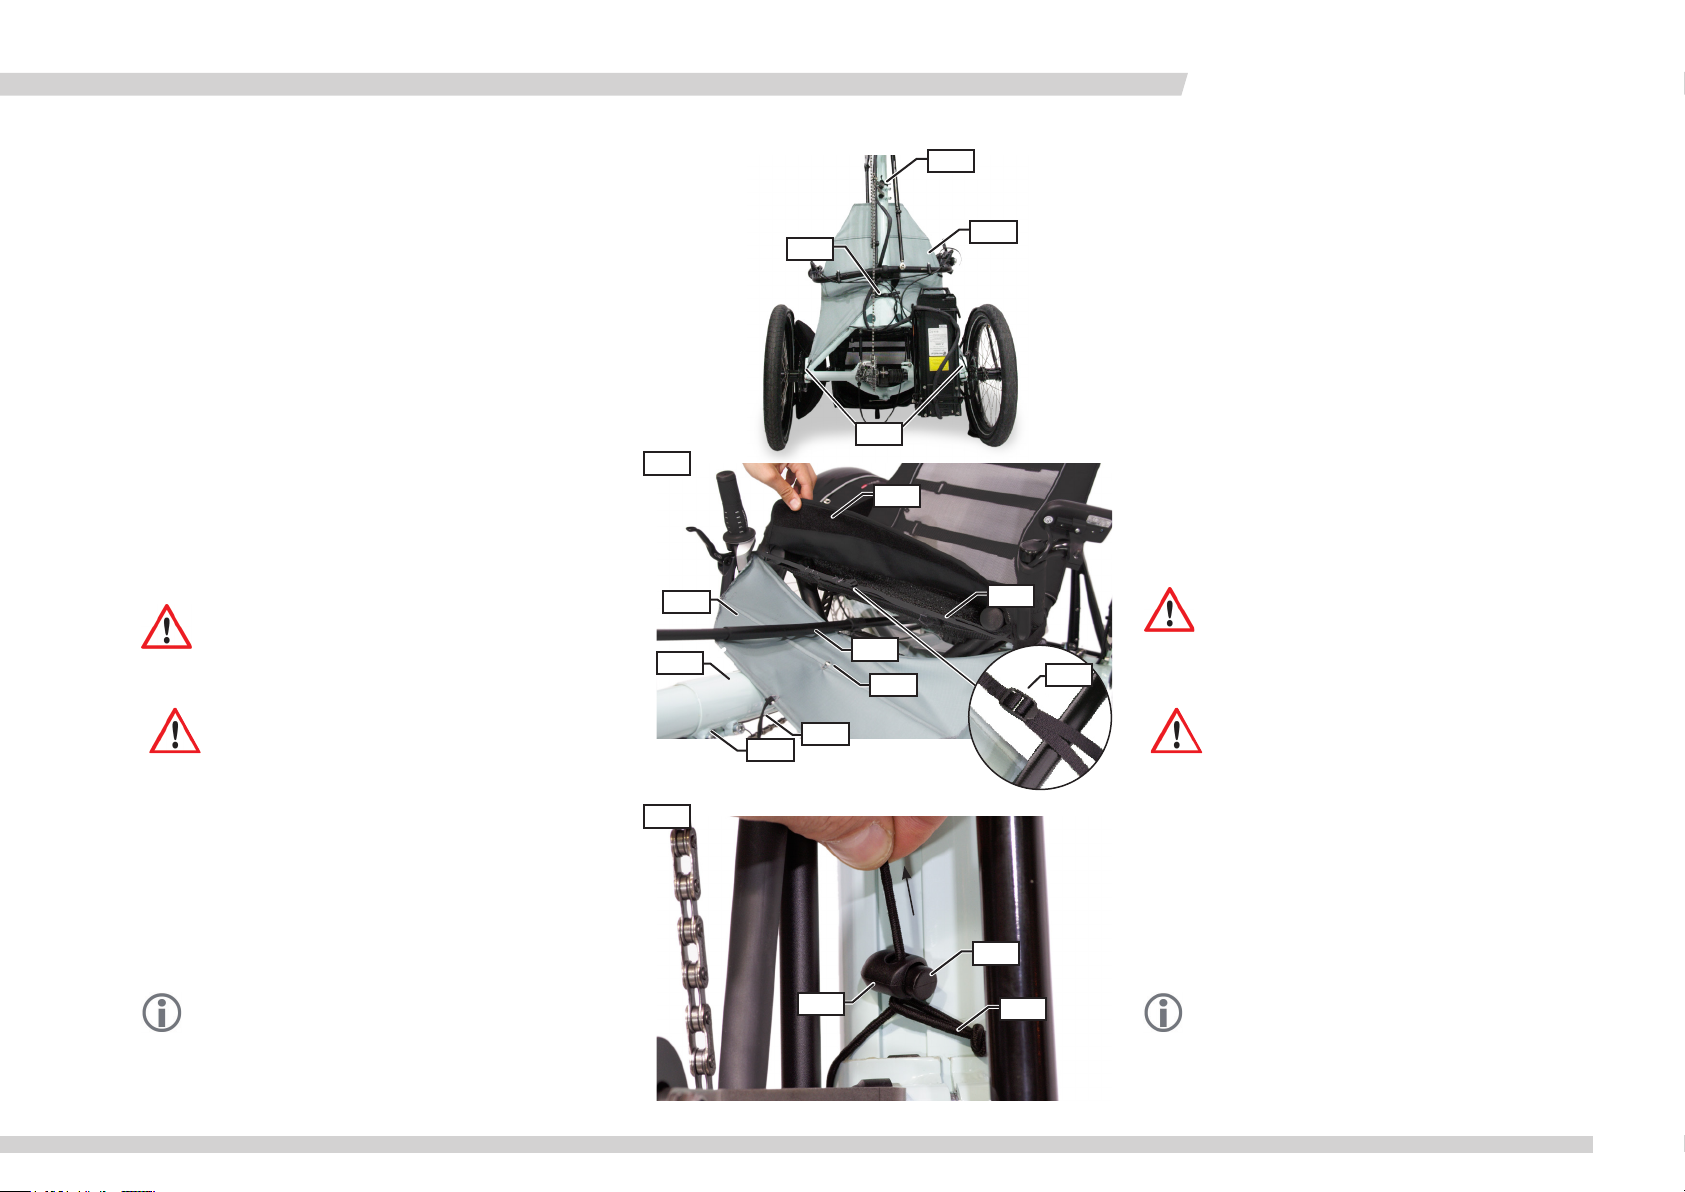
Der Spritzschutz ist nur für die Trike-Modelle Kettwiesel und
Trix geeignet und wird unter dem Sitz an fünf Punkten befestigt.
Punkt A:
1. Legen Sie den Spritzschutz (1) zwischen den Hauptrahmen (2)
und das Kettenschutzrohr (3). Die Nähte des Spannbandes (4)
müssen sich auf der Unterseite befinden.
2. Legen Sie das Spannband (4) über das Kettenschutzrohr (3)
und führen Sie das lose Ende in die Schnalle (5) ein.
3. Ziehen Sie das Spannband fest, so dass der Spritzschutz (1)
einen Bogen bildet.
4. Heben Sie die Sitzbespannung (6) ab, legen Sie das Spannband
(4) an die Sitzkante und klemmen Sie es mit der Sitzbespannung (6) fest.
Achtung!
Unfallgefahr. Der Spritzschutz muss so gespannt sein, dass
die Bewegungsfreiheit der Lenkung nicht eingeschränkt wird.
5. Kippen Sie das Trike nach hinten in Parkposition.
Achtung!
Aufgrund des längeren Radstandes besteht bei den vollgefederten Trikes die Gefahr des Überkippens. Achten Sie auf
einen sicheren Stand des Fahrrades.
A
B
A
Mounting the splash guard
The splash guard can be used only with the trike models Kettwiesel and Trix. It is mounted beneath the seat at five mounting
points.
D
Point A:
1. Position the splash guard (1) between the main frame (2) and
the chain tube (3), with the seams for the mounting strap (4)
C
6
1
2
3
12
7
8
4
5
on the underside of the splash guard.
2. Pull the mounting strap (4) over the chain tube (3), and thread
the loose end through the buckle (5).
3. Now tighten the mounting strap by pulling the loose end until
the splash guard (1) arches downward.
4. Lift the seat cover (6), lay the mounting strap (4) over the
edge of the seat, and secure it by replacing the seat cover (6).
Caution!
Safety hazard: It is of upmost importance that the splash
guard does not restrict the movement of the steering assembly.
5. Tip the trike onto its rear wheels in the upright parking position.
Caution!
Full-suspension trikes have a longer wheelbase and are therefore more prone to tipping over when parked with the front
wheel raised. Take care that the bike stands safe.
Punkt B:
6. Legen Sie das das Gummiband (7) um den Hauptrahmen (2)
vor den Schrauben der Längenverstellung (8) und führen Sie
die Schlaufe (9) über den Tanka (10).
7. Ziehen Sie das lose Ende des Gummibandes, um den Spritzschutz zu spannen. Durch Drücken auf den Knopf (11) des
Tankas lössen Sie die Spannung.
Hinweis:
Bei einer besonders kurzen Rahmenlänge, können Sie den
Spritzschutz falten und das Gummiband an der dafür vorgesehenen Stange (12) befestigen.
www.hasebikes.com
B
10
11
Point B:
6. Stretch the elastic cord (7) around the main frame (2) in front
of the bolts for frame-length adjustment (8), and pull the
cordlock (10) through the loop (9).
7. You can increase tension in the splash guard by pulling on the
loose end of the elastic cord. By pressing the button (11) of
the cordlock, you can reduce tension in the splash guard.
9
Note:
For frames that have been adjusted for especially short riders,
you can fold the splash guard and attach the elastic cord to
the special rod (12) intended for this purpose.
FV 02/16
9
Page 12
FALTVERDECK
Montage / Mounting
Punkte C:
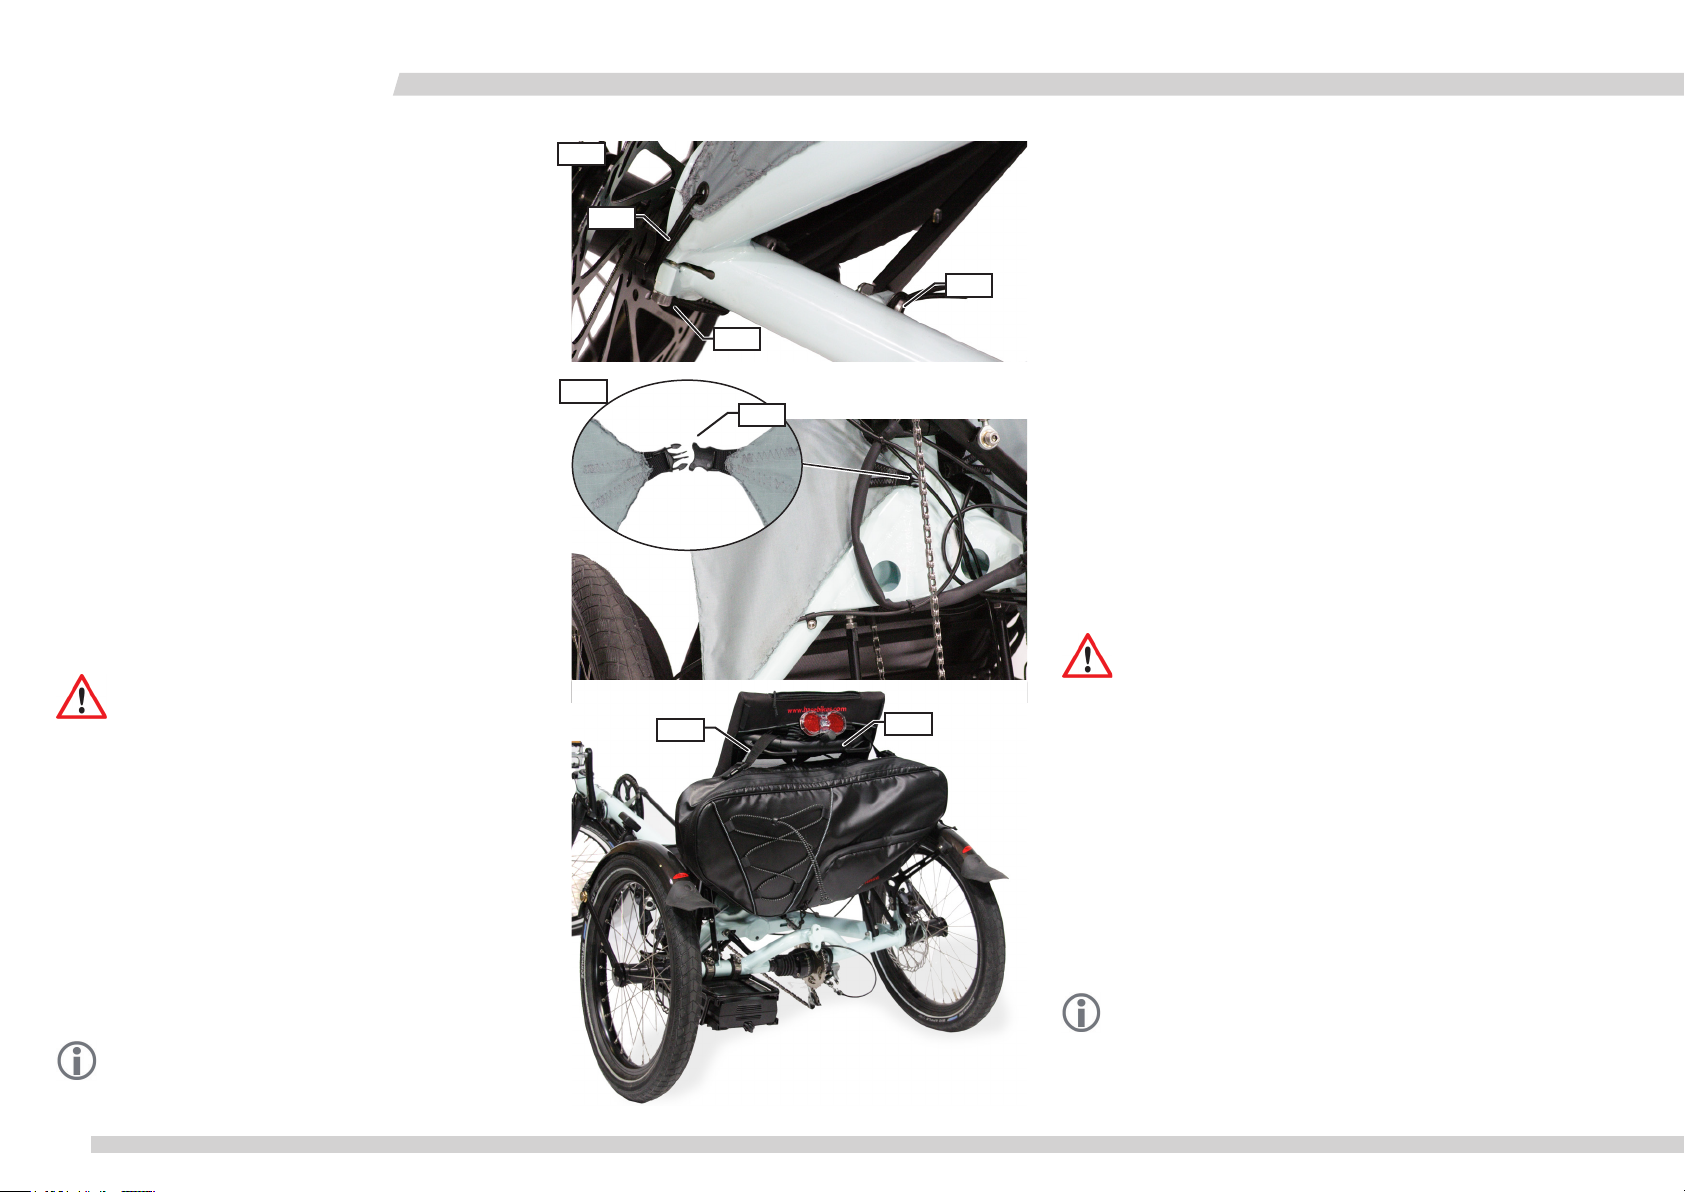
8. Ziehen Sie den Spanngummi (13) um das Achsrohr und
hängen Sie die Schlaufe um die Schraube (14) der Sitzstrebe.
Achten Sie darauf, dass das Gummiband nicht an der Nabe
oder der Antriebsschraube schleift.
Bei Modellen mit Sitzlehnenverstrebung (ab 2014):
Ziehen Sie den Spanngummi (13) um das Achsrohr und
hängen Sie die Schlaufe um die Schraube (15) der Achsklemmung. Der Spanngummi muss unter Spannung stehen. Kürzen
Sie daher den Spanngummi indem Sie zB. einen zusätzlichen
Knoten machen.
9. Wiederholen Sie den Vorgang auf der rechten Seite.
Punkt D:
10. Stecken Sie die beiden Teile der Steckschließe (16) unter dem
Hauptrahmen zusammen.
11. Ziehen Sie anschließend am Punkt B das Gummiband stramm.
12. Vergewissern Sie sich, dass der Spritzschutz nirgendwo die
Bewegungsfreiheit der Lenkung einschränkt. Ziehen Sie gegebenfalls die Schnalle (5) (Bild vorige Seite) unter der Sitzbespannung fester an.
Achtung!
Unfallgefahr. Der Spritzschutz muss so gespannt sein, dass
die Bewegungsfreiheit der Lenkung nicht eingeschränkt wird.
Tasche anbringen
In der als Zubehör erhältlichen Tasche können Sie bei Sonnenscheinfahrten das Faltverdeck unterbringen. Die Tasche selbst,
wird an der Rückseite des Sitzgestells angebracht.
1. Ziehen Sie die beiden Enden des Spanngurtes (1) durch das
Gestell (2) und stecken Sie die beiden Teile der Schließer
zusammen.
2. Ziehen Sie den Spanngurt (1) stramm. Achten Sie darauf, dass
das Ritzel nicht an der Tasche schleift.
Hinweis:
An der Rückseite des Sitzgestells lässt sich eine weitere
Packtasche befestigen.
C
D
13
Points C:
8. Pull the elastic band (13) around the axle tube, and hook the
loop onto the screw (14) of the seat stay. Check to make
sure that the elastic band cannot come in contact with the
hub or the drive screw.
14
15
For models with the new seat stay (from 2014):
Pull the elastic band (13) to the axle tube and hook the loop
to the screw (15) of the axis clamp. The elastic cord must
be under tension. Shorten the elastic band for example by
making an additional node.
9. Repeat Step 8 on the other side.
16
Point D:
10. Close the plastic buckle (16) beneath the main frame.
11. Then tighten the elastic cord at Point B.
12. Check to make sure that the mounted splash guard does not
restrict steering. If necessary, tighten the strap (4, page 8)
under the seat cover.
Caution!
Safety hazard: It is of upmost importance that the splash
guard does not restrict the movement of the steering assembly.
1
2
Mounting the Fairing Bag
On sunny trips, the Foldable Fairing can be stowed in the optional
Fairing Bag. The bag itself is mounted behind the seat to the seat
frame.
1. Pull both ends of the mounting strap (1) through the frame
(2) as shown, and close the buckle.
2. Tighten the mounting strap (1). Check to make sure that the
bag cannot come in contact with the sprocket.
Note: A pannier can be attached to the seat frame in addi-
tion to the Fairing Bag
10
FV 02/16
www.hasebikes.com
Page 13
Mounting the fairing mounts:
full-suspended Kettwiesel, Lepus and Trix
Caution!
Special tools may be required, depending on the type of ve-
hicle. Therefore, Hase recommends having a qualified bicycle
mechanic mount the Foldable Fairing and adjust it to your
height. An improperly mounted or adjusted fairing can cause
accidents.
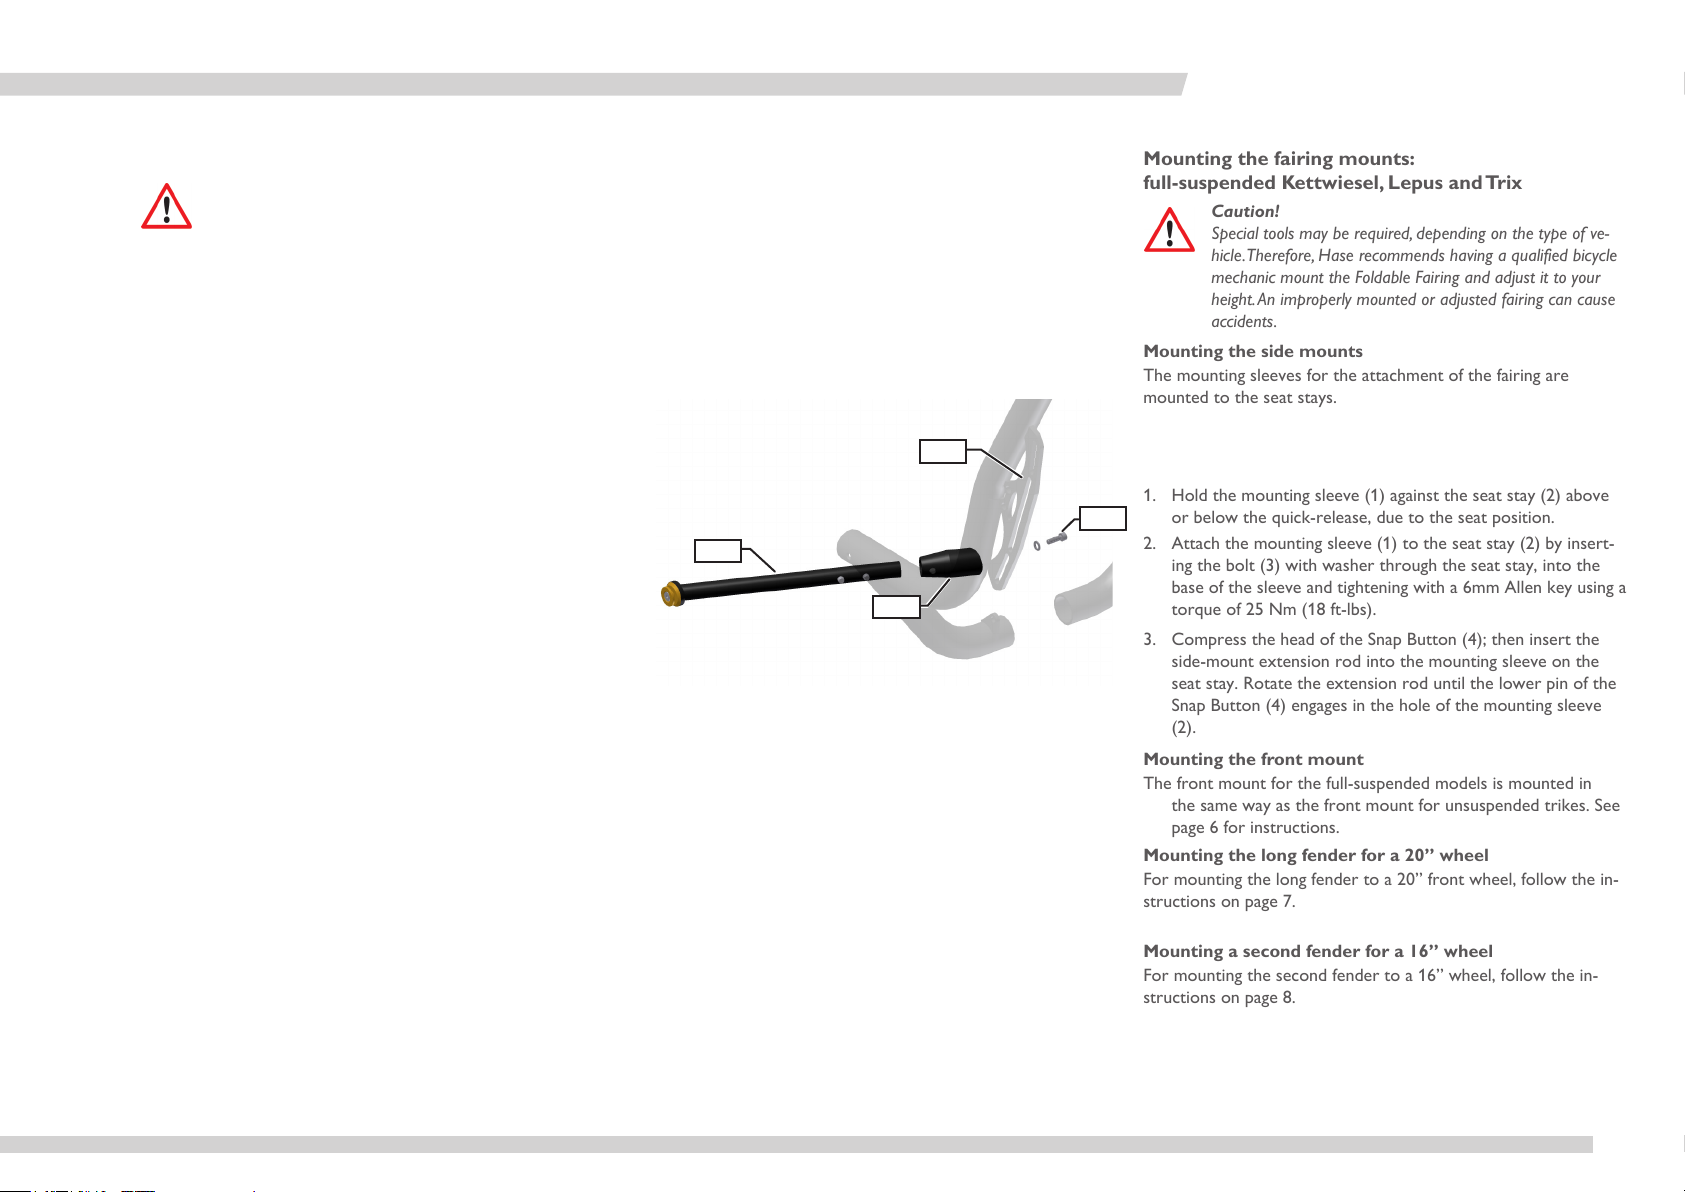
Mounting the side mounts
The mounting sleeves for the attachment of the fairing are
mounted to the seat stays.
1. Hold the mounting sleeve (1) against the seat stay (2) above
or below the quick-release, due to the seat position.
2. Attach the mounting sleeve (1) to the seat stay (2) by insert-
ing the bolt (3) with washer through the seat stay, into the
base of the sleeve and tightening with a 6mm Allen key using a
torque of 25 Nm (18 ft-lbs).
3. Compress the head of the Snap Button (4); then insert the
side-mount extension rod into the mounting sleeve on the
seat stay. Rotate the extension rod until the lower pin of the
Snap Button (4) engages in the hole of the mounting sleeve
(2).
Mounting the front mount
The front mount for the full-suspended models is mounted in
the same way as the front mount for unsuspended trikes. See
page 6 for instructions.
Mounting the long fender for a 20” wheel
For mounting the long fender to a 20” front wheel, follow the in-
structions on page 7.
Mounting a second fender for a 16” wheel
For mounting the second fender to a 16” wheel, follow the in-
structions on page 8.
Montage / Mounting
Montage am gefederten Kettwiesel, Lepus und Trix
Achtung!
Seitliche Befestigung montieren
Die Steckhülsen für die seitliche Befestigung des Regenverdecks
werden an der Sitzstrebe angeschraubt.
1. Halten Sie die Steckhülse (1) an die Sitzstrebe (2) je nach
2. Stecken Sie die mitgelieferte Unterlegscheibe auf die Schraube
3. Drücken Sie den Knopf am „Snap Button“ (4) und stecken
Vordere Befestigung montieren
Die Montage der vorderen Befestigung der gefederten Modelle gleicht der Montage der der vorderen Befestigung an ungefederten Trikes auf Seite 6.
Langes Schutzblech für 20“ Rad montieren
Die Montage des langen Schutzbleches für das 20“ Vorderrad
gleicht der Montage auf Seite 7.
Langes Schutzblech für 16“ Rad montieren
Die Montage des zweiten Schutzbleches für das 16“ Vorderrad
gleicht der Montage auf Seite 8.
Die Montage erfordert je nach Fahrradmodell eventuell
Spezialwerkzeug. Lassen Sie deshalb das Faltverdeck von
einer Fachwerkstatt montieren und auf Ihre Körpergröße
einstellen. Fehlerhafte Montage oder Einstellung können
Unfälle verursachen.
Sitzposition oberhalb oder unterhalb des Schnellspanners der
Sitzverstellung.
(3) und schrauben Sie die Steckhülse (1) mit einem Innensechskantschlüssel 6 mm mit 25 Nm an die Sitzstrebe (2) fest.
Sie das Seitensteckrohr in die Steckhülse an der Sitzstrebe.
Verdrehen Sie das Seitensteckrohr so, dass der „Snap Button“
(4) in der Steckhülse (2) einrastet.
FOLDABLE FAIRING
2
3
4
1
www.hasebikes.com
FV 02/16
11
Page 14
FALTVERDECK
Montage / Mounting
Montage am Lepus Stahl
Achtung!
Die Montage erfordert je nach Fahrradmodell eventuell
Spezialwerkzeug. Lassen Sie deshalb das Faltverdeck von
einer Fachwerkstatt montieren und auf Ihre Körpergröße
einstellen. Fehlerhafte Montage oder Einstellung können zur
gefährlichen Situationen führen.
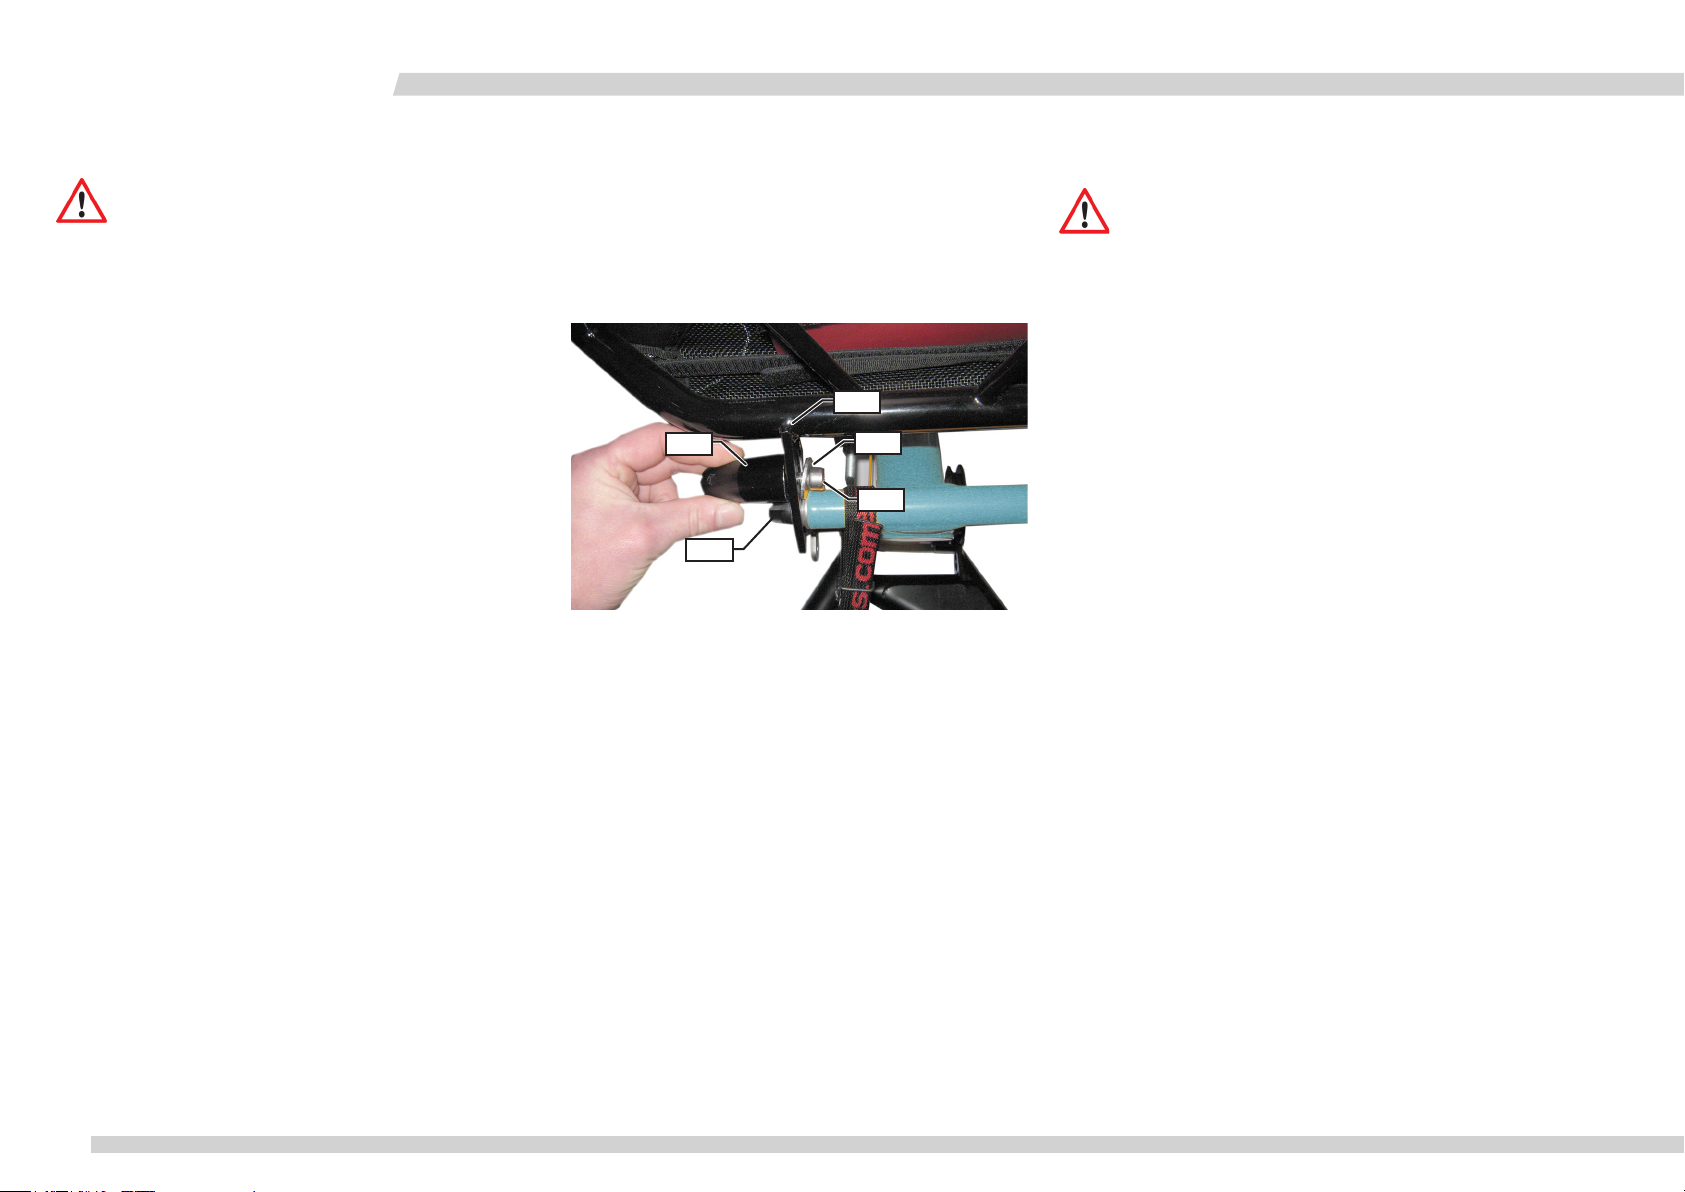
Seitliche Befestigung montieren
Die Steckhülsen für die seitliche Befestigung des Regenverdecks
werden an der Sitzstrebe angeschraubt.
1. Halten Sie die Steckhülse (1) an die Sitzstrebe (2) oberhalb
des Schnellspanners (5) der Sitzverstellung.
2. Stecken Sie die mitgelieferte Unterlegscheibe (3) auf die
Schraube (4) und schrauben Sie die Steckhülse (1) mit der
Schraube (4) mit einem Innensechskantschlüssel 6 mm mit
25 Nm an die Sitzstrebe (2) fest.
Mounting the fairing mount: Lepus steel
Caution!
Special tools may be required, depending on the type of vehicle. Therefore, Hase recommends having a qualified bicycle
mechanic mount the Foldable Fairing and adjust it to your
height. An improperly mounted or adjusted fairing can cause
accidents.
Mounting the side mounts
2
1
3
The mounting sleeves for the attachment of the fairing are
mounted to the seat stays.
4
1. Hold the mounting sleeve (1) against the seat stay (2) above
5
the quick-release (5) used for seat adjustment, as shown.
2. Attach the mounting sleeve (1) to the seat stay (2) by inserting the bolt (4) with washer (3) through the seat stay, into the
base of the sleeve and tightening with a 6mm Allen key using a
torque of 25 Nm (18 ft-lbs).
Vordere Befestigung montieren
Die Montage der vorderen Befestigung am Lepus gleicht der Montage der der vorderen Befestigung am Kettwiesel, Klimax und
Trix auf Seite 6.
Langes Schutzblech für 20“ Rad montieren
Die Montage des langen Schutzbleches für das 20“ Vorderrad
gleicht der Montage auf Seite 7.
Langes Schutzblech für 16“ Rad montieren
Die Montage des zweiten Schutzbleches für das 16“ Vorderrad
gleicht der Montage auf Seite 8.
FV 02/16
12
Mounting the front mount
The front mount for the Lepus is mounted in the same way as the
front mount for the Kettwiesel, Klimax, and Trix. See page 6 for
instructions.
Mounting the long fender for a 20” wheel
For mounting the long fender to a 20” front wheel, follow the instructions on page 7.
Mounting a second fender for a 16” wheel
For mounting the second fender to a 16” wheel, follow the instructions on page 8.
www.hasebikes.com
Page 15
FOLDABLE FAIRING
Rund ums Fahren
Faltverdeck anbringen
Das Faltverdeck ist für die Trike-Modelle: Kettwiesel, Trix und
Lepus. Das Verdeck ist für alle Modelle gleich. Unterschiedlich ist
die seitliche Befestigung.
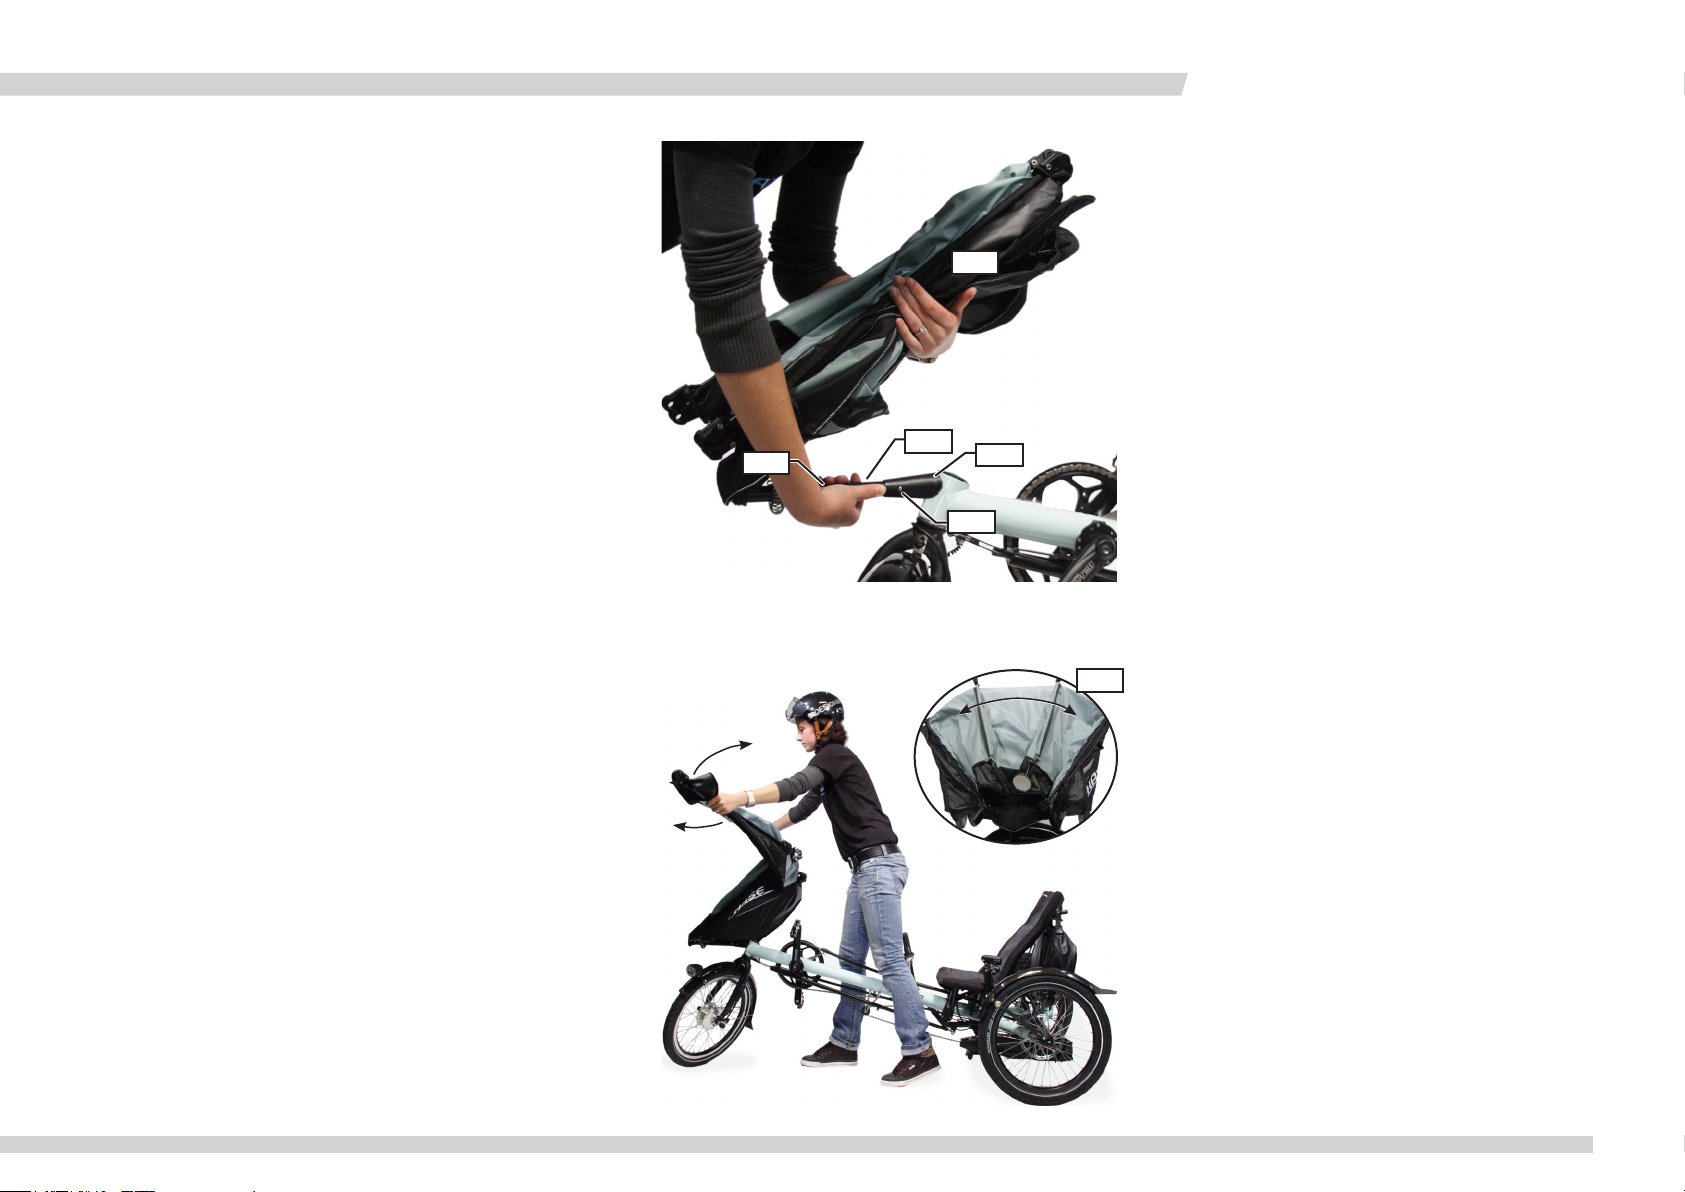
1. Alle Modelle
Drücken Sie den Knopf am „Snap Button“ (9) des Faltverdecks (10) und stecken Sie es in die montierte Nase (6) am
Steuerlager des Trikes. Verdrehen Sie die Stange des Regenverdecks (11) bis der „Snap Button“ (12) in der Nase (6) bzw.
in der Verlängerung arretiert ist.
2. Fächern Sie das Faltverdeck zu beiden Seiten auseinander (Bild
A).
11
Riding with the Foldable Fairing
Mounting the Foldable Fairing
The Foldable Fairing is intended for use with the trike models
10
9
6
12
Kettwiesel, Lepus and Trix. The fairing itself is identical for all
models. The side mounts, however, differ for the various models.
1. All models
Compress the head (9) of the Snap Button (12) in the mounting rod (11) of the Foldable Fairing (10), and insert the rod
into the mounted nose cone (6) on the head tube of the trike.
Rotate the mounting rod (11) until the lower pin of the Snap
Button (12) engages in the hole of the nose cone (6), or the
extension rod (Pino).
2. Hold the outer edges of the fairing frame, and spread the
fairing apart as shown (Fig. A).
A
3. Klappen Sie das Faltverdeck auf und setzen Sie sich anschließend auf das Fahrrad.
www.hasebikes.com
3. Unfold the fairing, and sit down on the seat of the trike (or
tandem).
FV 02/16
13
Page 16
FALTVERDECK
Rund ums Fahren / Riding with the Foldable Fairing
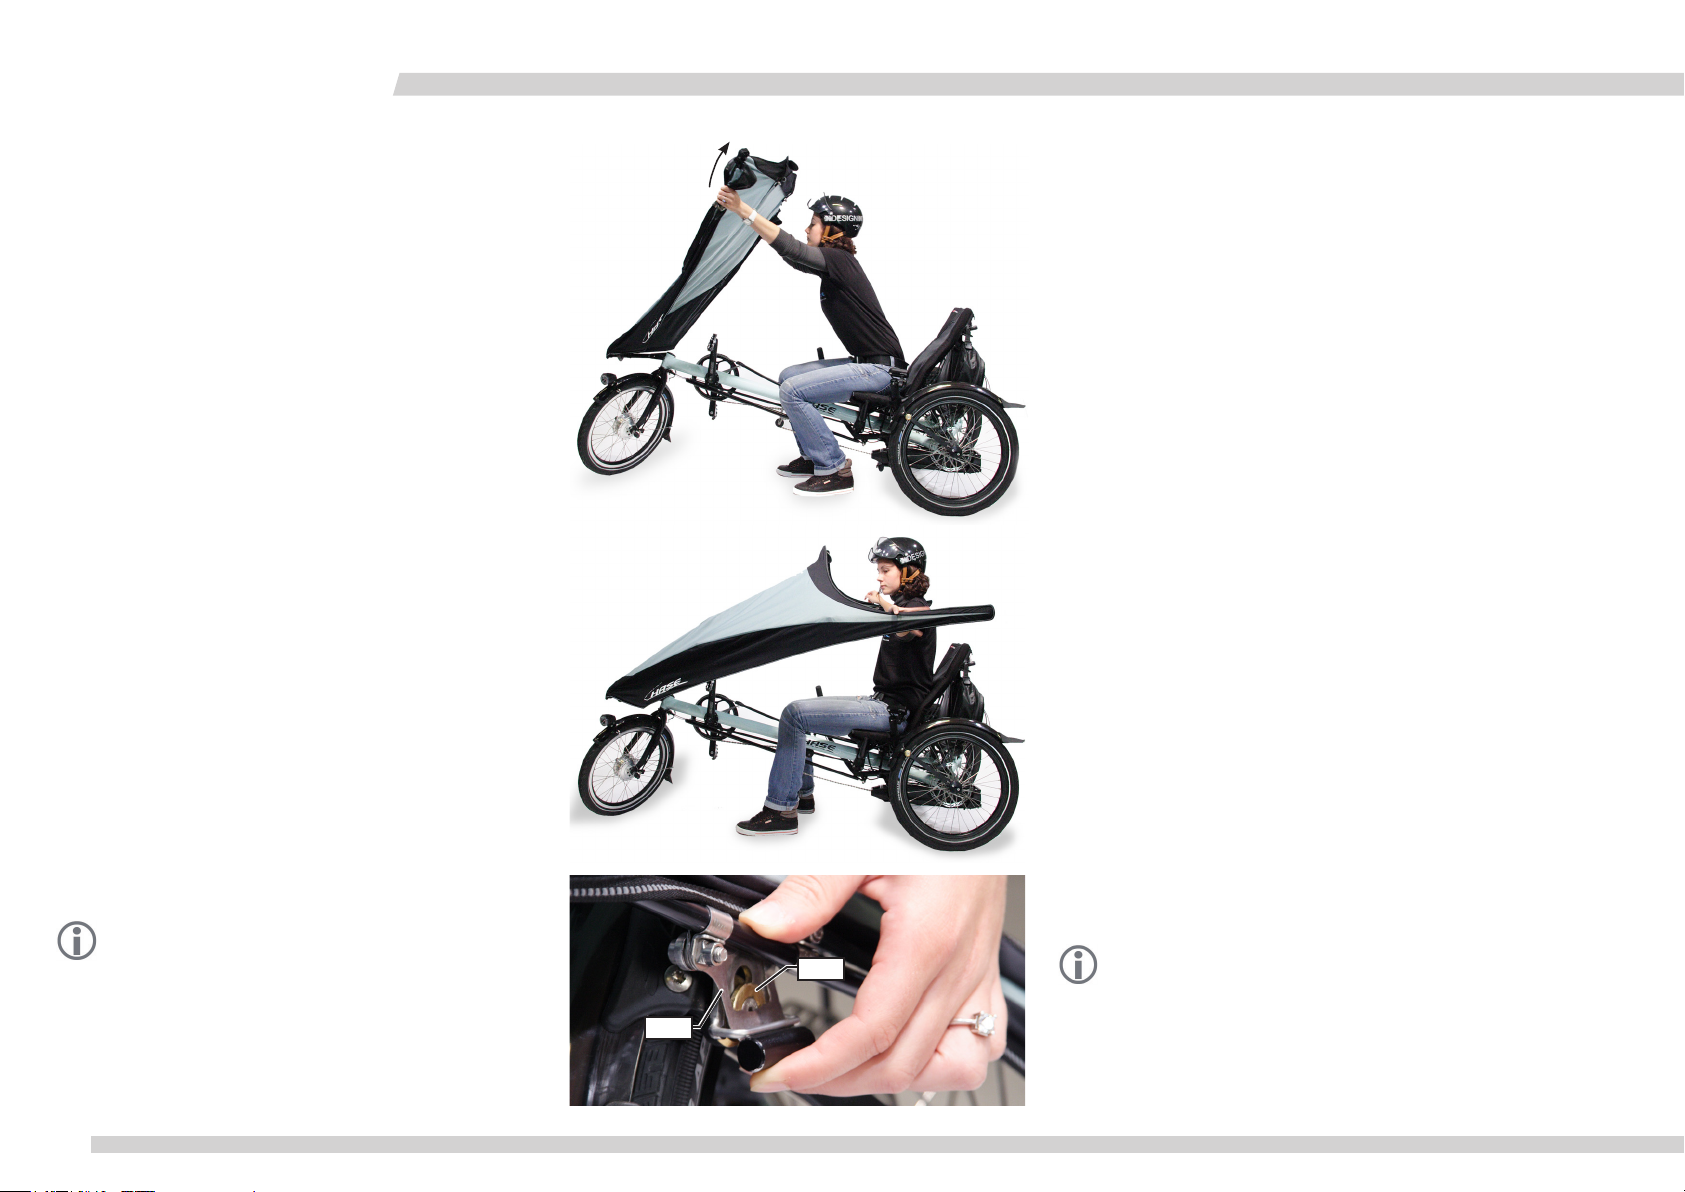
6. Ziehen Sie das Faltverdeck zu sich hin.
7. Schieben Sie auf beiden Seiten des Faltverdecks die Rastbleche
(13) auf die Befestigungsknöpfe (14) und rasten Sie sie ein.
6. Pull the fairing down over you.
7. Guide the locking plate (13) on each side of the Foldable Fairing over the respective mounting button (14) until the button
engages in the locking plate.
14
Hinweis:
Bei den gefederten Trikes und dem Lepus Stahl befinden sich
die Befestigungsknöpfe anders als im Bild dargestellt an den
Steckrohren am Sitz.
FV 02/16
13
14
Note:
The mounting buttons for the full-suspended trikes and Lepus
steel are located at the ends of the side-mount extension
rods beneath the seat (not shown).
www.hasebikes.com
Page 17
Rund ums Fahren / Riding with the Foldable Fairing
FOLDABLE FAIRING
Ausrichten des Faltverdecks
Nach dem Anbringen des Faltverdecks werden wahrscheinlich noch
Knitterfalten zu sehen sein. Das Material reagiert auf Umwelteinflüsse wie Hitze, Kälte und Feuchtigkeit. In feuchtem Zustand wird das
Faltverdeck nicht so straff sitzen, wie im trockenen Zustand. Die Stoffhülle strafft sich jedoch, wenn sie einige Zeit aufgespannt ist. Sollte das
Faltverdeck jedoch trotzdem nicht richtig gespannt sein, können Sie
folgende Einstellungen vornehmen:
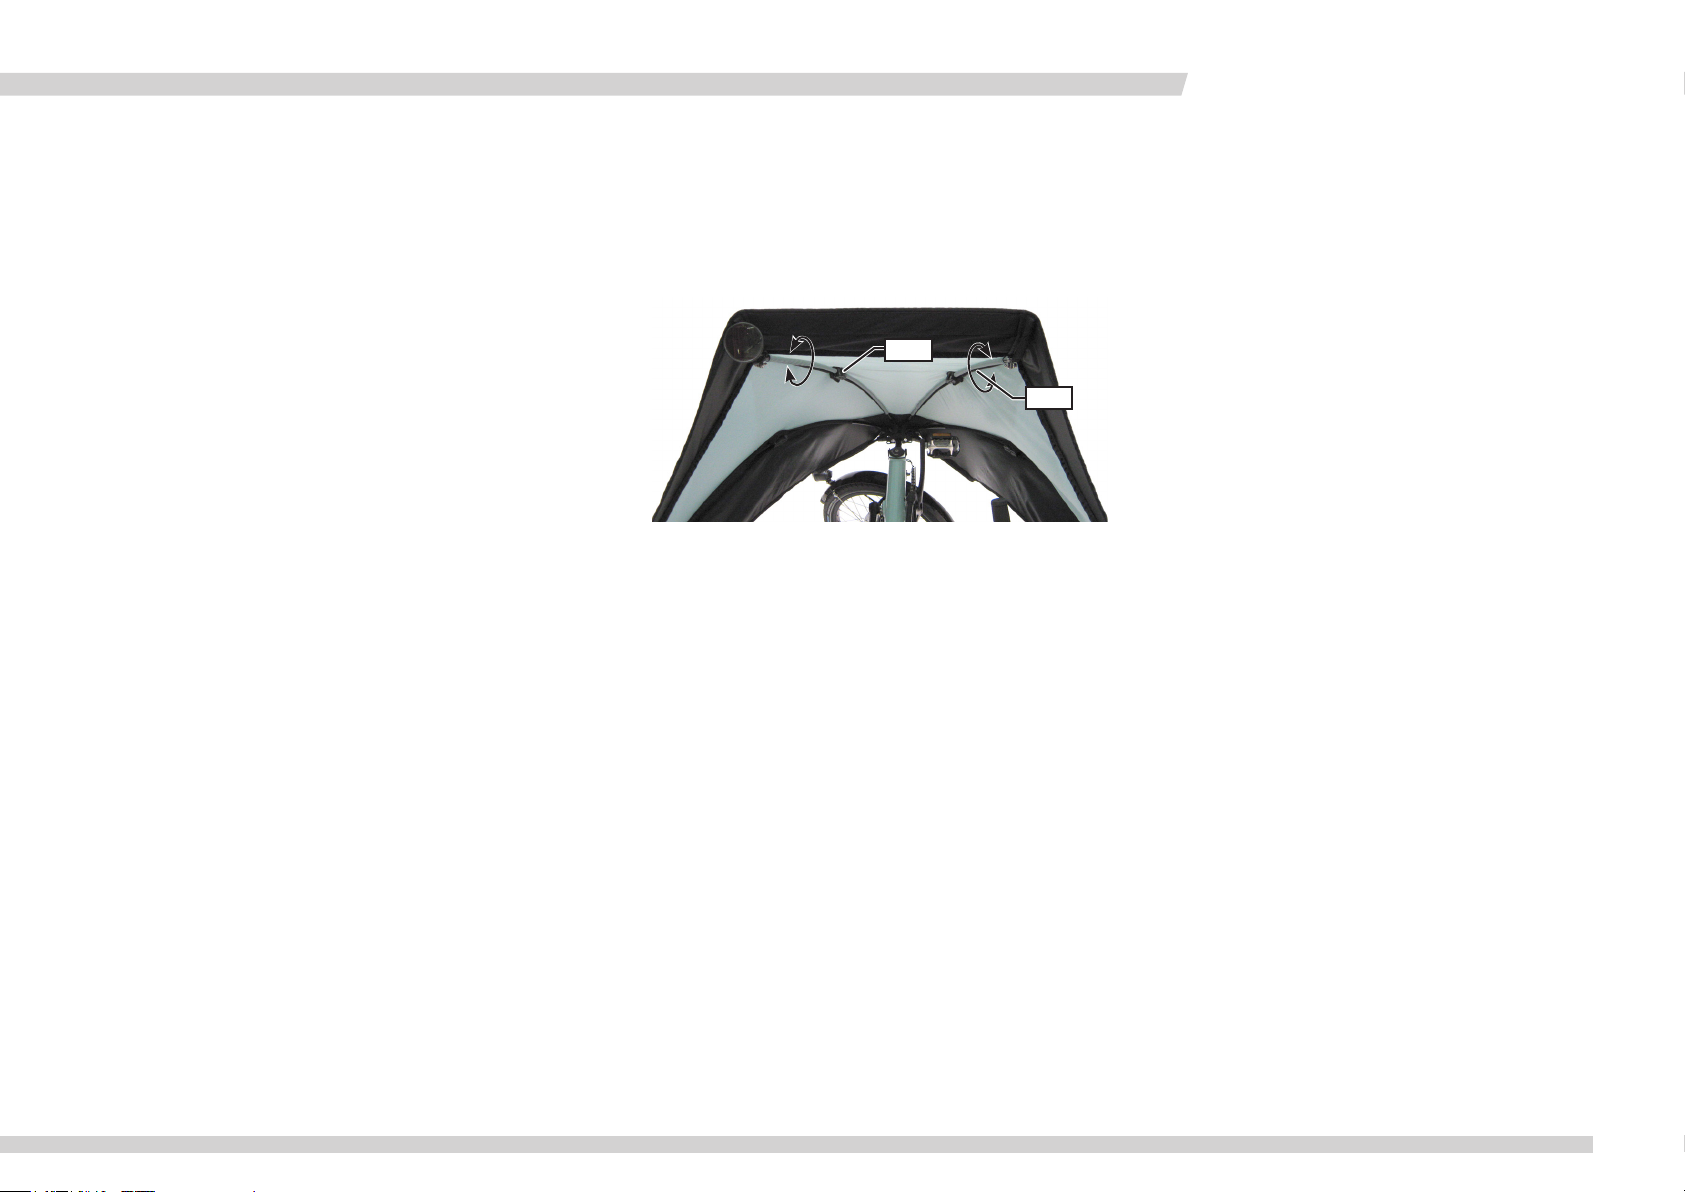
Fehlende Spannung im oberen Stoffbereich lässt sich durch Verdrehen der gebogenen Stangen (Windabrisskante) ausgleichen.
1. Lösen Sie mit einem Innensechskantschlüssel 4 mm die
Klemmschrauben (1) an den Stangengelenken.
2. Verdrehen Sie die Stangen (2) bis die Windabrisskante und
das obere Stofffeld gleichmäßig gespannt sind.
3. Ziehen Sie die Klemmschrauben (1) wieder fest.
4. Sollte die Windabrisskante nicht horizontal verlaufen, dann
kontrollieren Sie die Lage der seitlichen Befestigungen
5. Stellen Sie gegebenfalls die seitlichen Befestigungen wie im
Kapitel „Höhe der Windabrisskante einstellen“auf Seite 16
neu ein.
6. Kontrollieren Sie, ob die Rastbleche an beiden Seiten spannungsfrei einrasten und stellen Sie sie gegebenfalls neu ein.
Siehe Kapitel „Höhe der Windabrisskante einstellen“ auf Seite
16.
Adjusting the Foldable Fairing
After you have mounted the Foldable Fairing, the fabric will probably still have wrinkles. The fabric reacts to environmental influences like heat, cold, and moisture. When wet, the fairing will not
be stretched as taut as the dry fairing. However, the fabric will
become more taut over time when mounted. The tension in the
fabric can also be adjusted as follows:
Inadequate tension in the upper fabric area can be corrected by
1
2
rotating the ends of the bent frame rods (inside the wind deflector).
1. Using a 4mm Allen key, loosen the clamp bolts (1) on the
frame joints.
2. Rotate the ends of the frame rods (2) outward until the wind
deflector and upper fabric area are uniformly tensioned.
3. Retighten the clamp bolts (1).
4. If the upper edge of the wind deflector is not horizontal, then
check the positioning of the side mounts..
5. If necessary, reposition the side mounts as described in section “Adjusting wind deflector height” on page 16.
6. Make sure that the locking plates on both sides of the fairing
click easily onto the mounting buttons without jamming, and
readjust if necessary. See section “Adjusting wind deflector
height” on page 16.
www.hasebikes.com
FV 02/16
15
Page 18
FALTVERDECK
Rund ums Fahren / Riding with the Foldable Fairing
Höhe der Windabrisskante einstellen
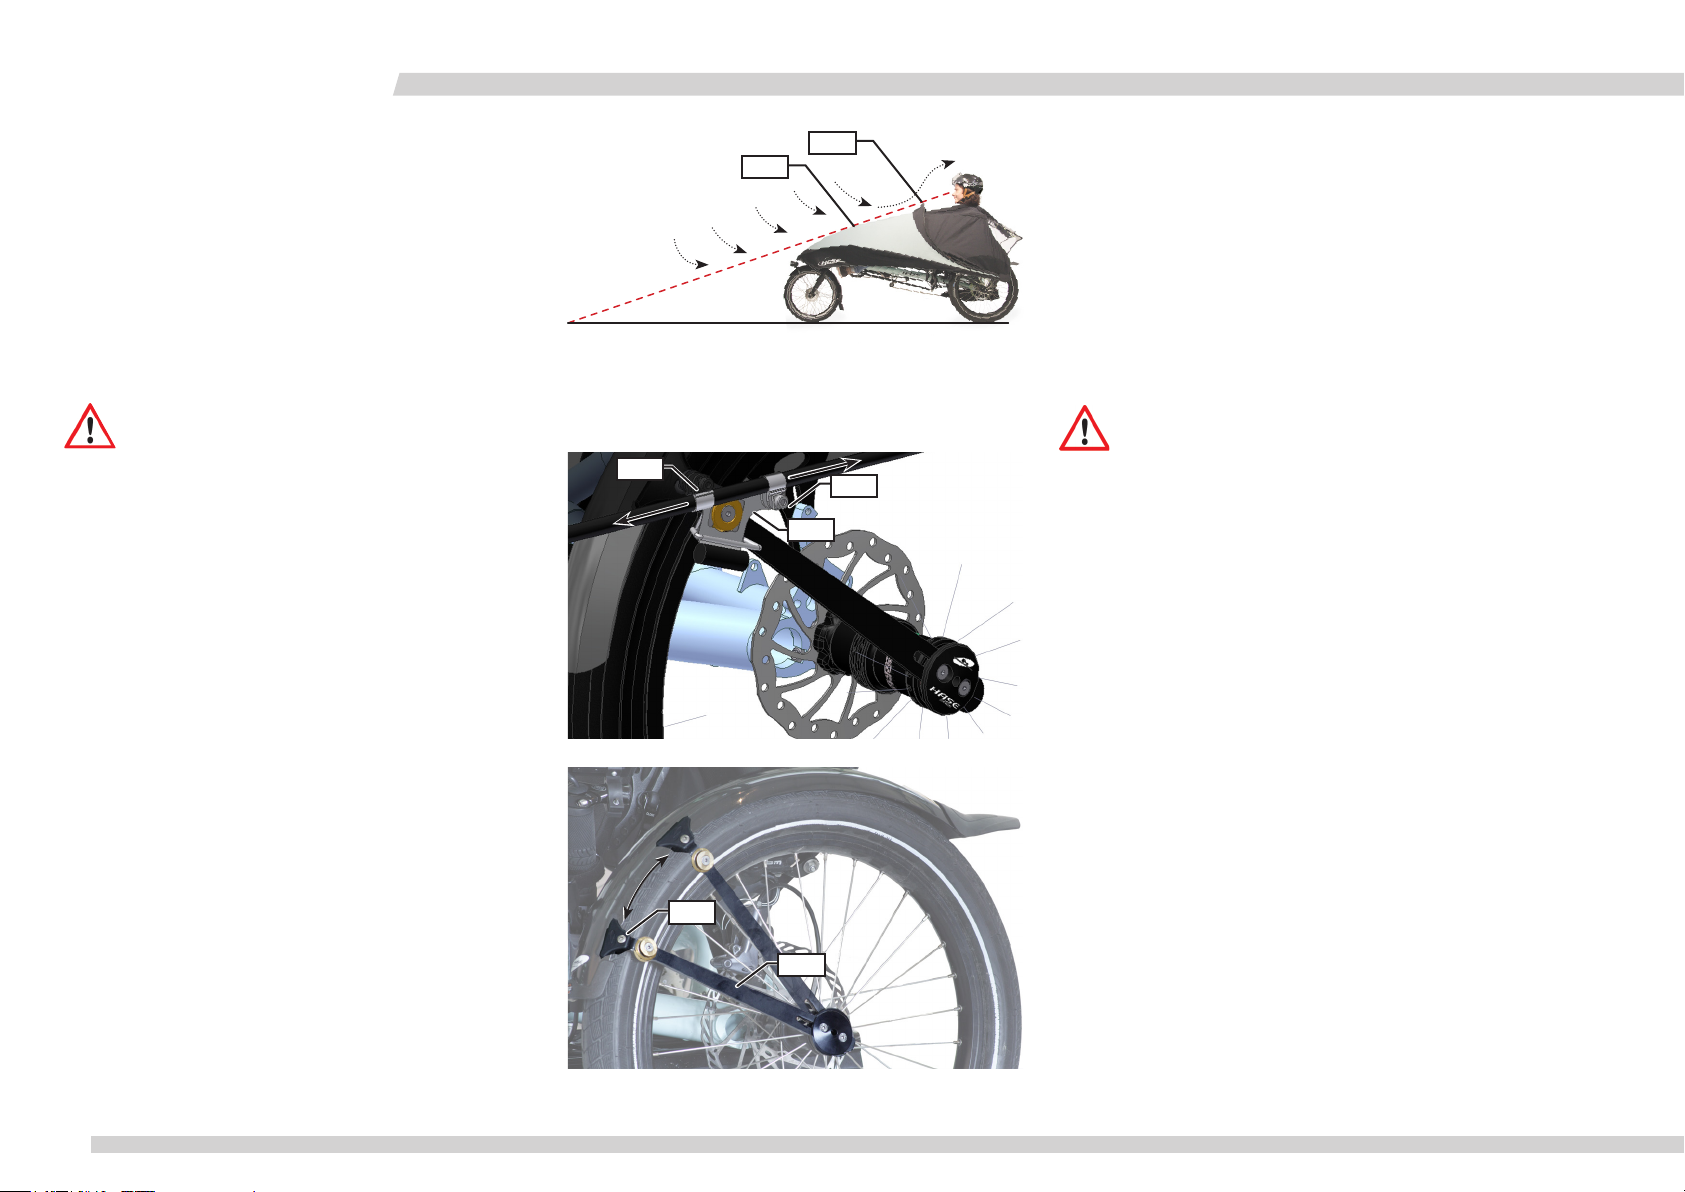
Das Faltverdeck ist so konstruiert, dass der Fahrtwind über den
Kopf geführt wird. Je höher die Windabrisskante (1) eingestellt
ist, desto weniger Wind hat man im Gesicht. Eine Einstellung für
optimale Sicht ist, wenn die Windabrisskante (1) eine Linie mit
den Gelenken (2) des Faltverdecks bildet. Wird die Windabrisskante (1) um ca. 4 bis 5 cm höher eingestellt, so erhöht sich der
Windschutz, die Sicht wird jedoch etwas eingeschränkt. Diese
Einstellung sollten nur erfahrene Fahrer benutzen.
Achtung!
Die Windabrisskante darf nur so hoch eingestellt werden,
dass noch gute Sicht gewährleistet ist. Einschränkungen der
Sicht können zu Unfällen führen.
Ungefederte Trikes
1. Lösen Sie die beiden Schrauben (4) am Rastblech (3) auf
beiden Seiten des Trikes mit einem Innensechskantschlüssel 4
mm.
2. Lösen Sie die Schraube der Schutzblechklemme (5) auf beiden
Seiten des Trikes mit einem Innensechskantschlüssel 4 mm.
1
2
Adjusting wind deflector height
The Foldable Fairing is designed to direct the airstream over the
rider’s head. The higher the top edge of the wind deflector (1),
the less wind the rider will feel in his or her face. For optimal vision, the top edge of the wind deflector (1) should form a straight
line with the rider’s eyes and the joints (2) of the Foldable Fairing.
Raising the top edge of the wind deflector (1) by approx. 4 to
5 cm (1½-2”) increases wind protection but restricts the rider’s
vision somewhat. This is not recommended for less experienced
riders.
Caution!
The wind deflector should not obstruct the rider’s vision.
Restricted vision can cause accidents.
4
4
3
Non-suspended trikes
1. Loosen the two bolts (4) on the locking plate (3) on each side
of the trike using a 4mm Allen key.
2. Loosen the bolt on the fender clamp (5) on each side of the
trike using a 4mm Allen key.
3. Verdrehen Sie die Schutzblechstreben (6), um die Höhe der
Windabrisskante einzustellen. Verschieben Sie auch passend
die Rastbleche (3) mit. Achten Sie darauf, dass die Windabrisskante horizontal verläuft und die Sicht ausreichend ist.
4. Ziehen Sie die Schrauben der Schutzblechklemmen (5) mit
einem Innensechskantschlüssel 4 mm wieder fest.
5. Ziehen Sie die beiden Schrauben (4) am Rastblech mit einem
Innensechskantschlüssel 4 mm wieder fest.Sitz.
FV 02/16
16
3. Adjust the height of the wind deflector by moving the fender
stay (6) and sliding the fender clamp (5) to a higher or lower
position on the fender. Slide the locking plate (3) into the
appropriate position. Check to make sure that the upper edge
of the wind deflector is horizontal and the rider’s vision is not
obstructed.
5
6
4. Retighten the bolts on the fender clamps (5) using a 4mm
Allen key.
5. Retighten the two bolts (4) on the locking plates using a 4mm
Allen key.
www.hasebikes.com
Page 19
Rund ums Fahren / Riding with the Foldable Fairing
FOLDABLE FAIRING
Gefederte Trikes und Stahl-Lepus
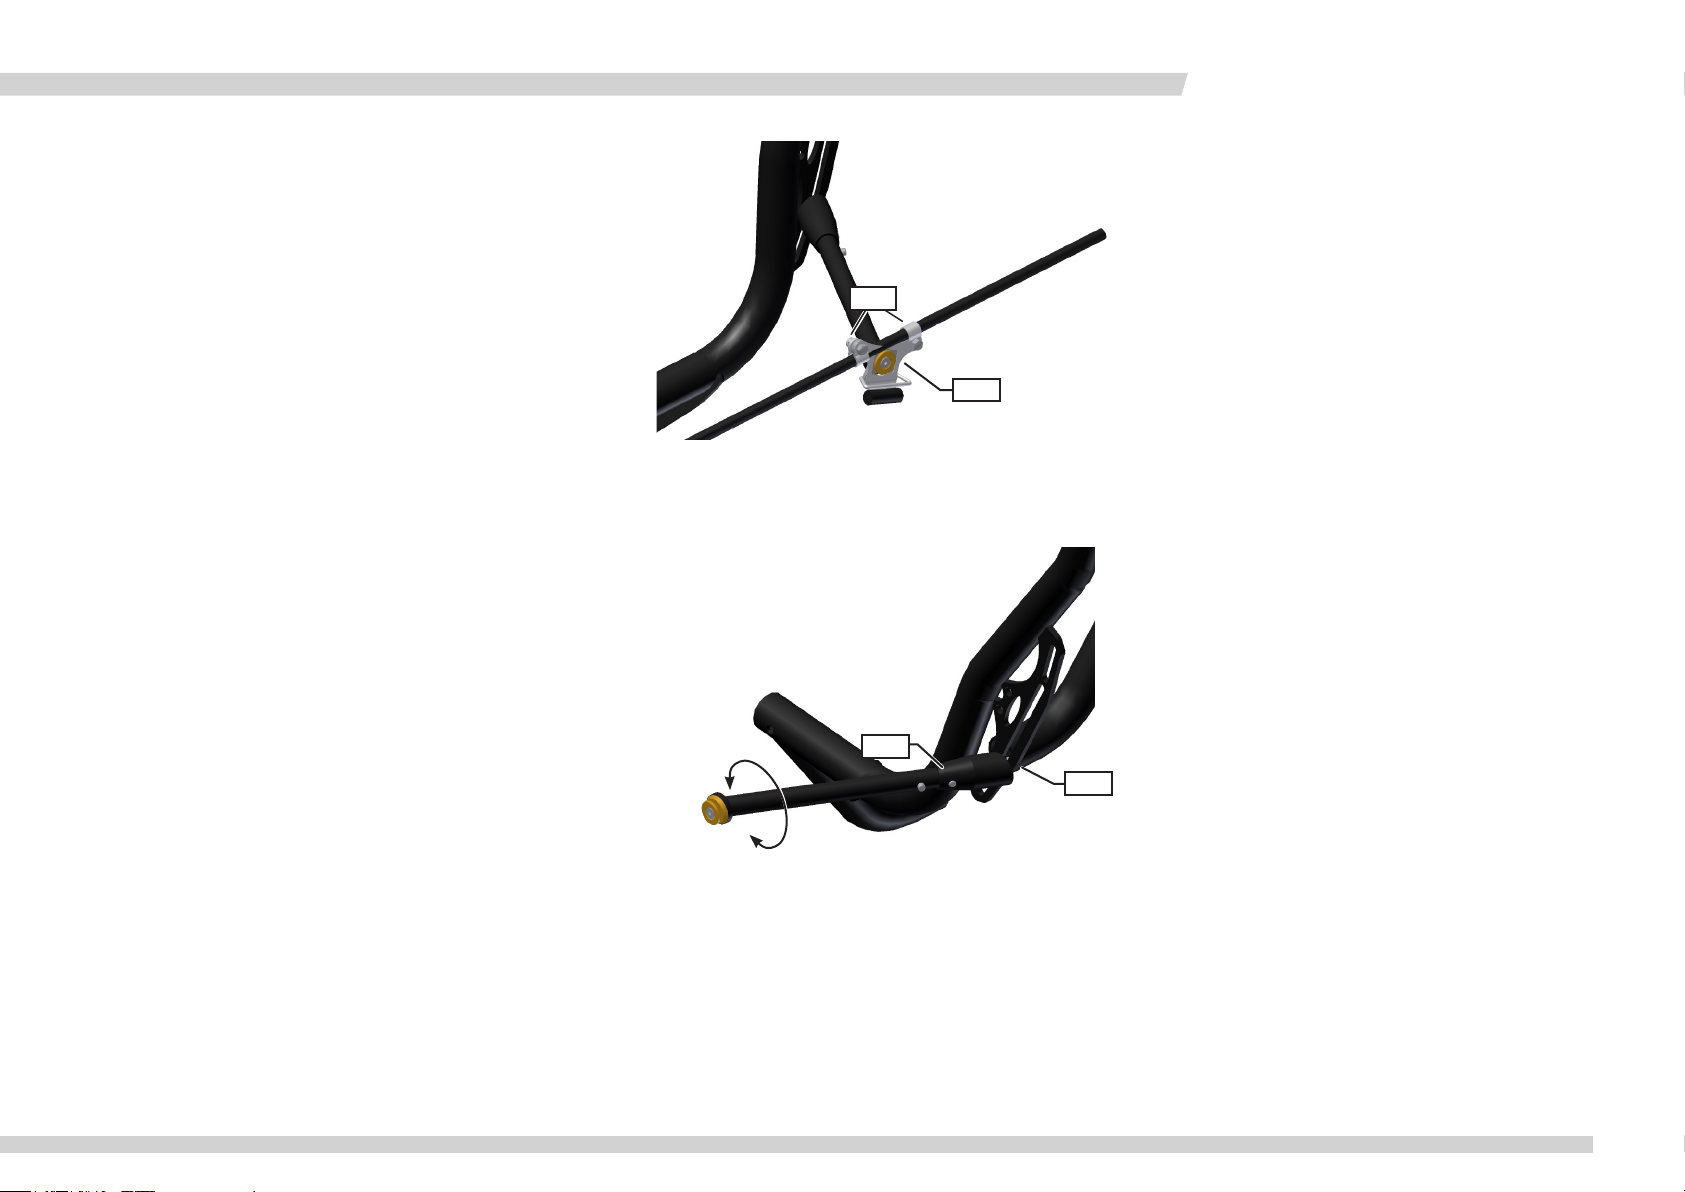
1. Lösen Sie die Schrauben (4) im Rastblech (3) auf beiden Seiten
mit einem Innensechskantschlüssel 4 mm.
2. Lösen Sie die Schrauben (5) der Steckhülse (6) auf beiden
Seiten des Pinos mit einem Innensechskantschlüssel 6 mm.
3. Verdrehen Sie die Steckhülsen (6), um die Höhe der Windabrisskante einzustellen. Verschieben Sie eventuell die Rastbleche mit. Achten Sie darauf, dass die Windabrisskante
horizontal verläuft und die Sicht ausreichend ist.
4. Ziehen Sie die Schrauben (5) der Steckhülsen (6) mit einem
Innensechskantschlüssel 6 mm wieder fest.
5. Ziehen Sie die beiden Schrauben (5) an den Rastblechen mit
einem Innensechskantschlüssel 4 mm wieder fest.
Full-suspended trikes and Steel Lepus
1. Loosen the bolts (4) in the locking plate (3) on each side of
using a 4mm Allen key.
4
2. Loosen the bolts (5) in the mounting sleeve (6) on each side
of the Pino using a 6mm Allen key.
3
3. Rotate the mounting sleeves (6) in order to adjust the height
of the wind deflector. If necessary, reposition the locking plates
accordingly. Check to make sure that the upper edge of the wind
deflector is horizontal and the rider’s vision is not obstructed.
4. Retighten the bolts (5) in the mounting sleeves (6) using a
6mm Allen key.
5. Retighten the two bolts (4) on the locking plates using a 4mm
Allen key.
www.hasebikes.com
6
5
FV 02/16
17
Page 20
FALTVERDECK
Rund ums Fahren / Riding with the Foldable Fairing
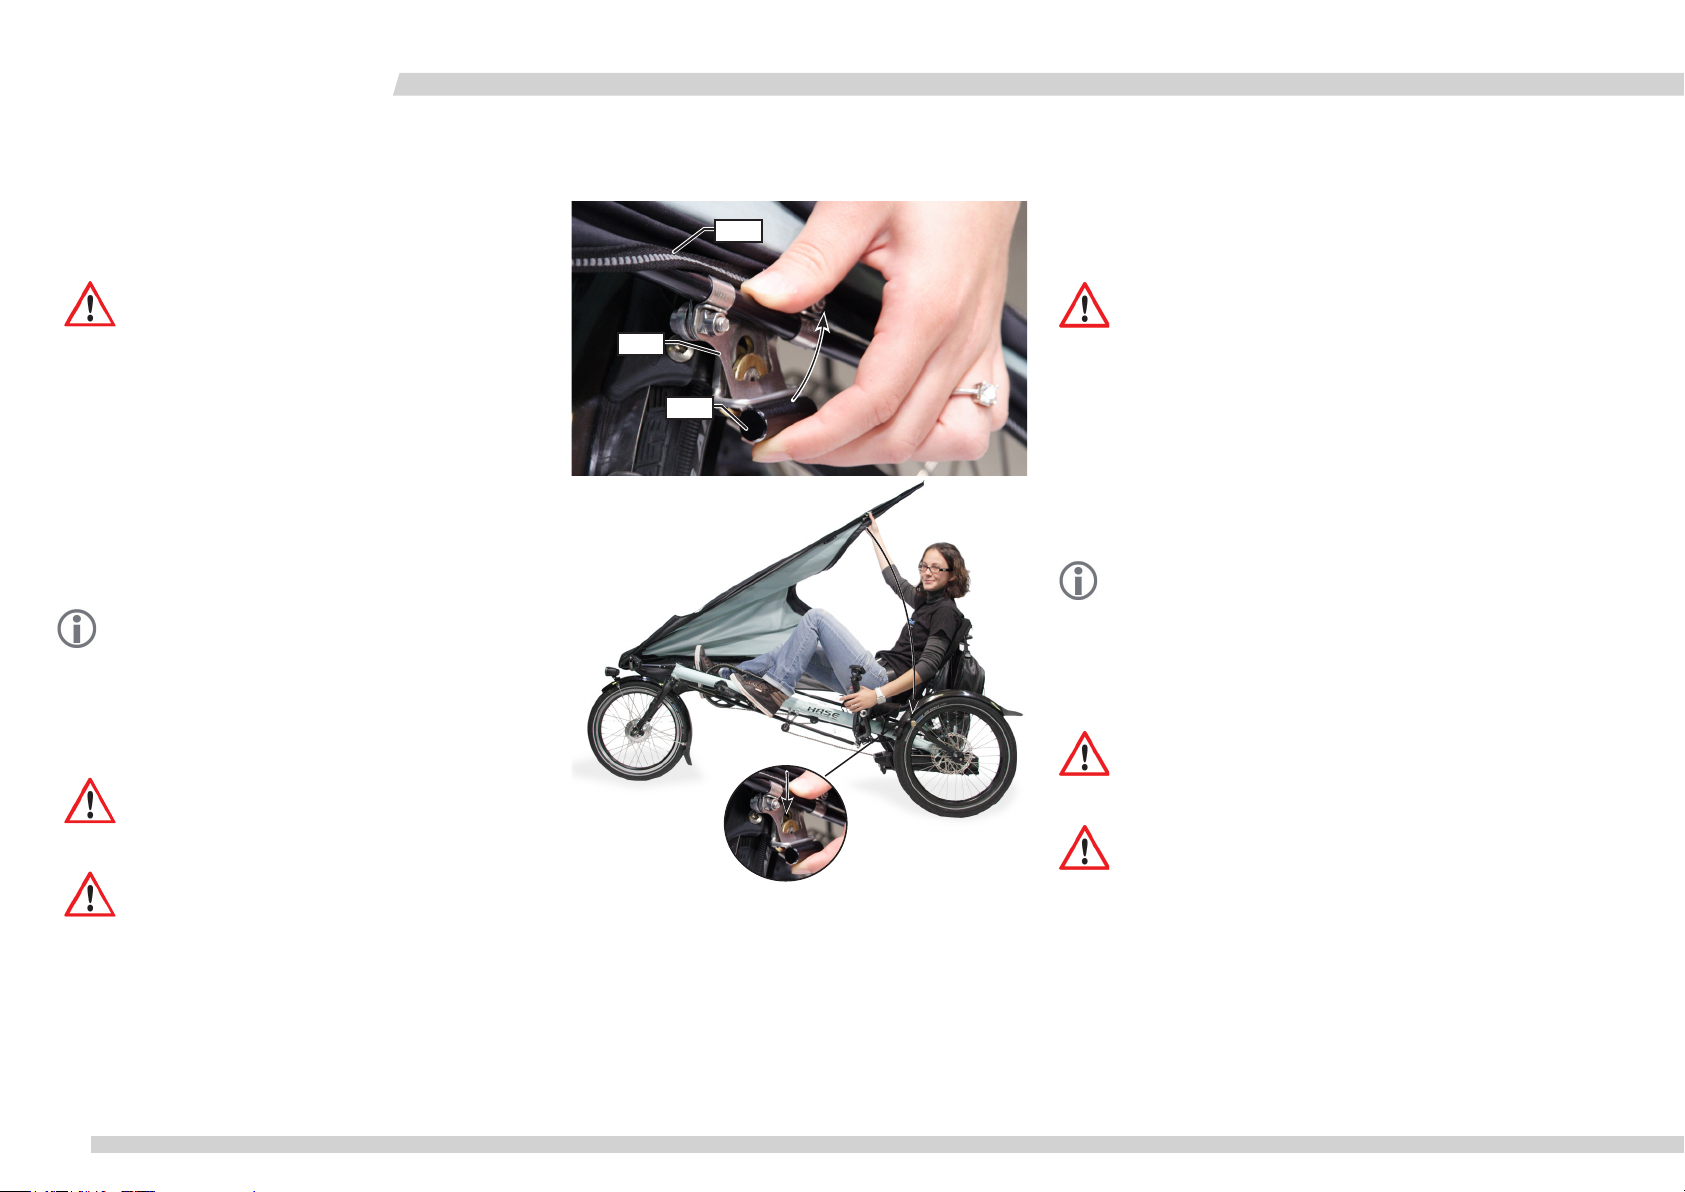
Ein- und Ausstiegen.
1. Betätigen Sie beim Trike die Feststellbremse.
2. Heben Sie leicht die Hülle des Stoffverdecks an, damit Sie das
Rastblech (1) erreichen.
Achtung!
Lösen Sie vorsichtig die seitliche Befestigung des Faltverdecks. Das Faltverdeck könnte sich durch die Spannung des
Gestänges plötzlich entfalten und möglicherweise Personen
in der Nähe verletzen. Achten Sie darauf, dass sich keine
Personen in unmittelbarer Nähe befinden.
3. Ziehen Sie den schwarzen Hebel (2) nach oben. Der Klemmmechanismus rastet aus. Heben Sie nun die gelöste Seite des
Verdecks nach oben.
4. Setzen Sie sich auf den Sitz.
5. Führen Sie die gelöste Seite des Faltverdecks nach unten und
rasten Sie das Rastblech ein.
Hinweis:
Damit sich der Verschluss leicht einrasten lässt, muss das
Rastblech möglichst parallel zum Messingknopf eingeführt
werden. Tragen Sie bei Bedarf dünn Vaseline auf das Rastblech auf.
6. Vergewissern Sie sich, dass die Befestigung des Faltverdecks
fest sitzt. Richten Sie eventuell den Rückspiegel neu aus.
Achtung!
Kontrollieren Sie das Faltverdeck auf eine korrekte Befestigung, damit es sich während der Fahrt nicht öffnen kann. Ein
loses Faltverdeck kann zu Unfällen führen.
Achtung!
Die Windabrisskante darf nicht zu hoch eingestellt sein und
die Sicht nicht einschränken.
7. Jetzt können Sie losfahren.
Mounting and dismounting
1. Engage the parking brake before mounting.
3
1
2
2. Lift up the fairing fabric slightly in order to access the locking
plate (1).
Caution!
Use caution when releasing the catch on the side mount of
the Foldable Fairing. The frame tension could cause the fairing
to spring open, possibly injuring bystanders. Be sure that no
one is standing near the fairing before you release the catch.
3. Pull up on the black release (2). The clamping mechanism will
disengage. Then raise the free side of the fairing.
4. Sit down on the seat.
5. Pull down the free side of the fairing and re-engage the locking plate.
Note:
The locking plate must be guided onto the brass mounting
button as directly as possible so that the catch does not jam.
Apply a thin layer of Vaseline to the locking plate at regular
intervals, as necessary.
6. Check to make sure that the fairing is securely mounted. If
necessary, adjust the rearview mirror.
Caution!
Check the Foldable Fairing to make sure it is mounted
securely. A loose fairing can come open while you are riding
and cause accidents.
Caution!
Check to make sure that the wind deflector is not too high
and does not obstruct the rider’s vision.
7. Now you are ready to ride.
Follow these instructions in the reverse order for dismounting.
Zum Aussteigen gehen Sie umgekehrt vor.
FV 02/16
18
www.hasebikes.com
Page 21
Rund ums Fahren / Riding with the Foldable Fairing
FOLDABLE FAIRING
Regenponcho anbringen
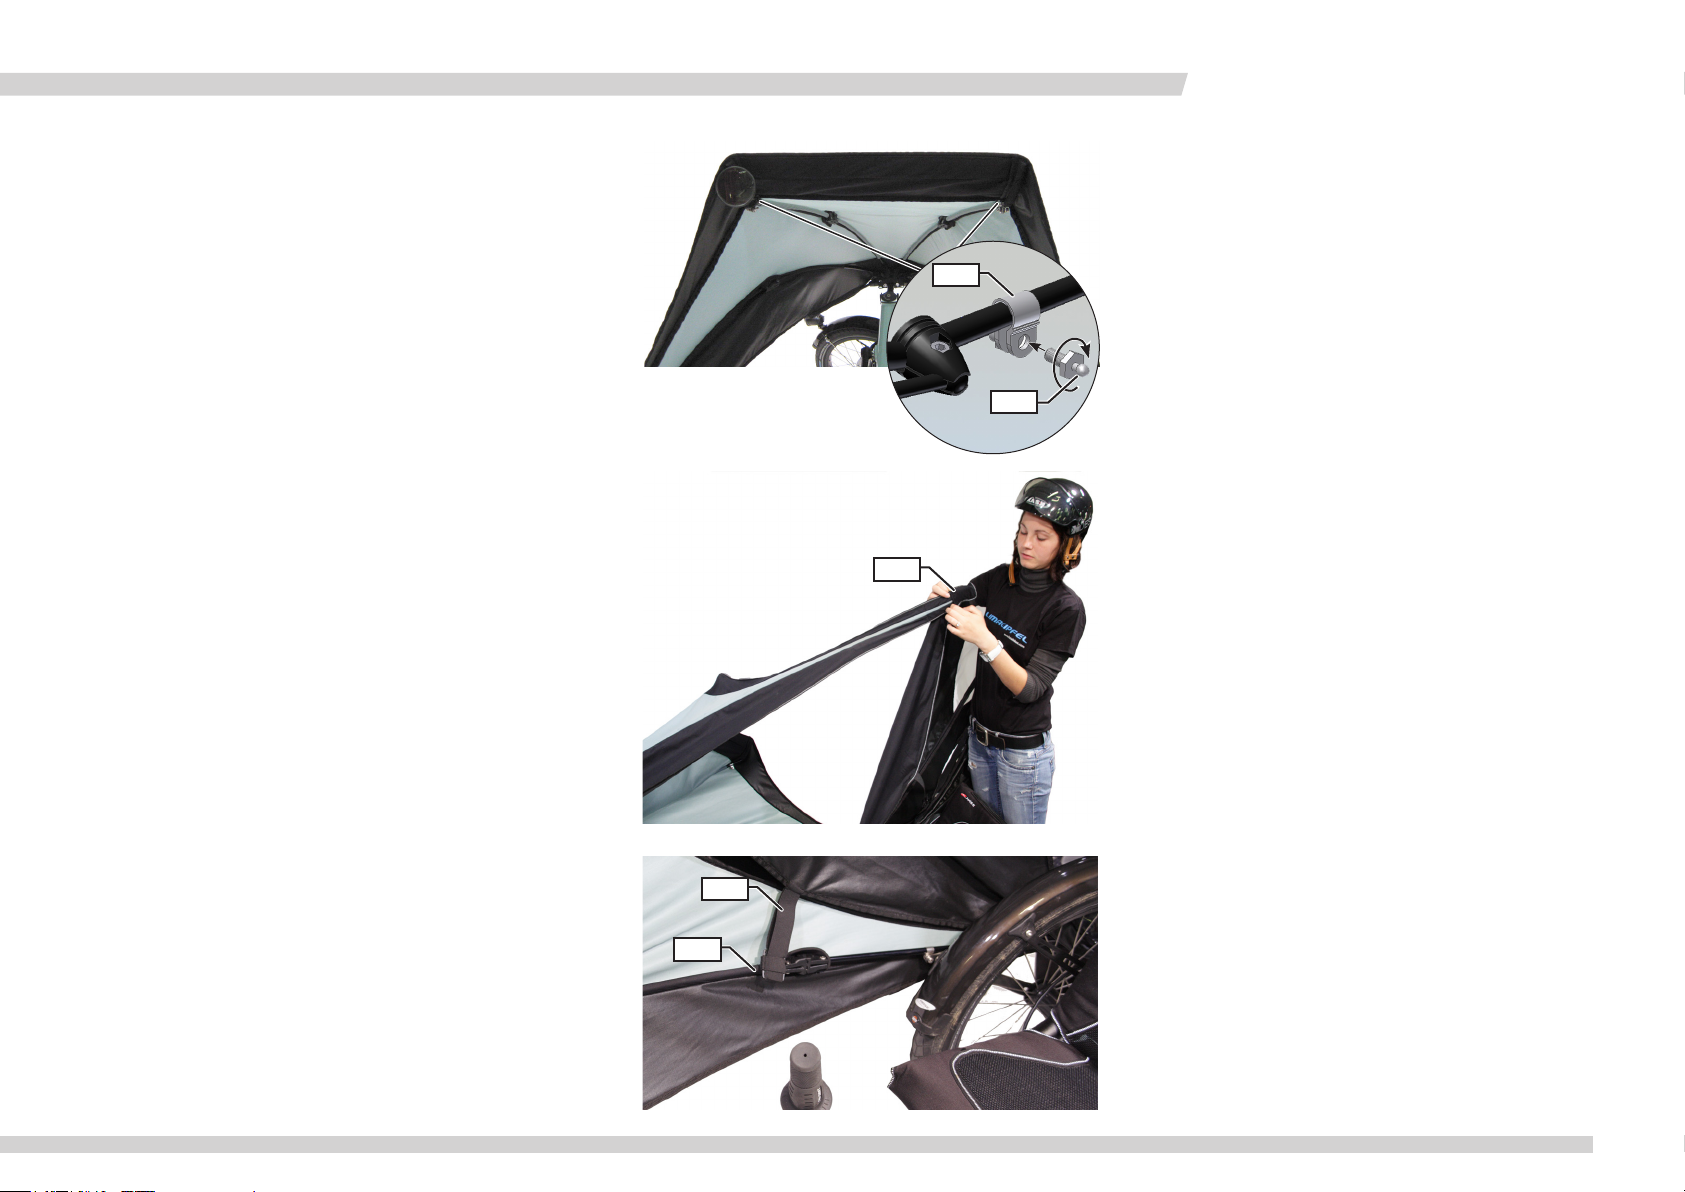
Bevor Sie den Regenponcho anbringen können, müssen Sie noch
die Köpfe der Tenax-Verschlüsse montieren. Diese werden am
Gestänge in der Nähe der Windabrisskante montiert.
1. Stecken Sie die mitgelieferten Schellen (1) auf das Gestänge.
2. Schrauben Sie die „Tenax“-Köpfe (2) in das Gewinde in den
Schellen mit einem Gabelschlüssel 8 mm ein.
3. Lösen Sie eine der seitlichen Arretierungen des Faltverdecks
(siehe Kapitel „Ein- und aussteigen“, Seite 18).
4. Ziehen Sie die Schlaufe (1) des Regenponchos über das Ende
des Gestänges.
5. Ziehen Sie die zweite Schlaufe des Regenponchos über das
Ende des Gestänges auf der anderen Seite.
Attaching the Rain Poncho
Before you can attach the Rain Poncho for the first time, you
must mount the studs of the Tenax fasteners. These are mounted
to the frame of the Foldable Fairing, near the wind deflector.
1
1. Attach the mounting clips (1) to the frame rods.
2. Screw the “Tenax” studs (2) into the threaded holes in the
clips using an 8mm open-end wrench.
2
3. Release the catch on one side of the Foldable Fairing (see
section “Mounting and dismounting” on page 18).
1
4. Pull the respective Rain Poncho tab (1) over the end of the
longest frame rod.
5. Pull the second tab of the Rain Poncho over the end of the
longest frame rod on the other side of the fairing.
4. Befestigen Sie die Gummibänder (2) mit den Haken (3) an
dem Gestänge vor dem Gelenk.
www.hasebikes.com
2
4. Attach the hooks (3) of the elastic straps (2) to the longest
frame rods, in front of the joints.
3
FV 02/16
19
Page 22
FALTVERDECK
Rund ums Fahren / Riding with the Foldable Fairing
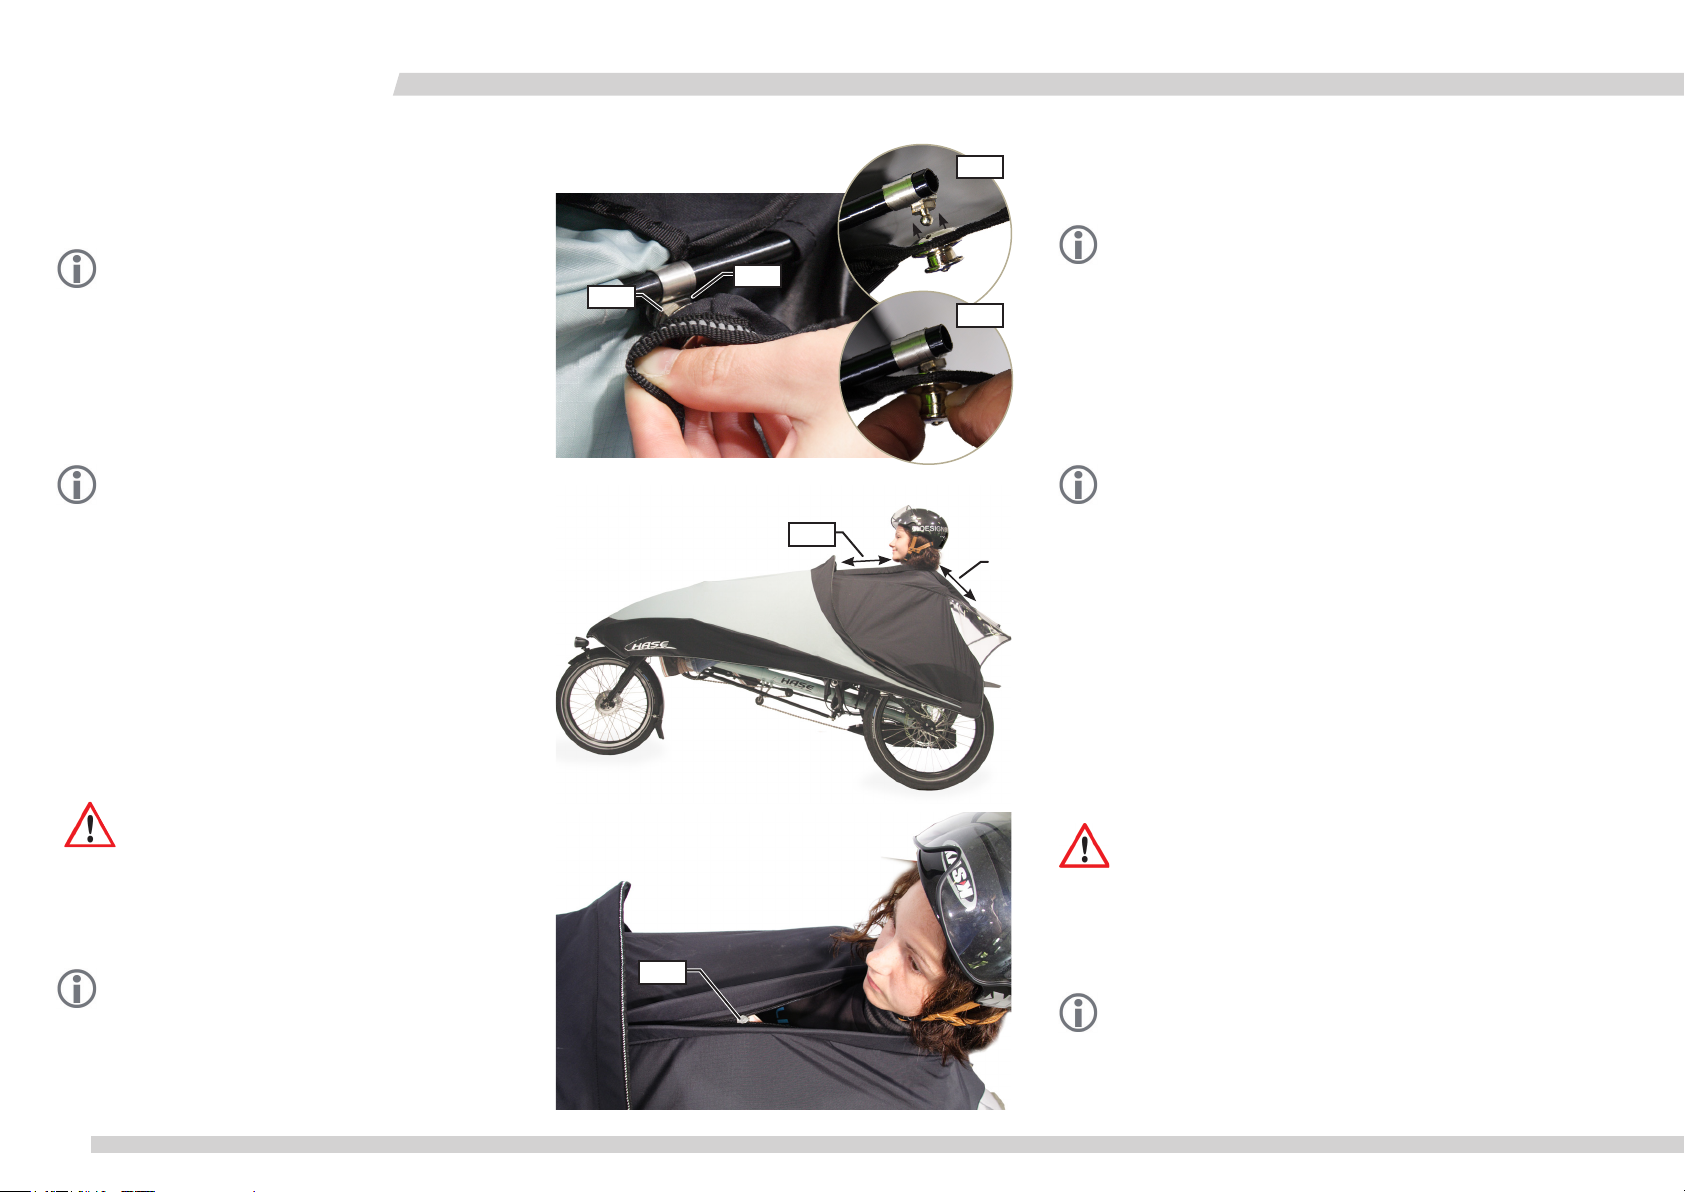
5. Drücken Sie die Stecker der „Tenax“-Verschlüsse (4), die
am Regenponcho angebracht sind, auf die Köpfe der „Tenax“-Verschlüsse (5) an der Windabrisskante des Faltverdecks.
Hinweis:
Zum Schließen werden die Stecker einfach auf die Köpfe
gedrückt (Bild A). Zum Öffnen werden die Stecker leicht
angehoben (Bild B).
6. Setzen Sie sich auf den Sitz.
7. Schließen Sie das Faltverdeck (siehe Kapitel „Ein- und aussteigen“, Seite 18), während Sie Ihren Kopf durch den geöffneten
Reißverschluss des Regenponchos stecken.
Hinweis:
Mit Hilfe eines Reißverschlusses lässt sich der Regenponcho
hinter und vor dem Kopf an die Sitzposition anpassen. Je
dichter der Reißverschluss an Hals und Nacken anschließt,
um so weniger werden Sie nass.
8. Lassen Sie eine andere Person den hinteren Reißverschluss
(6) bis zu ihrem Nacken ziehen. Sie können den hinteren
Reißverschluss auch alleine einstellen, in dem Sie den Reißverschluss über ihrem Kopf bei geöffnentem Faltverdeck bis an
die gewünschte Position ziehen. Dieser Reißverschluss ist
arretierbar, so dass er sich nicht von selbst verstellen kann.
Schließen Sie anschließend wieder das Faltverdeck.
9. Ziehen Sie von unten den vorderen Reißverschluss (7) bis
zum Hals. Dieser lässt sich von Innen einfach bedienen.
Achtung!
Bei Benutzung des Regenponchos müssen die Bewegungsfreiheit des Oberkörpers und der Arme, vor allem bei Handzeichen für Richtungswechsel und für den „Schulterblick“
gewährleistet sein. Achten Sie darauf, dass das Rücklicht
durch den Regenponcho nicht verdeckt wird. Stellen Sie auch
den Rückspiegel gegebenfalls neu ein.
Hinweis:
Eventuelle Falten im Regenponcho oder in der Windabrisskante des Faltverdecks können Sie durch Verdrehen des
Schellen der „Tenax“-Verschlüsse beseitigen.
A
4
5
B
7
7
5. Press the buttons of the Tenax fasteners (4) attached to
the Rain Poncho onto the studs of the Tenax fasteners (5)
attached to the wind deflector of the Foldable Fairing.
Note:
Tenax fasteners can be fastened by simply pressing the button onto the stud (Fig. A). To release the fasteners, gently pull
up on the button (Fig. B).
6. Sit down on the seat. Check the rain poncho to make sure
the zipper is opened wide enough for your head to pass
through.
7. Close the Foldable Fairing (see section “Mounting and dismounting” on page 18) pulling the attached Rain Poncho over
your head.
Note:
The Rain Poncho has a long zipper that lets you adjust the
opening to your sitting position. The more snugly the poncho
opening is adjusted to your neck and sitting position, the
6
8. Have another person draw up the rear zipper (6) to just be-
9. Now pull the front zipper (7) up to just in front of your neck.
dryer you will stay.
hind your neck. If there is no one available to help you adjust
the rear zipper, simply open the Foldable Fairing with the
attached poncho and pull the zipper into the desired position.
Then close the fairing again, and check whether the zipper
is positioned appropriately, just behind your neck, repeating
these steps until the correct position is reached. The zipper
can be locked in place to prevent it from changing position.
This zipper can be repositioned easily from inside the poncho.
Caution!
When using the optional Rain Poncho, be sure that it does
not in any way restrict the movement of the torso and arms
and, above all, that it is still possible to make the necessary
hand signals and turn your head for looking over your shoulder. Check that the Rain Poncho is not covering the taillight. If
necessary, readjust the rearview mirror.
Note:
Wrinkles in the Rain Poncho or wind deflector can be eliminated by rotating the mounting clips of the Tenax fasteners.
20
FV 02/16
www.hasebikes.com
Page 23
Rund ums Fahren / Riding with the Foldable Fairing
FOLDABLE FAIRING
Hinweis:
Bedenken Sie bei der Wahl Ihrer Kleidung, dass der Regenponcho nicht nur Regen, sondern auch Fahrtwind. abhält. Je
nach Witterung können Sie den vorderen Reißverschluss auch
etwas geöffnet lassen.
Achtung!
Bei einem Fahrzeug mit einer besonders kurz eingestellten
Rahmenlänge, ist es wahrscheinlich, dass der Regenponcho
das Rücklicht verdeckt. So dürfen Sie auf keinen Fall fahren.
Suchen Sie Ihre Fachwerkstatt auf, um den Regenponcho
anzupassen.
Wenn Sie den Regenponcho abnehemen möchten, gehen Sie umgekehrt vor.
Regenponcho an kurze Rahmenlängen anpassen
Bei einem Fahrzeug mit einer besonders kurz eingestellten Rahmenlänge, ist es wahrscheinlich, dass der Regenponcho das Rücklicht verdeckt. So dürfen Sie auf keinen Fall fahren. Suchen Sie
Ihre Fachwerkstatt auf, um den Regenponcho anzupassen, oder
passen Sie den Regenponcho selbst an. Gehen Sie dann wie folgt
vor:
1. Setzen Sie sich mit dem Regenponcho auf den Sitz, und
schließen Sie das Faltverdeck.
2. Lösen Sie die „Tenax“-Verschlüsse und schieben Sie den Regenponcho soweit unter das Faltverdeck nach vorne, bis das
Rücklicht frei ist.
3. Markieren Sie die Position, an der die Köpfe der „Tenax“-Verschlüsse den Regenponcho berühren.
4. Stanzen Sie an diesen Stellen, mit einem Locheisen 10 mm
große Löcher (1) ein.
5. Stecken Sie das obere Teil des Steckers (2) der „Tenax“-Verschlüsse mit dem Gewindestift durch das Loch (1) in der
Stoffhülle des Regenponchos durch.
6. Schrauben Sie das untere Teil der Stecker (3) der „Tenax“-Verschlüsse auf das ober Teil auf.
Note:
When deciding what to wear under the Rain Poncho, keep in
mind that the poncho not only keeps you dry but also blocks
the wind. You can also leave the front zipper open somewhat,
depending on the weather conditions.
Caution!
On trikes that have been adjusted for very short riders, the
Rain Poncho will probably hang in front of the taillight. In this
case, do not, under any circumstances, ride the trike with the
Rain Poncho. Ask your qualified bicycle mechanic to adjust the
Rain Poncho accordingly.
To remove the Rain Poncho, follow the above steps in the reverse order.
Adjusting the Rain Poncho for short frame lengths
For trikes that have been adjusted for especially short riders, the
3
1
Rain Poncho will probably hang in front of the taillight. In this
case, do not, under any circumstances, ride the trike with the
Rain Poncho attached. Ask your qualified bicycle mechanic to adjust the Rain Poncho accordingly, or adjust it yourself as follows:
2
1. Sit on the seat with Rain Poncho attached to the fairing, and
close the Foldable Fairing.
2. Release the Tenax fasteners, and pull the Rain Poncho forward, under the fairing, until it is no longer hanging in front of
the taillight.
3. Mark the positions where the Tenax studs contact the poncho.
4. Use a hole punch to make 10mm holes (1) in the poncho at
the marked sites.
5. Insert the threaded pins of the Tenax buttons (2) through the
holes (1) in the poncho.
6. Screw the locking nuts (3) of the Tenax buttons onto the
threaded pins as shown.
www.hasebikes.com
FV 02/16
21
Page 24
FALTVERDECK
Rund ums Fahren / Riding with the Foldable Fairing
Faltverdeck abnehmen
Wenn Sie das Faltverdeck abnehmen möchten, gehen Sie umgekehrt vor wie im Kapitel „Faltverdeck anbringen auf Seite 13.
Hinweis:
Am leichtesten geht es, wenn Sie auf dem Sitz sitzen und beide Rastbleche gleichzeitig. Lösen. Fächern Sie das Faltverdeck
auf und legen Sie es dann zusammen.
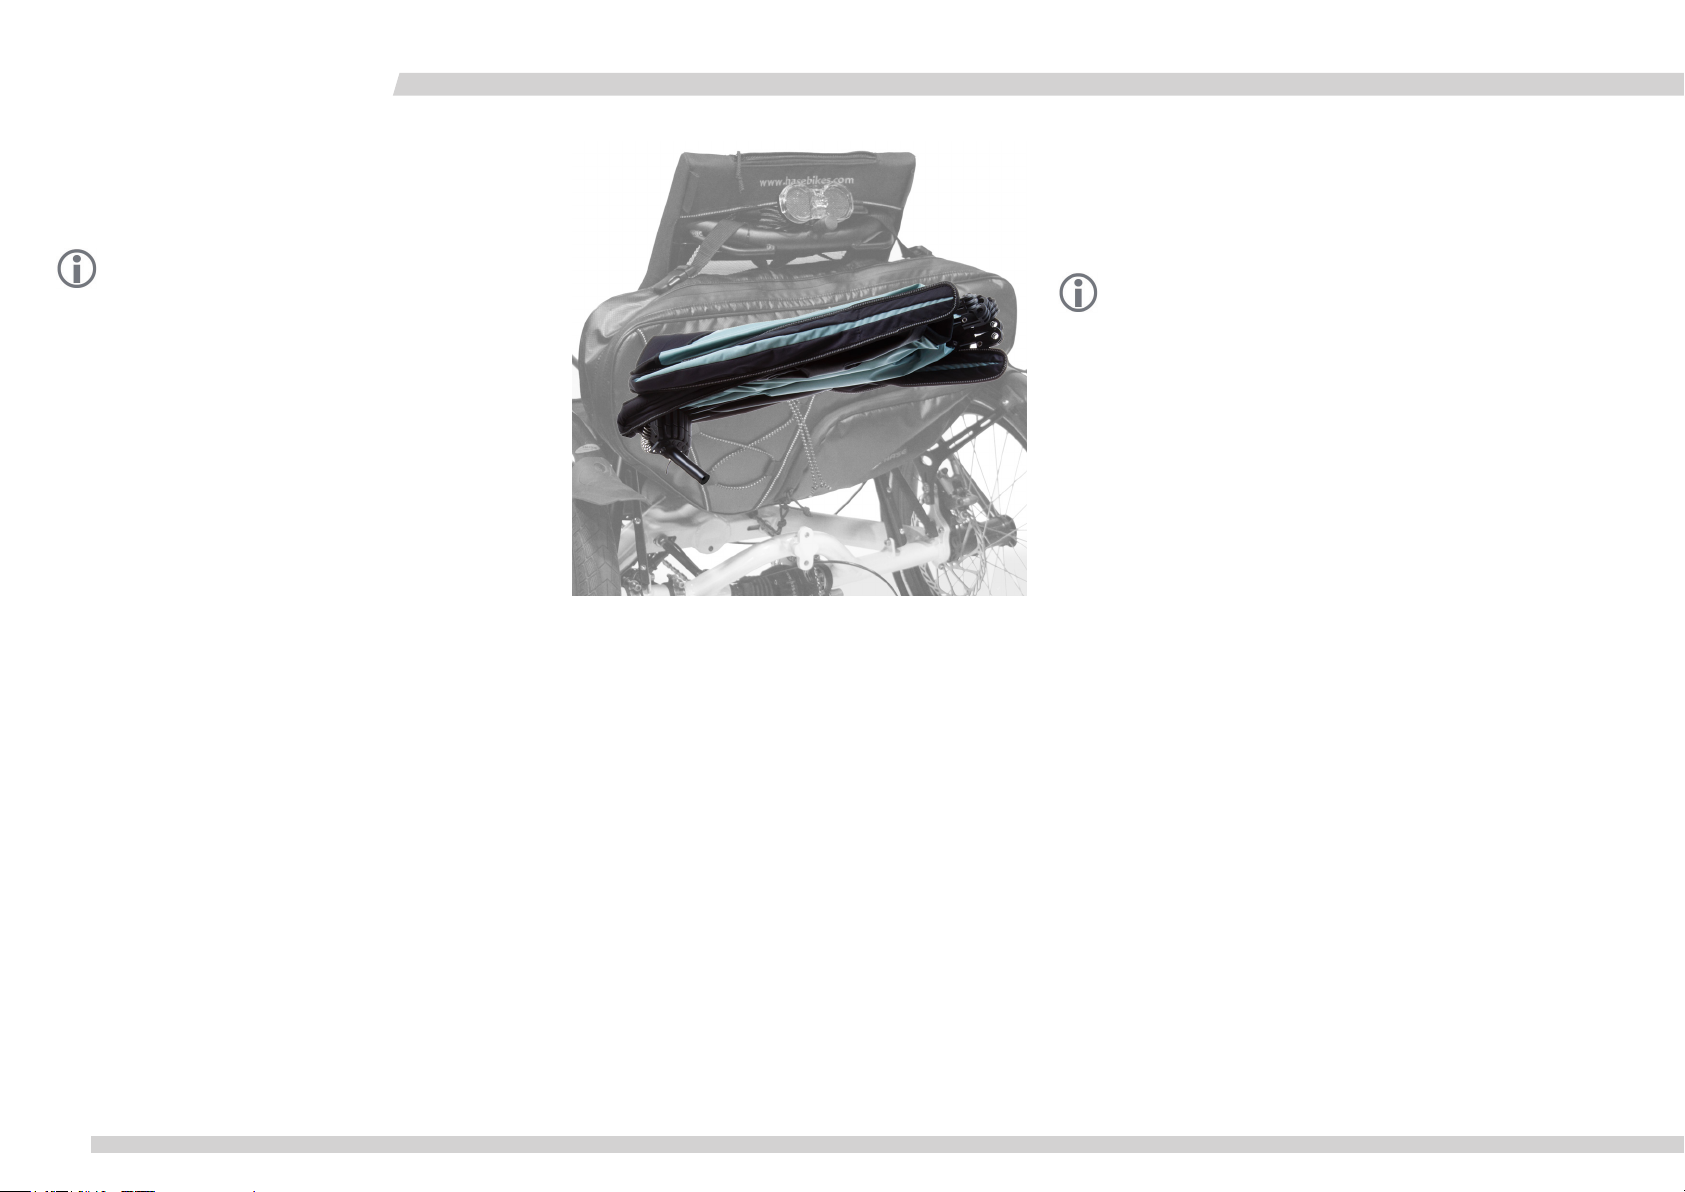
Für die Aufbewahrung empfehlen wir die als Zubehör erhältliche
Tasche. Diese können Sie an der Rückenlehne von Kettwiesel,
Klimax oder Trix anbringen. Legen Sie das zusammengefaltete
Faltverdeck wie auf dem Bild zu sehen in die Tasche.
Reinigung und Lagerung des Faltverdecks
Reinigen Sie das Faltverdeck nur mit reinem Wasser. Benutzen
Sie am besten einen feuchten Lappen. Verwenden Sie keine Reinigungsmittel, da sich sonst die Imprägnierung des Materials lösen könnte. Obwohl sich die Stoffhülle vom Gestänge abnehmen
lässt, dürfen Sie sie nicht in einer Waschmaschine waschen. Hier
könnte ebenfalls die Imprägnierung beschädigt werden. Verwenden Sie keinen Hochdruckreiniger, sonst könnte das Gestänge
beschädigt werden.
Reinigen Sie den als Zubehör erhältlichen Regenponcho ebenfalls
nur mit reinem Wasser.
Lagern Sie das Faltverdeck nur trocken ein, um Schimmelbildung
zu vermeiden. Falls das Faltverdeck nach einer Fahrt noch feucht
sein sollte, lassen Sie es ausgebreitet an einem trocknen Ort
trocknen.
Removing the Foldable Fairing
To remove the Foldable Fairing, refer to the section “Mounting
the Foldable Fairing” on page 13, and follow the steps in the reverse order.
Note:
The easiest way to remove the fairing is to sit in the seat and
release both locking plates at the same time. Fan out the
fairing, and then fold it.
For storing the Foldable Fairing, Hase recommends the optional Fairing Bag. This bag can be mounted behind the seat of the
Kettwiesel, Klimax, or Trix. Insert the folded fairing into the bag
as shown.
Cleaning and storing the Foldable Fairing
Use only clean water for cleaning the Foldable Fairing, ideally with
a damp cloth. Do not use cleaning agents, as these can damage
the impregnation of the material. The fabric itself can be removed
from the frame of the fairing. However, it cannot be washed in a
washing machine. This could also damage the impregnation. Do
not use a pressure washer, as this could damage the frame.
The optional Rain Poncho should also only be cleaned with water.
In order to avoid problems with mold and mildew, make sure the
Foldable Fairing is completely dry before storing. If the Foldable
Fairing is still when removed from the trike (or tandem), allow it
to dry, spread out on a clean, dry surface before packing it away.
22
FV 02/16
www.hasebikes.com
Page 25
FOLDABLE FAIRING
Ersatzteile
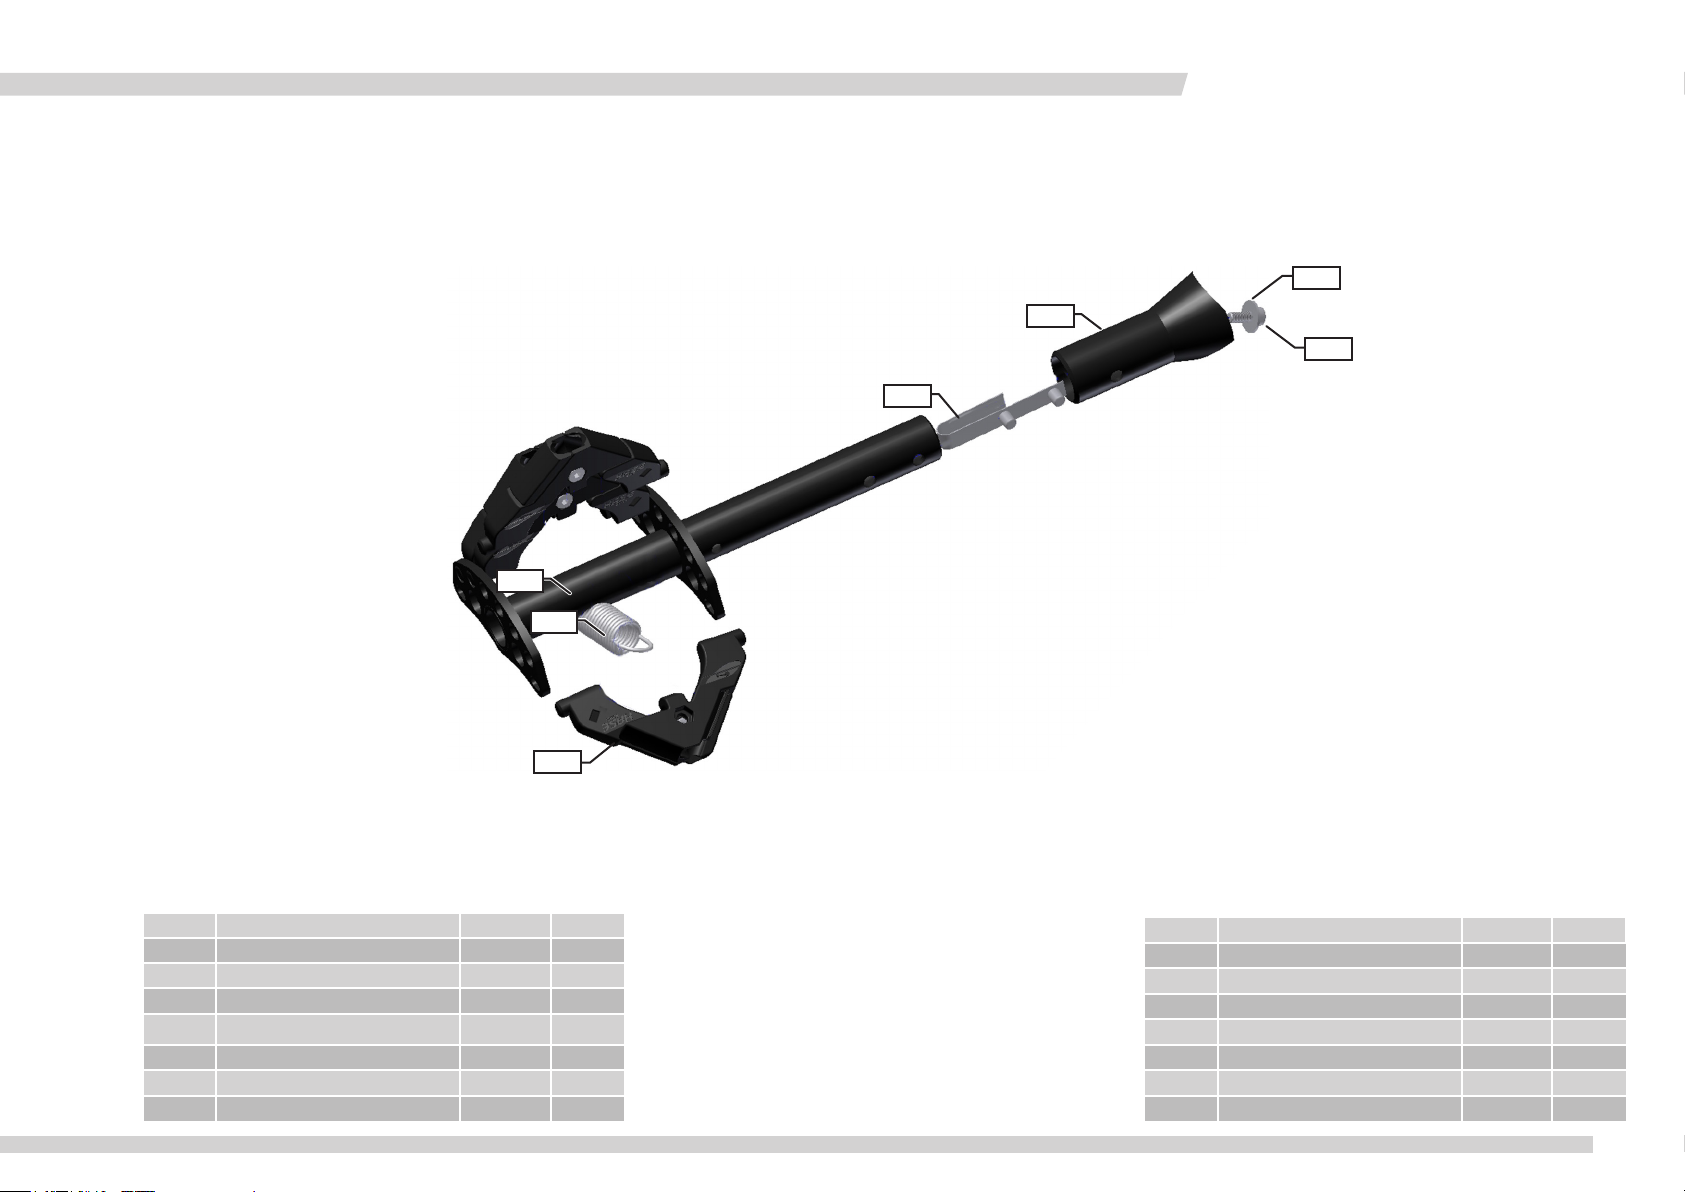
Vordere Befestigung
Replacement parts
Front mount
5
3
4
2
6
7
1
Position Bezeichnung Art.-Nr. Anzahl
1 Stangenaufnahme 23652 6
2 Snap Button 23649 1
3 Nase 24388 1
Schraube mit Innensechskant
4
M5 x 16 DIN 912
5 Unterlegscheibe Faltverdeck 24551 1
6 Sechs-Achsen-Gelenk, Alu 23634 1
7 Zugfeder RZ-140I 23625 1
www.hasebikes.com
20712 1
Position Description Art. No. Number
1
Rod holder 23652 6
2
Snap Button 23649 1
3
Nose cone 24388 1
4
Allen bolt M5 x 16 DIN 912 20712 1
5
Washer Foldable Fairing 24551
6
Aluminum 6-axis joint 23634 1
7
Tension spring RZ-140I 23625 1
FV 02/16
23
Page 26
FALTVERDECK
Ersatzteile / Replacement parts
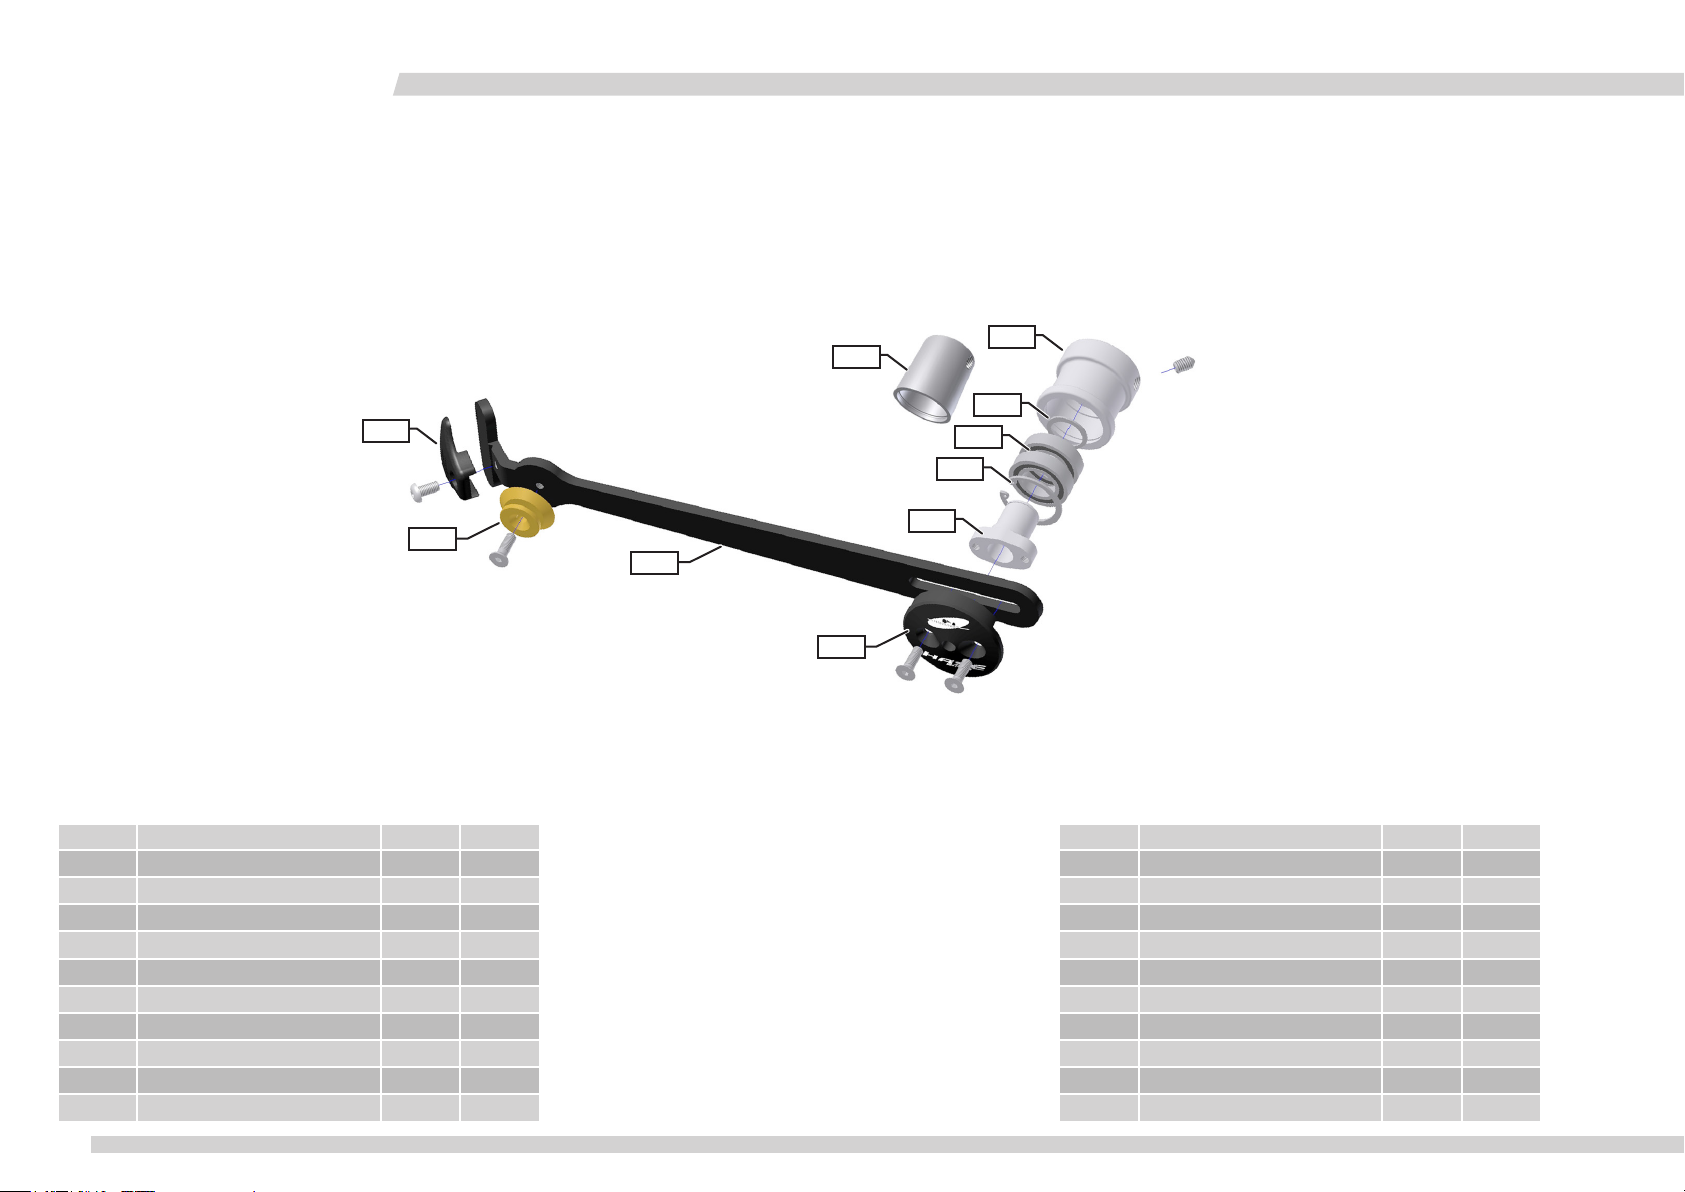
Seitliche Befestigung für ungefederte Trikes
1
2
Side-mount for non suspended trikes
9
10
8
7
6
5
3
4
Position Bezeichnung Art.-Nr. Anzahl
1
Schutzblechklammer 20903 2
2
Befestigungsknopf 23638 2
3
Schutzblechstrebe 23646 2
4
Radkappe 23665 2
5
Lagerstab 23637 2
6
Sicherungsring 30x1,2 23657 2
7
Lager 6903-2RS 20751 4
8
Sicherungsring 17x1 23656 2
9
Klemme für Quickstick-Nabe 23635 2
10
Klemme für Classic-Nabe (Universal) 23636 2
FV 02/16
24
Position Description Art. No. Number
1
Fender clamp 20903 2
2
Mounting button 23638 2
3
Fender stays 23646 2
4
Hubcap 23665 2
5
Bearing pin 23637 2
6
Circlip 30x1.2 23657 2
7
Bearing 6903-2RS 20751 4
8
Circlip 17x1 23656 2
9
Adapter for Quick Stick Hubs 23635 2
10
Adapter for Classic (Universal) Hubs 23636 2
www.hasebikes.com
Page 27
Ersatzteile / Replacement parts
FOLDABLE FAIRING
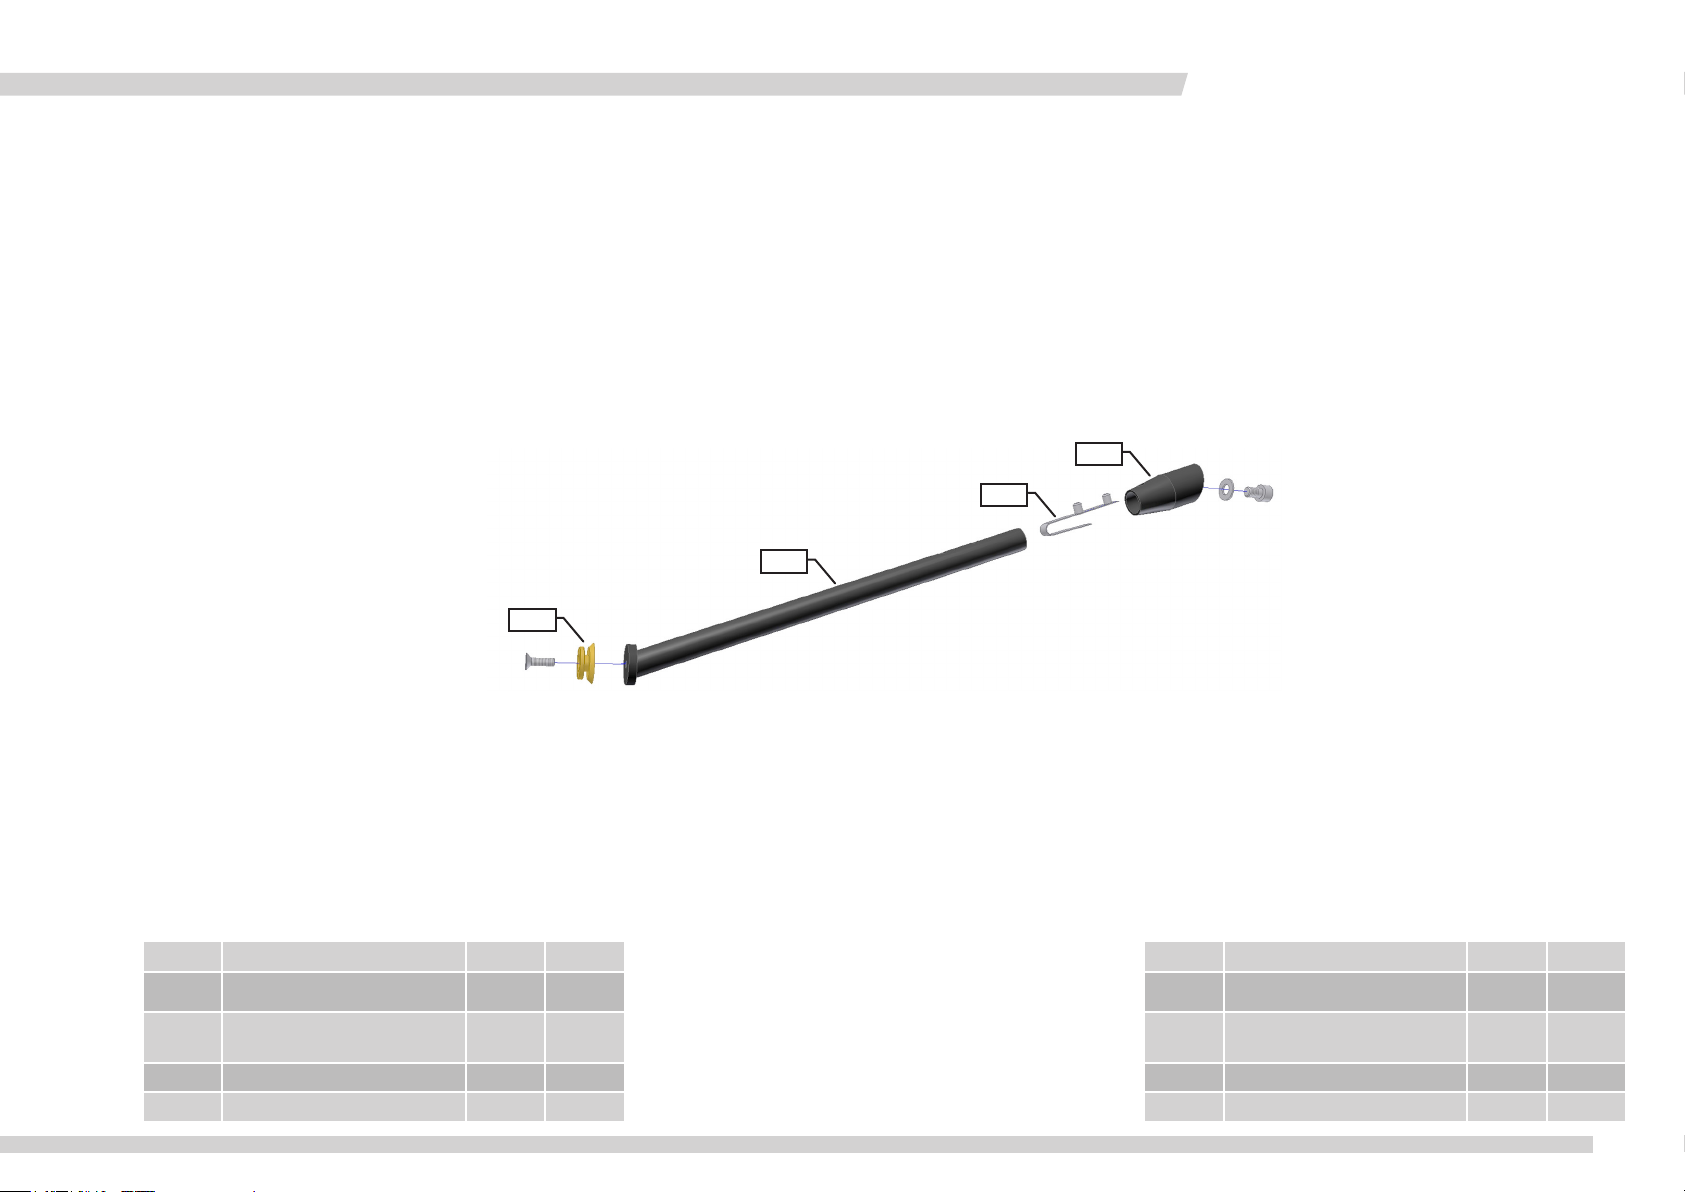
Seitliche Befestigung für gefederte Trikes
und Lepus Stahl
Side-mount for non-suspended trikes
and Lepus steel
4
3
2
1
Position Bezeichnung Art.-Nr. Anzahl
1 Befestigungsknopf 23638 2
Seitensteckrohr gefederte Trikes
2
Seitensteckrohr Lepus Stahl
3 Snap Button 23649 2
4 Steckhülse 23856 2
25501
23855
www.hasebikes.com
Position Description Art. No. Number
1 Mounting button 23638 2
2
Side-mount rod suspended trikes
2
Side-mount rod Lepus steel
3 Snap Button 23649 2
4 Mounting sleeve 23856 2
25501
23855
FV 02/16
2
25
Page 28
FALTVERDECK
Ersatzteile / Replacement parts
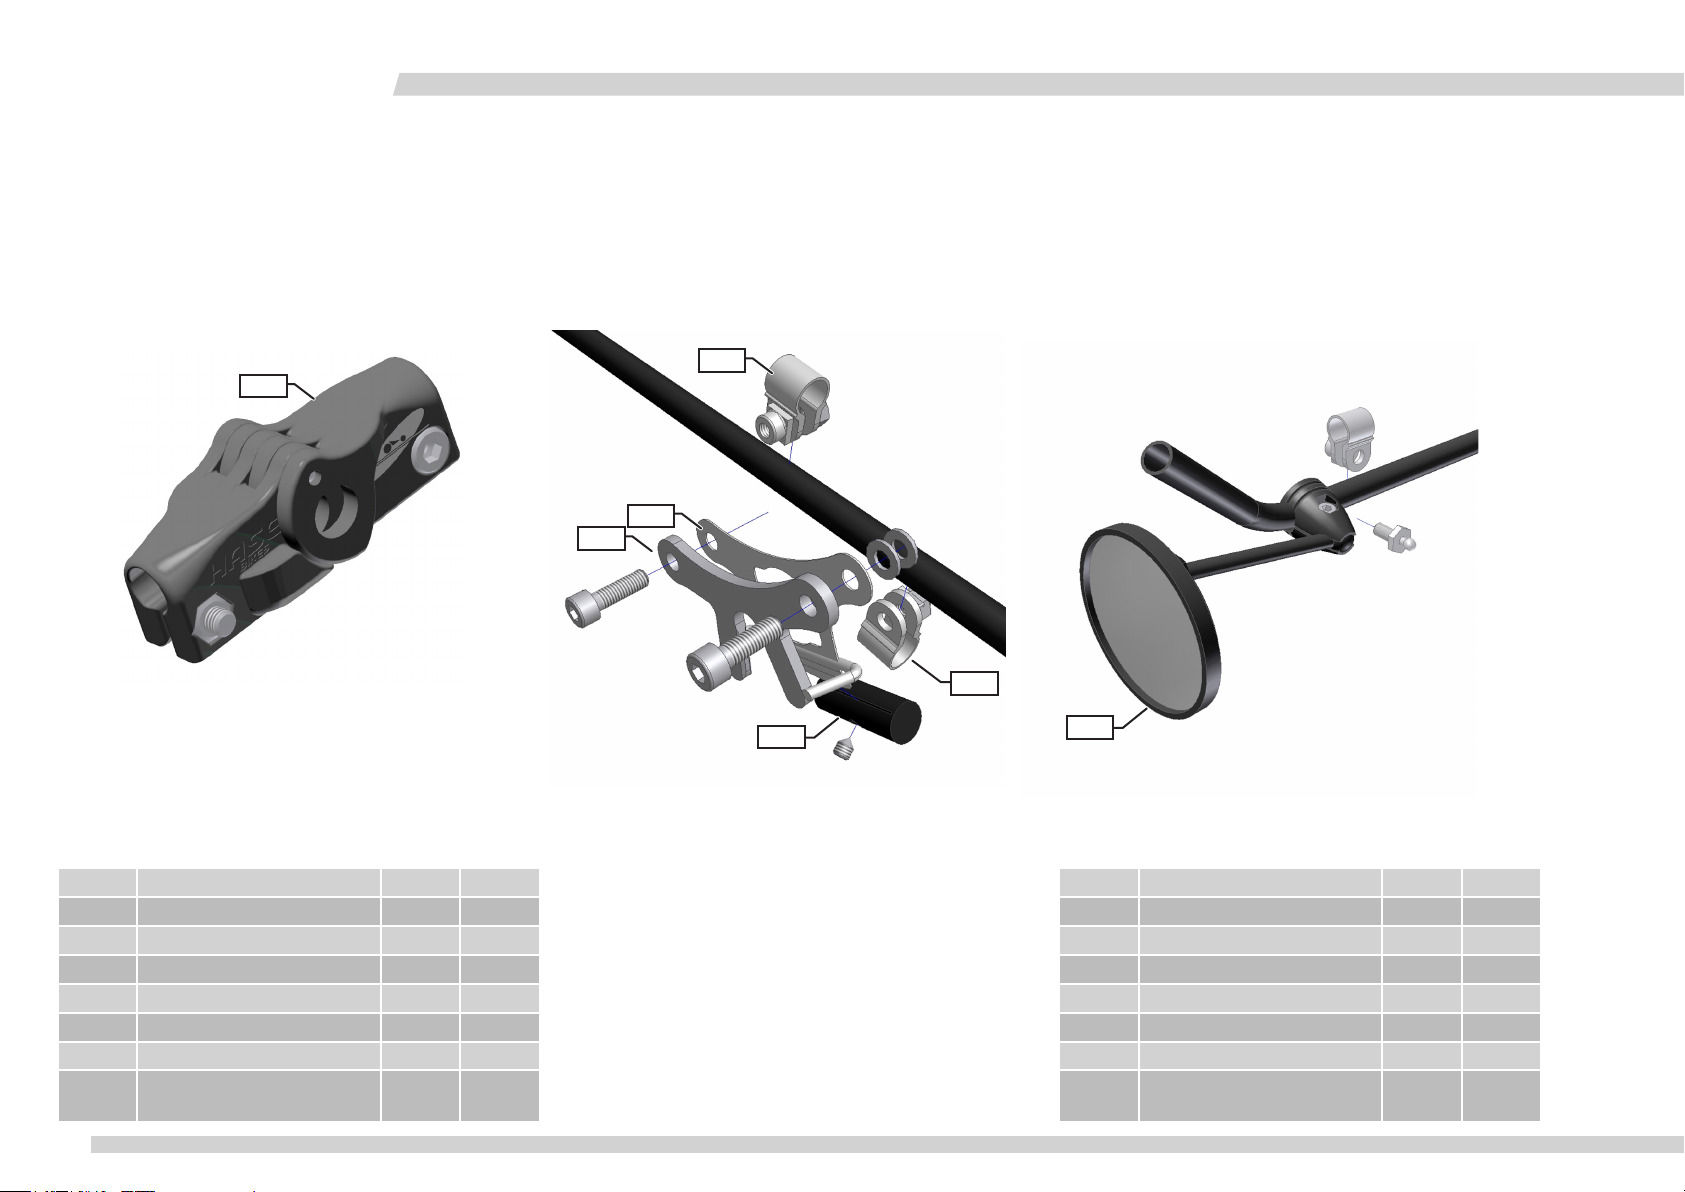
Stangengelenk, Rastblech, Rückspiegel Frame joint, locking plate, rearview mirror
2
1
3
4
Position Bezeichnung Art.-Nr. Anzahl
Stangengelenk 23661 6
1
2 Rohrschelle 9,6 23784 4
3 Rastfederblech 23655 2
4 Rastblech 23654 2
5 Federblechgriff 23932 2
6 Rückspiegel 23785 1
26
Stoffbespannung grau (ohne Abbildung)
7
Stoffbespannung rot (ohne Abbildung)
FV 02/16
23624
24219
2
5
1
6
Position Description Art. No. Number
Frame joint 23661 6
1
2
Pipe clamp 9.6 23784 4
3 Locking spring plate 23655 2
4 Locking plate 23654 2
5 Locking plate release 23932 2
6 Rearview mirror 23785 1
Fabric covering grey (not shown)
7
Fabric covering red (not shown)
www.hasebikes.com
23624
24219
1
Page 29
FOLDABLE FAIRING
Anhang für Händler
Bohrung im Steuerrohr anbringen
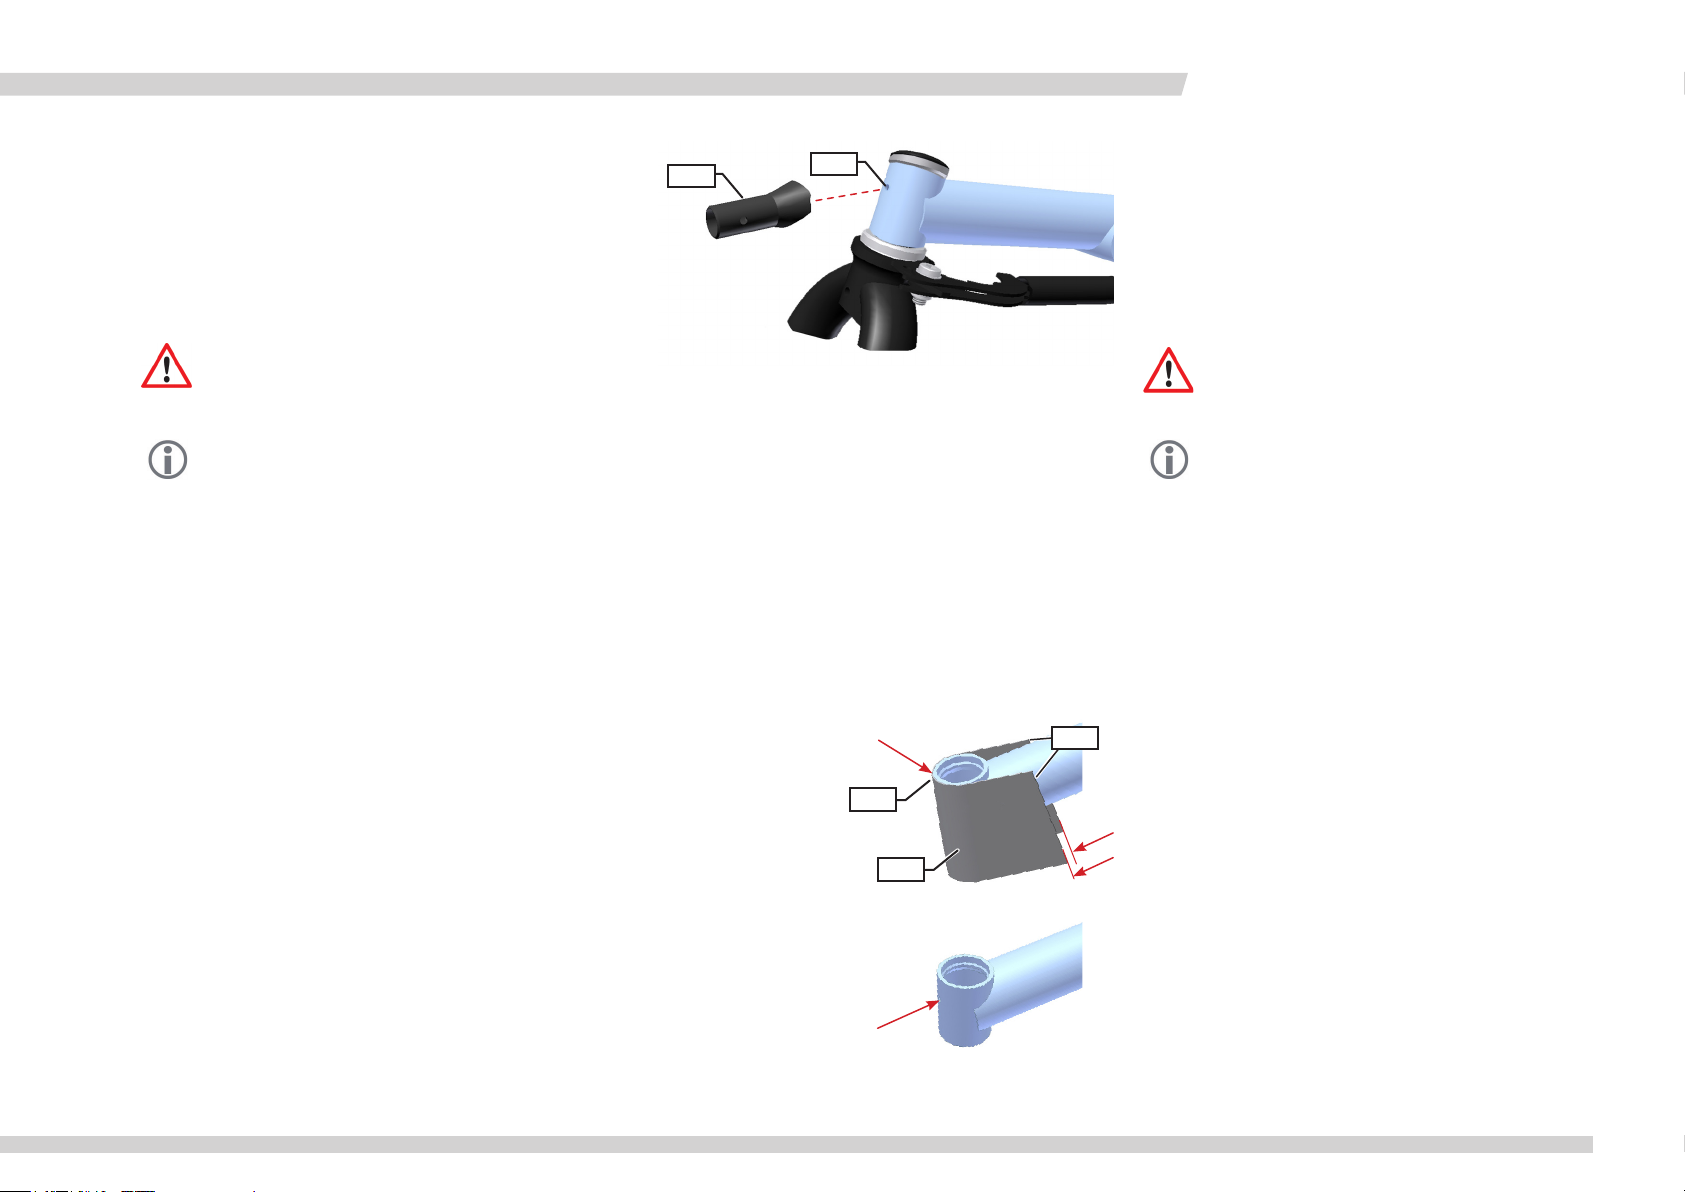
Die vordere Befestigung (2) für das Faltverdeck wird am Steuerrohr montiert. Dafür sollte sich im Steuerrohr eine Bohrung (1)
befinden. Sollte keine solche Bohrung vorhanden sein, so muss
das Steuerrohr fachgerecht von einer Fachwerkstatt nach den folgenden Anweisungen durchbohrt werden.
Achtung!
Folgende Anweisungen sind ausschließlich für eine Fachwerkstatt bestimmt. Endverbraucher dürfen auf keinen Fall diese
Bohrung anbringen.
Hinweis:
Fachgerechtes Durchbohren des Steuerrohrs führt nicht zum
Verlust der Garantie des Fahrzeugs. Dieses bezieht sich nur
auf diese Bohrung.
1. Bauen Sie den Steuersatz und Gabel nach Anweisung auf Seite
6 aus.
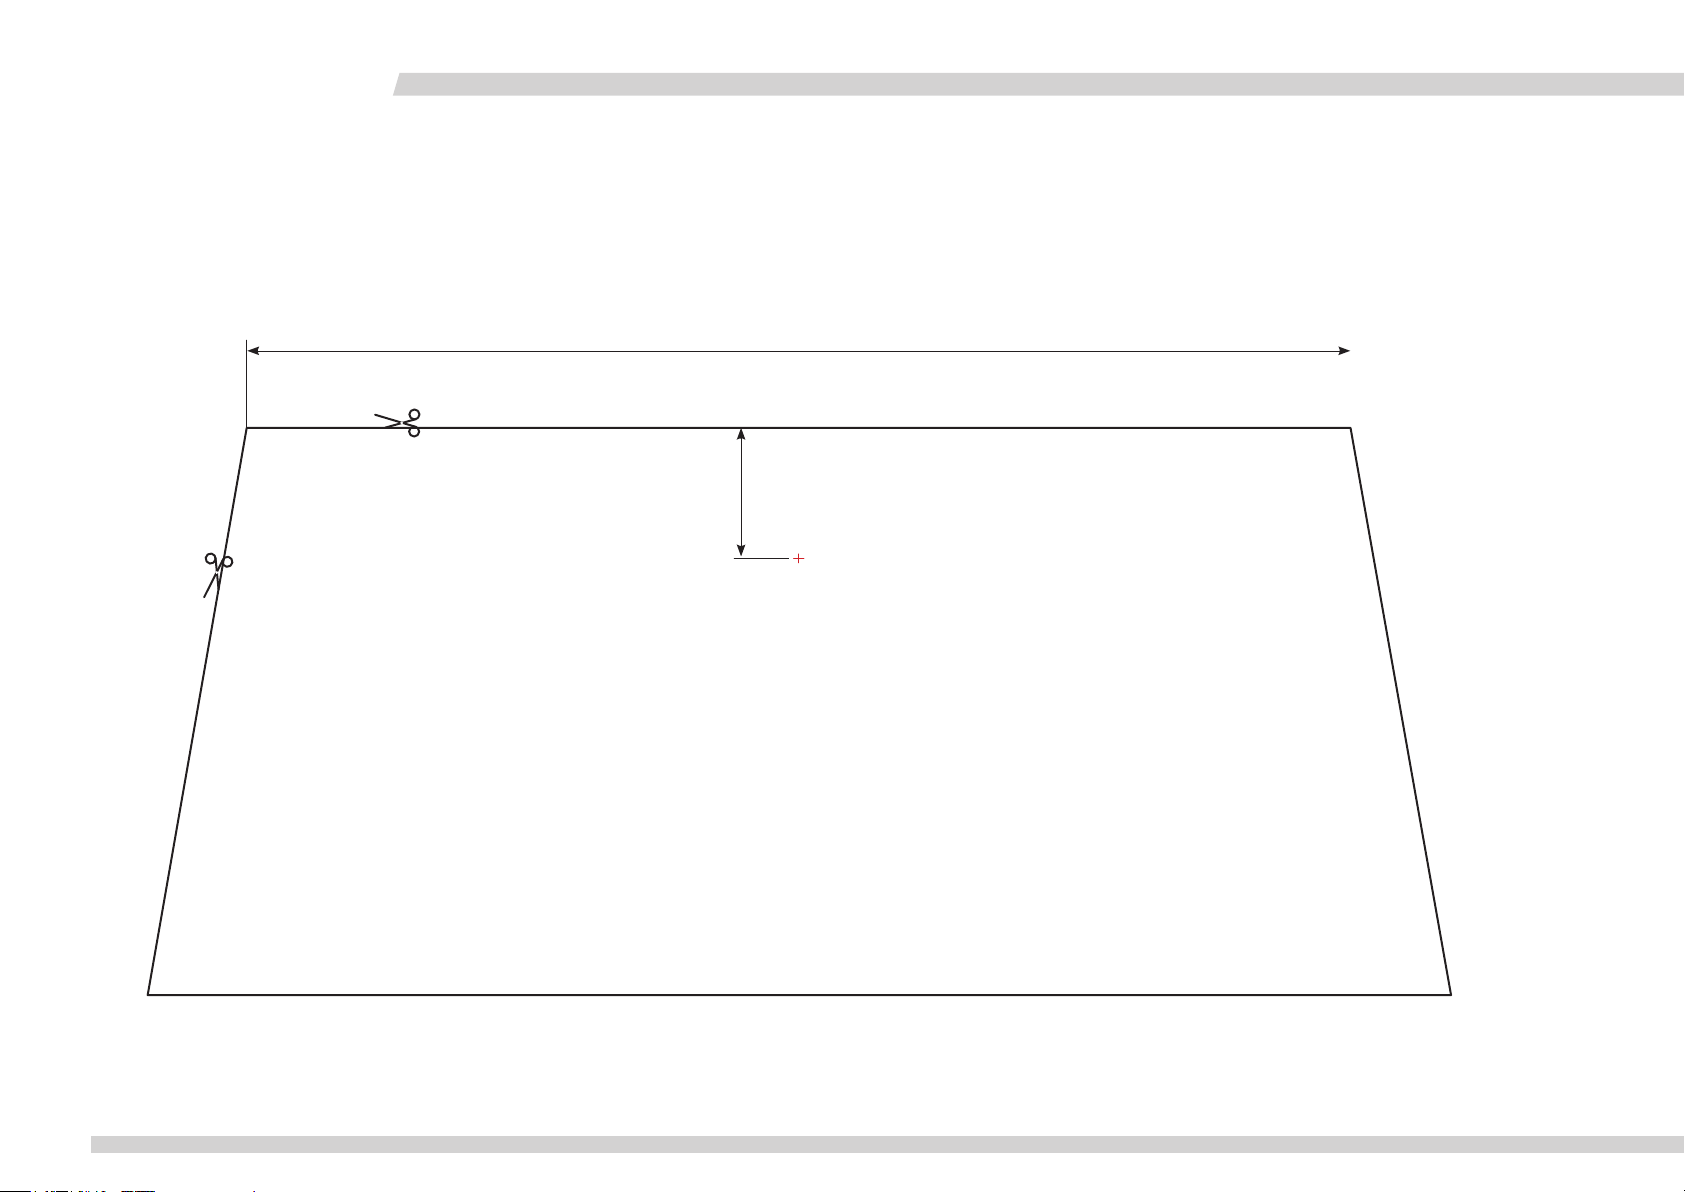
2. Schneiden Sie dem Faltverdeck beigelegte oder sich auf der
folgenden Seite befindliche Schablone (3) aus.
3. Legen Sie die Schablone (3) mit der Markierung an die Oberkannte des Steuerrohrs (4).
4. Legen Sie die beiden Kanten (5) der Bohrschablone parallel zu
einander.
5. Markieren Sie z.B. mit einem Filzstift die Lage der Bohrung.
6. Körnen Sie die zu bohrende Stelle an.
7. Bohren Sie mit einem 5,2 mm Bohrer die Bohrung und entfernen Sie den Grat.
8. Montieren Sie die vordere Befestigung des Faltverdecks und
bauen Sie den Steuersatz und Gabel nach Anweisungen auf
Seite 6 wieder ein.
2
1
Appendix for dealers
Drilling hole in head tube
The front mount (2) for the Foldable Fairing is mounted to the
head tube. For this purpose, the head tube must have a special
hole (1). If there is no such hole in the head tube, then a hole
must be drilled professionally by a qualified bicycle mechanic, following the instructions below.
Caution!
The following instructions are exclusively for qualified bicycle
mechanics. Under no circumstances should end users attempt to drill this hole.
Note:
A hole that is drilled in the head tube by a qualified bicycle
mechanic specifically for the purpose of mounting the front
mount of the Foldable Fairing does not void the warranty of
the vehicle.
1. Remove the headset and fork, following the instructions on
page 6.
2. Cut out the template included with the Foldable Fairing (or
the template provided on the following page of this manual)
(3) as described in the instructions printed on the template.
3. Wrap the template (3) around the head tube with its top
edge (as marked) flush with the upper edge of the head tube
5
4
3
(4).
4. The side (short) edges must be lined up parallel to one another, as shown in the diagram.
5. Mark the position of the hole, e.g., using a marker.
6. Using a center punch, make a small indentation at the center
point for the hole to be drilled.
7. Drill the hole using a 5.2mm drill bit, and remove the burr.
8. Mount the front mount of the Foldable Fairing, and remount
the headset and fork following the instructions on page 6
(steps 1 and 2) in the reverse order.
www.hasebikes.com
FV 02/16
27
Page 30
FALTVERDECK
Anhang für Fachhändler / Appendix for dealers
Bohrschablone Drilling template
194,7 mm
Hier ausschneiden
Cut along this line.
In der Schablone ein kleines Loch stechen,
markieren, ankörnen und mit 5,2 mm bohren
Make a small hole in the center of the crosshairs
(e.g., with a needle), mark this position using a
marker, then a center punch, and drill the hole
with a 5.2mm drill bit.
Diese Kante an das obere Ende des Steuerrohrs anlegen
Line up this edge with the upper edge of the head tube.
23 mm
28
FV 02/16
Diese Kante parallel zum Vorbau anlegen
Wrap the template around the head tube with these edges parallel to one another.
www.hasebikes.com
Page 31

FOLDABLE FAIRING
Gewährleistung und Garantiebedingungen
Es gilt die gesetzliche Gewährleistung. Ausgenommen sind Verschleißteile wie z.B. Kette,
Reifen, Bremsen etc. Der Gewährleistungszeitraum von (gesetzlich) 24 Monaten beginnt mit
dem Kaufdatum. HASE BIKES gibt eine Garantie von 24 Monaten auf Material und Verarbeitung.
Hase Bikes bietet keine Garantie gegen normale Abnutzung und Verschleiß; unerlaubte
Veränderungen, unsachgemäßen Gebrauch, unsachgemäße Wartung, Unfall, Missbrauch,
Fahrlässigkeit, Beschädigung oder wenn das Produkt zu einem Zweck genutzt wird, für das es
nicht ausgelegt ist.
Sollten wir feststellen, dass der Schaden aus normalen Verschleiß resultiert, Missbrauch oder
Unfall, oder die Lebensdauer des Produkts angemessen überschritten ist, können Reparaturen je nach Fall zu einem angemessenen Preis vorgenommen werden.
Pege
Waschen Sie sie nur mit Wasser per Hand. Lassen Sie die Tasche an der Luft trocknen. Nicht für
Trockner geeignet. Lagern Sie die Tasche trocken und sauber.
Conditions of warranty and liability
The terms and conditions are based on the statutory warranty. This excludes parts that wear such
as the chain, tyres, brakes etc.
The warranty period (statutory) of 24 months commences from the date of purchase.
This warranty covers defects in material and craftsmanship.
HASE BIKES do not warranty products against normal wear and tear, unauthorized
modifications or alterations, improper use, improper maintenance, accident, misuse, negligence,
damage, or if the product is used for a purpose for which it was not designed.
If we determine that the damage was a result of normal wear and tear, abuse or accident, or exceeding reasonable expectations of the products lifespan, repairs can be made at a reasonable cost
and according to each case.
Care
Wash it ONLY by hand with water without chemichals. Dry it naturally NOT in dry machine.
Always store the Fole Fairing dryed and clean.
www.hasebikes.com
FV 02/16
29
Page 32

Hase Spezialräder
Hiberniastraße 2
45731 Waltrop
Germany
Phone +49 (0) 23 09 / 93 77-0
Fax +49 (0) 23 09 / 93 77-201
[email protected]
www.hasebikes.com
 Loading...