

Page 1
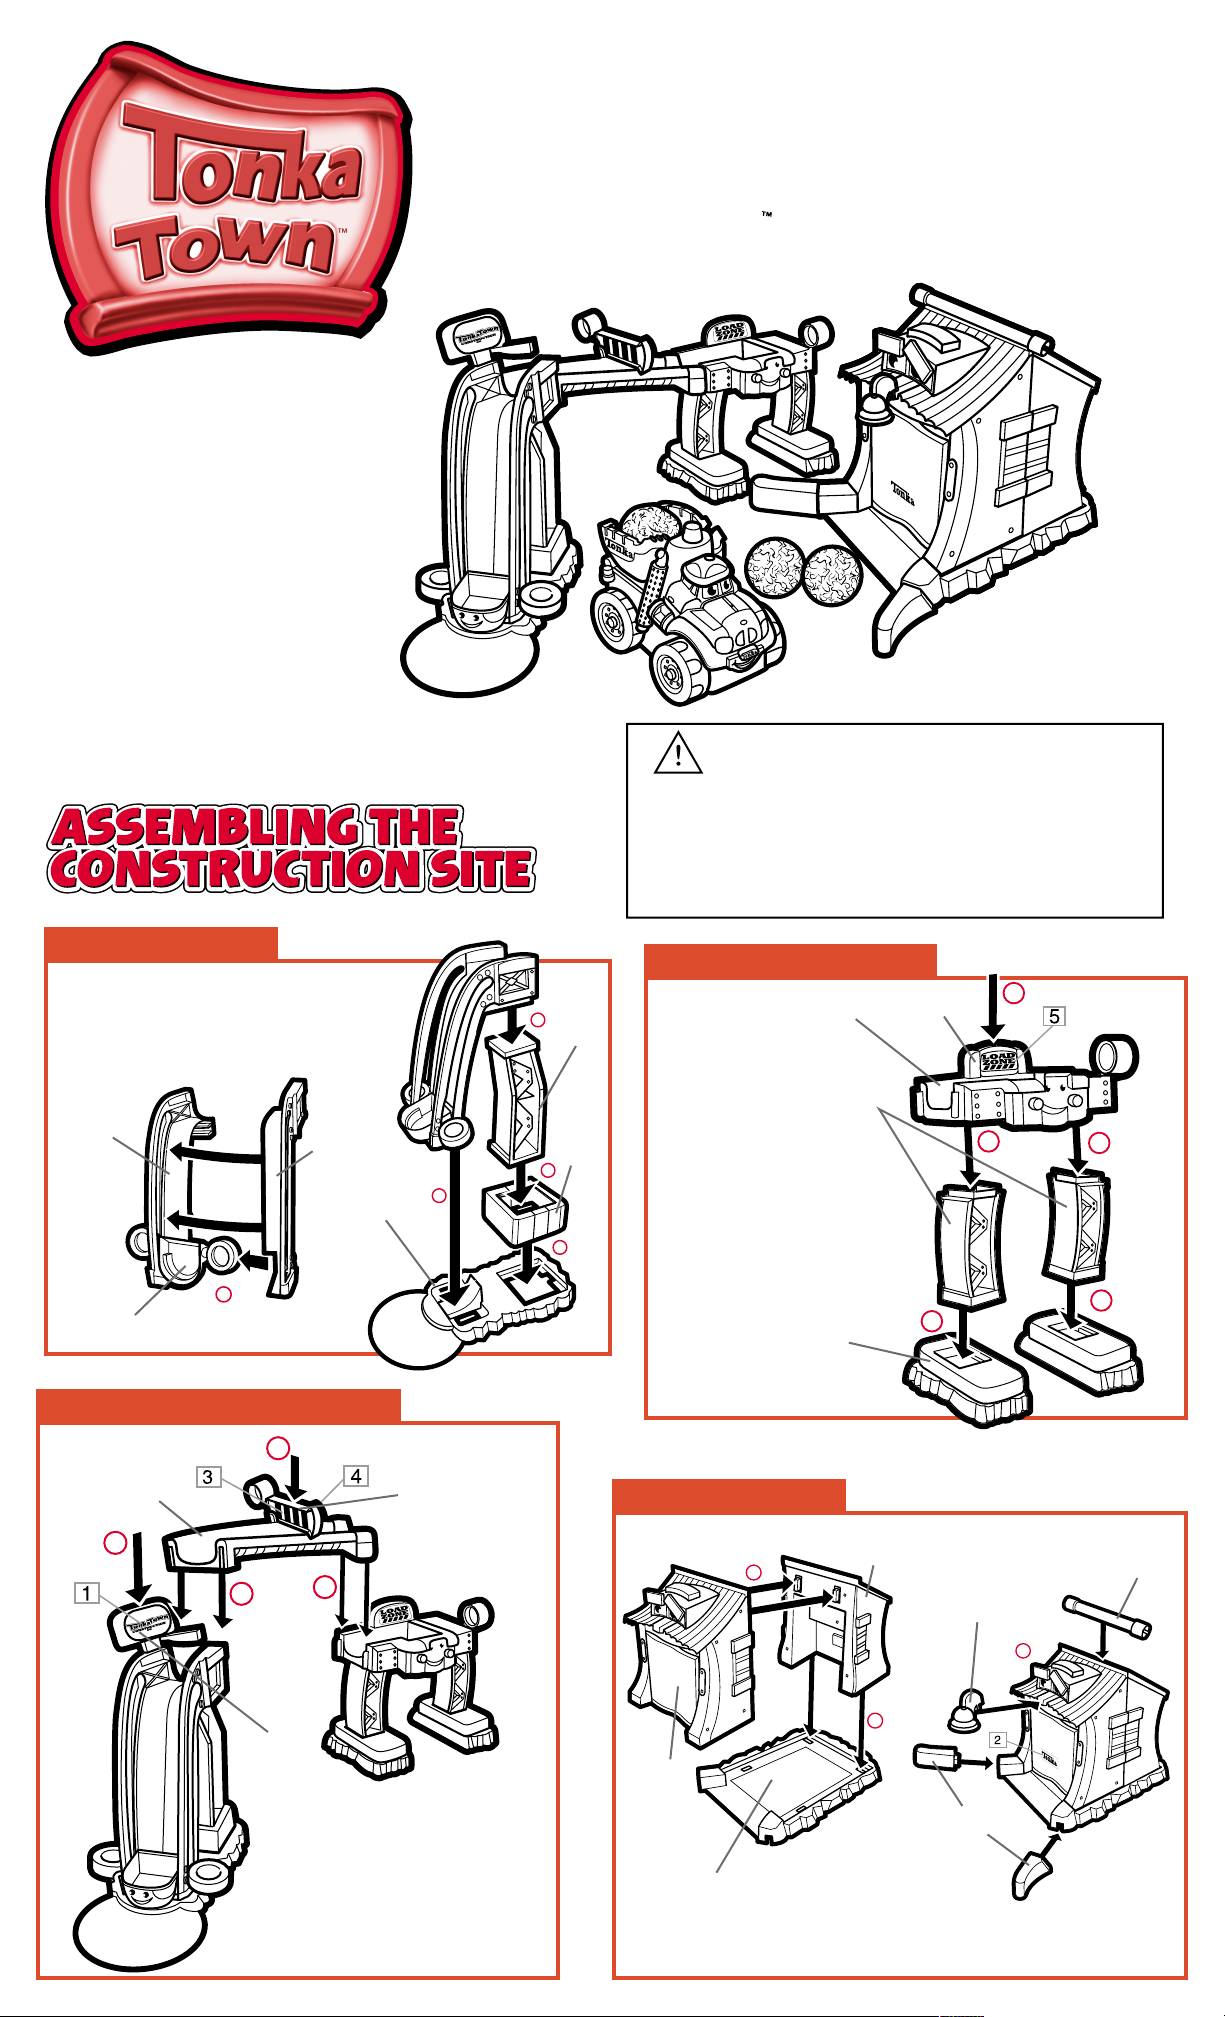
Adult assembly required.
label
c
c
b
d
a
c
b
a
label
c
label
label
label
c
b
a
a
Construction SiteConstruction SiteConstruction Site
C
h
u
c
k
t
h
e
D
u
m
p
T
r
u
c
k
"
k
n
o
w
s
"
h
o
w
t
o
f
i
n
d
h
i
s
w
a
y
h
o
m
e
!
C
h
u
c
k
t
h
e
D
u
m
p
T
r
u
c
k
"
k
n
o
w
s
"
h
o
w
t
o
f
i
n
d
h
i
s
w
a
y
h
o
m
e
!
b
d
d
a
No tools needed for playset assembly.
Requires 3 x 1.5V "AA"/LR6 alkaline batteries for
truck and 4 x 1.5V "AA"/LR6 alkaline batteries
for garage (batteries not included).
Phillips/cross-head screwdriver (not included)
needed to insert batteries.
AGES 3+
90548
Elevator Assembly:
Elevator Assembly:
a) Snap elevator support base into elevator base.
b) Snap elevator support into support base.
1.
c) Insert dump bucket handle through elevator left side.
Insert dump bucket handle through elevator right side.
d) Snap elevator into elevator base and elevator support.
elevator
left side
dump bucket
elevator
right side
elevator base
elevator
support
elevator
support
base
CAUTION:
Hair entanglement may result if child’ s hair comes in
contact with moving parts of toy. Adult supervision
is required.
Dump Station Assembly:
Dump Station Assembly:
2.
a) Fit left dump station support into left
dump station support base.
b) Fit right dump station support into
right dump station support base.
c) Fit dump station on top of left and
right supports.
d) Apply sign label. Snap sign into
grooves as shown at top of diagram.
dump station
dump station
supports
dump station
support base
sign
Boulder Chute Assembly:
Boulder Chute Assembly:
3.
boulder
chute
sign
a) Attach boulder chute to assembled elevator
and dump station units as shown.
b) Apply gate labels. Snap on center gate.
c) Apply sign label. Snap sign into grooves.
center gate
Garage Assembly:
Garage Assembly:
4.
front
garage floor
a) Fit garage front and back pieces together. b) Fit assembled front and back pieces onto
garage floor. c) Attach roof ridge, roof lamp, garage curbs and label as shown.
back
roof lamp
garage
curbs
roof ridge
Page 2
Product and colors may vary.
©2002 Hasbro. All Rights Reserved.
® denotes Reg. U.S. Pat. & TM Office.
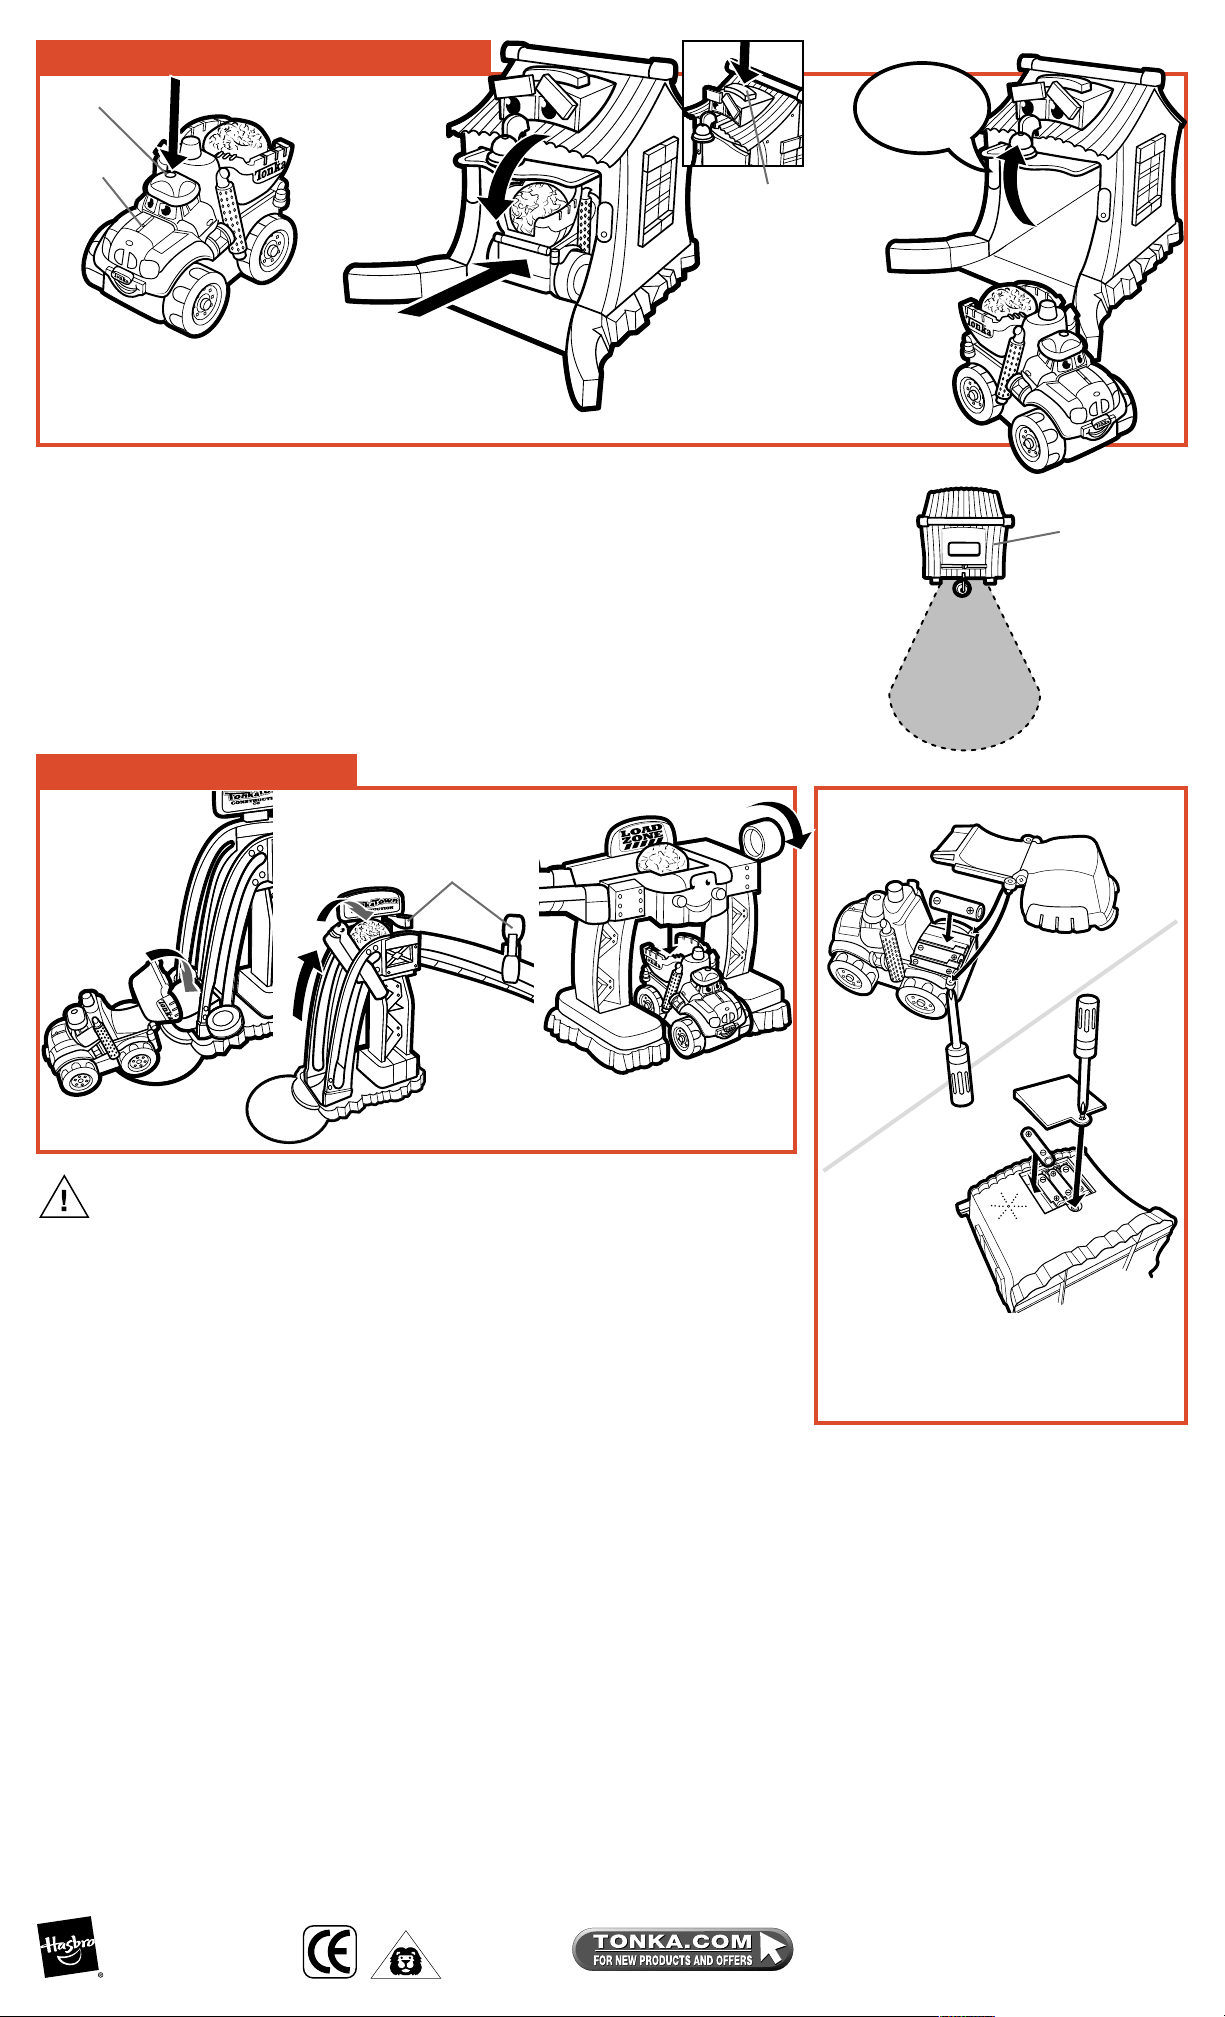
"Time to go
to work
Chuck!"
THE
INTERACTIVE
ZONE
THE
INTERACTIVE
ZONE
BASIC MOTORIZED TALKING PLAY INSTRUCTIONS:
BASIC MOTORIZED TALKING PLAY INSTRUCTIONS:
truck start button
on light
garage start button
4. GARY GARAGE says a
phrase. Animated mouth
(door) and eye brows on garage move
as GARY GARAGE “speaks.”
5. Garage door opens and truck backs
1. Push start button located on CHUCK
THE DUMP TRUCK’S cap. (Light on
hood indicates that truck is ON.)
MOTORIZED TALKING PLAY FEATURES:
MOTORIZED TALKING PLAY FEATURES:
• Motorized truck automatically returns to garage only when it is inside the interactive zone.
• Truck motor switches off after approximately 10 seconds to allow for push-along play when truck is removed from
interactive zone.
• When truck is outside of the interactive zone, GARY GARAGE continues to say encouraging phrases as well as "where
are you?" phrases to invite child to place truck back inside interactive zone to resume motorized play.
• Motor restarts when vehicle is returned to the interactive zone,garage door must be up. CHUCK THE DUMP TRUCK
drives back to garage. Press button on top of garage to start motorized play again.
• To save batteries,truck and garage go into sleep mode if CHUCK THE DUMP TRUCKdoes not return to the interactive
zone within 5 minutes. Light on truck hood turns OFF when truck enters sleep mode. To resume motorized play,
press truck start button and garage start button and place truck inside interactive zone,or follow BASIC MOTORIZED
TALKING PLAY INSTRUCTIONS.
• Fluorescent lighting may affect normal operation. If this occurs turn off lights or move to a different play environment.
2. Place truck inside garage (front of truck
should be pushed against switch on rear
wall), then close garage door.
3. Press start button located on top of garage.
out, then drives in a circle in front
of garage.
6. Truck returns to garage when GARY
GARAGE says a "come home" phrase.
garage (top view)
CONSTRUCTION SITE PLAY:
CONSTRUCTION SITE PLAY:
Raise truck’s dump bed to load
boulders into elevator bucket.
Lift bucket to raise elevator.
Tilt bucket to unload boulder onto chute.
Boulder chute gates can be lowered or lifted.
chute gates
Place truck under dump station.
Turn lever to unload boulders into truck bed.
To replace batteries:
CAUTION: TO AVOID BATTERY LEAKAGE
1) Be sure to insert the batteries correctly and always follow
the toy and battery manufacturer’s instructions;
2) Do not mix old and new batteries or alkaline, standard
(carbon-zinc) or rechargeable (nickel-cadmium) batteries;
3) Always remove weak or dead batteries from the product.
IMPORTANT: BATTERY INFORMATION
Please retain this information for future reference.
Batteries should be replaced by an adult.
1) Always follow the instructions carefully. Use only batteries specified and be sure to insert them correctly by matching the + and –
polarity markings.
2) Do not mix old batteries and new batteries, or standard (carbon-zinc) with alkaline batteries.
3) Remove exhausted or dead batteries from the product.
4) Remove batteries if product is not to be played with for a long time.
5) Do not short-circuit the supply terminals.
6) Should this product cause, or be affected by, local electrical interference, move it away from the other electrical equipment. Reset
(switching off and back on again or removing and re-inserting batteries) if necessary.
7) RECHARGEABLE BATTERIES: Do not mix these with any other types of battery. Always remove from the product before recharging.
Recharge batteries under adult supervision. DO NOT RECHARGE OTHER TYPES OF BATTERIES.
Use a Phillips/cross-head screwdriver to loosen screw in battery compartment door, and remove door (screw remains
attached to door). Discard exhausted batteries, and insert 3
fresh "AA"/LR6 alkaline batteries (truck), or 4 fresh "AA"/LR6
alkaline batteries (garage). Replace door and tighten screw.
This equipment has been tested and found to comply with the limits for a Class B digital device, pursuant to part 15 of the FCC Rules.
These limits are designed to provide reasonable protection against harmful interference in a residential installation. This equipment generates, uses and can radiate radio frequency energy, and, if not installed and used in accordance with the instructions, may cause harmful interference to radio communications. However, there is no guarantee that interference will not occur in a particular installation. If this
equipment does cause harmful interference to radio or television reception, which can be determined by turning the equipment off and
on, the user is encouraged to try to correct the interference by one or more of the following measures:
• Reorient or relocate the receiving antenna.
• Increase the separation between the equipment and the receiver.
• Consult the dealer or an experienced radio/TV technician for help.
FCC Statement
P/N 6194120000
 Loading...