

Page 1
AGES 8 & UP
MODEL 88-304
883040001IWTI-03
PICTURE PLUS IMAGE
PICTURE PLUS IMAGE
CAMERA
CAMERA
I N STRU CTI O N
Battle droids are the foot soldiers of the Trade Federation army. Under the
control of the Neimoidians, they serve as security, ground troops, and pilots
of the Trade Federation battleships. Battle droids overwhelm their enemy and
attack in massive waves. These electrobinoculars are standard issue to battle
droid unit commanders.
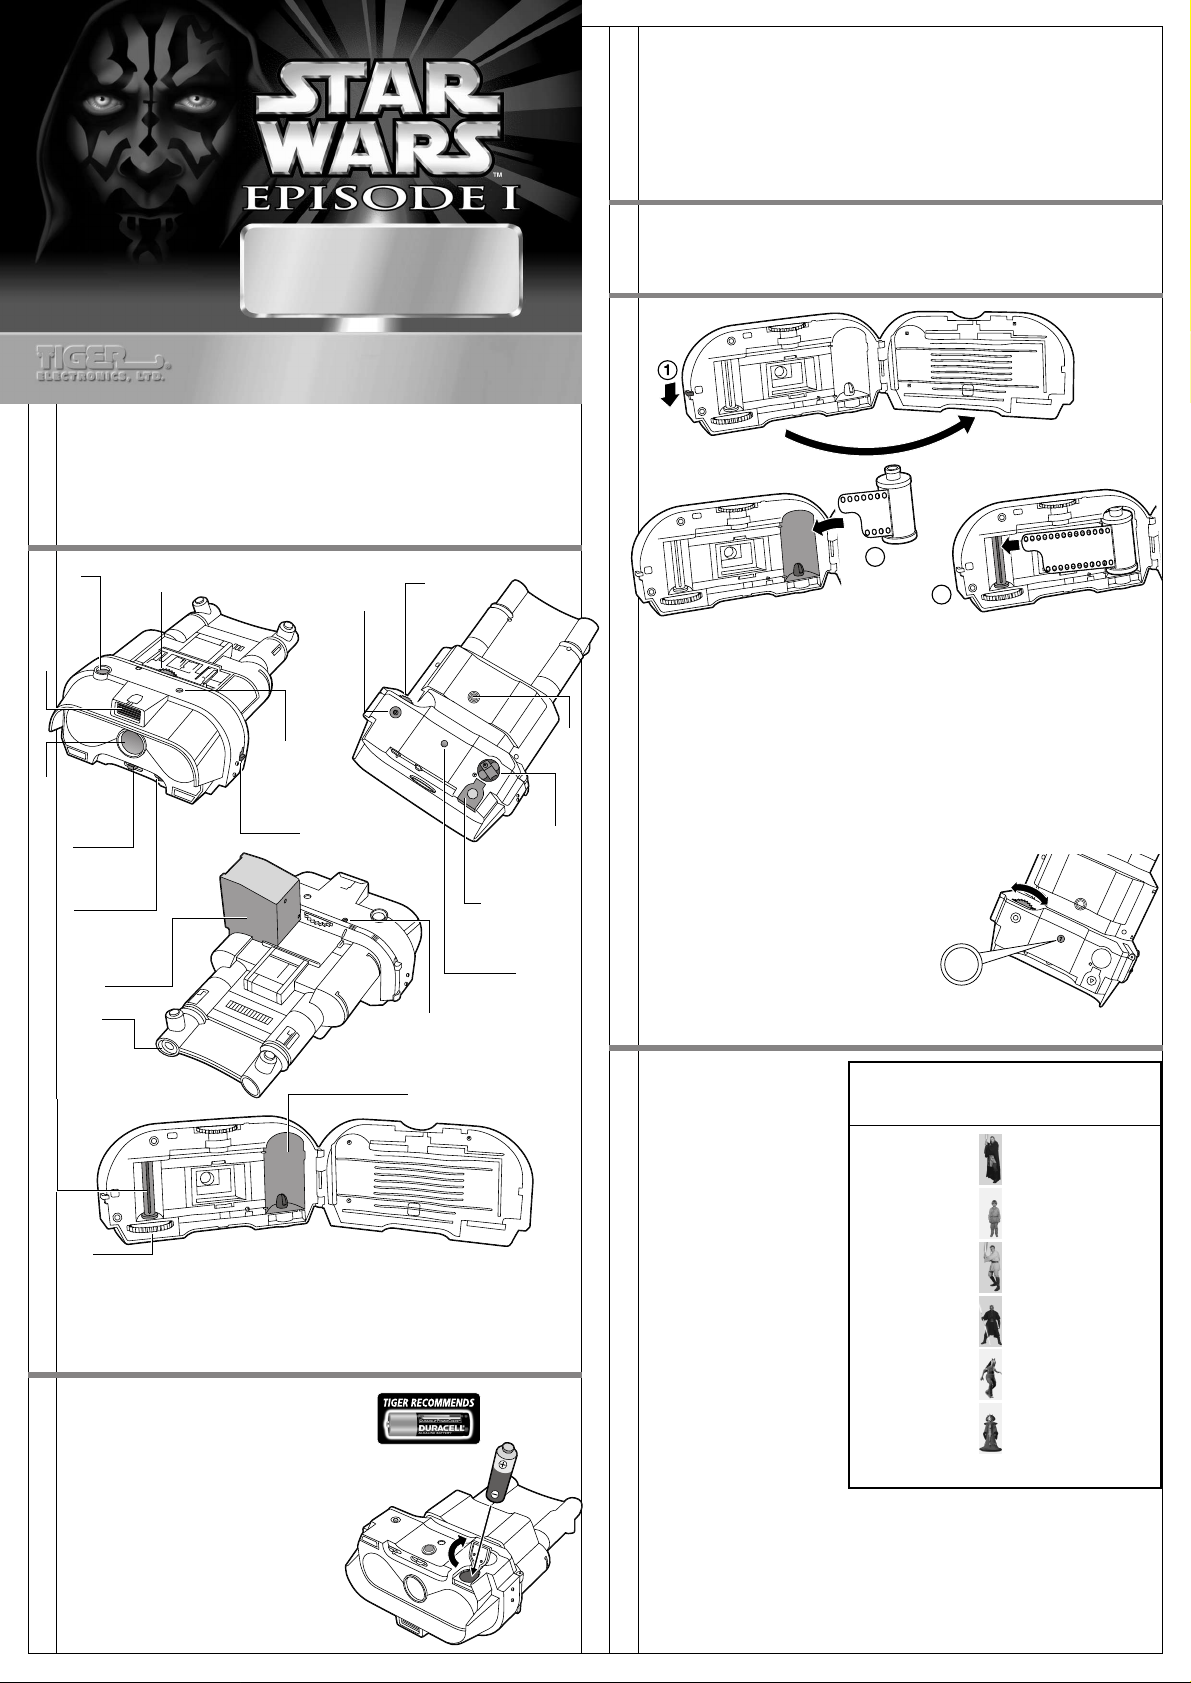
GETTING STARTED
Shutter
Button
Built-In
Flash
Camera
Lens
Lens
Cover
Switch
Flash
On/Off
Switch
Viewfinder
Box
Viewfinder
Film Take-Up
Spool
Film
Advance
Wheel
Note: Binoculars are for style only and do not have any magnification or
function.
BATTERY INSTALLATION
To open the battery compartment cover,
push the cover in the direction of the
arrow marked on the outside of the cover
and then lift up the cover. Insert 1 "AA"
or LR6 battery (not included), making
sure to align the "+" and "-" signs as
shown. Return the battery compartment
cover to its original position.
TO ENSURE PROPER FUNCTION :
– DO NOT MIX OLD AND NEW BATTERIES.
– DO NOT MIX ALKALINE, STANDARD OR
– BATTERY INSTALLATION SHOULD BE DONE
– NON-RECHARGEABLE BATTERIES ARE NOT TO
Background
Index Wheel
RECHARGEABLE BATTERIES.
BY AN ADULT.
BE RECHARGED.
Background
Index
Window
Film
Compartment
Door Switch
Rewind
Release
Button
Film
Advance
Wheel
Battery
Compartment
Flash
Ready Light
Film
Loading
Compartment
Viewfinder
Viewfinder
button
button
Rewind
Knob
Film
Counter
Window
– RECHARGEABLE BATTERIES ARE TO BE REMOVED FROM THE TOY BEFORE
BEING CHARGED (IF REMOVABLE).
– RECHARGEABLE BATTERIES ARE ONLY TO BE CHARGED UNDER ADULT
SUPERVISION (IF R EMOVABLE).
– ONLY BATTERIES OF THE SAME OR EQUIVALENT TYPE AS RECOMMEN DED
ARE TO BE USED.
– BATTERIES ARE TO BE INSERTED WITH THE CORRECT POLARITY.
– EXHAUSTED BATTERIES ARE TO BE REMOVED FROM THE TOY.
– THE SUPPLY TERMINALS ARE NOT TO BE SHORT-CIRCUITED.
CHOOSING FILM
This camera accepts standard 35mm(135), ISO 400 film with up to 36
exposures.
LOADING THE FILM
2
3
1. Pull down on the film door latch to open the film compartment.
2. Insert the film cartridge into the right side of the film compartment.
Make certain the film cartridge fits securely or the film will not advance.
3. Pull out the film cartridge leader from the cartridge and insert the tip of
the film into the slot of the take-up spool. The take-up spool is located
on the left side of the film compartment. Turn the manual film advance
wheel so the slot for the film is facing up. Make certain the film leader
fits completely into the slot before proceeding. The second or third lower
perforation on the film must lock onto the small tab on the edge of
the slot.
4. Turn the film advance wheel to the left until it stops turning. Make certain
that the upper perforations on the film are properly aligned with the film
wheel between the two film compartments. If the film advance wheel
does not stop, the film has not been loaded properly.
5. Press the shutter button once and turn
the film advance wheel again to make
certain the film has wound onto the take
up spool properly.
6. Close the film compartment door. Press
the shutter button and turn the film
advance wheel until the number "1"
appears in the film counter window.
(as shown in the illustration at right.)
1
SELECTING A BACKGROUND
There are 6 pre-selected
backgrounds built into this
camera. The pre-selected
background will appear on
the left side of your photo.
To select one of the 6, turn
the background index wheel
to the letter that corresponds
to the background you wish
to use on your picture. The
wheel can be turned to the
left or right. A slight "click"
will be felt as the wheel is
turned to indicate that the
wheel is in the correct
position or white dot is
appeared on the wheel. The
letter of the background
selected will be visible in the
background index window.
A different background may
be chosen for each picture
simply by turning the
background index wheel to a
different corresponding letter
before taking a picture.
To turn off the background and to take a picture without a background, turn
the background index wheel to the "-" symbol, which can be located after
the letter "F".
IMPORTANT NOTES:
1. The shutter button will not take a picture if the background index wheel
is not in the correct position.
2. The flash must be turned ON when taking a picture indoors or outdoors
with a pre-selected background.
Background Pre-Selected
Index Wheel Background
Symbol
A Qui-Gon Jinn
B Anakin Skywalker
C Obi-Wan Kenobi
D Darth Maul
E Jar Jar Binks
F Queen Amidala
– no background
Page 2
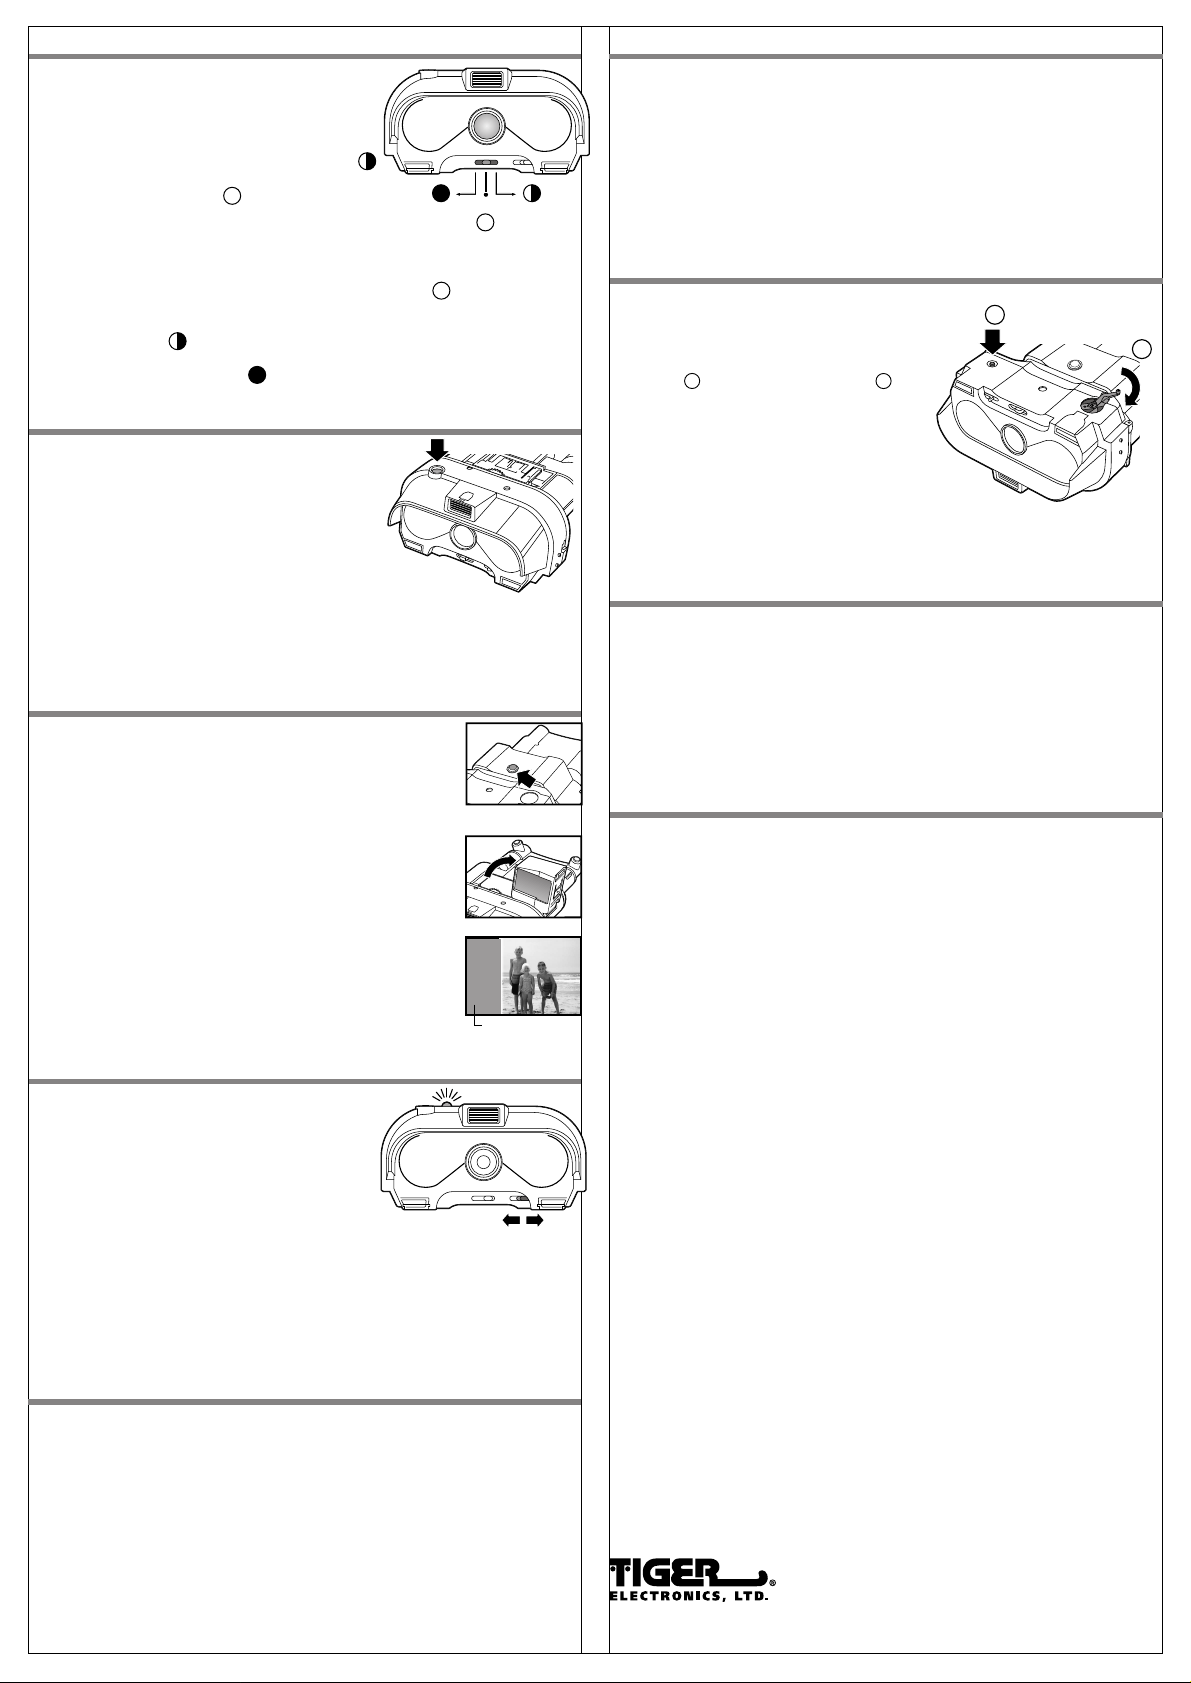
LENS COVER AND LENS COVER SWITCH
To open the lens cover, slide the lens cover
switch to the "open" or “mask” position. Look
at the front of the camera and make certain
the lens cover does not cover over the lens.
To take a picture using one of the
backgrounds, slide the lens cover to mask “ “.
To take a picture without a background, slide
the lens cover to open “ “.
To close the lens cover, slide the lens cover
OPEN
CLOSE MASK
switch to the "closed" position. Look at the front of the
camera and make certain the lens is covered and protected from damage.
IMPORTANT NOTES:
1. The lens cover must be opened to take a picture “ “.
2. The lens cover switch must be on mask to take a picture with a
background. The special background aperture will appear on the front
of the lens “ “.
3. The lens cover must be closed when the camera is not in use to protect
the lens from damage “ “.
SHUTTER BUTTON
The shutter button must be pressed down each
time you take a picture. Press the button and
a slight "click" will be heard to indicate the
camera has taken a picture.
IMPORTANT NOTES:
1. The shutter button will not take another
picture if the film advance wheel was not
advanced when the previous picture was taken.
2. The shutter button will not function when the film
has reached the end of the film cartridge. Make certain the number of
exposures in the film counter window matches the exposures on the film.
3. The shutter button will not function when the background index wheel
is not in the correct position.
VIEWFINDER SYSTEM
To open the viewfinder box, press the viewfinder button
located on the bottom of the camera. The box will pop up
slightly. Pull the box to an upright position.
(see illustration at right)
NOTE: The viewfinder box must be pulled upwards to take
a picture.
To take a picture, look through the left hole of the camera.
The right hole of the camera does not function.
Close the viewfinder box when the camera is not in use
to prevent damage.
When you use the camera to take a picture with an image
inserted onto the photo, you will notice a blue area on the
left. This area is where the image will appear on the picture.
Be careful not to put the subject of your picture inside this
area or else it will interfere with the background image.
blue translucent zone
BUILT-IN FLASH and FLASH ON/OFF SWITCH
To turn on the flash, simply slide the flash on/off
switch to the ON position. To turn off the
flash, simply slide the flash on/off switch to
the OFF position.
It takes approximately 8 seconds for the flash
to charge after each use. The flash ready light
will go on when the flash is ready.
IMPORTANT NOTES:
ONOFF
1. To take a picture indoors or outdoors with a background, the flash
on/off switch must be turned ON and the lens cover must be moved to
the open position.
2. To take a picture without a background, use the flash when you are
indoors or in poor light conditions.
3. When the camera is set to insert a character onto the photo, the flash is
automatically locked into the ON position.
TAKING A PICTURE
1. Install new batteries for best results
2. Load the film
3. Select one of the 6 pre-selected backgrounds or take a picture without
a background
4. Open the lens cover
5. Pull the viewfinder box upward to view the object of the picture.
6. Turn on the flash for pictures with a pre-selected background, indoor or
poor light conditions.
7. Look into the viewfinder and center the object in the window
8. Press down on the shutter button
9. Turn the film advance wheel clockwise to advance the film
10. The camera is now ready to take another picture
Congratulations - you have taken a picture using the Picture Plus Image
Camera!
FOR BEST RESULTS
1. If you are taking a picture outside, without the flash, try to keep the sun
behind you.
2. If you are taking a picture inside, turn on the flash and wait for it to be
charged.
3. Hold the camera steady. If necessary, place the camera on a stable
surface.
4. Press the shutter button gently so the camera does not move.
5. Don't forget to turn the film advance wheel each time you take a picture.
6. Monitor the film counter window and do not take any pictures when the
number in the window matches the film exposures on the film.
UNLOADING THE FILM
When the film counter window matches
the film exposures on the film, the film
cartridge must be rewound and removed.
To rewind the film, press the rewind release
1
button , unfold the rewind crank , and
2
turn the crank clockwise.
When the film is almost completely
rewound, there will be slight tension against
the crank. Continue to turn the crank until
the tension is released and the entire film
is wound onto the film cartridge.
Open the film compartment, remove the film and bring the film to a film
processing center.
1
CAUTION/DEFAULT OR DAMAGE
Replace battery at the first sign of erratic operation.
If a part of your camera is damaged or something has been left out, DO NOT RETURN
THE GAME TO THE STORE. The store doesn’t have replacement parts. Instead, write to
us at:
Tiger Electronics, Ltd. Repair Center
980 Woodlands Parkway,
Vernon Hills, Illinois 60061, U.S.A.
Please include a note with your return explaining the problem along with a sales slip,
date, place of purchase and price paid. We will do our best to expedite your return
promptly.
90-DAY LIMITED WARRANTY
Tiger Electronics, Ltd. (Tiger) warrants to the original consumer purchaser of this product
that the product will be free from defects in materials or workmanship for 90 days from
the date of original purchase. This warranty does not cover damages resulting from
accident, negligence, improper service or use or other causes not arising out of defects
in materials or workmanship.
During this 90-day warranty period, the product will either be repaired or replaced (at
Tiger’s option) without charge to the purchaser, when returned with proof of the date
of purchase to either the dealer or to Tiger.
Product returned to Tiger without proof of the date of purchase or after the 90-day
warranty period has expired, but prior to one year from the original date of purchase,
will be repaired or replaced (at Tiger’s option) for a service fee of U.S.$17.00. Payments
must be by check or money order payable to Tiger Electronics, Ltd.
The foregoing states the purchaser’s sole and exclusive remedy for any breach
of warranty with respect to the product.
All product returned must be shipped prepaid and insured for loss or damage to:
Tiger Electronics, Ltd. Repair Dept.
980 Woodlands Parkway, Vernon Hills,
Illinois 6006l, U.S.A.
The product should be carefully packed in the original box or other packing materials
sufficient to avoid damage during shipment. Include a complete written description of
the defect, a check if product is beyond the 90-day warranty period, and your printed
name, address and telephone number.
THIS WARRANTY IS IN LIEU OF ALL OTHE R WARRANTI ES AND NO OTHER
REPRESENTATIONS OR CLAIMS OF ANY NATURE SHALL BE BINDING ON OR OBLIGA TE
TIGER I N ANY WAY. ANY IMPLIED WARRANTIES APPLI CAB LE TO THI S P RO D U CT,
INCLUDING WARRANTIES OF MERCHANTABILITY AND FITNESS FOR A PARTICULAR
PURP OS E, AR E LIMITED TO THE N INETY (90) DAY PERIOD DESC R IBED ABOVE. IN
NO EVENT WILL TI G E R B E LIAB LE F O R ANY S P EC IAL, INCID E NTAL, OR
CONSEQUENTIAL DAMAGES RESULTING FROM POSSESSION, USE, OR MALFUNCTION
OF THIS TI G E R P RO D U CT.
Some states do not allow limitations as to how long an implied warranty lasts and/or
exclusions or limitations of incidental or consequential damages, so the above limitations
and/or exclusions of liability may not apply to you. This warranty gives you specific rights,
and you may also have other rights which vary from state to state.
For more information about Tiger Electronics, our products and special promotions,
please visit our Web Site at: www.tigertoys.com
© Lucasfilm Ltd. & TM. All rights reserved.
Used under authorization.
®, TM, & © 1999 Tiger Electronics, Ltd. All rights reserved.
980 Woodlands Parkway, Vernon Hills, Illinois 60061, U.S.A.
www.tigertoys.com
PRINTED IN CHINA
2
 Loading...