

Page 1
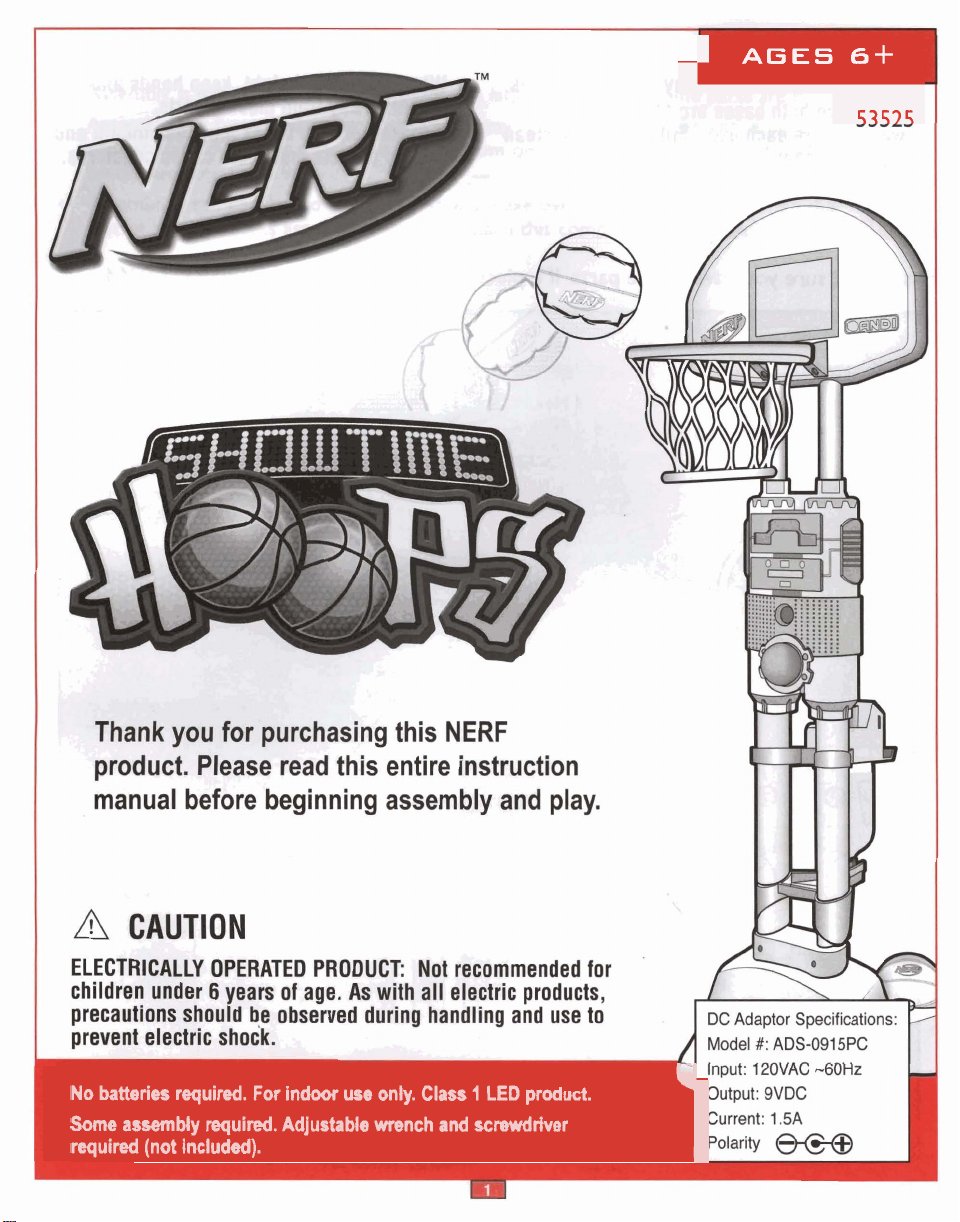
AGES
6-k
+
No
batteries
Some
assembly
required
required. For indoor use
required.
(not included).
Adjustable
only.
Class
wrench
1
LED
and
screwdriver
product.
1
Page 2
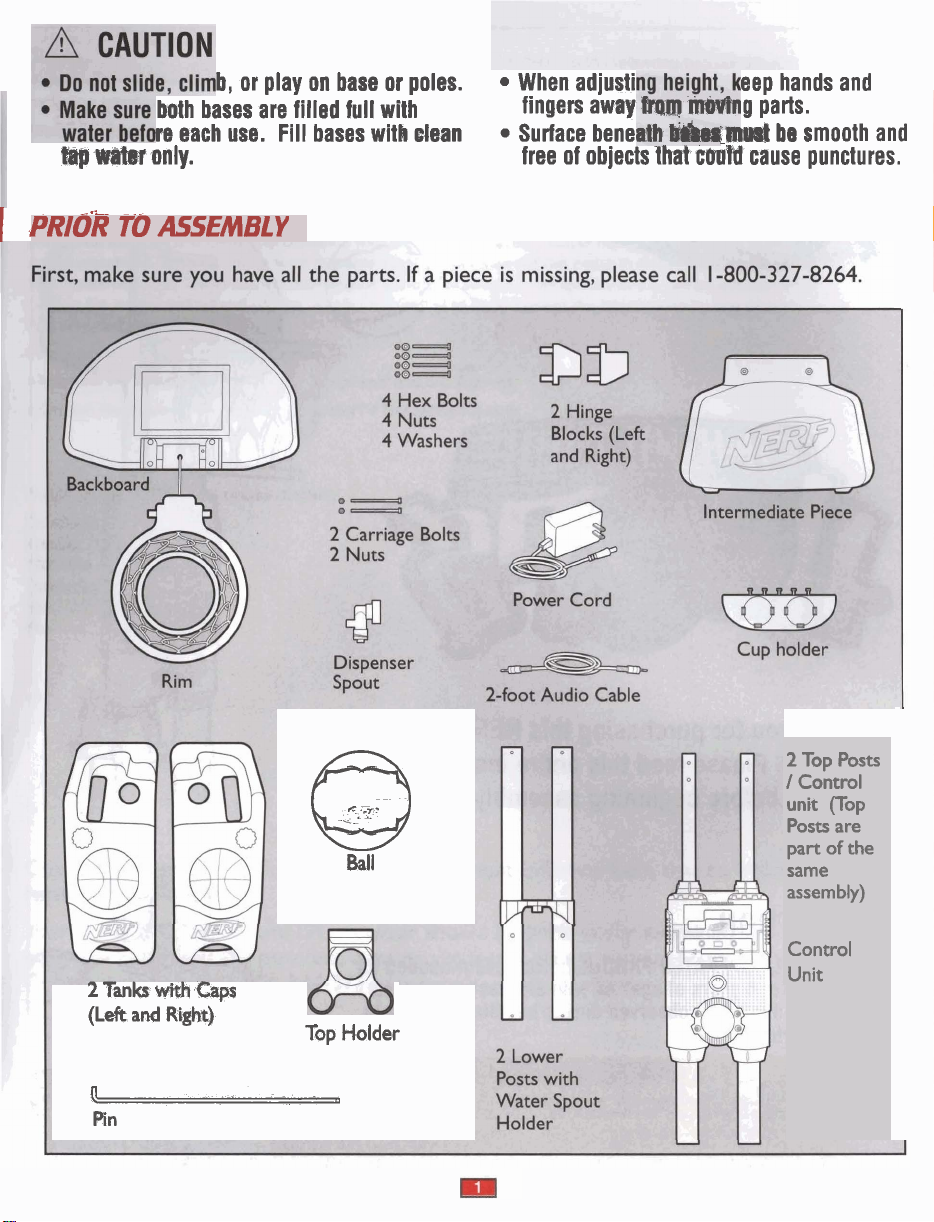
1
PRIOR
tap
b, or play on base or poles. When adjusti eep hands and
both bases are filled full with fingers away g parts.
re
each use. Fill bases with
wabf
only. free of objects
Tb
ASSEMBLY
elean
Surface bene
that
-mwt
be smooth and
cgPW
cause punctures.
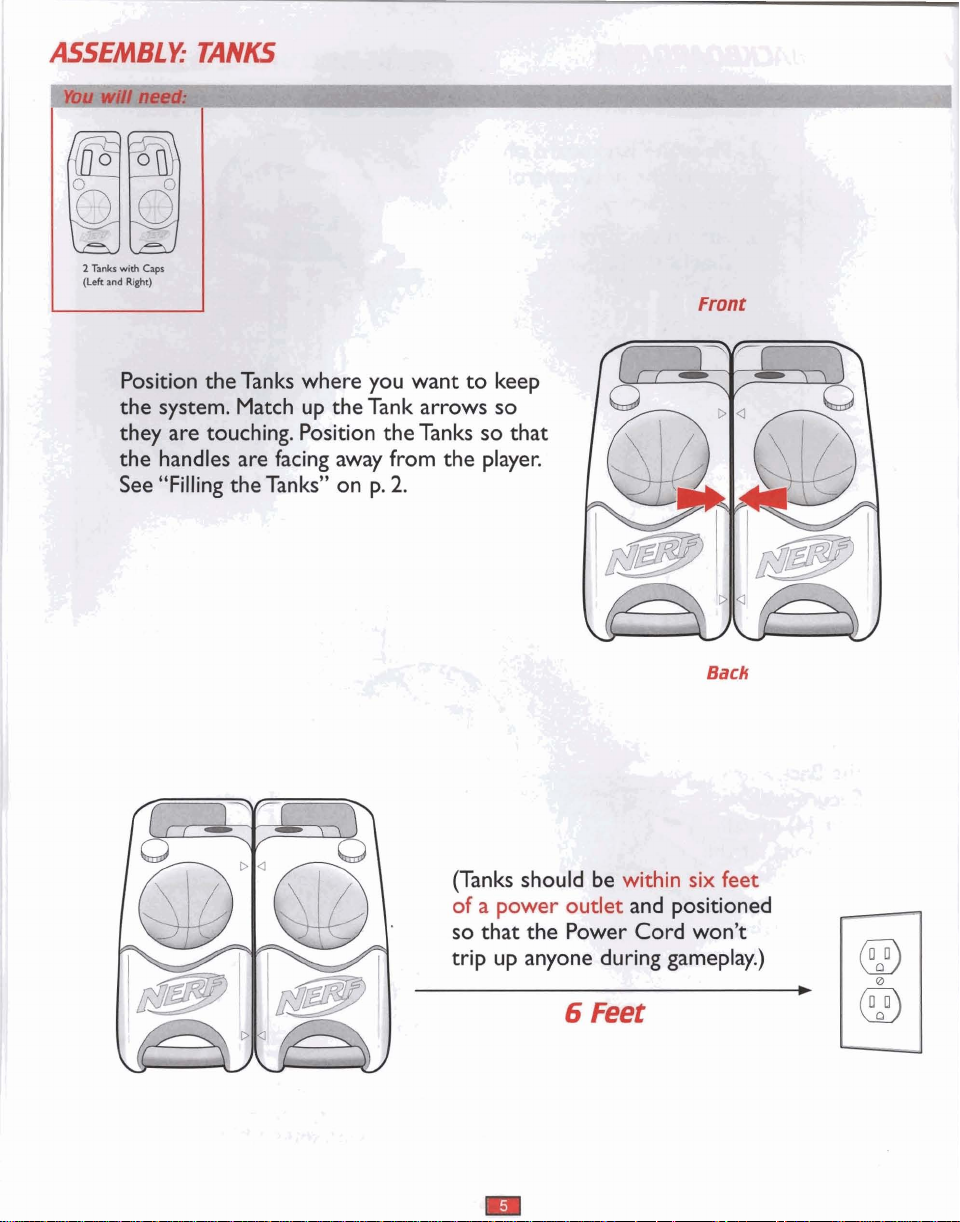
2TanksWh
(Left
and
Right)
n
Pin
Caps
rT
.T1
0
Ball
Top Holder
2
Top Posts
I
Control
unit (Top
Posts are
part of the
same
assembly)
Control
Unit
Page 3
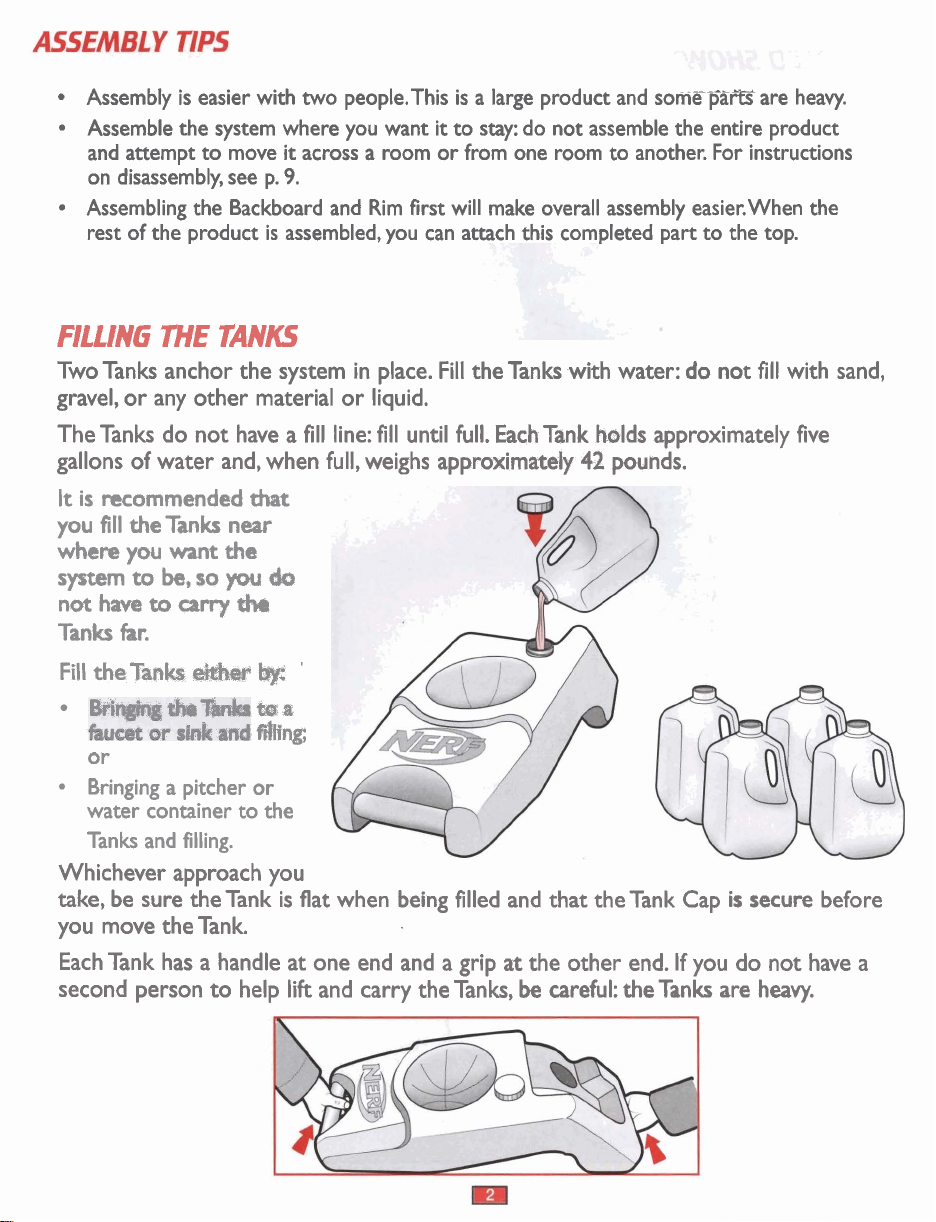
Assembly is easier with two people.This is a large product and somepatE are heavy.
Assemble the system where you want
it
and attempt to move
on disassembly, see p.
Assembling the Backboard and Rim first will make overall assembly easier.When the
rest of the product
across a room or from one room to another. For instructions
9.
is
assembled, you can attach this completed part to the top.
it
to stay: do not assemble the entire product
FIUING
TwoTanks anchor the system in place. Fill theTanks with water: do not
7HE
TANKS
fill
with sand,
gravel, or any other material or liquid.
The Tanks do not have a
gallons of water and, when full, weighs approximately
It
is recommended
you
fill
where
system
not
haw
Tank
Fill
the
the Tanks
you
to
be,
to
far.
Tank
want
so
cany
ebiw
near
the
you
thr
that
do
bC
ma
'
fill
line:
fill
until full. Each Tank holds approximately five
42
pounds.
fiHng
or
Bringing a pitcher or
water container to the
Tanks and filling.
Whichever approach you
take, be sure the Tank is flat when being filled and that the Tank Cap is secure before
you move
theTank.
Each Tank has a handle at one end and a grip at the other end. If you do not have a
second person to help lift and carry the Tanks,
be
careful: the Tanks are heavy.
Page 4
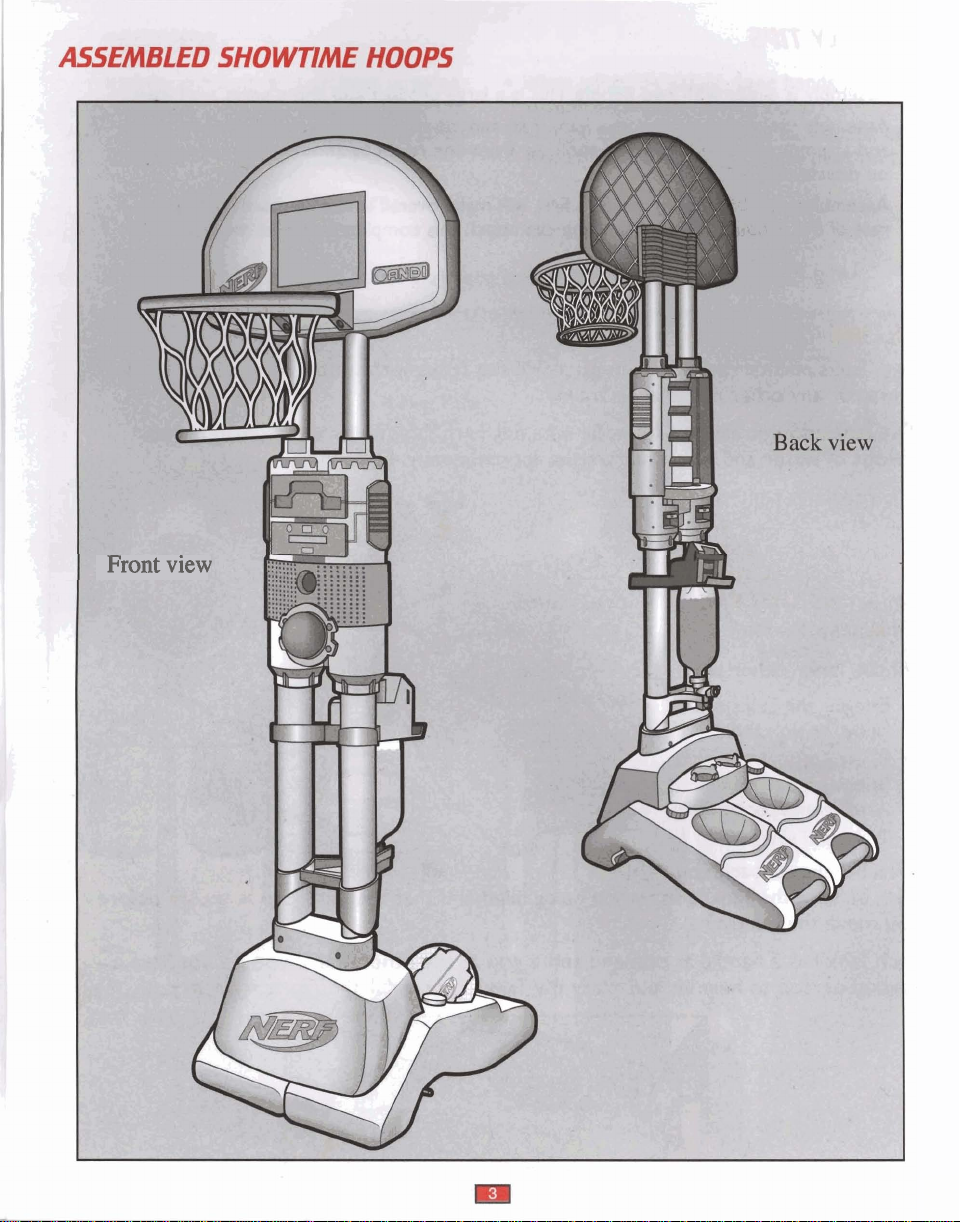
Front
view
Page 5
ASSEMBLE
!-OARD/Rlkr
Rim
------
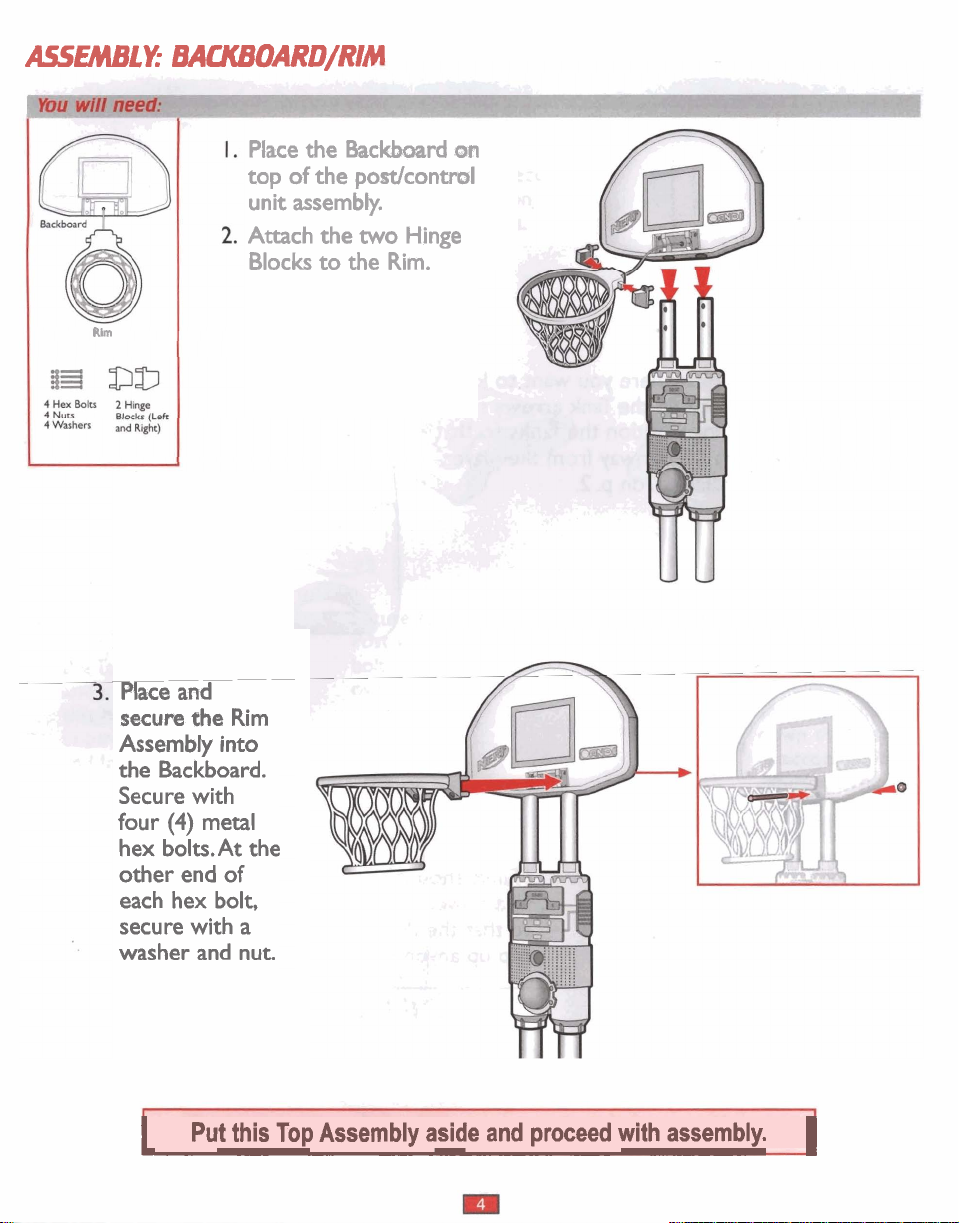
Place and
secure the Rim
Assembly into
the Backboard.
Secure with
four
(4)
metal
hex
bolts.At the
other end of
each hex bolt,
secure with
washer and nut.
Place the
top of the post/control
unit assembly.
Attach the two Hinge
Blocks to the Rim.
a
6ackt-d
on
cde and proceed
with
assembly.
I
Page 6
Page 7

RSSEMBLE
2
Tank
wtth
Caps
(M
and
Rdt)
Rn
BASE
Top Hdder
Cup
FLY--
hold.(.
I.
Attach the
lntermediate Piece
into the holes on
top of the Tanks.
2.
Insert two
(2)
Lower
Posts into the
lntermediate
nn
Piece.
The Drink
Dispenser faces
the rear of the
system.
-7,
2
Lower
Porn
Dispenser
3.
1
I
I
with the Tank
L
I
with Drink
hcku
There is a small hole
on the underside of
and insert
this hok.Ttiis will
secure the Metal Posts
and lntermediate
Piece to the Tanks.
Make sure the Pin
inserted all the way
through to be flush
it
through
;GZBdm
2
Washen
is
4.
Secure each Metal
Post with one carriage
bolt and nut. Do not
over-tighten the bolts.
TI,
5.
Slide the Top Holder onto
the
Metal
Posts: the Top
Holder faces the rear of the
system.This piece should
slide
freely
up and
down the posts
to
accommodate
+
different-sized
Attach the Cup
Holder feature
the base, as shown.
to
Page 8

Page 9

2.
i#
*
ng
the
bottle
straight
rew
on the dispenser
Make
spout
is fully attached, and be
careful not to cross-thread
bosdebyarndnglt
out
the
Putdrywithpupertawergsordothcmd
nmovedforcleQninah.
sure the spout
spring4odd
mechanism.
Run
e
top
of
the
backbard
is
approximately
1
1
F
2
Strap
'
.-
"hfn,"
4.
your
player
Dub
Tango's
bottom
backboard, net, crowd noises,
mice
and
setting is "line in" and sound
srrund
etc.).
-
.
rn
Page 10

Ektemal
To listen to your music through
select "External Source Amp" from the game selection menu and select either the middle
or bottom setting on the Audio Selection Switch.
Source
Amp
Mode
the
system without having the unit shut down automatically,
If the unit
External Music."
To leave the
Cancel
If you need
first
very heavy, and if you try to move the assembled product all in one piece, you may
damage
Unplug the system. Remove the Control Unit from the Lower Posts by pulling the tabs.
Unscrew the carriage bolts from the lower half of the system, and remove the Pin threaded
through the
move each Tank individually. Remember to be careful: the tanks are very heavy.
Is
not switched
External
to
one of these two modes, the
Source Amp Mode and return ta
LCD
will ask you to "Switch to
the
main menu, press the
buttsn.
to
move the system to a different spot or place,
take the product apart, move the parts, and reassemble.The base of the product
it
or hurt yourself.
Tanks.Take apart the Lower Posts and Intermediate Piece so that you can
it's
recommended that you
is
Page 11

The
system
Wetbsll games for one player,
is
more than an indoor backtrmrd and rim:
two
phpm,
ur
more!
it
allows you
to
play an array of
Before you play, you need
Some decisions involved in game play
one,
you and your opponent can decide who
The way some people play, the person who makes a
make another baske~ another way to play is to
1
a
basket.
b
Know the rules, and understand the buttons
more you play, the more you'll know how to
own way.
me
Contror Unit
Facing the front of the Control Unit, you'll sea
an
LED
display (for
to
the left
below,
Below the Displays, you'll see two round buttons,The one on the left
button.The sensors in the system's Backboard can register a basket, but
shoot the ball and miss the Backboard completely, you need to tell the computer in the
system
The
qpnd
.I
this
bufton to stop a game, return to the Main Menu, or answer "No" when the computer
asks you a question.
and righctwo Scoring displays
an
LCD
display (for
that you missed. Hitting this button will do so.
buston on the right is the Power button: use this to turn the system on and off.
he
L(CD,plu
to
understand the buttons and display on the Control Unit.
are
up
to
yd~:
for example, if you're playing one-on-
g@
to
"take out the ball" following a basket.
bask holds onto the ball and tries to
vsde
di
who gets the ball, following
and
c5isplq~
make
yovj
game
time
and
"P-I-G
text)
will see a rectangular red button: this
in
the
game
but most of all, have fun.The
yuur
own games and play your
ham
of"Rf)
is
the orange Airball
if
you happen to
is
the Cancel button.You press
been the two round buttons
press
this
button to select a game, start a game, answer "Yes" when the computer asks you
a
question, and to pause and re-start a game.
The Room Selector switch, to the left of the Airball button, is used to tell the computer
what size room you're playing in. Some
information.After you flip the room selection switch, the spotlight will not adjust to the new
room size until the
To the right of the Power button are the Wuma Control and, below
switch.This volume switch wntrols
games,
the
"line in" and sound effects (backboard, net, crowd noises, etc.).
MOTE-
middle
etc.The Audio Selection switch lets you choose between: the top setting, all audio;
middle setting "line-in", Duke Tango's voice and sound effects; and the bottom setting,
lf
you
select the top setting, you will not be able to hear music from an external
and bottom settings let you hear music from an external player..
next
shot.
is
a green rectangular button: this is the Enter button.You
of
the games use a spotlight and need this
it,
the Audio Selection
the
internal volume for the unit: the announcer, the
CD
or mp3 player: only the
Page 12

The large, circular dial in the middle of the Unit
is
the ExternalVolume control: this controls
the volume of a CD player or mp3 player you can hook up to the system.
On each side of the Control Unit are the
or register points in a game.
On the back of the Contr~l
player.The
AC
plug
is also
Unit
wt
the
is
the
Input jack, where you hook up your
back
of the unit.
Player
htms.You press these to select a game
CD
or mp3
Startlng
The
System
Every time you press the Power button to turn on the system, you will hear a start-up
sequence with lights and sound.
If the system is on and there are four minutes of inactivity, the system will automatically
:
change to External Amplifier Mode (see p. 9).To return to the Main Menu, press Cancel.
'U
rc
l*
Main Menu identifies games you can play: you'll see the name of the game on the
isplay screen, and you'll hear the games called out.
-$Mr.*s
-,Ad-
-kit-
ecause some of the game names are too long to appear on the display screen all at once,
be scrolling.To choose a game, press the Enter button.To advance through
enu, press either the Left or Right Player Button.
the
-
.-
-+,.,
\--
SCI
-..
1
Main
Page 13

Some of the games are for one player; others are for two players or more.
The games are:
Showtrme Basketball
Freeplay
Shootlng Perceniage
b
Shoot TI11 mu
Chase
Selecting
Once you get to the Main Menu, the system will wait for you to make a selection.
If, after five seconds, you haven't done so, Duke Tango will say, "Make a selection" and
repeat this every five seconds.
I
When you select a game, you will hear
start-up sequence.This will give you time
get ready and position yourself for play.
Prior to the game starting, some games
have options (number of players, spotlight
position) that need to be
through the options using the Player buttons.
Select the option and start the game by
pressing Enter. Press the Cancel button to
return to the main menu.
(1-2
(1
player)
a Game
players)
Miss
(1-2
playen/
(I
player) DmptheRoctf
(I
player) 7kenty9ne
a
selected.Toggle
I'
'
Jachpot
Around the Hrld
Pig
(24
-
--.---.YIL^
t
-
(2
players)
players)
hi,:,
,
4'.
(14
(2
players)
(1-4
players)
players)
Press the Enter button to pause the game.
During pause, the LCD will display "Pause."
To return to a game, press Enter again.
Press the Cancel button to stop the game: a
buzzer will sound, and the system will return
to the Main Menu.
I
If you're playing a game and there is
activity, Duke Tango will ask if you want to
continue and then return to the Main Menu.
If you select a game that involves high scores,
at the start of the game, the 2-digit displays
flash: the high score on the
left.When the game ends, Duke will announce
if there is a new high score.
right,"HS'on the
no
Page 14

Scoring
-A-
-
The system knows when a basket has been made, but if you are playing with more than one
it
player,
cannot determine who made the successful basket: you need to tell the system this,
by pressing the appropriate Player Button.
Once points are registered, they cannot be changed: so if
)idU
in identifying which player made a basket, you cannot go back and correct the scm.Your
options are to proceed with the game or cancel out of the game.
rT
Playing
wlth
More
Tnan
One
Player
When you select a game that involves more than one player, you'll see the following
displayed
on
the screen:
"<
I
P
>".
u-q
I
r
-,
.i
b
Pressing the righthand Player Button increases the number of players by one, and pressing
lefthand Player Button decreases the number of players by one. Pressing Enter
the
starts the game.
1
SHOWIIME
u
a
5.
BASKETBALL
(1-2
P)
e
,r'
T
.
-
-
BF:
I
This is a timed game for one or two players.
In the one-player version, the player is given a 2-minute quarter and the scorn
automatically awarded. In the two-pber version, each quarteris3mhmdmg--
an&Wienna3%kt
7-------
IS
scored, the unit asks the players to register the score by
----
pressing the appropriate Player Button.At the end of the quarter, the unit asks
is
if
the player(s) would like to play an additional quarter. If yes, the clock is reset to
the appropriate time, and play continues. Players are again asked if they want
to
play an additional quarter until 4 quarters have been played.When the game is
ji1,:q
over, the winner is announced.
The 3-digit display
is
used
for
a timer. During one-player games, the score is
.JJ
>,
115w
displayed on the left 2-digit display, and points are awarded automatically for
basket. During two-player games, scores are displayed on 2-digit displays, and
points are awarded by pressing the corresponding Player Buttons.
.
To assign points to a player, you must press the appropriate Player Button: either
Player
pauses and flashes, and
I
(left button) or Player 2 (right button).When a basket is made, the clock
"<
Score Up
>"
appears on LCD with a corresponding
voice prompt.
At the end of the I st through 3rd quarters, the LCD displays "Continue!" with
corresponding voice prompt. Press Enter to play another quarter and Cancel to
return to the Main Menu.
a
Page 15

FREEPLAY
I
ncrements in the one-player
display and continues to increase with no time limit or limitations on the number
In the two-player version, scores are displayed on 2-digit displays, and points are
awarded by pressing the corresponding Player Buttons.
To assign points to a player, you must press the appropriate Player Button:
either Player I (left button) or Player 2 (right
1
"<
The game starts immediately upon selection from Main Menu, following game
start-up sequence.
(1-2
P)
I
nls is basic basketball play in which scored baskets are displayed in 2-point
version.The score will appear in the left 2-digit
baskets.The game ends when the player cancels out of the game.
Score Up
button).When a basket
>"
appears on LCD with a corresponding voice prompt.
is
made
-
4
This is a one-player game which calculates your shooting percentage: that
is,
the
percentage of successful baskets per shots taken.
e game will prompt you to end the game after 10.25 and
50
shots.To continue
aying, hit Enter or shoot the ball.To end the game, hit Cancel.The game
tomatically ends after
100 shots.-?
I
L.----
>:#-.
.
When you select this game, the first and last characters of the LCD display will
"<"
and
">",
be
to indicate three options:"Short Shot", "Downtown", and "No
Spotlight." As the option is changed, the spotlight shines in the corresponding
location. Press the Enter button to make a selection.
In "No Spotlight" mode, the player chooses the location from which to shoot.
I
As you shoot baskets, your percentage will appear on the 3-digit display.The left
2-digit display shows the number of shots made; the right 2-digit display shows the
number of shots attempted.
Remember: if you shoot and miss the Backboard and hoop completely, the system
does not know you missed a shot.You need to press the Airball button for a
missed shot, and this will be figured into your shooting percentage.
m,,
-.
Page 16

4.
AROUND
THE
WORLD
(14
P)
to
advance
6-
fmm
to
all
the
9
The"o'Q6ct of this game is for the player(s) to score baskets from a serles of
9
locations around the room. Making a basket allows the player
next position; missing a basket moves a player back one position.
The Spotlight feature determines the shooting locations. Use the Room Size
space
Selector button to tell the system how big your playing
The one-player version is timed, so the player must successfully score
positions against a I 0-minute time clock.
The multiplayer version is not timed, and the winner is the player who scores
from all
Remember: press the Airball button when a player misses the Backboard
completely.
In the one-player version, your time clock and score will appear on the Display
screen.Your high score is how much time
all
In multiplayer games, there is no high score and there is no timer.The number of
the current player
9
9
locations.
positions first.
(e.g.
it
took you to make baskets from
I
P)
is shown on the left Zdigit display.
IS.
-1
\
I
I
I
In this game, players take turns taking shots from a location indicated by the
Spotlight.The object is to avoid earning the letters "P-I-GI'The player who earns
all three letters is out of the game. Play continues until one player is left and is
named the winner.
At the
Turns alternate until a player makes the first successful basket and thus begins the
"rotation."
The next player must make the same shot: that
misses, that player earns
Once a player earns a letter
that
If a player earns three letters (P-I-G), that player
Remember to use the Room Size Selector button to tell the system the size of
your playing area, and use the
start
of the game, the Spotlight will point to a shooting location.
a
letter ("P).The letter will be displayed on the
-
or all players make the shot - a new rotation begins:
is,
the Spotlight picks a new shooting location.
Airball button to register missed shots.
is,
from the same location.
is
out.
If
that player
LED
screen.
>
ti
31
8
;+
.
Page 17

1
6.
SHOOT
TILL
YOU
MISS
(I
P)
he object of
rL
I
button, the game is over.
Your score
select a room size. Just shoot
I
This game is a version of one-on-one: the winning player is the one who earns 2
I
I
u
points without going over 2
I
When one player makes a basket, that player registers the points using the Player
Button.That player then takes up to 3 free throws, which count as one point per
successful
and does not get to shoot any more free throws. Play then returns to standard
One-On-One.
If a player misses a free throw, the ball is in play as a rebound. If a player makes all
i:
three free throws or hits the Airball button, the system displays "Take
the other player takes possession of the ball.
the game
you register a miss, either by the game's sensors or the
is
displayed on the left 2-digit display.There is no timer, no need to
basketAs soon as a player misses a free throw, that player loses his turn
is
to makeks m%is"uccessful baskets as possible without
Airball
till
you miss.
1.
it
Out,'' and
1
Remember: press the Airball button when a player misses the backboard
completely on a free throw.
The first player who reaches exactly 21 points wins. If a player goes over 21 points,
his score returns to
Each player's score is shown in the 2-digit displays.
I
I
points.
Page 18

8.
DROPTHE-ROCK
(1-4
P)
I
i*-
e ofiject of this game
Use the Room Selector button to tell the system the size of
"
space.The Spotlight feature will show you where you need
"
Locations are random within a 2-point and 3-point perimeter. .
The first 40 seconds
and the final 20 scsonds places locations in a 3-point area.
In the multiplaym version, individual players shoot one at a
I
The game ends when time runs out.The winning player in
is the player with the most points.
I
Scores and time appear on the Display screen.
IS
to
score as many ~as~ets as possl~le in one minute.
of
the game places shooting locations
pur
playing
td
fnh
@h%
wMW%D+*nt
tim.
the,
ma
from.
-
are
wrsion
Players take turns shooting one basket at a time, with each successful basket
2
counting for
LED.
Once a player misses a basket, the opposing player earns all the points in the
"jackpot." Play continues, alternating turns, with subsequent baskets adding more
points to the "jackpot." When one player misses, the opposing player gets
points in the "jackpot."
The game continues until one player reaches 30 points.
Remember to use the
points. Scored points go into the "jackpot," displayed in the middle
all
the
Airball button to register misses.
Page 19

LC
X,
In this game, the player uses the Spotlight feature to shoot from randomly-chosen
locations in the play area.
next,
it
will move quickly to two random "in-between" positions before settling
on a final position.) Each location is timed: you will have five seconds to shoot.
The goal
Remember to use the Room Size Selector button to tell the system the size of
your playing area, and use the
miss, a dash appears in the righthand LED, as shown.
The Spotlight moves around the floor and stops to indicate the shooting location.
There are
I
Score and timer will appear on the Display screen.
is
to score as many points
2-
and 3-point areas within each room size.
(Note:As the spotlight moves from one position to the
as
possible before 3 misses are recorded.
Airball button to register missed shots.When you
m.
-UT.'
A..
'
Y
I
When
L
you
dash appears
miss, a
in
the
Page 20

#.yew
have
&nswner
'
bbro, Inc.
@27
Newport Avenue,
hwtucket, RI
-
pk
1-800-844-3733
haX:
1-401 -431 -8082
ons
to
W$
c&abr
~krgm
exPrienced
-
-
any questions, please contact:
Affairs
this
unit not
radiom technician for help.
approved
by
ths
pa&
Connect
mcaiver
Toslr
potential hazards.
Consumer
the
is
Show
connected,
Time
ilfiairs
I
equipment into an
&
P
Hoop
Product and colors may vary.
Manufactured under license from
Q
2006 Hasbro. All Rights Resewed.
TM
& @ denote
and
CK:
If
any
ptd
at
1
-W-844-3733
U.S.
Trademarks.
hazards
far
--7-
-
--
on
a circuit different from that to
should be periodically examined
are
found, please contact
repair or replacement.
Takara Co., Ltd.
Hh
which
for
-
dm
I
4
 Loading...