

Page 1

™
FOR 2 PLAYERS
AGES 8+
BASIC GAME GUIDE
Create a World of Epic Warfare!
Valhalla: A world of treacherous terrain, dark mysteries, and hidden artifacts.
A world of cosmic clashes between warriors of unimaginable power.
A world of spectacular defeats and hard-won victories.
A world that you create.
Page 2
BASIC Game Guide
Object: Create a battlefield, choose your Army, then wage war against your
opponent. To win, be first to achieve your objective.
Contents: See the Battlefield & Game Scenario Booklet for a list of contents.
Get Ready to Play
1. SET UP YOUR BATTLEFIELD AND YOUR ARMY
To do this, use the Battlefield & Game Scenario Booklet. It features five
Battlefields with step-by-step instructions for building them. It also provides 3
Basic Game Scenarios with their own victory conditions.
After you’ve chosen a Basic Game Scenario and built the battlefield, choose an
Army (Player 1 is the Good Army, Player 2 is the Evil Army). Place your Army
Cards in front of you, then place your figures on the battlefield.
About Your Army Cards
In this game you’ll use the Basic Game side of the Army Cards. There are two
types of Army Cards: Hero Cards, which show one (usually very powerful)
warrior; and Squad Cards, which show two or more (usually less powerful)
warriors.
Let’s say you built the Forsaken Waters battlefield, and chose the Dive the Dark
Lakes Game Scenario. Example 1 shows which Army Cards you chose; Example
2 explains the boxed numbers on them.
EXAMPLE 1: Your Army Cards
You’ve chosen an Evil Army with one Hero (Mimring) and two Squads (four
Marro Warriors and two Zettian Guards). You’ve taken your three Army Cards
and placed them in front of you, and you’ve placed your Army (all seven
figures) on their starting positions on the battlefield.
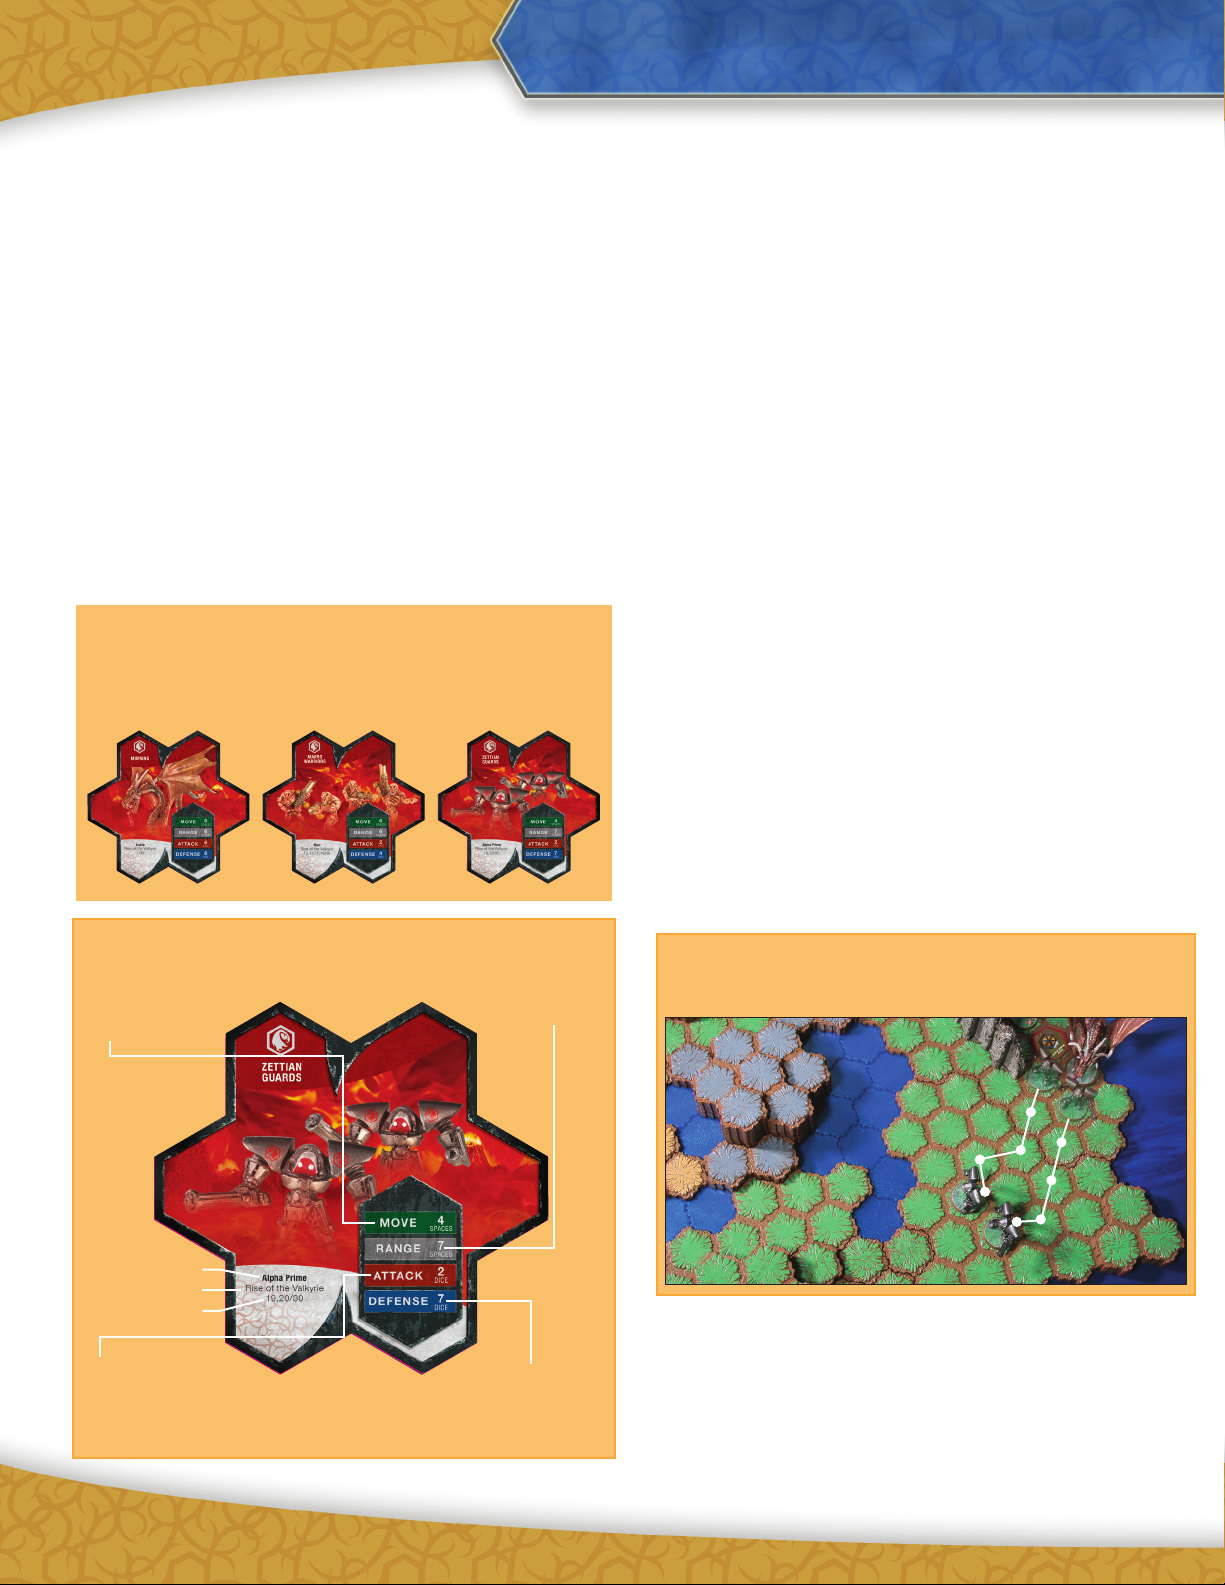
EXAMPLE 2: Army Card Numbers
MOVE 4 - Heavy armor makes
the Zettian Guards slower than
many other figures. You can
move each one up to
4 spaces.
RANGE 7 - Laser-powered
weaponry gives the Zettian
Guards a fairly long range;
each one can attack from up
to 7 spaces away.
2. THE ATTACK AND DEFENSE DICE
Place the 10 (red) attack dice and the 10 (blue) defense dice near the battlefield.
Unless otherwise directed by your chosen Game Scenario, you don’t need any
other game parts for the Basic Game. Just place them aside, out of play.
The Battle Begins!
Each player rolls 5 (red) attack dice. The player who rolls the most skulls takes
the first turn. (Re-roll if there’s a tie.) Players then alternate turns until the
game is over.
ON YOUR TURN
Usually, you’ll do three actions on your turn, in this order:
Action 1. Choose an Army Card
Action 2. Move Figure(s) on the Army Card
Action 3. Attack with Figure(s) on the Army Card
All three of these actions are explained in detail in the following sections.
Action 1. Choose an Army Card
First, choose any one of your Army Cards to use on your turn. The Hero figure or
Squad figures on this card may move, then attack (if possible), on this turn.
Which Army Card should you choose? It depends on lots of things: the
location of your figures, their Move, Range and Attack numbers, which enemy
figure(s) you want to attack, and (of course) your Victory objective. As you play,
you’ll get a better feel for which Army Card to use on each turn.
For example, let’s say you chose your Zettian Guard Squad on this turn. You want
to attack the enemy (your opponent’s Army figures) as soon as you can. The
Zettian Guards have the farthest Range (7 spaces) and the best Defense (7 dice)
in your Army; so you want to get them moving.
Action 2. Move Figure(s) on the Army Card
Now you may move any or all figures on your chosen Army Card, if you want to.
Follow these rules for moving each figure:
• Check the Move number: You can move a figure in any direction up to
the Move number on its Army Card. For example, with a Move number of
4, the Zettian Guards can each move 1, 2, 3 or 4 spaces. (Uneven terrain
and water may limit their movement, as you’ll soon see.) Example 3 shows
basic movement.
EXAMPLE 3: Basic Movement
On this turn, you choose to move each Zettian Guard its full four spaces
toward the enemy figures on the other end of the battlefield.
WORLD
SET
COLLECTOR NUMBER
ATTACK 2 - Lack of agility
ATTACK 2 -
can affect the Zettian Guards’
can affect the Zettian Guards’
aim. For each attacking
aim. For each attacking
Zettian Guard, you roll
Zettian Guard, you roll
2 (red) attack dice.
2 (red) attack dice.
Lack of agility
2
DEFENSE 7 - The Zettian
Guards are well protected by
their armor. Each time one is
attacked, you get to roll
7 (blue) defense dice.
1
2
3
4
1
2
3
4
• Order of movement: Move Squad figures in any order, one at a time.
• Passing and landing on other figures: You can move through a space
with a friendly figure (one of yours) on it; but you can’t move through a space
with an opponent’s figure on it.
Never end a move on a space with any other figure.
Page 3

• Moving up and down: When you move to a higher level, count the side of
each higher level as one space. When you move to any lower level, you don’t
need to count sides on the way down. Examples 4 and 5 show how to move
up and down.
EXAMPLE 4: Moving up
Count four spaces for your Zettian Guard to move up onto this ledge.
EXAMPLE 6B: Moving out of water
When moving from the water space to the adjacent land space, the Zettian
Guard must count two spaces.
4
3
2
1
4
3
2
1
EXAMPLE 5: Moving down
To get down from this ledge, the Zettian Guard counts only one space on
his move.
4
3
2
1
• Moving double-space figures: Some figures, like Grimnak and Mimring,
take up two spaces. When moving a double-space figure, decide which end
to lead with (for example, the front end or the back end). Then move the
figure so that the other end follows the same spaces that the leading end just
left. Always end a double-spaced figure’s move on two same-level spaces.
Example 7 shows how to move a double-space figure.
Double-space figures do not have to stop when moving over one water space
between two land spaces; but they do have to stop when moving down onto
two adjacent water spaces.
EXAMPLE 7: Moving double-space figures
From his starting spaces (top picture), Mimring moves six spaces headfirst,
with his back section following along the same spaces (middle picture).
Notice that Mimring counts the side of the land space when moving up from
the water space. His move ends across the water on two spaces of the same
level (bottom picture).
• Moving into water: When you move onto a water space from any other
space (even from another water space), you must end your move there. See
Example 6A.
EXAMPLE 6A: Moving into water
When he moves onto the water space, your Zettian Guard must stop after
moving only two spaces.
1
2
• Moving from water to land: For water spaces that are lower than their
adjacent land spaces, the “moving up” rule applies. When moving from water
to land, count the side of each land space as you move. See Example 6B.
6
5/4
3
2
1
Action 3: Attack with Figure(s) on the Army Card
Now it’s time for your Hero or Squad to attack any figures in your opponent’s
Army that they can.
Who can attack? Any figure(s) on your chosen Army Card within Range of an
opponent’s figure, and with a clear Line of Sight, can attack. If no figure on your
Army Card meets these two conditions, you can’t attack and your turn is over.
3
Page 4

To see if a figure can attack, check the Range and Line of Sight as
explained below.
• Range: A targeted figure must be within the Attacking figure’s Range: for
example, with a Range of 7, a Zettian Guard can attack any enemy within
7 spaces from it.
A figure with a Range of 1 can attack a figure only from an adjacent space.
A double-space figure can attack from either its front space or its
back space.
When checking a figure’s Range, don’t count extra spaces for higher levels.
However, being on a higher level is an advantage during an attack (see
Height Advantage under Attacking, below). Also, if the distance between
you and the targeted figure includes an area with no spaces (for example,
near the edge of the battlefield), you must count the spaces along the
battlefield to check the Range.
• Line of Sight: To attack a targeted figure, your figure must be able to
“see” it from its location. If the targeted figure is (for example) behind a
ruin or a ledge, so that the attacker can’t see any part of it, then no attack
is possible.
Unlike Range, Line of Sight is an imaginary straight line that has nothing to
do with the spaces on the battlefield. The best way to tell if your Attacker
has a clear Line of Sight is to get behind its head and look at the targeted
figure. If you can see any part of it from its head, you have a clear Line of
Sight. Note: It doesn’t matter if the Line of Sight goes off the edge of the
battlefield, with no spaces below it.
Example 8 shows how to determine if a targeted figure is within an
Attacker’s Range and Line of Sight.
EXAMPLE 8: Range and Line of Sight
You want your Zettian Guard to attack an Airborne Elite figure.
1. First, you count the spaces between them: there are 7, so the figure is
just within the Zettian Guard’s Range.
1
2
3
4
5
6
Height Advantage: If the base of one figure is higher than the base of the
other figure (no matter what their actual size), the higher figure rolls one
extra die.
3. For every skull you roll for your Attacker, your opponent must roll at least
one shield for his Defender, to block it.
• If you roll more skulls than the Defender rolls shields, your attack is
successful and the Defender is destroyed. The player who controls it places
it out of the game.
• If you roll the same number of skulls or less than the Defender rolls shields,
your attack is unsuccessful. The Attacking and Defending figures stay
where they are, and the attack is over.
After attacking with every figure that can attack, your turn is over.
Example 9 shows an attack and its outcome.
EXAMPLE 9: The Zettian Guards Attack!
Each Zettian Guard is within Range of an enemy Airborne Elite figure,
and has a clear Line of Sight. You choose one Zettian Guard to launch
the first attack.
FIRST ATTACK
Zettian Guards have an Attack number of 2, which means you roll 2 attack
dice. But this Zettian Guard has a height advantage over the Defender,
so you roll an extra attack die (a total of 3 dice):
The Defender has a Defense number of 2. Your opponent rolls
2 defense dice:
The Defender blocks the attack. Both figures stay where they are.
Now your other Zettian Guard can attack.
SECOND ATTACK
You decide to attack the same Defender. This attacking Zettian Guard also
has a height advantage, so again you roll 3 attack dice:
For the Defender, your opponent rolls 2 defense dice:
7
2. Then, you check for a clear Line of
Sight. Your Zettian Guard can “see”
the top of the figure, so it can attack.
ATTACKING
The figures on your chosen Army Card attack one at a time, in any order.
Each figure can attack only once, but different figures can attack the same
opposing figure.
For each Attacker, follow the rules below.
1. Announce which one of your figures is the Attacker, and which figure it’s
attacking. The attacked figure becomes the Defender.
2. Check the Attack number on the Attacker’s Army Card, then roll that
number of (red) attack dice. After you roll, your opponent rolls the number of
(blue) defense dice on his Defender’s Army Card.
4
You win the attack! Your opponent takes his destroyed Airborne Elite
figure out of the game. You have no more attacks to make, so your turn
is over.
Ending the Battle
Keep playing until one player achieves the Victory objective of the chosen
Game Scenario. That player wins the battle!
With experience, you may want to build your own battlefields and create your
own Game Scenarios, Armies, and Victory conditions. Good luck; and may the
best Valkyrie General win!
Visit the Official Heroscape Website
http://www.Heroscape.com
© 2004 Hasbro, Pawtucket, RI 02862. All Rights Reserved.
® denotes Reg. US Pat. & TM Office.
 Loading...