

Page 1
(3)
(8)
(5)
(10)
(12)
(13)(4)
(9)
(6)
(7)
(11)
(11)
(2)
(1)
WARNING:
CHOKING HAZARD-Small parts.
Not for children under 3 years
.
61238
AGES 5+
Remove all pieces from plastic frames.
If you have difficulty, use safety scissors.
NOTE: Adult supervision may be required.
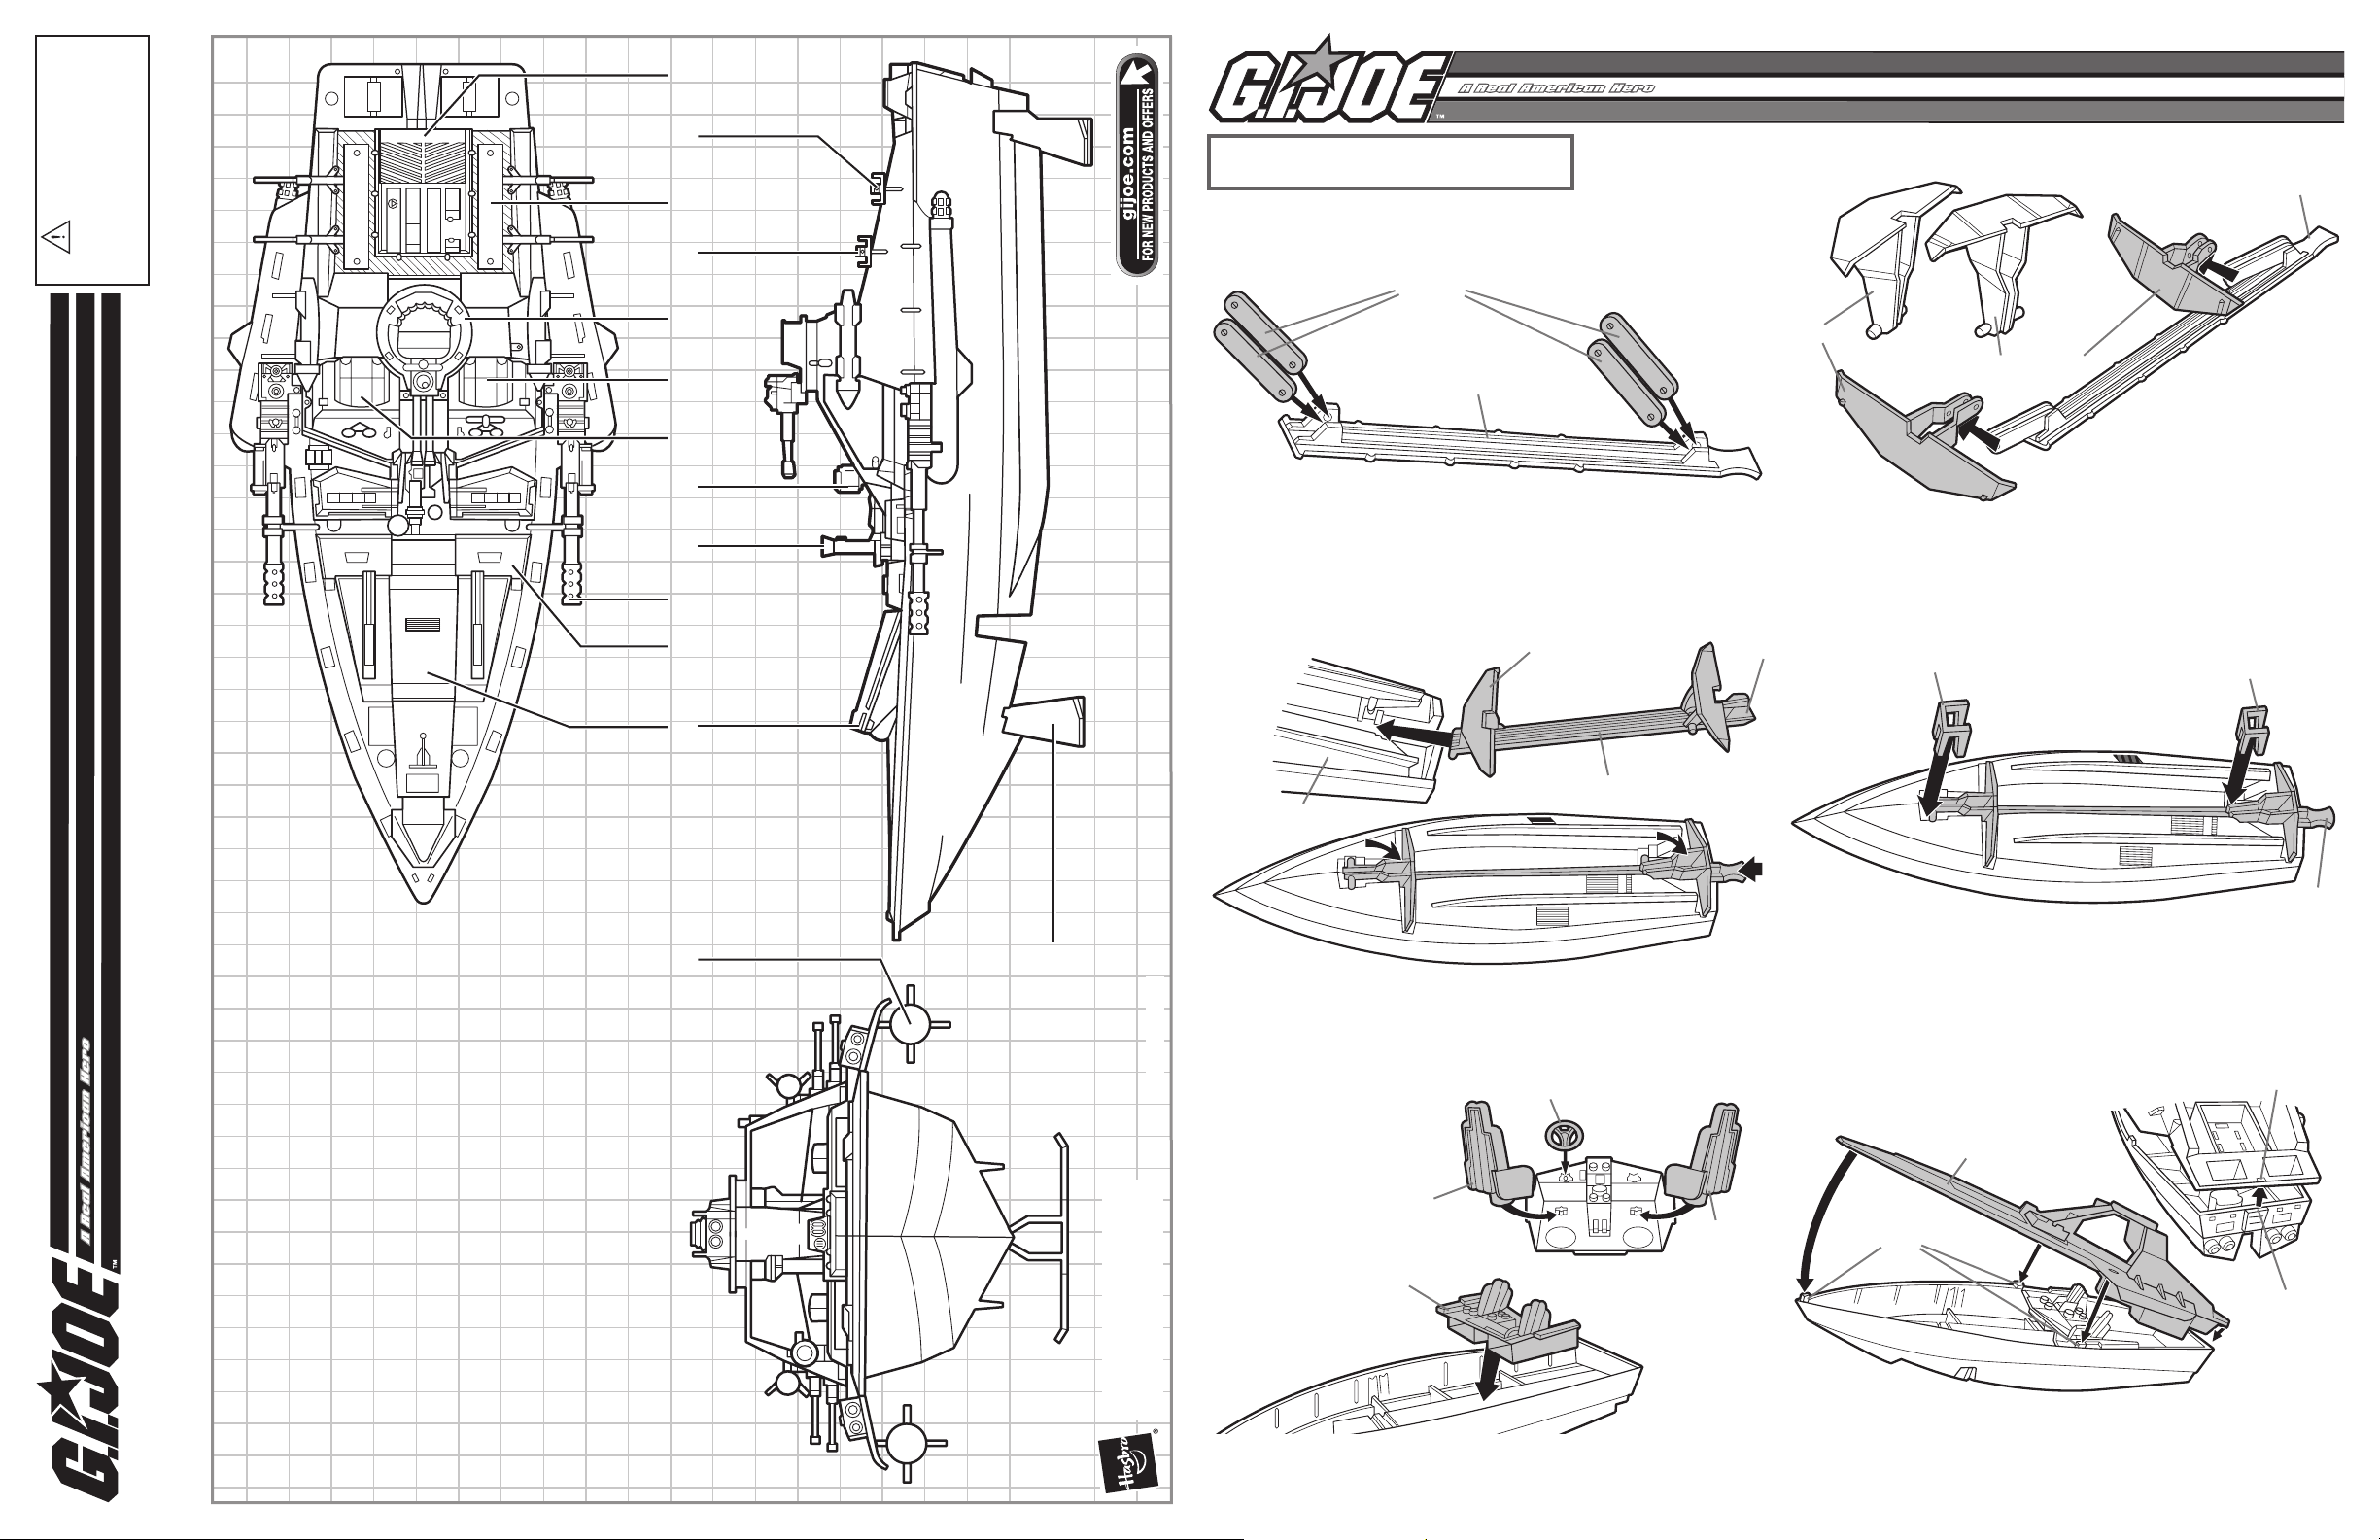
GI JOE MORAY™ HYDROFOIL INSTRUCTIONS
HANDLE
No tools needed.
vehicle and figures.
Includes: unassembled
Some assembly required.
STRUTS
CONTROL BAR
1. Position control bar with handle as shown.
Snap struts onto control bar.
FRONT
HYDROFOIL
CONTROL BAR
HULL
FRONT
HYDROFOIL
HANDLE
REAR HYDROFOIL
2. Snap rear hydrofoil onto struts that are closest
to handle, as shown. Snap front hydrofoil onto
remaining struts.
LONG
MOUNT
SHORT
MOUNT
HANDLE
4. With long mount in position shown, snap mount over
posts on front hydrofoil. Repeat with short mount
and rear hydrofoil. Slide handle back and forth to test
hydrofoils. NOTE: Put hydrofoils up before continuing.
HOLE
DECK
TABS
HYDROFOIL
3. Hold control bar handle. Lift front hydrofoil. Slide
P/N 6474770000
control bar into hull, making sure control bar slides
under tabs. Fold hydrofoils into slots in hull.
STEERING WHEEL
SEAT
SEAT
™
INTERIOR
1. HYDROFOILS.
2. TORPEDO.
3. RETRACTABLE MISSILE BOX.
GI JOE MORAY
Product and colors may vary.
© 2005 Hasbro. All Rights Reserved.
® & TM denote U.S. Trademarks.
MISSILE BOX.
4. DEFLECTOR SHIELD.
5. CANNONS.
6. PRESS ACTUATOR BUTTON TO REVEAL
7. SEARCHLIGHT.
8. PASSENGER’S SEAT HOLDS ONE FIGURE.
9. DRIVER’S SEAT HOLDS ONE FIGURE.
10. TURRET HOLDS ONE FIGURE.
11. M-30 WEAPONS.
12. STORAGE AREA.
13. REMOVABLE ENGINE COVER.
5. Attach steering wheel and seats to interior. Place
assembled interior into vehicle as shown.
6. Insert tab on hull rear into hole in deck rear. Swing
deck down and snap tabs on hull into slots in deck.
TAB
Page 2
15
20
14
6
9
18
12
3
1
7
18
19
21
22
5
10
17
13
11
4
2
8
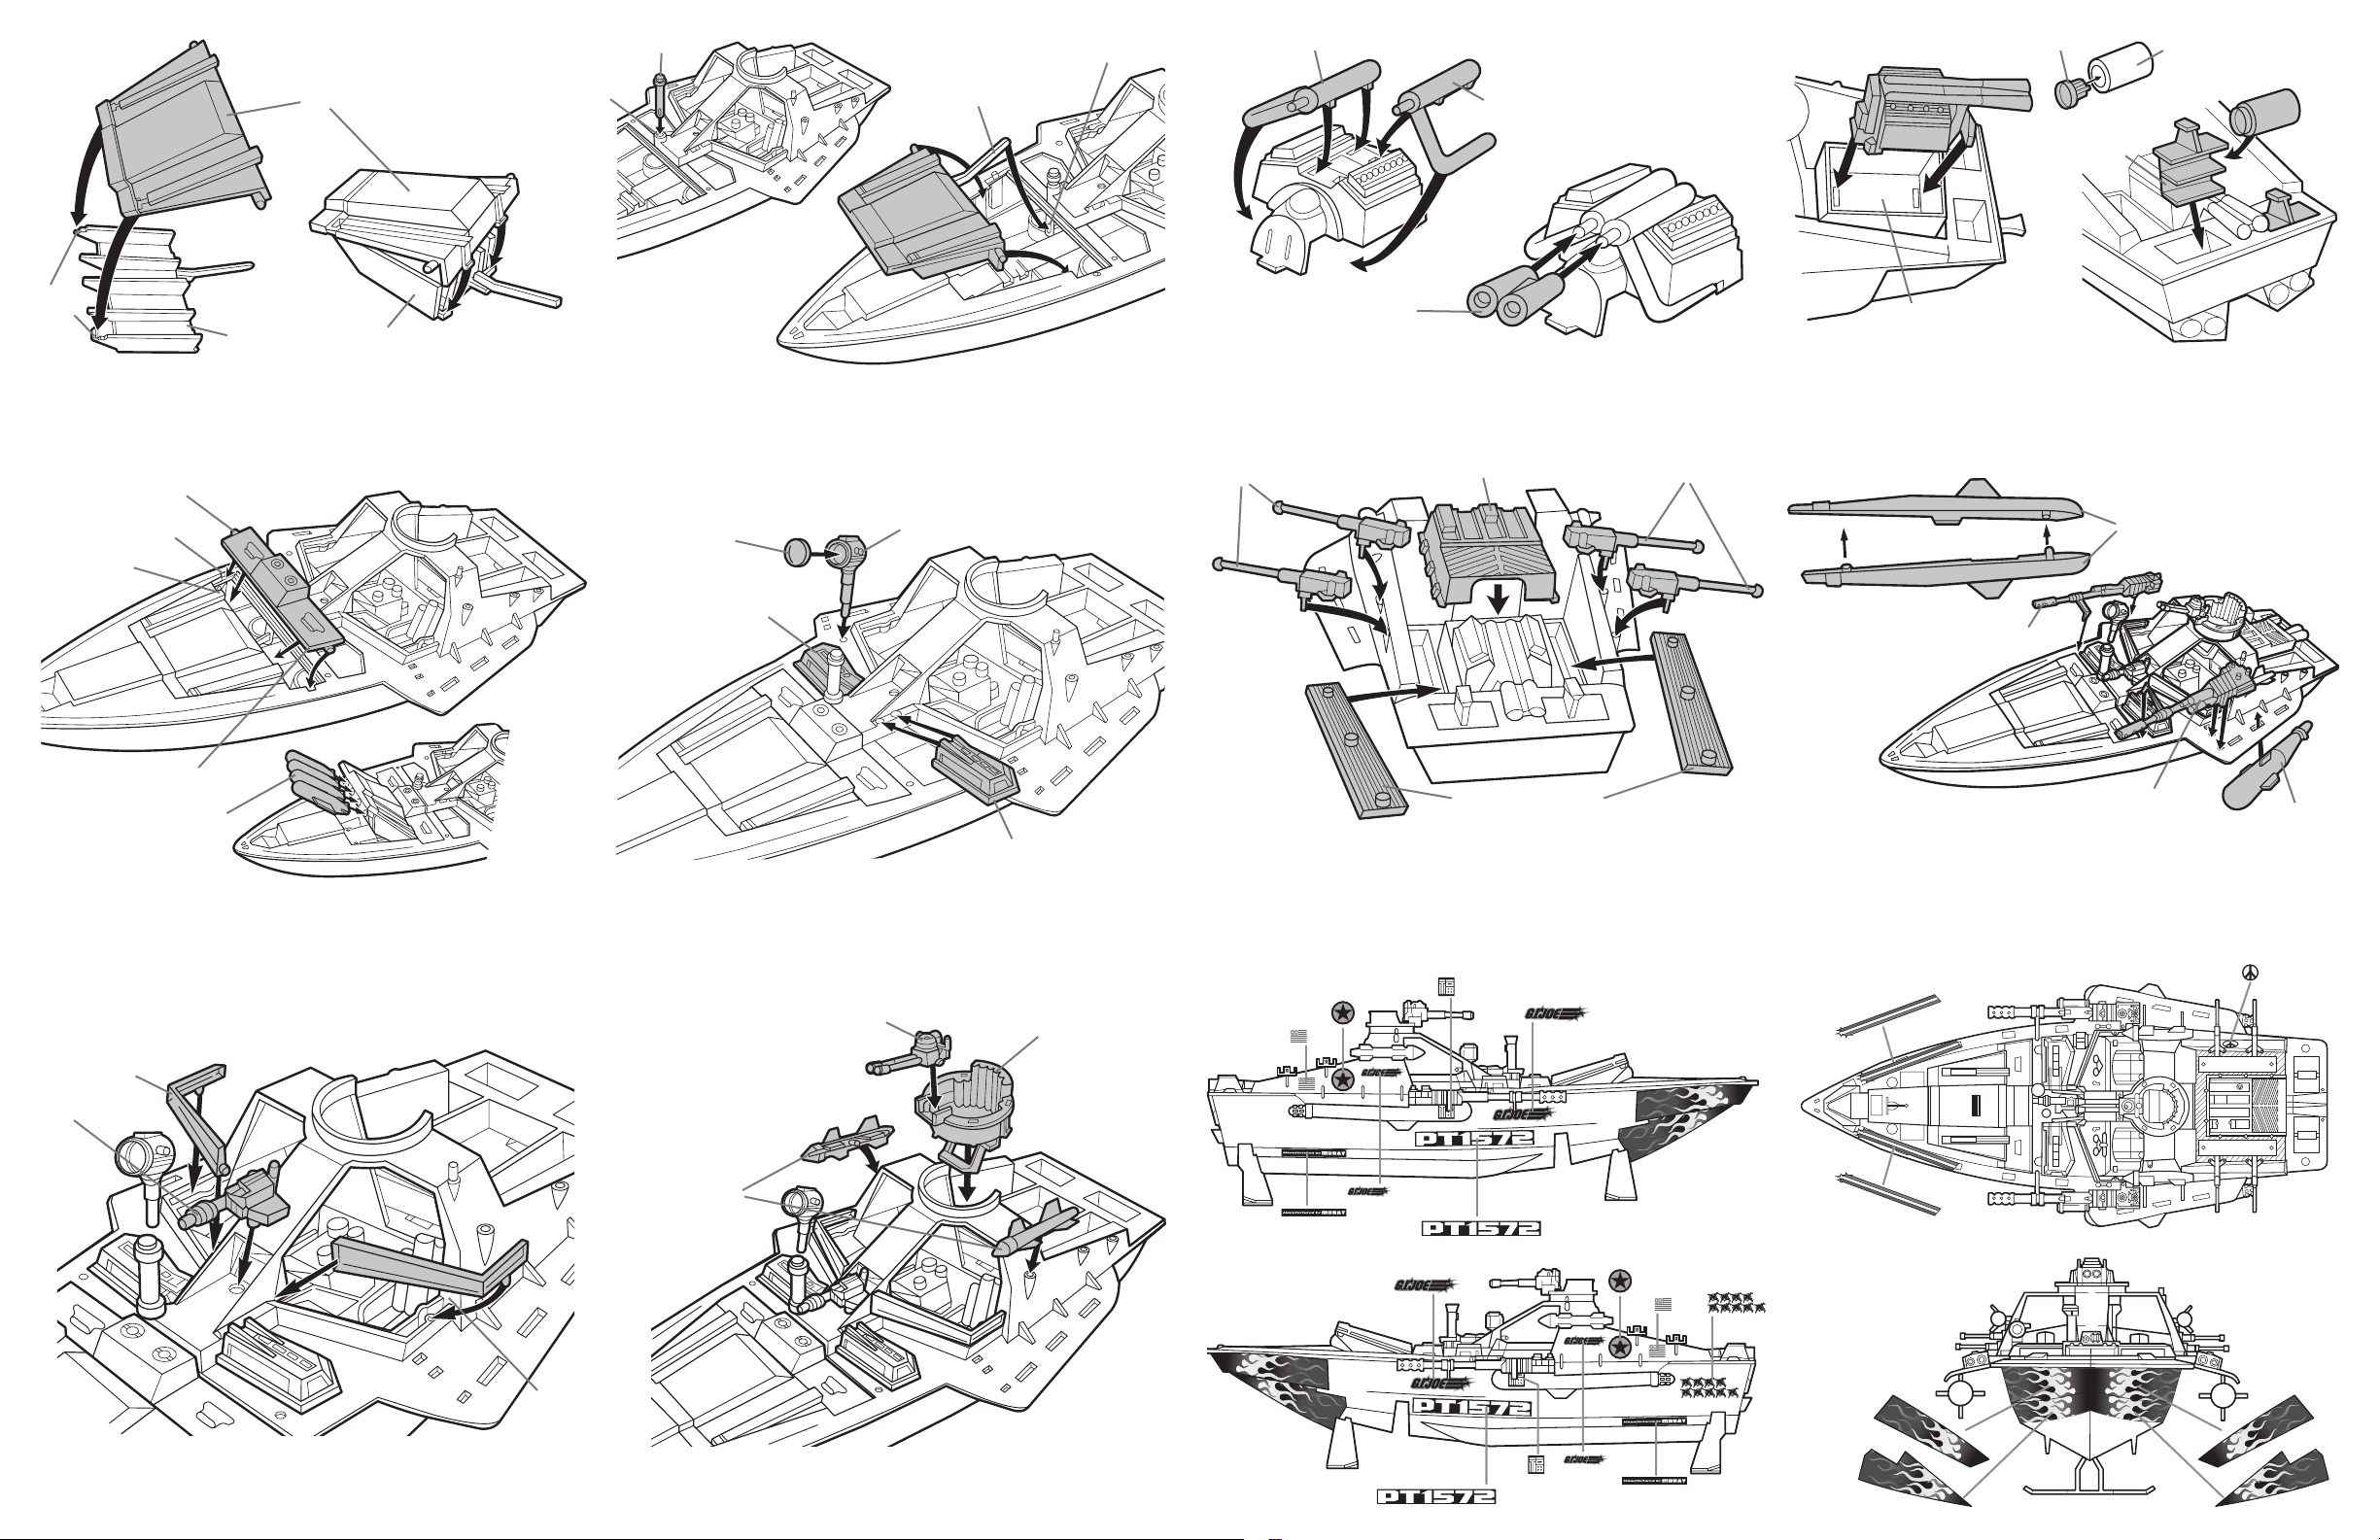
ACTUATOR BUTTON
HOLE
LEFT EXHAUST PIPE
CAP
DEPTH CHARGE
TOP
“T”
TABS
MISSILE BOX BOTTOM
7. Insert “T” tabs on missile box bottom into holes in
missile box top. Slide “T” tabs toward rear of box.
Snap rear of missile box together.
POST
NOTCH
TAB
HOLE
LEVER
8. Insert actuator button into hole in deck. Insert missile
box lever into hole in actuator button. Swing missile
box into place.
SEARCH
LENS
HATCH
COVER
LIGHT
RIGHT EXHAUST PIPE
TAILPIPE
13. Attach left exhaust pipe to left side of engine as
shown. Snap bottom of exhaust pipe under engine
half. Repeat with right exhaust pipe. Attach tailpipe to
exhaust pipes.
M-30’s
ENGINE COVER
M-30’s
DEPTH
CHARGE TRAY
ENGINE COMPARTMENT
14. Place front engine tab into slot in engine compartment,
and push rear tab into place. Attach depth charge caps
to depth charges. Slide depth charge tray into tray
compartments. Lift trays to insert depth charges.
TORPEDO HALVES
CANNON
BLAST SHIELD
MISSILES
9. Position front of blast shield under top tabs on back of
missile box, and place one post on notch under deck.
Place other post of blast shield over deck opening and
snap into place. Press actuator button to lift missile
box. Insert missiles into missile box.
WINDSHIELD
WINDSHIELD
GUN
HATCH
COVER
10. Snap hatch covers over hatch openings. Snap lens
into searchlight. Attach searchlight to vehicle.
TURRET GUN
SIDE
MISSILES
TURRET
STORAGE COVERS
15. Place storage covers over storage areas. Fit engine
cover over engine. Insert posts on M-30s into holes in
rear deck.
17. Peel and apply labels as shown.
CANNON
TORPEDO
16. Attach torpedo halves. Attach assembled torpedo to
vehicle, and slide forward to lock in place. Repeat
with other torpedo. Snap cannons onto sides of
deck as shown.
RIDGE
11. Attach left windshield to left side of cabin as shown. Slide
windshield between ridge, and press into place. Repeat with
right windshield. Attach windshield gun to vehicle as shown.
12. Attach turret gun to turret. Snap turret into turret
hole. Attach side missiles to vehicle.
 Loading...