

Page 1

®
TM
RULES FOR 1 OR 2 PLAYERS
ADULT ASSEMBLY REQUIRED
AGES 8+
Huge, glistening, dark and
ominous, the alien ships rose from
the depths of the ocean, directly in the
path of our Navy eet. They had come
with no warning, had oered no greeting.
Their menacing presence made only one
thing clear: whoever these beings were,
they had not come to befriend us.
A single shot pierced the deadly silence.
And so the battle for Earth began…
Page 2
x3
THE FIRST TIME YOU PLAY
CONTENTS
• Four-piece folding game unit with
storage trays
• 5 Navy ships
• 5 Alien ships
• Red, white and blue pegs
• 1 Red and 1 Blue Attack Squadron
• 1 Red and 1 Blue Scouting Craft
• Label sheet
• 4 Rubber feet
OBJECT
Destroy your opponent’s eet of
ships before he destroys yours.
THE FIRST TIME YOU PLAY
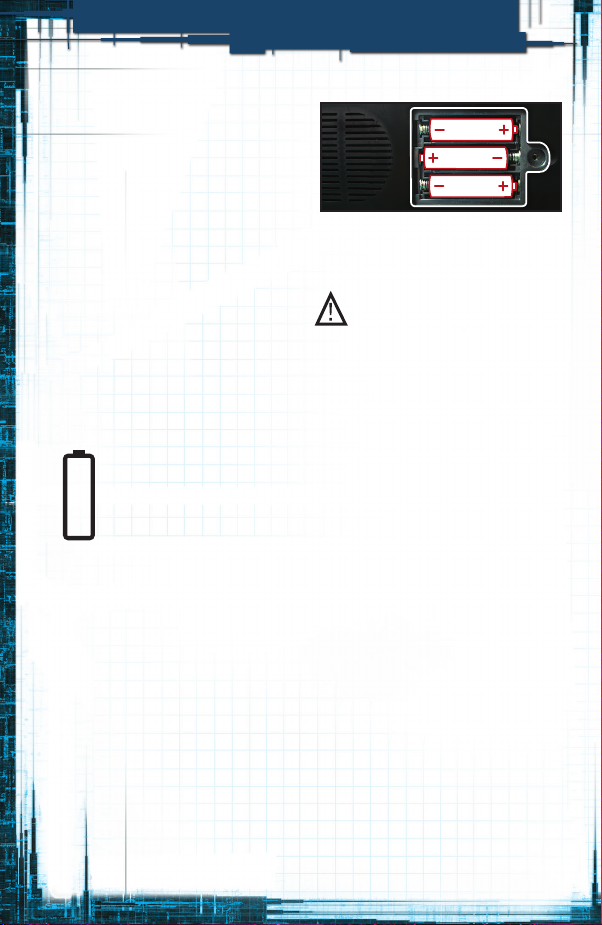
1. Insert the Batteries
1.5V AAo r LR6
ALKALINE
BATTERIES
REQUIRED
(NOT INCLUDED)
To insert the batteries, make sure
the red ON/OFF switch is OFF. Then
loosen the screw on the battery
box, located on the underside of
the center module, and remove the
door. Insert three AA-size alkaline
batteries, making sure to align the
+ and – symbols with the markings
in the plastic. See Figure 1.
Then replace the door and
tighten the screw.
Figure 1
Insert 3
AA Batteries
IMPORTANT: BATTERY
INFORMATION
CAUTION:
1. TO AVOID BATTERY LEAKAGE
a. Always follow the instructions carefully. Use
only batteries specied and be sure to insert
them correctly by matching the + and – polarity
markings. b. Do not mix old batteries and new
batteries or standard (carbon-zinc) with alkaline
batteries. c. Remove exhausted or dead batteries
from the product. d. Remove batteries if product
is not to be played with for a long time. e.
Do not short-circuit the supply terminals. f.
RECHARGEABLE BATTERIES: Do not mix these
with any other types of batteries. Always remove
from the product before recharging. Recharge
batteries under adult supervision. DO NOT
RECHARGE OTHER TYPES OF BATTERIES.
2. Should this product cause, or be aected by,
local electrical interference, move it away from
other electrical equipment. Reset (switching o
and back on again or removing and re-inserting
batteries) if necessary.
2
Page 3
THE FIRST TIME YOU PLAY
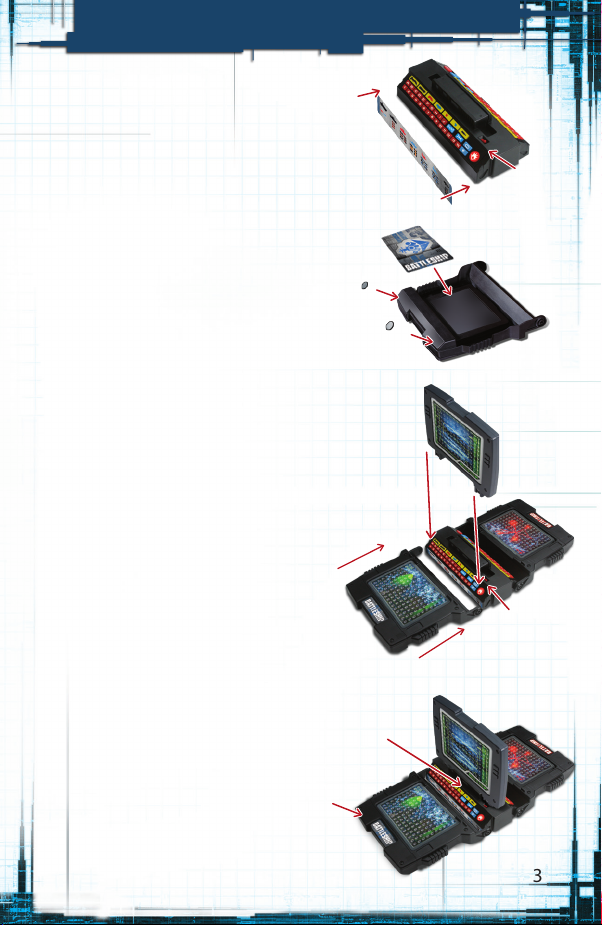
2. Assemble the Game Unit
Apply the light gray (Navy) Advanced
Weapons label to the side of the center
module with the red ON/OFF switch. See
Figure 2. Then apply the dark gray (Alien)
label to the other side.
Apply the large blue BATTLESHIP label
and two rubber feet to the back of the
green ocean grid. See Figure 3. Then
apply the large red BATTLESHIP label
and two rubber feet to the back of the red
ocean grid.
Press the ocean grid panels into the sides
of the module, with the green grid on the
side with the red ON/OFF switch. Then
snap the target grid into the top, with the
green side facing the red ON/OFF switch.
See Figure 4.
On the Navy side of the game, apply
the green label to the target grid and
the small blue BATTLESHIP label to the
storage tray. See Figure 5. Then apply
the red target grid label and the red
BATTLESHIP label in the same places on
the Alien side.
3. Place the Game Parts in the Tray
Carefully detach the 10 ships from
the plastic frames, then discard or
recycle the frame. If needed, use an
emery board or sandpaper to remove
any excess plastic from the ships.
Remove the pegs and aircraft from the
bags, and place half of the parts in each
storage tray, so that each tray has:
• 50 red HIT pegs
• 100 white MISS pegs
• 25 blue SCAN pegs
• 1 red and 1 blue Attack Squadron
(Navy tray only)
• 1 red and 1 blue Scouting Craft
(Alien tray only)
Light gray
label
Target
grid
Navy ocean grid
Target grid
label
Storage tray
label
FIGURE 2
ON/OFF
switch
FIGURE 3
FIGURE 4
Alien
ocean grid
ON/OFF
switch
FIGURE 5
3
Page 4
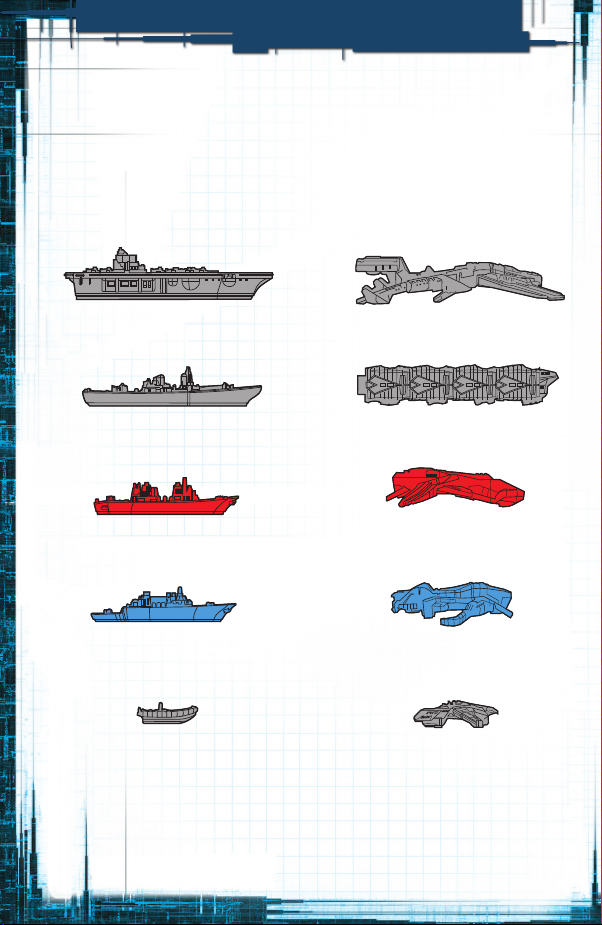
A LOOK AT YOUR SHIPS
A LOOK AT YOUR SHIPS
In this game, Alien Invaders attack the American and Japanese
Navy Fleet in a do-or-die battle for Earth. Each player controls a
eet of ve ships based on the BATTLESHIP movie. Here’s a look
at the ships that make up each eet.
THE NAVY FLEET
AIRCRAFT CARRIER
5 Hits To Sink
BATTLESHIP
4 Hits To Sink
RED JAPANESE DESTROYER
3 Hits To Sink
BLUE AMERICAN DESTROYER
3 Hits To Sink
RHIB
(RIGID-HULLED INFLATABLE
BOAT)
2 Hits To Sink
THE ALIEN FLEET
FLAGSHIP
5 Hits To Sink
HEAVY ORDNANCE CRAFT
4 Hits To Sink
RED STORM STINGER
3 Hits To Sink
BLUE SHREDDER STINGER
3 Hits To Sink
SMALL ASSAULT SHIP
2 Hits To Sink
4
Page 5
SETTING UP YOUR GAME
SETTING UP YOUR GAME
1. Lay the ocean grids at.
Then lift the target grid
straight up until the rubber
feet on the ocean grids grip
the play surface.
2. Push down on the top of the
game unit until the ocean
grids lock into place. Make
sure the game is stable
before you start playing. See
Figure 6.
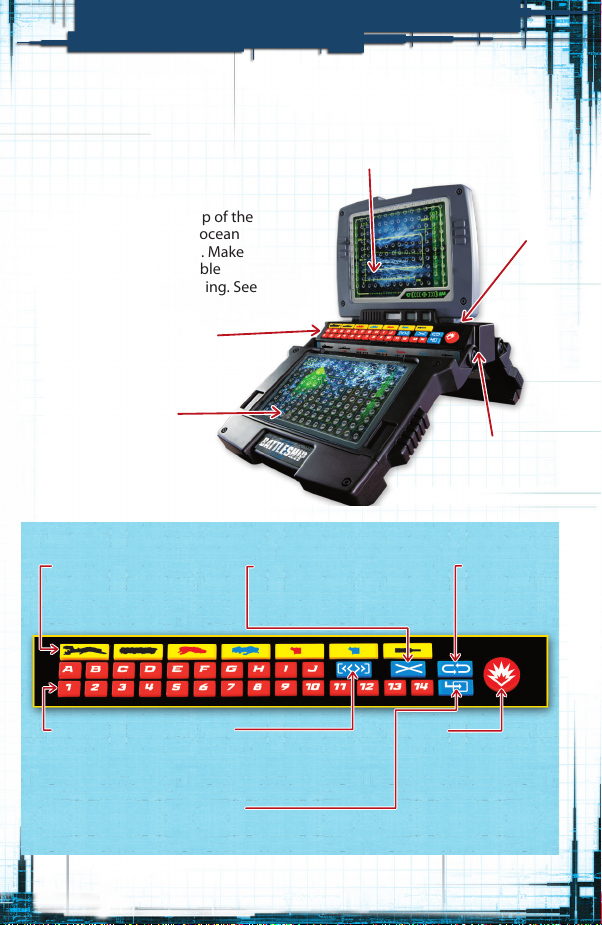
CONTROL PANEL
(SEE BOX FOR
CONTROL FEATURES)
TARGET GRID
ON/OFF
SWITCH
OCEAN GRID
FIGURE 6
THE CONTROL PANEL
ADVANCED WEAPONS
In the Advanced Weapons game,
press to activate a ship's special
weapons.
LETTER/NUMBER
BUTTONS
Press to select letter
and number coordinates
on your opponent’s
ocean grid when
searching for
enemy ships.
SCAN
In the Advanced Weapons game,
press to scan for enemy ships when
using the Blue American Destroyer
or the Blue Shredder Stinger.
ENTER
Press to conrm game options and commands.
CANCEL
Cancels your last command. The
last prompt by the computer will
be repeated. Enter new data.
Push grids into
grooves to lock
into place.
REPEAT
Press to repeat
the last
voice prompt.
FIRE
Press to launch an attack.
5
Page 6

STARTING A GAME
STARTING A GAME
1. If you’re playing a 1-player
game, face the side of the game
with the ON/OFF switch. If you’re
playing a 2-player game, decide
who will be Player 1 (the Navy
Commander) and who will be
Player 2 (the Alien Invader).
Sit across from each other with
the game between you. Player 1
faces the side with the
ON/OFF switch.
GAME TYPES
1. Classic Game
Press 1 and ENTER to play.
This mission is the easiest
to play, and is a great way to
develop your strategic battle
skills. On your turn, you’ll re
one shot to score a hit or a
miss. The winner is the rst
player to sink the enemy eet.
2. Press the ON/OFF switch ON.
The game will say <The battle for
Earth has begun! Input number of
players. Press 1 for solo game.
Press 2 for 2-player game.>
• 1-Player Game: If you’re playing
a solo game, press 1, then
press ENTER to conrm.
You’ll be the Navy Commander
playing against the Alien
Invader (the computer).
Next, you’ll be prompted
to choose Diculty Level
1 (Easy), 2 (Medium) or 3
(Hard). The higher the level,
the smarter the computer will
be. Press 1, 2 or 3, then press
ENTER to conrm.
• 2-Player Game: If you’re playing
a 2-player game, press 2, then
press ENTER to conrm.
Now follow steps 3, 4 and 5 to
choose a game type, weapon
type and eet setup.
6
2. Multi-Attack Game
Press 2 and ENTER to play.
This game plays the same as the
Classic Game, except that each
time you hit an enemy ship or
detect one during a scan, you’ll
earn an extra turn.
3. Salvo Game
Press 3 and ENTER to play.
This game plays the same as
the Classic Game, except that
you re one shot for each ship
in your eet that is still aoat.
For example, when the game
begins you’ll get ve shots per
turn. Then, for each ship your
opponent sinks, you’ll get one
less shot per turn.
Page 7
STARTING A GAME
3. Choose a Game: When the game
says <Press 1, 2 or 3 to select
game type>, press a number to
choose a game. (See the Game
Types box for details).
1: Classic Game
2: Multi-Attack Game
3: Salvo Game
For example, if you press 1, you’ll
hear <Classic Game Selected. Press
ENTER to conrm.> Press ENTER.
4. Choose Your Weapons: When
the game says <Press 1 or 2 to
select weapons>, press 1 or 2
to choose Basic or Advanced
Weapons. (See the Weapon
Choices box for details.) For
example, if you press 1, you’ll
hear <Basic Weapons Selected.
Press ENTER to conrm.>
Press ENTER.
5. Choose Your Fleet Setup: Now
you’ll hear <Player 1, press
1 or 2 for eet deployment
options.> Press 1 or 2 to choose
Custom Fleet Deployment
or Predetermined Fleet
Deployment. See the Fleet
Deployment Options box
for details.
For example, if you press 1, you’ll
hear <Custom eet deployment
selected. Press ENTER to conrm.>
Press ENTER.
WEAPON CHOICES
1. Basic Weapons: Press 1
and ENTER to play. In a Basic
Weapons game, each player
res one shot at a time. It’s the
easiest way to play.
2. Advanced Weapons: Press
2 and ENTER to play. In an
Advanced Weapons game, your
ships can use special weapons
to scan or attack several
coordinates at a time. This game
is recommended for experienced
players only.
FLEET DEPLOYMENT
OPTIONS
1. Custom: Press 1 and ENTER
to choose. Place each of your
ships wherever you want it on
your ocean grid, then input their
coordinates so the computer
knows where they are.
2. Predetermined: Press 2 and
ENTER to choose. Place each of
your ships in one of 100 preset
formations (see pages 18-27).
Enter that formation code, and
the computer automatically
inputs their coordinates.
7
Page 8
FLEET DEPLOYMENT
CUSTOM FLEET DEPLOYMENT
If you selected Custom Fleet
Deployment, the game will say
<Player 1, deploy your eet. When
the ship reports, input the rst and
last coordinates of its location.
Aircraft Carrier reporting!> If you’re
Player 1, place your ships on your
ocean grid, starting with your
Aircraft Carrier. Here’s how:
• Place the ship by tting its pegs
into the holes. You can place
ships vertically or horizontally, but
never diagonally.
• Ships may overhang the edge of
the grid or overlap other ships,
but make sure that each target
hole in your ships has its own
coordinate.
• Now input only the rst and
last coordinates of the ship so
the game will know where it is.
For example, if you place your
Aircraft Carrier where shown in
Figure 7, the coordinates are B5,
B6, B7, B8 and B9. To enter
them, just press B5 and B9. The
game will automatically know the
coordinates in between. Then
press ENTER to conrm.
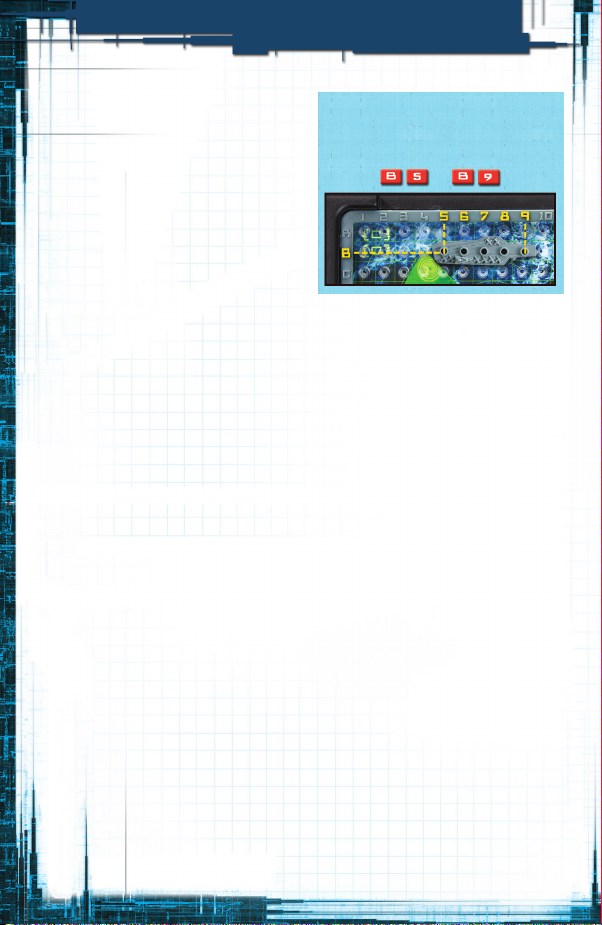
Canceling an entry: If you make a
mistake, press the CANCEL button
and re-enter the information after
the last command is repeated.
FIGURE 7
To input the position of your aircraft
carrier, press B5 and B9.
Incorrect coordinates: If you’ve
pressed a wrong coordinate,
the game will say, <Incorrect.>
In this case, just enter the
correct coordinate.
• After conrming the coordinates
of your Aircraft Carrier, you’ll
hear <Aircraft Carrier on station!
Battleship reporting!> Place
your Battleship and enter its
coordinates the same way. Then
do the same with your Red and
Blue Destroyers and your RHIB.
Aircraft Placement: If you’ve chosen
to use Advanced Weapons, you’ll
now be prompted to place your
aircraft. See Placing Your Aircraft on
page 12.
Next, the game will prompt Player 2
to choose a eet deployment option
for his Flagship, Heavy Ordnance
Craft, Red Storm Stinger, Blue
Shredder Stinger and Small
Assault Ship.
8
Page 9

FLEET DEPLOYMENT
PREDETERMINED FLEET
DEPLOYMENT
If you’ve chosen this option, take
a look at the 100 preset eet
formations on pages 18 - 27.
Choose the formation you want,
then place your ships on your
ocean grid in the positions shown.
When prompted by the game,
enter the letter and number of
the formation you want, then
press ENTER to conrm.
The ships shown in these
formations are shaped generically,
so that they can be used for
either the Navy Fleet or the Alien
Fleet. You may need to rely on
the color of your ships and the
number of holes in them as you
place your ships on your grid.
These formations also show two
aircraft aboard the 5-hole ships.
This tells you where to place your
aircraft in an Advanced Weapons
game. If you’re playing with Basic
Weapons, just ignore the aircraft.
9
Page 10

BASIC WEAPONS GAME
BASIC WEAPONS GAME
These rules are for players who are
using Basic Weapons. If you chose
to use Advanced Weapons, see
Advanced Weapons Game on pages
11 - 17.
The game begins by saying
<Awaiting orders Player 1>. If you’re
Player 1, it’s your turn to search for
a ship location and re at it. Here’s
how to do this:
1) Mark a target: Choose a
coordinate on your target
grid (one where you think
an opponent’s ship might be
located). Then t a white peg
into that hole, and enter the
letter/number coordinate. See
Figure 8.
FIGURE 8
If you choose this target, enter B3 to
re at it.
2. Fire! When prompted by the
game, press FIRE to launch a
missile at your target. Then wait
to see if it’s a hit or a miss.
• Hit! If you hit an enemy ship,
you’ll hear an explosion, see the
red light ash, and hear < Enemy
hit at [target]! > Good job! Replace
your white peg with a red one to
record the hit.
Your opponent records the hit by
tting a red peg into the matching
hole in his hit ship. See Figure 9.
(Your opponent does not tell you
which ship was hit.)
FIGURE 9
You hit your opponent’s destroyer
at B3. He places a red peg in that
ship hole.
• Miss! If you didn’t hit an enemy
ship, you’ll hear a buzzer, see
the yellow light ash, and hear
< Miss at [target]. > Better luck
next time! Leave your white peg in
the hole so you won’t re at that
target again.
3. Depending on which game
you’re playing, you may get
to re again. When your turn
is over, you’ll hear <Awaiting
orders Player 2. > Now it’s your
opponent’s turn to choose a
target and re at it.
10
Page 11

ADVANCED WEAPONS GAME
4. Keep taking turns ring at the
enemy, keeping track of your hits
and misses.
SINKING A SHIP
When all coordinates of a ship have
been hit, the ship is sunk. You’ll
hear < Alien target neutralized! > or
< Human target obliterated! > and
the name of the ship that was sunk.
Leave sunk ships on the grid, with
red pegs to indicate they’ve been
sunk.
WINNING THE GAME
When one player sinks the fth and
last ship in his opponent’s eet,
that player wins the game!
NAVAL LETTER CODE
When calling out letter
coordinates, this game uses the
same letter codes used by Naval
Commanders.
A = Alpha
B = Bravo
C = Charlie
D = Delta
E = Echo
F = Foxtrot
G = Golf
H = Hotel
I = India
J = Juliet
ADVANCED WEAPONS GAME
In this game, you have two options
on a turn: you can either enter a
coordinate as you would in a Basic
Weapons game, or you can press
a yellow or blue button on your
control panel to activate a special
weapon.
Here’s a rundown of the special
weapons you can use in this game:
• Your Aircraft Carrier (or Flagship)
has two aircraft that you can
launch to y over enemy air
space, scan for targets and re
at them.
• Your Battleship (or Heavy
Ordnance Craft) is equipped with
a deadly missile that can blast all
enemies in a 3x3 area.
11
Page 12

ADVANCED WEAPONS GAME
• Your Red Japanese Destroyer
(or Red Storm Stinger) that can
target three coordinates in a
single strike.
• Your Blue American Destroyer (or
Blue Shredder Stinger) has two
homing missiles that can search
and destroy along a vertical or
horizontal line.
If you choose Predetermined Fleet
Deployment, place your aircraft
in the positions shown in your
chosen formation. The computer
will automatically input their
coordinates.
LAUNCHING YOUR AIRCRAFT
As the game begins, you’ll want to
send out your aircraft to “y” above
the battle zone to scan for enemy
targets. To do this, follow these
steps:
• You can also launch anti-aircraft
missiles to destroy enemy aircraft
“ying” over the target grid.
PLACING YOUR AIRCRAFT
If you choose Custom Fleet
Deployment, you’ll need to place
each of your two aircraft into a hole
in your Aircraft Carrier (or Flagship),
and input their coordinates. After
you’ve entered the positions of
your ve ships, the game will say
(for example) <Red Attack Squadron
reporting! Input coordinates on
Aircraft Carrier. > Now enter the
coordinates of your red squadron.
Next, you’ll be prompted to enter
the coordinates of your blue
squadron.
12
1. Press the yellow Aircraft Carrier
(or Flagship) button on your
control panel. You’ll hear (for
example) < Aircraft Carrier
reporting! Select undeployed
Attack Squadron. >
2. Decide which of your two aircraft
to send out, then press that
yellow button on your control
panel. You’ll hear (for example)
<Red Attack Squadron reporting!
Enter search center coordinates. >
Page 13

ADVANCED WEAPONS GAME
3. Place your aircraft on your target
grid at a coordinate that will be
the center of your search pattern.
(See Figure 10.) Then input that
coordinate and press ENTER to
conrm.
FIGURE 10
Place your aircraft on your target
grid, then enter its coordinate.
4. Then you’ll hear
< Press 1 or 2
for search pattern coordinates. >
Choose a pattern (see Figure
11), press 1 or 2, then ENTER
to conrm. The aircraft will
scan the space it’s on, plus four
spaces next to it.
FIGURE 11
X Scanning
Pattern (1)
+
Scanning
Pattern (2)
• If it nds a target, you’ll be
prompted to re at it. Press FIRE
to launch your missile. Then you’ll
hear < Enemy hit at [target]. > This
sequence will repeat for each
target found. Both players record
the hits with red pegs. You place
white pegs in all other scanned
coordinates.
• If it nds no targets, the aircraft
will conrm clear waters. Record
all misses with white pegs.
Running Out of Ammo: An aircraft can
re only once; after that, it’s out of
ammo and can only scan for enemy
targets.
Moving Your Aircraft: After launching
an aircraft on a previous turn, you
may move it to a new location.
Just press the yellow button for
the aircraft you want to move, and
follow the prompts.
Destroying an Aircraft: An aircraft
can be destroyed in either of two
ways:
• If it’s still on your Aircraft Carrier
(or Flagship) when its coordinates
are hit; or
• If an anti-aircraft missile
launched by your opponent
destroys it. (See Anti-aircraft
Missiles/Air Defense System on
page 17.)
5. Now the aircraft will scan for
enemy ships.
If your aircraft is destroyed, remove
it from the game.
13
Page 14

ADVANCED WEAPONS GAME
BATTLESHIP/HEAVY
ORDNANCE CRAFT
ONE MISSILE
Your Battleship (or Heavy Ordnance
Craft) can re a powerful missile
that will hit any enemy ship within
nine spaces of a 3x3 area. You can
use this weapon only once, and only
if this ship is still aoat.
1. To choose this ship’s weapon,
press the yellow button on your
control panel.
2. When prompted to input blast
center coordinates, choose a
3x3 area on your target grid. See
Figure 12. Place a white peg in
each hole of the targeted area.
Then enter the coordinate of the
center hole.
FIGURE 12
To launch a missile into this
target, enter the center coordinate
• For each target found, you’ll hear
< Enemy hit at [target]! > Replace
the white peg with a red peg to
record the hit.
• For each miss, you’ll hear < Miss
at [target]. > Leave the white peg
in that hole.
ADVANCED WEAPONS
TARGET PATTERNS
The search or ring patterns for your
advanced weapons are shown on the
label below your control panel. Check
them out when prompted to select a
pattern.
3. When prompted to re, press
FIRE. Then wait to see if the
missile nds any targets.
14
Page 15

ADVANCED WEAPONS GAME
RED JAPANESE DESTROYER/
RED STORM STINGER
TWO MISSILES
Your Red Japanese Destroyer (or
Red Storm Stinger) can re a
deadly missile that will target three
coordinates in a row. You can re
two missiles from this ship (on
separate turns) if the ship is
still aoat.
1. To choose this ship’s weapon,
press the yellow button on your
control panel.
2. When prompted to input a ring
pattern, press 1 or 2, then press
ENTER to conrm.
FIGURE 13
Horizontal
Firing
Pattern (1)
3. When prompted to input blast
center coordinates, choose a
3-space line on your target grid,
and place a white peg in each
hole. Then enter the coordinate
of the center hole of the line.
See Figure 13.
Vertical
Firing
Pattern (2)
4. When prompted to re, press
FIRE. Then wait to see if the
missile nds any targets.
• For each enemy ship found, you’ll
hear, < Enemy hit at [target]! >
Replace the white peg with a red
peg to record the hit.
• For each miss, you’ll hear < Miss
at [target]. > Leave the white peg
in that hole.
BLUE AMERICAN DESTROYER/
BLUE SHREDDER STINGER
TWO HOMING MISSILES
Your Blue American Destroyer (or
Blue Shredder Stinger) can re
a missile from the edge of your
target grid to travel in a straight
line across the grid. It will keep
traveling until it either hits an
enemy target or reaches the other
side of the grid.
1. To choose this ship’s weapon,
press the yellow button on your
control panel.
2. When prompted to input a ring
pattern, press 1 or 2, then press
ENTER to conrm. See Figure
14 on the next page.
15
Page 16

ADVANCED WEAPONS GAME
FIGURE 14
Horizontal
Firing
Pattern (1)
Vertical
Firing
Pattern (2)
3. When prompted to input launch
coordinates on the grid edge,
choose a coordinate on the top,
bottom, left or right edge of your
target grid.
4. Input your target coordinate,
then place a white peg into
that hole. See Figure 15. Press
ENTER to conrm.
FIGURE 15
To search for enemy ships along
the bottom row, you enter ring
pattern 1 and target coordinate
J14. You place a white peg at J14.
5. When prompted to re, press
FIRE. Then wait to see if the
missile nds any targets.
• If a target is found, you’ll hear,
< Enemy hit at [target]! > After
hitting an enemy ship, the missile
won’t travel any further.
Place a red peg to record the hit,
and place a white peg in each hole
before that to record the misses.
See Figure 16.
FIGURE 16
Your missile hits a target at J3. All
coordinates before that are misses.
• If no targets are found, you’ll just
hear a buzzer. Place a white peg
in every hole in the line!
16
Page 17

ADVANCED WEAPONS GAME
SCANNING
Your Blue American Destroyer (or
Blue Shredder Stinger) can scan
underwater for enemy ships in a
3x3 area. See Figure 17. While it
won’t tell you the exact coordinates
of any enemies detected, it will give
you an idea of where to focus your
search. You can scan on any turn,
as long as your ship is still aoat.
FIGURE 17
Scan for
enemy ships
in a 3x3
area.
1. To scan, press the blue Scan
button on your control panel.
2. When prompted to enter search
center coordinates, input the
coordinates in the center hole of
the scanning pattern, then place
a blue peg in that hole. Press
ENTER to conrm.
• If one or more enemy ships are
detected, you’ll hear < Search
detects enemy vessel. Precise
location unconrmed. > Now you’ll
know to search this area on
future turns.
ANTIAIRCRAFT MISSILES
/AIR DEFENSE SYSTEM
These weapons are a great defense
against enemy aircraft “ying”
above the grid in search of your
ships. If you can destroy them, you
won’t need to worry about them!
1. To use this weapon, press the
yellow button on your control
panel.
2. Decide where to search for
enemy aircraft. Hint: If you
remember where your opponent’s
aircraft last attacked, that should
help narrow down their location.
3. When prompted to enter target
coordinates, input the coordinate
where you think the aircraft may
be ying above.
4. When prompted to re, press
FIRE.
• If you scored a hit, you’ll hear
<Enemy hit at [target]. > That
plane is destroyed.
• If you missed, you’ll hear < Miss
at [target]. > Better luck next
time!
• If no enemy ships are detected,
you’ll hear < Search conrms clear
waters. > Record all misses with
white pegs.
17
Page 18

A1
A3
A5
A7
DEPLOYMENT FORMATIONS
1
2 3 4 5 6 7 8 9 10 11 12 13 14 1
A
B
C
D
E
F
G
H
I
J
1
2 3 4 5 6 7 8 9 10 11 12 13 14 1
A
B
C
D
E
F
G
H
I
J
1
2 3 4 5 6 7 8 9 10 11 12 13 14 1
A
B
C
D
E
F
G
H
I
J
1
2 3 4 5 6 7 8 9 10 11 12 13 14 1
A
B
C
D
E
F
G
H
I
J
A
B
C
D
E
F
G
H
I
J
A
B
C
D
E
F
G
H
I
J
A
B
C
D
E
F
G
H
I
J
A
B
C
D
E
F
G
H
I
J
A2
A4
A6
A8
2 3 4 5 6 7 8 9 10 11 12 13 14
A
B
C
D
E
F
G
H
I
J
2 3 4 5 6 7 8 9 10 11 12 13 14
A
B
C
D
E
F
G
H
I
J
2 3 4 5 6 7 8 9 10 11 12 13 14
A
B
C
D
E
F
G
H
I
J
2 3 4 5 6 7 8 9 10 11 12 13 14
A
B
C
D
E
F
G
H
I
J
A
B
C
D
E
F
G
H
I
J
A
B
C
D
E
F
G
H
I
J
A
B
C
D
E
F
G
H
I
J
A
B
C
D
E
F
G
H
I
J
A9
18
1
2 3 4 5 6 7 8 9 10 11 12 13 14 1
A
B
C
D
E
F
G
H
I
J
A
B
C
D
E
F
G
H
I
J
A10
2 3 4 5 6 7 8 9 10 11 12 13 14
A
B
C
D
E
F
G
H
I
J
A
B
C
D
E
F
G
H
I
J
Page 19

1 2
B1
B3
B5
B7
B2
B4
B6
B8
B9
B10
19
Page 20

C1
C2
C3
C5
C7
C9
C4
C6
C8
C10
20
Page 21

1 2
D1
D3
D5
D7
D2
D4
D6
D8
D9
D10
21
Page 22

E1
E2
E3
E5
E7
E9
E4
E6
E8
E10
22
Page 23

1 2
F1
F3
F5
F7
F2
F4
F6
F8
F9
F10
23
Page 24

G1
G2
G3
G5
G7
G9
G4
G6
G8
G10
24
Page 25

1 2
H1
H3
H5
H7
H2
H4
H6
H8
H9
H10
25
Page 26

I1
I2
I3
I5
I7
I9
I4
I6
I8
I10
26
Page 27

1 2
J1
J3
J5
J7
J2
J4
J6
J8
J9
J10
27
Page 28

FCC Statement
NOTE: “This equipment has been tested and found
to comply with the limits for a Class B digital
device, pursuant to Part 15 of the FCC Rules.
These limits are designed to provide reasonable
protection against harmful interference in a
residential installation. This equipment generates,
uses and can radiate radio frequency energy,
and, if not installed and used in accordance with
the instructions, may cause harmful interference
to radio communications. However, there is no
guarantee that interference will not occur in a
particular installation. If this equipment does
cause harmful interference to radio or television
reception, which can be determined by turning the
equipment o and on, the user is encouraged to
try to correct the interference by one or more of the
following measures:
Reorient or relocate the receiving antenna.
Increase the separation between the equipment
and receiver.
Consult the dealer or an experienced radio/TV
technician for help.
Caution: Changes or modications to this unit
not expressly approved by the party responsible
for compliance could void the user’s authority to
operate the equipment.
This Class B digital apparatus complies with
Canadian ICES-003.
Cet appareil numérique de la classe B est conforme
à la norme NMB-003 du Canada.
HASBRO and its logo and BATTLESHIP are trademarks
of Hasbro and are used with permission. © 2012
Hasbro. All Rights Reserved. BATTLESHIP motion
picture © 2012 Universal Studios. All Rights
Reserved. TM & ® denote U.S. Trademarks.
The HASBR O, Milton Bradley and MB names and
logos are trademarks of Hasbro. US Pat. Nos.
7637505 and D546398.
Consumer contact:
USA and Canada: Hasbro Games, Consumer Aairs
Dept., P.O. Box 200, Pawtucket, RI 02862 USA.
☎ 888-836-7025.
Hasbro Australia Ltd., Level 2, 37-41 Oxford Street,
Epping, NSW 2121, Australia. ☎ 1300 138 697.
Hasbro NZ (a branch of Hasbro Australia Ltd.),
221 Albany Highway, Auckland, New Zealand.
☎ 0508 828 200.
PROOF OF PURCHASE
38194
GAMES
DELUXE
movie edition
®
®
battleship.com
 Loading...