

Page 1
Ages 6 & Up
INSTRUCTIONS
INSTRUCTIONS
Page 2

Contents
YOUR SHEPHERD’S JOURNAL KEYPAD 2
GOING TO MAIN MENU 4
1. CHARACTERS 4
2. VEHICLES/WEAPONS 5
3. ATLANTEAN LANGUAGE 7
4. PERSONAL LOG 8
5. COMMUNICATIONS 10
6. SCHEDULE LIST 12
7. PASSWORD 15
8. TIME 17
9. CALCULATOR 17
10. FAVORITE LISTING 18
11. ATLANTIS ADVENTURE 19
DIRECTION CONTROLS 20
INSERTING OR REPLACING BATTERIES 24
CAUTION 26
DEFECT OR DAMAGE 27
90-DAY LIMITED WARRANTY 27
1
Page 3
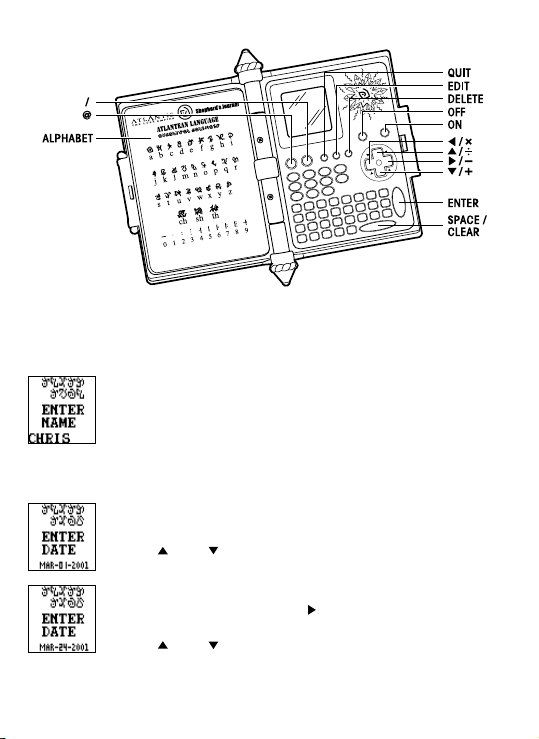
YOUR SHEPHERD’S JOURNAL KEYPAD
Turn ON your Shepherd's Journal. You have discovered this ancient book which
reveals a hidden civilization. With it you must learn to read and decipher the ancient
language of Atlantean.
NAME
After the opening screens, type in your name.
Use the keypad to do this.
Then press ENTER.
DATE
Enter in the date.
Month:
You will see the month of "JAN" flashing.
Use the "
For example "March".
Day:
To enter the correct month, use the "
day selection.
Use the "
(which would be a "0", "1", "2" or "3". For example "2".
Or you can use your keypad to type in the correct number.
For example, type in the "2" on your keypad.
" and " " arrows to toggle to the correct month.
" arrow to move to the
" and " " down arrows to type in the first digit of the month
2
Page 4
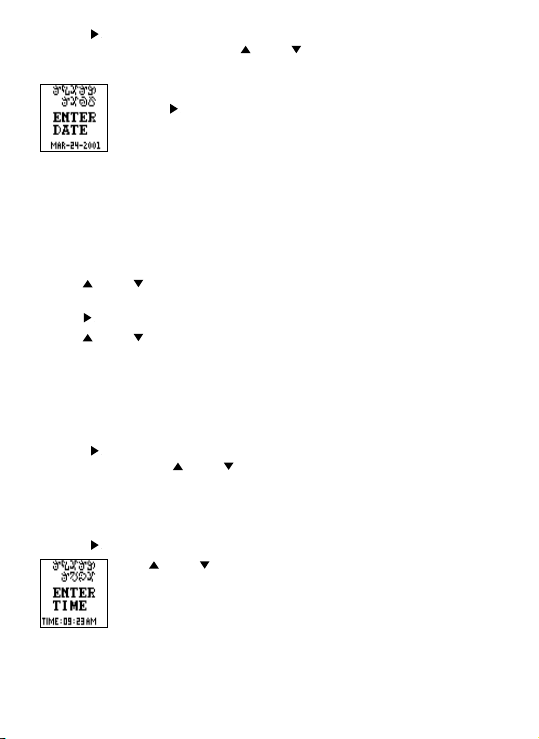
Use the " " arrow to move to the second digit, which will be a number from "0" to
"9". For example "4". Then use the " " and " " buttons to toggle to the correct
number or type in the number on your keypad.
Year:
Use the "
For example "2001".
After you've toggled to the correct year, press ENTER.
TIME
Now that you have learned how to set the date, setting the time is easy!
Hour:
Use :
– the "
" and " " buttons to enter the first digit or type in the first digit number
using the keypad.
" to move to the second digit.
– the "
" and " " buttons to enter the second digit or type in the number using
– the "
the keypad.
For example " 0"
Now do the same thing for the second digit.
For example "9".
Minute:
Use the "
the same way with the "
the keypad.
For example, "23".
AM or PM:
Use the "
" button to move to the minute spaces and enter in the correct minute
" button to move to the AM/PM space.
Use "
Or you can type "A" on the keypad for AM or type "P" on your keypad
for PM.
Now press ENTER.
" arrow to move to the year selection.
" and " " arrows or by typing the actual number on
" and " " to toggle to your choice. For example, "AM".
3
Page 5
ALARM
You'll hear the alarm sounds!
On screen, you would set the alarm the same way you set the time.
When done press ENTER.
Next you will see the words, "WOULD YOU LIKE TO SET THE ALARM FUNCTION? Y/N
Type in "Y" for yes or "N" for no. If yes, then use "
OFF. Now press ENTER.
SOUND EFFECTS
You can also set the unit to hear sound effects.
On screen, you will see the words, "WOULD YOU LIKE TO SET THE SOUND EFFECTS?
Y/N
Type in "Y" for yes or "N" for no. "If yes, then use "
be ON or OFF. Now press ENTER.
" & " " to set alarm to be ON or
" & " " to set the sound effect to
GOING TO MAIN MENU
After you're entered all your data of name, date, time, alarm and sound effects, press
the QUIT button to go to the main menu. From the main menu, you can access 11
different really cool functions for playing! On the main menu, you will see one icon
on screen at a time. The name of that icon function will scroll across the screen.
Use the "
main menu selection choices. Let's spend a little time explaining how each of these
functions work! They're each a lot of fun, so you'll want to learn about them all!
CHARACTERS
In the characters function, you'll find really interesting information on all the
characters in the movie. You can see their pictures and see their pictures come to life.
Read all about each of them!
Highlight CHARACTERS and press ENTER.
" & " " buttons to move left and right along the main menu to see all the
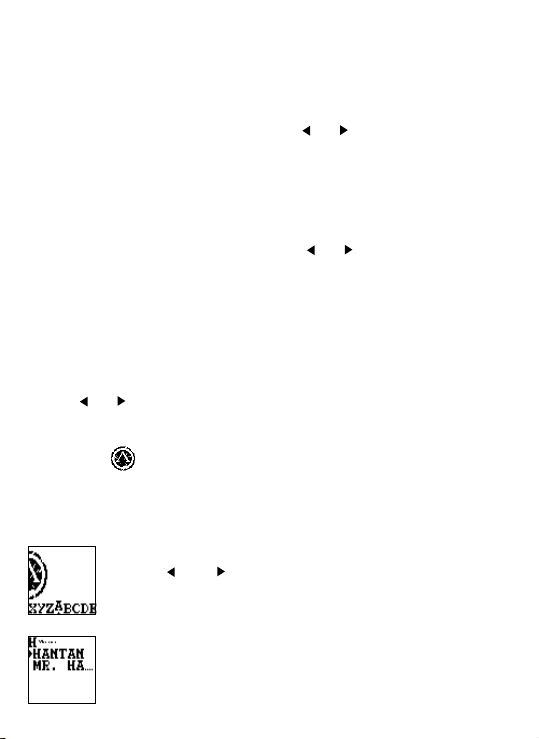
The letters of the alphabet will appear
Use your "
choice. For example, "H".
Press ENTER.
" and " " arrow buttons to move to a letter of your
See the list of all the characters with names that begin with the
letter "H".
4
Page 6
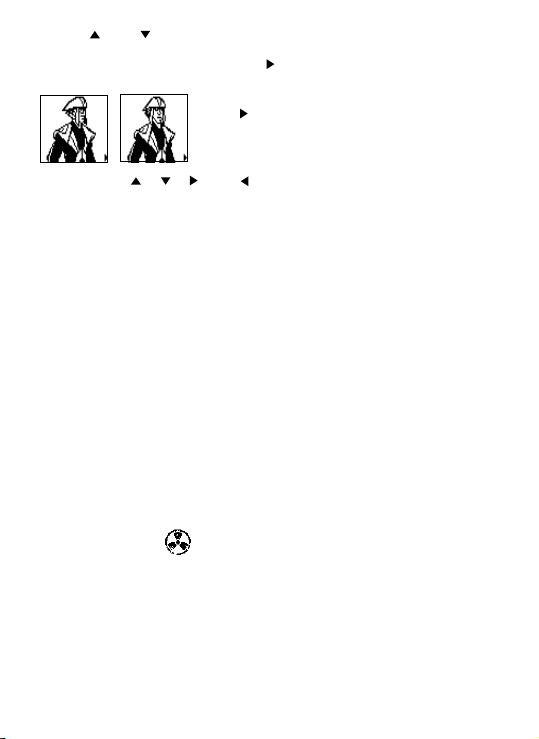
Use the " " and " " arrows to highlight the character you want to study, for
example, HANTAN. Sometimes a character name will not fit on the entire screen.
When you highlight the name press the "
Press ENTER.
Keep using the " ", " ", " " and " " buttons to scroll through the biography.
You can also use the ENTER button to quickly start back at the beginning of the
biography. This is very useful if there is a lot of information to read through on
different lines of text.
More characters of the same letter:
When you have finished your study on the Hantan, press the QUIT button to go
back to the "H" screen that listed all the characters that began with that letter of
the alphabet.
Select another letter of the alphabet for study:
Choose another character to study whose name begins with the letter "H" or you can
press QUIT again to go back to the main CHARACTERS and choose another letter of
the alphabet.
Go back to the main menu:
Press QUIT a third time and go back to the main menu and play with another
function of your Shepherd's Journal!
Please note not all the letters in the CHARACTERS alphabet are associated with
Atlantis names. For example if you highlight the letter "C" and press ENTER you will
see the following text appear, "No Data Found". This means there are no Atlantis
character names that start with this letter. Press QUIT to go back to the main letters in
the CHARACTERS alphabet and try again.
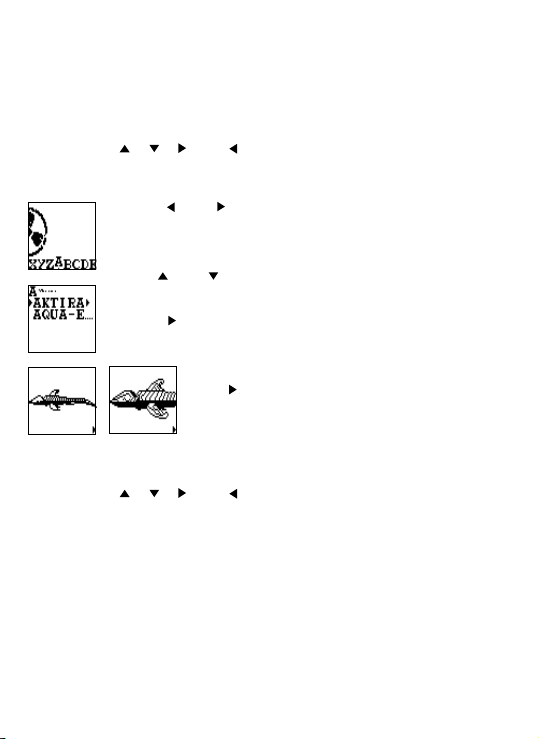
VEHICLES/WEAPONS
In the vehicles/weapons function, you'll find really interesting information on all the
vehicles/weapons in the movie. You can see their pictures and see their pictures
come to life. Read all about each of them!
Highlight VEHICLES/WEAPONS and press ENTER.
You will first see the Atlantean units of measure. This is how to read and understand
the size and dimensions vehicles and weapons.
You will then see Hantan moving on the screen.
Press "
" button to scroll through the whole name.
" again to see the biography on Hantan!
5
Page 7
Atlantean Units of Measure:
Kelim (KEH-lihm) = measurement of length
1 Kelim is approximately 2.3 ft. (Atlantean yard of meter)
Wokanos (WOH-Kuh-nohs) = measurement of speed
1 Wokanos is approximately .65 mph
Nayut (NAH-yut) = measurement of weight
1 Nayut is approximately 943 lbs. (Atlantean ton)
Keep using the "
After studying the Atlantean Units of Measure press ENTER.
The letters of the alphabet will appear.
Please note: You will only see moving animations of the VEHICLES. The weapons will
not have moving animations
Keep using the "
You can also use the ENTER button to quickly start back at the beginning of the
biography. This is very useful if there is a lot of information to read through on
different lines of text.
More VEHICLES/WEAPONS of the same letter:
When you have finished your study on the Aktirak, press the QUIT button to go back
to the "A" screen that lists all the vehicles/weapons that begin with that letter of
the alphabet.
Select another letter of the alphabet for study:
Choose another VEHICLES/WEAPONS to study whose name begins with the letter "A"
or you can press QUIT again to go back to the main VEHICLES/WEAPONS and
choose another letter of the alphabet.
", " ", " " and " " buttons to scroll through units of measure.
Use your "
choice. For example, "A".
Press ENTER.
See the list of all the vehicles/weapons that begin with the letter "A".
Use the "
want to study, for example, AKTIRAK. Sometimes a vehicle/weapon
name will not fit on the entire screen. When you highlight the name
press the "
Press ENTER.
" and " " arrow buttons to move to a letter of your
" and " " arrows to highlight the vehicles/weapons you
" button to scroll through the whole name.
You will then see Aktirak moving on the screen.
" again to see the biography on Aktirak!
Press "
", " ", " " and " " buttons to scroll through the biography.
6
Page 8
Go back to the main menu:
Press QUIT a third time and go back to the main menu and play with another
function of your Shepherd's Journal!
Please note not all the letters in the VEHICLES/WEAPONS alphabet are associated
with Atlantis. For example if you highlight the letter "E" and press ENTER you will see
the following text appear, "No Data Found". This means there are no ATLANTEAN
VEHICLES/WEAPONS names that start with this letter. Press QUIT to go back to the
main letters in the VEHICLES/WEAPONS alphabet and try again.
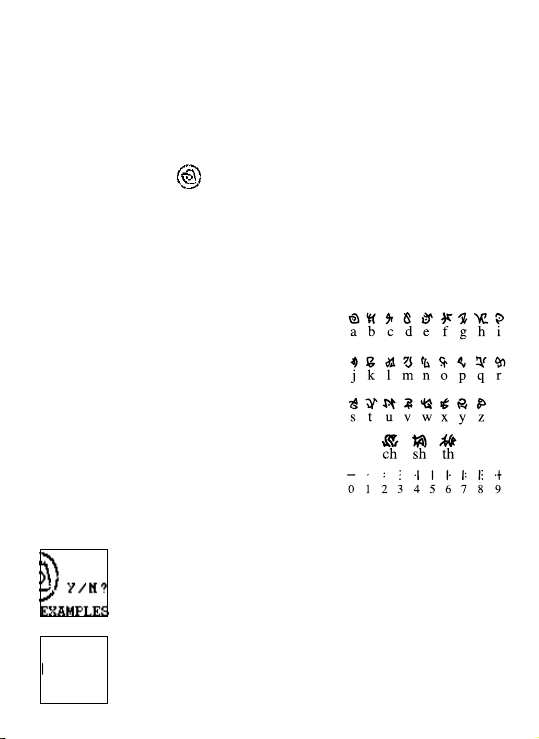
ATLANTEAN LANGUAGE
This is the dictionary on the Atlantean Language. The Atlantean alphabet is a
standard 26 letter a-z alphabet with three additions of CH, SH, TH. Atlantean is not
just read for left to right like English. It reads from left to right and then right to left
then left to right and so on. So, it zig zags down the page. When you read a
paragraph, the first line will be regular, but the second line will be backwards, and
the third line will be regular again. However, there are only a few cases in the
Shepherd's Journal where the text reads in paragraph form.
ATLANTEAN ALPHABET
Below is the complete translation of English to
Atlantean alphabet. The translation is also printed on
the inside cover of your Shepherd's Journal.
When you first enter the ATLANTEAN LANGUAGE, On screen you will see the following
text scroll across the screen,
"WOULD YOU LIKE TO ENTER SOME TEXT TRANSLATIONS EXAMPLES?
(Y/N)
Press Y for YES.
A blank screen will appear. Now use your keyboard to type your
message!
7
Page 9
Now use your keyboard to type in whatever message you want! When finished press
ENTER and you will see that message translated into Atlantean. Press ENTER again,
on screen you will see the following text scroll across the screen,
You will then be back on the main menu screen. All the names of the Shepherd's
Journal functions will now be in Atlantean. So if you enter the CHARACTERS function,
all the text will be in Atlantean. PLEASE NOTE: NOT ALL THE FUNCTIONS IN THE
GAME CAN BE TRANSLATED INTO ATLANTEAN TEXT. FOR EXAMPLE THE COMMUNICATIONS FUNCTION WILL ONLY APPEAR IN ENGLISH. ALSO ALL OF THE WARRING
TEXT SCREENS WILL APPEAR IN ENGLISH.
Quick Translation
YOU CAN ALSO CHANGE THE ENGLISH TEXT TO ATLANTEAN AND BACK TO ENGLISH
WITHOUT EVEN ENTERING THE ATLANTEAN LANGUAGE FUNCTION. WHEN ON THE
MAIN MENU SCREEN, PRESS THE ATLANTEAN ACTION BUTTON "
PERSONAL LOG
Entering the first message:
From the main menu page, move the arrows to highlight PERSONAL LOG and then
press ENTER.
"WOULD YOU LIKE TO CHANGE ALL THE TEXT FROM ENGLISH TO
ATLANTEAN? (Y/N)
Press Y for YES.
bb
b".
bb
Pressing the Atlantean action button "
change the text back and forth from English to Atlantean.
On screen you will see the following text scroll across the screen,
"WOULD YOU LIKE TO ENTER YOUR OWN NOTES? (Y/N)
Press Y for YES.
A blank screen will appear. Now use your keyboard to type
your message!
bb
b" can quickly
bb
Use your keyboard to type in your message. The message will only appear on one
continuous scrolling line.
8
Page 10

HOWEVER YOU ARE LIMITED BY THE AMOUNT OF TEXT YOU ENTER IN THE
PERSONAL LOG. WHEN YOU REACH YOUR TEXT LIMIT, A WARNING SCREEN WILL
APPEAR TELLING YOU TO DELETE SOME TEXT. YOU MUST DO SO IN ORDER TO SAVE
THE CURRENT MESSAGE YOU ARE ENTERING. FOR BEST PERFORMANCE IN THE
PERSONAL LOG, ALWAYS TRY TO DELETE OLD MESSAGES BEFORE YOU ENTER
NEW ONES.
Saving your messages:
When you are done typing, press the ENTER button.
On screen you will see,
Entering more messages:
You want to enter in more messages to your personal log? No problem! Highlight
PERSONAL LOG again and press ENTER.
Then, enter a new message and save it by pressing the EDIT button. Or press EDIT
on your saved notes screen. Your second message will then be saved as "NOTE2".
Now you have two messages in your personal log.
Editing messages:
If you want to edit (revise) a message you have written in your personal log, go to
the message on screen and then press the DELETE button.
On screen you will see,
"SAVE RECORD? (Y/N)
Type "Y" for yes.
You will then see your message saved as "NOTE1".
Use the "
saved. Then press ENTER to review them. Press " " to scroll forward
through your message. Press "
your message.
"EDIT THIS MESSAGE? Y/N
" and " " buttons to highlight the different messages you
" to scroll backwards through
9
Page 11

Press "Y" for yes to start editing (revising) your message. Use the directional arrows
to move the cursor to the part of the message you want to change. Then by pressing
the DELETE button, you will delete whatever letter is by the cursor. As you delete
letters, you can retype whatever revised message you wish to write.
When you're done revising, resave your message by pressing the ENTER button.
Deleting messages:
Let's say you want to delete (erase) a message. Go to the message on screen and
press the DELETE button.
On screen, you will see EDIT THIS MESSAGE? Y/N
Press "N" for no.
On screen will appear,
COMMUNICATIONS
Store names and phone numbers, email addresses and web addresses here!
Highlight COMMUNICATIONS from the main menu and press ENTER.
DELETE RECORD? Y/N
Press "Y" for yes and you will delete (erase) this entire message!
You will see a screen that says NAMES & PHONE NUMBERS scroll
across the screen..
Use the "
Use the "
Use the "
in that file.
Names and Phone Numbers:
Let's begin by highlighting NAMES AND PHONE NUMBERS and pressing ENTER.
On screen, you will see the following text scroll across the screen,
" and " " buttons to scroll to the item you want and press ENTER to work
" button to scroll to E-MAIL ADDRESS.
" button to scroll to WEB ADDRESSES.
10
Page 12

WOULD YOU LIKE TO ADD NAMES & PHONE NUMBERS? Y/N
Press Y for yes.
Name:
Type in the name (up to 17 letters) and press ENTER.
Phone Number:
Now type in the phone number.
Press ENTER.
On screen, see the message WOULD YOU LIKE TO ADD NAMES & PHONE NUMBERS?
Y/N again. This time, type "N" for no.
On screen:
WOULD YOU LIKE TO SAVE? Y/N
Press Y for yes.
Your name and phone number information is now saved.
Go back to the NAMES AND PHONE NUMBERS file.
You can add more names and phone numbers or use the "
scroll to between this file and the files for e-mail addresses and web addresses.
Adding More Names and Phone Numbers:
You can enter a total of 25 names and phone numbers. Press EDIT to add more
names. Follow the same procedure as before.
Deleting Names and Phone Numbers:
Press DELETE instead of edit.
See an arrow on screen and use your directional buttons to move the arrow to
highlight the entry you want to change.
Once the entry is highlighted, you have two options:
Option 1: Press the DELETE button to delete the entire entry.
Option 2: If you press EDIT, you will pull up the highlighted entry again and can edit
any part of the entry by moving the cursor to the letters you want to change. Then,
" and " " buttons to
11
Page 13

retype the new letters or numbers. When you're done revising, press ENTER.
E-mail Address:
Let's say instead of adding more names and phone numbers, you want to go to the
E-mail address folder.
Simply scroll right with the "
ADDRESS and press ENTER.
On screen, see the message:
WOULD YOU LIKE TO ADD E-MAIL ADDRESS? Y/N
Press Y for yes and enter an e-mail address.
Press the "A" button to get the "@" symbol.
Press the Atlantean button "
Then, press ENTER.
Just like with Names & Phone Numbers, you will see the message:
This is the same basic procedure as Names and Phone Numbers. EDIT and DELETE
the same way! You can save up to 25 E-Mail addresses!
Web Addresses:
If you want to record web addresses, it's just as easy! From the file menu, use the
" and " " buttons to scroll left or right to WEB ADDRESSES and press ENTER.
"
On screen, you will see the message:
WOULD YOU LIKE TO ADD WEB ADDRESSES? Y/N
Press "Y" for yes. Use the same procedure to add, edit and delete web addresses you
used for "E-Mail" and for "Names and Phone Numbers". You can save up to 25
web addresses!
SCHEDULE LIST
From the main menu, press ENTER. On screen you will see,
WOULD YOU LIKE TO SAVE? Y/N
Type in "Y" for yes.
SCHEDULE LIST followed by WOULD YOU LIKE TO ENTER REMINDER
TO YOURSELF? Y/N
Press "Y" for yes.
" arrow from NAMES & PHONE NUMBERS to E-MAIL
bb
b" button to get the "/" symbol.
bb
You can go straight to the blank screen and begin entering your
schedule immediately.
12
Page 14

When you are done typing in your schedule, press ENTER.
WOULD YOU LIKE TO SET THE ALARM FOR YOUR REMINDER? Y/N
Type in "Y" for yes.
On screen you will see,
On screen you will see, WOULD YOU LIKE TO SAVE YOUR REMINDER
TO YOURSELF? Y/N
Press "Y" for yes and you will see,
DAY: 01-01-2001
TIME: 01:21PM
Use your "
keypad keys to type in the DAY and TIME for the alarm. Press ENTER.
If you press NO for the alarm instead of YES, you will return to the main menu.
From the main menu, highlight the SCHEDULE LIST again and press ENTER.
Your schedule will be on screen.
Adding more schedules:
Press EDIT to add more scheduling. See the screen:
Press Y for yes and you will go straight to the blank screen and can begin entering
your schedule immediately.
When you are done typing in your schedule, press ENTER.
On screen you will see,
" and " " arrows to move through the DAY and TIME and then use the
The day and time of your alarm settings will appear on top of the page
of your schedule.
WOULD YOU LIKE TO ENTER REMINDER TO YOURSELF? Y/N
WOULD YOU LIKE TO SAVE YOUR REMINDER TO YOURSELF? Y/N
Press "Y" for yes and you will see,
WOULD YOU LIKE TO SET THE ALARM FOR YOUR REMINDER? Y/N
Type in "Y" for yes.
13
Page 15

You will see the ALARM SETTING screen again, enter an alarm setting just as before
for this new schedule.
When you're finished with the added schedule, press ENTER.
THE SCHEDULE LIST CAN ONLY HOLD 15 REMINDERS AT ONE TIME. ALSO YOU ARE
LIMITED BY THE AMOUNT OF TEXT YOU ENTER FOR THE REMINDERS. WHEN YOU
REACH YOUR TEXT LIMIT OR TRY TO ADD MORE THAT 15 REMINDERS AT ONE TIME,
A WARNING SCREEN WILL APPEAR TELLING YOU TO DELETE SOME TEXT OR DELETE
SOME REMINDERS COMPLETELY. YOU MUST DO SO IN ORDER TO SAVE THE
CURRENT REMINDER YOU ARE ENTERING. FOR BEST PERFORMANCE IN THE
SCHEDULE LIST ALWAYS TRY TO DELETE OLD REMINDERS AND TRY TO LIMIT THE
AMOUNT OF TEXT FOR EACH ONE BEFORE YOU ENTER NEW ONES.
Deleting messages:
When you get to the message you want to delete, press the DELETE button.
On screen, you will see
So you have two options.
Option 1:
If you type in Y for yes, you can go right into the schedule and delete/change parts of
the DAY and TIME, using the "
and then type over the letters or numbers you are highlighting to delete the old letters
and numbers and replace them with new text.
When you are done changing the day and time, press ENTER.
Now the revised day and time are on the top of the page and you can use your "
and " " arrows to move through the text of your actual schedule. As you move " "
and "
on the keypad to revise your schedule.
When you have revised your schedule, press ENTER.
On screen you will see,
Go to SCHEDULE LIST again from the main menu and press ENTER.
This time, you will see your FIRST schedule plus a flashing arrow on
the bottom right hand corner of the screen.
Press the "
EDIT THIS MESSAGE? Y/N
" with your arrows to highlight the letters you want to change, use the letters
" button to toggle through your added schedules.
" and " " arrows to move through the day and time
"
14
Page 16

SAVE THIS MESSAGE? Y/N
Press Y for yes to save this edited schedule.
Option 2:
If you press "N" for no,
On screen you will see,
DELETE RECORD? Y/N
Press Y for YES and delete the entire schedule.
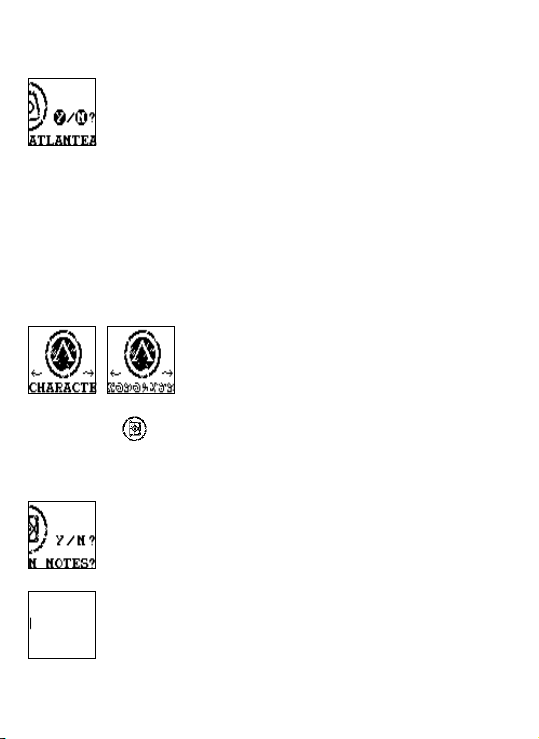
PASSWORD
This is where you enter your own private password and lock out intruders from
entering your files! Neat! Highlight the PASSWORD from the main menu and
press ENTER.
On screen you will see the following text scroll across the screen,
PLEASE ENTER YOUR PASSWORD.
Your password can be up to 8 letters long. Type it in and press ENTER.
On screen you will see,
On screen you will see,
PLEASE SELECT WHICH SECTORS YOU WISH TO LOCK OUT.
Press ENTER and you will return to the main menu. Highlight a file from the main
menu to "password protect". For example, the CHARACTERS.
Press ENTER. On screen you will see,
PLEASE RE-ENTER YOUR PASSWORD FOR CONFIRMATION
So, type in your password again to confirm it and press ENTER.
DO YOU WISH TO PASSWORD PROTECT CHARACTERS? Y/N
Type in "Y" for YES and you will see a
really cool animation of that section of
your Shepherd's Journal being "locked
up" to protect it from intruders!
15
Page 17

Now if anyone tries to enter the CHARACTERS, they must enter the password.
Without the password, they can't get in.
Select any other functions of your Shepherd's Journal you want to lock up. When
you are finishing "locking up", press QUIT.
On screen you will see,
THE FOLLOWING FUNCTIONS ARE NOW LOCKED and then a list of the functions you
have "password protected".
If you've entered in a bunch of functions as "password protected", use the "
to see them all.
Press QUIT a second time. Now you're back in the Main Menu.
Go to a section that you have password protected. Instead of the function opening,
on screen you will see
PLEASE ENTER YOUR PASSWORD.
If you type in the wrong password, you will see
WRONG PASSWORD.
Use the DELETE button to erase the incorrect password and try again!
When you type in the correct password, the function will open properly.
You can "password protect" any functions you want, even this
PASSWORD SYSTEM function! When you go to "password protect" the
password (Security System), you will see a warning on screen.
This warning is important! The warning explains that if you happen to forget your
password, you are out of luck if you have "locked up" this section. In order to gain
password access when you've locked up this security function, you will have to reset
your unit or take out the batteries and start all your programming for your entire
Shepherd's Journal all over again.
So consider "password protecting" every section except the PASSWORD System
function. That way, if you forget your password and you haven't locked up the
password system, you can go into this section and change your password!
Here's how:
Go to PASSWORD on the Main Menu and press ENTER.
On screen you will see
CHANGE PASSWORD? Y/N
Press Y for yes and go through the entire procedure of selecting a password again.
The sections of the Shepherd's Journal you have previously locked up with your old
password (which you have forgotten), can now be opened with your new password.
" arrow
16
Page 18

TIME
The TIME is all the basic information you entered when you first programmed your
Shepherd's Journal. Highlight this function from the Main Menu and press ENTER.
By either repeatedly pressing the "
button you can toggle through all your basic information: NAME, DAY, TIME, ALARM
and SOUND EFFECTS.
To change any of this information, go to the screen you wish to change.
For example, go to the NAME screen and press EDIT.
Then press or hold down the DELETE button to delete the old name and then type in
the new name. Press ENTER.
When you change any of the core information, you will need to re-enter all the
information from that point, using the same procedure you used for the NAME
entry change.
To QUIT the time system, press the QUIT button.
CALCULATOR
Highlight the calculator from the main menu and press ENTER.
Here's your own built-in calculator.
Use:
– the NUMBER keys for NUMBERS.
– the UP button for DIVISON (/).
– the DOWN button for ADDITION (+).
– the LEFT button for MULTIPLICATION (x).
– the RIGHT button for SUBTRACTION(-).
– the ENTER button for EQUALS (=).
– the SPACE button for CLEAR.
For example, if you wanted to add 7 + 4 = 11.
Here's how you would do it:
Press the "7" key. (7)
Press the "
Press the "4" key. (4)
Press the ENTER key. (=)
Then the number "11" would appear in the bottom right hand corner.
A calculator is a "must have" for any scientist or paleontologist!
Press QUIT to return to the Main Menu.
" key. (+)
" button or by repeatedly pressing the ENTER
17
Page 19

FAVORITE LISTING
In FAVORITE LISTING, you can list your 5 favorite characters – and have all their
biographic information available at an instant!
Press ENTER to enter the FAVORITE LISTING.
On screen, you will see the word EDIT highlighted by an arrow.
Press ENTER. You will see the alphabet chart from the
CHARACTERS folder.
Just as in the CHARACTERS function, you can use the "
highlight different letters in the alphabet. For example, if you want to include MILO
JAMES THATCH as one of your favorites, scroll along the alphabet bar until you reach
"T" and press ENTER.
On screen, you will see all the characters last names beginning with the letter "T",
Scroll down to MILO JAMES THATCH and press ENTER.
On screen you will see,
WOULD YOU LIKE TO ADD THIS CHARACTER TO YOUR FAVORITE LIST? Y/N
Press "Y" for yes and on screen you will see a graphic image of Milo being book
marked and his name appearing on a screen
Then the screen automatically goes back to the SELECT CHARACTERS screen with the
alphabet bar.
You can add up to 5 characters in exactly this same way. When you're done making
your "favorites" list, press QUIT.
Then you will see,
Milo James Thatch
Trooper 229
Tropper465
MILO JAMES THATCH
" and " " buttons to
18
Page 20

WOULD YOU LIKE TO SAVE YOUR FAVORITE LISTING? Y/N
Press "Y" for yes and your favorite characters will be saved.
You will then be automatically returned to the Main Menu.
Now go back into the FAVORITE LISTING, and press ""
VIEW and press ENTER to see them all. The cursor will be set for the first character
on your list. Use the "
character listings.
Press ENTER. All bio information for that character will appear. Just press the "
button to cycle through all the information. Remember, you can always press the " "
button or ENTER to cycle backwards through this information, as well.
If you've entered 5 characters to your favorite's list and you try to enter another
character, you will see,
Then on the screen you will see,
If you would like to change your list, highlight the character on your list you want to
delete and press the DELETE button. That character will be deleted instantly from your
list! Each time you press DELETE, you will delete another character from your list!
To add new characters to your list press the EDIT button when on your list or
highlight the word Edit on the main FAVORITE LISTING screen and press ENTER.
ATLANTIS ADVENTURE
Now you can play the Atlantis Adventure game and try to save the lost city! Just like
in the movie!!
Highlight the ATLANTIS ADVENTURE from the main menu and press ENTER.
Press ENTER again to start the first level in the game.
The Atlantis Adventure game is made up of five levels where you play as Milo using
the Shepherd's Journal to find and save Atlantis.
" and " " buttons to toggle to any of your favorite
THERE ARE ALREADY 5 CHARACTERS IN YOUR LIST.
WOULD YOU LIKE TO SAVE YOUR FAVORITE LISTING? Y/N
Press "Y" for yes and your favorite characters will be saved.
" arrow to highlight the word
"
19
Page 21

When you start the game you will only have three lives and five continues to win the
game. You will also have a life bar made up of six sections located in the upper left
corner of the screen. Each time you get hit, you will lose a one section off your life
bar. Lose all six sections and you will lose a life. If you can't beat the game within
the five continues you are given, it's Game Over.
DIRECTION CONTROLS
Use " ", " ", " ", " "
– To control your character and vehicle on the screen.
Action Button A
– Used to fire torpedoes, make the Digger jump, make Milo Jump, fire the weapon
on the flying stone fish.
Atlantean Button
– Spin the blades on the Digger, close the hatch door on level 2, move the flying
stone fish toward the enemy planes.
Enter Button
– To pause the game.
Quit Button
– To quit the game at any time.
Level One
In level one you will be controlling the giant submarine trying to find the entrance
to Atlantis.
bb
b
bb
You must move the sub up and down to avoid hitting the sides of the
underwater caves. You must also be on the lookout for falling rocks.
You can either avoid the falling rocks or you can fire a
torpedo at them by pressing Action Button A.
20
Page 22

Several sections of the underwater caves have various
pillars you must avoid by moving your sub around
them. This is done by pressing right and left to make
your sub move in and out of the background. If you see
a large pillar, you must press right to make your sub
smaller and move further into the background to avoid
getting hit. If you see a smaller pillar and your sub is
already in the background, press left to make you sub
Some sections underwater will be completely blocked forcing you to
fire a torpedo at the rocks to clear a path.
When you clear a path several smaller rocks will be moving toward
you. When this happens, the game will switch to a first person view
where you must move your crosshair at the rocks and fire a torpedo
before they hit the sub.
If you don't read the message correctly and go in the wrong cave,
rocks will fall on your sub.
At the end of the level you will come up against the Levialhan. Here
you must fire torpedoes at the Levialhan, but they won't cause any
damage. After a few seconds, the Levialhan will grab the sub and hit it
with a bot of lighting causing the hole in the sub. This is the end of the
level one.
Level Two
Level two will be inside the sub. The Levialhan has just shot the sub with a bot of
lightning which punched a hole in the sub.
In this level, you must move Milo to the right and reach the Aqua E-Vac vehicles
before the sub completely floods with water. You will have two minutes and thirty
seconds to complete this level.
bigger and move it into the foreground.
At certain locations there will be more than one path to
take. When this happens, you will see Milo read from
the Shepherd's Journal. You will then see a message
appear in the Journal, telling you which cave is the
correct one to go in; but, the message will be in
Atlantean. So, you must quickly translate the message
and press the correct direction to go into the cave.
21
Page 23

Level Three
As you run through the sub, you must duck and jump over equipment
and obstacles that stand in your way. Objects will also fall from
the ceiling.
You must also climb up and down ladders.
At certain locations, you will go through hatch doors,
which you must close behind by pressing the Atlantean
bb
Button
b. When you close the hatch door you will slow
bb
the water down and gain more time to escape the
sinking sub.
Watch out for large holes in the ground. If you miss jumping over
them, you will lose a whole life and not just one section off your
life bar.
When you get to the end of the sub, you will escape to complete
the level.
In level three you will be controlling the Digger. Move the Digger to the
right and jump over any holes by pressing Action Button A. If you miss
jumping over a hole, you will lose a whole life and not just one section
off your life bar.
There are also lava exploding craters you must jump over without
touching the lava. So, you must time your jumps carefully.
You will also come across a large rock wall you must dig through.
When you reach one of these walls, hold down Atlantian Button
until you dig through the entire wall.
22
bb
b
bb
Page 24

Level Four
Level Five
Towards the end of the level the Digger will pick up speed and side
downhill. When this happens, you must quickly move the Digger left
and right to avoid hitting large rocks.
When you get to the bottom of the hill, the Digger will try to
breakthrough a large wall. The Digger will breakdown at this point.
This is the end of the level. Now, you are on foot!
You are still in the inside the caves running on foot. You must continue
to run to the right avoiding falling rocks and jump over crater holes.
Miss one of the jumps and you will lose a life.
This level is also infested with Atlantean fireflies. When these fireflies
move toward you, press down to duck underneath them.
Again you will come across two cave entrances. When
this happens you will see Milo read from the Shepherd's
Journal. You will then see a message appear in the
Journal telling you which cave is the correct one to go
in; but, the message will be in Atlantean. You will have
30 seconds to translate the message and press the
correct direction to go in. If you choose the wrong
entrance an Atlantean monster will come out and
attack you.
At the end of the level you will see the city of Atlantis.
Rourke has just taken Kida hostage! You must take to the air in one of
the Atlantean stone flying fish.
In the air you must avoid the attacking planes by moving up
and down.
23
Page 25

When the enemy planes turn around, move behind them
and press the Atlantean Button
When you get close to them the game will switch to first
person view. Here you must move your crosshair onto
the enemy plane and press Action Button A to shoot
You must shoot down 20 enemy planes to complete the level and
save Kida and the city!!!
them down.
bb
b to catch up to them.
bb
INSERTING OR REPLACING BATTERIES
Reset Operations:
By pressing the reset button, you can
delete all the data previously entered.
A screen will ask you, DATA FOUND!
KEEP RECORD? Y/N. By pressing
Y (yes) all data will be kept.
By pressing N (no), you will return
to the initial screen.
Be sure to press the reset
button before you use
Shepherd's Journal for the
first time.
Replacing Batteries:
This Shepherd's Journal is powered by two button-cell
batteries type LR44 or G13A and four AAA or LR03 batteries.
The four AAA or LR03 batteries are the main batteries and the
two LR44 or G13A batteries are the back-up batteries. The
main batteries provide power for normal operations. The
back-up batteries protect data stored in memory when
changing the main batteries.
CAUTION : Batteries should be replaced by an adult.
Not suitable for children under 36 months, may contain small parts.
If the LCD display becomes dim, you should turn off the Shepherd's Journal and
replace the main batteries. Your Shepherd's Journal is protected by the back-up
batteries during main battery replacement.
24
Page 26

Memory contents are lost when the back-up batteries are removed or need to be
replaced. Be sure to always leave the back-up batteries in place to protect memory
contents when you are changing the main batteries. However, when you remove the
main batteries at any time, memory retention will depend entirely on the condition of
the back-up batteries in place. If back-up batteries are not in place, memory contents
are likely to be damaged. If memory seems corrupted, clear it using the reset.
Normally the back-up batteries can support over 180 days of data back-up even
when no main batteries have been installed. However, in order to guarantee your
data is stored, never leave the unit without main batteries for a whole day. Otherwise,
you could lose your data. For regular maintenance, please exchange the back-up
batteries once a year.
Important:
Incorrect use of batteries can cause them to burst or leak possibly damaging the
interior of the Shepherd's Journal. Note the following precautions:
Never leave dead batteries in the battery compartment.
To avoid damage to the unit from leaky batteries, replace both the main battery and
the back-up battery every three years. Batteries should be replaced no matter how
much you use the diary during that time.
Warning:
Never try to recharge the batteries supplied with Shepherd's Journal.
Do not expose batteries to direct heat.
Keep batteries out of the reach of small children. If swallowed, consult a physician
immediately.
To Replace The Main Battery:
1. Switch power off, loosen the screws that holds the battery compartment cover in
place, then remove the battery compartment cover.
2. Insert a thin, pointed, non-metallic object into small hole and remove the
old battery.
3. Wipe the surfaces of a new battery with a soft, dry cloth. Insert the new battery
into the Shepherd's Journal, making sure to align "+" and "-" as shown.
4. Replace the battery compartment cover and the screws that secure it in place.
25
Page 27

To Replace the Back-Up Battery:
1. Be sure always to leave main battery in place to protect memory contents before
you replace back-up battery.
2. Loosen the screw that holds the back-up battery cover in place. Remove the
cover, then remove the old battery with a thin pointed, non-metallic object.
3. Wipe the surfaces of a new battery with a soft, dry cloth. Insert the new battery
into the Shepherd's Journal, making sure that its positive (+) side is facing up
(so that you can see it).
4. Replace the battery compartment cover and the screws that secure it in place.
CAUTION:
To ensure proper function:
• Do not mix old and new batteries.
• Do not mix alkaline, standard or rechargeable batteries.
• Battery installation should be done by an adult.
• Non-rechargeable batteries are not to be recharged.
• Rechargeable batteries are to be removed from the toy before being charged
(If removable).
• Rechargeable batteries are only to be charged under adult supervision
(If removable).
• Only batteries of the same or equivalent type as recommended are to be used.
• Batteries are to be inserted with the correct polarity.
• Exhausted batteries are to be removed from the toy.
• The supply terminals are not to be short circuited.
• Replace with new batteries at the first sign of erratic operation.
DO NOT DISPOSE OF THIS PRODUCT IN FIRE, BATTERIES INSIDE THE PRODUCT MAY
EXPLODE OR LEAK.
26
Page 28

DEFECT OR DAMAGE
If a part of your game is damaged or something has been left out, DO NOT RETURN
THE GAME TO THE STORE. The store doesn’t have replacement parts. Instead, write
to us at:
Tiger Repair Department.
1000 N. Butterfield Road, Unit 1023, Vernon Hills, IL 60061, U.S.A.
In your note, mention the name of your game, your game’s model number, and tell
us briefly what the problem is. Also include sales slip, date, place of purchase and
price paid. We will do our best to help.
90 DAY LIMITED WARRANTY
Tiger Electronics. (Tiger) warrants to the original consumer purchaser of this product
that the product will be free from defects in materials or workmanship for 90 days
from the date of original purchase. This warranty does not cover damages resulting
from accident, negligence, improper service or use or other causes not arising out of
defects in materials or workmanship.
During this 90-day warranty period, the product will either be repaired or replaced
(at Tiger’s option) without charge to the purchaser, when returned with proof of the
date of purchase to either the dealer or to Tiger.
Product returned to Tiger without proof of the date of purchase or after the 90-day
warranty period has expired, but prior to one year from the original date of purchase,
will be repaired or replaced (at Tiger’s option) for a service fee of U.S.$13.50.
Payments must be by check or money order payable to Tiger Electronics.
The foregoing states the purchaser’s sole and exclusive remedy for any breach of
warranty with respect to the product.
All product returned must be shipped prepaid and insured for loss or damage to:
Tiger Repair Department.
1000 N. Butterfield Road, Unit 1023, Vernon Hills, IL 60061, USA
The product should be carefully packed in the original box or other packing materials
sufficient to avoid damage during shipment. Include a complete written description of
the defect, a check if product is beyond the 90-day warranty period, and your printed
name, address and telephone number.
THIS WARRANTY IS IN LIEU OF ALL OTHER WARRANTIES AND NO OTHER
REPRESENTATIONS OR CLAIMS OF ANY NATURE SHALL BE BINDING ON OR
OBLIGATE TIGER IN ANY WAY. ANY IMPLIED WARRANTIES APPLICABLE TO THIS
PRODUCT, INCLUDING WARRANTIES OF MERCHANTABILITY AND FITNESS FOR A
PARTICULAR PURPOSE, ARE LIMITED TO THE NINETY (90) DAY PERIOD
DESCRIBED ABOVE. IN NO EVENT WILL TIGER BE LIABLE FOR ANY SPECIAL,
INCIDENTAL, OR CONSEQUENTIAL DAMAGES RESULTING FROM POSSESSION, USE,
OR MALFUNCTION OF THIS TIGER PRODUCT.
27
Page 29

Some states do not allow limitations as to how long an implied warranty lasts and/or
exclusions or limitations of incidental or consequential damages, so the above
limitations and/or exclusions of liability may not apply to you. This warranty gives
you specific rights, and you may also have other rights which vary from state
to state.
For more information about Tiger Electronics, our products and special promotions,
please visit our Web Site at: www.tigertoys.com
This device complies with Part 15 of the FCC Rules. Operation is subject to the
following two conditions : (1) this device may not cause harmful interference, and
(2) this device must accept any interference received, including interference that may
cause undesired operation.
Warning: Changes or modifications to this unit not expressly approved by the party
responsible for compliance could void the user’s authority to operate the equipment.
NOTE: This equipment has been tested and found to comply with the limits for a
Class B digital device, pursuant to Part 15 of the FCC Rules. These limits are
designed to provide reasonable protection against harmful interference in a
residential installation. This equipment generates, uses, and can radiate radio
frequency energy and, if not installed and used in accordance with the instructions,
may cause harmful interference to radio communications. However, there is no
guarantee that interference will not occur in a particular installation. If this equipment
does cause harmful interference to radio or television reception, which can be
determined by turning the equipment off and on, the user is encouraged to try to
correct the interference by one or more of the following measures:
– Reorient or relocate the receiving antenna.
– Increase the separation between the equipment and receiver.
– Connect the equipment into an outlet on a circuit different from that to which the
receiver is connected.
– Consult the dealer or an experienced radio TV technician for help.
28
Page 30

A division of Hasbro, Inc.
Where T echnology Comes to Play!
®, TM, & © 2001 Tiger Electronics. All rights reserved.
980 Woodlands Parkway, Vernon Hills, IL 60061, USA
www.tigertoys.com
®, TM, & © 2001 Tiger Electronics, a division of Hasbro, Inc.
All Rights Reserved.
Belvedere House, Victoria Avenue, Harrogate,
North Yorkshire HG1 1EL, England.
www.tigertoys.co.uk
Visit the Disney Web Site at www.disney.com/atlantis
Item No. 59875
200103770IWTI-02
PRINTED IN CHINA
DISNEY
©
 Loading...