

Page 1
x3
BATTERIES REQUIRED
1.5VAA/R6 size
Alkaline batteries recommended.
Phillips/cross head screwdriver (not
included) needed to insert batteries.
NOT INCLUDED
Product and colors may vary.
© 2007 Lucasfilm Ltd. & ® or TM where indicated. All rights reserved.
®* and/or TM* & © 2007 Hasbro. All Rights Reserved.
TM & ® denote U.S. Trademarks.
P/N 6783420000
*
Not suitable for children
under 3 years because of
small parts - choking hazard.
AGES 4
+
87603/87629 Asst.
Some assembly required.
Includes unassembled vehicle, 6 ”laser” barrels, 1 cannon projectile, figure, blaster, 8 wheels, and label sheet.
FCC Statement:
This equipment has been tested and found to comply with the limits for a Class B digital device, pursuant to part 15 of the
FCC Rules. These limits are designed to provide reasonable protection against harmful interference in a residential installation.
This equipment generates, uses and can radiate radio frequency energy, and, if not installed and used in accordance with the
instructions, may cause harmful interference to radio communications. However, there is no guarantee that interference will not
occur in a particular installation. If this equipment does cause harmful interference to radio or television reception, which can be
determined by turning the equipment off and on, the user is encouraged to try to correct the interference by one or more of the
following measures:
• Reorient or relocate the receiving antenna.
• Increase the separation between the equipment and receiver.
• Consult the dealer or an experienced radio/TV technician for help.
CAUTION: Changes or modifi cations not expressly approved by the party responsible for compliance could void the user’s
authority to operate the equipment.
AT-TE
™
5008(87603_87629_SW_CW_AT-TE.indd)2007-11-0566(1)/Tomy/2007-12-13/CN_Mac7/ER_Creo_EP10600
CMYK
K
Page 2
SWITCHESOPERATION
ASSEMBLY
BATTERIES
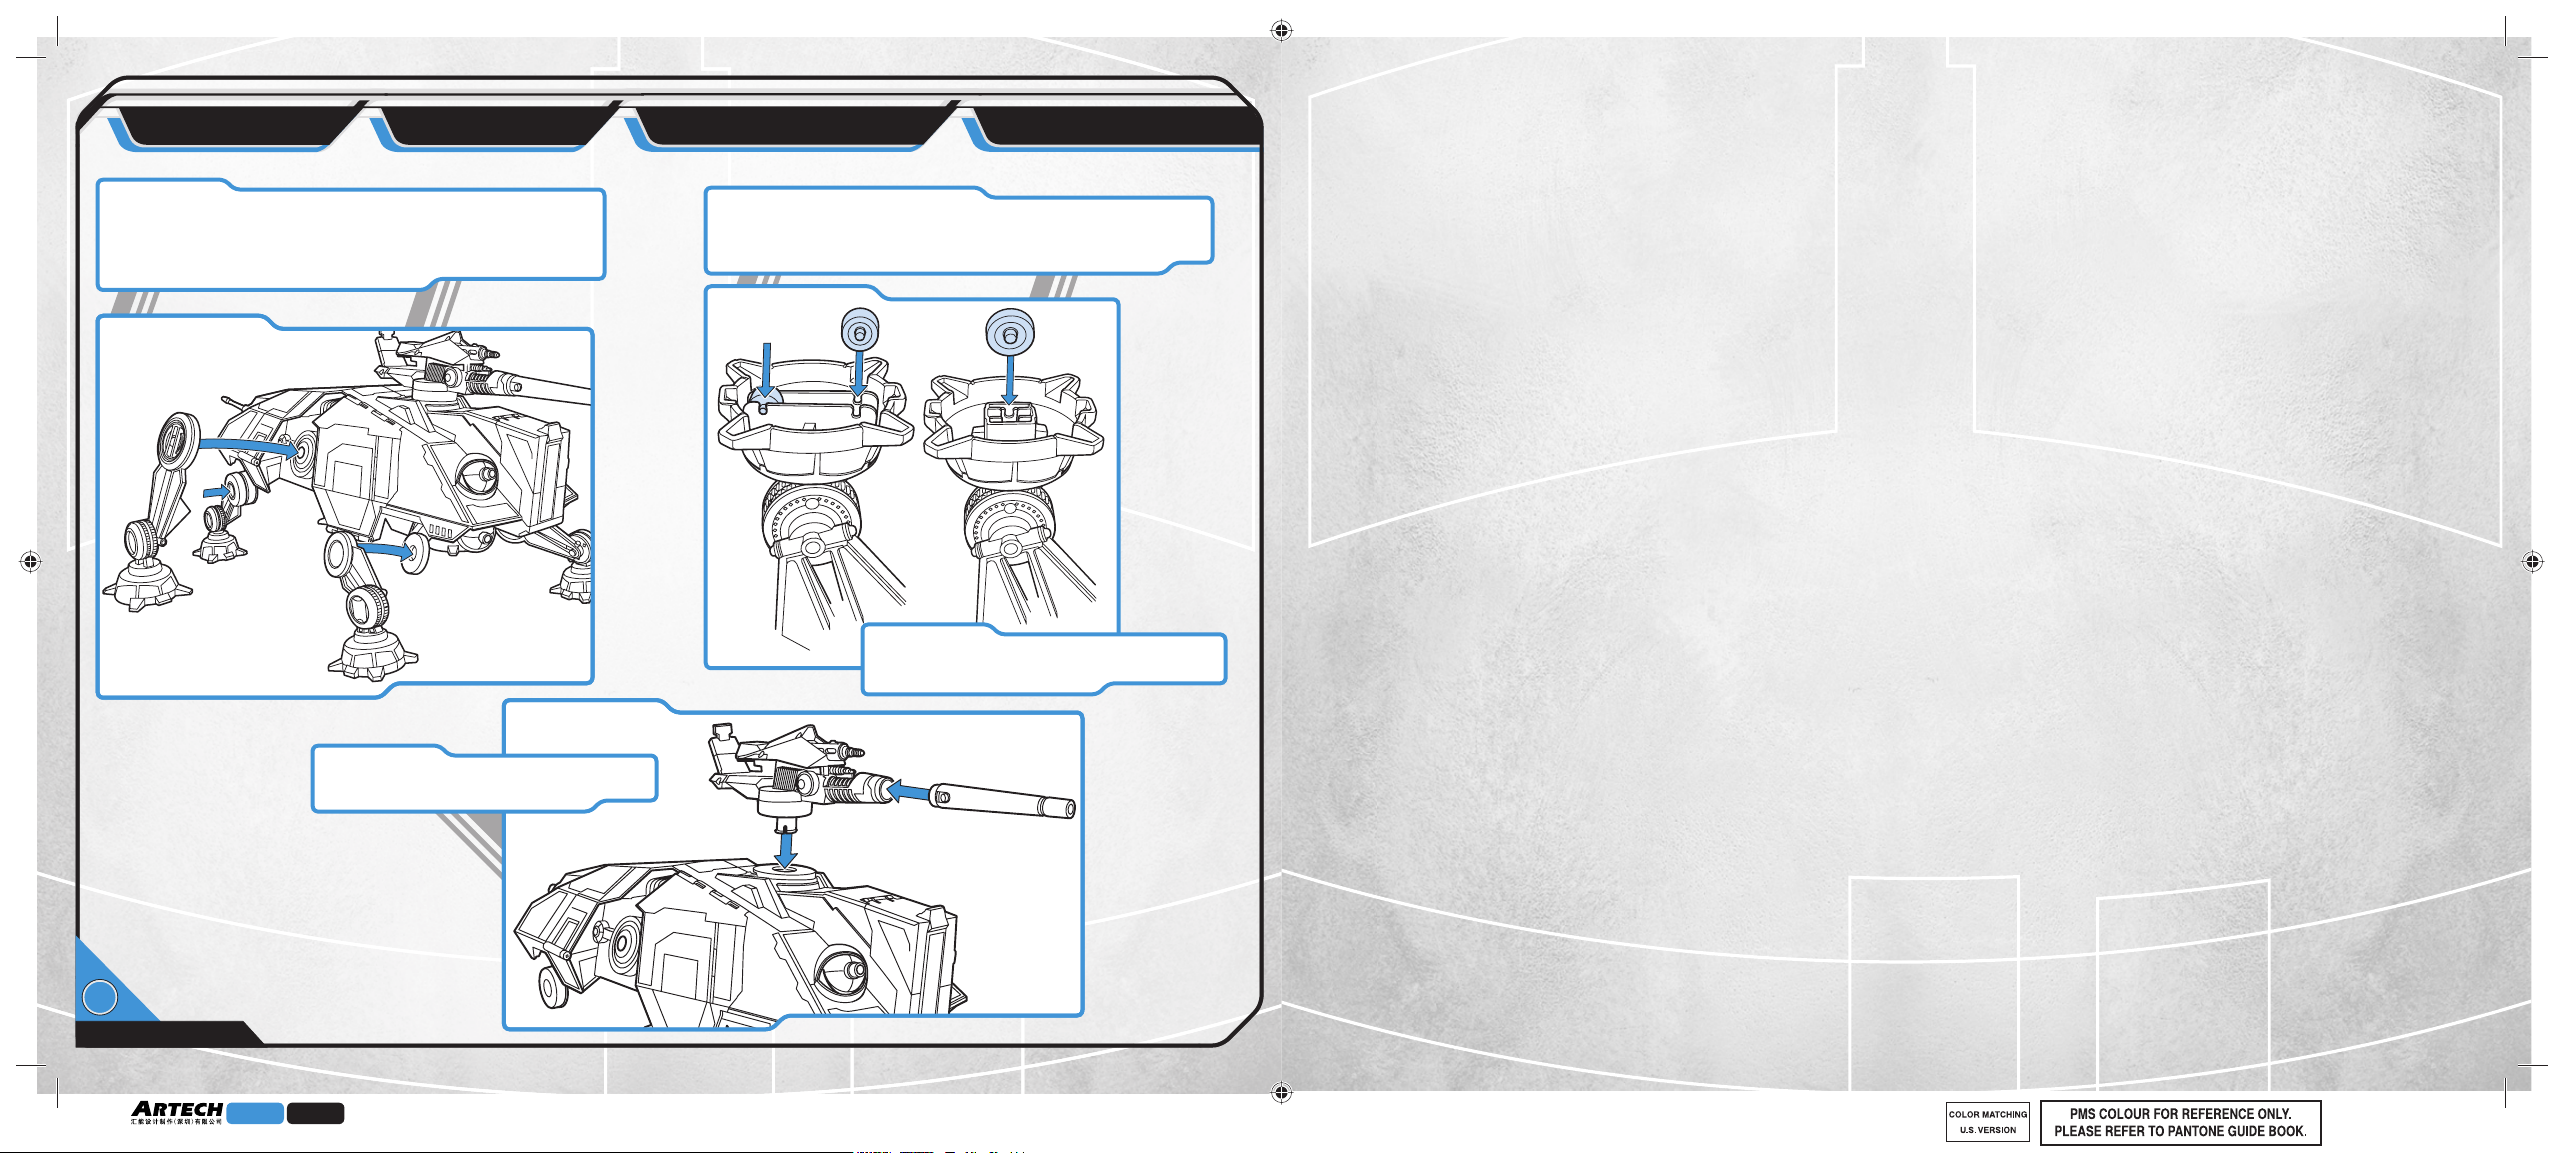
1
Attach legs as shown in illustration, referencing
engraved leg positions and illustration. Note:
The engraved leg positions (”ML” etc.) can be
found on the inside of each leg.
Optional: Snap wheels into undersides of feet.
(If you wish to remove the wheels for display
purposes, have an adult help with removal.)
Legs are articulated to pose them
in different positions.
Attach main cannon to vehicle.
Attach barrel to cannon.
5008(87603_87629_SW_CW_AT-TE.indd)2007-11-0566(1)/Tomy/2007-12-13/CN_Mac7/ER_Creo_EP10600
7461 K
Page 3

SWITCHESOPERATION
ASSEMBLY
BATTERIES
9
Switch #4
Press switch to hear a phrase. Keep pressing
switch to cycle through the phrases:
”All forward positions are advancing.”
”Approaching droid perimeter. We are
undetected.”
”All units fire at will.”
”All units attack.”
”The droid army is in full retreat.”
Switch #3
Long Press: ”All units fire at will”
phrase, targeting screen light and
weapon blast sounds.
Short Press: Weapon blast sounds
and targeting screen light.
Switch #5
Press to hear vehicle walking sounds.
Switch #6
Press to auto-deploy hatch with
accompanying hatch-opening
sounds and hear ”Move out, let’s
go” phrase.
5008(87603_87629_SW_CW_AT-TE.indd)2007-11-0566(1)/Tomy/2007-12-13/CN_Mac7/ER_Creo_EP10600
7461 K
Peel and apply labels as shown.
To access interior, press button
(see page 5). For location names
and visual references, see page 7.
Underneath Rear
Hatch Button
Back Wall of
Rear Hatch
5
Left
4
Right
Cockpit Interior
Right
Left
Cockpit Exterior
2
1
2
8
7
3
9
6
Page 4

SWITCHESOPERATION
ASSEMBLY
BATTERIES
8
The vehicle has 6 switches. For switches
1, 2, and 3, press them for different time
lengths to activate different features:
Long Press = press and hold, then release
Short Press = press/release quickly
Switch #1
Long Press: Battle station alarm and
targeting screen light.
Short Press: Small cannon light,
targeting screen light, and weapon
blast sounds.
Switch #2
Long Press: ”Fire at will” phrase,
blasting sounds, main cannon light
and targeting screen light.
Short Press: Weapon blast sounds,
main cannon light and targeting
screen light.
5008(87603_87629_SW_CW_AT-TE.indd)2007-11-0566(1)/Tomy/2007-12-13/CN_Mac7/ER_Creo_EP10600
7461 K
SWITCHESOPERATION
ASSEMBLY
BATTERIES
3
TO INSERT BATTERIES
Using a Phillips/cross head screwdriver (not
included), loosen screw in battery compartment
door (screw remains attached to door). Remove
door. Insert 3 x 1.5V “AA” or R6 size batteries
(not included). Alkaline batteries recommended.
Replace door and tighten screw.
2
1
Page 5

SWITCHESOPERATION
ASSEMBLY
BATTERIES
7
Inside figure support bars are
removable. Open area can be used
for accessories (not included).
Built-in blaster racks hold
weapons (includes 1 blaster;
others not included).
Foot pegs are located on ramp, stairs and troop
compartment to hold figures in place. (Includes
1 figure; others sold separately)
To replace them, insert end into
wall, then attach it to the floor.
5008(87603_87629_SW_CW_AT-TE.indd)2007-11-0566(1)/Tomy/2007-12-13/CN_Mac7/ER_Creo_EP10600
7461 K
CAUTION:
TO AVOID BATTERY LEAKAGE
1. Be sure to insert the batteries correctly and always follow the toy and battery manufacturers’ instructions;
2. Do not mix old and new batteries or alkaline, standard (carbon-zinc) or rechargeable (nickel-cadmium) batteries;
3. Always remove weak or dead batteries from the product.
CAUTION:
1. Always follow the instructions carefully. Use only batteries specified and be sure to insert them correctly by matching
the + and – polarity markings.
2. Do not mix old batteries and new batteries, or standard (carbon-zinc) with alkaline batteries.
3. Remove exhausted or dead batteries from the product.
4. Remove batteries if product is not to be played with for a long time.
5. Do not short-circuit the supply terminals.
6. Should this product cause, or be affected by, local electrical interference, move it away from other electrical equipment.
Reset (switching off and back on again or removing and re-inserting batteries) if necessary.
7. RECHARGEABLE BATTERIES: Do not mix these with any other types of battery. Always remove from the product before
recharging. Recharge batteries under adult supervision. DO NOT RECHARGE OTHER TYPES OF BATTERIES.
4
IMPORTANT: BATTERY INFORMATION
Please retain this information for future reference.
Batteries should be replaced by an adult.
Page 6

SWITCHESOPERATION
ASSEMBLY
BATTERIES
Insert projectile into main
cannon. Press button to fire.
To close side doors, close
upper section of doors first,
then close lower section.
2
1
Side doors open and 4 figures can fit inside.
(Includes 1 figure; others sold separately.)
6
Front ball turrets are linked together:
rotate any one turret and the other
three will automatically follow. The four
turrets can still be independently aimed.
Insert barrels into front and back ball
turrets. Press buttons to fire. These
turrets can be manually rotated.
5008(87603_87629_SW_CW_AT-TE.indd)2007-11-0566(1)/Tomy/2007-12-13/CN_Mac7/ER_Creo_EP10600
7461 K
SWITCHESOPERATION
ASSEMBLY
BATTERIES
5
Slide switch to ”on” position. When finished
playing with toy, please remember to slide
switch to ”off” position.
Press button to open rear hatch – all 3
hatch doors will open automatically.
Close hatch doors manually.
Cockpit opens and can
hold one figure.
 Loading...