

Page 1
Not suitable for children
under 3 years because of
small parts - choking hazard.
x3
BATTERIES REQUIRED
1.5VAA/R6 size
Alkaline batteries recommended.
Phillips/cross head screwdriver (not
included) needed to insert batteries.
NOT INCLUDED
x3
BATTERIES REQUIRED
1.5VAA/R6 size
Alkaline batteries recommended.
Phillips/cross head screwdriver (not
included) needed to insert batteries.
NOT INCLUDED
FCC Statement:
This equipment has been tested and found to comply with the limits for a Class B digital device, pursuant to part
15 of the FCC Rules. These limits are designed to provide reasonable protection against harmful interference
in a residential installation. This equipment generates, uses and can radiate radio frequency energy, and, if not
installed and used in accordance with the instructions, may cause harmful interference to radio communications.
However, there is no guarantee that interference will not occur in a particular installation. If this equipment does
cause harmful interference to radio or television reception, which can be determined by turning the equipment off
and on, the user is encouraged to try to correct the interference by one or more of the following measures:
• Reorient or relocate the receiving antenna.
• Increase the separation between the equipment and receiver.
• Consult the dealer or an experienced radio/TV technician for help.
CAUTION: Changes or modifications not expressly approved by the party responsible for compliance could void
the user’s authority to operate the equipment.
Millennium Falcon
Some assembly required.
AGES 4
87591/87636 Asst.
™
+
Product and colors may vary.
© 2007 Lucasfilm Ltd. & ® or TM where indicated. All rights reserved.
®* and/or TM* & © 2007 Hasbro. All Rights Reserved.
TM & ® denote U.S. Trademarks.
*
P/N 6819130000
Page 2
ASSEMBLY
1
2
3
14
16 22
7
17
8
12
26
28
13
27
29
24
18
15
19
23
4
5
6
9
25
20
21
10
11
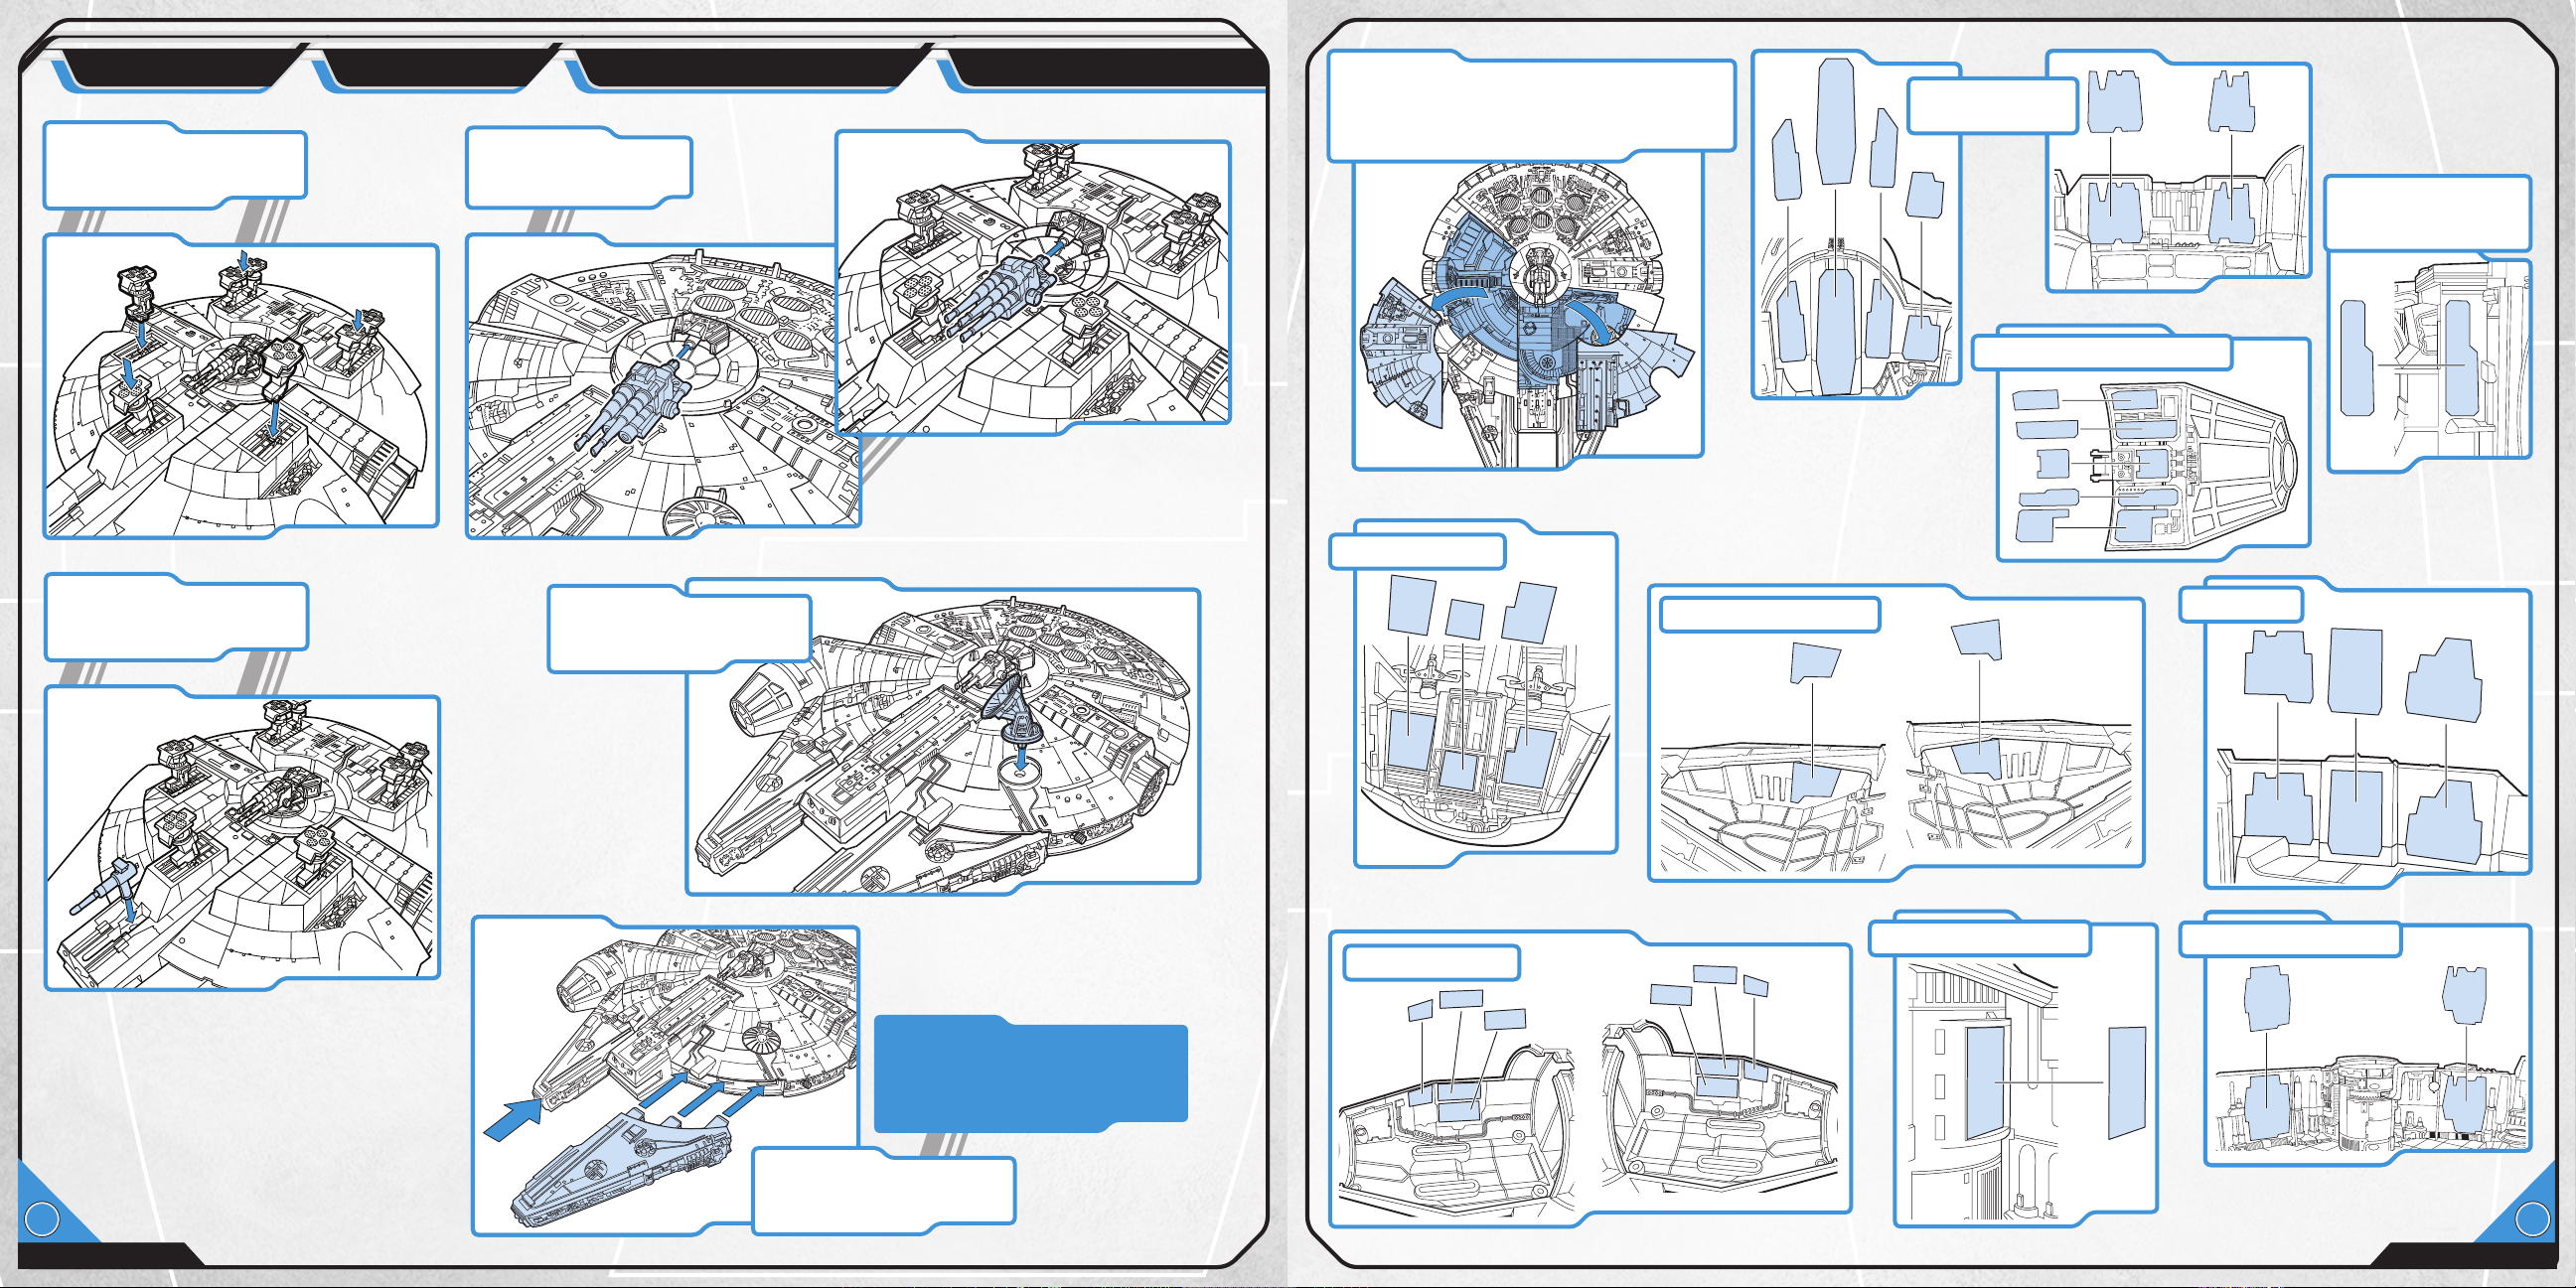
Attach landing gear as
shown, noting right and
left positioning.
BATTERIES
Attach laser
cannons to top and
bottom of vehicle.
TOP
EXTERIOR FEATURES
BOTTOM
INTERIOR FEATURES
Peel and apply labels as shown. To
access interior, remove panels (see
page 8). For location names and visual
references, see pages 9-10.
Cockpit Interior
Interior - Near
Boarding Ramp
Training Probe
Area - Underneath
Laser Cannon
Cockpit Canopy Interior
Attach laser cannon.
1
Medic Bay
Training Probe Area
Attach sensor dish.
Mini-Fighter Interior
Under Satellite Dish
Cockpit Interior
NOTE: These are a one-time
fit; please make sure you are
attaching them correctly
– refer to illustration.
Attach left and right
forward mandibles.
2
Page 3
ASSEMBLY
BATTERIES
EXTERIOR FEATURES
INTERIOR FEATURES
ASSEMBLY
BATTERIES
EXTERIOR FEATURES
INTERIOR FEATURES
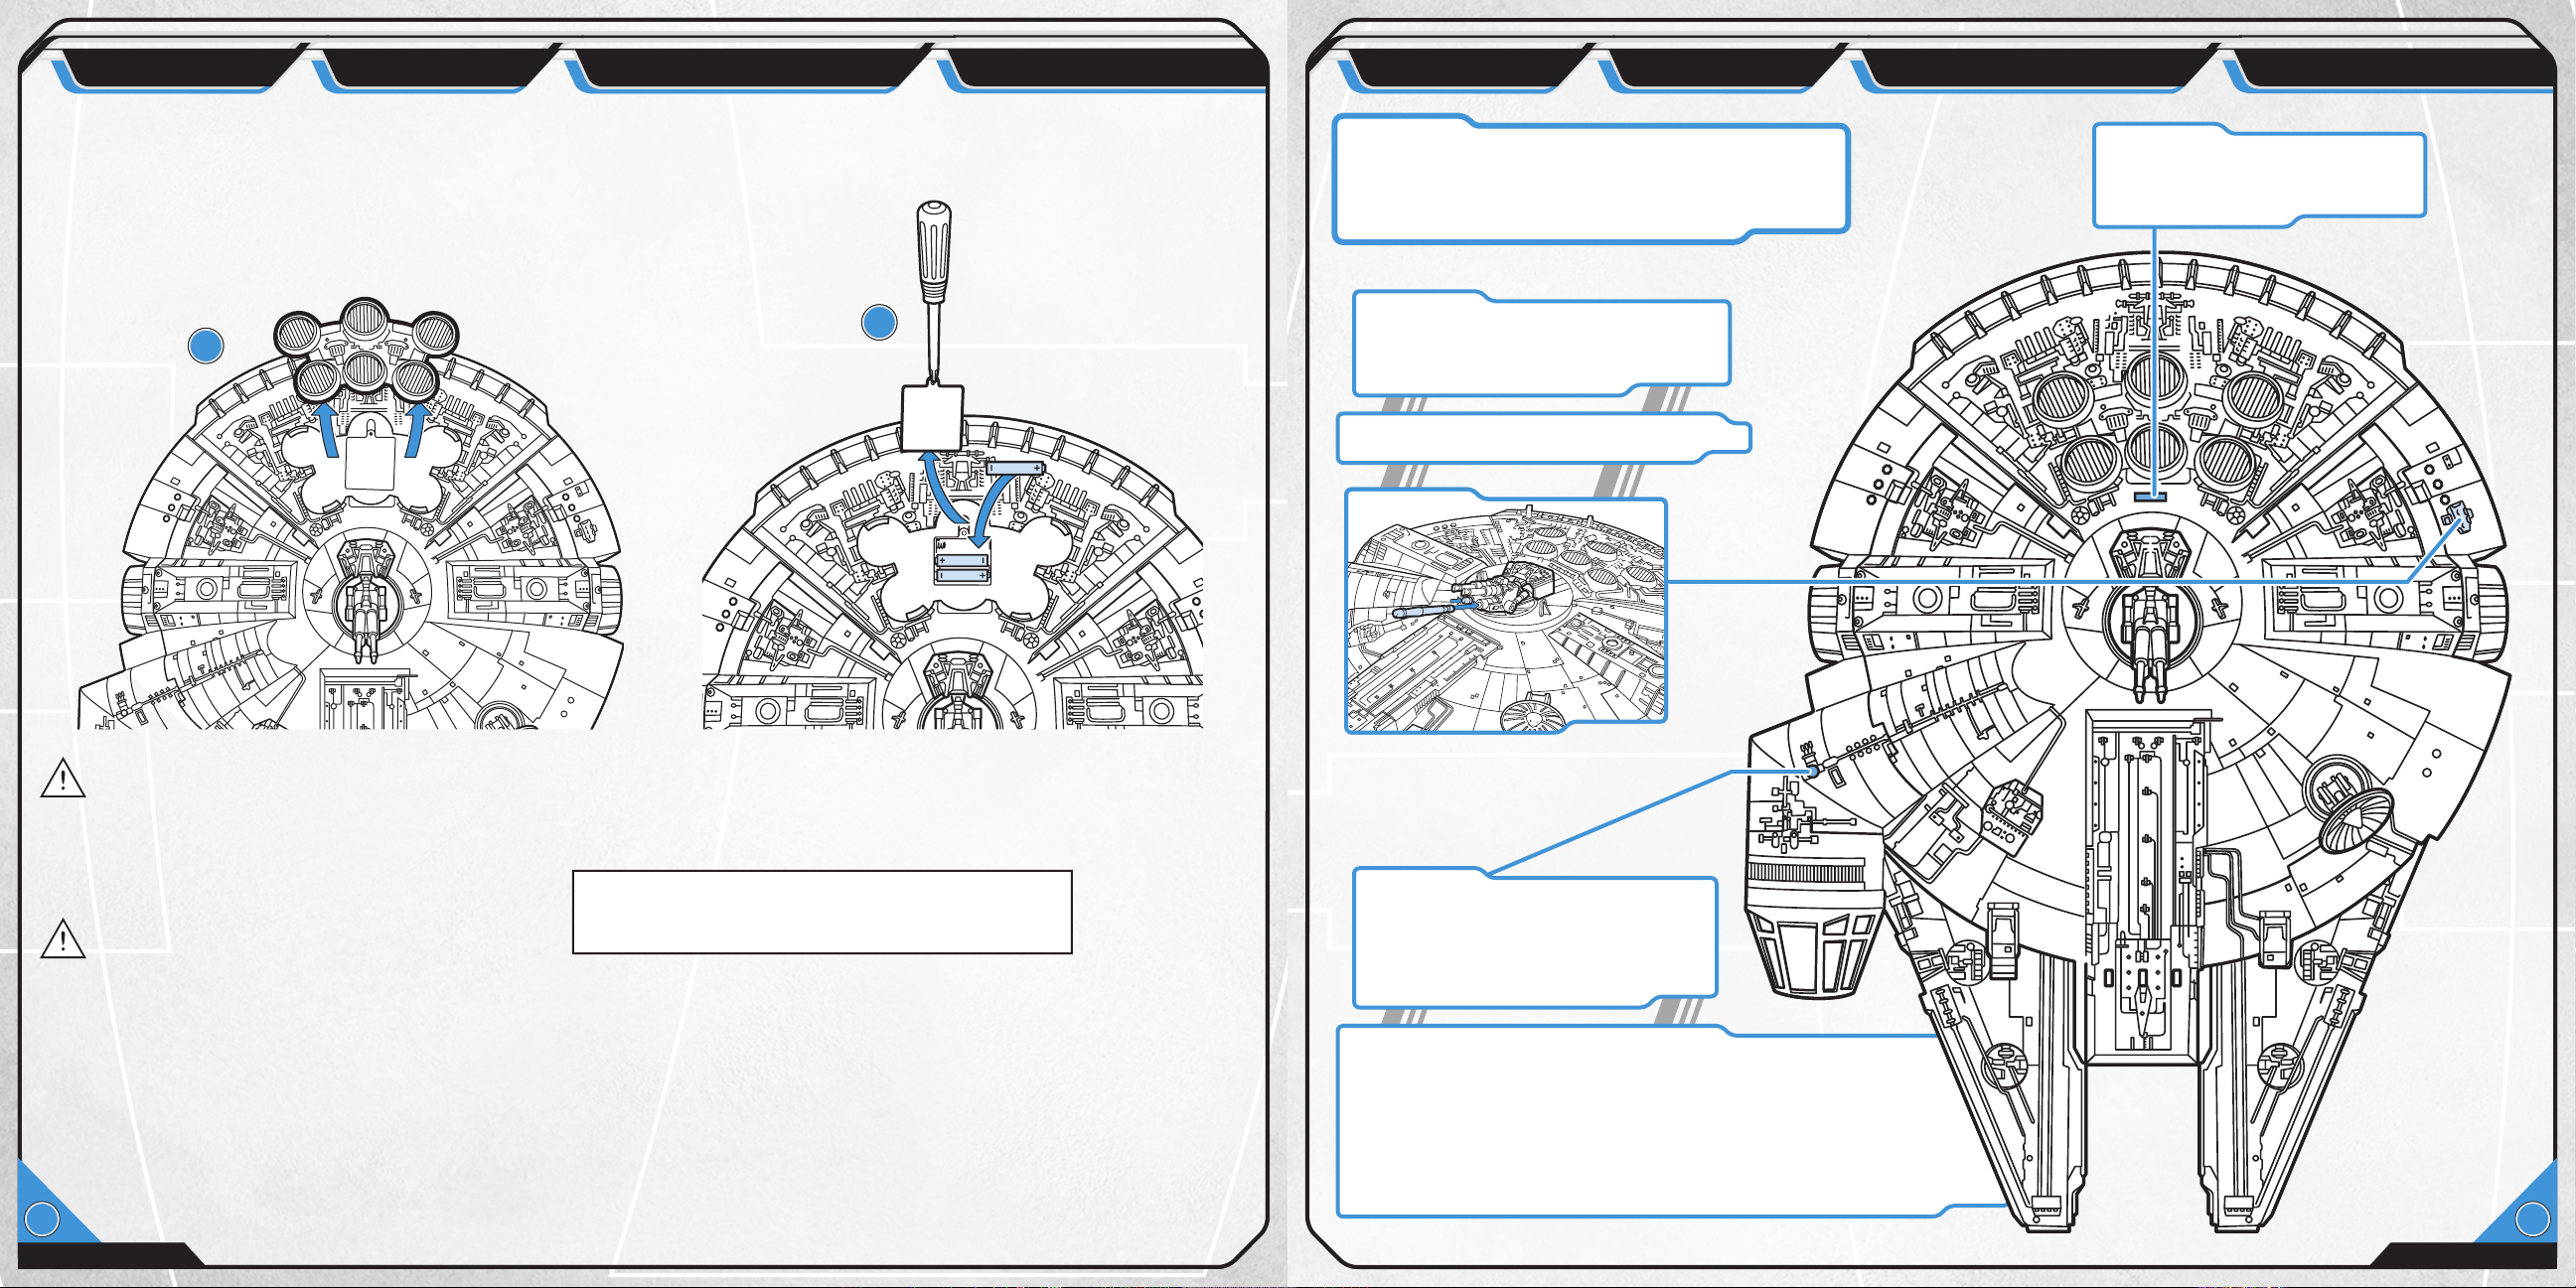
TO INSERT BATTERIES:
Squeeze hooks to remove cover. Using a Phillips/cross
head screwdriver (not included), loosen screw in battery
compartment door (screw remains attached to door).
Remove door. Insert 3 x 1.5V “AA” or R6 size batteries
(not included). Alkaline batteries recommended. Replace
door and tighten screw. Replace cover
1
Switch Activation: The vehicle has 13 switches.
For switches 1, 3, 5, and 6, press them for different
time lengths to activate different features:
Short-press = press/release quickly
Long-press = press and hold, then release
Switch #2
2
Laser cannon: Insert missiles into cannon.
Slide switch to rotate cannon and activate
firing sounds. When cannon hits tabs, the
missiles will automatically fire.
Note: Interchangeable projectiles will fit into
all the working launchers on this vehicle.
Switch #13
On/Off: Slide switch to ”On” position.
When finished playing with toy,
slide switch to ”off” position to help
conserve battery life.
CAUTION:
1. Be sure to insert the batteries correctly and always follow the toy and battery manufacturers’ instructions;
2. Do not mix old and new batteries or alkaline, standard (carbon-zinc) or rechargeable (nickel-cadmium) batteries;
3. Always remove weak or dead batteries from the product.
TO AVOID BATTERY LEAKAGE
IMPORTANT: BATTERY INFORMATION
Please retain this information for future reference.
CAUTION:
1. Always follow the instructions carefully. Use only batteries specified and be sure to insert them correctly by matching the + and – polarity markings.
2. Do not mix old batteries and new batteries, or standard (carbon-zinc) with alkaline batteries.
3. Remove exhausted or dead batteries from the product.
4. Remove batteries if product is not to be played with for a long time.
5. Do not short-circuit the supply terminals.
6. Should this product cause, or be affected by, local electrical interference, move it away from other electrical equipment. Reset (switching off and
back on again or removing and re-inserting batteries) if necessary.
7. RECHARGEABLE BATTERIES: Do not mix these with any other types of battery. Always remove from the product before recharging. Recharge
batteries under adult supervision. DO NOT RECHARGE OTHER TYPES OF BATTERIES.
3
Batteries should be replaced by an adult.
Switch #1
Startup: Short-press switch to activate
startup sequence (lights, sounds). The
sequence will randomly ”fail,” re-creating
the
Falcon
in the movies; if it ”fails,” short-press
switch again to activate startup.
Long-press switch to hear these phrases:
”She may not look like much, but she’s got it where it counts, kid.”
”Chewie, get us out of here!”
”What’s that flashing?”
”We’re losing the deflector shield.”
”Go strap yourselves in; I’m going to make the jump to lightspeed.”
”You’re all clear, kid.”
”Let’s blow this thing and go home!”
”Great shot, kid. That was one in a million.”
”Come on, come on! Switch over. Let’s hope we don’t have a burnout.”
’s infamous ”breakdowns”
4
Page 4
ASSEMBLY
BATTERIES
EXTERIOR FEATURES
INTERIOR FEATURES
ASSEMBLY
BATTERIES
EXTERIOR FEATURES
INTERIOR FEATURES
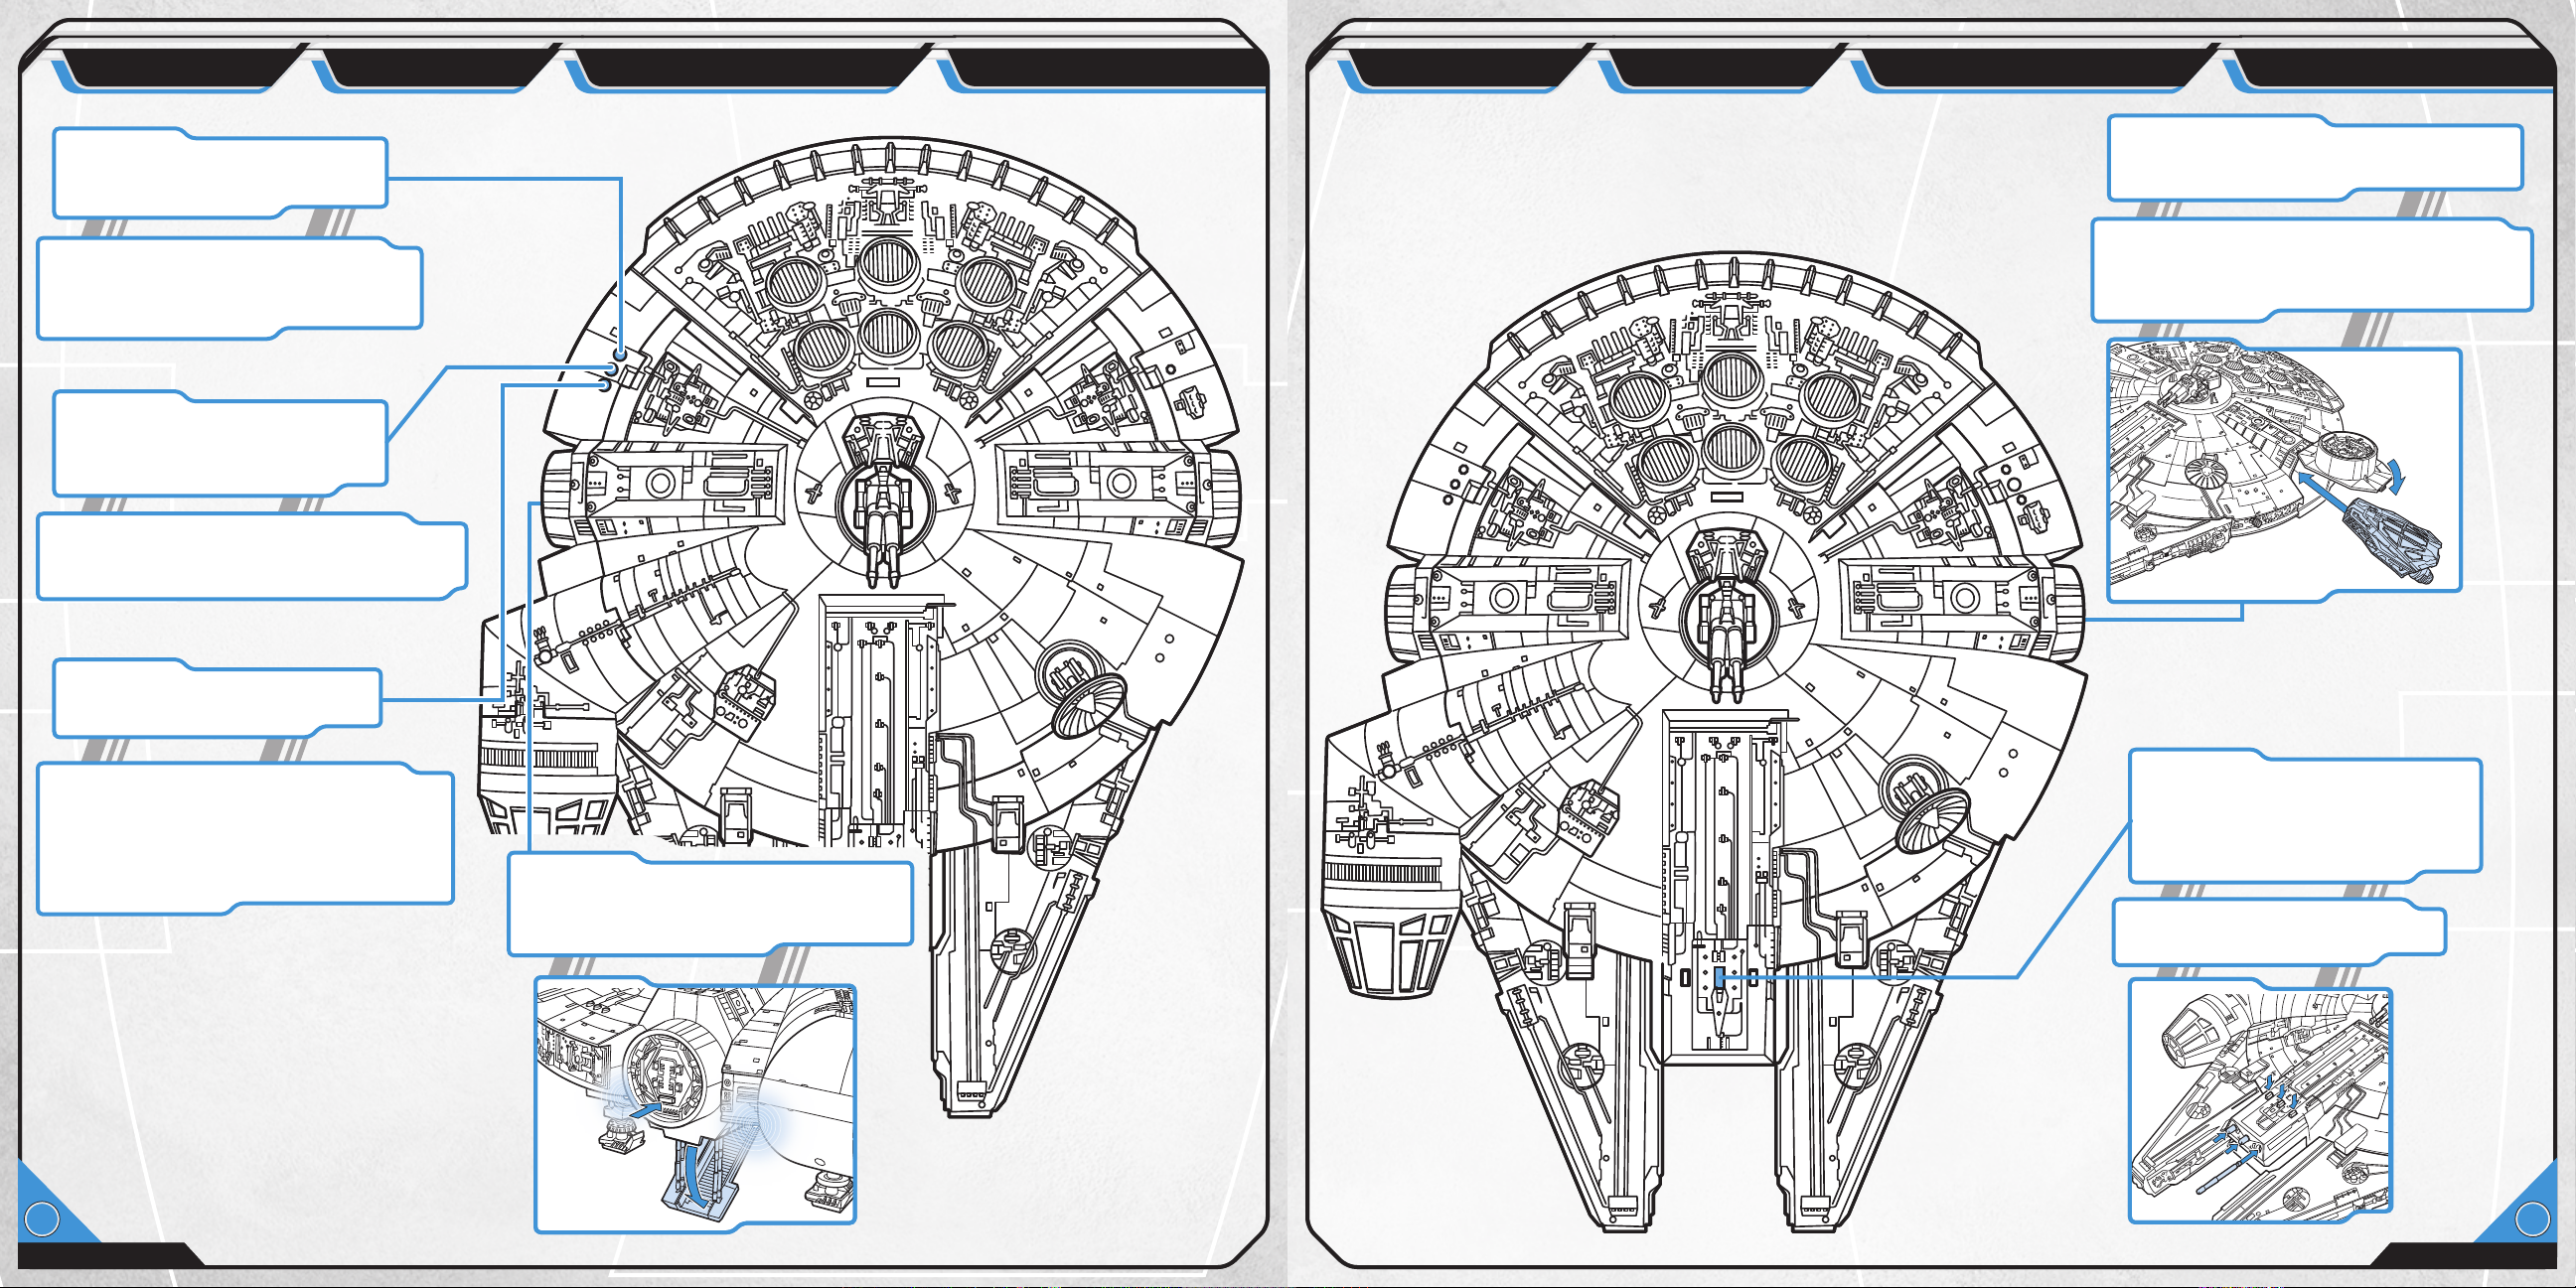
Switch #8
Fly-by: If engine is on (already playing
cruise sounds), pressing this switch
will activate fly-by sound.
If engine is not on (if vehicle is switched
on but Switch #1 Startup has not been
pressed), pressing this switch will
activate startup sequence (lights and
sounds) and cruise sound.
Switch #7
Boost/cruise: If engine is on (already
playing cruise sounds), pressing the
switch will activate boost sounds,
engine lights and cruise sounds.
If engine is not on (if vehicle is switched on
but Switch #1 Startup has not been pressed),
pressing this switch will activate startup
sequence (lights and sounds) and cruise sound.
Switch #6
Battle sounds/dialogue: Short-press
switch to hear cannon firing sounds.
Switches #11 & #12
Docking bay: These switches are automatically
activated when you insert or remove the minifighter or close the hatch.
• Manually open hatch and place mini-fighter all
the way inside bay to activate docking sounds.
• Close the hatch for hatch closing sounds.
• Open the hatch and remove the mini-fighter
for escape sounds.
Long-press switch to hear these phrases:
”Hold them off. Angle the deflector shields
while I charge up the main guns!”
”Okay, stay sharp!”
”Don’t worry, she’ll hold together.”
”Got him! I got him!”
”Great kid, don’t get cocky.”
”That’s it! We did it!”
5
Switch #9
Auto-open boarding ramp: Press switch
– ramp will lower automatically accompanied
by sounds and lights. To close, manually raise
ramp until it latches in place.
Switch #10
Missiles: Insert missiles into launcher.
Press button to fire center missile and
hear firing sounds. Firing sounds will
repeat each time you press the switch,
even when no missile is in the launcher.
Press the other 2 buttons to fire
remaining 2 missiles (they do not
make sounds when fired).
6
Page 5
ASSEMBLY
BATTERIES
EXTERIOR FEATURES
INTERIOR FEATURES
ASSEMBLY
BATTERIES
EXTERIOR FEATURES
INTERIOR FEATURES
Fighter:
Insert missile into launcher on minifighter and press button to fire.
Sensor dish: Turn
knob to rotate dish.
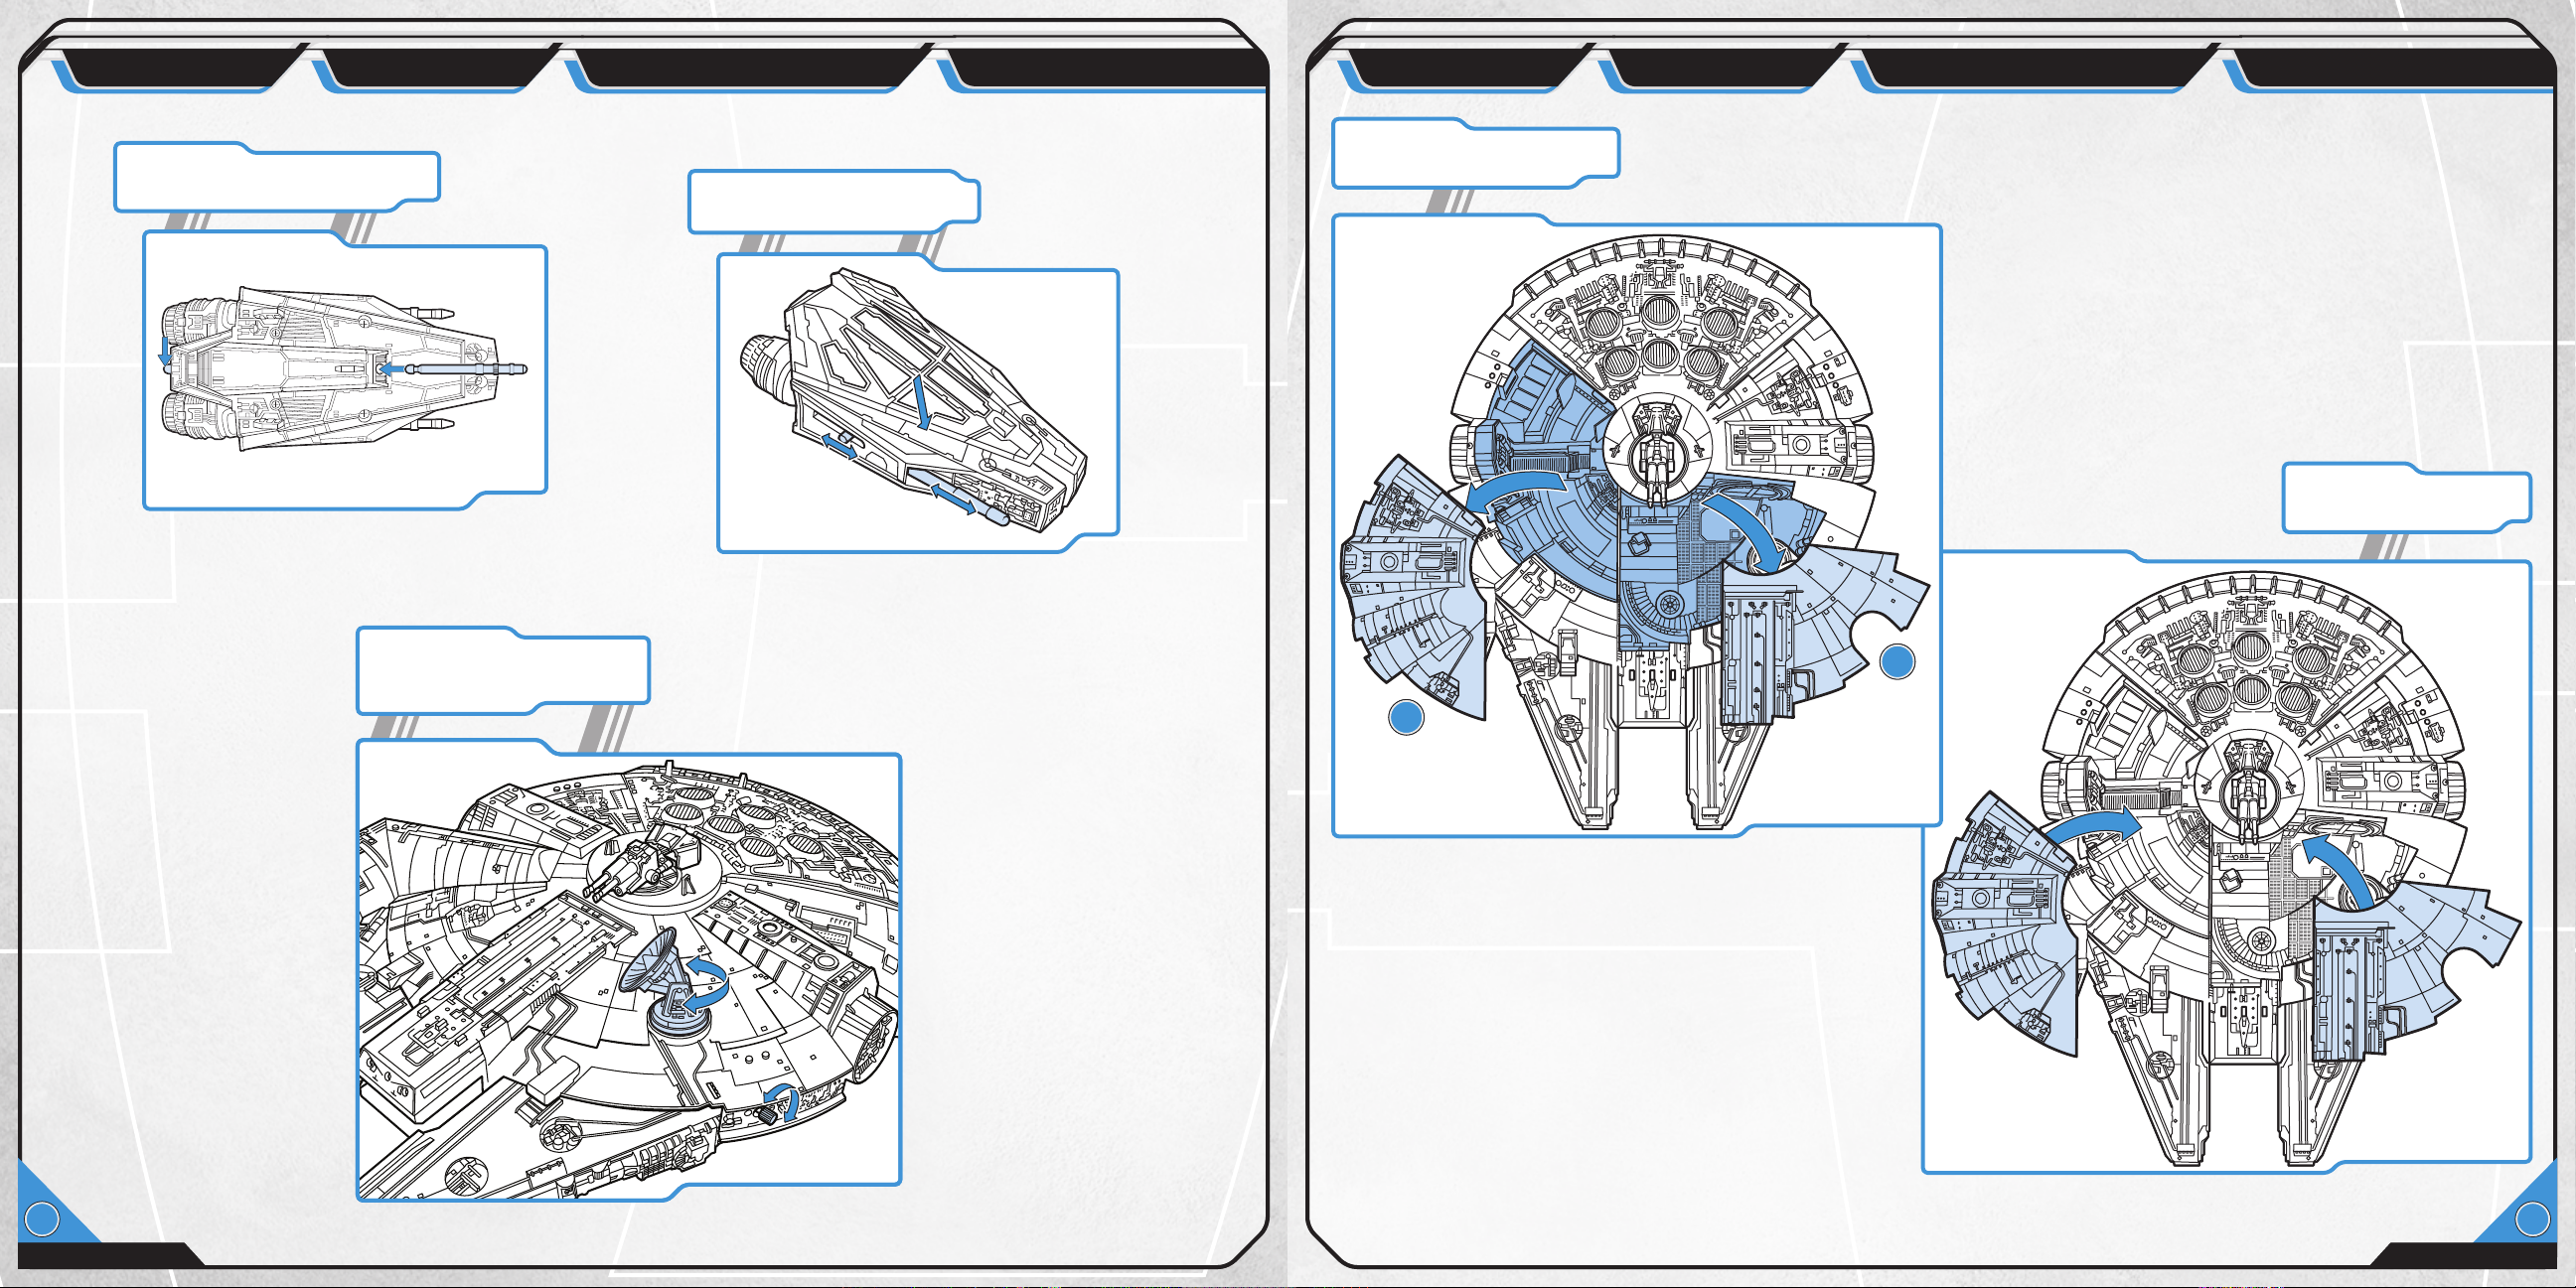
To access interior: Remove
2 covers on top of vehicle.
Slide button on either side of
mini-fighter to make non-firing
missiles extend and retract.
To replace covers, attach
side A first, then side B.
2
1
SIDE B
7 8
SIDE A
Page 6
ASSEMBLY
BATTERIES
EXTERIOR FEATURES
INTERIOR FEATURES
ASSEMBLY
BATTERIES
EXTERIOR FEATURES
INTERIOR FEATURES
Switch #3
Dejarik table: Short-press switch to activate table light
and hear a sound/phrase. Keep short-pressing the
switch to cycle through the Wookiee sounds, R2-D2
sounds, and the following phrases:
”It’s not wise to upset a Wookiee.”
”I suggest a new strategy, Artoo: let the Wookiee win.”
Long-press switch – all the sounds and phrases will
play at once.
Switch #5
Training dialogue: Short-press switch to hear
training sounds and the following phrases:
”With the blast shield down, I can’t even see. How
am I supposed to fight?”
”You see, you can do it.”
”You’ve taken your first step into a larger world.”
Long-press to activate R2-D2 sounds, vehicle
lights and sounds, and the following phrases:
”Artoo, come back at once! You don’t know how
to fix the hyperdrive.”
”You did it!”
Switch #4
Training probe: Push knob in to activate
training sounds. Turn knob to rotate
arm and make probe move.
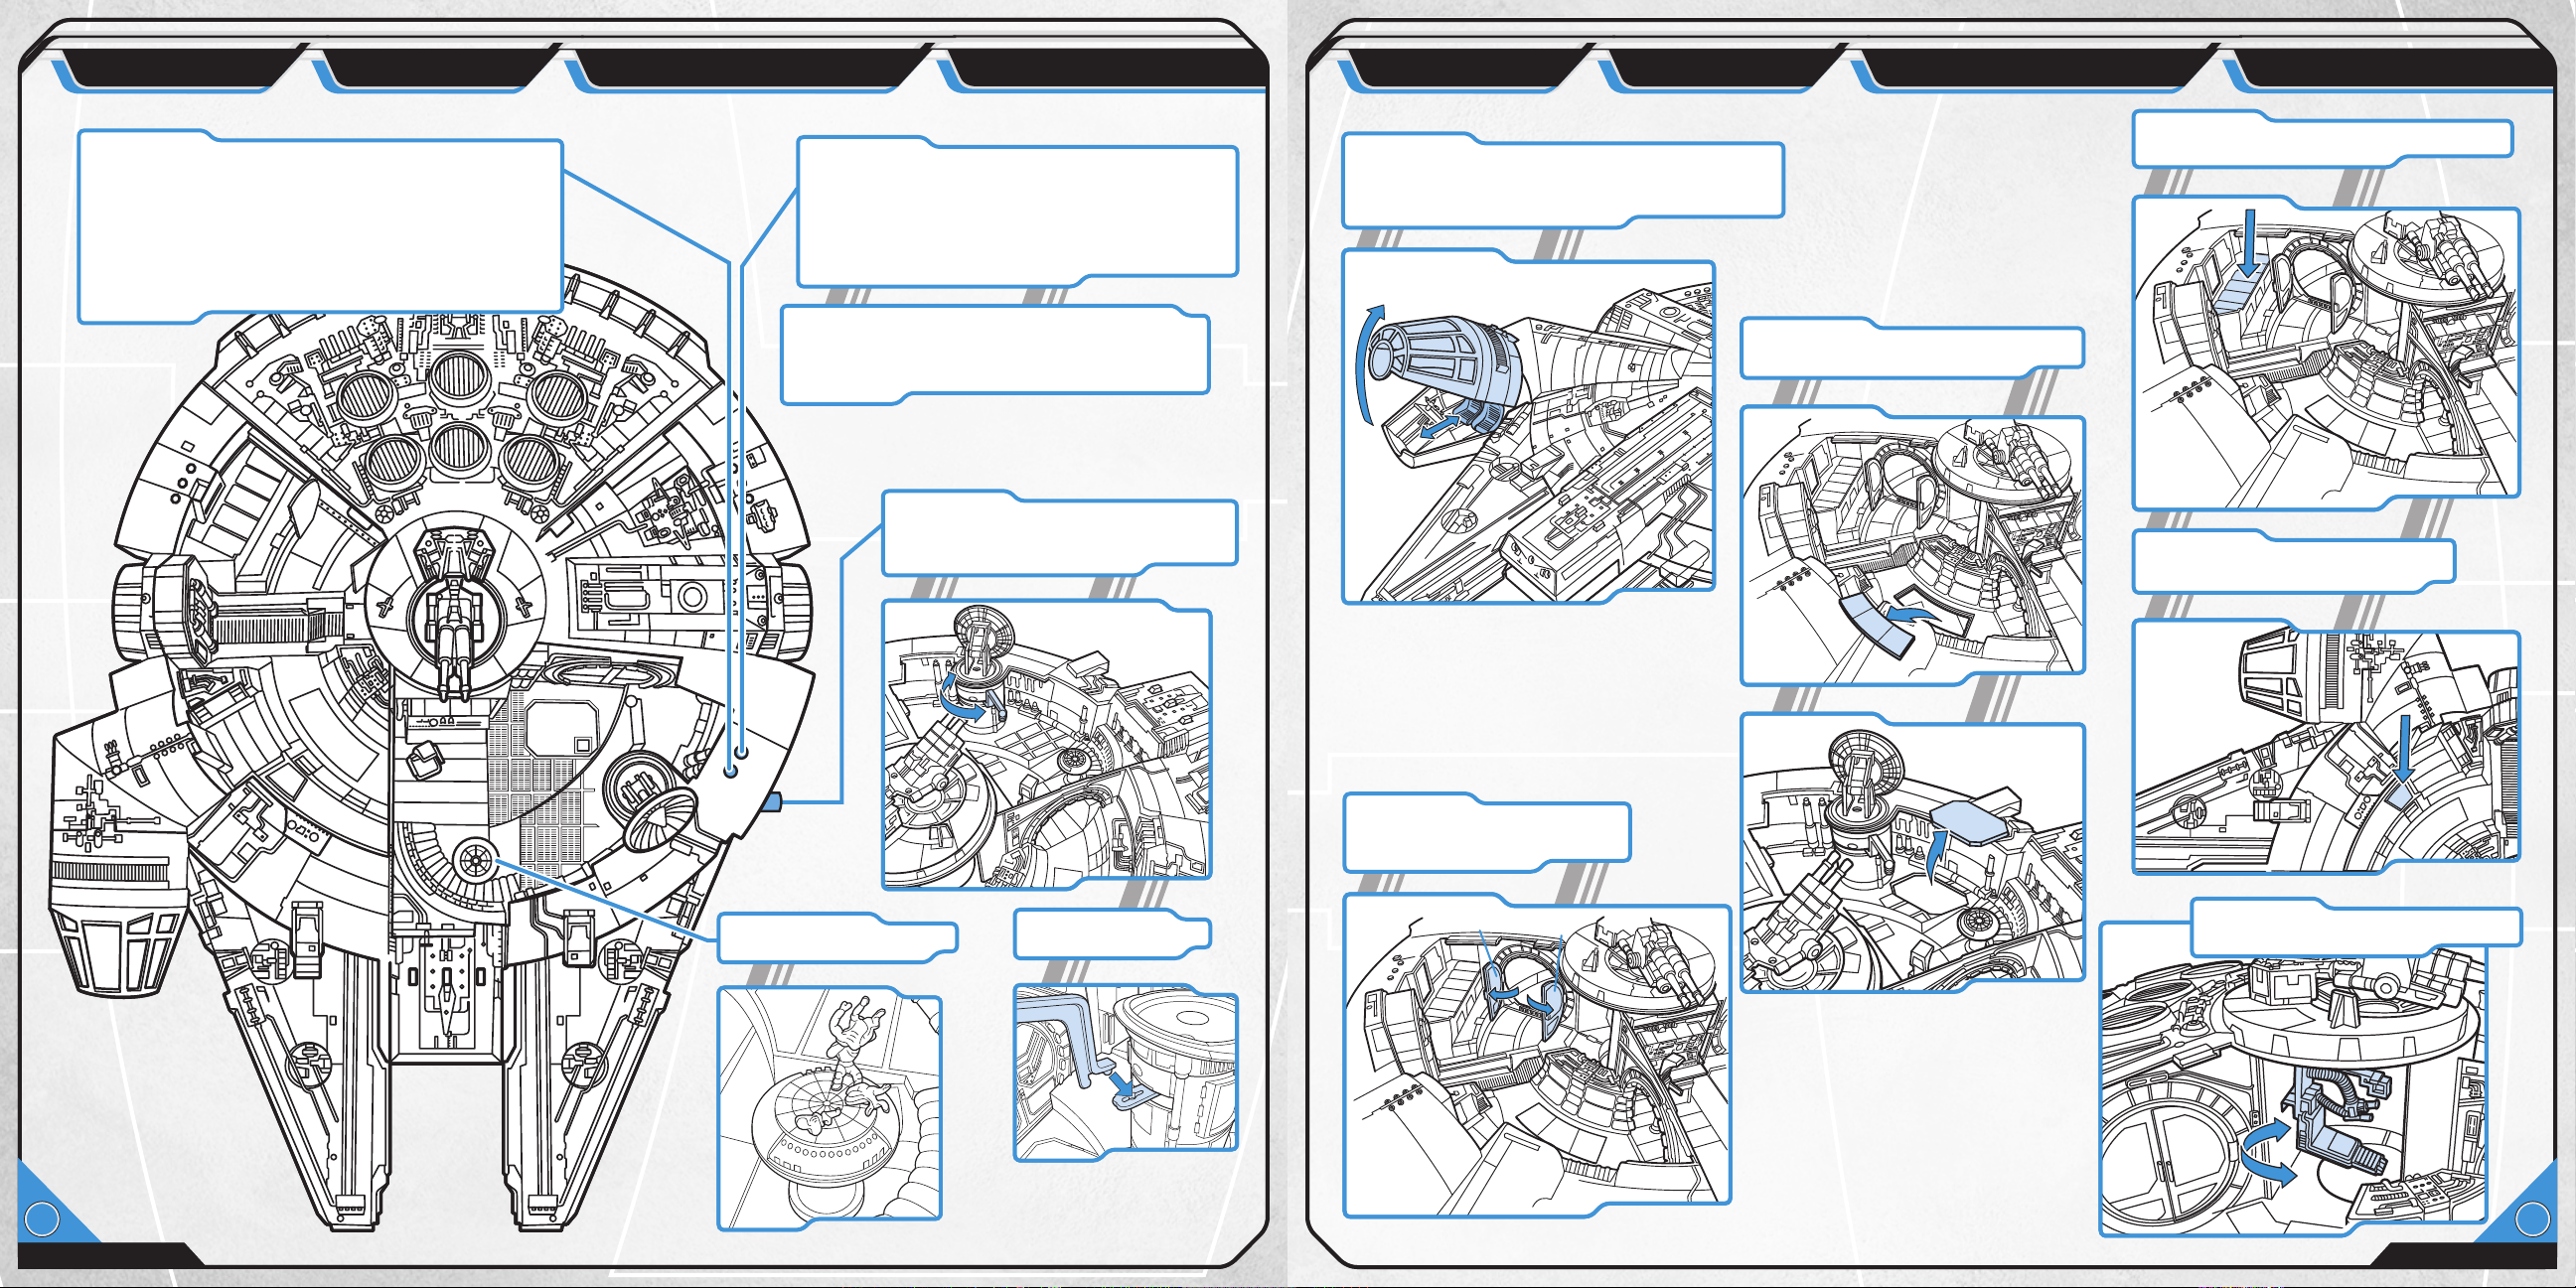
Cockpit: Manually lift cockpit; it can hold 4 figures
Medical Bay: Figure can be placed in bay.
(2 figures included; others sold separately).
Front seats adjust forward and backward to
accommodate different figures.
Smuggler’s compartments: Lift panels
in floor to reveal compartments.
Storage bin can hold gas masks or
other accessories (not included).
Doors: See illustration to locate
doors ”A” and ”B” that open to
reveal storage areas.
Figures attach to
Dejarik table as shown.
Assemble training
remote as shown.
A
B
9
Laser cannon seat: Seat moves back
and forth as turret moves.
10
 Loading...