

Page 1

SAFETY INFORMATION
Your wireless hand-held portable transceiver contains a low power transmitter. When the
Push-to-Talk (PTT) button is pushed it sends out radio frequency (RF) signals. The device
is authorized to operate at a duty factor not to exceed 50%. In August 1996, the Federal
Communications Commissions (FCC) adopted RF exposure guidelines with safety levels for
hand-held wireless devices.
CAUTION: To maintain compliance with the FCC’s RF exposure guidelines hold the
transmitter and antenna at least 2 inches (5 centimeters) from your face and speak in a normal
voice, with the antenna pointed up and away from the face.
Use only the supplied antenna. Unauthorized antennas, modifications, or attachments could
damage the transmitter and may violate FCC regulations.
Warning: Adjustment to this unit or replacement of any transmitter component (crystal,
semiconductor, etc.) to this unit could result in a violation of the rules.
FCC STATEMENT
This device complies with part 15 of the FCC Rules. Operation is subject to the following two
conditions: (1) This device may not cause harmful interference, and (2) this device must accept
any interference received, including interference that may cause undesired operation.
This equipment has been tested and found to comply with the limits for a Class B digital device,
pursuant to part 15 of the FCC Rules. These limits are designed to provide reasonable protection
against harmful interference in a residential installation. This equipment generates, uses and can
radiate radio frequency energy, and, if not installed and used in accordance with the instructions,
may cause harmful interference to radio communications. However, there is no guarantee that
interference will not occur in a particular installation. If this equipment does cause harmful
interference to radio or television reception, which can be determined by turning the equipment
off and on, the user is encouraged to try to correct the interference by one or more of the
following measures:
- Reorient or relocate the receiving antenna.
- Increase the separation between the equipment and the receiver.
- Consult the dealer or an experienced radio/TV technician for help.
Product and colors may vary.
© 2005 Hasbro. All Rights Reserved.
TM & ® denote U.S. Trademarks.
72970 Asst. PN XXXXXX0000
for new products and offers
Questions? Call 1-800-327-8264
72970 Asst.
AGES 8+
75028 Asst.
Communicator
Thank you for purchasing the
CHATNOW Communicator. Be
sure to read and follow all
instructions carefully before
using this product.
CHATNOW is the only 3-in-1
personal communicator designed
just for you! Now you can chat
with your friends up to 2 miles
away, send them text messages,
and take their photos! Store
30 photos to your electronic
buddy list and when your
friends call, their photo pops
up! You can even customize or
animate the photos to make your
friends look funky!
Each Communicator requires 4 x 1.5V “AAA” alkaline batteries
(not included). Phillips/cross head screwdriver (not included)
needed to insert batteries.
FLIP-OUT
COMMUNICATOR
SLIDE-OUT
COMMUNICATOR
Page 2

TABLE OF CONTENTS
Product Features & Control Keys
WRITE YOUR PERSONAL BUDDY # HERE: ___________________________________________________
Product Features & Control Keys ........Page 1
Installing the Batteries ..........................Page 2
Low Battery Indicator ...........................Page 3
Important Tips .......................................Page 4
Personal Buddy # ................................Page 4
Selecting a Channel ............................Page 4
Compatibility with other
FRS 2-way radios ................................Page 4
Chat Zone™ Communication Range..Page 4
Getting Started ......................................Page 5
Turning On/Off.....................................Page 5
Resetting .............................................Page 5
Basic Navigation .................................Page 5
Main Menu ..........................................Page 6
Tips......................................................Page 6
Chat Mode..............................................Page 6
Selecting a Channel ............................Page 6
How to Talk .........................................Page 6
How To Listen......................................Page 6
Call Mode ...............................................Page 7
Calling a New Number ........................Page 7
Calling a Buddy ...................................Page 7
Text Messaging......................................Page 8
How to use the keypad .......................Page 8
Writing a new text message................Page 8
Using a preset text message ..............Page 8
Sending a text message .....................Page 8
Saving a text message........................Page 8
Editing a text message........................Page 8
Viewing your Inbox ..............................Page 9
Viewing your Outbox ...........................Page 9
Viewing your Sent mail ........................Page 9
Inserting a Symbol ..............................Page 9
Receiving a text message ...................Page 9
Saving a received text message .........Page 10
Deleting a text message......................Page 10
Forwarding a text message.................Page 10
Replying to a text message ................Page 10
Digital Camera .......................................Page 10
Taking a photo..................................... Page 10
Saving a photo to your album.............Page 11
Saving a photo to your buddy list .......Page 11
Deleting a photo ..................................Page 11
Animating a photo ...............................Page 11
Adding text to a photo ........................ Page 12
Adding props to a photo.....................Page 12
Buddy List ..............................................Page 12
Calling a buddy ...................................Page 13
Accessing your buddy’s info ...............Page 13
Adding a buddy ...................................Page 13
Editing a buddy ...................................Page 13
Deleting a buddy .................................Page 13
Personal Settings ..................................Page 14
Setting your name ............................... Page 14
Viewing your personal
buddy #................................................Page 14
Setting your birthday ...........................Page 14
Customized Settings.............................Page 15
Selecting a Ring Tone .........................Page 15
Selecting a Screen Saver ....................Page 15
Selecting a Text Message Alert...........Page 15
Controlling the Contrast ......................Page 15
Setting the Time ..................................Page 16
Setting the Date ..................................Page 16
Checking the Battery Level.................Page 16
Muting the Sound................................ Page 16
Volume Setting.......................................Page 16
Accessories ...........................................Page 17
Carry Case/Faceplates........................Page 17
Earpiece ..............................................Page 17
Troubleshooting Guide..........................Page 17
Safety Information
FCC Statement
Push To Talk
[PTT] Button
Earpiece Jack
(Earpiece sold
separately.)
Release
(slide-out
communicator
only.)
Control Pad (Left,
Right, Up, Down)
Digital
Camera
FOR BEST USE:
When using your CHATNOW Communicator
to talk to your friends, hold it in a vertical
position with the microphone 1 to 2 inches
away from your mouth.
Antenna
Speaker
Indicator
Light
LCD Screen
On/Off
Button
Cancel
Enter
Microphone
Keypad
Reset Button
1
Page 3

TO INSERT BATTERIES:
IMPORTANT: BATTERY INFORMATION
Please retain this information for future reference.
For each Communicator, use a
Phillips/cross head screwdriver
to loosen the screw in the battery
compartment cover (screw stays
attached to cover). Remove cover.
Insert 4 x 1.5V “AAA” alkaline
batteries (not included). Replace
cover and tighten screw.
CAUTION: TO AVOID BATTERY LEAKAGE
1. As with all small batteries, the batteries used with this toy should
be kept away from small children who still put things in their
mouths. If they are swallowed, promptly see a doctor and, in the
U.S., have the doctor phone (202) 625-3333 collect, or, in Canada,
have the doctor call your provincial Poison Control Centre.
2. Make sure the batteries are inserted correctly and always follow the
toy and battery manufacturers’ instructions;
3. Do not mix old batteries and new batteries or alkaline, standard
(carbon zinc) or rechargeable (nickel-cadmium) batteries.
2 3
Batteries should be replaced by an adult.
CAUTION:
1. Always follow the instructions carefully. Use only batteries specified and be sure
to insert item correctly by matching the + and – polarity markings.
2. Do not mix old batteries and new batteries or standard (carbon-zinc) with alkaline
batteries.
3. Remove exhausted or dead batteries from the product.
4. Remove batteries if product is not to be played with for a long time.
5. Do not short circuit the supply terminals.
6. Should this product cause, or be affected by, local electrical interference, move it
away from other electrical equipment. Reset (switching off and back on again or
removing and re-inserting batteries) if necessary.
7. RECHARGEABLE BATTERIES: Do not mix these with any other types of batteries.
Always remove from the product before recharging. Recharge batteries under adult
supervision. DO NOT RECHARGE OTHER TYPES OF BATTERIES.
8. As with all small items, these batteries should be kept away from children. If
swallowed, seek medical attention immediately.
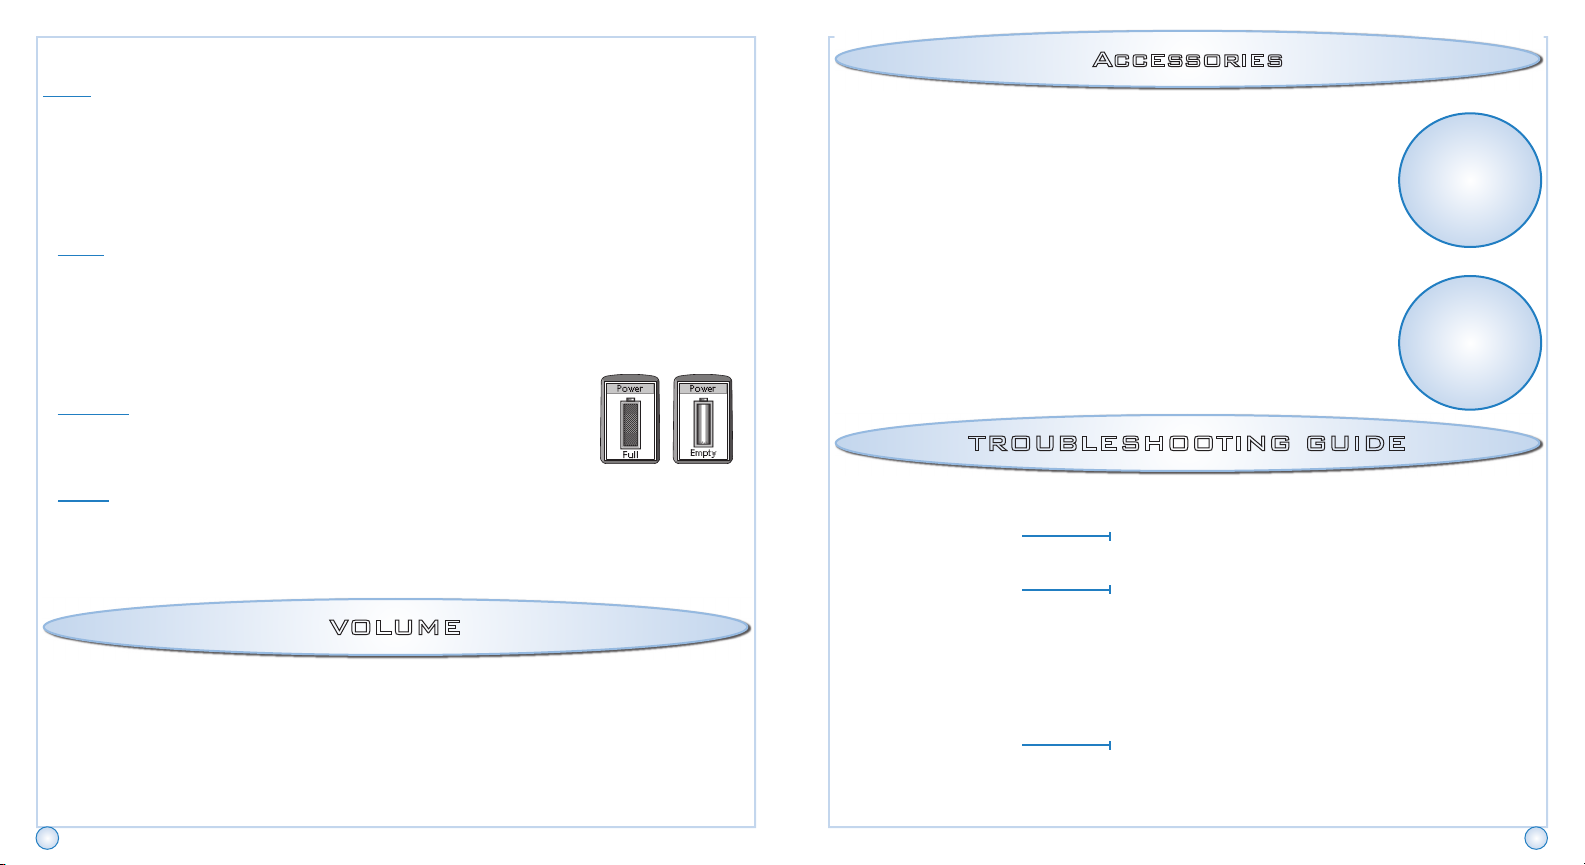
LOW BATTERY INDICATOR
Your CHATNOW Communicator features a Low Battery
Indicator which shows the battery charge level, from full
to empty. The indicator will pop up on your screen and
flash to alert you that it’s time to change the batteries.
You will also receive a on-minute warning before your
Communicator will turn off.
Page 4
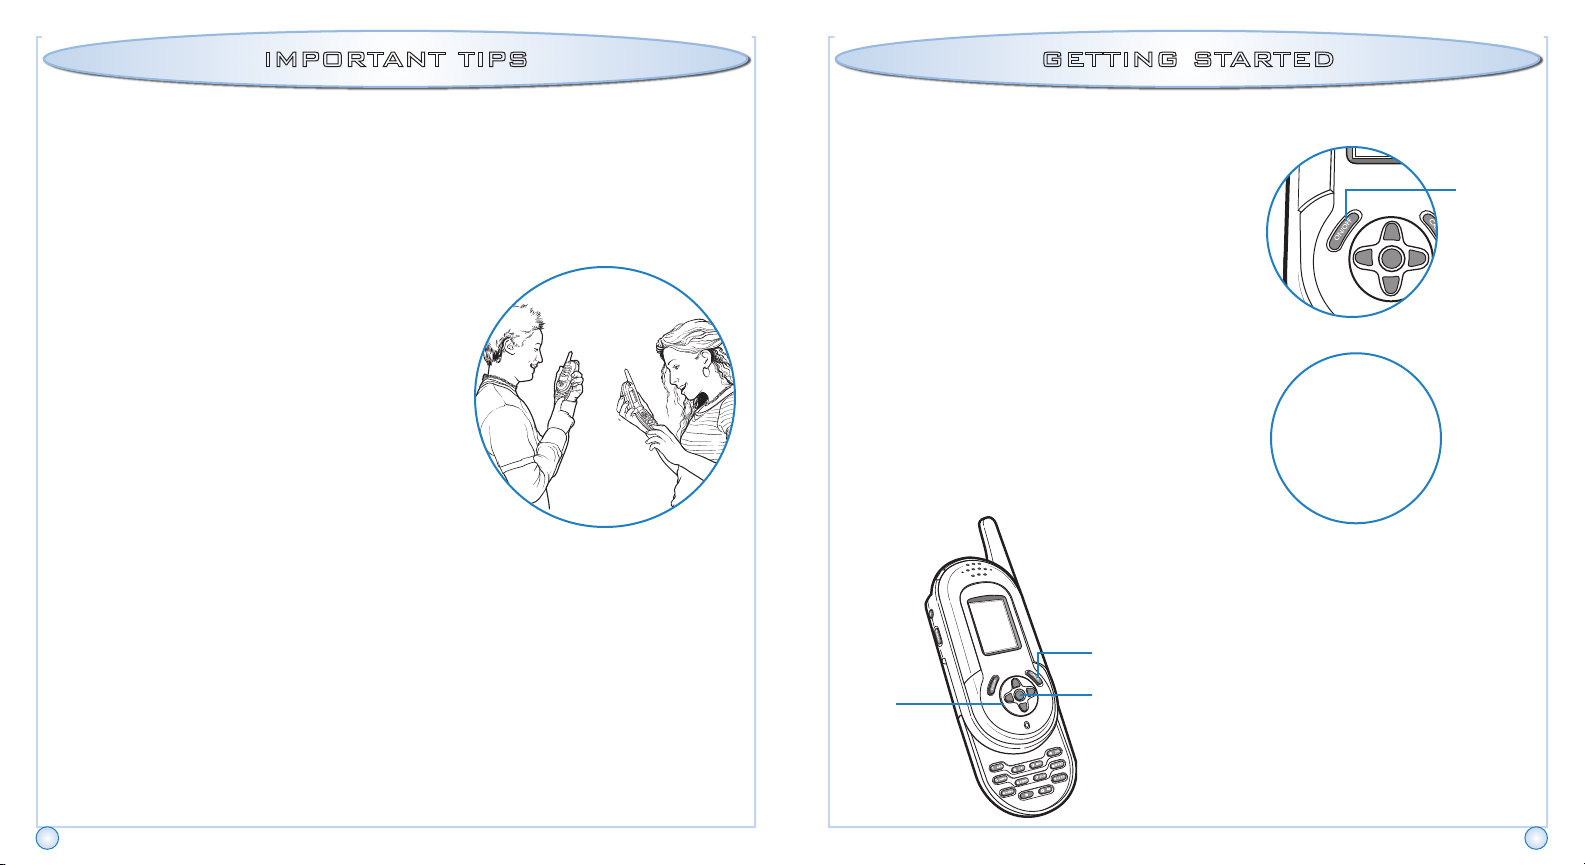
IMPORTANT TIPS GETTING STARTED
PERSONAL BUDDY #
Each CHATNOW Communicator has its own private, personal, 10-digit buddy
ID number. To find out what yours is, scroll to “PERSONAL” in the Main Menu
and then “MY BUDDY #”. Your personal buddy number will appear. Keep this
handy and exchange your number with your friends so that you can receive
calls and call friends directly.
SELECTING A CHANNEL
Your CHATNOW Communicator has 14
channels. Everyone you’re communicating with
has to be on the same channel. (So pick a
number that you’ll remember!)
COMPATIBILITY WITH OTHER
FRS 2-WAY RADIOS
Your CHATNOW Communicator may also be
compatible with some other FRS [Family Band
Radio Service] 2-way radios (walkie talkies) for
Chat Mode only. To use your CHATNOW communicator with another FRS 2-way
radio simply make sure both units are set to the same channel (1 –14).
CHAT ZONE COMMUNICATION RANGE
Your CHATNOW Communicator has a range of up to 2 miles. This is called
the CHAT ZONE. This means you can chat, call, and text message your
friends from up to 2 miles away based on an unobstructed line of sight, terrain
and conditions. Make sure to stay within the CHAT ZONE so your calls and
messages go through!
TURNING YOUR CHATNOW
COMMUNICATOR ON AND OFF
• Press the On/Off Button to turn the
CHATNOW Communicator ON.
• Press the On/Off Button to turn the
CHATNOW Communicator OFF.
RESETTING YOUR CHATNOW
COMMUNICATOR
In the event that your Communicator freezes up,
press the Reset Button once to reset it. You will
begin at the Main Menu.
BASIC NAVIGATION
• Use the Control Pad [^v<>
• Press ENTER to confirm your
• Press CANCEL to exit from
Control
Pad
Cancel
Enter
On/Off
Button
RESET
FPO
keys] to scroll to and select
an item.
selection.
your selection.
4 5
Page 5
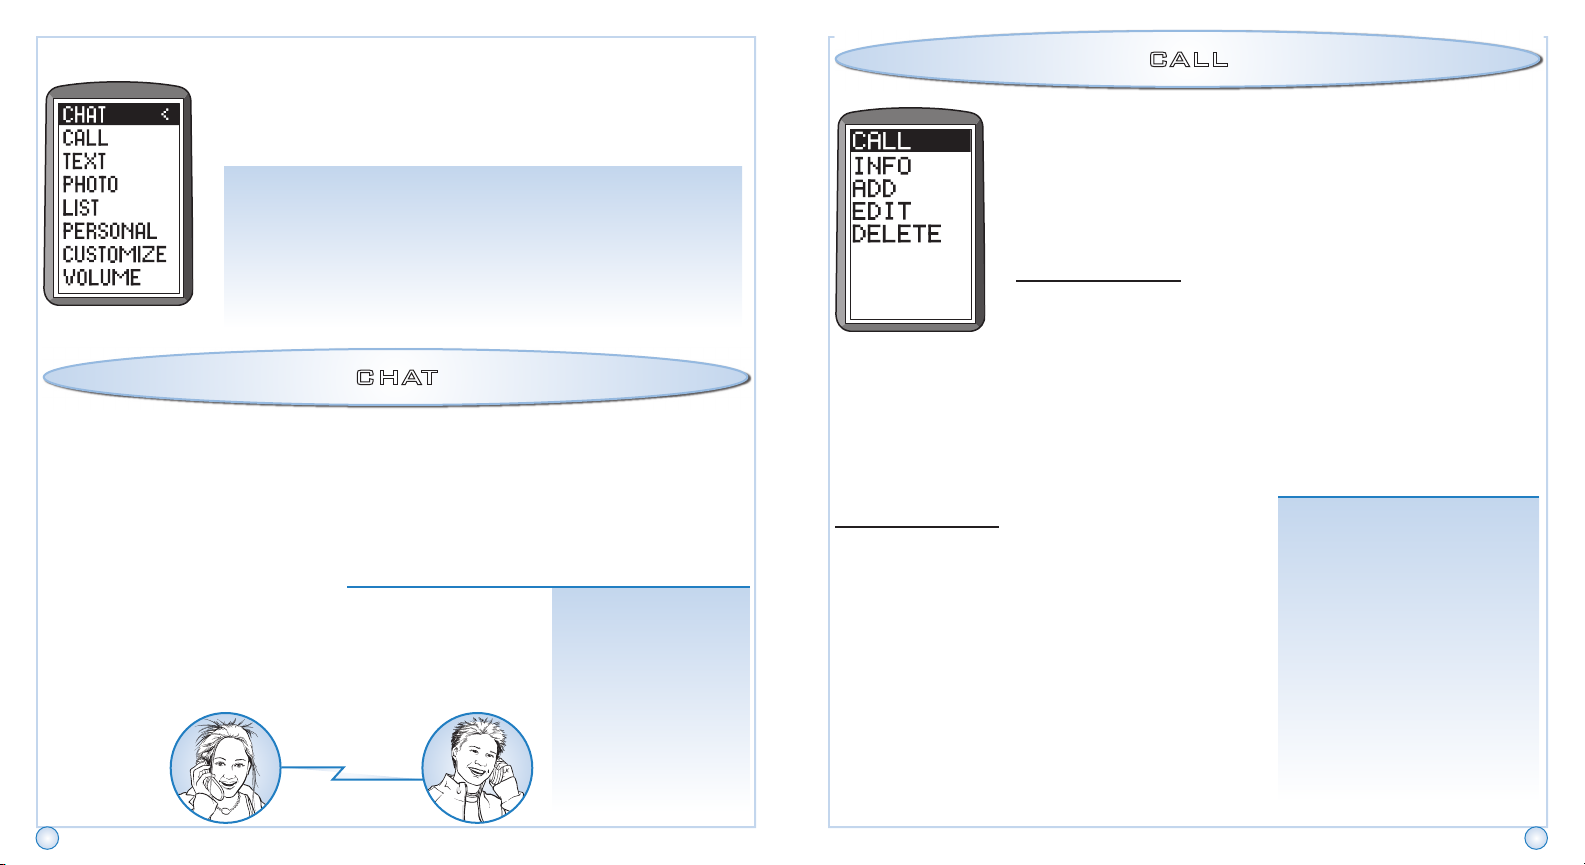
Main Menu
BEFORE YOU BEGIN USING YOUR
COMMUNICATOR, MAKE SURE TO
FOLLOW THE TIPS BELOW.
TIPS
MAKE SURE:
1. ALL THE COMMUNICATORS ARE TURNED ON.
2. ALL THE COMMUNICATORS ARE ON THE SAME
CHANNEL.
3. EVERYONE IS WITHIN THE CHAT ZONE (2 MILE RANGE).
CHAT
Start chatting with your friends! Use your
CHATNOW Communicator like a walkie talkie!
SELECTING A CHANNEL / HOW TO TALK / HOW TO
LISTEN
1. Scroll to “CHAT” on the Main Menu and press ENTER.
2. Select a channel by pressing
the ^ or v keys and press ENTER.
3. Press and hold the Push To Talk [PTT] button and start
chatting!
4. Release the [PTT] button to listen to what your friends are
saying.
5. Press CANCEL to exit your Chat and return to the
Main Menu.
TIP: Your
group of
friends must
all be on
the same
channel in
order to
chat.
CALL
Call one of your friends privately!
1. Scroll to “CALL” on the Main Menu and press ENTER.
2. Scroll to either “New Buddy?” if you wish to call a new buddy,
or “Buddy List” to select an existing buddy from your buddy list.
CALLING A NEW NUMBER
New Buddy:
- Enter your buddy’s 10-digit personal buddy number and press
ENTER.
- The screen will display “Calling…” and then “Connecting…”
- You will hear a ring.
- Once connected, press and hold the [PTT] button and start
talking!
- Release the [PTT] button to listen to what your friends are
saying.
CALLING A BUDDY
Buddy List:
- Select a buddy and press ENTER.
- The screen will display “Calling…” and then
“Connecting…”
- You will hear a ring.
- Once connected, your buddy’s photo will pop up
(if you have it saved). See Page 13 for how to
save a buddy’s # to your buddy list.
- Press and hold the [PTT] button and start talking!
- Release the [PTT] button to listen to what your
friends are saying.
NOTE: If the screen
displays “FAIL” try again.
Three things may have
happened:
1– Your friend may not have
his/her CHATNOW
Communicator on.
2– Your friend may have
traveled out of the 2-mile
range.
3– Your friend may not have
the channel set to the
same channel as yours.
6 7
Page 6
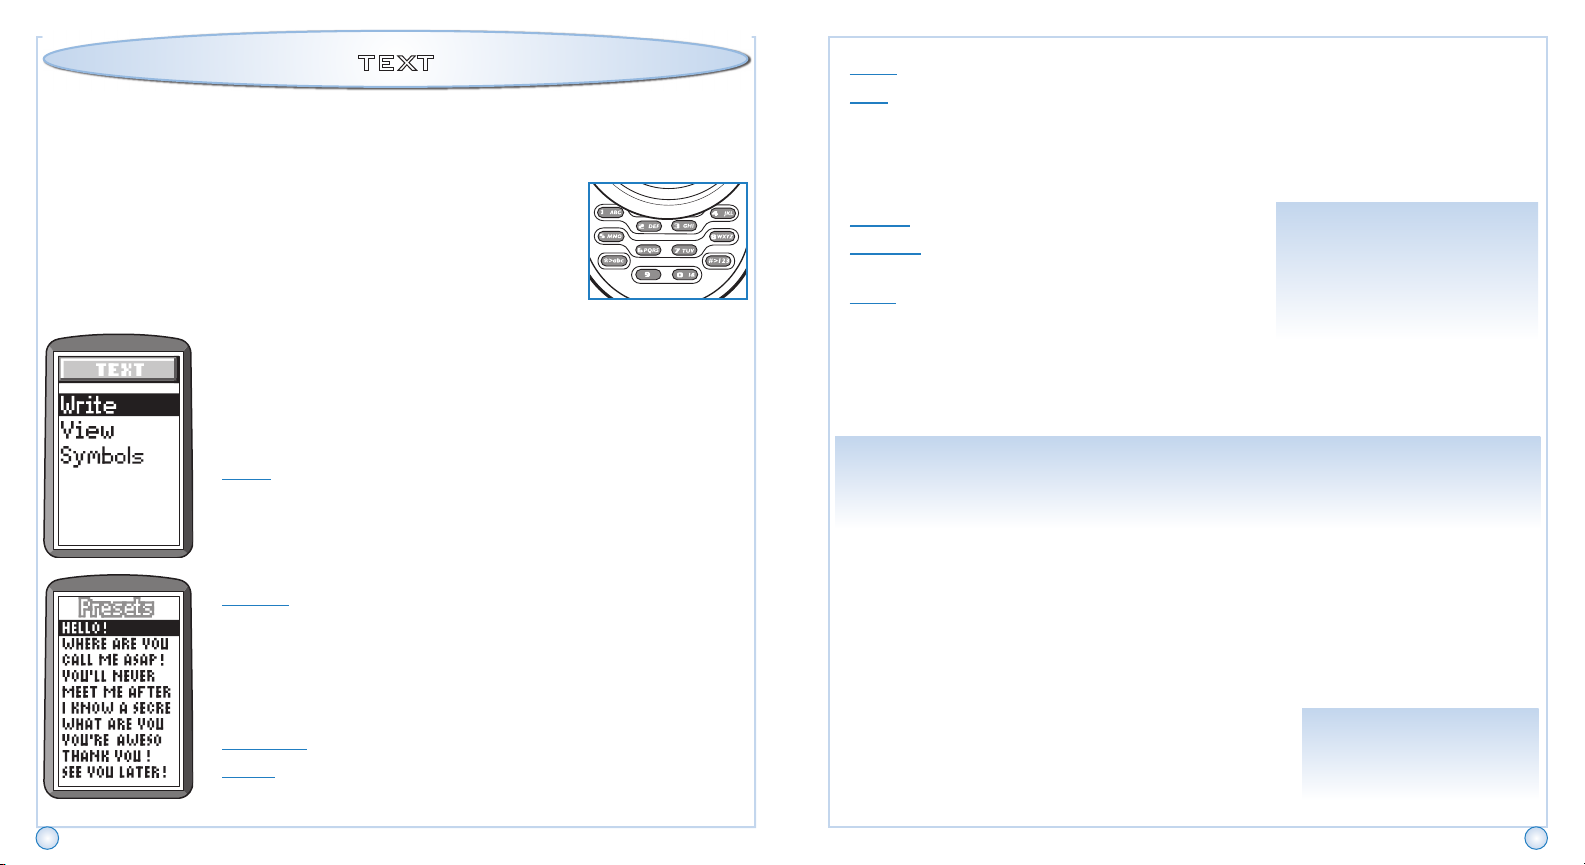
TEXT
SAVE: Store your message in the Outbox.
EDIT: Make any necessary corrections to your message and press ENTER when finished.
Send and receive text messages from your friends!
How to Use the Keypad
Each numbered button features specific letters. For example,
press the number 1 button and “A” will appear. Press it again
to see “B”, press it a third time to see “C” and a fourth time
to see “1”. Do this to locate the your desired letter and press
ENTER to insert it into your text message.
WRITING A NEW TEXT MESSAGE
Scroll to “TEXT” on the Main Menu and press ENTER.
Select “WRITE” from the Menu. Then choose either “NEW” or
“PRESETS.”
NEW: Use the keypad to write your friend a text message! At the
bottom of the screen a box with common words you may want
to use will appear. Scroll through the list of suggested words and
press ENTER to insert that word into your message.
VIEWING YOUR INBOX, OUTBOX AND SENT MAIL
Select “VIEW” from the Menu. Then choose either “INBOX,” “OUTBOX” or
“SENT” and press ENTER.
INBOX: View the last 10 messages you received.
OUTBOX: View the 10 messages that you have
saved to send.
SENT: View the last 10 messages you sent.
NOTE: Only 10 messages
are stored in each box. Be
sure to delete unnecessary
messages in order to keep
space for important ones!
INSERTING A SYMBOL
Select “SYMBOLS” from the Menu and press ENTER. Select a symbol and press
ENTER to insert it into your text message.
NOTE: You can only add one symbol to the end of each message.
NOTE: If your message does not go through, don’t worry! It’s saved automatically
to your outbox and can be sent later.
RECEIVING A TEXT MESSAGE
USING A PRESET TEXT MESSAGE
PRESETS: Select one of 10 preset messages to send to your friend!
SENDING, SAVING AND EDITING A
TEXT MESSAGE
After you have finished writing your text message, select
either “SYMBOLS,” “SEND,” “SAVE,” or “EDIT.”
SYMBOLS: Choose one of 15 symbols to insert into your message.
SEND: Select a buddy from your buddy list and your message will
be sent!
8 9
When you receive a new text message, your Communicator will make a sound
(whichever text message alert sound you have selected) and the indicator light will flash.
You can only receive a text message when you are in the Main Menu. If you are not
in the Main Menu when a text message arrives, you will see an icon appear in the
top right corner alerting you that a message has been received for you to read. At this
point, exit to the Main Menu to read your new message.
Once you have located your new text message you will
be given two options: READ? or SAVE?.
Select “READ” to read your new message. When you are
done, you will be given the option to “SAVE,” “DELETE,”
“SEND ON” or “REPLY.”
NOTE: Always go to
the Main Menu to receive
a new text message.
Page 7
SAVING A RECEIVED TEXT MESSAGE
SAVE: To save your message, select “SAVE” and press ENTER. Your message will be
saved to your inbox.
DELETING A TEXT MESSAGE
DELETE: To delete your message, select “DELETE” and you will be asked “R U SURE?”
Press ENTER and your message will be deleted, or CANCEL to exit.
FORWARDING A TEXT MESSAGE
SEND ON: To forward your message to one of your friends, select “SEND ON” and
your buddy list will appear. Select the buddy you wish to forward your message to and
press ENTER.
REPLYING TO A TEXT MESSAGE
REPLY: To reply to your buddy’s message, select “REPLY” and using the keypad, enter a
message. Select “SEND” and your message will be sent to your buddy.
DIGITAL CAMERA
Press ENTER again and now you can save your photo to your ALBUM, BUDDY
LIST or DELETE it.
SAVING A PHOTO TO YOUR ALBUM
ALBUM: Select “ALBUM” to save your photo to your personal photo album. You can
always pull a photo out of the album and save it to your buddy list later.
SAVING A PHOTO TO YOUR BUDDY LIST
BUDDY LIST: Select “BUDDY LIST” to assign a photo to one of your buddy’s numbers.
Select the appropriate buddy from the buddy list and press ENTER. Now when your
buddy calls you, his or her photo will pop up!
DELETING A PHOTO
DELETE: Erase a photo. Be careful! Once you do this it’s gone forever!
ALBUM: Use the < and > keys to scroll through your saved photos. Select a photo by
pressing ENTER.
You will be given three options: “2 BUDDY,” “DESIGN” or “DELETE.”
2 BUDDY: Select “2 BUDDY” and press ENTER. Scroll to a buddy and press ENTER to
assign that photo. When this buddy calls you, his or her photo will pop up!
ANIMATING A PHOTO
Take pictures of your friends and store them to
your buddy list or album! Watch your friend’s
photo appear when he or she is calling. You can
even animate the photo to make it look like your
friend’s talking to you!
Select “PHOTO” from the Main Menu. Then choose either
“SHOOT” or “ALBUM” and press ENTER.
TAKING A PHOTO
Select “SHOOT” to take a photo.
SHOOT: Use the screen to view your friend. Make sure your
friend’s head is within the frame of your screen. Press ENTER
and check out your photo!
10 11
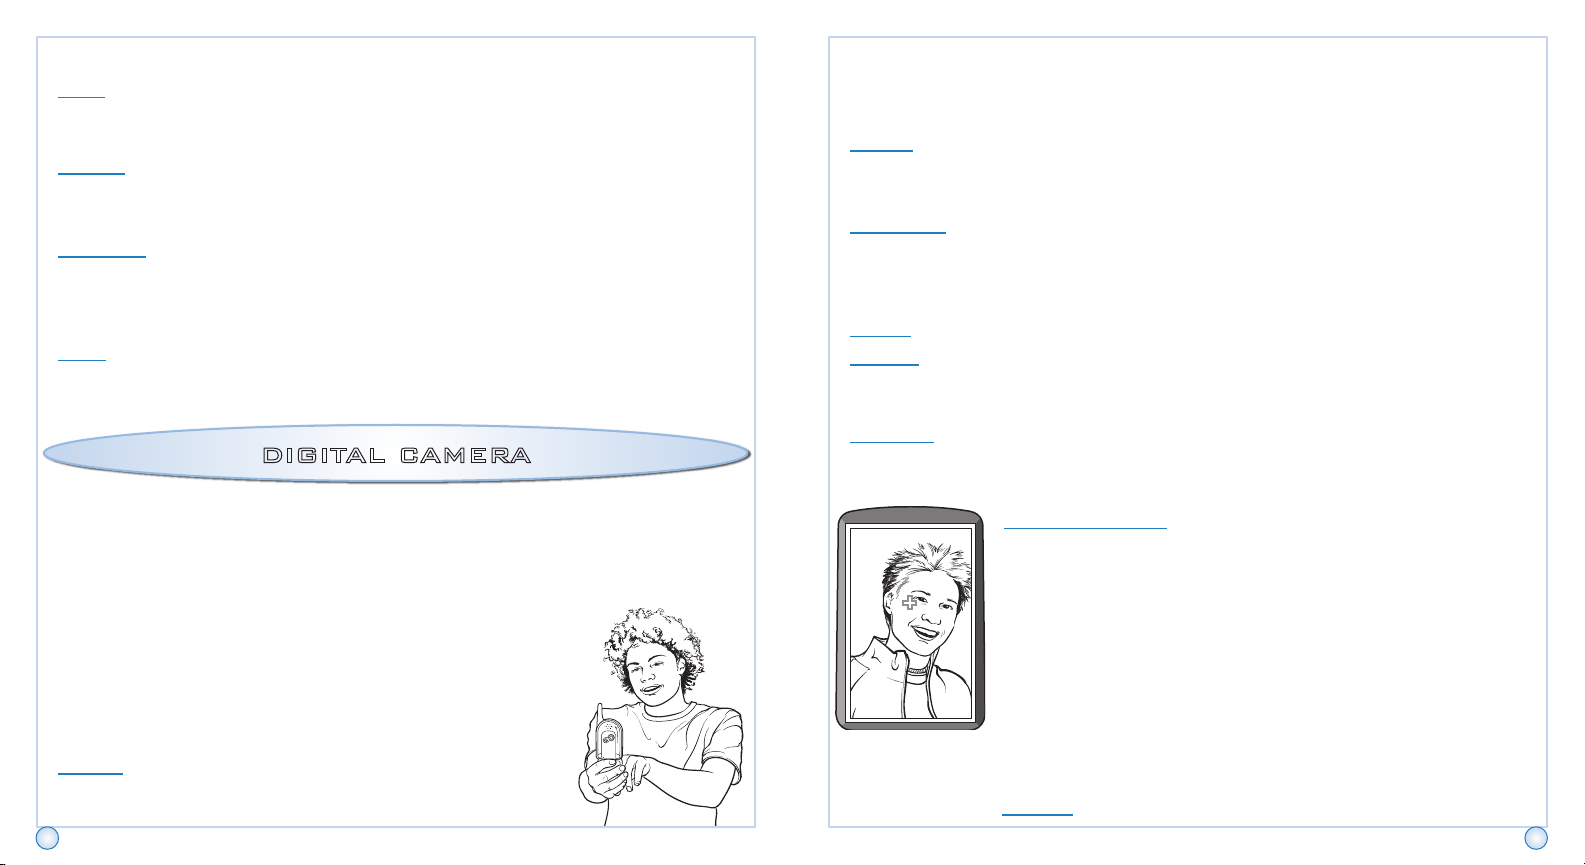
ANIMATION SETUP: After you have assigned a photo to a buddy
you have the option to animate that photo. This will make your
buddy look like he or she is talking to you!
- Select “YES” to make your friend look funky or “NO” to leave
the photo as is.
- A cursor will appear on the photo [ + ], as shown.
- Use the ^v<> keys to move the cursor to the area of your
buddy’s face that the prompt at the bottom of the screen is
telling you (ex. left eye: right, or mouth: left).
- Press ENTER when you’ve finished and watch the animation!
- Now every time your buddy calls you, that photo will pop up
and animate while your buddy is talking!
- Press CANCEL to exit.
DESIGN: Design mode lets you add text and props to your photos!
Page 8
ADDING TEXT TO A PHOTO
- Select “TEXT” and press ENTER.
- Use the keypad to write a caption and press ENTER when finished.
- Your caption will appear on your photo!
- Then use the ^v<> keys to move your caption to its desired location.
- Press ENTER to save your photo with the caption and exit.
- Press CANCEL at any time to return to the Design menu.
ADDING PROPS TO A PHOTO
- Select “PROPS” and press ENTER. You will be given
the option of adding: HAIR, EARS, EYES, NOSE and
MOUTH to your photo.
- Select your desired feature and press ENTER. You
will be able to choose from several sets of hair, ears,
eyes, noses and mouths.
- Pick one and press ENTER.
- Use the ^v<> keys to move the prop to its desired
location and press ENTER.
- Your edited photo will be displayed. Add more props
to make your photo funky!
- Press ENTER a second time to save your photo with
the prop(s) and exit.
- Press CANCEL at any time to return to the Design
menu.
DELETE: Select “DELETE” and your photo will be erased.
NOTE: Once props or a
caption has been added and
saved to a photo, you cannot
remove them.
NOTE: when inserting
ears or eyes, press the * key
to flip the prop horizontally.
NOTE: when adding a
right ear or eye, press 0 to
flip the ear or eye from the
left to the right side of the
face.
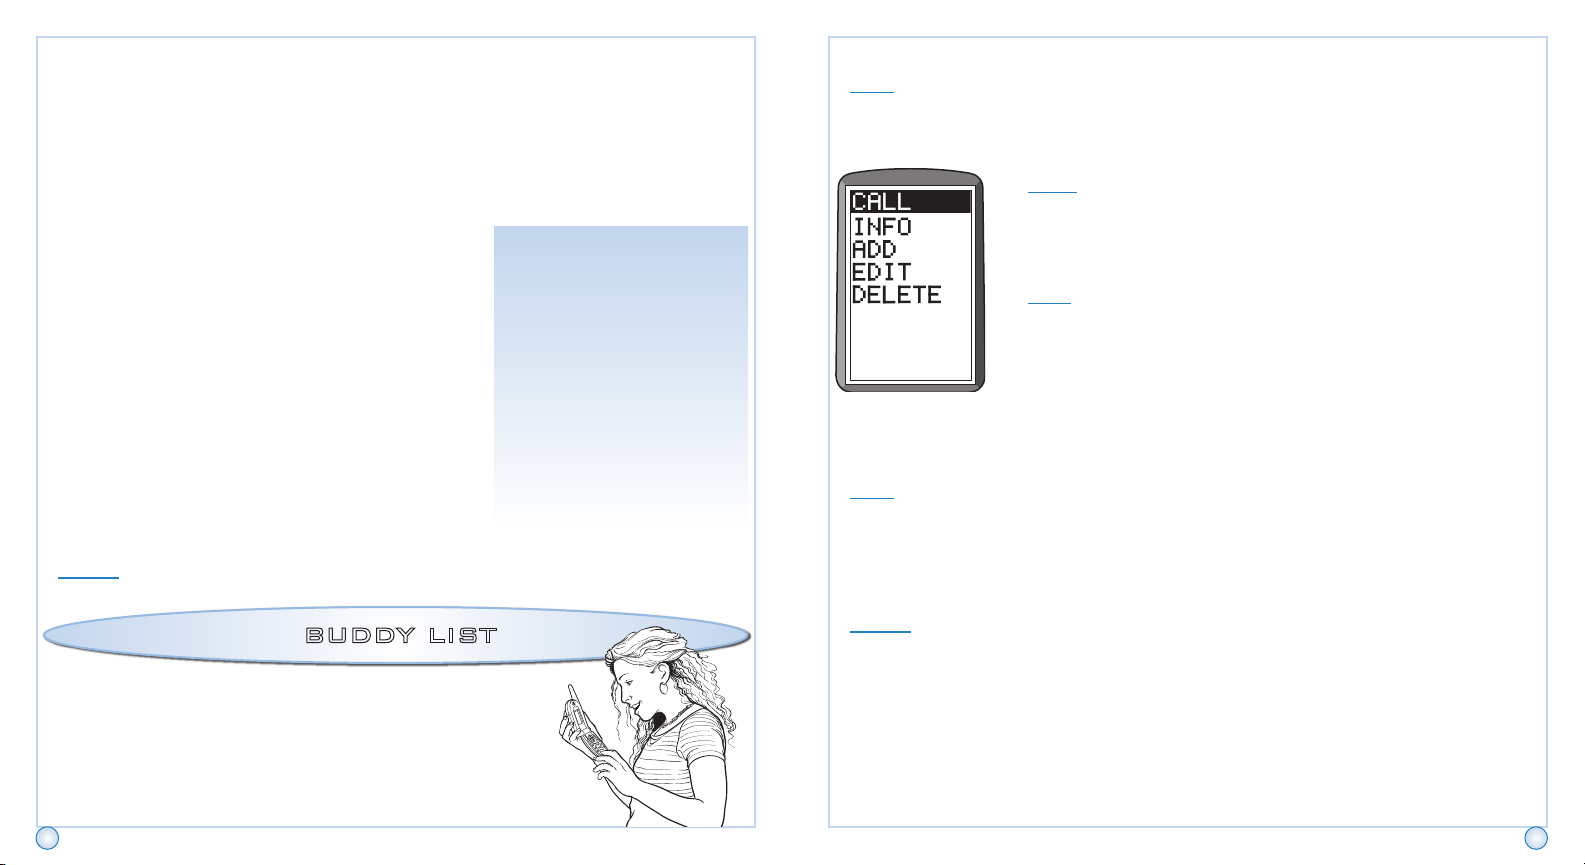
BUDDY LIST
Here’s where you can find and
manage your list of buddies!
CALLING A BUDDY
CALL: Select “CALL” from the menu and you will automatically call your buddy privately.
Listen for a ring! You know what to do next!
ACCESSING YOUR BUDDY’S INFO
INFO: Select “INFO” from the menu. Here you can access
your buddy’s personal buddy #, photo, address, home phone
number, birthday, star sign and any notes you’ve written.
ADDING A BUDDY
ADD: Select “ADD” from the menu. Here you can add a new
buddy to your buddy list.
- Add his or her name, personal buddy #, address, home
phone number, birthday and any notes.
- Press ENTER to save each entry and move on to the next.
- Press CANCEL to back up a step or exit back to the Buddy
List menu.
EDITING A BUDDY
EDIT: Select “EDIT” from the menu. Here you can edit your buddy’s name, personal
buddy #, address, home phone number, birthday and any notes.
• Press ENTER to save each entry and move on to the next.
• Press CANCEL to back up a step or exit back to the Buddy List menu.
DELETING A BUDDY
DELETE: Select “DELETE” from the menu. Here you can permanently erase a buddy from
your buddy list.
• Select a buddy from the list and press ENTER. That buddy will be deleted from
your buddy list.
• Press CANCEL to exit to the Buddy List menu.
Scroll to the buddy you wish to access and press ENTER.
12 13
Page 9
PERSONAL
CUSTOMIZE
Save all of your personal info here!
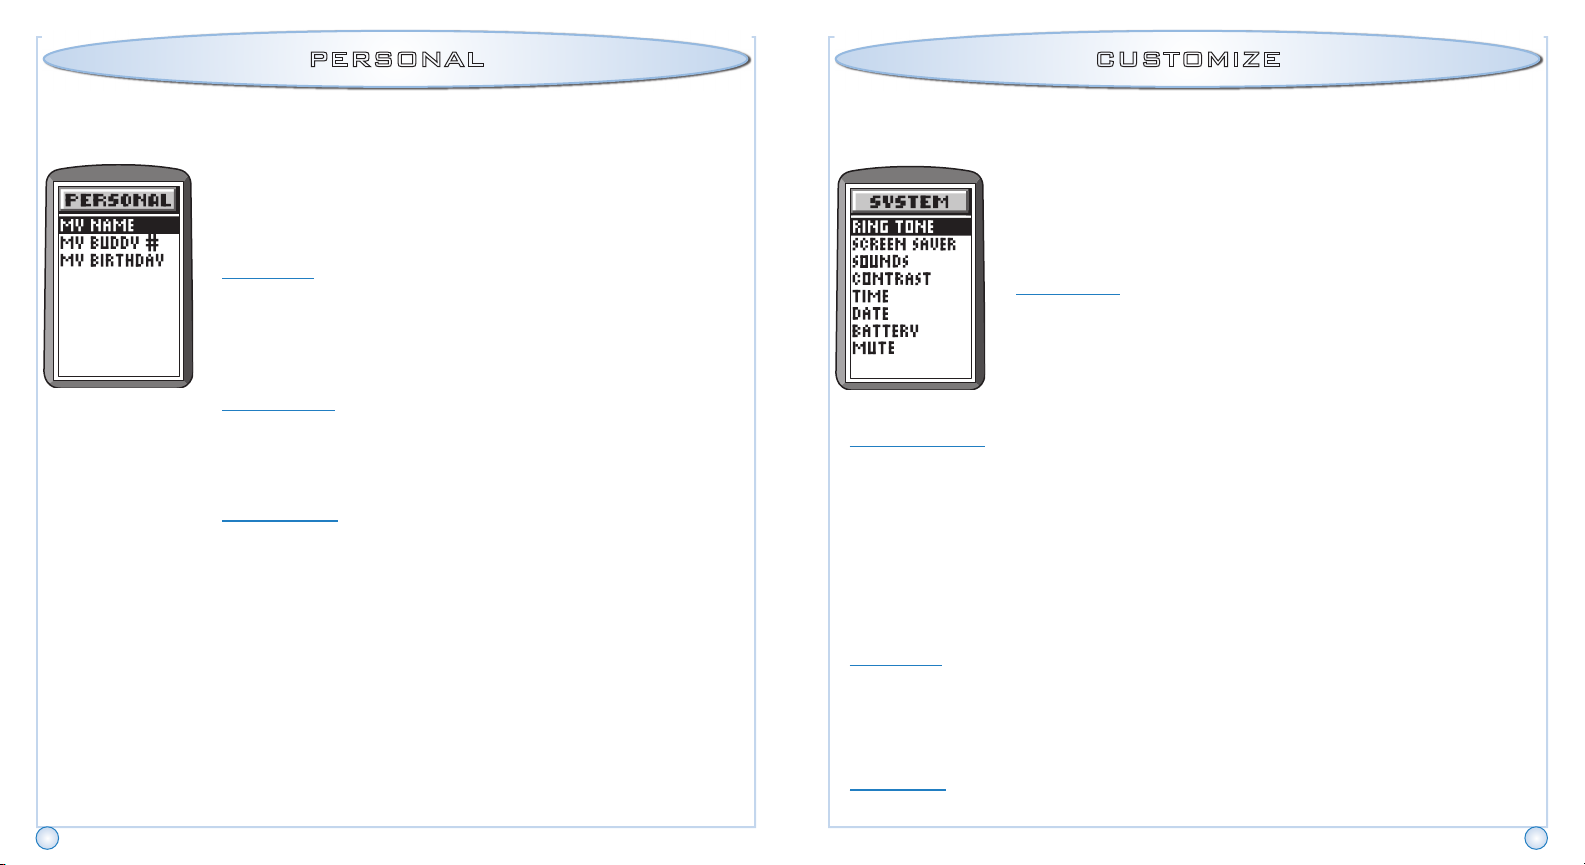
Select “PERSONAL” from the Main Menu and you will be
given several options:
SETTING YOUR NAME
MY NAME: Select “MY NAME” from the menu and use the
keypad to enter your first and then last name. Press ENTER to save
your name and return to the Personal Menu. Press CANCEL at any
time to return to the Personal Menu.
VIEWING YOUR PERSONAL BUDDY #
MY BUDDY #: Select “MY BUDDY #” from the menu to view your
personal buddy number. Keep this number handy to give to your
friends so they can call you!
SETTING YOUR BIRTHDAY
MY BIRTHDAY: Select “MY BIRTHDAY” from the menu.
• Use the ^v<> keys to enter the month, date and year you
were born.
• Press ENTER to save your birthday and return to the Personal
Menu.
• Press CANCEL at any time to return to the Personal Menu.
Here is where you can select and save your
personal settings!
Select “CUSTOMIZE” from the Main Menu and you will be
given several options:
SELECTING A RING TONE
RING TONE: You can select one of 10 ring tones. Select the one
you wish to preview and press the > key. You will hear that ring
tone play. If that’s the one you wish to save, press ENTER and
from now on when your Communicator rings, that’s what you’ll
hear! You can also choose “SILENT” for when you’re in school!
SELECTING A SCREEN SAVER
SCREEN SAVER: You can choose one of 10 screen savers to run when you’re not using
your Communicator. If you haven’t touched any key on your Communicator for over
three minutes, the screen saver will automatically run. It can run for up to 4 hours.
• Select the one you wish to preview and press the < key.
• Press the > key to exit the preview and return to the screen saver menu.
• Highlight the screen saver you wish to select and press ENTER. It will then be
saved and stored to your Communicator.
• Press CANCEL to return to the Customize Menu.
SELECTING A TEXT MESSAGE ALERT
TEXT ALERT: Select a sound effect to alert you when you have a new text message.
Choose from five different sounds. Select the one you wish to preview and press ENTER.
It will then be saved and stored to your Communicator. Press CANCEL to return to the
Customize Menu.
CONTROLLING THE CONTRAST
CONTRAST: Adjust the contrast of your screen by selecting level 1, 2 or 3. Press ENTER
to set the contrast to a level you like. Press CANCEL to return to the Customize Menu.
14 15
Page 10
SETTING THE TIME
Accessories
TIME: Set the current time on your Communicator.
• Use the ^ and v keys to set the hour and then minutes.
• Use the < and > keys to move the cursor from hours to minutes.
• Press ENTER when you are finished setting the time.
• Press CANCEL to return to the Customize Menu.
SETTING THE DATE
DATE: Set the current date on your Communicator.
• Use the ^ and v keys to set the month, date, and year.
• Use the < and > keys to move the cursor from month, to date, to year.
• Press ENTER when you are finished setting the date.
• Press CANCEL to return to the Customize Menu.
CHECKING THE BATTERY LEVEL
BATTERY: Select “BATTERY” to view your current battery level. Press
CANCEL to return to the Customize Menu.
CARRY CASE/FACEPLATES
(SOLD SEPARATELY.)
Slide your CHATNOW Communicator into one of our fashionable
carry cases and get moving! Choose the one that most suits your
style! Designed with a hip belt loop, it’ll go everywhere you go and
you’ll always be in touch! Snap on one of the faceplates to give your
Communicator a new look!
EARPIECE (SOLD SEPARATELY.)
Plug it in and go! This functional earpiece allows you to chat with your
friends without holding onto your CHATNOW! Simply plug it in, clip it
on, press and talk! High-tech performance coupled with high-tech use,
the CHATNOW Earpiece provides effortless communication anytime,
anywhere!
FPO
FPO
TROUBLESHOOTING GUIDE
MUTING THE SOUND
MUTE: You can choose to mute the sound on your Communicator, if you will be in
places where they are not allowed.
• Scroll to “SOUND OFF” and press ENTER to disable the sound.
• Scroll to “SOUND ON” to turn the sound back on.
VOLUME
Make sure to set the Volume level on your
CHATNOW communicator to a reasonable, audible
level.
• Select “VOLUME” on the Main Menu.
• Use the < key to decrease the volume.
• Use the > key to increase the volume.
16 17
WHAT TO DO IF:
Communicator
Freezes Up
Screen
displays “FAIL”
Hear static or
people talking on
the channel you
want to use.
Press the Reset Button
Three things may have happened:
1. Your friend may not have his/her CHATNOW
Communicator on.
2. Your friend may have traveled out of the CHAT ZONE.
3. Your friend may not have the channel set to the same
channel as yours.
When selecting a channel, if the number you selected
is occupied or contains static, simply scroll to the next
available channel.
 Loading...