

Page 1
U
®
L
Look for Queasy Bake™ Cookerator™
refill packs!
If you have any questions, comments, or need additional infor-
mation concerning this product or its parts, please call our
Hasbro Consumer Affairs hotline at 1-800-327-8264, Monday
through Friday during business hours (Eastern Time).
Product and colors may vary.
Mixes manufactured for Hasbro, Inc.
© 2002 Hasbro. All Rights Reserved.
® denotes Reg. U.S. Pat. & TM Office.
65774 P/N 6124250000
QUEASYBAKE.COM
QUEASYBAKE.COM
FOR NEW PRODUCTS AND OFFERS
FOR NEW PRODUCTS AND OFFERS
ll
Caution: Electric Toy
XXXX
Immersing this toy in water can cause an electric shock.
Not recommended for children under 8 years of age. As
with all electric products, precautions should be observed
during handling and use to prevent electric shock.
AGES 8+
Cookerator
Cookerator
Thank you for purchasing the
Queasy Bake™ Cookerator™ Set!
For maximum enjoyment of this
product, be sure to follow all
instructions carefully.
Phillips screwdriver required
for assembly.
100 watt light bulb required -- frosted or standard (not included). (Do
not use soft white or long life.)
This set includes:
• Chocolate Crud Cake Mix
• Mucky Mud Mix
• Bugs ‘n Worms Mix
• Delicious Dirt Mix
• Magic Surprise Gravel
• Crunchy Dog Bones Mix
• Cool Drool Mix
• Foaming Drool Eruptor Mix A
• Foaming Drool Eruptor Mix B
• 1 baking pan
• 2 cooking utensils
• 1 cookie cutter
• 1 mixing bowl
• 1 bug/worm mold
• 1 warmer cover
• 1 pan pusher
To make the recipes, you
will need:
• flour
• nonstick cooking spray or
margarine
• cake plate
• 1/4 cup milk
• dessert dish
• roller
• small mixing bowl
65774
™
™
ADULT SUPERVISION RECOMMENDED
HOTpans and food. Handle carefully.
HOToven interior, oven top and oven back. Do not touch.
WARNING:
before removing back and changing light bulb. Do not use light
bulbs larger than 100 watts.
Shock hazard. Pull plug out of receptacle
ALWAYS: Unplug oven when not baking. Use pan
pusher to move pans through baking chamber. Allow oven,
pans and food to cool before handling. Wash all pans and
utensils before using for the first time.
NEVER: Use plugged-in oven around water at any
time. Never leave plugged-in oven unattended or unassembled. Never push pans through oven with your fingers. Do not
leave empty pans or pan pusher in oven.
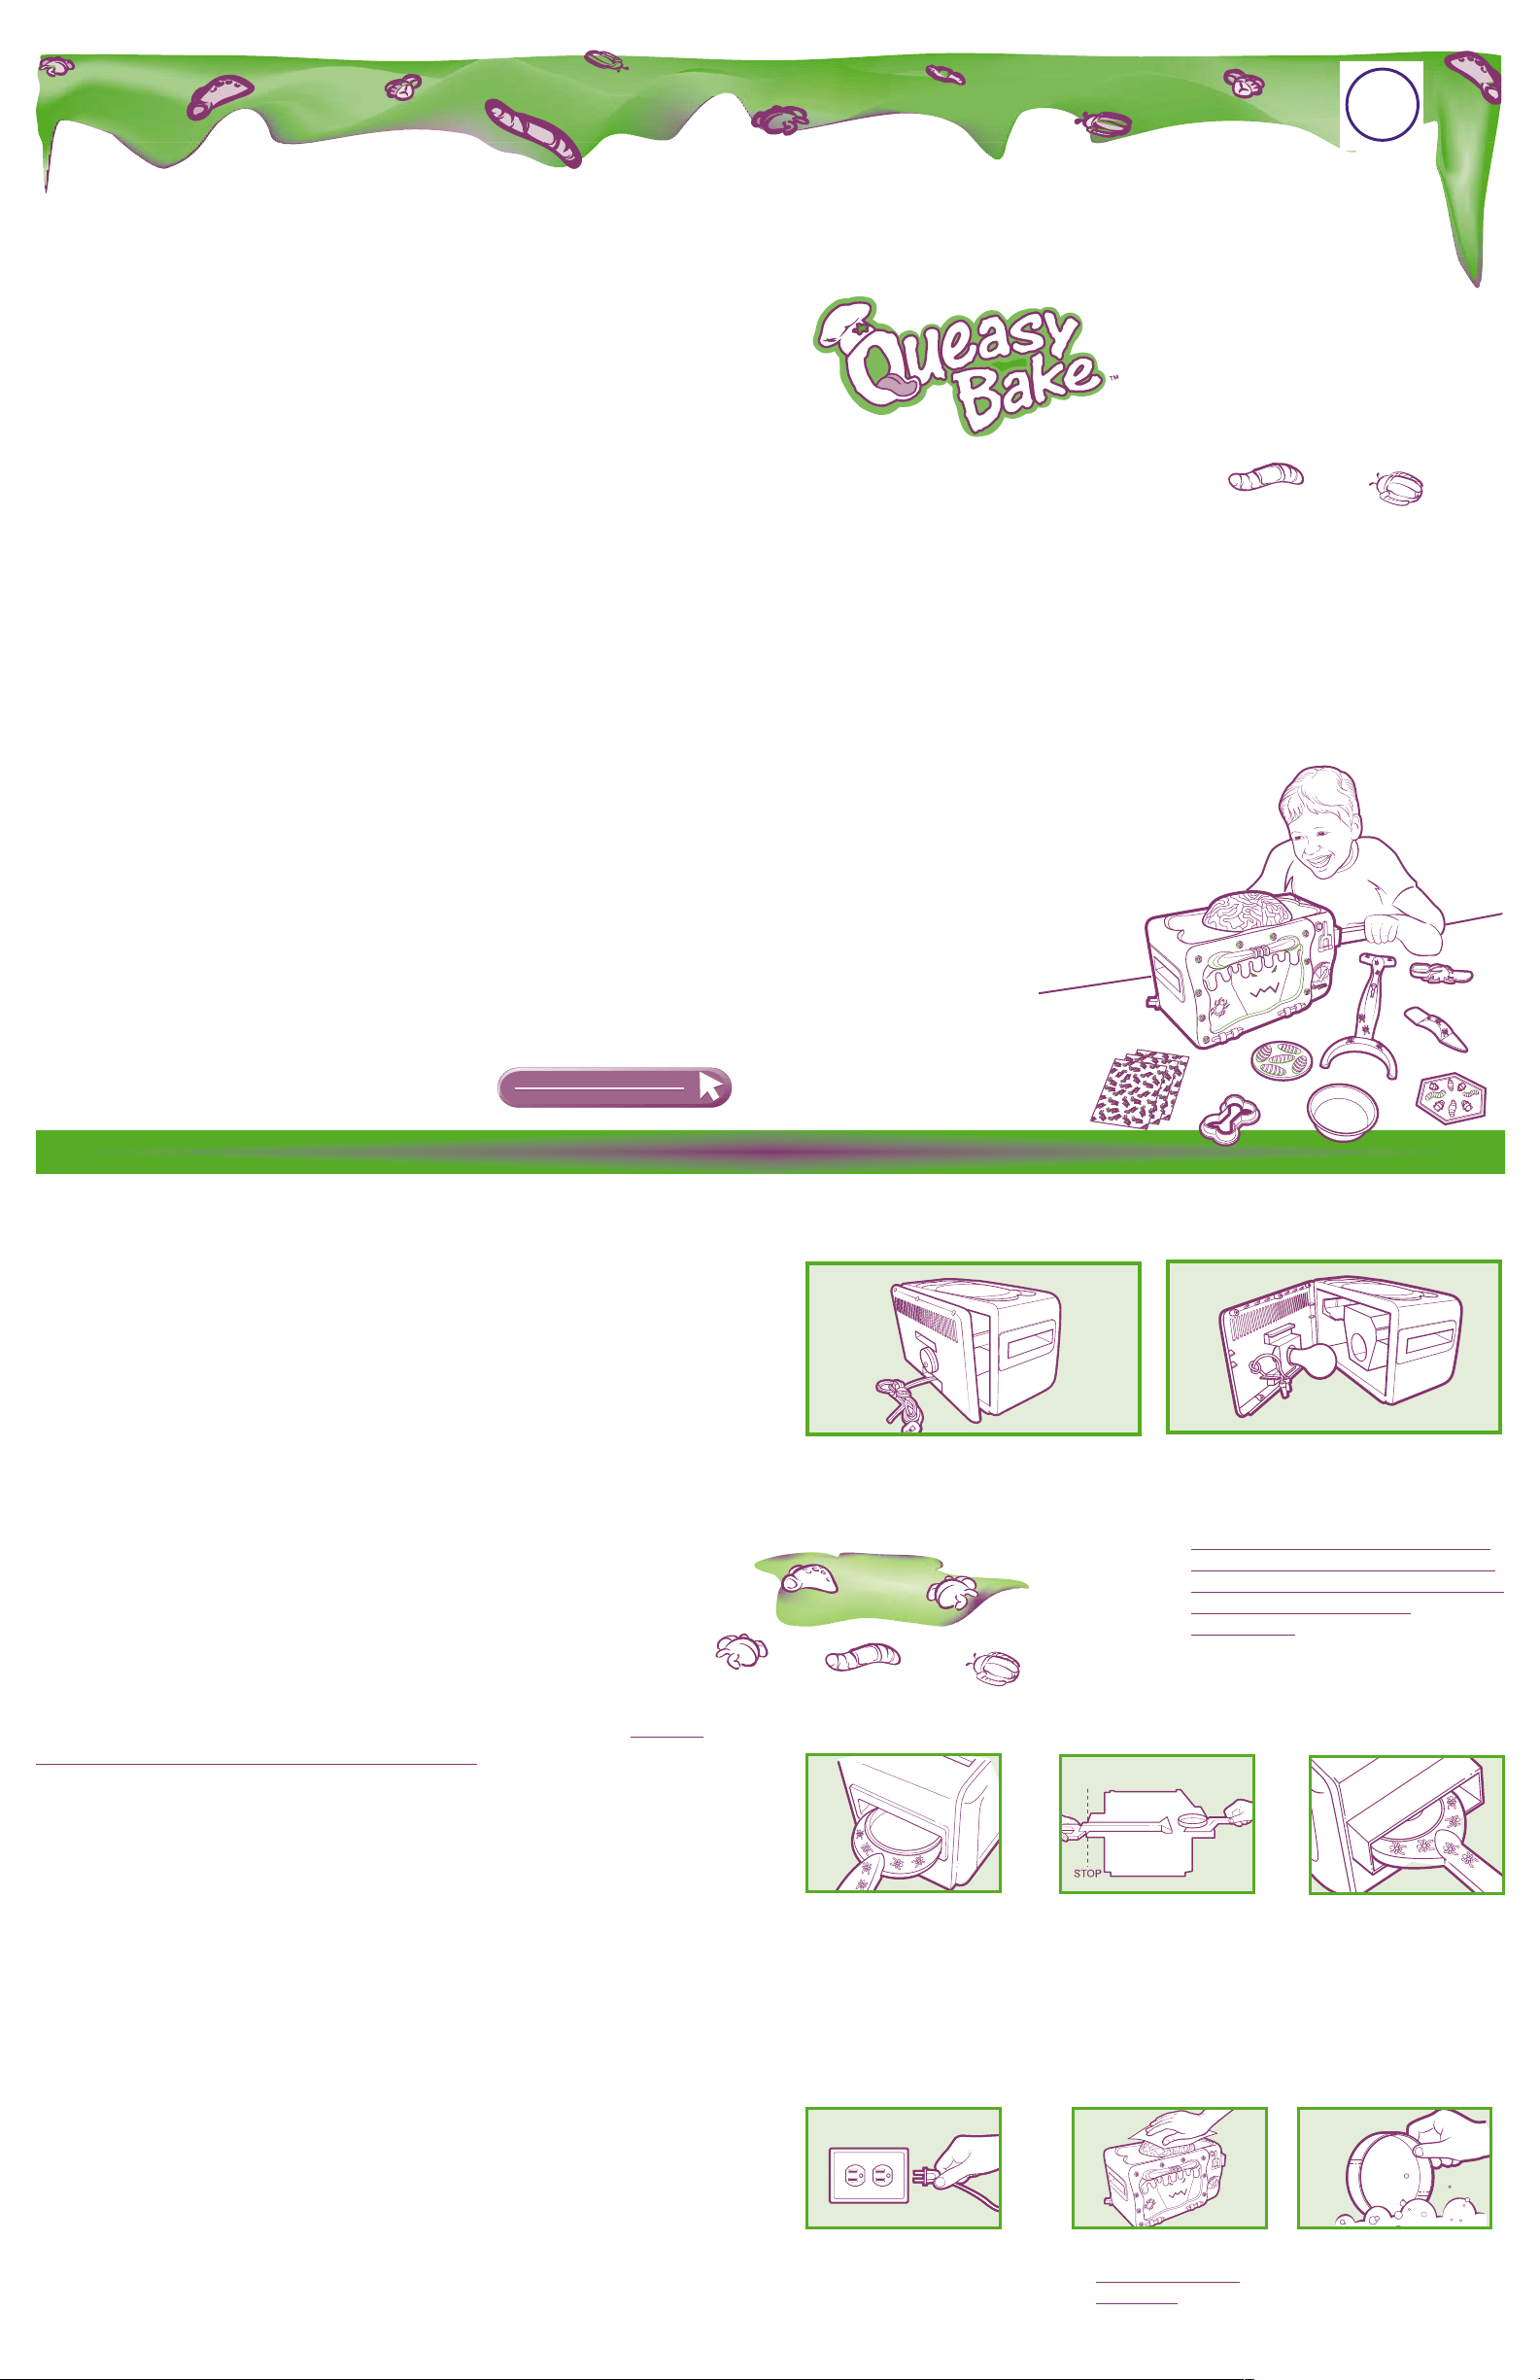
ASSEMBLY
1. Remove Back of Oven
• Using a Phillips screwdriver,
remove the 6 screws from the
back panel. Lift the panel out.
HOW TO USE YOUR QUEASY BAKE™ COOKERATOR™
For best results, oven must be level.
2. Install Light Bulb
• Install one standard 100-watt bulb
(regular or frosted) into the socket
in the panel.
• DO NOT use long life, soft white
or high efficiency bulbs, or bulbs
of higher or lower wattage, which
will cause oven to work
improperly.
• Replace the panel and 6 screws.
DANGER:To prevent electric shock, do not immerse
oven in water. Wipe clean with damp cloth. We recommend that
you periodically examine the toy for potential hazards and that
any potentially hazardous parts be repaired or replaced.
DO NOTuse bulbs of higher wattage, long life or soft
white type bulbs.
120 Volts AC only - 60 Hz 100 watts.
CAUTION:Adult supervision recommended. Internal
metal edges. Care should be taken during installation of the
light bulb. Phillips screwdriver required for assembly.
PROTECTIVE COATING: • The pans and metal parts in
your oven are coated with a food-grade oil for protection during
transit. •
before first baking. Coating is nontoxic, but for the first few
bakings it may detract from the taste of the food if not washed.
The “new” smell the oven gives off the first few minutes is the
•
protective oil evaporating from the metal parts in the oven. You
may also see a vapor. It is nontoxic and evaporates quickly.
Wash pans with soap and water and dry thoroughly
1. Using the pan
pusher, slide pan
into baking
chamber until arrow
lines up with edge
of chute.
WHEN YOU'RE FINISHED USING THE OVEN…
• When you are
finished baking,
unplug the oven.
2. After baking, push
pan into cooling
chamber with other
end of pan pusher.
Push all the way up
to the "stop" on the
pan pusher.
• Wipe to clean.
Do not immerse
in water.
3. Cool for 10
minutes in cooling
chamber, then use
the pan pusher to
remove from oven.
DO NOT LEAVE PAN
PUSHER IN OVEN.
• Wash all Queasy
Bake™ parts in
warm, soapy
water. Rinse and
dry thoroughly.
Page 2
QUEASY BAKE™ RECIPES
Before making the recipes below...
1. Wash all utensils, pans - and your hands. 2. Preheat Queasy Bake™ Cookerator™ unit
for 15 minutes.
3. Spray the baking pan with nonstick cooking spray, or
grease and flour pan.
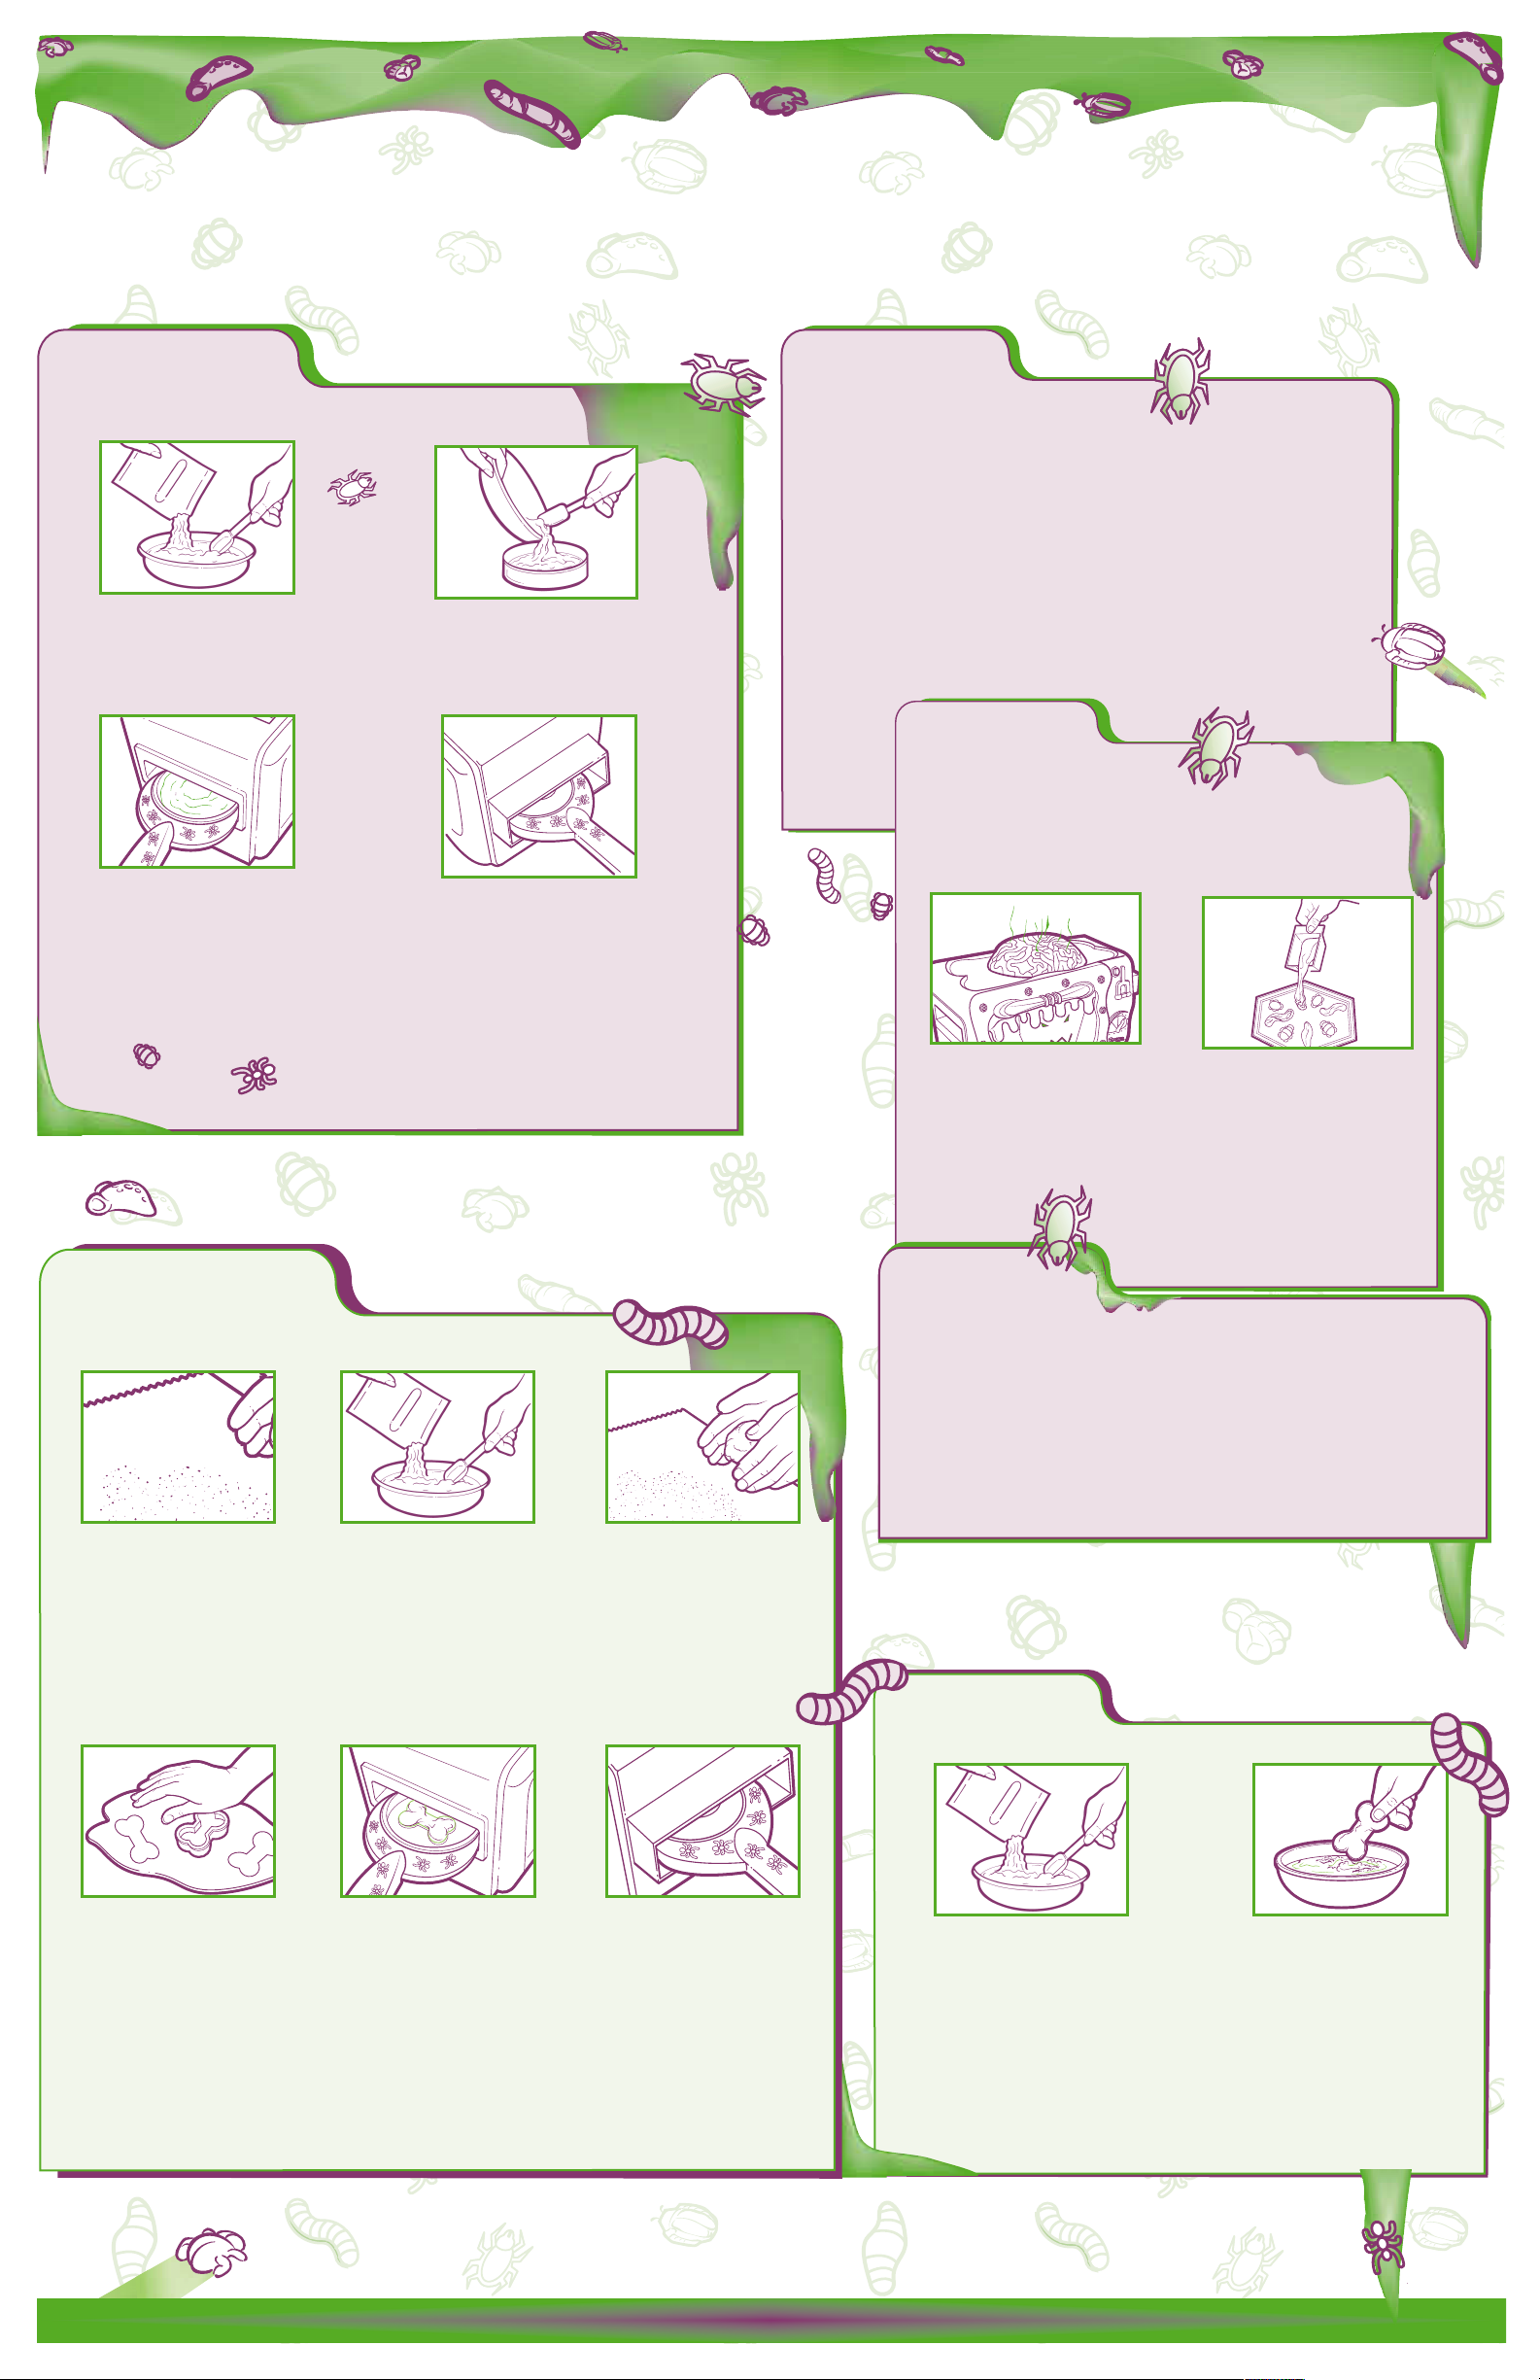
MUD ‘N CRUD
™
CAKE
Bake a Cake...
1. Pour contents of Chocolate
Crud Cake Mix envelope
into mixing bowl. Add 3
teaspoons of water and mix
with a spoon until smooth.
3. Use pan pusher to insert
pan into Queasy Bake™
Cookerator unit. Be sure to
insert pan far enough so
that metal door closes.
Bake for 10-12 minutes.
DIP ‘N DROOL™
DOG BONE
Bake a Dog Bone…
1. Prepare a clean
surface for making the
dog bone. Open
Crunchy Dog Bones
Mix envelope and
remove 1/2 teaspoon
of mix. Sprinkle mix
onto clean surface.
2. Slowly pour batter into
baking pan and spread
evenly.
4. When baking time is
complete, use pan pusher
to push baking pan all the
way through to cooling
chamber. Allow cake to
cool in cooling chamber for
10 minutes, then carefully
remove pan from oven with
pan pusher. When cool,
remove cake from pan and
place it on a cake plate.
2. Pour remaining
contents of envelope
into a mixing bowl.
Add 1 teaspoon of
water, and stir with a
spoon until mixed
thoroughly.
3. Lightly flour clean
hands and form dough
into a ball with your
hands. Flatten dough
on the clean, cookie
dusted surface. Use a
roller to roll dough flat
to about 1/4”
thickness.
Make the
“Mud” Pudding…
1. Measure 1/4 cup of cold milk. Pour milk into a small bowl or
the Queasy Bake™ Mixerator™ unit (not included).
2. Pour contents of Mucky Mud Mix envelope into milk. If
mixing by hand, stir vigorously with a spoon until lumps are
gone and mixture thickens to consistency of pudding. If
using Mixerator unit, cover and blend for 20 seconds.
3. Pour “mud” pudding into dessert dish. Chill in refrigerator
for 10 minutes.
Create Bugs ‘n
Worms…
1. Pour contents of Bugs ‘n Worms MIx envelope into
a mixing bowl or the Queasy Bake™ Mixerator™ unit.
2. Add 4 1/2 teaspoons of warm water. Mix thoroughly.
3. Warm mix in the
warming chamber
(under the brain) for
10 minutes. Stir
mix again.
4. Spray bug/worm mold
with nonstick cooking
spray or grease and
flour mold. Pour mix
into mold. Chill 10
minutes in freezer.
Remove bugs and
worms from mold and
repeat process to make
more bugs and worms.
Complete
Your Creation!
1 Tear cake into pieces and place them on a cake plate or
in the mixing bowl.
2. Spoon on the mud mixture.
3. Open Delicious Dirt Mix envelope and sprinkle “dirt” over
your creation.
4. Top with bugs ‘n worms.
5. Add the Magic Surprise Gravel. Take a bite of
cake…SURPRISE...your tongue changes color!
Make the
Dog Drool…
4. Sprinkle a small
amount of flour into a
cookie cutter, then
firmly press dog bone
cutter into dough
5. Place dog bone
cookie in a baking
pan. Use pan pusher
to insert pan into
Queasy Bake™
Cookerator™ unit. Be
sure to insert pan far
enough so that metal
door closes. Bake for
8-9 minutes.
6. When baking time is
complete, use pan
pusher to push baking
pan all the way through
to cooling chamber.
Allow dog bone to cool
in cooling chamber for
10 minutes. Then,
remove pan with pan
pusher. When cool,
remove dog bone
from pan.
1. Pour contents of Cool
Drool Mix envelope into
mixing bowl. Add 1/3 cup
of water and stir with
spoon.
2. Pour contents of Foaming
Drool Eruptor Mix A and B
envelopes in a small, dry
mixing bowl and stir to
mix. Pour mixture onto
drool…watch it foam!
Enjoy Your Treats…They’re a Disgusting Delight!
3. Dip the dog bone
into the foaming drool
and take a bite…it’s
gross looking and
great tasting!
 Loading...