

Page 1
CAUTION: ELECTRIC TOY
®
U
L
Immersing this toy in water can cause an electric shock. Not
recommended for children under 8 years of age. As with all
electric products, precautions should be observed
during handling and use to prevent electric shock.
Adult assembly
Cookbook
35229
AGES 8+
Adult
supervision
required
required
LISTED
(ELECTRIC TOY)
739G
Thank you for purchasing the
EASY-BAKE Oven & Snack Center!
For best results, be sure to follow all instructions carefully.
Page 2

Be Safe
Before you start baking, check out these simple
safety tips and reminders.
ELECTRICAL REQUIREMENTS:
120 Volts AC only - 60 Hz. 100 Watts
WARNING: Shock hazard. Pull plug out of receptacle
before removing light bulb door and changing light bulb. Do not use light
bulbs larger than 100 watts.
CAUTION: Adult supervision required. Internal metal
edges. Care should be taken during installation of the light bulb. Phillips
screwdriver required for assembly.
DANGER: To prevent electric shock, do not immerse oven in
water. Wipe clean with a damp cloth. We recommend that you periodically
examine the toy for potential hazards and that any potentially hazardous
parts be repaired or replaced.
(See back page for company contact information.)
ADULT SUPERVISION REQUIRED.
ALWAYS:
√ Hand-wash all pans and utensils before
using first time.
√ Wash your hands before using oven.
√ Use pan tool to move pans through
baking chamber.
√ Allow oven, pans and food to cool
before handling.
√ Unplug oven when not baking.
√ Use the correct type of light bulb.
NEVER:
x NEVER leave empty pans or pan tool in
oven!
x NEVER use plugged-in oven around
water at any time.
x NEVER leave plugged-in oven unat-
tended or unassembled.
x NEVER put your fingers in oven.
Safety Tips and Cautions:
HOT pans and food. Handle carefully!
HOT oven interior, oven top and back. Do not touch!
NOTE: The “new” smell the oven gives off the first few minutes
is the protective oil evaporating from the metal parts in the
oven. You may also see a vapor. The oil is food-grade, nontoxic
and evaporates quickly. Do not immerse oven in water.
2
Page 3
Table of Contents
Be Safe
Get Everything Together
Install the Light Bulb
Check Out the Basics
Let’s Bake a Cake
Everybody Loves Cookies
Top This!
Pg. 2
Pg. 4
Pg. 5
Pg. 6
Pg. 7
Pg. 9
Pg. 11
3
Page 4
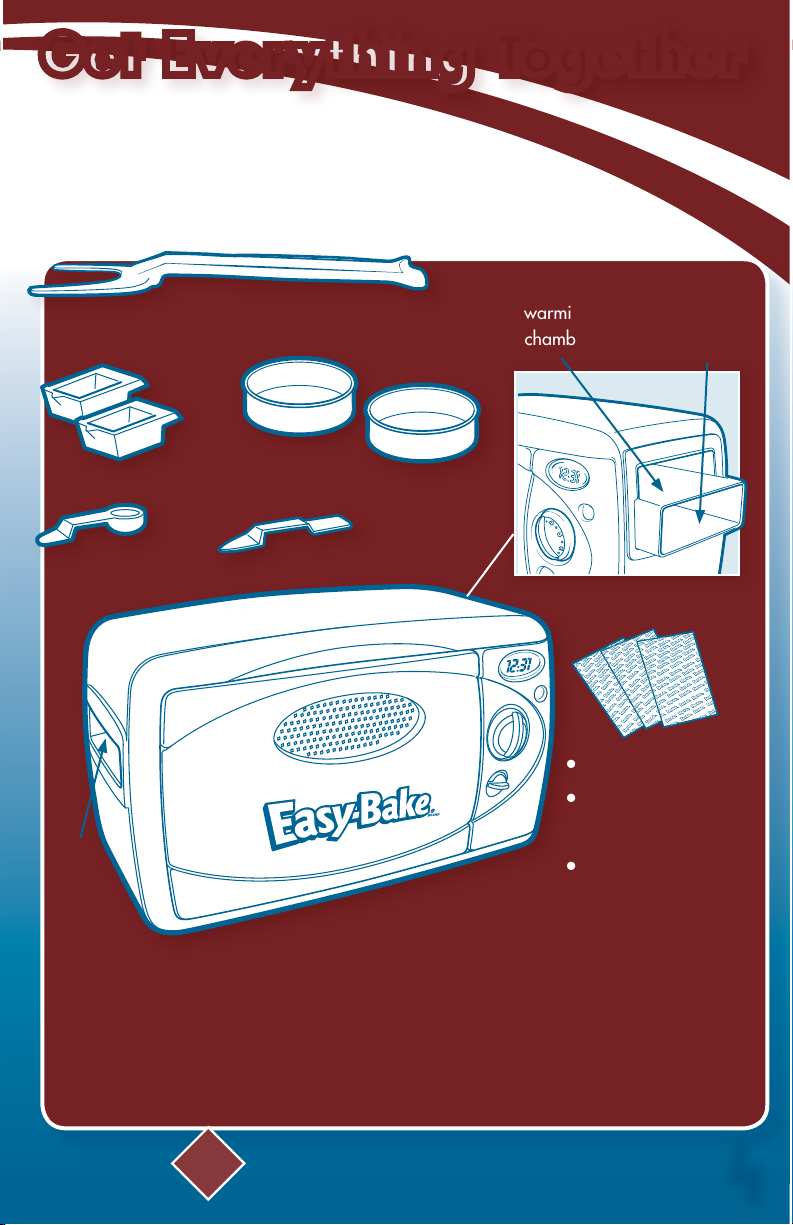
Get Everything Together
Here’s the scoop on everything
you need to bake yourself some fun!
holder end
2 warming cups
spoon
baking
slot
pan tool
2 baking pans
spatula
pusher end
oven
warming
chamber
• 1 yellow cake mix
• 1 chocolate flavored
frosting mix
• 1 sugar cookie mix
cooling
chamber
• flour
You will also need from home:
• nonstick cooking spray
• measuring spoons
• mixing bowl
• Phillips head screwdriver
Tip!
Always read a recipe and gather all the
ingredients before you begin.
• 100-watt light bulb,
frosted or standard.
*Do not use soft white
or long life bulbs.
4
Page 5

Install the Light Bulb
ADULT SUPERVISION REQUIRED.
1. Make sure oven is unplugged.
2. Use a Phillips screwdriver to remove the 4 screws
from the light bulb door. Remove door.
3. Install one standard 100-watt bulb.
IMPORTANT! Do not use long life, soft white,
or high efficiency bulbs, or bulbs of higher or lower
wattage.
4. Replace the door and tighten the screws.
5
Page 6

Check Out the Basics
Before you bake...
• For best results, be sure to follow all instructions carefully.
• Hand-wash the pans and utensils with soap and warm water and dry
thoroughly before first use, and always wash and dry them after baking.
• Always wash your hands before using the oven.
• The oven should rest flat on a level surface at all times.
• Plug in the oven and preheat it for 15 minutes.
• Make sure both metal doors inside the oven are closed while preheating and cooking.
Baking basics:
1. Preheat oven for 15 minutes.
2. Place baking pan in baking slot, then use pusher end
of pan tool to push pan into oven. Push pan tool
into oven until arrow on tool lines up with edge of
baking slot as shown below. Do not use your hands
to push pan in. Do not leave pan tool in oven.
3. Make sure both metal doors inside oven are closed.
Food may not cook properly if doors are open.
4. When baking time is done, use pusher end of pan
tool to push pan through to cooling chamber.
Be careful — pan is hot! Allow pan to cool in
the cooling chamber for the time specified in the recipe.
lines up with edge of baking slot .
Push pan tool
into oven until arrow on tool
5. When cooling time is complete, use holder end of pan tool to remove
pan from cooling chamber.
6. Unplug oven when finished baking. Wait for oven to cool, then wipe it down.
6
Page 7

Let’s Bake a Cake
Yellow Cake and
Chocolate Frosting
Have these handy:
• yellow cake mix
• chocolate frosting mix
• baking pan
• pan tool
• cooking spray (from home)
First Steps:
• Preheat oven for 15 minutes • Spray pans with cooking spray
• bowls (from home)
• measuring spoons (from home)
• water (from home)
• plate (from home)
Makes one cake
Now let’s mix and bake:
Yellow Cake
1. Pour contents of yellow cake mix into bowl and stir
to break up any lumps.
2. Add 1½ teaspoons of water and stir to form batter.
3. Pour batter into baking pan and spread evenly.
4. Place pan in baking slot of oven and use pusher end
of pan tool to push it into baking chamber. Do not
use your hands to push pan in.
Do not leave pan tool in oven. Make sure both
metal oven doors are closed.
5. Bake cake for 12 minutes.
Continued on page 8
7
Page 8

Let’s Bake a Cake
Continued
6. When baking time is complete, use pusher end of
pan tool to push pan into cooling chamber and let
cool for 10 minutes. Be careful — pan is hot!
7. When cooling time is complete, use holder end of
pan tool to remove pan from cooling chamber.
Transfer cooled cake to a plate, turning cake over so
bottom is facing up.
Frosting
1. Pour contents of chocolate frosting mix into bowl.
2. Add ½ teaspoon of water and stir until smooth. For
thinner frosting, stir in a few extra drops of water.
3. Spread frosting over cooled cake. Enjoy!
8
Page 9

Everybody Loves Cookies
Sugar Cookies
Use cookie cutters and frosting from
Tip!
home to make fun treats!
Makes 6 cookies
Have these handy:
• sugar cookie mix
• 2 baking pans
• pan tool
• cooking spray (from home)
• bowl (from home)
• measuring spoons (from home)
• water (from home)
• flour (from home)
First steps:
• Preheat oven for 15 minutes • Spray pans with cooking spray
Now let’s mix and bake:
1. Pour contents of sugar cookie mix into bowl and stir
to break up any lumps.
2. Add ¾ teaspoon of water and stir to form dough.
3. Sprinkle your hands with flour and shape dough
into 6 small balls.
4. Flatten 3 cookie balls and place in baking pan.
Continued on page 10
9
Page 10

Everybody Loves Cookies
Continued
5. Place pan in baking slot of oven and use pusher end
of pan tool to push it into baking chamber.
Do not use your hands to push pan in.
Do not leave pan tool in oven. Make sure both
metal oven doors are closed.
6. Bake cookies for 10 minutes.
7. When baking time is complete, use pusher end of
pan tool to push pan into cooling
chamber and let cool for 10 minutes.
Be careful — pan is hot!
8. When cooling time is complete, use holder end of
pan tool to remove pan from cooling chamber.
9. Repeat steps 4–8 to make remaining 3 cookies.
Enjoy!
10
Page 11

Top This!
You can melt toppings in the
warming chamber, using ingredients from home.
Dip strawberries in melted chocolate, or warm up
fudge topping and drizzle it over cookies.
What other scrumptious ideas can you think of?
Here are the basic directions:
1. Fill one or both warming
cups with your choice of
topping (chocolate chips,
fudge sauce, etc.).
2. Place warming cup(s)
in warming chamber.
Heat topping until it’s
warm (not hot!).
11
3. Dip cookies, strawberries,
pretzels or another snack
into the topping.
Enjoy!
Page 12

If you have any questions, comments, or need
additional information concerning your EASY-BAKE®
oven and Snack Center, or if you need additional
information concerning this product or its parts,
please call our Hasbro Consumer Affairs hotline at
1-800-327-8264, Monday through Friday during
business hours (Eastern time).
NOTE: Never use REAL MEAL™ baking pans in this oven.
FOOD PACKETS MADE IN THE USA.
OTHER COMPONENTS MADE IN
CHINA. PACKAGED IN CHINA.
35229
Product and colors may vary.
© 2007 Hasbro, Pawtucket, RI 02862 USA.
All Rights Reserved.
TM & ® denote U.S. Trademarks.
P/N 6781100000
 Loading...