

Page 1
HARVIL 3-IN-1 POKER TABLE
ASSEMBLY INSTRUCTIONS
NGD2350/NGD2365
Page 2

Thank you for your purchase of this Harvil product.
We work around the clock and around the globe to ensure that Harvil
products maintain the highest possible quality. However, in the rare
instance that your product is defective or missing parts, contact your
retailer to submit parts requests or warranty claims. Please read the
warranty information at the back of these assembly instructions for
further details.
IMPORTANT! PLEASE READ THESE ASSEMBLY INSTRUCTIONS
IN ENTIRETY BEFORE ASSEMBLING YOUR PRODUCT.
THANK YOU!
2
Page 3
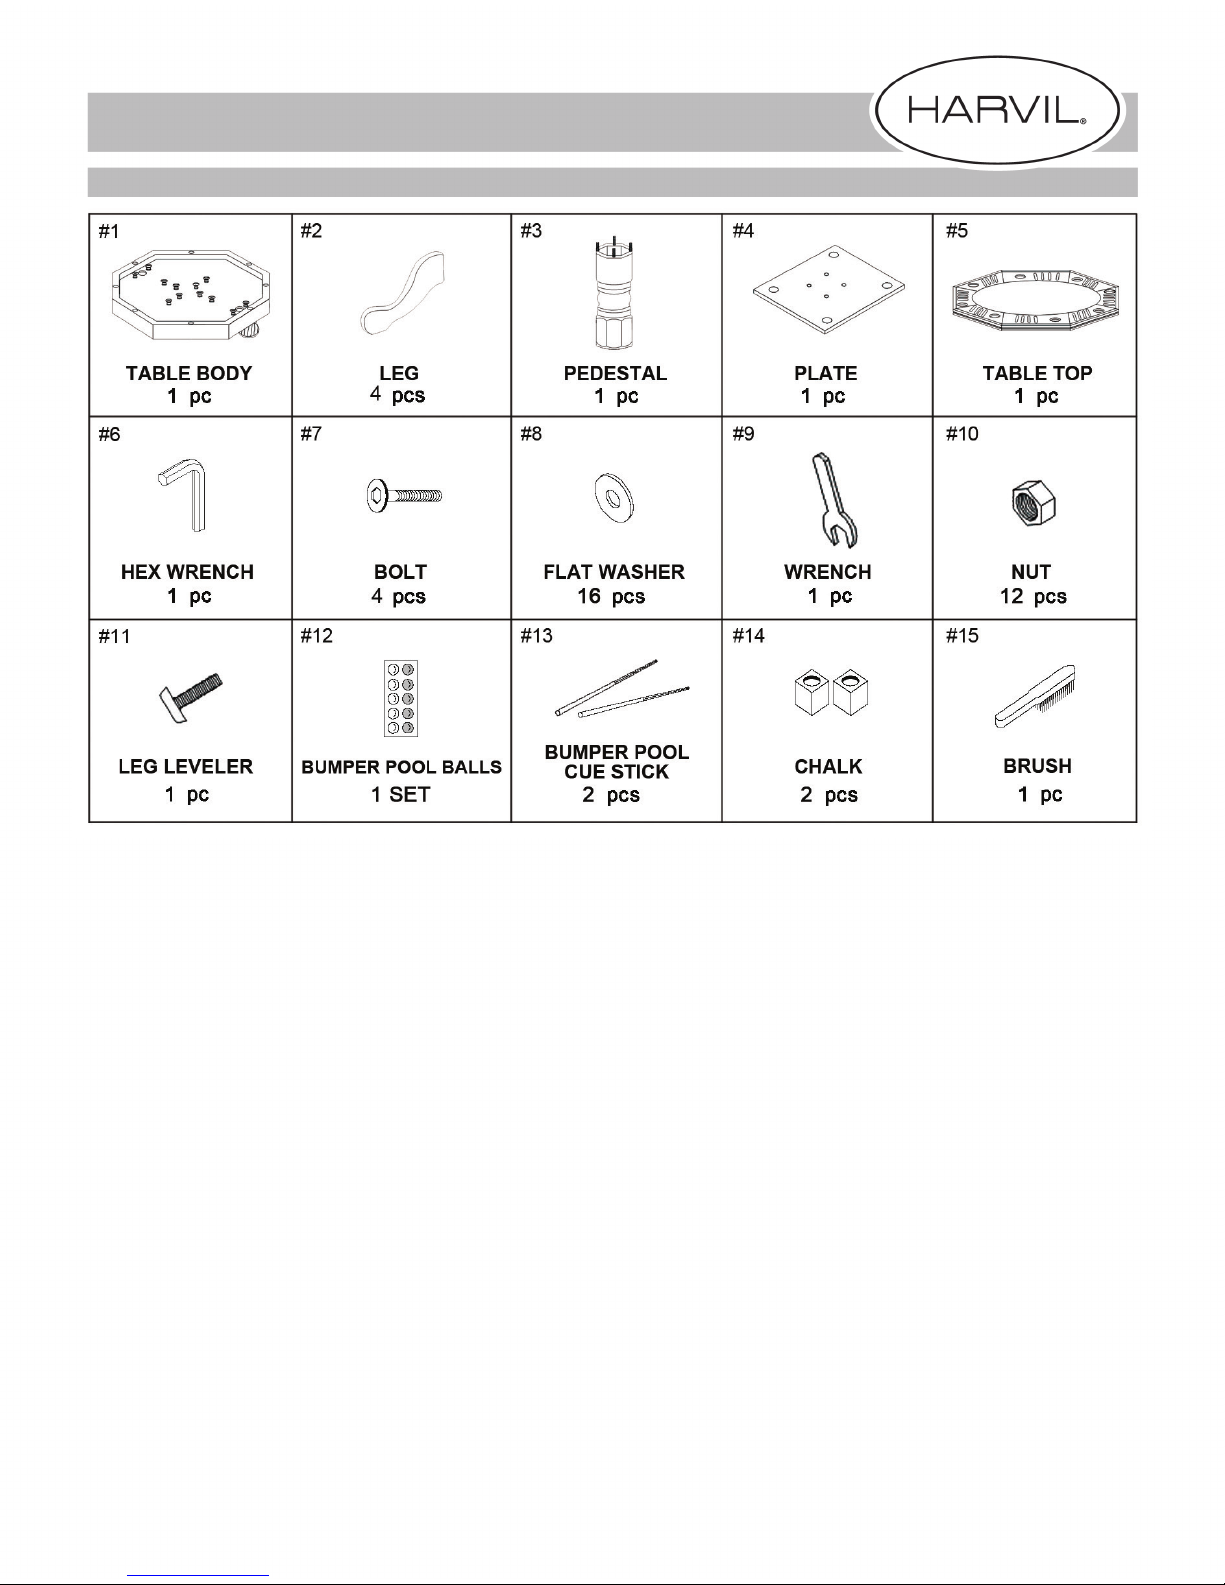
PARTS IDENTIFIER (NOT TO SCALE)
TABLE
3
Page 4

PARTS IDENTIFIER (NOT TO SCALE)
CHAIRS
4
*NUMBER IN ( ) REQUIRED FOR EACH CHAIR
Page 5

ASSEMBLY TIPS
1. Find a clean, level surface to begin the assembly of your game table. The table will
be partially assembled upside down and then turned over onto its legs. This is a heavy
game and turning it over will require at least two strong adults.
2. Remove all of the contents from box and verify that you have all of the parts shown
on the Parts Identifier before you begin assembly. Note: Some parts may be pre-
installed or pre-assembled.
3. Some figures or drawings may not look exactly like your product. Please read and
understand the text before beginning each assembly step.
4. When installing parts that have more than one screw or bolt, hand tighten all screws
or bolts in place before finishing tightening with screwdriver or hex wrench.
5. Electric screwdrivers may be helpful during assembly; however, please set a low
torque and use extreme caution because screws may be stripped or overtightened if
the electric screwdriver's torque is set too high.
WARNINGS!
READ AND FOLLOW ALL ASSEMBLY, OPERATION AND SAFETY INSTRUCTIONS
CAREFULLY.
CHOKE HAZARD - THIS TABLE CONTAINS SMALL PARTS - NOT SUITABLE FOR
CHILDREN UNDER 3 YEARS OF AGE.
5
Page 6

ASSEMBLY INSTRUCTIONS
1. Attach PLATE #4 to PEDESTAL #3 with NUT #10 and FLAT WASHER #8.
2. Attach assembled PEDESTAL to the bottom of the TABLE BODY #1 with BOLT #7
and FLAT WASHER #8.
3. Attach LEGS #2 to PEDESTAL with NUT #10 and FLAT WASHER #8. Thread one
LEG LEVELER #11 onto each LEG.
4. Carefully turn table over. Place TABLE TOP #5 on top of assembled TABLE.
6
TABLE
Page 7

ASSEMBLY INSTRUCTIONS
1. Attach BACK FRAME #16 to SEAT FRAME #17 with one 1-3/4" BOLT #30 and one
16mm FLAT WASHER #28 and four 3" BOLTS #31 and four 16mm FLAT WASHERS
#28 as shown.
2. Attach RIGHT ARMREST #18A and LEFT ARMREST #18B to SEAT FRAME with
1-3/4" BOLT #30 and 16mm FLAT WASHER #28 and to BACK FRAME with 1-3/4"
BOLT #30 and 12mm FLAT WASHER #27.
3. Attach BACK CUSHION #19 to BACK FRAME with 1-3/4" BOLT #30 and 12mm
FLAT WASHER #27. Insert WOOD CAPS #36 into BACK FRAME to cover BOLTS.
4. Attach SEAT CUSHION #20 to SEAT FRAME with 1-1/2" SCREW #33.
7
CHAIRS
Page 8

ASSEMBLY INSTRUCTIONS (CONT.)
5. Attach one CASTER WHEEL #34 to each leg of the BASE #22 as shown. Attach
BASE CAP #23, SEAT LIFT #25 and LIFT COVER #24 to BASE #22 and SEAT ADJUSTER #26 as shown.
6. Attach assembled SEAT to assembled BASE with 1-1/4" BOLT #32 and 19mm
FLAT WASHER #29.
7. Attach one LEG COVER #21 onto each leg of the BASE.
8
CHAIRS
Page 9

CONGRATULATIONS!
You have now assembled your Harvil Game Table.
Please note the Care and Use instructions below to
ensure years of trouble free use of your game table.
CARE AND USE
1. This product is intended for INDOOR use only.
2. Do NOT sit, climb or lean on the table.
3. Do NOT drag the table when moving it as this will damage the legs.
9
 Loading...