

HARVEY Hydroclave MC8, Hydroclave MC10 Owner's And Operator's Manual

BARNSTEAD THERMOLYNE CORPORATION
®
Harvey
Hydroclave MC8
Hydroclave MC10
Steam Sterilizer
(With Optional Non-Recirculating System)
OWNER AND OPERATOR MANUAL
1

Table of Contents
Introduction ........................................................................................................................................................ 4
Operation Overview ..................................................................................................................................... 4
Hydroclave MC8 and MC10 Steam Sterilizer ........................................................................................4
Drying Cycle .......................................................................................................................................... 6
Operator Maintenance ................................................................................................................................. 6
Daily ...................................................................................................................................................... 6
Weekly .................................................................................................................................................. 7
Safety Information .............................................................................................................................................. 8
Declaration of Conformity ............................................................................................................................ 8
Description of Symbols on the Equipment ................................................................................................... 9
General Description ......................................................................................................................................... 11
Intended Use ............................................................................................................................................. 11
General Usage .......................................................................................................................................... 11
Operating Features .................................................................................................................................... 11
Printer ........................................................................................................................................................ 14
Non-Recirculating Water Accessory .......................................................................................................... 14
Recommended Steam Sterilization Monitoring Program ........................................................................... 14
Operation ......................................................................................................................................................... 16
Power On/Controls On .............................................................................................................................. 17
Filling Reservoir ......................................................................................................................................... 18
Filling Non-Recirculating Tank (Option) ..................................................................................................... 19
Emptying Collection Bottle ......................................................................................................................... 19
Installing Overflow Tube (Optional) ........................................................................................................... 20
Load Chart ................................................................................................................................................. 20
Preparing Items for Sterilization ................................................................................................................ 22
Loading ...................................................................................................................................................... 22
Selecting Cycle .......................................................................................................................................... 23
Starting Cycle ............................................................................................................................................ 24
Drying Phase ............................................................................................................................................. 24
Open Door Drying ...................................................................................................................................... 25
Removing Load ........................................................................................................................................ .26
Additional Information ...................................................................................................................................... 27
Cancel Cycle ............................................................................................................................................. 27
Emergency Power Off................................................................................................................................ 27
Power Failure During Cycle ....................................................................................................................... 27
Diagnostic Messages ....................................................................................................................................... 28
Troubleshooting ............................................................................................................................................... 29
Printer............................................................................................................................................................... 30
Installation ................................................................................................................................................. 30
MC8 ..................................................................................................................................................... 30
MC10 ................................................................................................................................................... 30
Operation ................................................................................................................................................... 30
Paper Roll Replacement ............................................................................................................................ 31
Ribbon Replacement ................................................................................................................................. 31
Printer Removal (MC10) ............................................................................................................................ 32
Operator Maintenance ..................................................................................................................................... 33
Daily ........................................................................................................................................................... 33
2

TABLE OF CONTENTS
Cleaning Door Gasket ......................................................................................................................... 33
Weekly ....................................................................................................................................................... 33
Cleaning Chamber, Trays and Rack ................................................................................................... 33
Cleaning and Disinfecting Exterior Surfaces ....................................................................................... 34
Every 25 Cycles ......................................................................................................................................... 34
Cleaning Reservoir .............................................................................................................................. 34
Draining Reservoir .............................................................................................................................. 34
Cleaning Reservoir Filter ..................................................................................................................... 35
Cleaning Chamber Filter Screen ......................................................................................................... 36
When Required .......................................................................................................................................... 37
Emptying Non-Recirculating Collection Bottle ..................................................................................... 37
Cleaning Printer Recess (MC10) ........................................................................................................ 37
Replacing Door Gasket ....................................................................................................................... 37
Every 6 Months .......................................................................................................................................... 38
Cleaning Non-Recirculating Water Cooling Tank ................................................................................ 39
Recommended Spare Parts ............................................................................................................................. 40
Installation ........................................................................................................................................................ 41
Leveling Sterilizer Cabinet/Clearance/Electrical Connection .....................................................................41
Non-Recirculating Water Accessory Installation ........................................................................................ 42
Setting the Clock/Calendar ........................................................................................................................ 43
Technical Data .................................................................................................................................................. 48
Appendix .......................................................................................................................................................... 49
Voltage Conversion (Dual Voltage Models Only) ....................................................................................... 49
115 VAC to 230 VAC.................................................................................................................................. 50
Parts Required .................................................................................................................................... 50
230 VAC to 115 VAC.................................................................................................................................. 53
Parts Required .................................................................................................................................... 53
Two-Year Limited Warranty .............................................................................................................................. 56
3

Introduction
As leaders in the field of sterilization, our goal is
to engineer and manufacture safe, efficient,
quality sterilization products. We are certain you
will agree that this sterilizer meets our goal.
Regardless of how well a piece of equipment is
designed, misuse, abuse, or neglect will deny its
owner the safe, efficient, quality service
expected. Often, misuse, abuse or neglect occurs
unintentionally because the operator is unaware
of the proper operating and maintenance
procedures. This manual provides you with the
information required to properly operate and
routinely maintain your sterilizer. The information
included in this manual applies to all models
unless noted for specific models.
We urge you to read this manual carefully before
operating the unit, and retain it for future
reference.
Operation Overview
Hydroclave MC8 and MC10
Steam Sterilizer
The MC8 and MC10 sterilizer operates on the
principle of heated water converted to steam in a
sealed pressure chamber.
What happens when the controls are turned
on?
• The chamber vent valve opens and the
heater turns on to warm up the chamber.
The items to be sterilized are placed on
4

INTRODUCTION
the trays and the trays are placed
inside the sterilizer chamber. (Certain
parameters such as positioning and
size of the load must be observed for
proper operation and satisfactory
result.) Then, the door is closed and
latched, and the “START” button
pressed to start the cycle.
What happens when the cycle starts?
• The water fill valve opens and the
proper amount of water automatically
flows from the reservoir into the
chamber.
• The water in the chamber begins to
heat. As the water turns to steam, the
temperature and pressure increase,
forcing air from the chamber.
• When the temperature in the chamber
reaches the proper temperature (121
or 135°C) the exposure timer begins.
During this exposure time, the
temperature in the chamber is
automatically maintained at either 121
or 135°C, plus or minus about two
degrees.
• At the completion of the exposure time
a solenoid valve opens, allowing the
steam and water to vent back into the
reservoir. The steam reenters the
5

INTRODUCTION
reservoir through tubing below the water
level in the reservoir. The water in the
reservoir condenses the steam to a
liquid for reuse in the next cycle.
When the one minute timed vent is
complete an indicator light on the control
panel lights to alert the operator that the
cycle is complete.
Drying cycle
At the completion of the sterilization cycle, the
drying cycle automatically begins. This cycle
continues until the selected time has elapsed or
the door is opened.
To restart a drying cycle that has been terminated
by opening the door; close the door (DO NOT
LATCH) and press the “START” button.
Operator Maintenance
It is important to establish the maintenance
schedule called for in the Operator Maintenance
section of this manual.
Daily
Before each days use: Check the water level in
the reservoir. Refill with distilled or deionized
water if needed. Clean the door gasket and its
mating surface.
6

INTRODUCTION
Weekly
Clean the chamber, rack and trays once a week
to prevent a buildup of mineral deposits inside
the chamber. Normal tap water contains
chemicals and minerals, chlorine being the
most common. Chlorine is especially corrosive
to the stainless steel chamber, trays and rack
when water is turned to steam during the
sterilization process. It is important to remove
any mineral deposits regularly to ensure peak
operating efficiency.
Distilled or deionized water should always be
used in the MC8 and MC10 steam sterilizer.
Even when distilled or deionized water is used,
some contaminants can collect in the chamber,
rack and trays.
Clean the reservoir, reservoir filter and chamber
screen at least every 25 cycles. A clogged filter
and/or screen will result in restricted water flow
and prolong the time it takes to fill the chamber.
Maintaining a clean reservoir, filter and
chamber screen is especially important. Foreign
particles, such as bits of oil, adhesives,
amalgam, etc., can be picked up from items
being sterilized and returned to the reservoir,
clogging the filter and screen.
The daily and weekly maintenance should be
performed as outlined above to ensure long,
trouble-free service. Failure to routinely perform
maintenance procedures could result in
processing delays or equipment down time and
possible equipment repairs.
Detailed maintenance procedures for those
listed above and also other “as required” items
are shown in the Operator Maintenance
section of this manual.
7
Safety Information
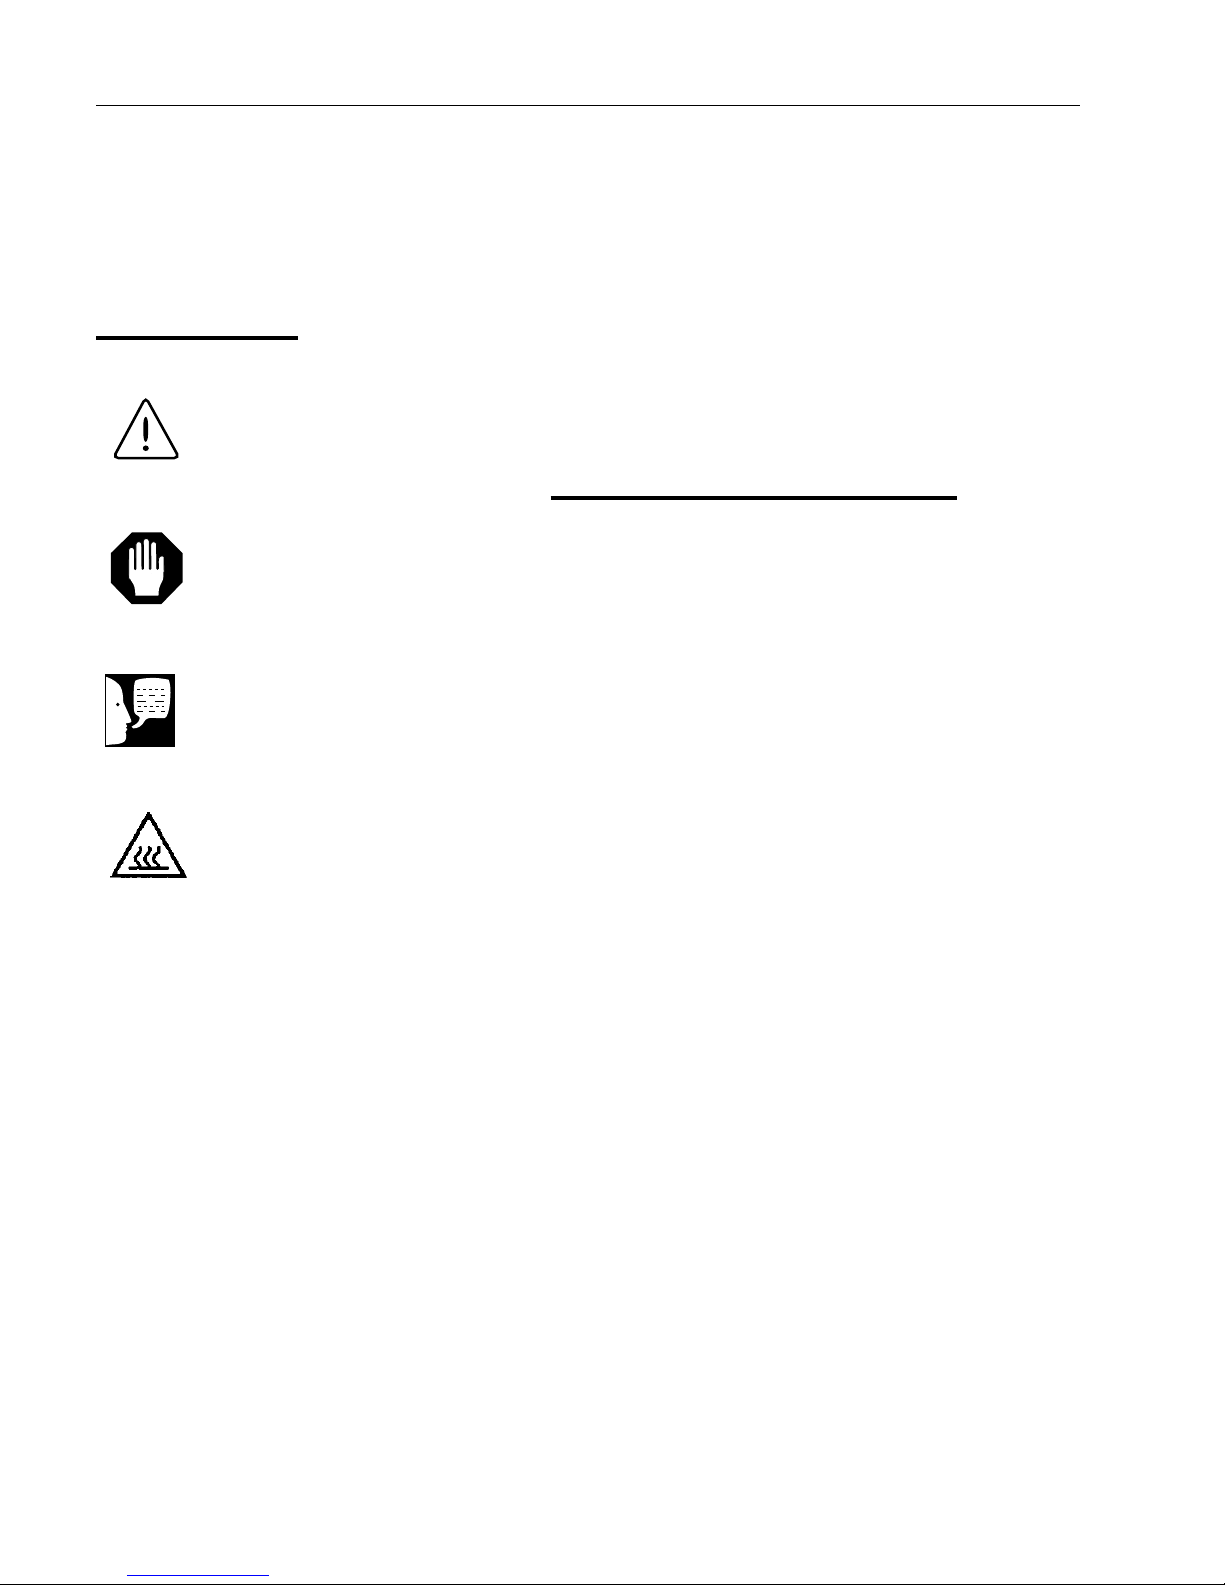
Alert Signals
Warning
Warnings alert you to a
possibility of personal injury.
Caution
Cautions alert you to possibility
of damage to the equipment.
Note
Notes alert you to pertinent
facts and conditions.
Hot Surface
Hot Surfaces alert you to a
possibility of personal injury if
you come in contact with a
surface during use or for a
period of time after use.
The special safety information instructions that
follow appear within the manual. Read them
carefully before operating the unit and follow
instructions.
Declaration of Conformity
Barnstead/Thermolyne hereby declares under its
sole responsibility that this product conforms with
the technical requirements of the following
standards (applies to -33 model(s) only):
EMC: EN 55011 Emission Standard
EN 60801 Immunity Standard
Safety: EN 60601 Medical Electrical
IEC 601-1 Equipment; Part 1:
General
Requirements for
Safety
per the provisions of the Electromagnetic
Compatibility Directive 89/336/EEC, as amended
by 92/31/EEC, and per the provisions of the Low
Voltage Directive 73/23/EEC, as amended by 93/
68/EEC.
8
Copies of the Declaration of Conformity are
available upon request.

SAFETY INFORMATION
Description of Symbols on the
Equipment
Hot Surface
Printer Receptacle
Fuse Type and Rating
Attention: Consult Accompanying Documents
(Refer to Warning and Caution notes in this
manual.)
Type B Equipment, Class I
(Refer to IEC Standard 601-1.)
OFF (Only for a part of equipment.)*
ON (Only for a part of equipment.)*
Paper Feed
* Does not disconnect equipment from mains voltage (AC
power)
9
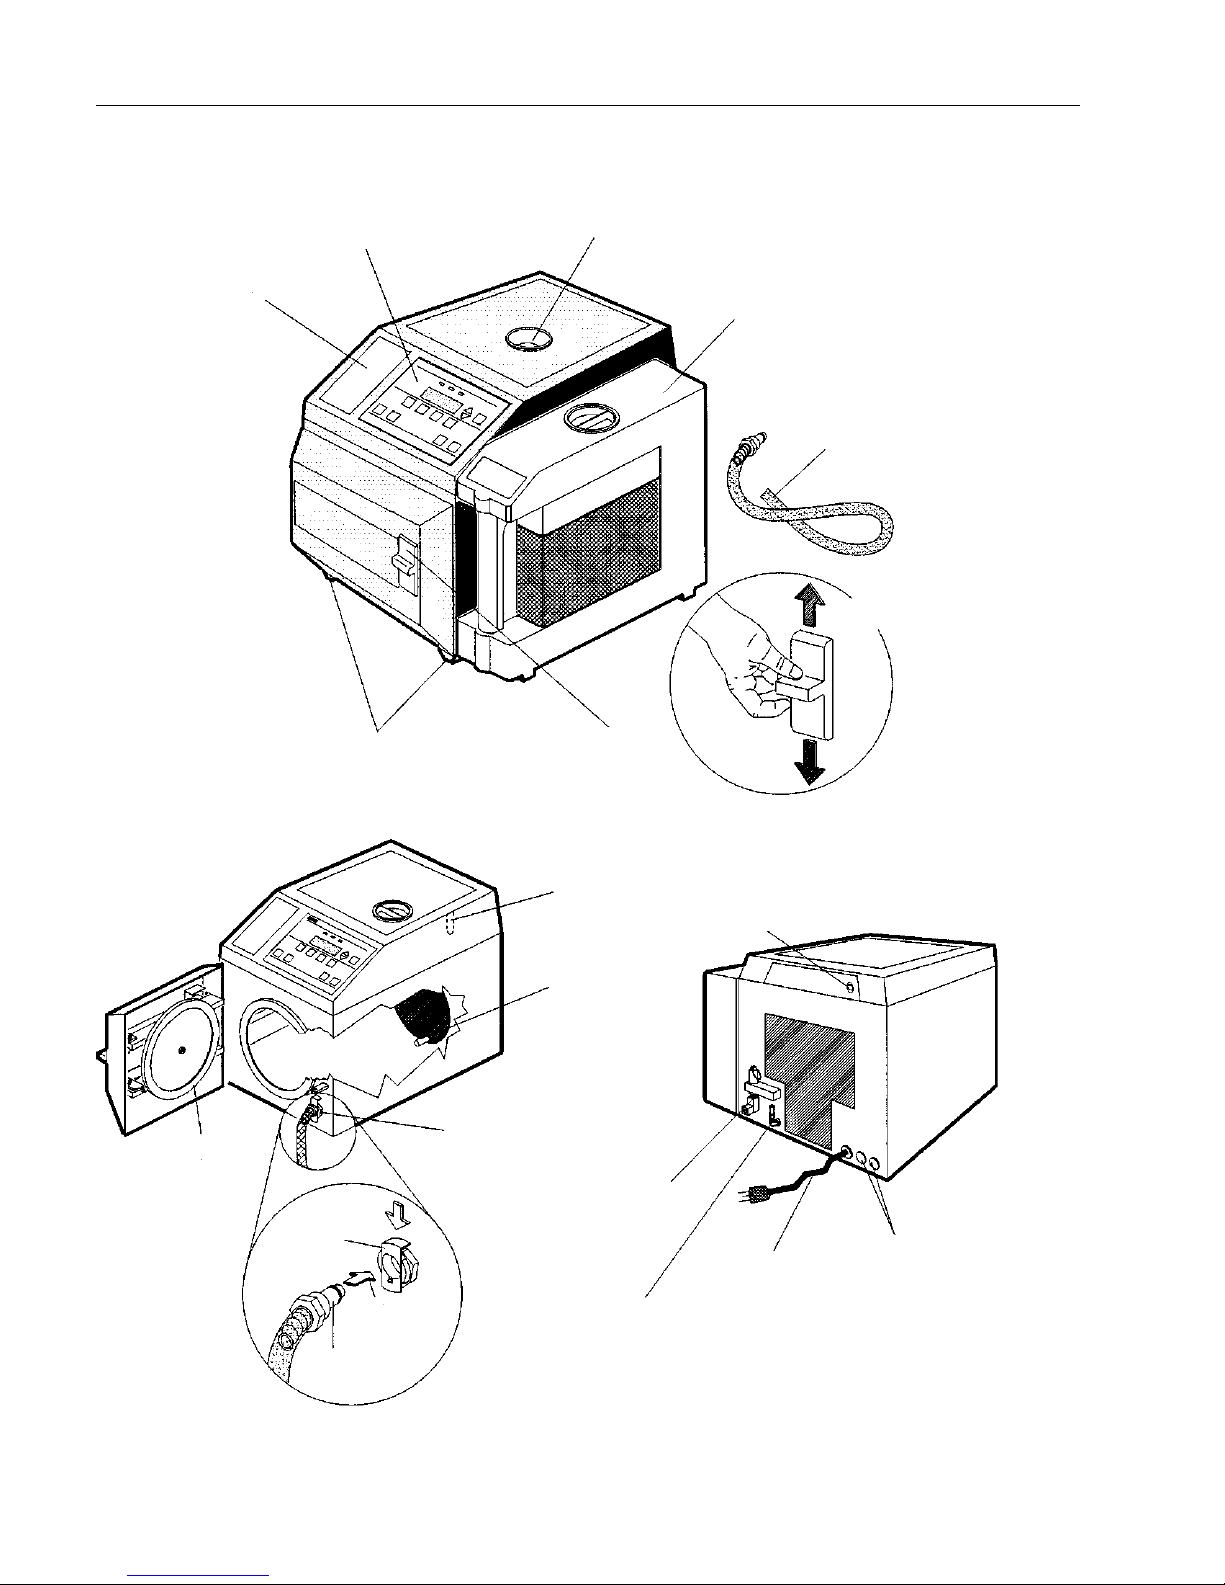
MC10
Printer
(Optional)
Control Panel
Reservoir
Fill Funnel
Non-Recirculating
Water Accessory
(Optional)
Drain
Tube
Open
Door
Gasket
Release
Tab
Drain
Fitting
Leveling
Feet
Push To
Release
Click In
To Drain
Reservoir
Drain Valve
Locking
Handle
Reservoir
Filter
Screen
Water Fill
Port &
Chamber
Filter Screen
Pressure
Relief
Valve
Discharge Port
Non-Recirculating
Lock
Printer
Receptacle
(MC8)
Fuses
Power Cord
Hydroclave MC8/MC10 Sterilizer Overview
10

General Description
Intended Use
The Hydroclave MC8 and MC10 Sterilizers
have been designed for use in medical and
dental offices, hospitals, clinics, laboratories
and other facilities where a variety of materials
require processing.
This steam sterilizer can be used for wrapped
or unwrapped instruments, linen packs, and
liquids. Glassware may be processed using the
liquids cycle.
Warning
Volatile Reaction: Do not use
this sterilizer for processing
volatile substances or for any
purpose other than its intended
design. Failure to heed this
warning could cause personal
injury to personnel or damage to
equipment.
General Usage
Do not use this product for anything other than
its intended use.
Operating Features
• Four preset sterilizing cycles—
unwrapped instruments, wrapped
instruments, packs and liquids.
Exposure and drying times are
adjustable.
• Automatic closed door drying and
optional open door drying (except for
liquid cycle). Drying times are
adjustable.
• Cycle runs automatically when START
switch is pressed.
• Optional printer records temperature
and pressure during cycle.
• Chamber temperature may be
displayed in °C or °F.
• Chamber temperature is displayed
continuously throughout cycle
(excluding dry phase) and may be
displayed in psi, kPa or bars.
11
GENERAL DESCRIPTION
Note
Refer to Service Manual for
setup of temperature unit, pressure units, language, and clock
format.
• Messages may be displayed in English,
French, Spanish or German.
• Clock format may be 12-hour or 24-hour.
• Non-recirculating discharge of steam is
available as an option. This option may
be installed in the field by a service
technician or purchased and installed by
the owner/operator.
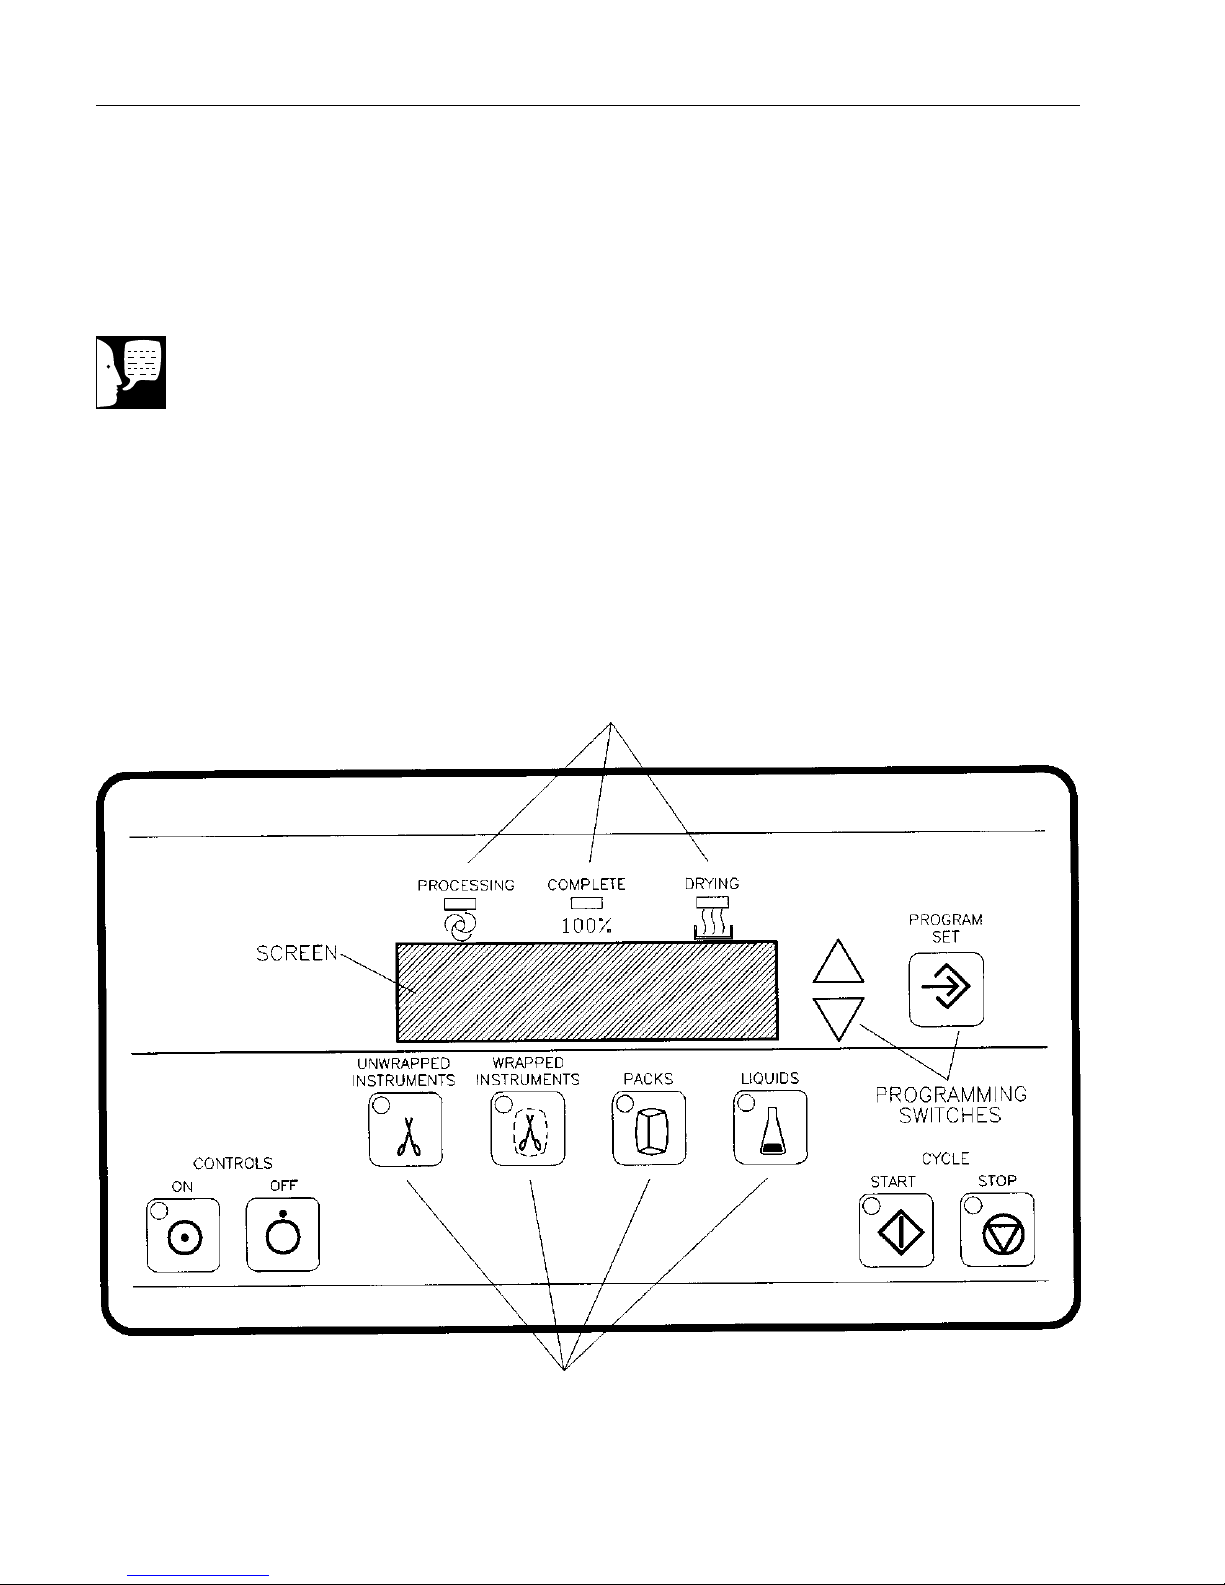
Cycle Phase Indicators
Harvey
Hydroclave MC8
Figure 1
Control Panel
12
Cycle Select Switches
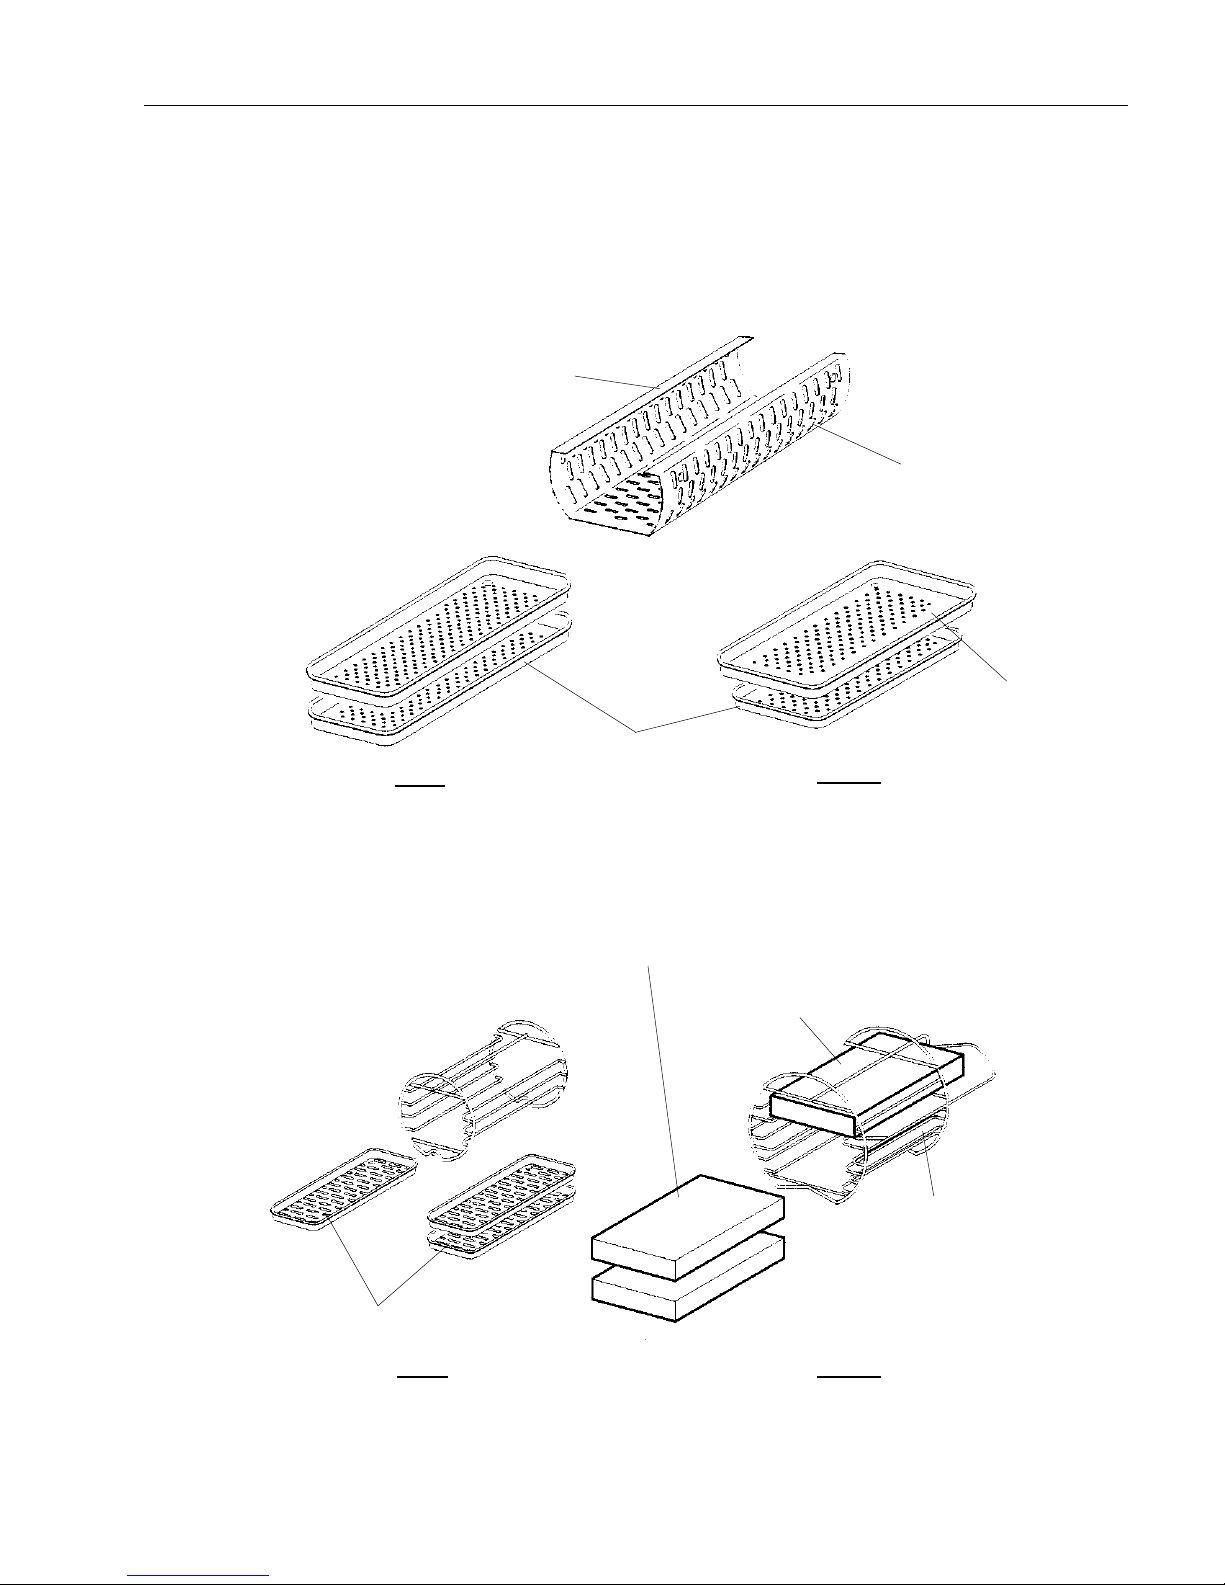
MC8
Support
Flange
Small Tray
(Part No. 265001)
GENERAL DESCRIPTION
Tray Rack
(MC8 - Part No. 265002)
(MC10 - Part No. 2-513025)
Large Tray
(Part No. 2-57811)
MC10
Figure 2
Standard Accessories
(MC8 - Part No. 265024)
IMS Cassette
Four
Tray Rack
Trays
(Not Sold By B/T)
Wrapped
Cassette
MC8 MC10
IMS
Cassette Rack (Holds
MC10 - Part No. 260761)
Figure 3
Optional Accessories
13

GENERAL DESCRIPTION
Figure 4
MC8 Printer
MC8
Printer
Printer
The MC8 printer is a separate unit connected to
the sterilizer by a plug-in cable. The optional
MC10 printer is an integral part of the Control
Panel.
Non-Recirculating
Water Accessory
Standard MC8 and MC10 sterilizers discharge
steam back into the reservoir. For sterilizers with
the non-recirculating system, the distilled water is
used to make steam in the chamber for one cycle
only. Used water (steam) is exhausted into the
cooling tank which then overflows into the
collection bottle. The collection bottle is then
emptied when full.
Waste Water
Optional
Overflow
Drain
From
Sterilizer
Figure 5
Non-Recirculating Water Accessory
14
Cooling
Ta nk
Collection
Bottle
An optional overflow tube is provided for
connection to the back of the cooling tank. This
feature allows the excess water to drain directly
into a sink or drain (if available), eliminating the
need to periodically empty the collection bottle.
Recommended Steam
Sterilization Monitoring Program
All functions of the sterilizer should be monitored
to provide maximum sterilization assurance.
The Joint Commission on Accreditation of
Hospitals and the American Dental Association
recommends that biological indicators be used at
least weekly to check the effectiveness of steam
GENERAL DESCRIPTION
sterilizers to sterilize; i.e., to kill test organisms
of a known high resistance. (Bacillus
stearothermophilus is the recommended test
organism for monitoring steam sterilization.)
We recommend the use of process indicators
such as the B T Check Indicator within each
package of each cycle. For additional
assurance that minimum sterilizing conditions
have been achieved, a biological indicator such
as B T Sure should be used at least once a
week.
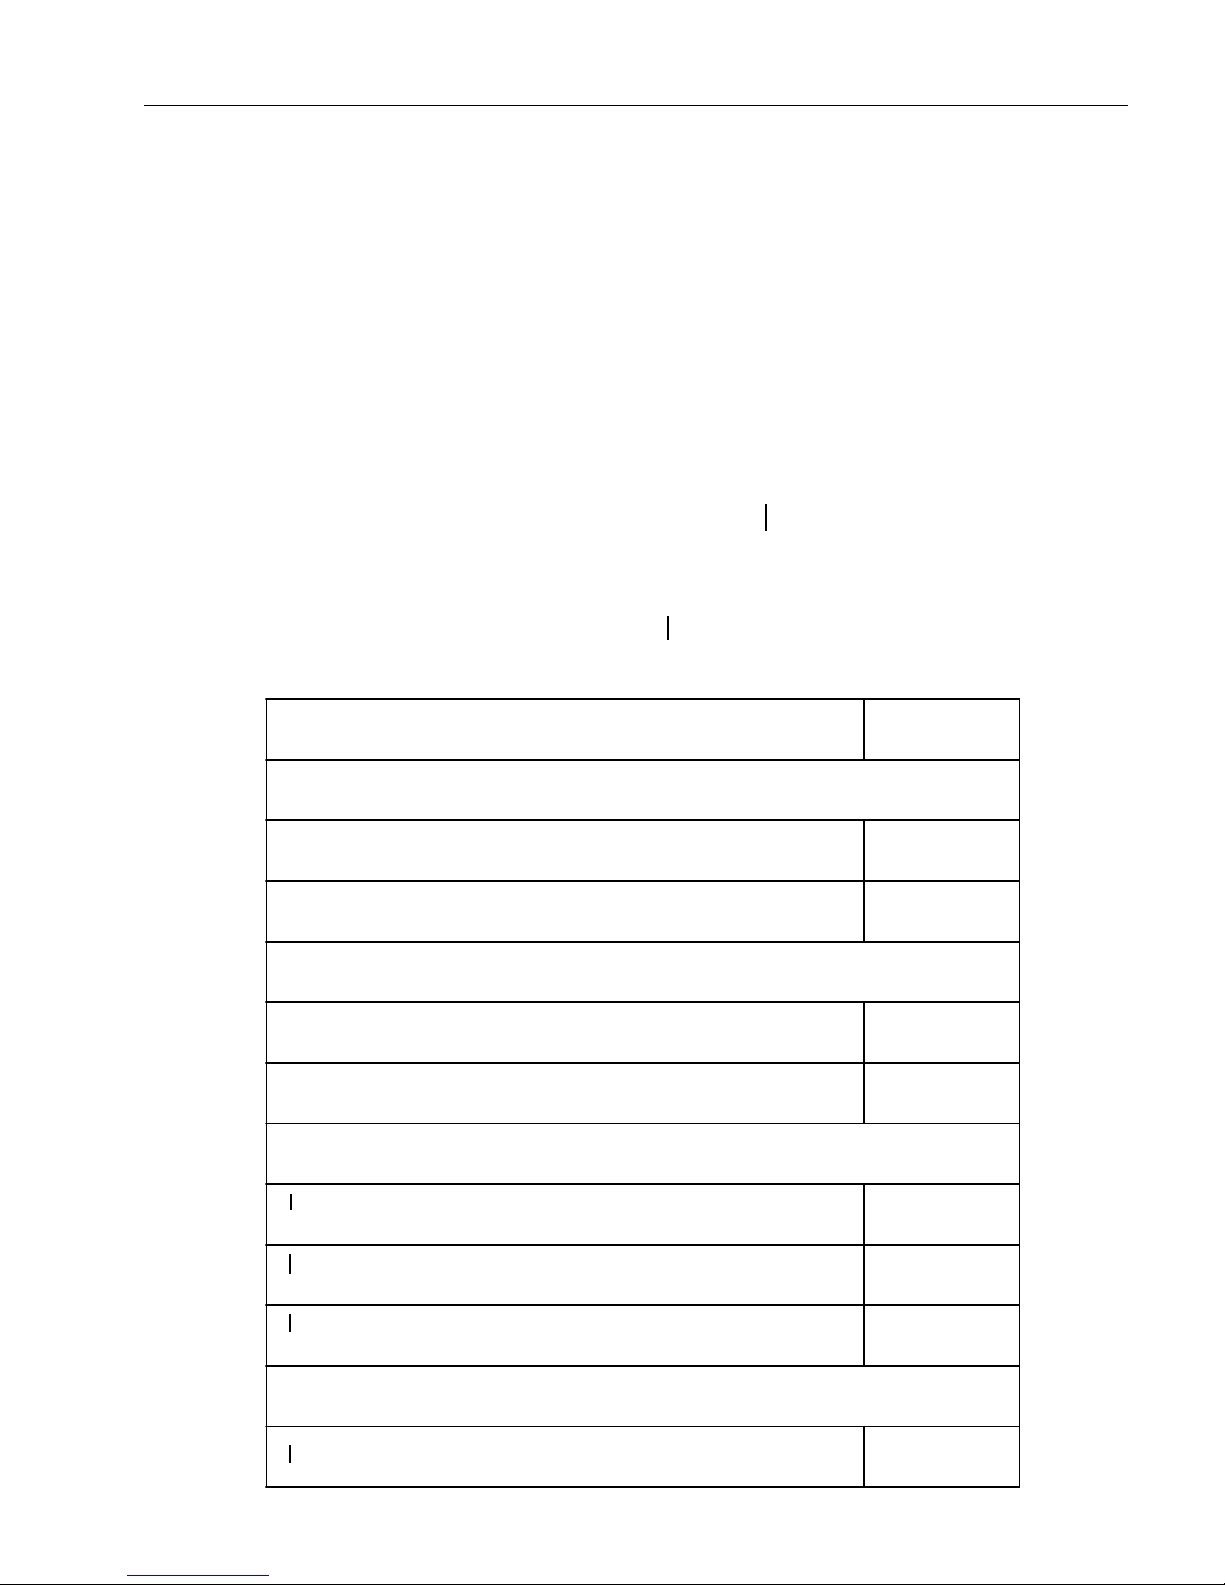
noitpircseD rebmuNtraP
sgaBgnilaeS-fleStsetimehC
)xobrep051("2/1-51x"2x"5:eziSyarT 100003032
)xobrep052("2/1-01x"2/1-1x"2/1-2:eziStnemurtsnI 100103032
sehcuoProtacidnIurhT-eeStsetimehC
)xobrep051("2/1-51x"5:eziSyarT 100203032
)xobrep052("21x"3:eziStnemurtsnI 100303032
srotacidnIlacigoloiB
5
01noitalupoPeropS
5
01noitalupoPeropS
)slaivrotacidnI5foxoB(rotacidnIlacigoloiBeruSTB
)slaivrotacidnI001foxoB(rotacidnIlacigoloiBeruSTB
1X957YA
3X957YA
6
01noitalupoPeropS
srotacidnIssecorP
rotacidnIlacimehCeruSTB 2X957YA
)slaivrotacidnI001foxoB(rotacidnIlacigoloiBeruSTB
8X957YA
15

Operation
1. Press Controls ON.
Warning
Patient Safety Zone: Do not
operate this sterilizer within 6 ft.
(2 m) of patient treatment point.
2. Fill Reservoir.
3. Load Chamber.
4. Lock Door.
5. Select Cycle.
6. Press START.
7. Open Door to Dry.*
8. Remove Load.
* Optional—Drying phase, if selected, will start
automatically without opening the door. Opening the door,
however, may improve drying efficiency.
Operation
16

Power On/Controls On
OPERATION
Note
If time and date are incorrect,
reset the clock/calendar.
1. When the sterilizer is plugged in and
the controls are off, the time and date
will be displayed.
2. Press Controls ON switch to turn on
the control panel. The cycle
temperature, exposure time and drying
time will be displayed and the Standby
Mode will begin. During the Standby
Mode, the heater turns on to warm the
chamber to approximately 38°C. The
heater then cycles ON and OFF to
maintain the warm temperature.
3. Turn ON the optional printer (see
Printer section).
Power On/Controls On
17
 Loading...