

Harvest TEC 860 Owner's Manual

OWNER’S MANUAL
Model 860
Bale Scanner
#010-0850
REVISED 4-09

HARVEST TEC 860 TABLE OF CONTENTS
INTRODUCTION 3
OVERVIEW 4
INSTALLATION OF ANTENNA 5
1. INSTALLATION OF ANTENNA FOR HAND HELD MODE 5
SYSTEM WIRING DIAGRAM 5
OPERATION INSTRUCTIONS 6-10
MAIN MENU 6
CREATING, SAVING, AND CLEARING A BALE GROUP 7
READING BALES WITH HAND HELD OR LOADER ANTENNA 8
VIEWING GROUP ID INFORMATION 9
SETTING SYSTEM ALARMS AND SCREEN BACKLIGHT BRIGHTNESS 10
COMMON QUESTIONS ABOUT THE 860 11
TROUBLE SHOOTING CHECKS 11
PARTS BREAKDOWN FOR SCANNER AND ANTENNA 12
NOTES 13
WARRANTY STATEMENT BACK PAGE
PAGE
2

INTRODUCTION
Congratulations on purchasing a Harvest Tec Model 860 bale scanner. This scanner will
allow you to read all the information stored on the RFID tags applied to the bale with the
Harvest Tec model 850 tagger. The model 860 will include the bale scanner, hand held
antenna, AC charger, and mounting hardware.
Federal Communications Commission (FCC) Statement:
This device complies with part 15 of the FCC Rules. Operation is subject to the following two
conditions: (1) This device may not cause harmful interference, and (2) this device must accept any
interference received, including interference that may cause undesired operation. Class A Device
Statement: (Section 15.105(a) of the FCC Rules) This equipment has been tested and found to
comply with the limits for a Class A digital device, pursuant to part 15 of the FCC Rules. These limits
are designed to provide reasonable protection against harmful interference when the equipment is
operated in a commercial environment. This equipment generates, uses, and can radiate radio
frequency energy and, if not installed and used in accordance with the instruction manual, may
cause harmful interference to radio communications. Operation of this equipment in a residential
area is likely to cause harmful interference in which case the user will be required to correct the
interference at the operators own expense. Caution: Changes or modifications not expressly
approved by Harvest Tec can void the user’s authority to operate the equipment.
Industry Canada (IC) Compliance Statement:
This Class A digital apparatus meets the requirements of the Canadian Interference-Causing
Equipment Regulations.
Cet appareil numérique de la classe A respecte toutes les exigences du Règlement sur le matériel
brouilleur du Canada.
3
OVERVIEW
The Harvest Tec model 860 Bale Scanner uses RFID to read the information stored on the tags.
Radio Frequency Identification (RFID)
The antennas used (either in handheld or on the baler) emit radio waves to ‘wake up’ the microchip
in the tag. The tag uses captured energy broadcast by the antenna to power itself up. Once the tag
‘wakes up’, it responds to the antenna.
Radio waves cannot be seen, so it can be difficult to visualize. Imagine that the antenna is a
flashlight and the tag is a mirror. When the flashlight is focused on the mirror, the beam is reflected
back to the flashlight. The reflected light is what the antenna sees and it knows how to interpret the
‘response’ signal.
The frequency being used for the Bale Identification system does not work well around high
moisture, and can be totally blocked by metal. Plastics, wood, and glass do not pose any problems
to the functionality.
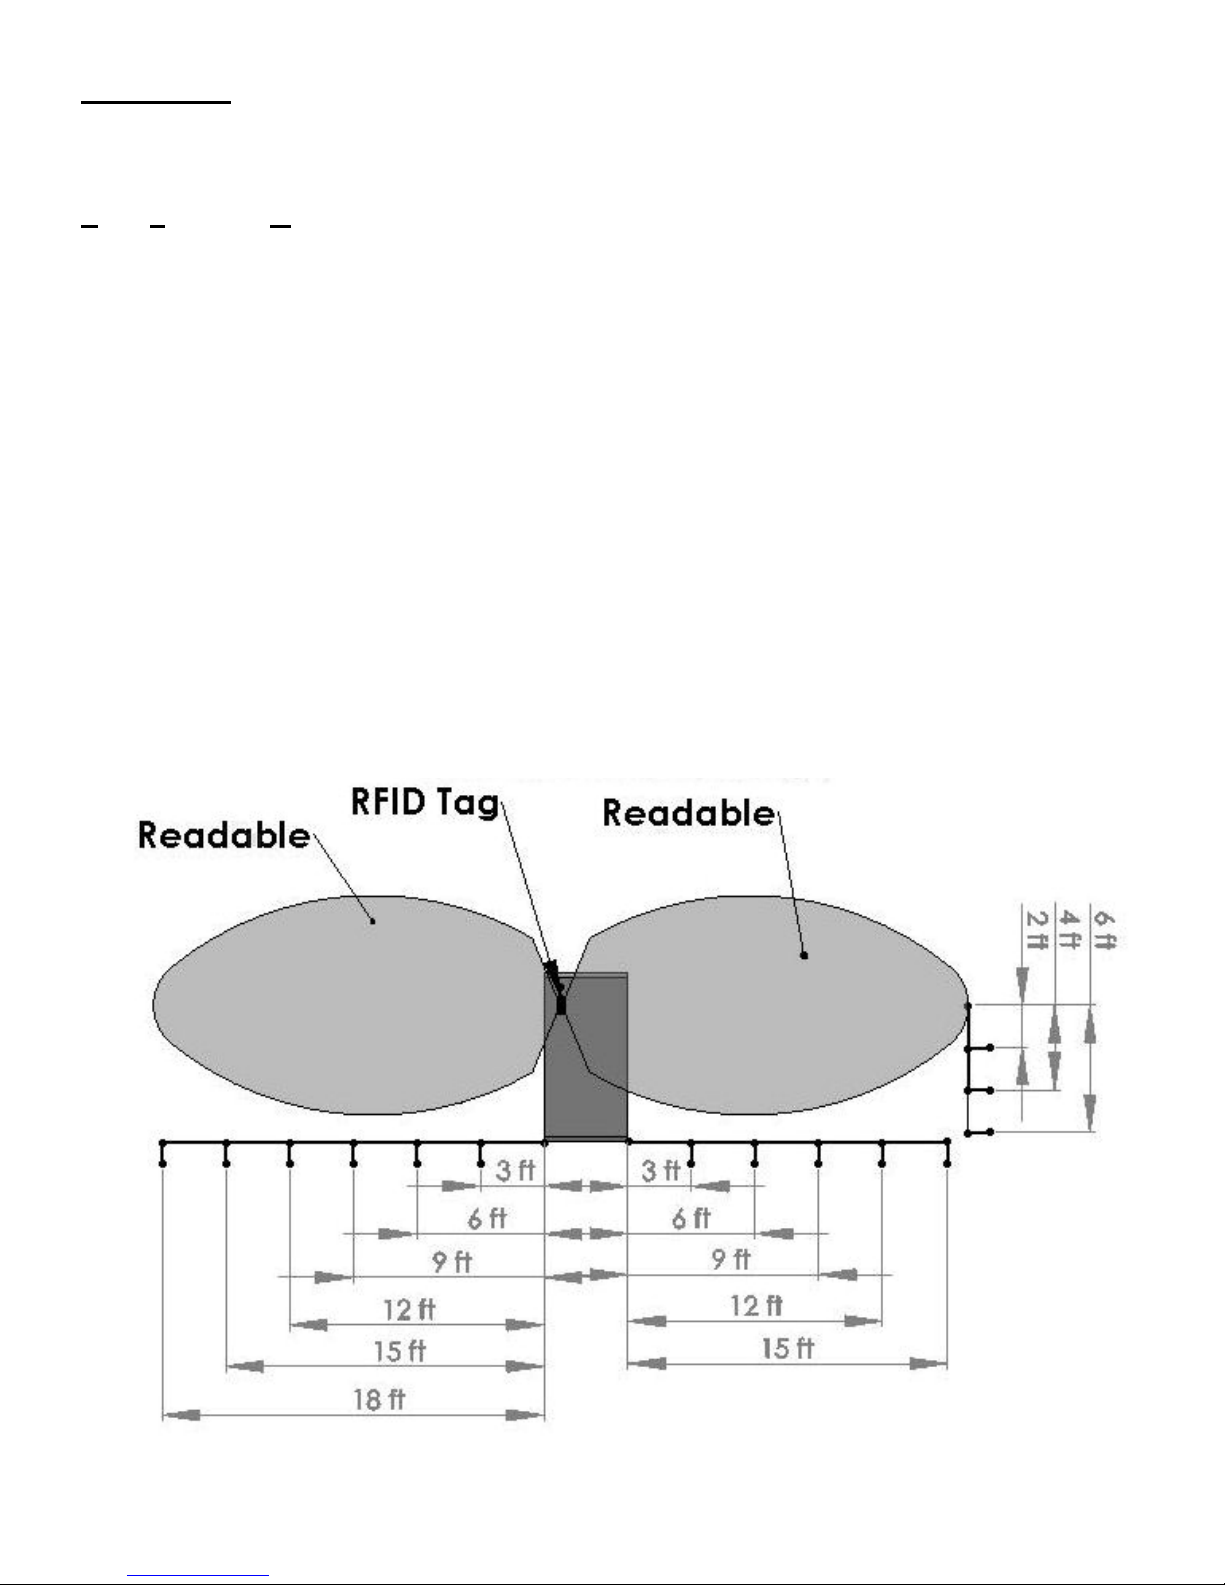
Positioning of the antenna to the tag is critical. The diagram below shows the range and distance of
the antenna. The antenna needs to be positioned so the “face” of the tag is towards the antenna.
Antenna Range
4

1. INSTALLATION OF ANTENNA FOR HAND HELD MODE
Locate the smaller hand held antenna (006-8601) and attach it using the sliding mount on the back
of the scanner. Attach the coaxial cable to the right antenna plug on the scanner.
SYSTEM WIRING DIAGRAM
1. Connect the antenna to the scanner port.
2. Connect the battery charging plug on the right side as shown. When the battery is charging
the screen charging icon will turn red. When the battery is not charging the icon will be grey.
3. The USB port is located on the bottom of the scanner. Insert a USB drive to upload software
or download bale groups.
4. The power button is located on the top of the screen. Press and hold for 1/2 second to power
on/off. The green led will be illuminated when the scanner is powered on.
5. Optional foot switch lead for scanning and accepting bales.
4
2
1
1
5
3
5
 Loading...