

Harvest TEC 600SS Operation Manual
Model 600SS
Moisture Sensor Kit for Small Square Balers
600SS-16-OPR-BLE
11/17
Operation Manual

2
(intentionally blank)

3
Page
Introduction
4
System Requirements
4
Safety
4
Safety Decals
4
Bluetooth Operation
5-9
Turn On / Off iPad
5
Downloading Hay App
5
Shutting Down the Hay App
6
Device Selection
7
Manual Selection & Recommended Preservative
8
Tab Descriptions
9
Screen Menus
10-
Automatic Mode & Manual Mode
10
Setup Mode
11
Job Records
12-13
Baling Rate Settings
14
Stroke Counter Setup
14
Operation Instructions
15
Automatic Mode
15
Manual Mode
16
Job Records
17
Download Job Records
18
Export Job Records
19-20
Wiring Diagram
21
Pin Outs
22-23
Common Questions
24
Troubleshooting
25
Maintenance, Winter Storage, Status Alerts
25
Parts Breakdown
26-29
Controls and Harnesses
26
Star Wheels and Bale Rate Sensors
27
Optional iPad Mini Mounting Kit (030-2012MK)
28
Optional iPad Display Kit (030-2670DK)
29
Notes
30
Warranty Statement
31
600SS Operation Manual Table of Contents
4
Introduction
Number 1
Disconnect power before servicing.
Part no. DCL-8003
Number 2
Read and understand the operator’s manual
before using or working around the equipment.
Part no. DCL-8000
Thank you for purchasing a Harvest Tec Model 600SS Moisture Monitor System. This 600SS Moisture
Monitoring System has been designed to be operated through an Apple iPad (not included) using the Hay App.
As well as the option to plug directly into most tractors that have an ISOBUS Monitor. The 600SS Moisture
Monitoring System offers these advantages by operating through an Apple iPad:
1. Large bright, clear, colorful display
2. More durable and can be read in bright sunlight
3. Wireless connection in cab
4. Can be used for multiple other uses than just the applicator display
5. Option to tie-into the tractor ISOBUS system
The 600SS Moisture Monitor kit includes the following parts: Dual Channel Processor (DCP), Moisture
Sensors, Harnesses, Bluetooth receiver and Miscellaneous Hardware. For your convenience a parts break
down for the 600SS Moisture Monitoring System is included in the back of this manual. If you do have
questions please bring this manual into the dealership.
Right and Left sides are determined by facing in the direction of forward travel.
*Requirement to run iPad option are 3rd Generation iPad (2012) or newer with
iOS8 or greater operating system, plus the Hay App.
If choosing to operate the unit though the ISOBUS monitor, part number 006-6670A
will need to be ordered through your local equipment dealer.
Safety
Carefully read all the safety signs in this manual and on the applicator before use. Keep signs clean and
visible. Replace missing or damaged safety signs. Replacement signs are available from your local authorized
dealer. See your installation manual under the replacement parts section for the correct part numbers.
Keep your applicator in proper working condition. Unauthorized modifications to the applicator may impair the
function and/or safety of the machine.
Carefully read and understand all of the baler safety signs before installing or servicing the baler. Always use
the supplied safety equipment on the baler to service the applicator.
Safety Decals
5
Bluetooth Operation
Hay App
Sleep/Wake Button
2. Turn Wi-Fi on by sliding button to the right.
3. Use same process to turn on Bluetooth function
Turn On / Off iPad using the Sleep/Wake button
*(Info from Apple User’s Guide)
Turn iPad on. Hold down the Sleep/Wake button until Apple logo appears. iPad will take a moment to load.
You can lock iPad and put it to sleep when you’re not using it. Locking
iPad puts the display to sleep, saves the battery, and prevents
anything from happening if you touch the screen.
When you are not going to use the iPad for an extended period of time put the unit into sleep mode by pressing
the Sleep/Wake button. Press Sleep/Wake button to wake iPad and then unlock iPad by entering passcode.
Turn iPad off. Hold down the Sleep/Wake button for a few seconds until the slider appears onscreen, then drag
the slider to the right.
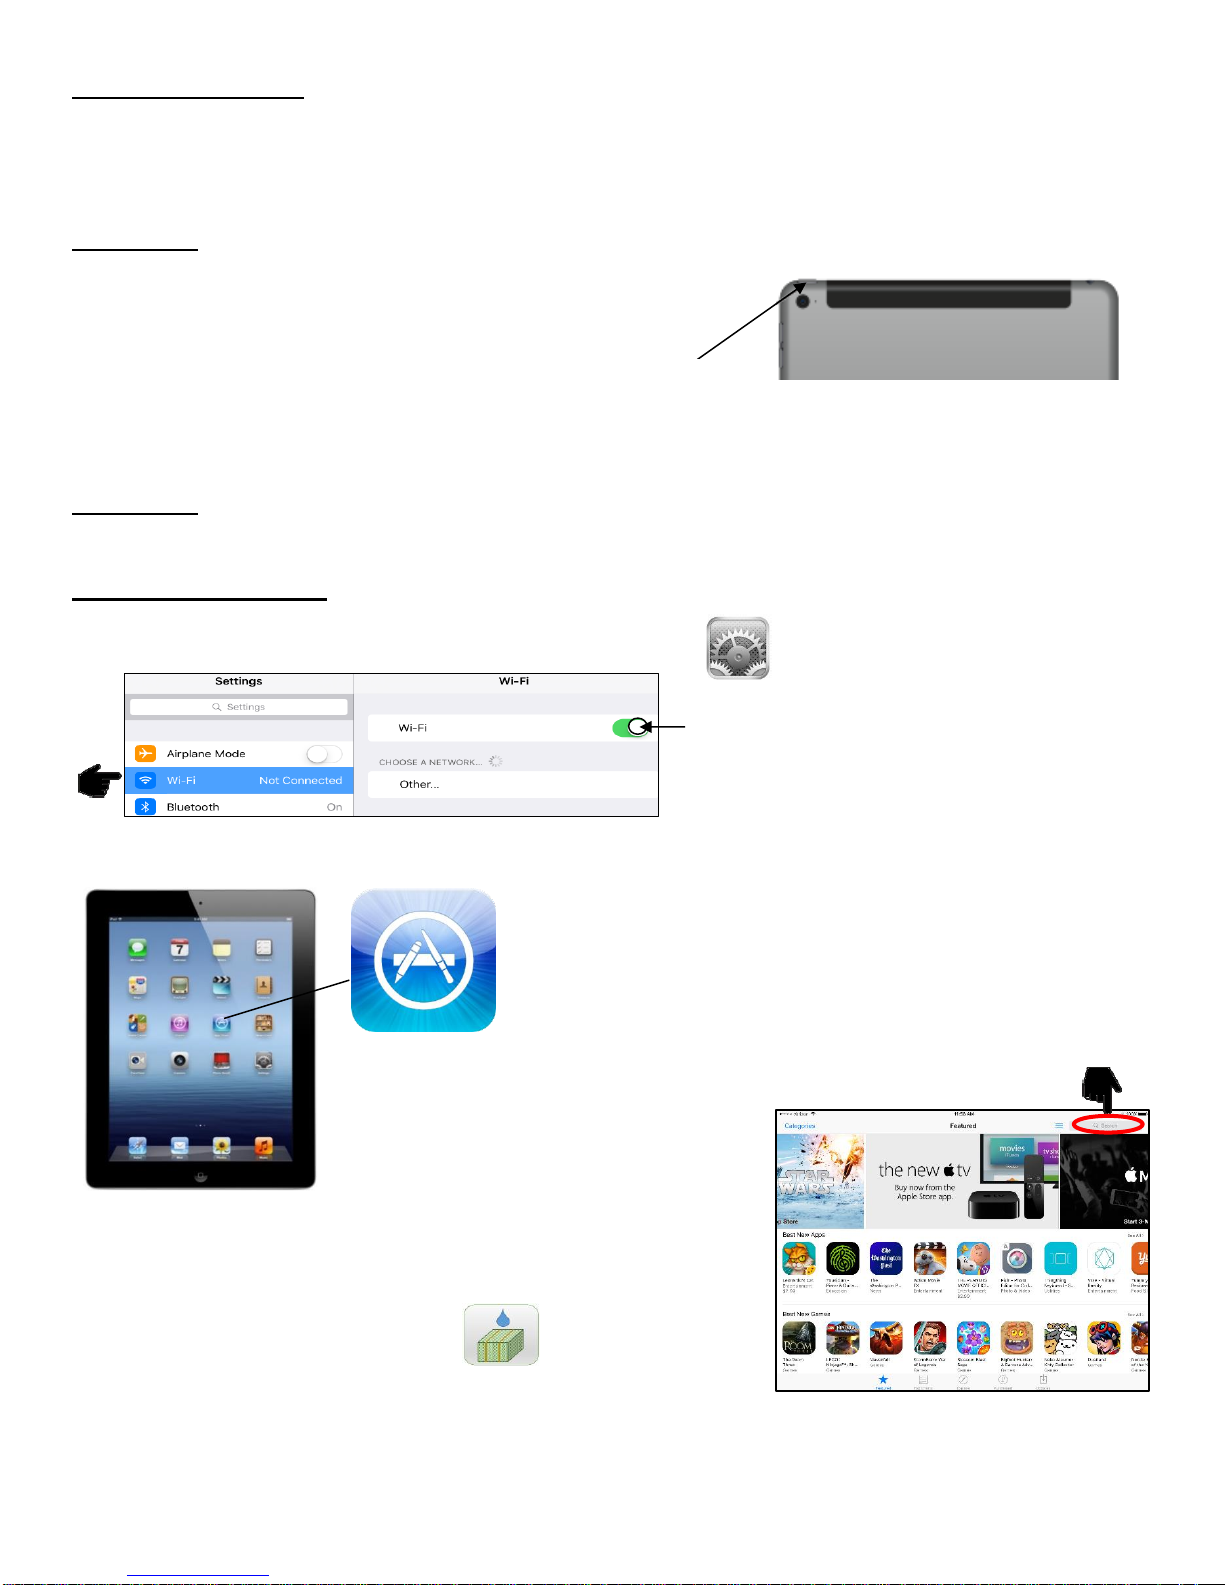
Downloading Hay App
1. If iPad does not have Wi-Fi turned on, select the Settings tab then select the Wi-Fi tab (below).
*Green bar indicates ON
4. Select an available network when detected by the iPad, shown in area above that currently says ‘Other.’
5. Select App Store icon (below) and open. *You will need a Wi-Fi connection available to view App Store.
Download the Hay App in the App Store by searching for
‘Hay App’ in the search bar in the top right corner of screen (right):
*The advertisements displayed on the App Store screen will change.
The app will have the icon as shown:
Note: Operation requires 3rd generation (2012) iPad, iPad Mini, or newer with iOS8 or greater operating system.
6
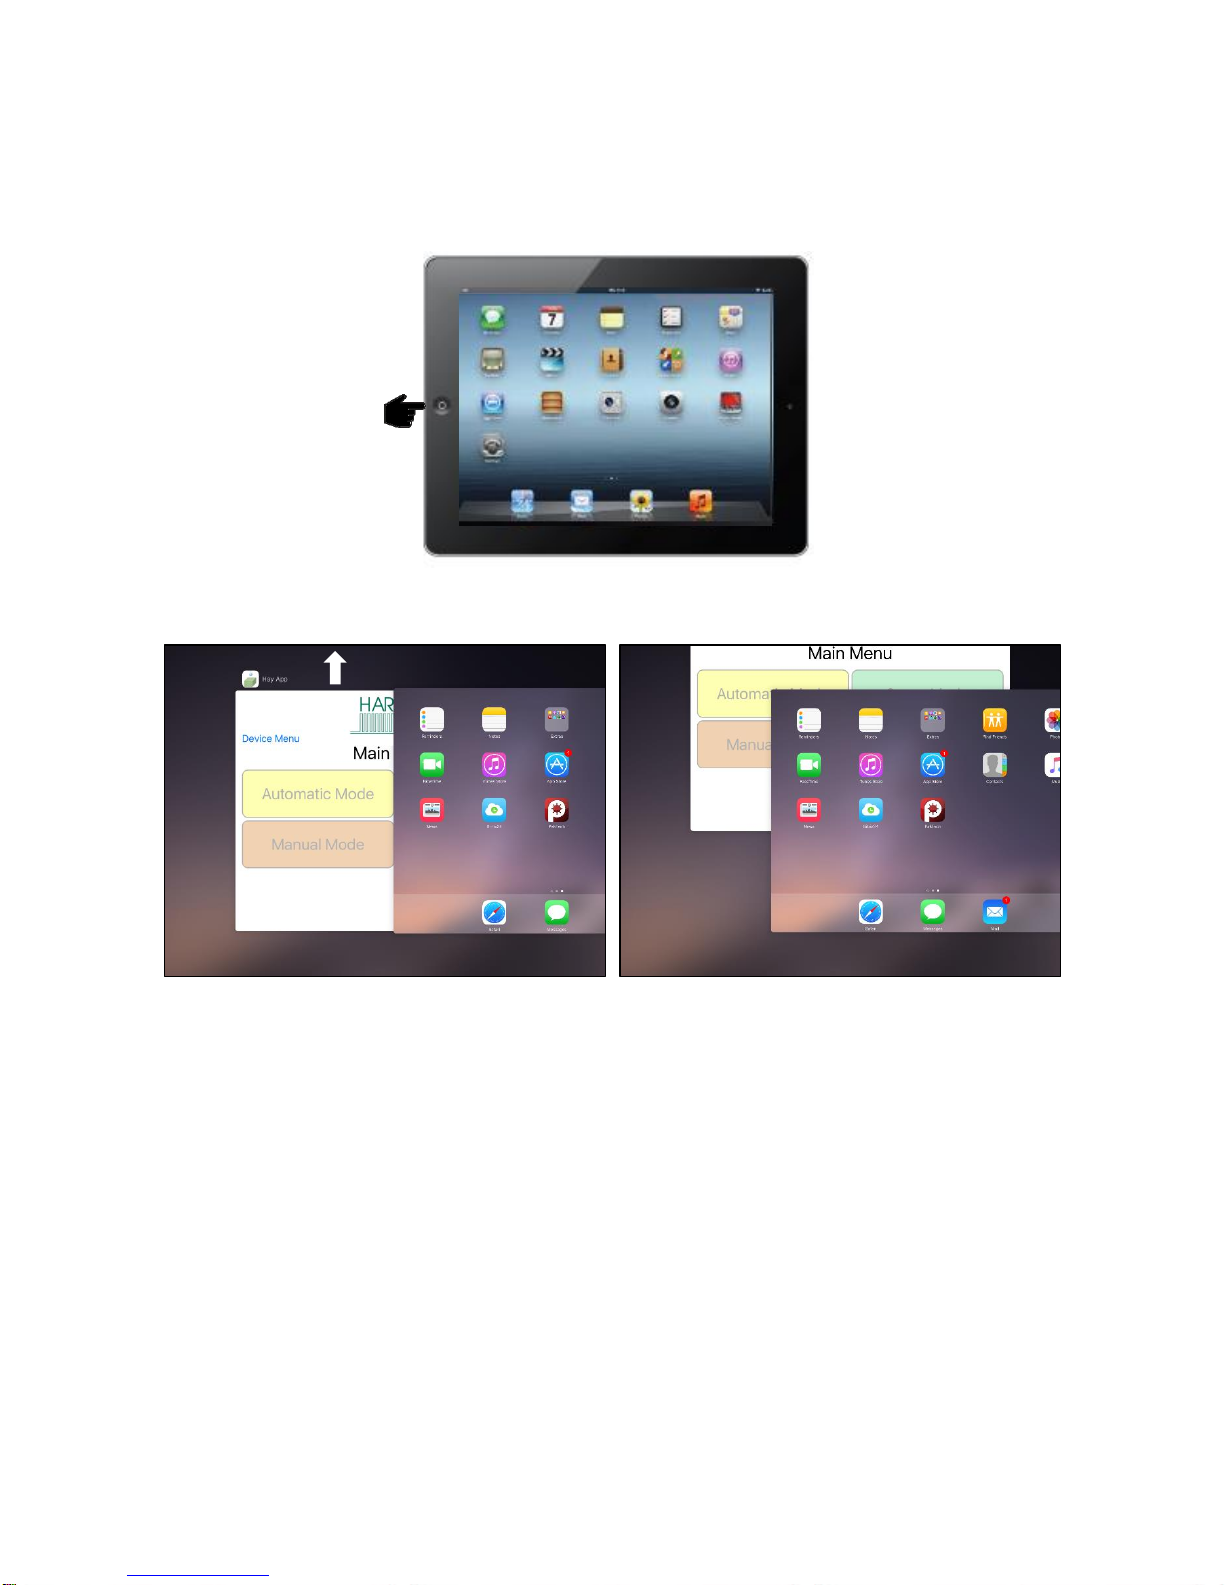
Shutting Down the Hay App
Figure A
Figure B
Figure C
To shut down the Hay App double click the home button (Figure A). This will show the open apps that are
running on your iPad (Figure B).
*Note: By pressing the home button one time to return to the home screen, the Hay App does not shut down.
The system will however, stop applying preservative after 10 seconds.
Slide the app you want to shut down by sliding the app toward the top of the iPad, until the app is no longer
visible (Figure C).
7
Operating the Harvest Tec iPad App
After the iPad connects to
want to connect with.
After installation of the Bluetooth Receiver (030-6672A) on to the applicator system, attach the power cord
006-6650TM to supply power.
*Refer to the applicator installation manual for details on connecting the Bluetooth Receiver.
When ready to operate your applicator system, open the Hay App on the iPad by selecting the Hay App icon.
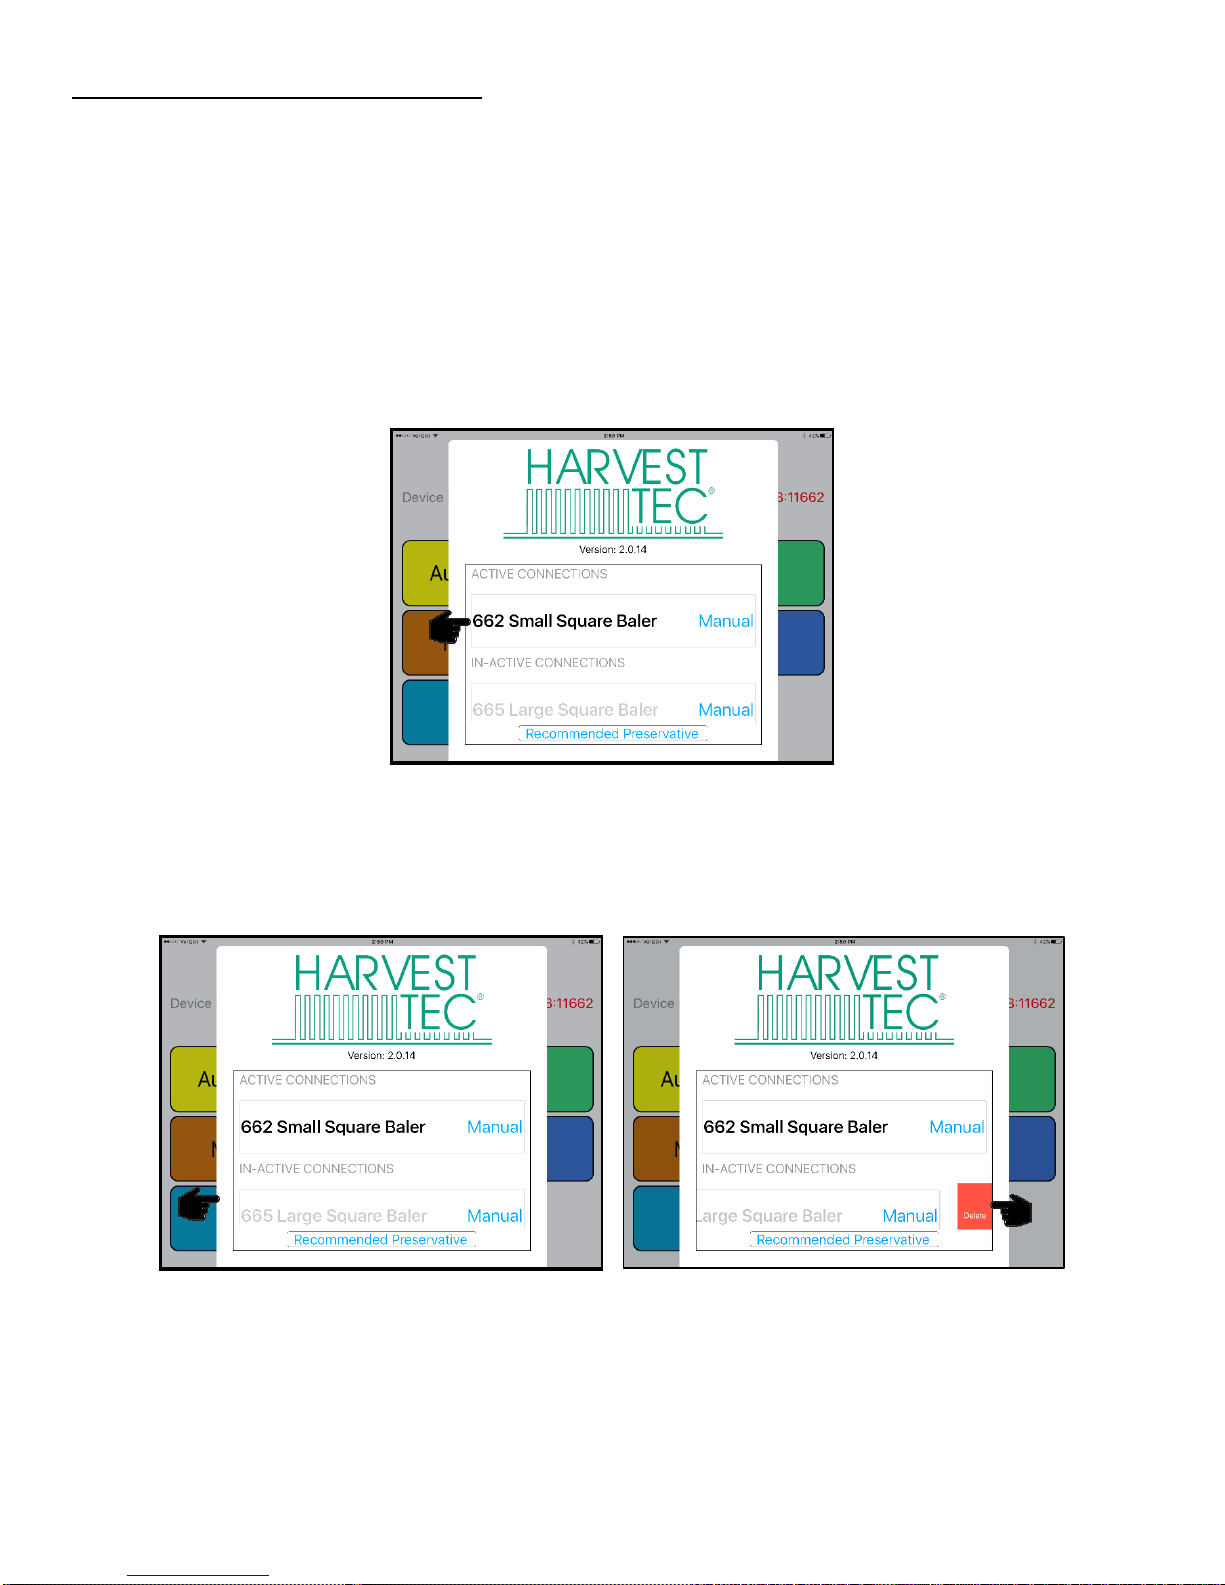
Device Selection
The app will open to the Device Menu screen as shown below. Applicators which are equipped with the
Bluetooth receiver that are within range (20’) of the iPad and have power going to them, will be shown under
the Active Connections section.
the Bluetooth receiver,
select the applicator you
The In-Active Connections section will show applicator systems that have been connected in the past, but are
not within range of the iPad or do not currently have power going to them (bottom left).
To remove a baler from the In-Active list, slide the bar displaying the baler name to the left, and select the
Delete button that will appear (bottom right).
8
Operating the Harvest Tec iPad App (continued)
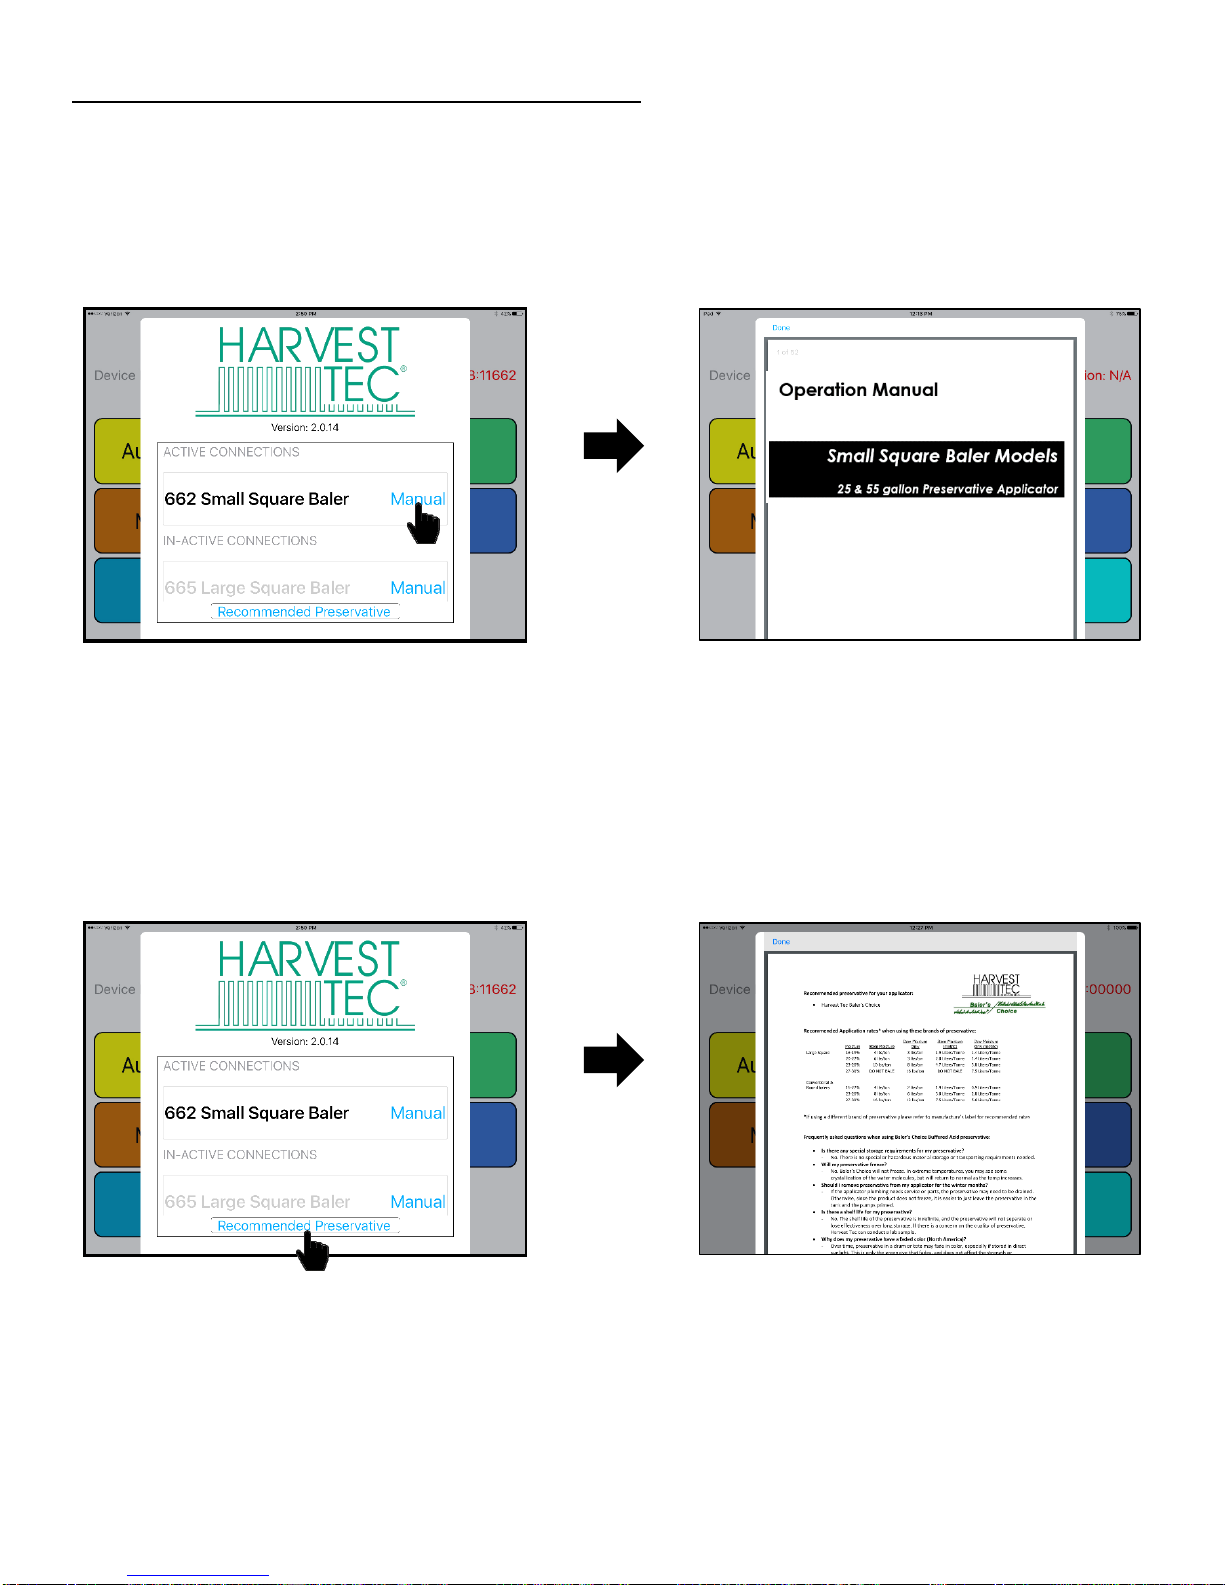
Manual Selection
Selecting the Manual button (below) displayed to the right of the baler name will open the operation manual for
your baler.
*You do not need to be connected to a baler to open the manual after a baler has been connected.
When finished reviewing the manual, press the Done button in the top left corner to return to the Device Menu.
Recommended Preservative
To view recommended preservative information, application rates, and frequently asked preservative
questions, select Recommended Preservative (below).
*You do not need to be connected to a baler to open the recommended preservative page.
9
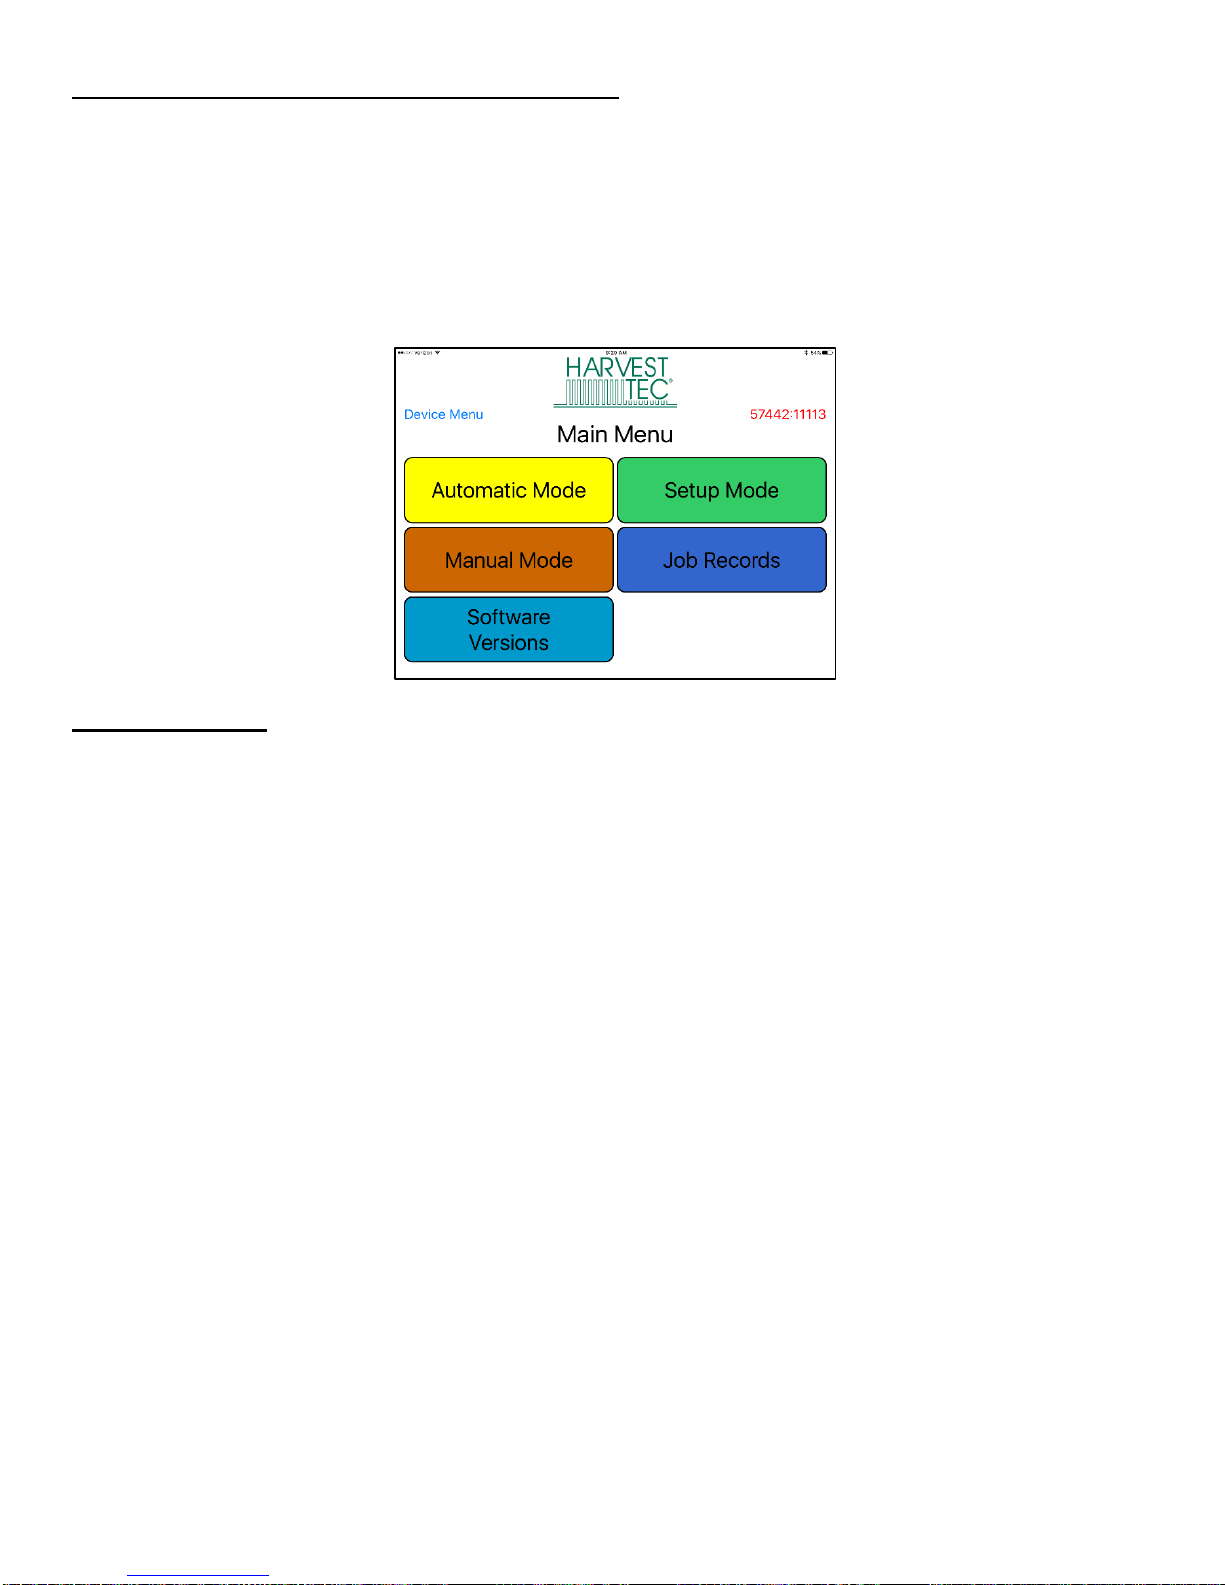
Operating the Harvest Tec iPad App (continued)
Once you have selected the baler you want to connect with from the Device Menu, the applicator main menu
will display (below).
Ensure the iPad Bluetooth function is turned on in the Settings App.
*The applicator system will not appear under the Bluetooth Devices in the Settings App upon initial connection.
You must open the Hay App to view the available devices by selecting the Device Menu. After you have
connected through the Hay App, the system will then appear under the Bluetooth Devices in the Settings App.
Tab Descriptions
Automatic Mode: This mode allows you to use all of the applicator features such as adjusting preservative
application on the go and counting total pounds of product used.
Manual Mode: Allows operator to manually turn pumps on and off. This mode also has moisture content
displayed. Use this mode to prime pumps.
Software Versions: Selecting this tab will display the software currently installed.
Setup Mode: This mode allows the operator to adjust bale rate, application rate settings and select tip output.
Job Records: Keep track of up to 300 jobs with total product used, average moisture content, tons baled, and
baling date.
10
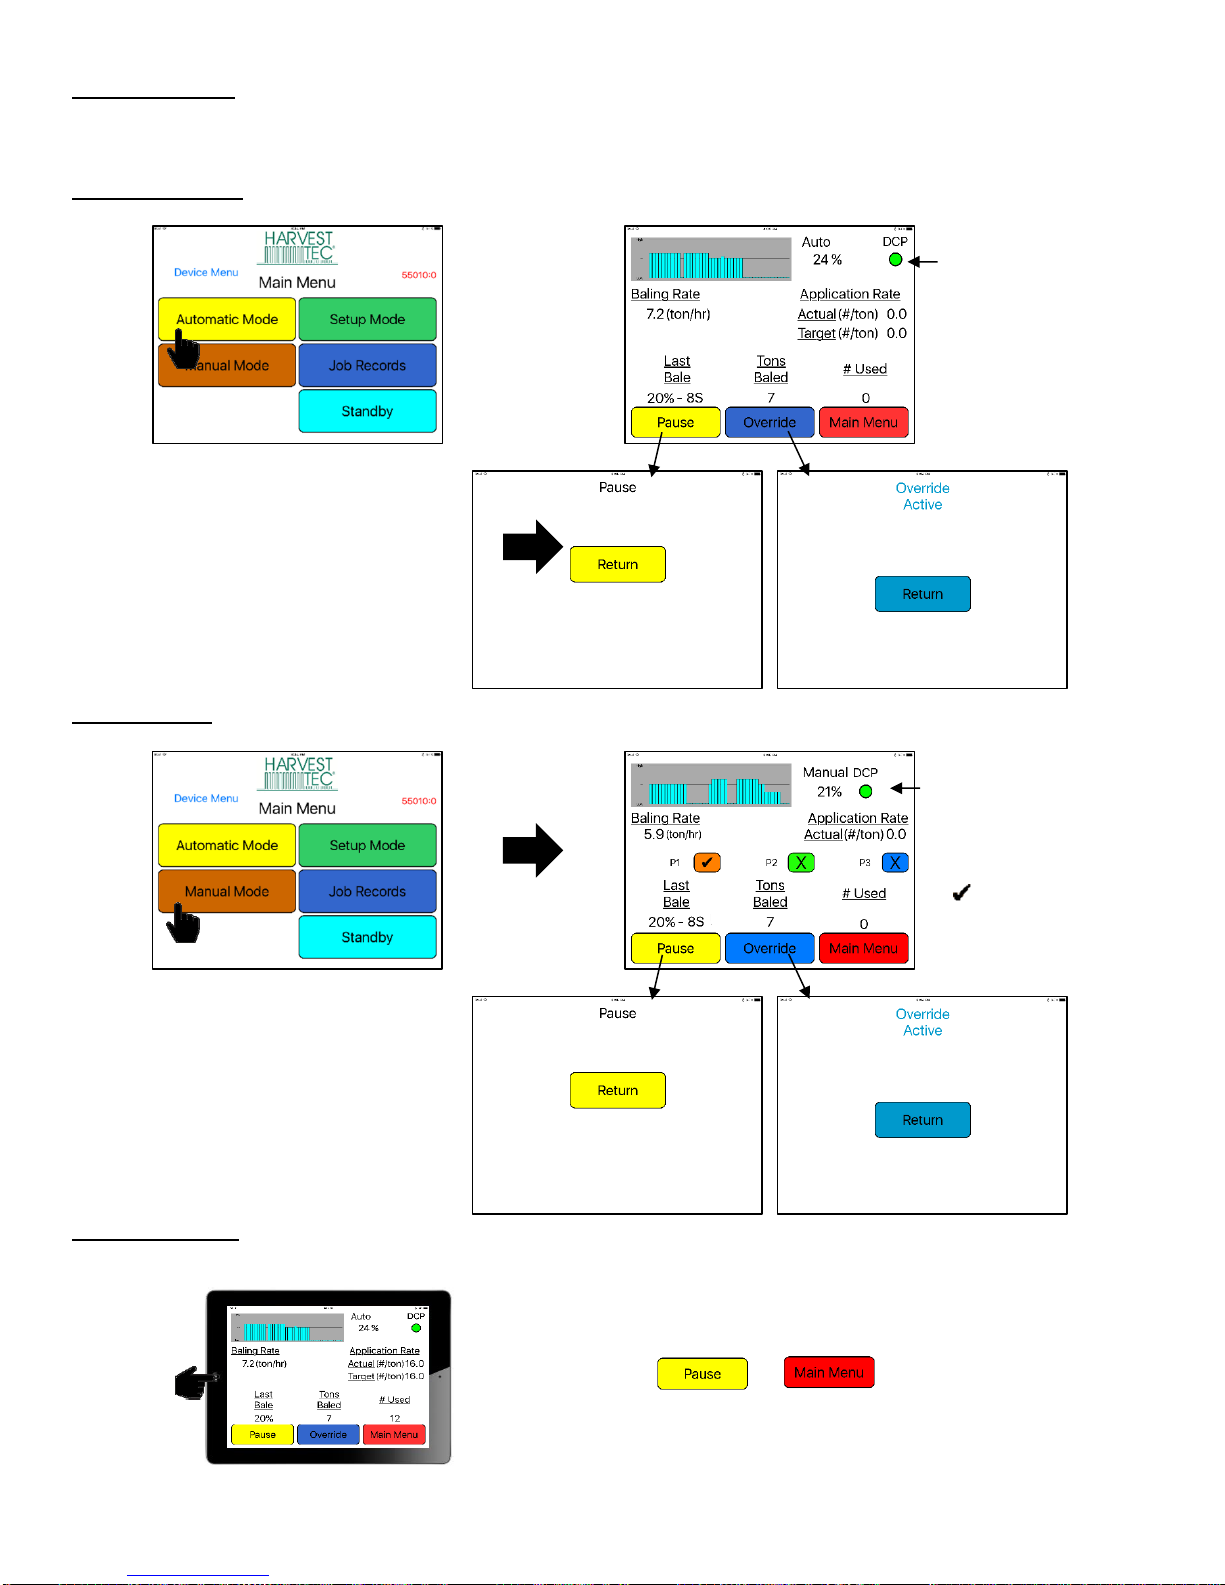
Screen Menus
Select or to stop application
*To close app see the Shutting Down Hay App Section
Bluetooth Connection Indicator
Green
-DCP is connected
Yellow
-DCP connecting
Red
-DCP not connected
Bluetooth Connection Indicator
Green
-DCP is connected
Yellow
-DCP connecting
Red
-DCP not connected
X -Pump is OFF
-Pump is ON
Use the screen shots below to navigate through the operation screens.
Automatic Mode
*Actual, Target, and # Used will
read 0 with moisture only system
Manual Mode
*Ensure pumps are shut off with
moisture only system
Operation Note:
Pressing the Home Button on the iPad WILL NOT stop the system from reading moisture for 10 seconds.
 Loading...